---
title: Launching a flow with a Ping SDK
description: Launch a prepared flow through an application built with one of the Ping SDKs.
component: davinci
page_id: davinci:integrating_flows_into_applications:davinci_sdk_launching_a_flow_with_the_sdk
canonical_url: http://docs.pingidentity.com/davinci/integrating_flows_into_applications/davinci_sdk_launching_a_flow_with_the_sdk.html
revdate: November 13, 2024
section_ids:
configuring-the-flow: Configuring the Flow
about-this-task: About this task
steps: Steps
creating-a-davinci-application: Creating a DaVinci application
steps-2: Steps
result: Result:
result-2: Result:
configuring-pingone-for-flow-invocation: Configuring PingOne for flow invocation
about-this-task-2: About this task
steps-3: Steps
invoking-the-flow: Invoking the flow
---
# Launching a flow with a Ping SDK
Launch a prepared flow through an application built with one of the Ping SDKs.
The Ping SDKs provide powerful orchestration capabilities with PingOne DaVinci. They let you create flows to meet your use cases, while providing a native iOS, Android, or single-page app JavaScript experience.
This method is effective when you want complete control of your end user's experience while using a flow behind the scenes.
## Configuring the Flow
Prepare a flow to be launched with the Ping SDK for Android, iOS, or JavaScript.
### About this task
| | |
| - | ---------------------------------------------------------------------------------------------------------------------------------------------------------------------------------------------------------------------------------------------------------------------------------------------------------------------------------------------------------------------------------------------------------------- |
| | This procedure only covers the steps and nodes required to prepare a flow for SDK invocation. It assumes that you've already created a flow for the purpose you have in mind. You can find more information about building flows in the [Getting started with DaVinci](../flows/davinci_getting_started.html) and [DaVinci Best Practices](../davinci_best_practices/davinci_best_practices.html) documentation. |
### Steps
1. On the **Flows** tab, find the flow and click **... > Edit**.
2. Verify that your user interface nodes use only compatible connectors, capabilities, and elements.
Compatible connectors and capabilities are:
* The HTTP Connector and its Custom HTML Template capability
* The Form Connector and its Show Form capability
Compatible elements within the Custom HTML Template and Form connector capabilities are:
| PingOne Forms element name | Custom HTML element name | Description |
| ----------------------------------------- | ------------------------------------------ | ------------------------------------------------------------------------------------------------------------------------------- |
| **Text Input** | **Text field** | Lets the user enter text. |
| **Password** | **Text Input** with the **Secure** setting | Lets the user enter a password that cannot be read from the screen. The PingOne Forms **Verify Password** feature is supported. |
| **Submit Button** | **Submit Button** | Lets the user submit field data and proceed. |
| **Flow Button** | **Flow Button** | Lets the user trigger a new process without submitting field data. |
| **Translatable Rich Text** | **Label** | Displays text for the user. |
| **Dropdown** | **Dropdown** | Lets the user make a selection from a dropdown list. |
| **Radio Button List** | **Radio Button List** | Lets the user make a selection from a radio button list. |
| **Checkbox List** | N/A | Lets the user select any number of options from a checkbox list. |
| **Combobox** | N/A | Lets the user select an existing option from a dropdown list or enter text. |
| **Social Login** | **skIDP component** | Lets users sign on using a third-party identity provider (IdP). |
| **MFA Device Selection - Registration** | N/A | Displays available MFA devices for a new user registration based on policy. |
| **MFA Device Selection - Authentication** | N/A | Displays available MFA devices for an existing user. |
| **Phone Number** | **Text field** | Lets the user enter a phone number including country and area codes. |
| **FIDO2** | **N/A** | Lets the user register or authenticate with their device using FIDO2. |
3. Verify that your flow does not depend on any unsupported elements:
* **SKPolling components**: SKPolling components cannot be processed by the SDK and should not be included.
- **Images**: Images included in the flow cannot be passed to the SDK.
4. If you're using HTTP Connector nodes, ensure that any buttons that submit page data use the following parameters:
* `type=submit`
* The `data-skbuttonvalue` must be `Continue`, `Submit`, `Proceed`, or `Next`.
For example:
```html
```
5. If you're using HTTP Connector nodes, ensure that any buttons that navigate to a different screen without submitting data use the following parameters:
* The `data-skbuttonvalue` must not be `Continue`, `Submit`, `Proceed`, or `Next`.
For example:
```html
```
6. If you're using HTTP Connector nodes, add each text field, password field, and button to the node's output fields.
These outputs are all used by the SDK, regardless of any conditional logic used to control their display in the HTML.
1. Click the node.
2. On the **General** tab, find the **Output Fields List** section, and click **Add**.
3. In the **Property Name** field, enter a name for the property to be passed to the SDK.
4. In the **Display Name** field, enter a name for the property to be used in the user interface.
5. In the **Control Type** list, select **Text Field**.
6. In the **Data Type** list, select **String**.
7. If the value is a password, select **Secure**.
8. In the **Value** field, select the {} option and map the field's value to the property.
9. Repeat steps b-h for each additional output.
10. Click **Apply**.
11. Repeat these steps for each additional node with outputs.
7. If you're using social login, ensure that your flow uses a supported method.
Social login lets users sign on using a third-party IdP. Apple, Google, and Facebook are natively supported, and other IdPs can be included with a login redirect. You must configure the external IdPs according to the [PingOne documentation](http://docs.pingidentity.com/pingone/integrations/p1_external_idps.html) before including them in a flow.
| | |
| - | ---------------------------------------------------------------------------------------------------------------------------------------------------- |
| | Social Login using the **Sign On with External Identity Provider** capability of the PingOne Authentication connector is not supported in SDK flows. |
* In a PingOne Form, you can use the **Social Login** tool to enable social login. Configure this button using the PingOne documentation.
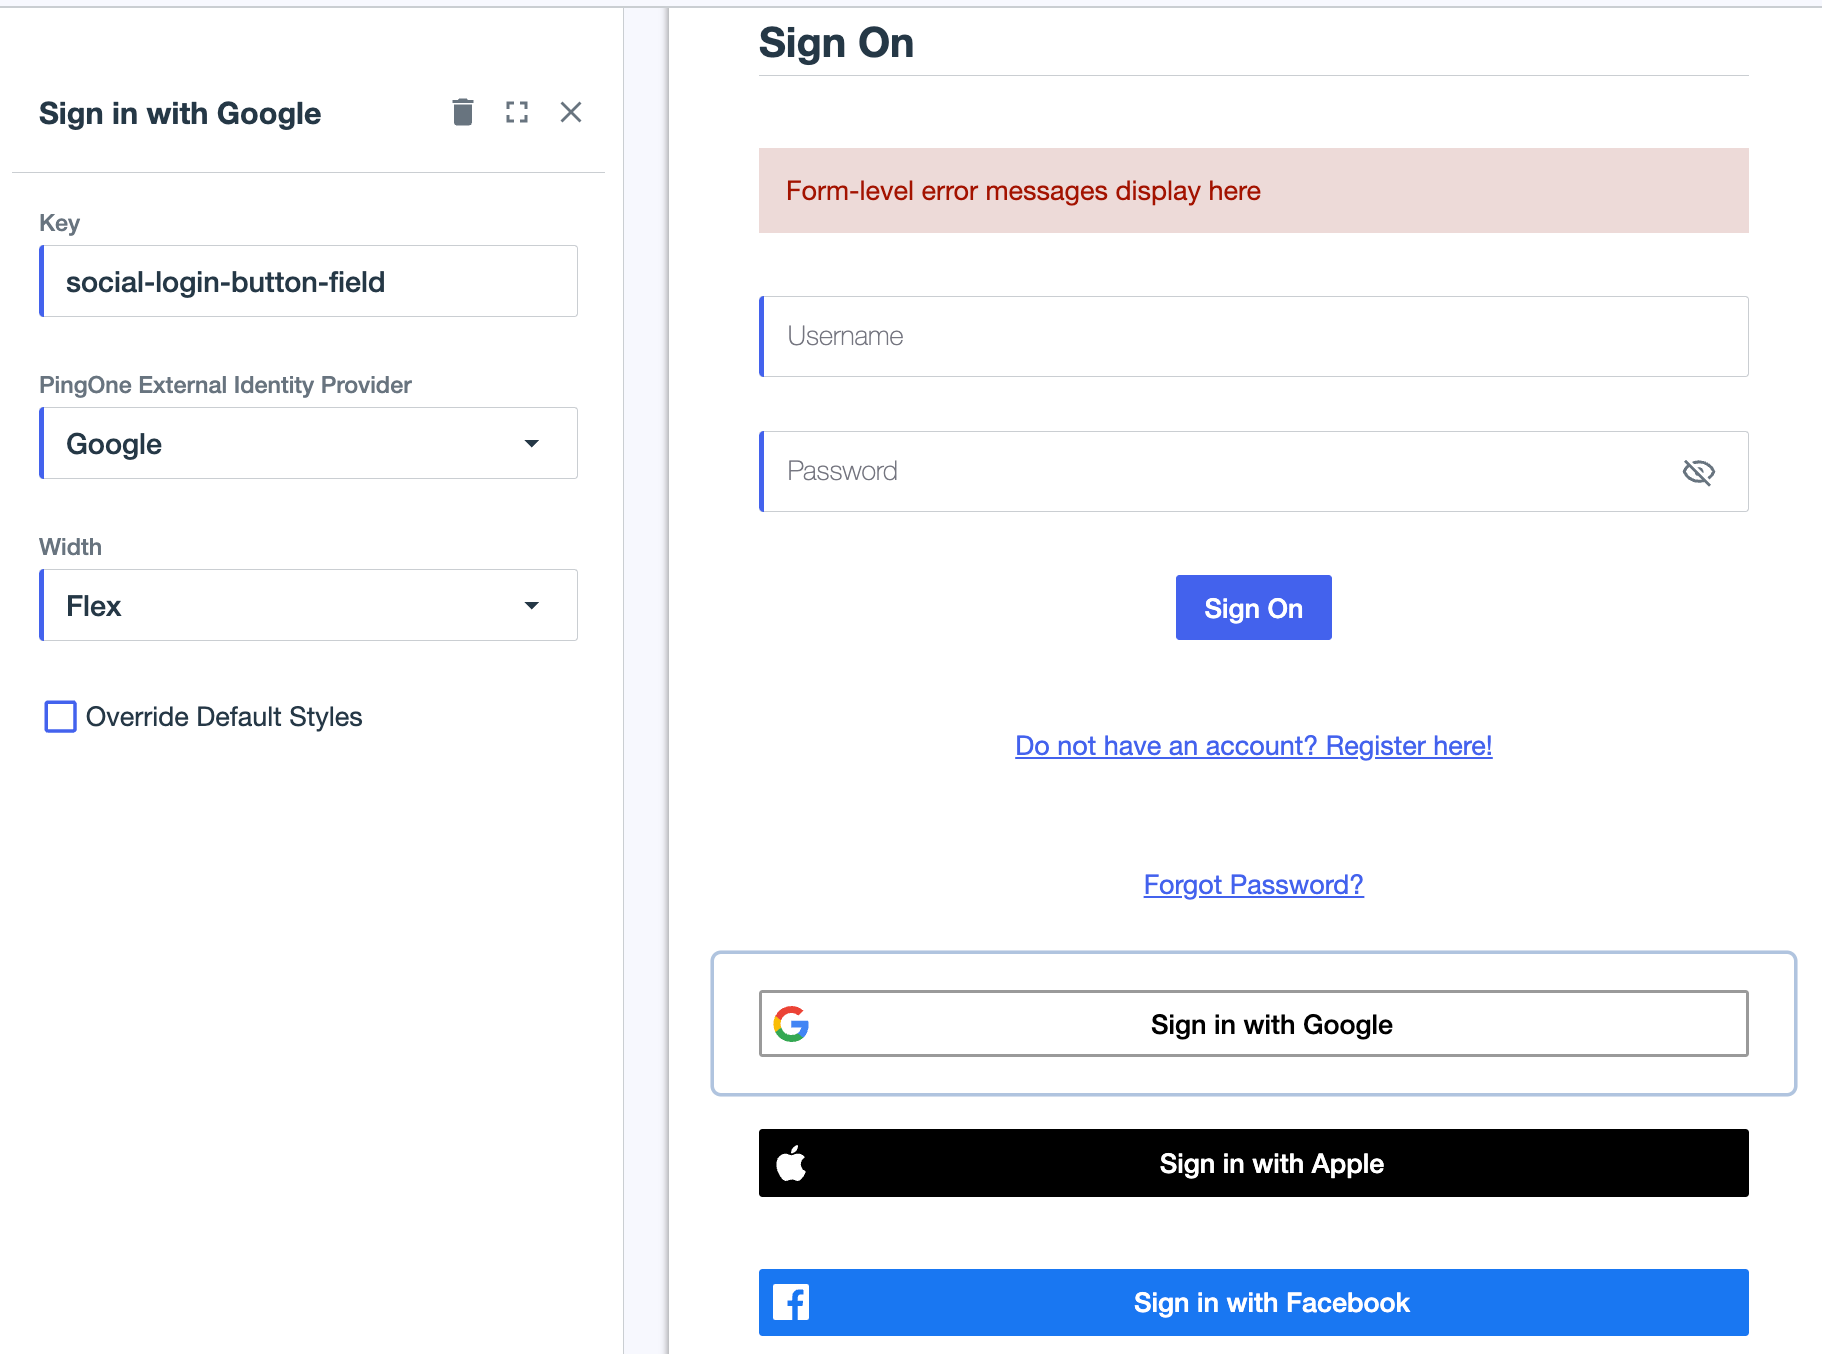
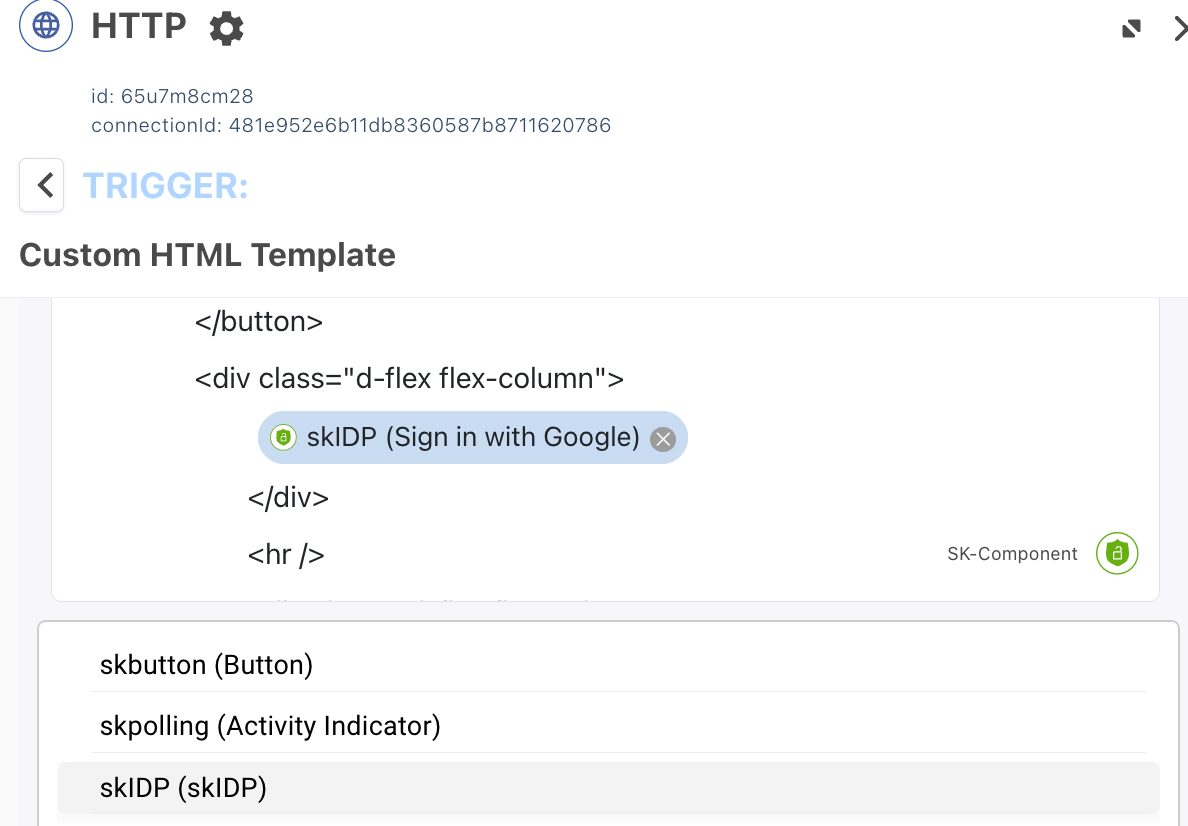
* In a Custom HTML Template, you can use the skIDP sk-component to enable social login:
1. In the **HTML Template** section of the **General** tab, click the **{}** icon.
2. In the **Choose Connection** list, select **SK-Component**, then select **skIDP**.
3. Click the **skIDP** component in the **HTML Template** field.
4. In the **Identity Provider Connector** list, select **PingOne Authentication**.
5. In the **PingOne External Identity Provider** list, select a configured social login provider.
6. If you want to correlate the third-party login user with a PingOne user, select **Link with PingOne User**, then select a user population in the **PingOne Population** list.
7. In the **Button ID** field, enter an ID.
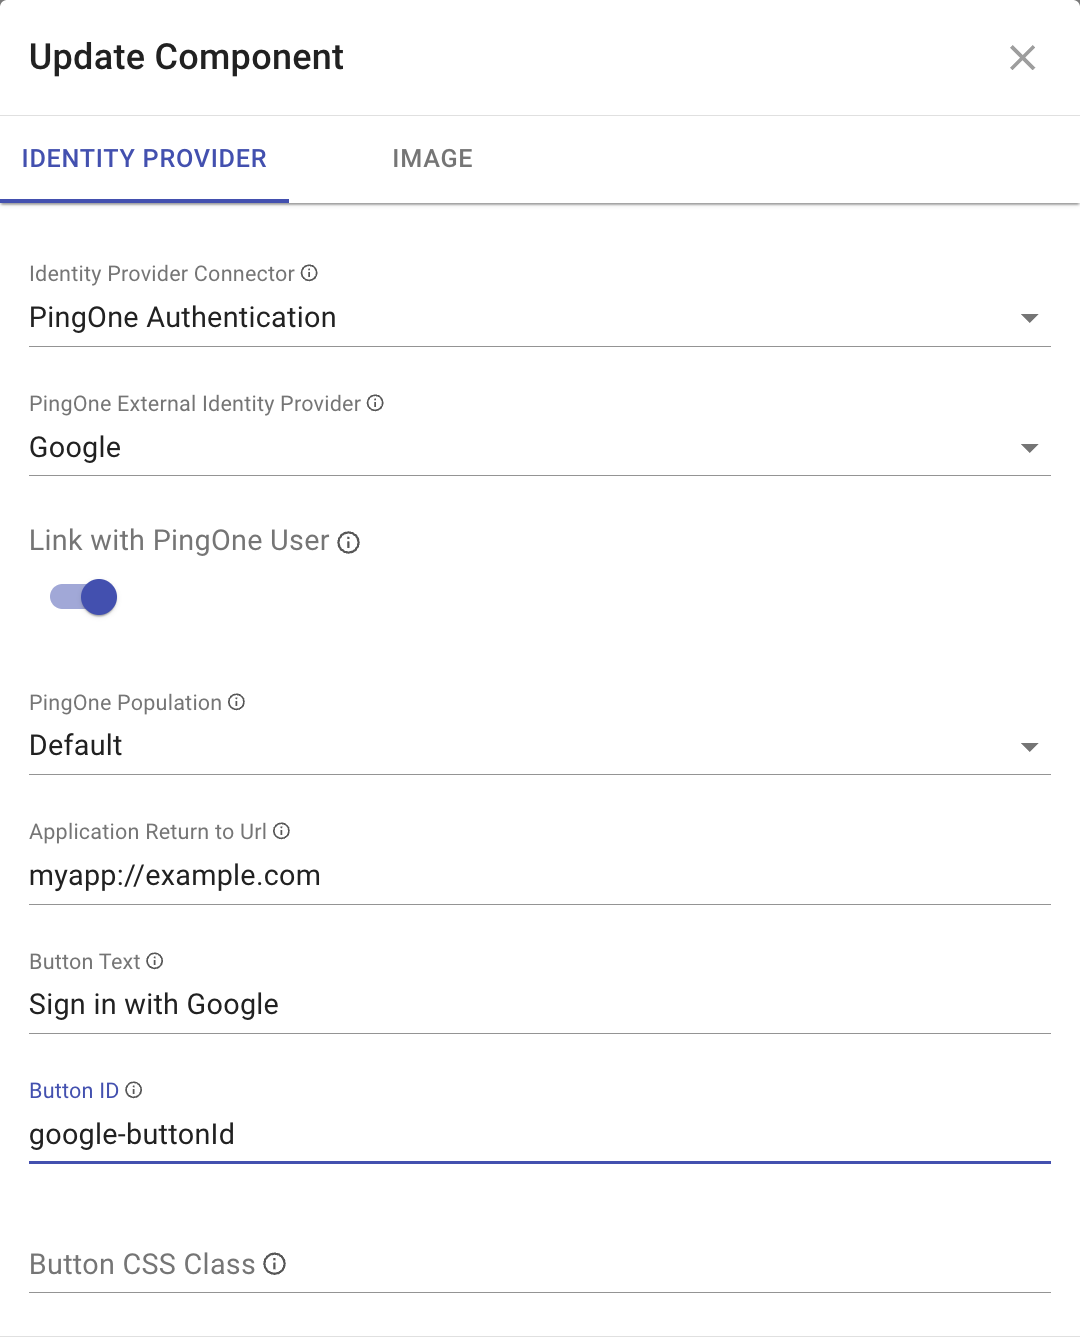
8. Click **Save**.
8. To use the user's PingOne User ID in your flow, include the `p1UserId` global parameter in your flow.
| | |
| - | ------------------------------------------------------------------------------------------------------------------------------------------------------------------------------------------------------------------------------ |
| | The user's PingOne User ID is only available after the user has been identified. The user can be identified directly through PingOne or using a third-party authentication that is correlated with the user's PingOne account. |
1. Open the node in which you want to include the invocation information.
2. Click the **Variables ( {} )** icon.
3. Click **Global**.
4. Select the **p1UserId** property.
9. If you're using an OTP with PingOne MFA, configure your environment and flow according to the [one-time passcode use case in the SDK documentation](http://docs.pingidentity.com/sdks/latest/davinci/use-cases/otp/index.html) and verify that it uses supported elements.
1. If you're using email OTP registration or authentication, verify that the flow has screens that:
* Let the user enter an email address using a **Text Input** or **Text Field**
* Let the user enter the OTP using a **Text Input** or **Text Field**
| | |
| - | --------------------------------------------------------------------------------------------------------------------------------------------------------------------- |
| | If you're using PingOne Forms, you can dynamically populate the user's email address using the **Dynamic Text** option within the **Translatable Rich Text** element. |
2. If you're using SMS/Voice OTP registration or authentication, verify that the flow has screens that:
* Let the user enter a phone number and select a country code using the **Phone Number Input** component
* Let the user enter the OTP using a **Text Input** or **Text Field**
| | |
| - | -------------------------------------------------------------------------------------------------------------------------------------------------------------------- |
| | If you're using PingOne Forms, you can dynamically populate the user's phone number using the **Dynamic Text** option within the **Translatable Rich Text** element. |
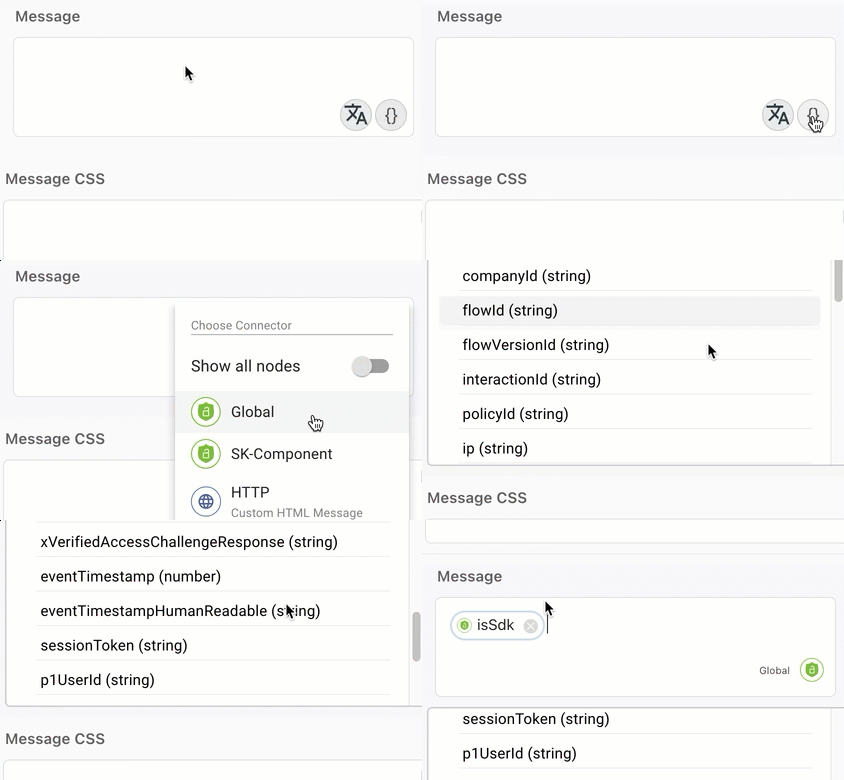
10. To use data about the invocation method or the invocation platform type in your flow, include the `isSdk` and `platformType` global parameters in your flow.
| Property | Type | Description |
| -------------- | ------- | ---------------------------------------------------------------------------------------------------------------------------------- |
| `isSdk` | Boolean | Indicates whether the flow was launched using the SDK. |
| `platformType` | String | Indicates what platform was used to launch the flow if it was launched using the SDK. Valid values are `js`, `android`, and `ios`. |
1. Open the node in which you want to include the invocation information.
2. Click the **Variables ( {} )** icon.
3. Click **Global** > **Current Request**.
4. Select the **isSdk** or **platformType** property.
For example:
11. Click **More options ( [icon: ellipsis-v, set=fa]) > Flow Settings** to show the flow settings.
12. Select the **PingOne Flow** option.
13. Click **Save**, then close the **Flow Settings** pane.
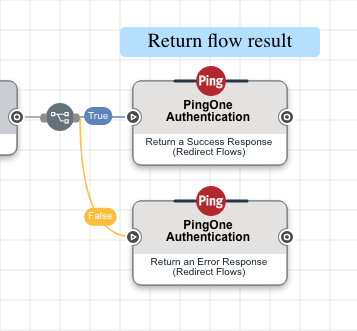
14. End the flow with the following two **PingOne Authentication** nodes, one for success and one for failure.
| Node | Purpose |
| ---------------------------------------------- | ----------------------------------------------------------------------------------------------------------------------------------------------------------------------------------------------------------- |
| **Return a Success Response (Redirect Flows)** | This creates a PingOne session for the user and redirects the browser back to the source of the authentication request. This response provides the requested scopes as well as an access token or ID token. |
| **Return an Error Response (Redirect Flows)** | This redirects the browser back to the source of the authentication request. This response provides information about the error that occurred. |
15. Click **Save**, then click **Deploy**.
16. If the main flow uses subflows, ensure that the subflows are not configured as PingOne flows.
1. On the **Flows** tab, find the flow and click … > Edit.
2. Click **More options ( [icon: ellipsis-v, set=fa]) > Flow Settings** to show the flow settings.
3. Select the **PingOne Flow** option.
4. Click **Save**, then close the **Flow Settings** pane.
5. Repeat these steps for each additional subflow.
## Creating a DaVinci application
Create an application in DaVinci to enable your flow.
### Steps
1. Sign on to DaVinci.
2. On the **Applications** tab, click **Add Application**.
#### Result:
The **Add Application** modal opens.
3. In the **Name** field, enter a name for the application.
4. Click **Create**.
5. Find the application and click **Edit**.
6. On the **OIDC** tab, note the application parameters for the following:
* **Company ID**
* **Client ID**
* **Client Secret**
* **Issuer**
* **Token Endpoint**
* **JWKS Endpoint**
7. Create a flow policy:
1. On the **Flow Policy** tab, click **[icon: plus, set=fa]Add Flow Policy**..
2. In the **Name** field, enter a name for the flow policy.
3. Select **PingOne Flow Policy**.
4. In the flow list, select your flow.
5. In the version list, select **Latest Version**.
6. Click **Create Flow Policy**.
##### Result:
The **Edit Your Weight Distribution** modal opens.
| | |
| - | ---------------------------------------------------------------------------------------------------------------------------------------------------------- |
| | This example only uses one flow, but if your flow policy included multiple flows or flow versions, you could use this modal to split traffic between them. |
7. Click **Save Flow Policy**.
8. Note the **Policy ID** of your flow policy.
## Configuring PingOne for flow invocation
Configure an application in PingOne to launch flows.
### About this task
The PingOne application is used as part of the flow invocation process.
### Steps
1. Sign on to PingOne and go to **Applications > Applications**.
2. Click the **[icon: plus, set=fa]**icon.
3. In the **Application Name** field, enter a name for the application.
4. In the **Application Type** section, select an application type corresponding to your platform:
* If you're using the Ping SDK for JavaScript, select **OIDC Web App**.
* If you're using the Ping SDK for iOS or Android, select **Native**.

5. Click **Save**.
6. On the **Policies** tab, click **Add Policies**.
7. On the **DaVinci Policies** tab, select one or more flow policies to add to the application.
| | |
| - | -------------------------------------------------------------------- |
| | Only flow policies with the **PingOne Policy** option are displayed. |
8. Click **Save**.
9. If you're using the Ping SDK for JavaScript, configure CORS settings for your application.
1. On the **Configuration** tab, click the **Pencil** icon.
2. In the **CORS Settings** section, select **Allow specific origins**.
3. In the **Allowed Origins** field, enter the domain from which you plan to launch the flow.
4. Click **Save**.
## Invoking the flow
To launch the flow, construct a link with the PingOne details and add it to the resource that will launch the flow. You must download the Ping SDKs and create a user experience that launches the flow.
To create the link, you need the following values:
* Client ID
* Redirect URI
* Scopes
* OIDC Discovery Endpoint
Learn more about creating the link and launching the flow in the [SDK documentation](http://docs.pingidentity.com/sdks/latest/davinci/tutorials.html).