---
title: Install a multi-node deployment
description: This section presents instructions on deploying Ping Autonomous Identity in a multi-node deployment. Multi-node deployments are configured in production environments, providing performant throughput by distributing the processing load across servers and supporting failover redundancy.
component: autonomous-identity
version: 2022.11.12
page_id: autonomous-identity:install-guide:chap-install-multinode
canonical_url: https://docs.pingidentity.com/autonomous-identity/2022.11.12/install-guide/chap-install-multinode.html
section_ids:
summary_of_the_installation_steps: Summary of the installation steps
prerequisites-multinode: Prerequisites
setup-nodes-multinode: Set up the nodes
install-third-party-multinode: Install third-party components
setup-ssh-deployer-multinode: Set up SSH on the deployer
set-up-shared-directory: Set up a shared data folder
install-autoid-multinode: Install Ping Autonomous Identity
set-replication-factor: Set the Cassandra replication factor
resolve_hostname: Resolve Hostname
access_the_dashboard: Access the Dashboard
check_apache_cassandra: Check Apache Cassandra
check_mongodb: Check MongoDB
check_apache_spark: Check Apache Spark
start_the_analytics: Start the Analytics
---
# Install a multi-node deployment
This section presents instructions on deploying Ping Autonomous Identity in a multi-node deployment. Multi-node deployments are configured in production environments, providing performant throughput by distributing the processing load across servers and supporting failover redundancy.
Like single-node deployment, Ping Identity provides a Deployer Pro script to pull a Docker image from Ping Identity's Google Cloud Registry repository with the microservices and analytics needed for the system. The deployer also uses the node IP addresses specified in your `hosts` file to set up an overlay network and your nodes.
| | |
| - | ---------------------------------------------------------------------------------------------------------------------------------------------------------------------------------------------------------------------------------------------------------------------------------------------------------------------------------------- |
| | The procedures are similar to multinode deployments using older Ping Autonomous Identity release, except that you must install and configure the dependent software packages (for example, Apache Cassandra/MongoDB, Apache Spark and Livy, Opensearch and Opensearch Dashboards, and Docker) prior to running Ping Autonomous Identity. |
## Summary of the installation steps
To set up the 2022.11.12 deployment, run the following steps:
* [Prerequisites](#prerequisites-multinode)
* [Set up the nodes](#setup-nodes-multinode)
* [Install third-party components](#install-third-party-multinode)
* [Set up SSH on the deployer](#setup-ssh-deployer-multinode)
* [Set up a shared data folder](#set-up-shared-directory)
* [Install Ping Autonomous Identity](#install-autoid-multinode)
* [Set the Cassandra replication factor](#set-replication-factor)
## Prerequisites
Deploy Ping Autonomous Identity on a multi-node target on Redhat Linux Enterprise 8 or CentOS Stream 8. The following are prerequisites:
* **Operating System**. The target machine requires Redhat Linux Enterprise 8 or CentOS Stream 8. The deployer machine can use any operating system as long as Docker is installed. For this chapter, we use Redhat Linux Enterprise 8 as its base operating system.
| | |
| - | ------------------------------------------------------------------------------------------------------------------------------------------------------------------------------------------------------------------------ |
| | If you are upgrading Ping Autonomous Identity on a RHEL 7/CentOS 7, the upgrade to 2022.11 uses RHEL 7/CentOS 7 only. For new and clean installations, Ping Autonomous Identity requires RHEL 8 or CentOS Stream 8 only. |
* **Default Shell**. The default shell for the `autoid` user must be `bash`.
* **Subnet Requirements**. We recommend deploying your multi-node machines within the same subnet. Ports must be open for the installation to succeed. Each instance should be able to communicate to the other instances.
| | |
| - | ---------------------------------------------------------------------------------------------------------------------------------------------------------------------------------------------------------------------------------------------------------------------------------------------------------------------------------------------------------------------------- |
| | If any hosts used for the Docker cluster (docker-managers, docker-workers) have an IP address in the range of 10.0.x.x, they will conflict with the Swarm network. As a result, the services in the cluster will not connect to the Cassandra database or Elasticsearch backend.The Docker cluster hosts must be in a subnet that provides IP addresses 10.10.1.x or higher. |
* **Deployment Requirements**. Ping Autonomous Identity provides a `deployer.sh` script that downloads and installs the necessary Docker images. To download the deployment images, you must first obtain a registry key to sign on to the Ping Google Cloud Registry. The registry key is only available to Ping Autonomous Identity customers. For specific instructions on obtaining the registry key, refer to [How To Configure Service Credentials (Push Auth, Docker) in Backstage](https://backstage.forgerock.com/knowledge/backstagehelp/article/a92326771).
* **Filesystem Requirements**. Ping Autonomous Identity requires a shared filesystem accessible from the Spark main, Spark worker, analytics hosts, and application layer. The shared filesystem should be mounted at the same mount directory on all of those hosts. If the mount directory for the shared filesystem is different from the default, `/data` , update the `/autoid-config/vars.yml` file to point to the correct directories:
```
analytics_data_dir: /data
analytics_conf_dif: /data/conf
```
* **Architecture Requirements**. Make sure that the Spark main is on a separate node from the Spark workers.
* **Database Requirements**. Decide which database you are using: Apache Cassandra or MongoDB. The configuration procedure is slightly different for each database.
* **Deployment Best-Practice**. The example combines the Opensearch data and Opensearch Dashboards nodes. For best performance in production, dedicate a separate node to Opensearch, data nodes, and Opensearch Dashboards.
* **IPv4 Forwarding**. Many high-security environments run their CentOS-based systems with IPv4 forwarding disabled. However, Docker Swarm doesn't work with a disabled IPv4 forward setting. In such environments, make sure to enable IPv4 forwarding in the file `/etc/sysctl.conf`:
```
net.ipv4.ip_forward=1
```
| | |
| - | --------------------------------------------------------------------------------------------------------------------------------------------------- |
| | We recommend that your deployer team have someone with Cassandra expertise. This guide is not sufficient to troubleshoot any issues that may arise. |
## Set up the nodes
Set up three virtual machines.
1. Create a Redhat Linux Enterprise 8 or CentOS Stream 8 virtual machine: N2 4 core and 16 GB. Verify your operating system.
```
sudo cat /etc/centos-release
```
| | |
| - | --------------------------------------------------------------------------------------------------------------------------------------------------------------------------------------------------------------- |
| | For multinode deployments, there is a known issue with RHEL 8/CentOS Stream 8 and overlay network configurations. Refer to [Known Issues in 2022.11.0](../release-notes/changelog.html#known-issues-2022-11-0). |
2. Set the user for the target node to `autoid`. In this example, create user `autoid`:
```
sudo adduser autoid
sudo passwd autoid
echo "autoid ALL=(ALL) NOPASSWD:ALL" | sudo tee /etc/sudoers.d/autoid
sudo usermod -aG wheel autoid
su - autoid
```
3. Optional. Install yum-utils package on the deployer machine. yum-utils is a utilities manager for the Yum RPM package repository. The repository compresses software packages for Linux distributions.
```
sudo yum install -y yum-utils
```
4. Install the following packages needed in the Ping Autonomous Identity deployment:
* **Java 11**. For example, `sudo dnf install java-11-openjdk-devel`.
* **wget**. For example, `sudo dnf install wget`.
* **unzip**. For example, `sudo dnf install unzip`.
* **elinks**. For example, `sudo yum install -y elinks`.
* **Python 3.10.9**. Refer to .
5. Repeat this procedure for the other nodes.
## Install third-party components
Set up a machine with the required third-party software dependencies. Refer to: [Install third-party components](chap-install-singlenode-target.html#install-third-party).
## Set up SSH on the deployer
1. On the deployer machine, change to the `~/.ssh` directory.
```
cd ~/.ssh
```
2. Run `ssh-keygen` to generate an RSA keypair, and then click Enter. You can use the default filename.
| | |
| - | ----------------------------------------------------------- |
| | Do not add a key passphrase as it results in a build error. |
```
ssh-keygen -t rsa -C "autoid"
```
The public and private rsa key pair is stored in `home-directory/.ssh/id_rsa` and `home-directory/.ssh/id_rsa.pub`.
3. Copy the SSH key to the `autoid-config` directory.
```
cp id_rsa ~/autoid-config
```
4. Change the privileges to the file.
```
chmod 400 ~/autoid-config/id_rsa
```
5. Copy your public SSH key, `id_rsa.pub`, to each of your nodes.
| | |
| - | ------------------------------------------------------------------------------------------------------------------------------------------------- |
| | If your target system doesn't have an `~/.ssh/authorized_keys`, create it using `sudo mkdir -p ~/.ssh`, then `sudo touch ~/.ssh/authorized_keys`. |
For this example, copy the SSH key to each node:
```
ssh-copy-id -i id_rsa.pub autoid@
```
6. On the deployer machine, test your SSH connection to each target machine. This is a critical step. Make sure the connection works before proceeding with the installation.
For example, SSH to first node:
```
ssh -i id_rsa autoid@
Last login: Sat Oct 3 03:02:40 2020
```
7. If you can successfully SSH to each machine, set the privileges on your `~/.ssh` and `~/.ssh/authorized_keys`.
```
chmod 700 ~/.ssh && chmod 600 ~/.ssh/authorized_keys
```
8. Enter Exit to end your SSH session.
9. Repeat steps 5–8 again for each node.
## Set up a shared data folder
The Docker main and worker nodes plus the analytics main and worker nodes require a shared data directory, typically, `/data`. There are numerous ways to set up a shared directory, the following procedure is just one example and sets up an NFS server on the analytics master.
1. On the Analytics Spark Main node, install `nfs-utils`. This step may require that you run the install with root privileges, such as `sudo` or equivalent.
```
sudo yum install -y nfs-utils
```
2. Create the `/data` directory.
```
mkdir -p /data
```
3. Change the permissions on the `/data` directory.
```
chmod -R 755 /data
chown nfsnobody:nfsnobody /data
```
4. Start the services and enable them to start at boot.
```
systemctl enable rpcbind
systemctl enable nfs-server
systemctl enable nfs-lock
systemctl enable nfs-idmap
systemctl start rpcbind
systemctl start nfs-server
systemctl start nfs-lock
systemctl start nfs-idmap
```
5. Define the sharing points in the `/etc/exports` file.
```
vi /etc/exports
/data (rw,sync,no_root_squash,no_all_squash)
/data (rw,sync,no_root_squash,no_all_squash)
```
If you change the domain name and target environment, you need to also change the certificates to reflect the new changes. For more information, refer to [Customize Domains](../admin-guide/chap-customize-domain.html).
6. Start the NFS service.
```
systemctl restart nfs-server
```
7. Add the NFS service to the `firewall-cmd` public zone service:
```
firewall-cmd --permanent --zone=public --add-service=nfs
firewall-cmd --permanent --zone=public --add-service=mountd
firewall-cmd --permanent --zone=public --add-service=rpc-bind
firewall-cmd --reload
```
8. On each spark worker node, run the following:
1. Install `nfs-utils`:
```
yum install -y nfs-utils
```
2. Create the NFS directory mount points:
```
mkdir -p /data
```
3. Mount the NFS shared directory:
```
mount -t nfs :/data /data
```
4. Test the new shared directory by creating a small text file. On an analytics worker node, run the following, and then check for the presence of the test file on the other servers:
```
cd /data
touch test
```
## Install Ping Autonomous Identity
Make sure you have the following prerequisites:
* IP address of machines running Opensearch, MongoDB, or Cassandra.
* The Ping Autonomous Identity user should have permission to write to `/opt/autoid` on all machines
* To download the deployment images for the install, you still need your registry key to log into the Ping Google Cloud Registry to download the artifacts.
* Make sure you have the proper Opensearch certificates with the exact names for both pem and JKS files copied to `~/autoid-config/certs/elastic`:
* esnode.pem
* esnode-key.pem
* root-ca.pem
* elastic-client-keystore.jks
* elastic-server-truststore.jks
* Make sure you have the proper MongoDB certificates with exact names for both pem and JKS files copied to `~/autoid-config/certs/mongo`:
* mongo-client-keystore.jks
* mongo-server-truststore.jks
* mongodb.pem
* rootCA.pem
* Make sure you have the proper Cassandra certificates with exact names for both pem and JKS files copied to \~/autoid-config/certs/cassandra:
* Zoran-cassandra-client-cer.pem
* Zoran-cassandra-client-keystore.jks
* Zoran-cassandra-server-cer.pem
* zoran-cassandra-server-keystore.jks
* Zoran-cassandra-client-key.pem
* Zoran-cassandra-client-truststore.jks
* Zoran-cassandra-server-key.pem
* Zoran-cassandra-server-truststore.jks
Install Ping Autonomous Identity:
1. Create the `autoid-config` directory.
```
mkdir autoid-config
```
2. Change to the directory.
```
cd autoid-config
```
3. Sign on to the Ping Google Cloud Registry using the registry key. The registry key is only available to Ping Autonomous Identity customers. For specific instructions on obtaining the registry key, refer to [How To Configure Service Credentials (Push Auth, Docker) in Backstage](https://backstage.forgerock.com/knowledge/backstagehelp/article/a92326771).
```
docker login -u _json_key -p "$(cat autoid_registry_key.json)" https://gcr.io/forgerock-autoid
```
The following output is displayed:
```
Login Succeeded
```
4. Run the create-template command to generate the `deployer.sh` script wrapper and configuration files. Note that the command sets the configuration directory on the target node to `/config`. The `--user` parameter eliminates the need to use `sudo` while editing the hosts file and other configuration files.
```
docker run --user=$(id -u) -v ~/autoid-config:/config -it gcr.io/forgerock-autoid/deployer-pro:2022.11.12 create-template
```
5. Create a certificate directory for elastic.
```
mkdir -p autoid-config/certs/elastic
```
6. Copy the Opensearch certificates and JKS files to `autoid-config/certs/elastic`.
7. Create a certificate directory for MongoDB.
```
mkdir -p autoid-config/certs/mongo
```
8. Copy the MongoDB certificates and JKS files to `autoid-config/certs/mongo`.
9. Create a certificate directory for Cassandra.
```
mkdir -p autoid-config/certs/cassandra
```
10. Copy the Cassandra certificates and JKS files to `autoid-config/certs/cassandra`.
11. Update the `hosts` file with the IP addresses of the machines. The `hosts` file must include the IP addresses for Docker nodes, Spark main/livy, and the MongoDB master. While the deployer pro doesn't install or configure the MongoDB main server, the entry is required to run the MongoDB CLI to seed the Ping Autonomous Identity schema.
```
[docker-managers]
[docker-workers]
[docker:children]
docker-managers
docker-workers
[spark-master-livy]
[cassandra-seeds]
#For replica sets, add the IPs of all Cassandra nodes
[mongo_master]
# Add the MongoDB main node in the cluster deployment
# For example: 10.142.15.248 mongodb_master=True
[odfe-master-node]
# Add only the main node in the cluster deployment
```
12. Update the `vars.yml` file:
1. Set `db_driver_type` to `mongo` or `cassandra`.
2. Set `elastic_host`, `elastic_port`, and `elastic_user` properties.
3. Set `kibana_host`.
4. Set the Apache livy install directory.
5. Ensure the `elastic_user`, `elastic_port`, and `mongo_part` are correctly configured.
6. Update the `vault.yml` passwords for elastic and mongo to refect your installation.
7. Set the `mongo_ldap` variable to `true` if you want Ping Autonomous Identity to authenticate with Mongo DB, configured as LDAP.
| | |
| - | --------------------------------------------------------------------------------------------------------------------------------------------------------------------------------------------------------------------- |
| | The `mongo_ldap` variable only appears in fresh installs of 2022.11.0 and its upgrades (2022.11.1+). If you upgraded from a 2021.8.7 deployment, the variable is not available in your upgraded 2022.11.x deployment. |
8. If you are using Cassandra, set the Cassandra-related parameters in the `vars.yml` file. Default values are:
```
cassandra:
enable_ssl: "true"
contact_points: 10.142.15.248 # comma separated values in case of replication set
port: 9042
username: zoran_dba
cassandra_keystore_password: "Acc#1234"
cassandra_truststore_password: "Acc#1234"
ssl_client_key_file: "zoran-cassandra-client-key.pem"
ssl_client_cert_file: "zoran-cassandra-client-cer.pem"
ssl_ca_file: "zoran-cassandra-server-cer.pem"
server_truststore_jks: "zoran-cassandra-server-truststore.jks"
client_truststore_jks: "zoran-cassandra-client-truststore.jks"
client_keystore_jks: "zoran-cassandra-client-keystore.jks"
```
13. Download images:
```
./deployer.sh download-images
```
14. Install Apache Livy.
* The official release of Apache Livy doesn't support Apache Spark 3.3.1 or 3.3.2. Ping Identity has re-compiled and packaged Apache Livy to work with Apache Spark 3.3.1 hadoop 3 and Apache Spark 3.3.2 hadoop 3. Use the zip file located at `autoid-config/apache-livy/apache-livy-0.8.0-incubating-SNAPSHOT-bin.zip` to install Apache Livy on the Spark-Livy machine.
* For Livy configuration, refer to .
15. On the Spark-Livy machine, run the following commands to install the python package dependencies:
1. Change to the `/opt/autoid` directory:
```
cd /opt/autoid
```
2. Create a `requirements.txt` file with the following content:
```
six==1.11
certifi==2019.11.28
python-dateutil==2.8.1
jsonschema==3.2.0
cassandra-driver
numpy==1.22.0
pyarrow==6.0.1
wrapt==1.11.0
PyYAML==6.0
requests==2.31.0
urllib3==1.26.18
pymongo
pandas==1.3.5
tabulate
openpyxl
wheel
cython
```
3. Install the requirements file:
```
pip3 install -r requirements.txt
```
16. Make sure that the `/opt/autoid` directory exists and that it is both readable and writable.
17. Run the deployer script:
```
./deployer.sh run
```
18. On the Spark-Livy machine, run the following commands to install the Python egg file:
1. Install the egg file:
```
cd /opt/autoid/eggs
pip3.10 install autoid_analytics-2021.3-py3-none-any.whl
```
2. Source the `.bashrc` file:
```
source ~/.bashrc
```
3. Restart Spark and Livy.
```
./spark/sbin/stop-all.sh
./livy/bin/livy-server stop
./spark/sbin/start-all.sh
./livy/bin/livy-server start
```
## Set the Cassandra replication factor
Once Cassandra has been deployed, you need to set the replication factor to match the number of nodes on your system. This ensures that each record is stored in each of the nodes. In the event one node is lost, the remaining node can continue to serve content even if the cluster itself is running with reduced redundancy.
You can define replication on a per keyspace-basis as follows:
1. Start the Cassandra shell, `cqlsh`, and define the `autoid` keyspace. Change the replication factor to match the number of seed nodes. The default admin user for Cassandra is `zoran_dba`.
```
bin/cqlsh -u zoran_dba
zoran_dba@cqlsh> desc keyspace autoid;
CREATE KEYSPACE autoid WITH replication = {'class':'SimpleStrategy','replication_factor':'2'} AND durable_writes=true;
CREATE TABLE autoid.user_access_decisions_history(
user text,
entitlement text,
date_created timestamp,
…
```
2. Restart Cassandra on this node.
3. Repeat these steps on the other Cassandra seed node(s).
## Resolve Hostname
After installing Ping Autonomous Identity, set up the hostname resolution for your deployment.
1. Configure your DNS servers to access Ping Autonomous Identity dashboard on the target node. The following domain names must resolve to the IP address of the target node:
```
-ui.
```
2. If DNS cannot resolve target node hostname, edit it locally on the machine that you want to access Ping Autonomous Identity using a browser.
Open a text editor and add an entry in the `/etc/hosts` (Linux/Unix) file or `C:\Windows\System32\drivers\etc\hosts` (Windows) for the target node.
For multi-node, use the Docker Manager node as your target.
```
-ui.
```
For example:
```
autoid-ui.forgerock.com
```
3. If you set up a custom domain name and target environment, add the entries in `/etc/hosts`. For example:
```
myid-ui.abc.com
```
For more information on customizing your domain name, see [Customize Domains](../admin-guide/chap-customize-domain.html).
## Access the Dashboard
Access the Ping Autonomous Identity console UI:
1. Open a browser. If you set up your own url, use it for your login.
```
https://autoid-ui.forgerock.com/
```
2. Log in as a test user.
```
test user: bob.rodgers@forgerock.com
password:
```
## Check Apache Cassandra
Check Cassandra:
1. Make sure Cassandra is running in cluster mode. For example
```
/opt/autoid/apache-cassandra-3.11.2/bin/nodetool status
```
## Check MongoDB
Check MongoDB:
1. Make sure MongoDB is running. For example:
```
mongo --tls \
--host \
--tlsCAFile /opt/autoid/mongo/certs/rootCA.pem \
--tlsAllowInvalidCertificates \
--tlsCertificateKeyFile /opt/autoid/mongo/certs/mongodb.pem
```
## Check Apache Spark
Check Spark:
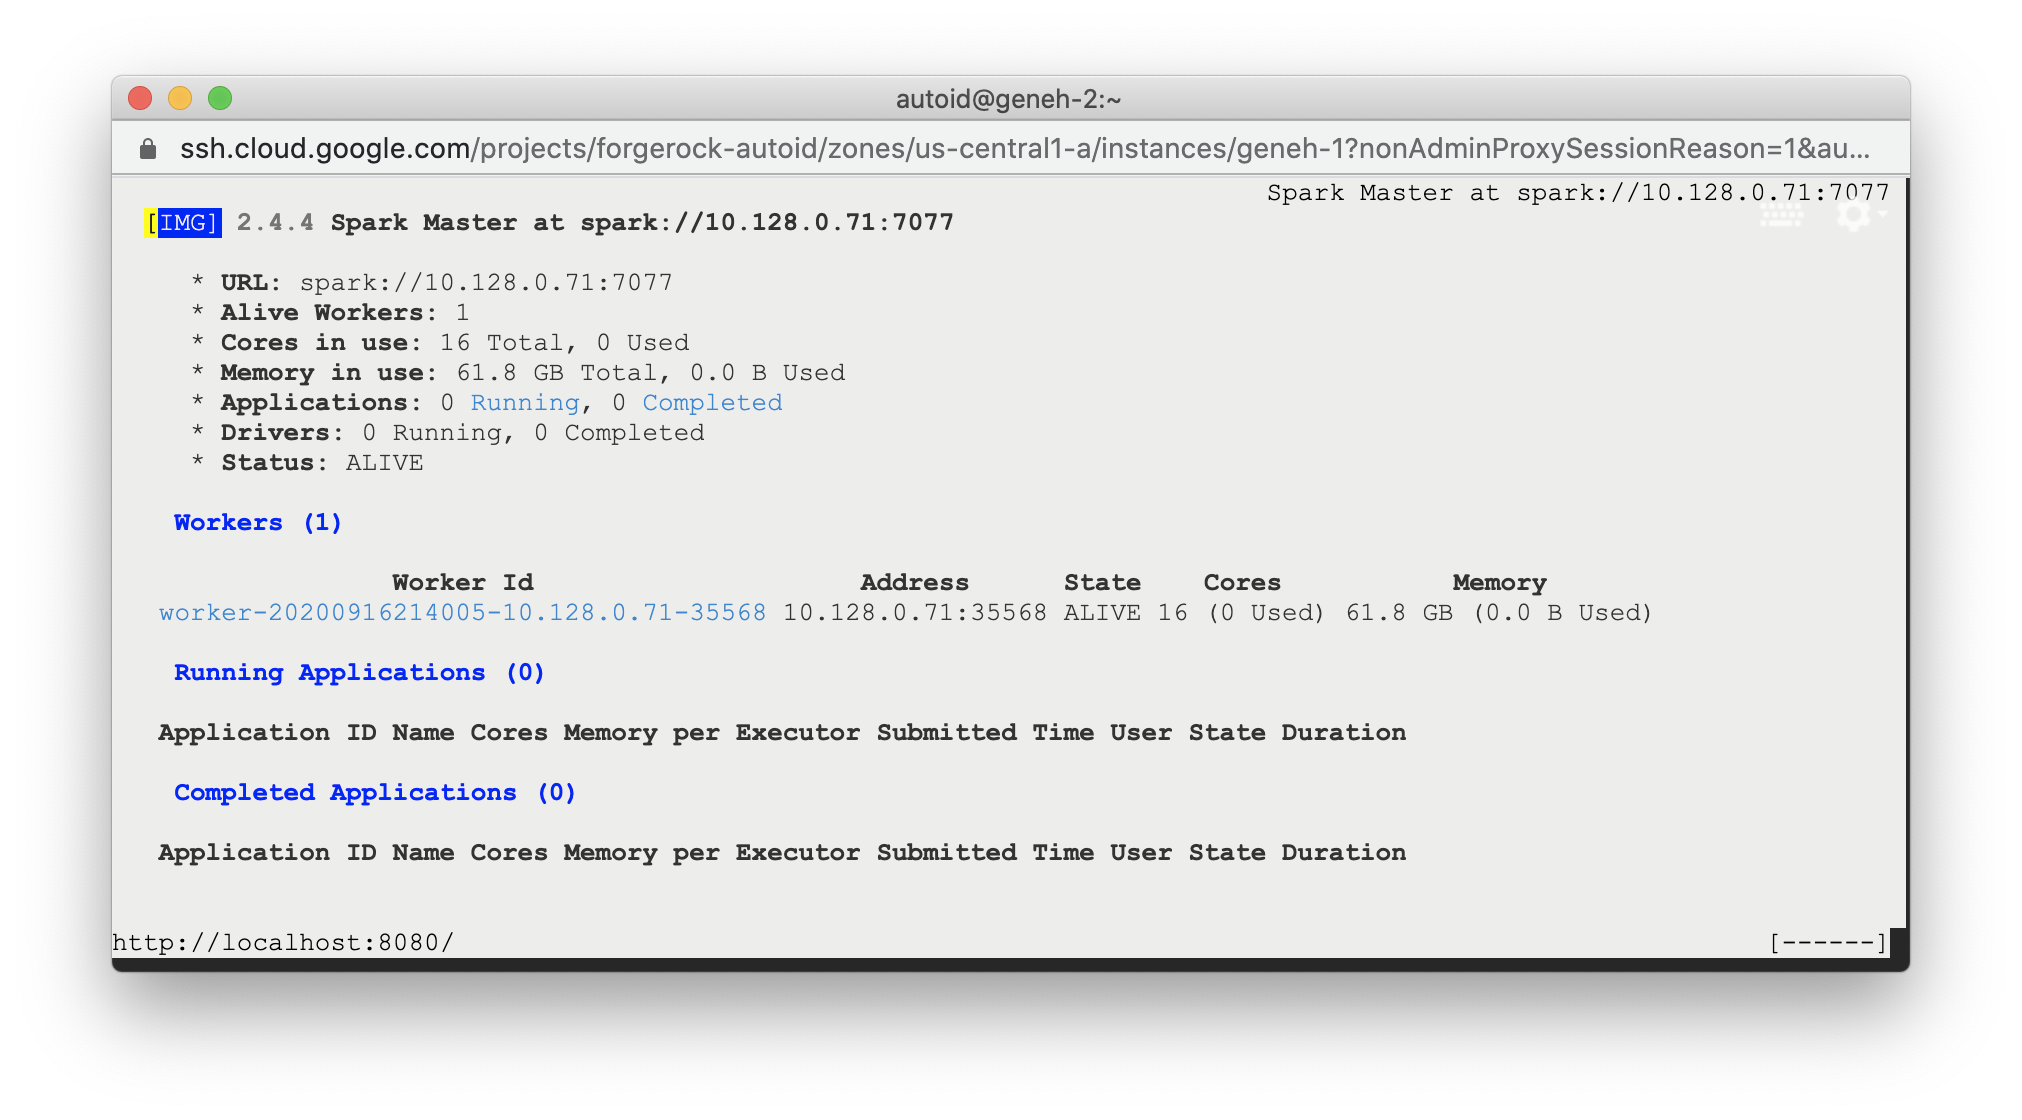
1. SSH to the target node and open Spark dashboard using the bundled text-mode web browser
```
elinks http://localhost:8080
```
Spark Master status should display as ALIVE and worker(s) with State ALIVE.
> **Collapse: Click to display an example of the Spark dashboard**
>
> 
## Start the Analytics
If the previous installation steps all succeeded, you must now prepare your data's entity definitions, data sources, and attribute mappings prior to running your analytics jobs. These step are required and are critical for a successful analytics process.
For more information, refer to [Set Entity Definitions](../admin-guide/set-entity-definitions.html).