---
title: Apache and IBM HTTP Web Agent
description: Consider the following before installing Apache or IBM HTTP Web Agent:
component: web-agents
version: 2025.11
page_id: web-agents:installation-guide:apache
canonical_url: https://docs.pingidentity.com/web-agents/2025.11/installation-guide/apache.html
section_ids:
install-apache: Install Apache or IBM HTTP Web Agent
apache-multi-processing: Tune multi-processing modules
install-apache-interactive: Install interactively
install-apache-web-agent-vhost: Install on a virtual host
silent-apache-agent-installation: Install silently
apache-check-installation: Check the installation
install_in_a_subrealm: Install in a subrealm
error-log: Configure error logs
configure-apache: Configure Apache or IBM HTTP Web Agent
apache-amagent: AmAgent directive to switch the agent on or off
example_where_amagent_is_on_globally_and_off_for_specific_directories: Example where AmAgent is On globally and Off for specific directories
amagent_is_off_globally_and_on_for_specific_server_locations: AmAgent is Off globally and On for specific server locations
apache-amauthprovider: AmAuthProvider directive to use Apache as the enforcement point
when_amauthprovider_is_on_and_the_request_doesnt_match_a_not_enforced_rule: When AmAuthProvider is On and the request doesn't match a not-enforced rule
when_amauthprovider_is_on_and_the_request_matches_a_not_enforced_rule: When AmAuthProvider is On and the request matches a not-enforced rule
when_amauthprovider_is_on_and_require_amauth_isnt_specified: When AmAuthProvider is On and Require AmAuth isn't specified
example_where_amauthprovider_is_off_globally_and_on_for_specific_directories: Example where AmAuthProvider is Off globally and On for specific directories
apache-errordocument: AmAuthErrorDocument directive to authorize ErrorDocument internal redirects
configure-apache-server: Apache as a reverse proxy
---
# Apache and IBM HTTP Web Agent
## Install Apache or IBM HTTP Web Agent
Consider the following before installing Apache or IBM HTTP Web Agent:
* SELinux can prevent the web server from accessing agent libraries, and the agent from being able to write to audit and debug logs. Learn more in [Troubleshoot](../maintenance-guide/troubleshooting.html).
* By default, 32 agent instances can run at the same time in a single installation. You can find information about changing the limit in *AM\_MAX\_AGENTS* in [Environment variables](../user-guide/configure-envvars.html).
* (For Apache Web Agent) By default, the agent replaces authentication functionality provided by Apache, for example, the `mod_auth_*` modules. Configure [Use Built-in Apache HTTPD Authentication Directives](../properties-reference/com.forgerock.agents.no.remoteuser.module.compatibility.html) to use built-in Apache authentication directives such as `AuthName`, `FilesMatch`, and `Require` for specified not-enforced URLs.
### Tune multi-processing modules
Apache and IBM HTTP server include Multi-Processing Modules (MPMs) that extend the functionality of a web server to support a wide variety of operating systems and customizations for a site.
Before installation, configure and tune MPMs, as follows:
* Configure one of the following modules:
* `mpm-event` for Unix-based servers
* `mpm-worker` for Unix-based servers
* `mpm_winnt` for Windows servers
The `prefork-mpm` module isn't adapted to high-traffic deployments. It can cause performance issues to both the agent and AM.
* Make sure that there are enough processes and threads available to service the expected number of client requests.
MPM-related performance is configured in the file `conf/extra/http-mpm.conf`:
```none
StartServers 2
MaxRequestWorkers 150
MinSpareThreads 25
MaxSpareThreads 75
ThreadsPerChild 25
MaxConnectionsPerChild 0
```
`MaxRequestWorkers` and `ThreadsPerChild` control the maximum number of concurrent requests. The default configuration allows 150 concurrent clients across 6 processes of 25 threads each.
Configure `MaxRequestWorkers` and `ServerLimit` to get a high level of concurrent clients.
To prevent problems registering the notification queue listener, don't change the default value of `MaxSpareThreads`, `ThreadLimit`, or `ThreadsPerChild`.
For information about Apache configuration properties, refer to [Apache MPM worker](https://httpd.apache.org/docs/2.4/mod/worker.html).
### Install interactively
1. Review the information in [Before you install](pre-installation.html#before-install) and complete the [pre-installation tasks](pre-installation.html#preinstall-tasks).
2. (Optional) In environments where a user isn't defined in the Apache or IBM HTTP server configuration file `httpd.conf`, set the following environment variables in your command line session to change ownership of created directories.
The following examples change ownership to the user `user`:
```
$ export APACHE_RUN_USER=user
$ export APACHE_RUN_GROUP=user
```
Learn more in [Installation environment variables](installer-env-vars.html)
3. Shut down the Apache or IBM HTTP server where you plan to install the agent.
4. Make sure AM is running.
5. Run `agentadmin --i` to install the agent:
* Apache on Linux
* Apache on Windows
* IBM HTTP Server on Linux
```
$ cd /web_agents/apache24_agent/bin/
$ ./agentadmin --i
```
```
C:\> cd web_agents\apache24_agent\bin
C:\path\to\web_agents\apache24_agent\bin> agentadmin.exe --i
```
```
$ cd /web_agents/httpservern_agent/bin/
$ ./agentadmin --i
```
6. When prompted, enter information for your deployment:
| | |
| - | ----------------------------------------------------- |
| | To cancel the installation at any time, press Ctrl+C. |
1. Enter the complete path to the Apache or IBM HTTP server configuration file:
* Apache on Linux
* Apache on Windows
* IBM HTTP Server on Linux
```
Configuration file [/opt/apache/conf/httpd.conf]: /etc/httpd/conf/httpd.conf
```
```
Configuration file [/opt/apache/conf/httpd.conf]: /etc/httpd/conf/httpd.conf
```
```
Configuration file [/opt/apache/conf/httpd.conf]: /opt/IBM/HTTPServer/conf/httpd.conf
```
2. (Optional) When installing the agent as the root user, consider changing directory ownership to the same user and group specified in the server configuration:
```
Change ownership of created directories using
User and Group settings in httpd.conf
[ q or 'ctrl+c' to exit ]
(yes/no): [no]: yes
```
This step appears only if environment variables are set as described in step 2, and `User` and `Group` are not defined in `httpd.conf`, such as in non Red Hat Enterprise Linux-based distributions.
| | |
| - | ----------------------------------------------------------------------------------------------------------- |
| | See which user or group is running the server by viewing the `Group` and `User` directives in `httpd.conf`. |
The following errors can occur when the permissions are wrong:
* Server fails to start up
* Requests to a protected resource return a blank page
* Log rotation errors
3. Enter the full path to import an existing agent configuration file, or press Enter to skip the import.
```
Existing agent.conf file: path/to/config/agent.conf
```
The installer can import settings from an existing agent on the new installation and skip prompts for values present in the existing configuration file. You must re-enter the agent profile password.
4. Enter the full URL for the AM instance that the agent will use, including the deployment URI:
```
AM server URL: http://am.example.com:8088/am
```
| | |
| - | ----------------------------------------------------------------------------------------------------------------------------------------------------------------------------------------------------------------------------------------------------------------------------------- |
| | If a reverse proxy is configured between AM and the agent, set the AM URL to the proxy URL, for example, `https://proxy.example.com:443/am`. You can find information about setting up an environment for reverse proxies in [Apache as a reverse proxy](#configure-apache-server). |
5. Enter the full URL of the agent:
```
Agent URL: http://www.example.com:80
```
6. Enter the ID of the agent profile created in AM:
```
Agent ID: web-agent
```
7. Enter the [agent profile realm](../user-guide/glossary.html#def-agent-profile-realm):
```
Agent realm/organization name: [/]: /
```
| | |
| - | -------------------------- |
| | Realms are case-sensitive. |
8. Enter the full path to the file containing the agent password:
```
The path and name of the password file: /secure-directory/pwd.txt
```
9. Review the configuration:
```
Installation parameters:
AM URL: https://am.example.com:8443/am
Agent URL: http://www.example.com:80
Agent ID: web-agent
Agent realm/organization name: /
Agent password source: /secure-directory/pwd.txt
Confirm configuration (yes/no): [no]:
```
10. Accept or update the configuration:
* To accept the configuration enter `yes`.
* To change the configuration enter `no` or press Enter. The installer loops through the configuration prompts again using your provided settings as the default. Press Enter to accept each one or enter a replacement setting.
On successful completion, the installer adds the agent as a module to the server configuration file `httpd.conf`. The agent adds a backup configuration file with the installation datestamp: `http.conf_amagent_yyyymmddhhmmss`.
7. (Unix only) Make sure the user or group running the Apache or IBM HTTP server has appropriate permissions for the following directories:
* Apache on Linux
* Apache on Windows
* IBM HTTP Server on Linux
```
Read permission:
* /web_agents/apache24_agent/lib
Read and write permission:
* /web_agents/apache24_agent/instances/agent_n
* /web_agents/apache24_agent/log
Execute permission to validate an installation by using the agentadmin --V[i\] command:
* /web_agents/apache24_agent/instances/agent_n
* /web_agents/apache24_agent/log
```
```
Read permission:
* /web_agents/apache24_agent/lib
Read and write permission:
* /web_agents/apache24_agent/instances/agent_n
* /web_agents/apache24_agent/log
Execute permission to validate an installation by using the agentadmin --V[i\] command:
* /web_agents/apache24_agent/instances/agent_n
* /web_agents/apache24_agent/log
```
```
Read permission:
* /web_agents/httpservern_agent/lib
Read and write permission:
* /web_agents/httpservern_agent/instances/agent_n
* /web_agents/httpservern_agent/log
Execute permission to validate an installation by using the agentadmin --V[i\] command:
* /web_agents/httpservern_agent/instances/agent_n
* /web_agents/httpservern_agent/log
```
| | |
| - | ----------------------------------------------------------------------------------------------------------- |
| | See which user or group is running the server by viewing the `Group` and `User` directives in `httpd.conf`. |
The following errors can occur when the permissions are wrong:
* Server fails to start up
* Requests to a protected resource return a blank page
* Log rotation errors
| | |
| - | ------------------------------------------------------------------------------------------------------------------------------------------------------------------------------------------------------ |
| | The same issues can occur if SELinux is enabled in `enforcing` mode, and not configured to allow access to agent directories. Learn more in [Troubleshoot](../maintenance-guide/troubleshooting.html). |
8. Start the Apache or IBM HTTP server.
9. Check the installation, as described in [Check the installation](#apache-check-installation).
### Install on a virtual host
Web Agent instances can operate with multiple virtual hosts. Each configuration instance is independent and has its own configuration file, debug logs, and audit logs. Each instance can connect to a different AM realm, or even different AM servers.
Installing on a virtual host is a manual process that involves copying an instance directory created by the `agentadmin` installer and adding it to the configuration file of the virtual host.
1. Install an agent in the default root configuration, as described in [Install Apache or IBM HTTP Web Agent](#install-apache-web-agent). This agent is referred to as the *root agent*.
2. Create a profile for the agent on the virtual host, as described in [Create agent profiles](pre-installation.html#create-agent-profiles). This agent is referred to as the *virtual host agent*.
3. Create at least one AM policy to protect resources on the virtual host, as described in [Policies](https://docs.pingidentity.com/pingam/8/am-authorization/policies.html) in AM's *Authorization guide*.
4. Shut down the Apache or IBM HTTP server where you plan to install the agent.
5. Locate an agent configuration instance to duplicate, and make a copy. For example, copy `agent_1` to `agent_2`:
* Apache on Linux
* Apache on Windows
* IBM HTTP Server on Linux
```
$ cd /web_agents/apache24_agent/instances
$ cp -r agent_1 agent_2
```
```
c:\> cd c:\web_agents\apache24_agent\instances
c:\path\to\web_agents\apache24_agent\instances> xcopy /E /I agent_1 agent_2
```
```
$ cd /web_agents/httpservern_agent/instances
$ cp -r agent_1 agent_2
```
6. Assign modify privileges to the new instance folder for the user that runs the virtual host. The following examples assign privileges for `agent_2` to a user named *user*:
* Apache on Linux
* Apache on Windows
* IBM HTTP Server on Linux
```
$ cd /web_agents/apache24_agent/instances
$ chown -hR user agent_2
```
```
c:\> cd c:\web_agents\apache24_agent\instances
c:\path\to\web_agents\apache24_agent\instances> **icacls "agent_2" /grant user:M
```
```
$ cd /web_agents/httpservern_agent/instances
$ chown -hR user agent_2
```
7. In the new instance folder, edit the configuration as follows:
1. In `agent.conf`, set the value of [Agent Profile Name](../properties-reference/com.sun.identity.agents.config.username.html) to the name of the profile you created for the virtual host agent. For example, set the value to `agent_2`.
2. In `agent-password.conf` and `agent-key.conf`, configure the encryption key and password for the virtual host agent. Use a scenario that suits your environment:
* Scenario 1: The password of the virtual host agent profile is the same as the password of the root agent profile\[[1](#_footnotedef_1 "View footnote.")].
The encryption key and encryption password of the root agent and virtual host agent must match. Because you copied the configuration file, you don't need to do anything else.
* Scenario 2: The password of the virtual host agent profile is different from the password of the root agent profile\[[2](#_footnotedef_2 "View footnote.")].
Follow these steps to generate a new encryption key, encrypt the new password, and configure them in the profile of the virtual host agent:
1. Generate a new encryption key:
```
$ agentadmin --k
Encryption key value: YWM…5Nw==
```
2. (Unix only) Store the agent profile password in a file, for example, `newpassword.file`.
3. Encrypt the agent profile password:
* Apache on Linux
* Apache on Windows
* IBM HTTP Server on Linux
```
$ ./agentadmin --p "YWM…5Nw==" "cat newpassword.file"
Encrypted password value: 07b…dO4=
```
```
$ agentadmin.exe --p "YWM…5Nw==" "newpassword"
Encrypted password value: 07b…dO4=
```
```
$ ./agentadmin --p "YWM…5Nw==" "cat newpassword.file"
Encrypted password value: 07b…dO4=
```
4. Set the following property in `agent-key.conf`:
* [Agent Profile Password Encryption Key](../properties-reference/com.sun.identity.agents.config.key.html) with the value of the generated encryption key:
```none
com.sun.identity.agents.config.key = YWM...5Nw==
```
1. Set the following property in `agent-password.conf`:
* [Agent Profile Password](../properties-reference/com.sun.identity.agents.config.password.html) with the value of the encrypted password:
```none
com.sun.identity.agents.config.password = 07b...dO4=
```
3. Throughout the configuration, replace references to the original instance directory with the new instance directory. For example, replace `agent_1` with `agent_2` in the following properties:
* [Local Agent Debug File Name](../properties-reference/com.sun.identity.agents.config.local.logfile.html)
* [Local Agent Audit File Name](../properties-reference/com.sun.identity.agents.config.local.audit.logfile.html)
4. Throughout the configuration, replace references to the original website being protected with the new website being protected. For example, replace `http://www.example.com:80/amagent` with `http://customers.example.com:80/amagent` in the following properties:
* [Agent Deployment URI Prefix](../properties-reference/com.sun.identity.agents.config.agenturi.prefix.html)
* [FQDN Default](../properties-reference/com.sun.identity.agents.config.fqdn.default.html)
8. Edit the Apache or IBM HTTP server configuration file, `httpd.conf`:
1. Find the following lines at the end of the file. The following example is for Apache agent on Linux, but you can adapt it to your configuration:
```
LoadModule amagent_module /web_agents/apache24_agent/lib/mod_openam.so
AmAgent On
AmAgentConf /web_agents/apache24_agent/bin/../instances/agent_1/config/agent.conf
```
2. Leave the first line, `LoadModule …`, and move the other two lines on the virtual host configuration element of the default site, for example:
```
# This first-listed virtual host is also the default for *:80
ServerName www.example.com
ServerAlias example.com
DocumentRoot "/var/www/html"
AmAgent On
AmAgentConf /web_agents/apache24_agent/instances/agent_1/config/agent.conf
```
3. Copy the same two lines on the new virtual host, and replace `agent_1` with the new agent configuration instance folder, for example `agent_2`:
```
ServerName customers.example.com
DocumentRoot "/var/www/customers"
AmAgent On
AmAgentConf /web_agents/apache24_agent/instances/agent_2/config/agent.conf
```
| | |
| - | -------------------------------------------------------------------------------------------------------------------------------------------- |
| | If the new virtual host configuration is in a separate file, copy the two configuration lines on the `VirtualHost` element within that file. |
9. Save and close the configuration file.
10. (Unix only) Make sure the user or group running the Apache or IBM HTTP server has appropriate permissions for the following directories:
* Apache on Linux
* Apache on Windows
* IBM HTTP Server on Linux
```
Read permission:
* /web_agents/apache24_agent/lib
Read and write permission:
* /web_agents/apache24_agent/instances/agent_n
* /web_agents/apache24_agent/log
Execute permission to validate an installation by using the agentadmin --V[i\] command:
* /web_agents/apache24_agent/instances/agent_n
* /web_agents/apache24_agent/log
```
```
Read permission:
* /web_agents/apache24_agent/lib
Read and write permission:
* /web_agents/apache24_agent/instances/agent_n
* /web_agents/apache24_agent/log
Execute permission to validate an installation by using the agentadmin --V[i\] command:
* /web_agents/apache24_agent/instances/agent_n
* /web_agents/apache24_agent/log
```
```
Read permission:
* /web_agents/httpservern_agent/lib
Read and write permission:
* /web_agents/httpservern_agent/instances/agent_n
* /web_agents/httpservern_agent/log
Execute permission to validate an installation by using the agentadmin --V[i\] command:
* /web_agents/httpservern_agent/instances/agent_n
* /web_agents/httpservern_agent/log
```
| | |
| - | ----------------------------------------------------------------------------------------------------------- |
| | See which user or group is running the server by viewing the `Group` and `User` directives in `httpd.conf`. |
The following errors can occur when the permissions are wrong:
* Server fails to start up
* Requests to a protected resource return a blank page
* Log rotation errors
| | |
| - | ------------------------------------------------------------------------------------------------------------------------------------------------------------------------------------------------------ |
| | The same issues can occur if SELinux is enabled in `enforcing` mode, and not configured to allow access to agent directories. Learn more in [Troubleshoot](../maintenance-guide/troubleshooting.html). |
11. Start the Apache or IBM HTTP server.
12. Check the installation, as described in [Check the installation](#apache-check-installation).
### Install silently
Use the `agentadmin --s` command for silent installation. Learn more in [agentadmin command](agentadmin.html).
1. Review the information in [Before you install](pre-installation.html#before-install) and complete the [pre-installation tasks](pre-installation.html#preinstall-tasks).
2. Shut down the Apache or IBM HTTP server where you plan to install the agent.
3. Make sure AM is running.
4. Run the `agentadmin --s` command with the required arguments. The following example is for Apache agent on Linux, but you can adapt it to your configuration:
```
$ ./agentadmin --s \
"/etc/httpd/conf/httpd.conf" \
"https://am.example.com:8443/am" \
"http://www.example.com:80" \
"/" \
"webagent" \
"/secure-directory/pwd.txt" \
--changeOwner
AM Web Agent for Apache Server installation.
…
Installation complete.
```
5. (Unix only) Make sure the user or group running the Apache or IBM HTTP server has appropriate permissions for the following directories:
* Apache on Linux
* Apache on Windows
* IBM HTTP Server on Linux
```
Read permission:
* /web_agents/apache24_agent/lib
Read and write permission:
* /web_agents/apache24_agent/instances/agent_n
* /web_agents/apache24_agent/log
Execute permission to validate an installation by using the agentadmin --V[i\] command:
* /web_agents/apache24_agent/instances/agent_n
* /web_agents/apache24_agent/log
```
```
Read permission:
* /web_agents/apache24_agent/lib
Read and write permission:
* /web_agents/apache24_agent/instances/agent_n
* /web_agents/apache24_agent/log
Execute permission to validate an installation by using the agentadmin --V[i\] command:
* /web_agents/apache24_agent/instances/agent_n
* /web_agents/apache24_agent/log
```
```
Read permission:
* /web_agents/httpservern_agent/lib
Read and write permission:
* /web_agents/httpservern_agent/instances/agent_n
* /web_agents/httpservern_agent/log
Execute permission to validate an installation by using the agentadmin --V[i\] command:
* /web_agents/httpservern_agent/instances/agent_n
* /web_agents/httpservern_agent/log
```
| | |
| - | ----------------------------------------------------------------------------------------------------------- |
| | See which user or group is running the server by viewing the `Group` and `User` directives in `httpd.conf`. |
The following errors can occur when the permissions are wrong:
* Server fails to start up
* Requests to a protected resource return a blank page
* Log rotation errors
| | |
| - | ------------------------------------------------------------------------------------------------------------------------------------------------------------------------------------------------------ |
| | The same issues can occur if SELinux is enabled in `enforcing` mode, and not configured to allow access to agent directories. Learn more in [Troubleshoot](../maintenance-guide/troubleshooting.html). |
6. Start the Apache or IBM HTTP server.
7. Check the installation, as described in [Check the installation](#apache-check-installation).
### Check the installation
1. After you start Apache or IBM HTTP server, check the error log to make sure startup was successful:
```
[Tue Sep …] AH00163:
Apache/2.4.6 (CentOS) Web Agent/2025.11 configured — resuming normal operations
```
2. Make an HTTP request to a resource protected by the agent, then check the `/log/system_0.log` file to verify that no errors occurred on startup. The log should contain a message similar to this:
```
[0x7fb89e7a6700:22]: Web Agent Version: 2025.11
Revision: ab12cde, Container: Apache 2.4 Linux 64bit (Centos6),
Build date: Mar …
```
3. (Optional) If an AM policy is configured, test that the agent enforces a policy decision. For example, make an HTTP request to a protected resource and check that you are redirected to AM to authenticate. After authentication, AM redirects you back to the resource you tried to access.
### Install in a subrealm
Examples in this document install the agent in the top-level realm. To install the agent in a subrealm during interactive or silent installation, use the subrealm during the installation or in the response file.
For example, instead of:
```bash
Agent realm/organization name: [/]: /
```
specify:
```bash
Agent realm/organization name: [/]: /myrealm
```
Even though the agent is installed in a subrealm, the default login redirect requires the [user realm](../user-guide/glossary.html#def-user-realm) to be the top-level realm. You can find information about changing the user realm in [Login redirect](../user-guide/login-redirect.html).
### Configure error logs
Edit the server configuration file `httpd.conf` to log errors.
The following line, present by default in `httpd.conf`, logs warning conditions for the container:
```none
LogLevel warn
```
The following example line includes the agent error logs at debug-level:
```none
LogLevel warn amagent:debug
```
## Configure Apache or IBM HTTP Web Agent
The examples in this section are for Apache agent on Linux, but you can adapt them to your configuration.
| | |
| - | ----------------------------------------------------------------------------- |
| | IBM HTTP server 9 supports Apache directives but IBM HTTP server 8.5 doesn't. |
### `AmAgent` directive to switch the agent on or off
Switch the agent on or off globally or independently for different server locations. Server locations include the global environment, a virtual host, a specific location, or a set of directory blocks. Use the following settings:
* `AmAgent On`
The agent protects server locations. It allows or denies requests based on AM policy configuration and not-enforced rules.
* `AmAgent Off`
Apache or IBM HTTP server protects server locations; the agent plays no part in protecting the server locations.
Default: `AmAgent` is set to `On` at a global level in the `httpd.conf` configuration file as follows:
```
AmAgent On
AmAgentConf /opt/web_agents/apache24_agent/instances/agent_1/config/agent.conf
AmAuthProvider Off
```
The `AmAgent` configuration is hierarchical. When it's `On` or `Off` globally it's set for all server locations except those explicitly specified otherwise.
| | |
| - | --------------------------------------------------------------------------------------------------------------------------------------------------------------------------------------------------------------------------------------------------------------------------------------------------------------------------------------------------------------------------------------------------- |
| | Consider setting `AmAgent` to `Off` for the following situations:- For server locations that need no AM authentication or policy, such as the public face of a website, or `/css` or `/images` directories.
- When Apache or IBM HTTP server is acting as a reverse proxy to AM or Advanced Identity Cloud, and you don't want the agent to take part in protecting AM or Advanced Identity Cloud. |
#### Example where `AmAgent` is `On` globally and `Off` for specific directories
In the following example `httpd.conf`, the agent is `On` globally and `Off` for the `/var/www/transaction` directory:
```
Options Indexes FollowSymLinks
AllowOverride None
Require all granted
AmAgent Off
Options Indexes FollowSymLinks
AllowOverride None
Require all granted
AmAgent On
AmAgentConf /opt/web_agents/apache24_agent/instances/agent_1/config/agent.conf
AmAuthProvider Off
```
* Accessing a resource in `/var/www/`
The agent protects the resource, and overrides the `Require all granted` directive.
To access the resource, the request must match a not-enforced rule in the agent configuration or be allowed by an AM policy evaluation.
* Accessing a resource in `/var/www/transaction`
Apache or IBM HTTP server manages the access and applies the `Require all granted` directive. The agent plays no part in protecting the resource.
#### `AmAgent` is `Off` globally and `On` for specific server locations
| | |
| - | ------------------------------------------------------------------------------------------------------------------------------------------------------------------------- |
| | When `AmAgent` configuration is `Off`, configure the server location `/agent` as `On`. This allows AM to redirect requests to the `/agent` endpoint after authentication. |
In the following example `httpd.conf`, the agent is `Off` globally but `On` for the `/var/www/transaction` and `/agent` locations:
```
Options Indexes FollowSymLinks
AllowOverride None
Require all granted
AmAgent On
Options Indexes FollowSymLinks
AllowOverride None
Require all granted
AmAgent On
AmAgent Off
AmAgentConf /opt/web_agents/apache24_agent/instances/agent_1/config/agent.conf
AmAuthProvider Off
```
* Accessing a resource in `/var/www/`
Apache or IBM HTTP server manages the access and applies the `Require all granted` directive. The agent plays no part in protecting the resource.
* Accessing a resource in `/var/www/transaction`
The agent protects the resource, and overrides the `Require all granted` directive.
To access the resource, the request must match a not-enforced rule in the agent configuration or be allowed by an AM policy evaluation.
### `AmAuthProvider` directive to use Apache as the enforcement point
When `AmAgent` is `On`, combine AM policy with Apache `Require` directives to control access globally or independently for different server locations. Server locations include the global environment, a virtual host, a specific location, or a set of directory blocks.
| | |
| - | ----------------------------------------------------------------------------------------------------------------------------------------------------- |
| | Using multiple authorization sources increases complexity. To reduce the risk of an invalid security configuration, test and validate the directives. |
Use the following settings:
* `AmAuthProvider Off`
The agent acts as the enforcement point, allowing or denying requests based on not-enforced rules and AM policies.
* `AmAuthProvider On`
Apache or IBM HTTP server acts as the enforcement point, allowing or denying requests based on AM policy and Apache `Require` directives
For information about `Require` directives, refer to [Require Directive](https://httpd.apache.org/docs/2.4/mod/mod_authz_core.html#require) on the Apache website. `Require AmAuth` is a directive specifically for Web Agent. When the directive is specified, users must be authenticated with AM. Otherwise, the agent redirects them to AM for authentication.
Default: `AmAuthProvider` is `Off`
The `AmAuthProvider` configuration is hierarchical. When it's `On` or `Off` globally it's set for all server locations except those explicitly specified otherwise.
For simplicity, it's recommended to leave `AmAuthProvider` as `Off` globally and set it to `On` for specific locations where you want Apache to act as the enforcement point.
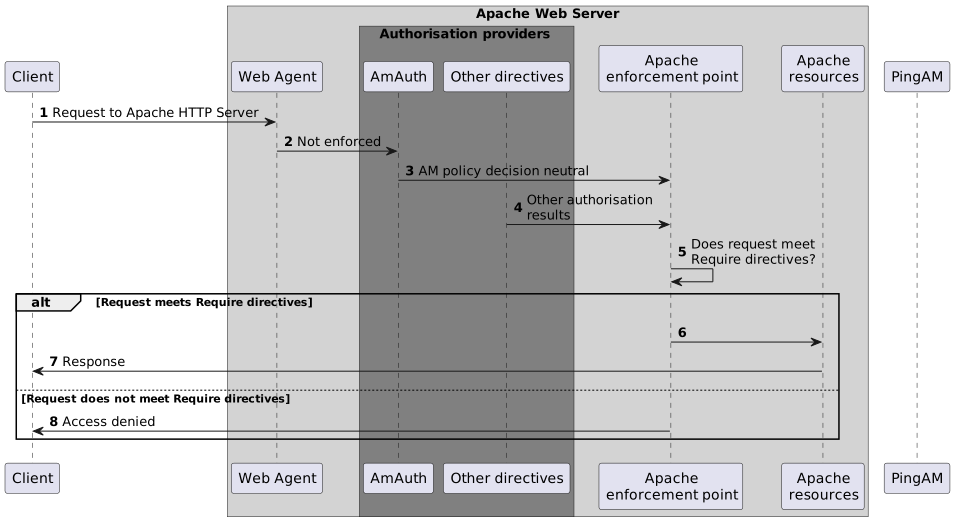
#### When `AmAuthProvider` is `On` and the request doesn't match a not-enforced rule
When a request doesn't match a not-enforced rule, the agent does the following:
* Checks that the user is authenticated with AM, and redirects the user for authentication if not.
* Requests policy information from AM for the request.
* Relays the policy information to the Apache `Require AmAuth` directive.
Apache or IBM HTTP server uses the `Require AmAuth` directive and other `Require` directives to allow or deny access to resources.
The following image shows the flow of requests:

#### When `AmAuthProvider` is `On` and the request matches a not-enforced rule
When a request matches a not-enforced rule, the agent doesn't require the user to be authenticated with AM or request policy information from AM. The `Require AmAuth` directive returns a neutral value.
Apache or IBM HTTP server uses the other `Require` directives to allow or deny access to resources.
The following image shows the flow of requests:
Consider the following for using not-enforced rules when `AmAuthProvider` is `On`:
* Instead of using not-enforced rules to provide caveats to AM policy enforcement, use Apache `Require` directives.
* In server locations where the agent is configured with not-enforced rules, set `AmAuthProvider` to `Off` to let the agent do the enforcement.
* If you use not-enforced rules when `AmAuthProvider` is `On`, remember that the agent drops out of authorisation decisions for requests that match a rule. Apache `Require` directives are used to allow or deny requests.
#### When `AmAuthProvider` is `On` and `Require AmAuth` isn't specified
When `AmAuthProvider` is `On`, the `Require AmAuth` directive should always be specified. If `AmAuthProvider` is `On`, but the `Require AmAuth` directive isn't specified, users are still required to authenticate with AM but Apache doesn't use policy information from AM in its decision.
The following image shows the flow of requests:
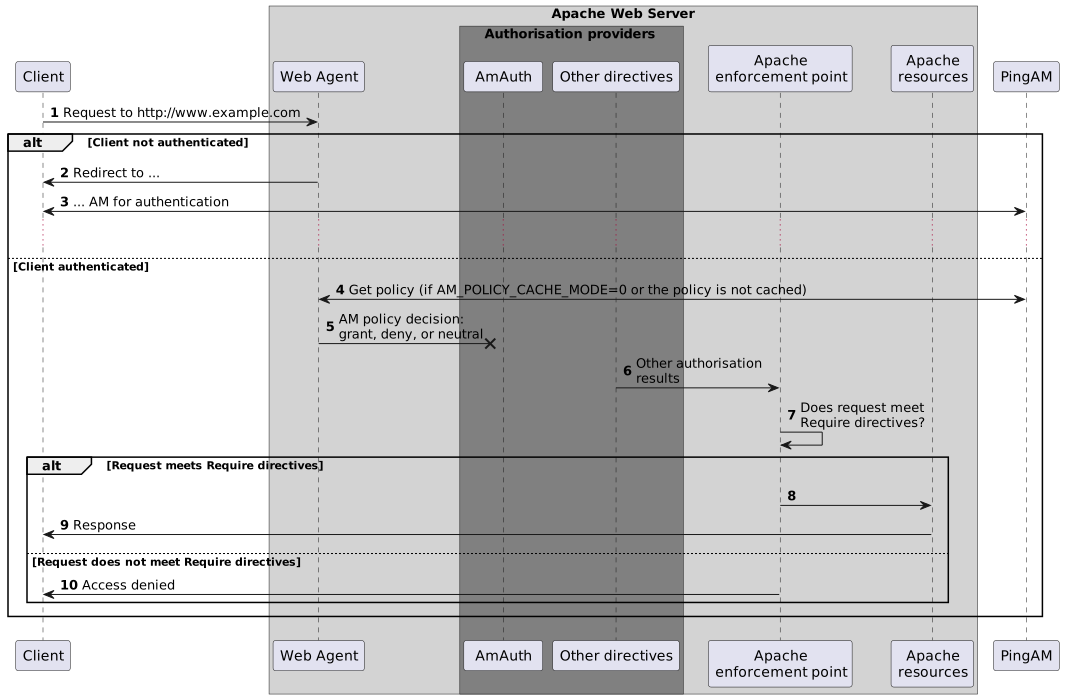
The following example has this configuration:
* The request doesn't match a not-enforced rule.
* `AmAuthProvider` is `On` for the `/var/www/transaction` directory.
* `Require AmAuth` isn't specified
```
//Not a recommended configuration
Options Indexes FollowSymLinks
AllowOverride None
Require all granted
AmAuthProvider On
Options Indexes FollowSymLinks
AllowOverride None
Require ip 19.168.2
AmAgent On
AmAgentConf /opt/web_agents/apache24_agent/instances/agent_1/config/agent.conf
AmAuthProvider Off
```
* Accessing a resource in `/var/www/transaction`
Apache or IBM HTTP server uses the `Require ip` directive to allow or deny the request. The user must be authenticated with AM and a valid user must be set, but AM policy information is ignored.
#### Example where `AmAuthProvider` is `Off` globally and `On` for specific directories
The example is configured as follows:
* The request doesn't match a not-enforced rule
* `AmAuthProvider` is `Off` globally
* `AmAuthProvider` is `On` for the `/var/www/transaction` directory:
* `Require AmAuth` is specified
```
Options Indexes FollowSymLinks
AllowOverride None
Require all granted
AmAuthProvider On
Options Indexes FollowSymLinks
AllowOverride None
Require AmAuth
Require ip 19.168.2
AmAgent On
AmAgentConf /opt/web_agents/apache24_agent/instances/agent_1/config/agent.conf
AmAuthProvider Off
```
* Accessing a resource in `/var/www/`
The agent acts as the enforcement point, allowing or denying requests based on not-enforced rules and AM policies.
* Accessing a resource in `/var/www/transaction`
The agent provides AM policy information to the `Require AmAuth` directive. Apache uses that and the `Require ip` directive to allow or deny the request.
To access the resource, the user must be authenticated with AM, and the request must meet AM policy requirements and come from the specified IP address.
### `AmAuthErrorDocument` directive to authorize ErrorDocument internal redirects
Switch authorization on or off for ErrorDocument internal file or CGI redirects either at the Server or VirtualHost level, or at the Directory level.
| | |
| - | ---------------------------------------------------------------------------------------------------------------- |
| | This setting doesn't apply to external redirects or simple text based responses for the ErrorDocument directive. |
Use the following settings:
* `AmAuthErrorDocument On`
The agent performs authorization on ErrorDocument internal file or CGI redirects.
Use this setting when you have ErrorDocuments that use CGI scripts and require authorization. For example:
```
ErrorDocument 400 /cgi/bin/cgi-error-script
```
When this directive is set to `On`, it lets the CGI script read user attributes from headers or cookies to make decisions.
For example, if a user attempts to access a page they're not authorized to access, the CGI helper can allow them to request access to that page.
The CGI script must be in an AM policy to be authorized. If a policy denies access to the CGI script, Apache displays a default error response page and informs you that an error occurred while trying to display the custom response.
* `AmAuthErrorDocument Off`
The ErrorDocument internal redirects are allowed and the agent doesn't perform any authorization.
Default: `AmAuthErrorDocument` is `Off`.
The `AmAuthErrorDocument` configuration is hierarchical. When it's `On` or `Off` at the Server level, it's set for all server locations except those explicitly specified otherwise.
If authorization is needed for ErrorDocument internal redirects, the simplest configuration is to set `AmAuthErrorDocument` to `On` at the Server level.
### Apache as a reverse proxy
This section has an example configuration of Apache HTTP Server as a reverse proxy between AM and Web Agent. You can use any reverse proxy that supports the WebSocket protocol.
For information about how to configure Apache for load balancing, and other requirements for your environment, refer to the Apache documentation.
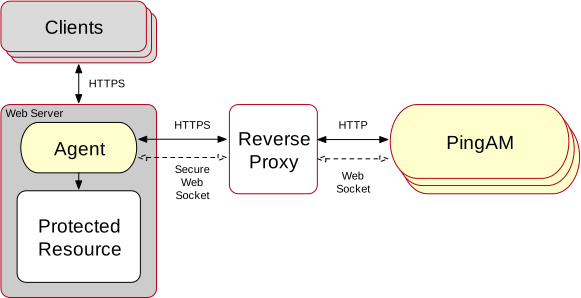Figure 1. Apache HTTP Server reverse proxy configured between the agent and AM
1. Locate the `httpd.conf` file in your deployed reverse proxy instance.
2. Add the modules required for a proxy configuration, as follows:
```bash
# Modules required for proxy
LoadModule proxy_module modules/mod_proxy.so
LoadModule proxy_http_module modules/mod_proxy_http.so
LoadModule proxy_wstunnel_module modules/mod_proxy_wstunnel.so
```
The `mod_proxy_wstunnel.so` module is required to support the WebSocket protocol used for communication between AM and the agents.
3. Add the proxy configuration inside the `VirtualHost` context. Consider the following directives:
```bash
...
# Proxy Config
RequestHeader set X-Forwarded-Proto "https" (1)
ProxyPass "/am/notifications" "ws://am.example.com:8080/am/notifications" Upgrade=websocket (2)
ProxyPass "/am" "http://am.example.com:8080/am" (3)
ProxyPassReverseCookieDomain "am.internal.example.com" "proxy.example.com" (4)
ProxyPassReverse "/am" "http://am.example.com:8080/am" (5)
...
```
(1) RequestHeader: Set to `https` or `http`, depending on the proxy configuration. If the proxy is configured for https, as in the above example, set to `https`. Otherwise, set `http`. In a later step, you configure AM to recognize the forwarded header and use it in the `goto` parameter for redirecting back to the agent after authentication.
(2) ProxyPass: Set to allow WebSocket traffic between AM and the agent. If HTTPS is configured between the proxy and AM, set to use the `wss` protocol instead of `ws`.
(3) ProxyPass: Set to allow HTTP traffic between AM and the agent.
(4) ProxyPassReverseCookieDomain: Set to rewrite the domain string in \`Set-Cookie\`headers in the format *internal domain* (AM's domain) *public domain* (proxy's domain).
(5) ProxyPassReverse: Set to the same value configured for the `ProxyPass` directive.
For more information about configuring Apache HTTP Server as a reverse proxy, refer to the [Apache documentation](https://httpd.apache.org/docs/2.4/howto/reverse_proxy.html).
4. Restart the reverse proxy instance.
5. Configure AM to recover the forwarded header you configured in the reverse proxy. Also, review other configurations that may be required in an environment that uses reverse proxies. Learn more in [Agent connection to AM through a load balancer/reverse proxy](../user-guide/load-balancers-proxies.html#comms-am-agents)
***
[1](#_footnoteref_1). The root agent profile refers to the agent installation performed in [Install Apache or IBM HTTP Web Agent](#install-apache-web-agent) and required for installation on virtual hosts.[2](#_footnoteref_2). The root agent profile refers to the agent installation performed in [Install Apache or IBM HTTP Web Agent](#install-apache-web-agent) and required for installation on virtual hosts.