---
title: IIS and ISAPI Web Agent
description: IIS and ISAPI Web Agent instances can be configured to operate with multiple websites. Each configuration instance is independent and has its own configuration file, debug logs, and audit logs. Each instance can connect to a different AM realm, or even different AM servers.
component: web-agents
version: 2025.11
page_id: web-agents:installation-guide:install-iis
canonical_url: https://docs.pingidentity.com/web-agents/2025.11/installation-guide/install-iis.html
section_ids:
install-iis-web-agent: Install IIS or ISAPI Web Agent interactively
silent-iis-agent-installation: Install IIS or ISAPI Web Agent silently
manage-iis-agents: Enable and disable IIS Web Agent
proc-enable-disable-iis-web-policy-agent: Disable and enable Web Agent on an IIS site or application
proc-disabling-enabling-child-protection: Disable and enable agent protection for child applications
iis-enable-basic-auth: Enable support for basic authentication and password replay
microsoft_issues: Microsoft issues
configure-iis-basic-auth: Configure basic authentication and password replay support
install_in_a_subrealm: Install in a subrealm
---
# IIS and ISAPI Web Agent
IIS and ISAPI Web Agent instances can be configured to operate with multiple websites. Each configuration instance is independent and has its own configuration file, debug logs, and audit logs. Each instance can connect to a different AM realm, or even different AM servers.
Consider the following for IIS and ISAPI Web Agent:
* IIS agents must run in Integrated mode.
* IIS and ISAPI agents can't run in the same Windows Server instance.
* ISAPI agent handles the POST method for form data but not for other data types.
* An agent configured for a site or parent application protects any application configured in the site or parent application.
* A protected application configured for a site or parent application protects any application configured in the site or parent application.
* Agents configured in a site or parent application protect only the child applications that inherit their parent IIS or ISAPI configuration.
* Because of architectural differences, agents configured for a site or parent application running in a 64-bit pool *don't* protect child applications running in a 32-bit pool. 32-bit applications can't load 64-bit web agent libraries.
Similarly, agents configured for a site or parent application running in a 32-bit pool *don't* protect child applications running in a 64-bit pool.
In this case, child applications require their own agent installation, as explained in the next item of this list. Both 32-bit and 64-bit agent libraries are supplied with the IIS and ISAPI Web Agent binaries.
* If an application requires a specific agent configuration or, for example, the application is a 32-bit application configured within a 64-bit site, follow the procedures in this section to create a new agent instance for it. Configuring an agent on an application overrides the application's parent web agent configuration, if any.
| | |
| - | --------------------------------------------------------------------------------------------------------------------------------------------------------------- |
| | Install Web Agent on the child application before installing it in the parent. Trying to install an agent on a child that is already protected causes an error. |
* (IIS agent) You can disable the agent protection at any level of the IIS hierarchy, with the following constraints:
* Disabling the agent in a parent application disables protection on all child applications that don't have a specific agent instance installed on them.
* Disabling the agent in a child application doesn't disable protection on its parent application.
* (ISAPI agent) You can't disable the agent protection. ISAPI agent is either installed and running or not installed.
* Agents require the *Application Development* component to be installed alongside the core IIS or ISAPI services. Application Development is an optional component of the IIS and ISAPI web server. The component provides required infrastructure for hosting web applications.
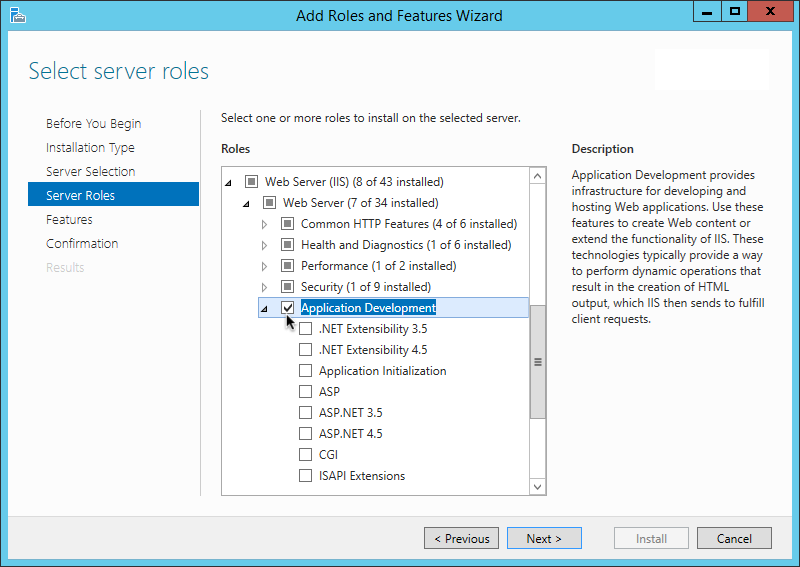Figure 1. Adding the application development component to IIS and ISAPI
* The following properties don't work with ISAPI agent:
* [Ignore Path Info in Request URLs](../properties-reference/com.sun.identity.agents.config.ignore.path.info.html)
* [Authorization flow for applications using Javascript](../properties-reference/com.forgerock.agents.config.auth.flow.callback.html)
## Install IIS or ISAPI Web Agent interactively
| | |
| - | --------------------------------------------------------------------------------------------------------------------------------------------------------------------------------------------------------------------------------------------------------------------------------------------------------------------------------------------------- |
| | The IIS Web Agent installer doesn't support custom namespace elements in the `web.config` file. If any exist, they're removed from the `web.config` file during the installation process.If you require custom namespace elements, back up the `web.config` file before installing the agent and manually restore them once the agent is installed. |
1. Review the information in [Before you install](pre-installation.html#before-install) and complete the [pre-installation tasks](pre-installation.html#preinstall-tasks).
2. Log on to Windows as a user with administrator privileges.
3. Make sure AM is running.
4. Run the [agentadmin --i](agentadmin.html) command to install the agent.
```
c:\> cd web_agents\iis_agent\bin
c:\web_agents\iis_agent\bin> agentadmin.exe --i
```
5. When prompted, enter information for your deployment.
| | |
| - | ----------------------------------------------------- |
| | To cancel the installation at any time, press Ctrl+C. |
1. Choose the site and application in which to install the web agent.
The `agentadmin` command reads the IIS or ISAPI server configuration and converts hierarchy as follows:
* (ISAPI agent) Into a single value ID.
* (IIS agent) Into an ID composed of three values separated by the dot (`.`) character:
The first value specifies an IIS site. The number `1` specifies the first site in the server.
The second value specifies an application configured in an IIS site. The number `1` specifies the first application in the site.
The third value specifies an internal value for the web agent.
The following is an example IIS server configuration read by the `agentadmin` command:
```
IIS Server Site configuration:
====================================
id details
====================================
Default Web Site
application path:/, pool DefaultAppPool
1.1.1 virtualDirectory path:/, configuration: C:\inetpub\wwwroot\web.config
MySite
application path:/, pool: MySite
2.1.1 virtualDirectory path:/, configuration C:\inetpub\MySite\web.config
application path:/MyApp1, pool: MySite
2.2.1 virtualDirectory path:/ configuration C:\inetpub\MySite\MyApp1\web.config
application path:/MyApp1/MyApp2, pool: MySite
2.3.1 virtualDirectory path:/ configuration C:\inetpub\MySite\MyApp1\MyApp2\web.config
Enter IIS Server Site identification number.
[ q or 'ctrl+c' to exit ]
Site id: 2.1.1
```
* ID `2.1.1` corresponds to the first application, `/` configured in a second IIS site, `MySite`. You would choose this ID to install the web agent at the root of the site.
* ID `2.2.1` corresponds to a second application, `MyApp1`, configured in a second IIS site, `MySite`. You would choose this ID to install the web agent in the `MyApp1` application.
* ID `2.3.1` corresponds to a child application, `MyApp1/MyApp2`, configured in the second application, `MyApp1`, configured in a second IIS site, `MySite`. You would choose this ID to install the web agent in the sub-application, `MyApp1/MyApp2`.
2. The installer can import settings from an existing web agent on the new installation and skips prompts for any values present in the existing configuration file. You will be required to re-enter the agent profile password.
Enter the full path to an existing agent configuration file to import the settings, or press Enter to skip the import.
```
To set properties from an existing configuration enter path to file
[ q or 'ctrl+c' to exit, return to ignore ]
Existing agent.conf file:
```
3. Enter the full URL of the AM instance the agent will use. Make sure the deployment URI is specified.
| | |
| - | ---------------------------------------------------------------------------------------------------------------------------------------------------------------------------------------------------------------------------------------------------------------------------------------------- |
| | If a reverse proxy is configured between AM and the agent, set the AM URL to the proxy URL, for example, `https://proxy.example.com:443/am`. You can find information about setting up an environment for reverse proxies in [Apache as a reverse proxy](apache.html#configure-apache-server). |
```
Enter the URL where the AM server is running. Please include the
deployment URI also as shown below:
(http://am.sample.com:58080/am)
[ q or 'ctrl+c' to exit ]
AM server URL: https://am.example.com:8443/am
```
4. Enter the full URL of the site the agent will run in.
```
Enter the Agent URL as shown below:
(http://agent.sample.com:1234)
[ q or 'ctrl+c' to exit ]
Agent URL: http://customers.example.com:80
```
5. Enter the name given to the agent profile created in AM.
```
Enter the Agent profile name
[ q or 'ctrl+c' to exit ]
Agent Profile name: iisagent
```
6. Enter the [agent profile realm](../user-guide/glossary.html#def-agent-profile-realm). Realms are case-sensitive.
```
Enter the Agent realm/organization
[ q or 'ctrl+c' to exit ]
Agent realm/organization name: [/]: /
```
7. Enter the full path to the file containing the agent profile password created earlier.
```
Enter the path to a file that contains the password to be used
for identifying the Agent
[ q or 'ctrl+c' to exit ]
The path to the password file: c:\pwd.txt
```
8. The installer displays a summary of the configuration settings you specified.
If a setting is incorrect, enter `no` or press Enter. The installer loops through the configuration prompts using your provided settings as the default. Press Enter to accept each one or enter a replacement setting.
If the settings are correct, enter `yes` to proceed with installation.
```
Installation parameters:
AM URL: https://am.example.com:8443/am
Agent URL: https://customers.example.com:443
Agent Profile name: iisagent
Agent realm/organization name: /
Agent Profile password source: c:\pwd.txt
Confirm configuration (yes/no): [no]: yes Validating…
Validating… Success.
Cleaning up validation data…
Creating configuration…
Installation complete.
```
On successful completion, the installer adds the agent as a module to the IIS or ISAPI site configuration.
| | |
| - | ------------------------------------------------------------------------------------------------------- |
| | To ease logging, the installer grants full user access permissions on the IIS or ISAPI instance folder. |
Each agent instance has a numbered configuration and logs directory.
* For IIS, the first agent configuration and logs are located in `web_agents\iis_agent\instances\agent_1\`.
* For ISAPI, the agent ID corresponds to the site ID. If site 5 is used, the agent configuration and logs are located in `web_agents\iis_agent\instances\agent_5\`.
6. Make sure the application pool identity related to the IIS site has the appropriate permissions on the following agent installation folders:
* `\web_agents\iis_agent\lib`
* `\web_agents\iis_agent\log`
* `\web_agents\iis_agent\instances\agent_nnn`
To change the ACLs for files and folders related to the agent instance, run the `agentadmin --o` command. For example:
```
C:\web_agents\iis_agent\bin>agentadmin.exe --o "ApplicationPoolIdentity1" "C:\web_agents\iis_agent\lib"
```
Learn more in [agentadmin command](agentadmin.html).
When permissions aren't set correctly, errors such as getting a blank page when accessing a protected resource can occur.
7. If you installed Web Agent in an application, set [CDSSO Redirect URI](../properties-reference/com.sun.identity.agents.config.cdsso.redirect.uri.html) to the application path, as follows:
1. Go to Realms > *Realm Name* > Agents > Web > *Agent Name* > SSO > Cross Domain SSO.
2. Add the application path to the default value of [CDSSO Redirect URI](../properties-reference/com.sun.identity.agents.config.cdsso.redirect.uri.html). For example, if you installed Web Agent in an application such as `MyApp1/MyApp2`, set the property to `MyApp1/MyApp2/agent/cdsso-oauth2`.
3. Save your changes.
## Install IIS or ISAPI Web Agent silently
| | |
| - | --------------------------------------------------------------------------------------------------------------------------------------------------------------------------------------------------------------------------------------------------------------------------------------------------------------------------------------------------- |
| | The IIS Web Agent installer doesn't support custom namespace elements in the `web.config` file. If any exist, they're removed from the `web.config` file during the installation process.If you require custom namespace elements, back up the `web.config` file before installing the agent and manually restore them once the agent is installed. |
1. Review the information in [Before you install](pre-installation.html#before-install) and complete the [pre-installation tasks](pre-installation.html#preinstall-tasks).
2. Make sure AM is running.
3. Run the [agentadmin --s](agentadmin.html) command with the required arguments. For example:
```
c:\web_agents\iis_agent\bin> agentadmin.exe --s ^
"2.1.1" ^
"https://am.example.com:8443/am" ^
"http://iis.example.com:80" ^
"/" ^
"iisagent" ^
"c:\pwd.txt" ^
AM Web Agent for IIS Server installation.
Validating…
Validating… Success.
Cleaning up validation data…
Creating configuration…
Installation complete.
```
4. Make sure the application pool identity related to the IIS site has the appropriate permissions on the following agent installation folders:
* `\web_agents\iis_agent\lib`
* `\web_agents\iis_agent\log`
* `\web_agents\iis_agent\instances\agent_nnn`
To change the ACLs for files and folders related to the agent instance, run the `agentadmin --o` command. For example:
```
C:\web_agents\iis_agent\bin>agentadmin.exe --o "ApplicationPoolIdentity1" "C:\web_agents\iis_agent\lib"
```
Learn more in [agentadmin command](agentadmin.html).
When permissions aren't set correctly, errors such as getting a blank page when accessing a protected resource can occur.
5. (Optional) If you installed the agent in a parent application, enable it for its child applications, as described in [Disable and enable agent protection for child applications](#proc-disabling-enabling-child-protection).
## Enable and disable IIS Web Agent
| | |
| - | -------------------------------------------------------------------------------------------------- |
| | ISAPI Web Agent can't be enabled or disabled; it is either installed and running or not installed. |
### Disable and enable Web Agent on an IIS site or application
The `agentadmin` command shows only instances of the agent. Learn about how to enable or disable the protection of child applications in [Disable and enable agent protection for child applications](#proc-disabling-enabling-child-protection).
1. Log on to Windows as a user with administrator privileges.
2. Run the [agentadmin --l](agentadmin.html) command to list the installed agent configuration instances.
```
c:\web_agents\iis_agent\bin> agentadmin.exe --l
AM Web Agent configuration instances:
id: agent_1
configuration: c:\web_agents\iis_agent\bin\..\instances\agent_1
server/site: 2.2.1
```
Make a note of the ID value of the configuration instance you want to disable or enable.
3. Perform one of the following steps:
* To disable the agent in a site, run the [agentadmin --d](agentadmin.html) command and specify the ID of the agent configuration instance to disable.
```
c:\web_agents\iis_agent\bin> agentadmin.exe --d agent_1
Disabling agent_1 configuration…
Disabling agent_1 configuration… Done.
```
* To enable the agent in a site, run the [agentadmin --e](agentadmin.html) command and specify the ID of the agent configuration instance to enable.
```
c:\web_agents\iis_agent\bin> agentadmin.exe --e agent_1
Enabling agent_1 configuration…
Enabling agent_1 configuration… Done.
```
### Disable and enable agent protection for child applications
1. Edit the child application's `web.config` configuration.
2. Decide whether to enable or disable agent protection:
* To disable agent protection, add the following lines to the child application's `web.config` file:
```xml
```
Note that the path specified in `configFile` may be different for your environment.
* To enable agent protection, understand that agents configured in a site or parent application also protect any applications that inherit the IIS configuration from that site or parent.
If you have disabled the agent's protection for a child application by following the steps in this procedure, remove the lines added to the `web.config` file to enable protection again.
## Enable support for basic authentication and password replay
| | |
| - | ------------------------------------------------ |
| | ISAPI Web Agent doesn't support password replay. |
The IIS Web Agent supports basic authentication and password replay. Use the appropriate software versions.
Given the proper configuration and with Active Directory as a user data store for AM, the IIS agent can provide access to IIS server variables. The instructions for configuring the capability follow in this section, though you should read the section in full, also paying attention to the required workarounds for Microsoft issues.
When configured as described, the agent requests IIS server variable values from AM, which gets them from Active Directory. The agent then sets the values in HTTP headers so that they can be accessed by your application.
The following IIS server variables all take the same value when set: `REMOTE_USER`, `AUTH_USER`, and `login_USER`. The agent either sets all three, or doesn't set any of them.
When [Logon and Impersonation](../properties-reference/com.sun.identity.agents.config.iis.logonuser.html) is enabled, the agent performs Windows login and sets the user impersonation token in the agent session context.
When [Show Password in HTTP Header](../properties-reference/com.sun.identity.agents.config.iis.password.header.html) is enabled, the agent adds the password in the `USER_PASSWORD` header.
The agent doesn't modify any other IIS server variables related to the authenticated user's session.
The agent requires IIS to run in Integrated mode.
### Microsoft issues
Apply workarounds for the following Microsoft issues:
* [Prompt for credentials when you access WebDav-based FQDN sites in Windows](https://learn.microsoft.com/troubleshoot/windows-server/networking/credentials-prompt-access-webdav-fqdn-sites)
* [Office applications open blank from SharePoint WebDAV or sites](https://learn.microsoft.com/office/troubleshoot/powerpoint/office-opens-blank-from-sharepoint)
### Configure basic authentication and password replay support
1. Use the `openssl` tool to generate a suitable encryption key:
```
$ openssl rand -base64 32
e63…sw=
```
2. In the AM admin UI, go to Deployment > Servers > *Server Name* > Advanced, and then add a property `com.sun.am.replaypasswd.key` with the encryption key you generated in a previous step as the value.
3. Go to Realms > *Realm Name* > Authentication > Settings > Post Authentication Processing, and in Authentication Post Processing Classes, add the class `com.sun.identity.authentication.spi.JwtReplayPassword`.
4. Restart AM.
5. In the AM admin UI go to Realms > *Realm Name* > Applications > Agents > Web > *Agent Name* > Advanced
1. (AM 7.4.x and earlier versions) In Replay Password Key, enter the encryption key generated in a previous step. The field corresponds to [Replay Password Key](../properties-reference/com.sun.identity.agents.config.replaypasswd.key.html).
| | |
| - | --------------------------------------------------------------------------------------------------------------------------------------------------------------------------------------------------------------------------------------------------------- |
| | From AM 7.5, setting this property in the AM admin UI is deprecated. Values set in this field of the AM admin UI are ignored. The value of the DES key is inherited from the secret mapped to the AM secret label `am.authentication.replaypassword.key`. |
2. For Windows login for user token impersonation, enable [Logon and Impersonation](../properties-reference/com.sun.identity.agents.config.iis.logonuser.html).
3. Save your changes.
6. (Optional) To set the encrypted password in the IIS `AUTH_PASSWORD` server variable, go to Realms > *Realm Name* > Applications > Agents > Web > *Agent Name* > Advanced, and enable [Show Password in HTTP Header](../properties-reference/com.sun.identity.agents.config.iis.password.header.html).
7. (Optional) If you require Windows login, or you need to use basic authentication with SharePoint or OWA, then you must do the following so that the agent requests AM to provide the appropriate account information from Active Directory in its policy response:
* Configure Active Directory as a user data store
* Configure the IIS or ISAPI agent profile User ID Parameter and User ID Parameter Type.
Skip this step if you don't use SharePoint or OWA and no Windows login is required.
Make sure the AM data store is configured to use Active Directory as the user data store.
In the AM admin UI under Realms > *Realm Name* > Applications > Agents > Web > *Agent Name* > AM Services, set [User ID Parameter](../properties-reference/com.sun.identity.agents.config.userid.param.html) and [User ID Parameter Type](../properties-reference/com.sun.identity.agents.config.userid.param.type.html).
For example, if the real username for Windows domain login in Active Directory is stored on the `sAMAccountName` attribute, then set the User ID Parameter to `sAMAccountName`, and the User ID Parameter Type to `LDAP`.
Setting [User ID Parameter Type](../properties-reference/com.sun.identity.agents.config.userid.param.type.html) to `LDAP` causes the web agent to request that AM get the value of the User ID Parameter attribute from the data store, in this case, Active Directory. Given that information, the agent can set the HTTP headers `REMOTE_USER`, `AUTH_USER`, or `login_USER` and `USER_PASSWORD` with Active Directory attribute values suitable for Windows login, setting the remote user, and so forth.
8. (Optional) To access Microsoft Office from SharePoint pages, configure AM to persist the authentication cookie. Learn more in [Persistent cookie decision node](https://docs.pingidentity.com/auth-node-ref/8/persistent-cookie-decision.html).
## Install in a subrealm
Examples in this document install the agent in the top-level realm. To install the agent in a subrealm during interactive or silent installation, use the subrealm during the installation or in the response file.
For example, instead of:
```bash
Agent realm/organization name: [/]: /
```
specify:
```bash
Agent realm/organization name: [/]: /myrealm
```
Even though the agent is installed in a subrealm, the default login redirect requires the [user realm](../user-guide/glossary.html#def-user-realm) to be the top-level realm. You can find information about changing the user realm in [Login redirect](../user-guide/login-redirect.html).