Administrator tasks
This chapter is written for administrators who must manage and maintain Autonomous Identity.
ForgeRock® Autonomous Identity is an entitlements and roles analytics system that lets you fully manage your company’s access to your data.
An entitlement refers to the rights or privileges assigned to a user or thing for access to specific resources. A company can have millions of entitlements without a clear picture of what they are, what they do, and who they are assigned to. Autonomous Identity solves this problem by using advanced artificial intelligence (AI) and automation technology to determine the full entitlements landscape for your company. The system also detects potential risks arising from incorrect or over-provisioned entitlements that lead to policy violations. Autonomous Identity eliminates the manual re-certification of entitlements and provides a centralized, transparent, and contextual view of all access points within your company.
For installation instructions, refer to the Autonomous Identity Installation Guide.
For a description of the Autonomous Identity UI console, refer to the Autonomous Identity Users Guide.
Self service
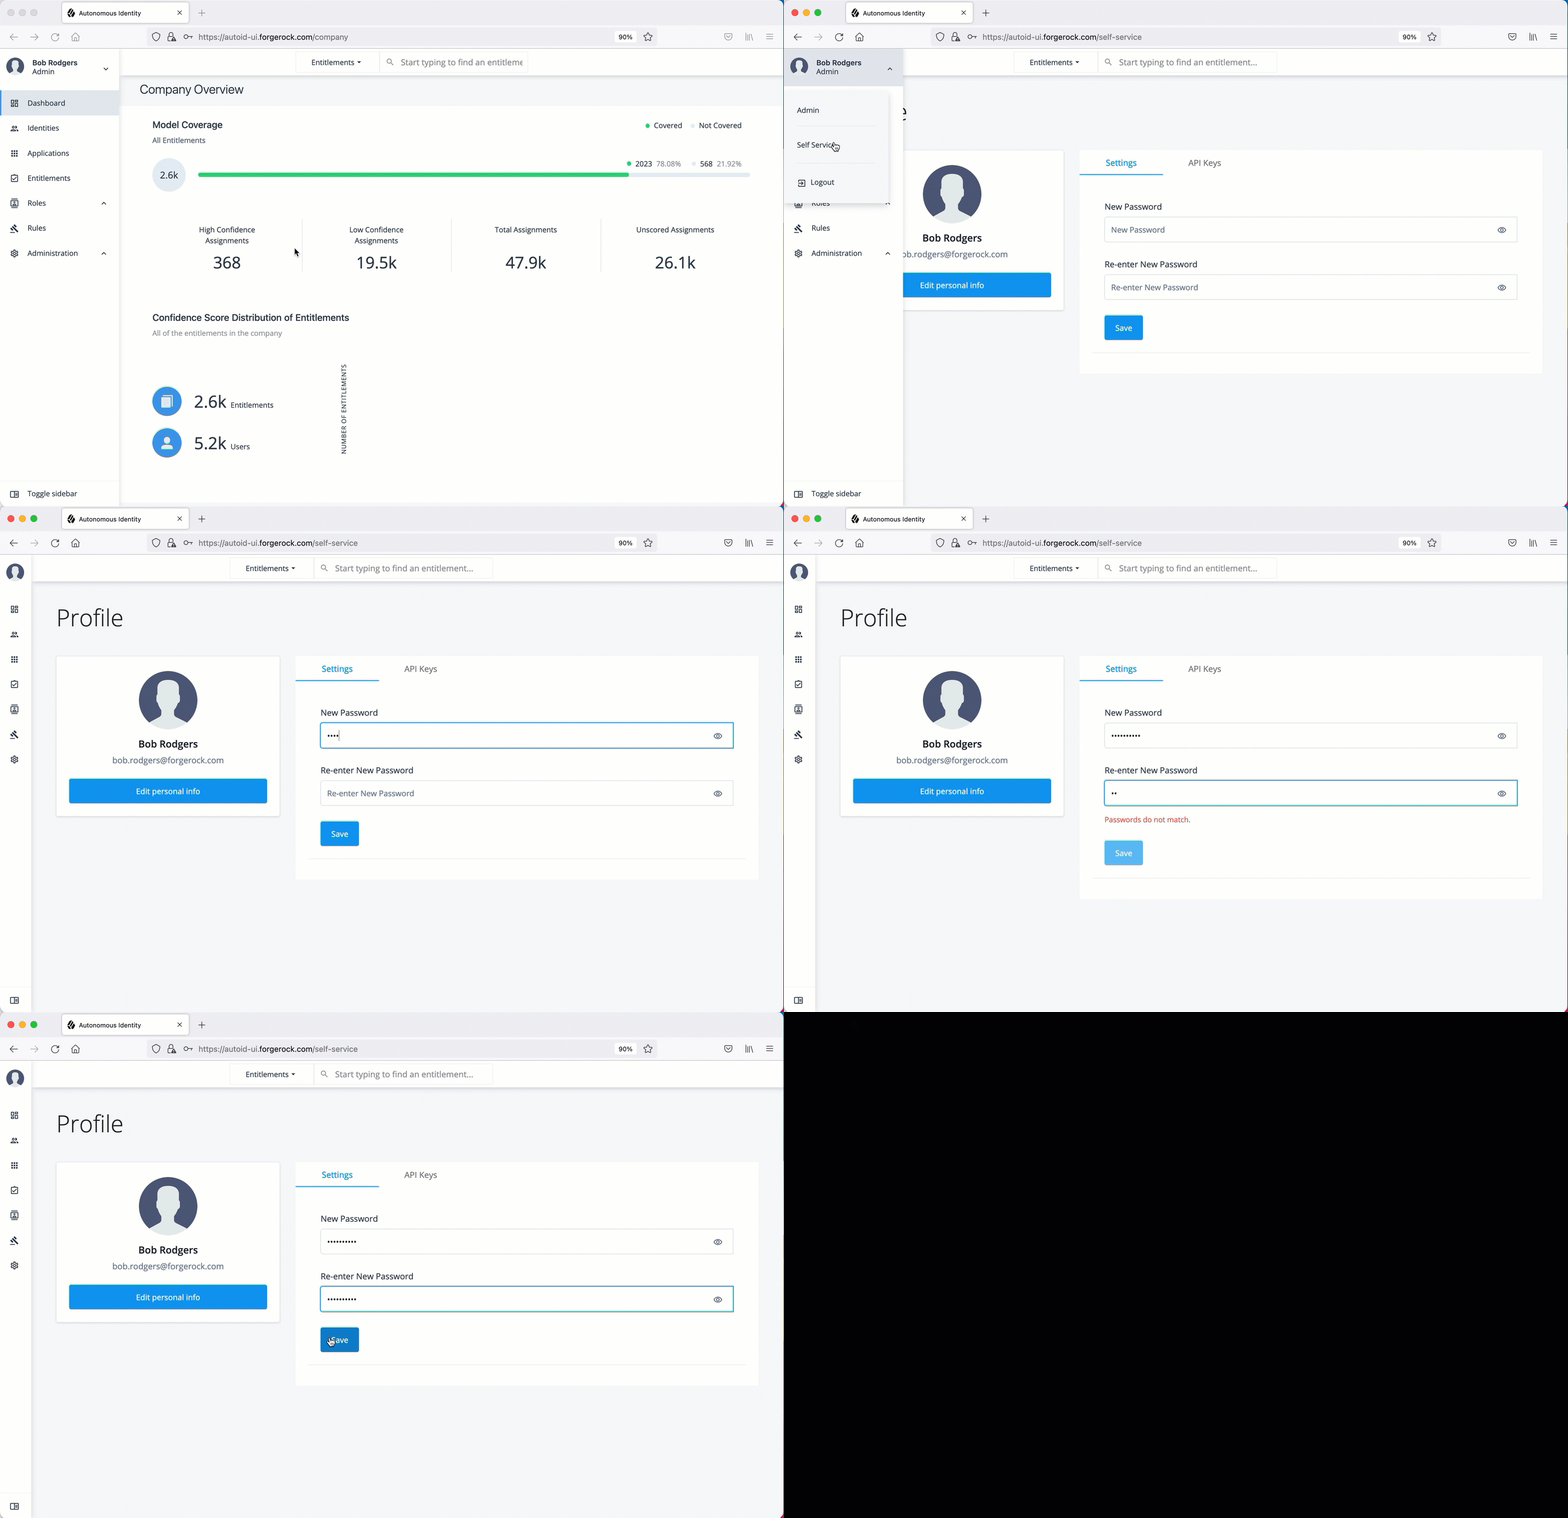
Autonomous Identity provides a self service UI page for administrators to change their profile and password information.
The page also lets administrators create time-based API keys for users to access the Autonomous Identity system. For more information, refer to Generate an API key.
Reset your password
-
On the Autonomous Identity UI, click the admin drop-down on the top-left of the page.
-
Click Self Service.
-
On the Profile page, enter and re-enter a new password, and then click Save.
Click an example
Update your profile
-
On the Autonomous Identity UI, click the admin drop-down on the top-left of the page.
-
Click Self Service.
-
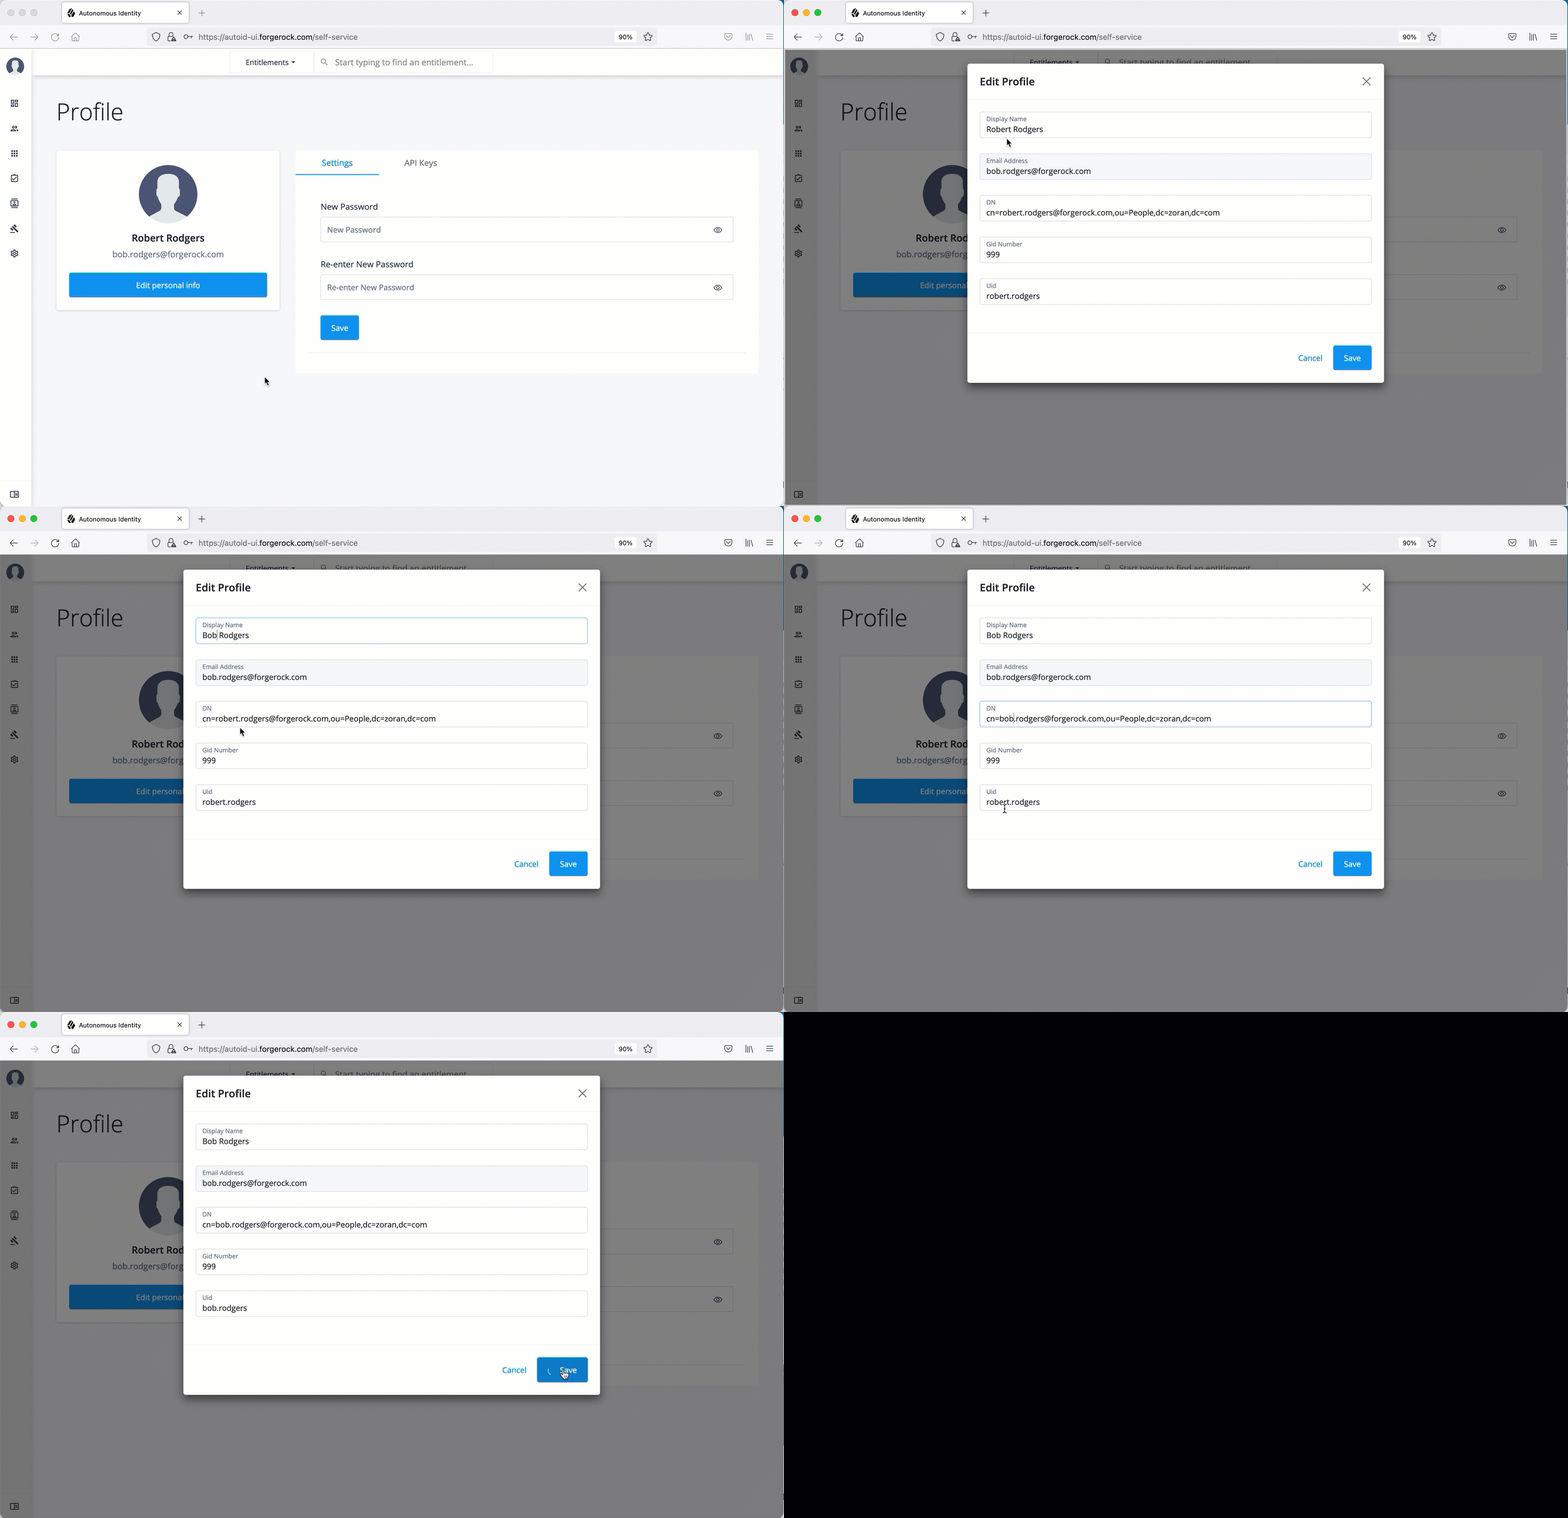
On the Profile page, click Edit personal info to update your profile details:
You cannot change your email address or group ID as these are used to identify each user. -
Update the display name.
-
Update your distinguished name (DN).
-
Update your uid.
-
-
Click Save to apply your changes.
Click an example
Manage identities
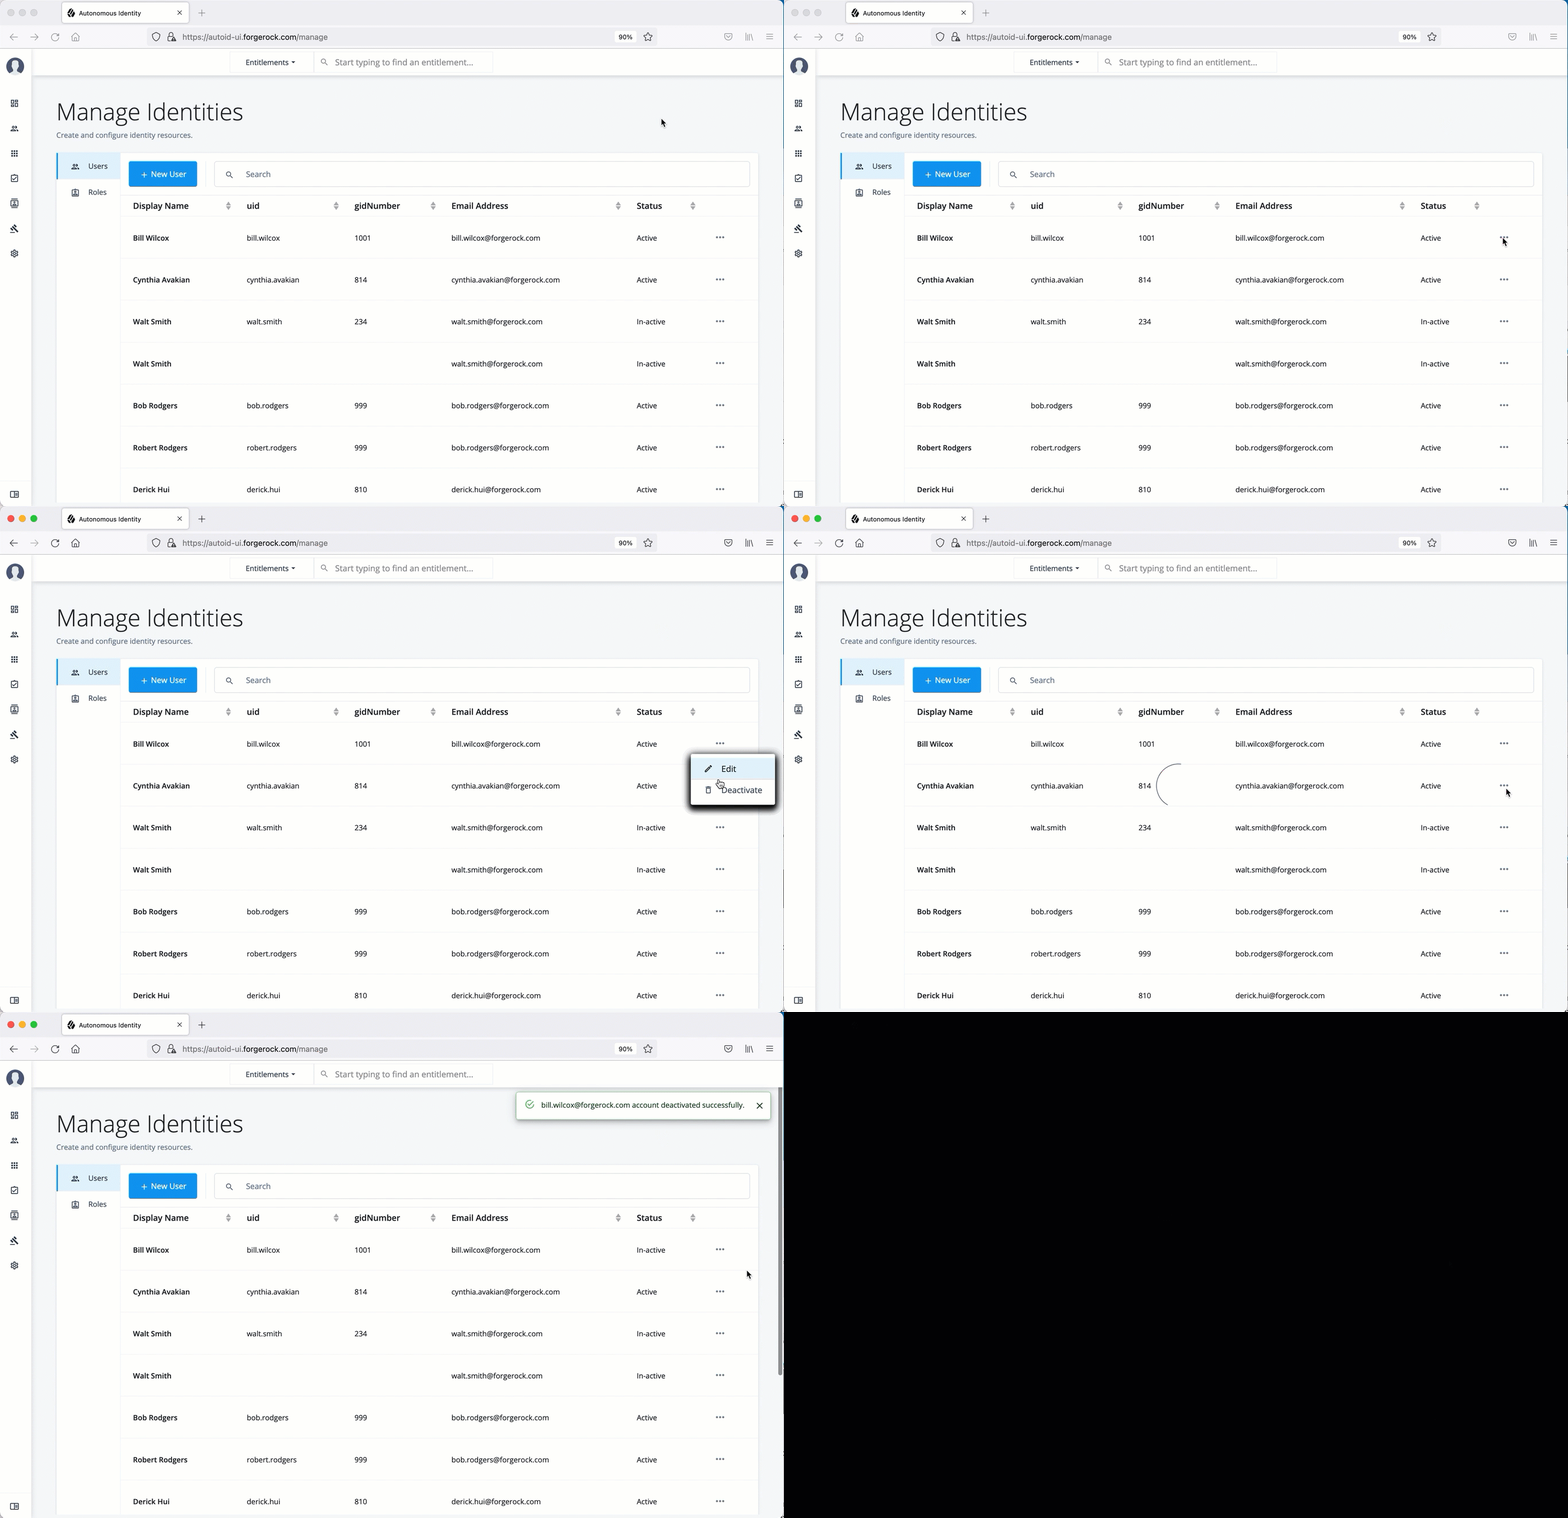
The Manage Identities page lets administrators add or edit, assign roles, and deactivate users to Autonomous Identity.
View the default roles
-
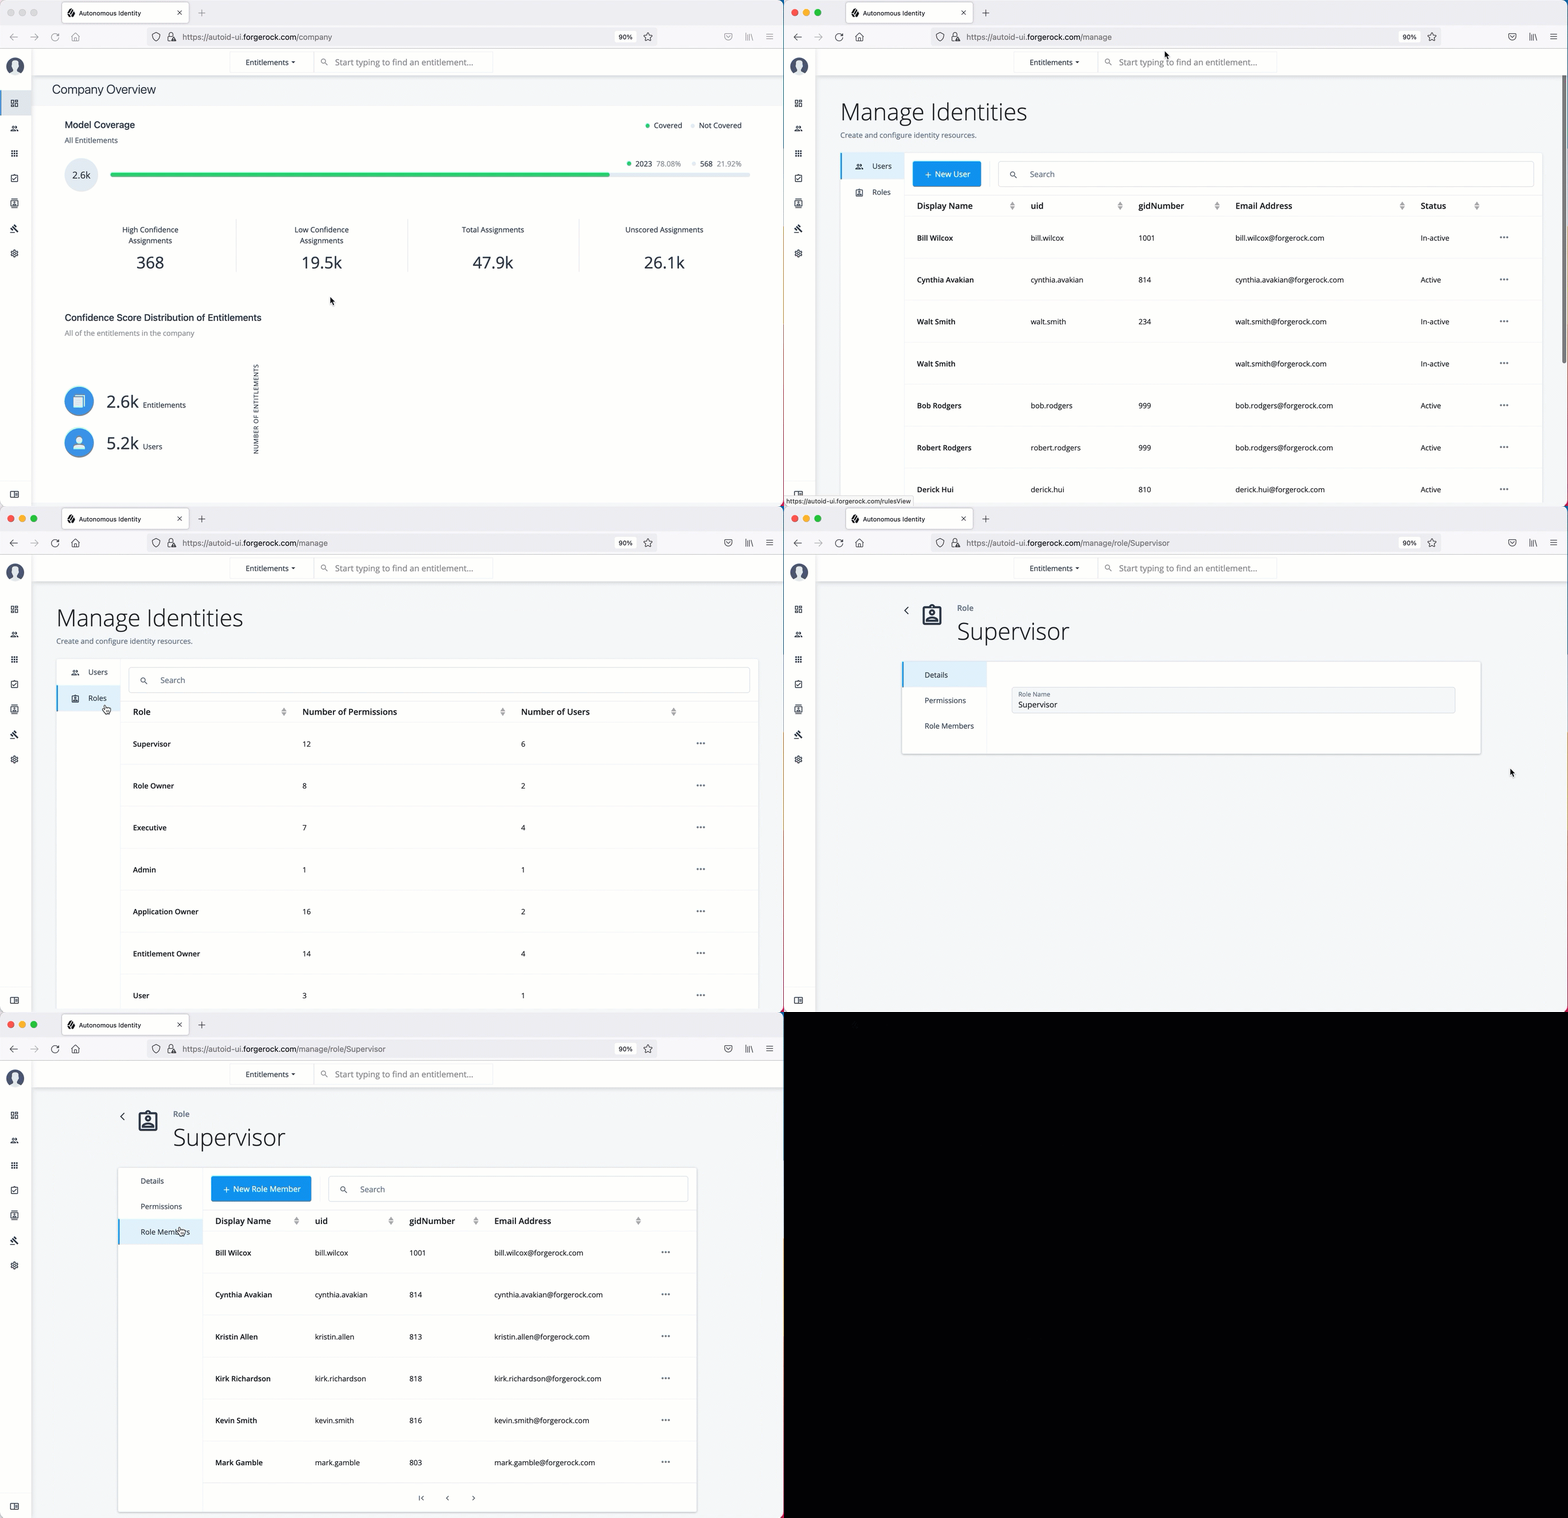
On the Autonomous Identity UI, click the administration icon on the navigation menu, and then click Manage.
-
On the Manage Identities page, click Roles.
-
Select a specific role, and then click Edit to view its details.
-
Click through the Details and Permissions to view its details. You cannot change the permissions in these roles.
-
Click Role Members to access the members associated with this role. If you want to add a user to this Role group, click New Role Member and enter the user’s name. You can enter multiple users. When finished, click Save.
Click an example
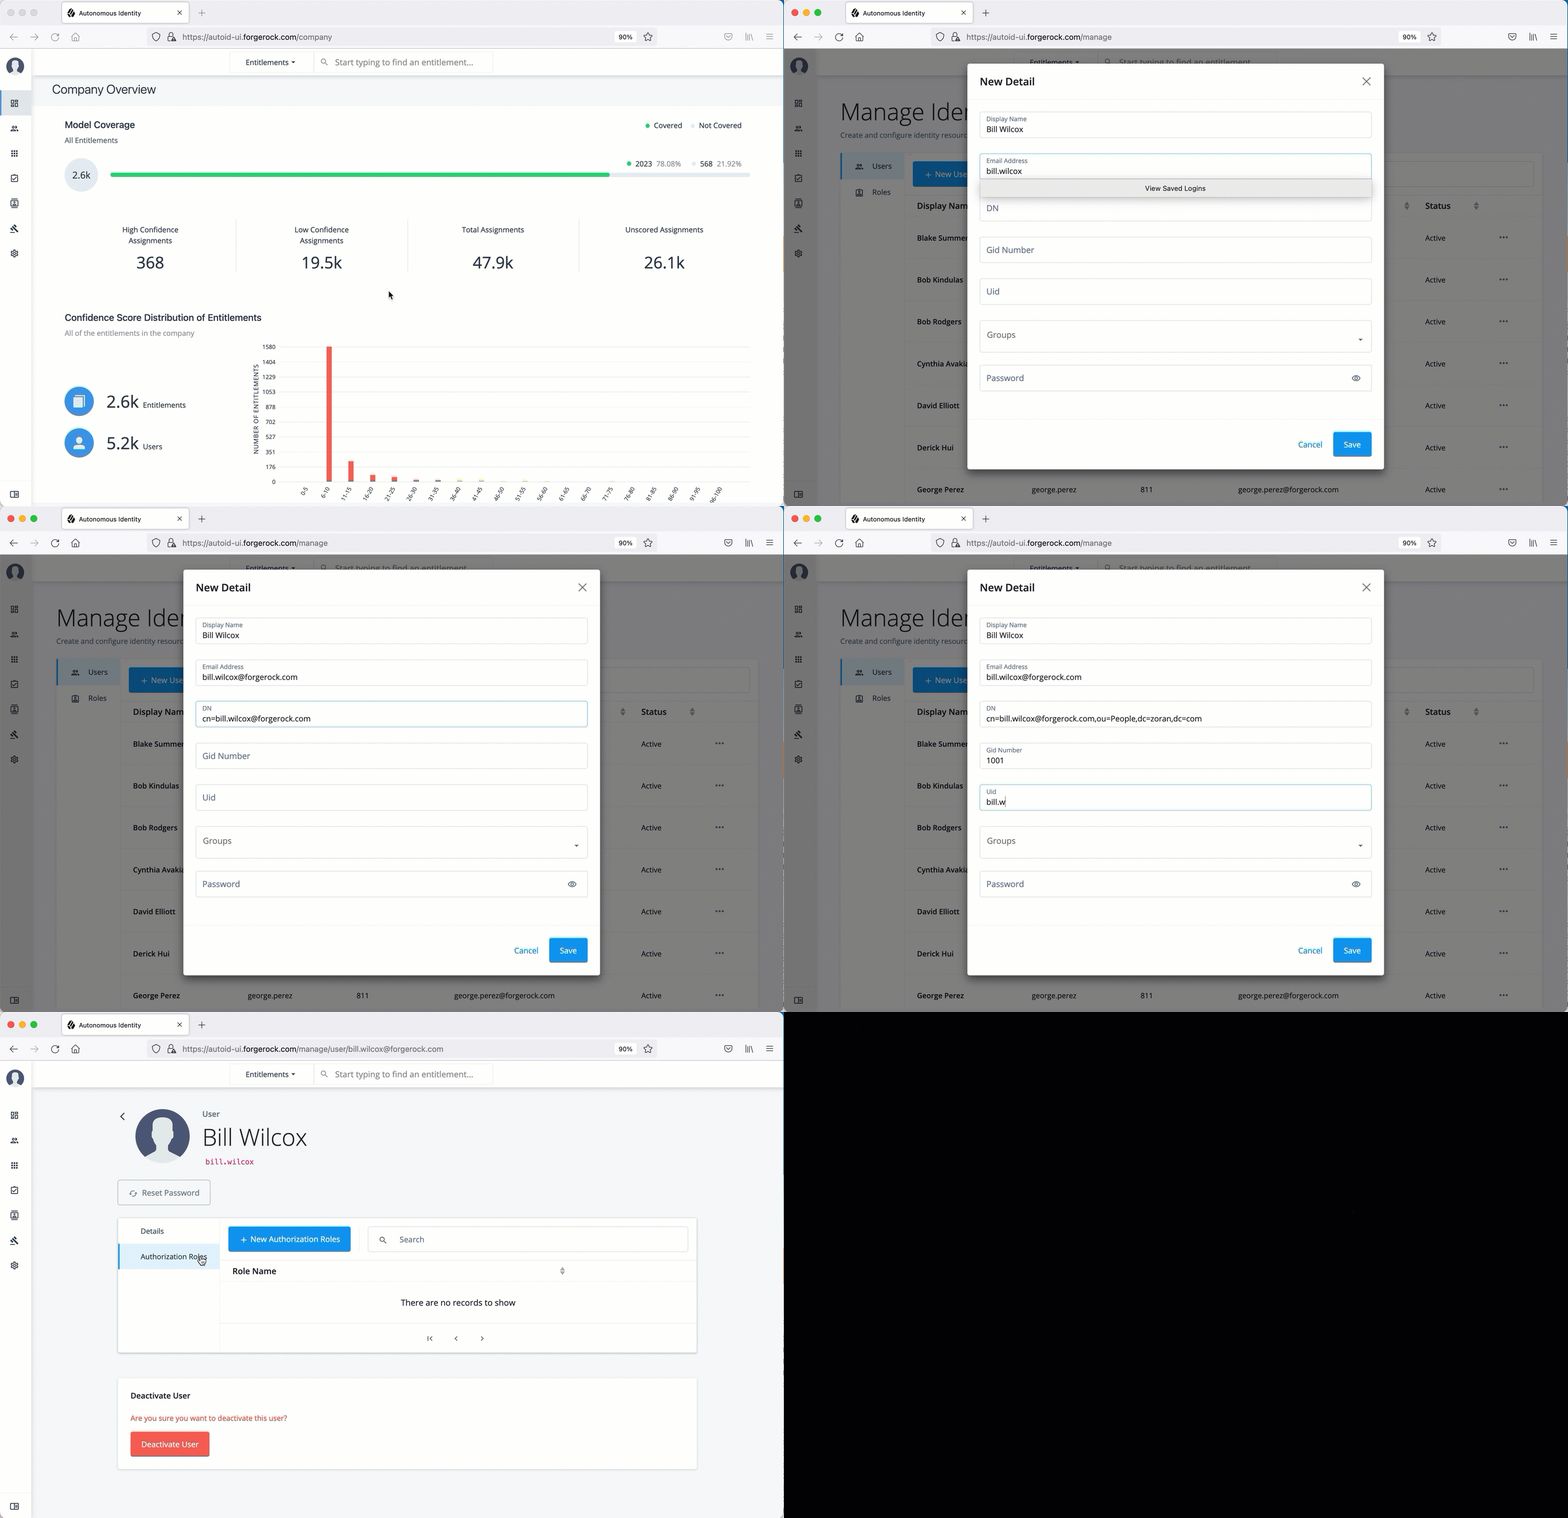
Create a new user
-
On the Autonomous Identity UI, click the administration icon on the navigation menu, and then click Manage.
-
On the Manage Identities page, click New User.
-
Enter the Display Name, Email Address, DN, Gid Number, Uid, and Password for the user.
-
Click Save.
-
Click Authorization Roles, and then click New Authorization Roles. This step is important to assign the proper role to the user.
-
Select a role to assign the user, and then click Save.
Click an example
Reset a user’s password
-
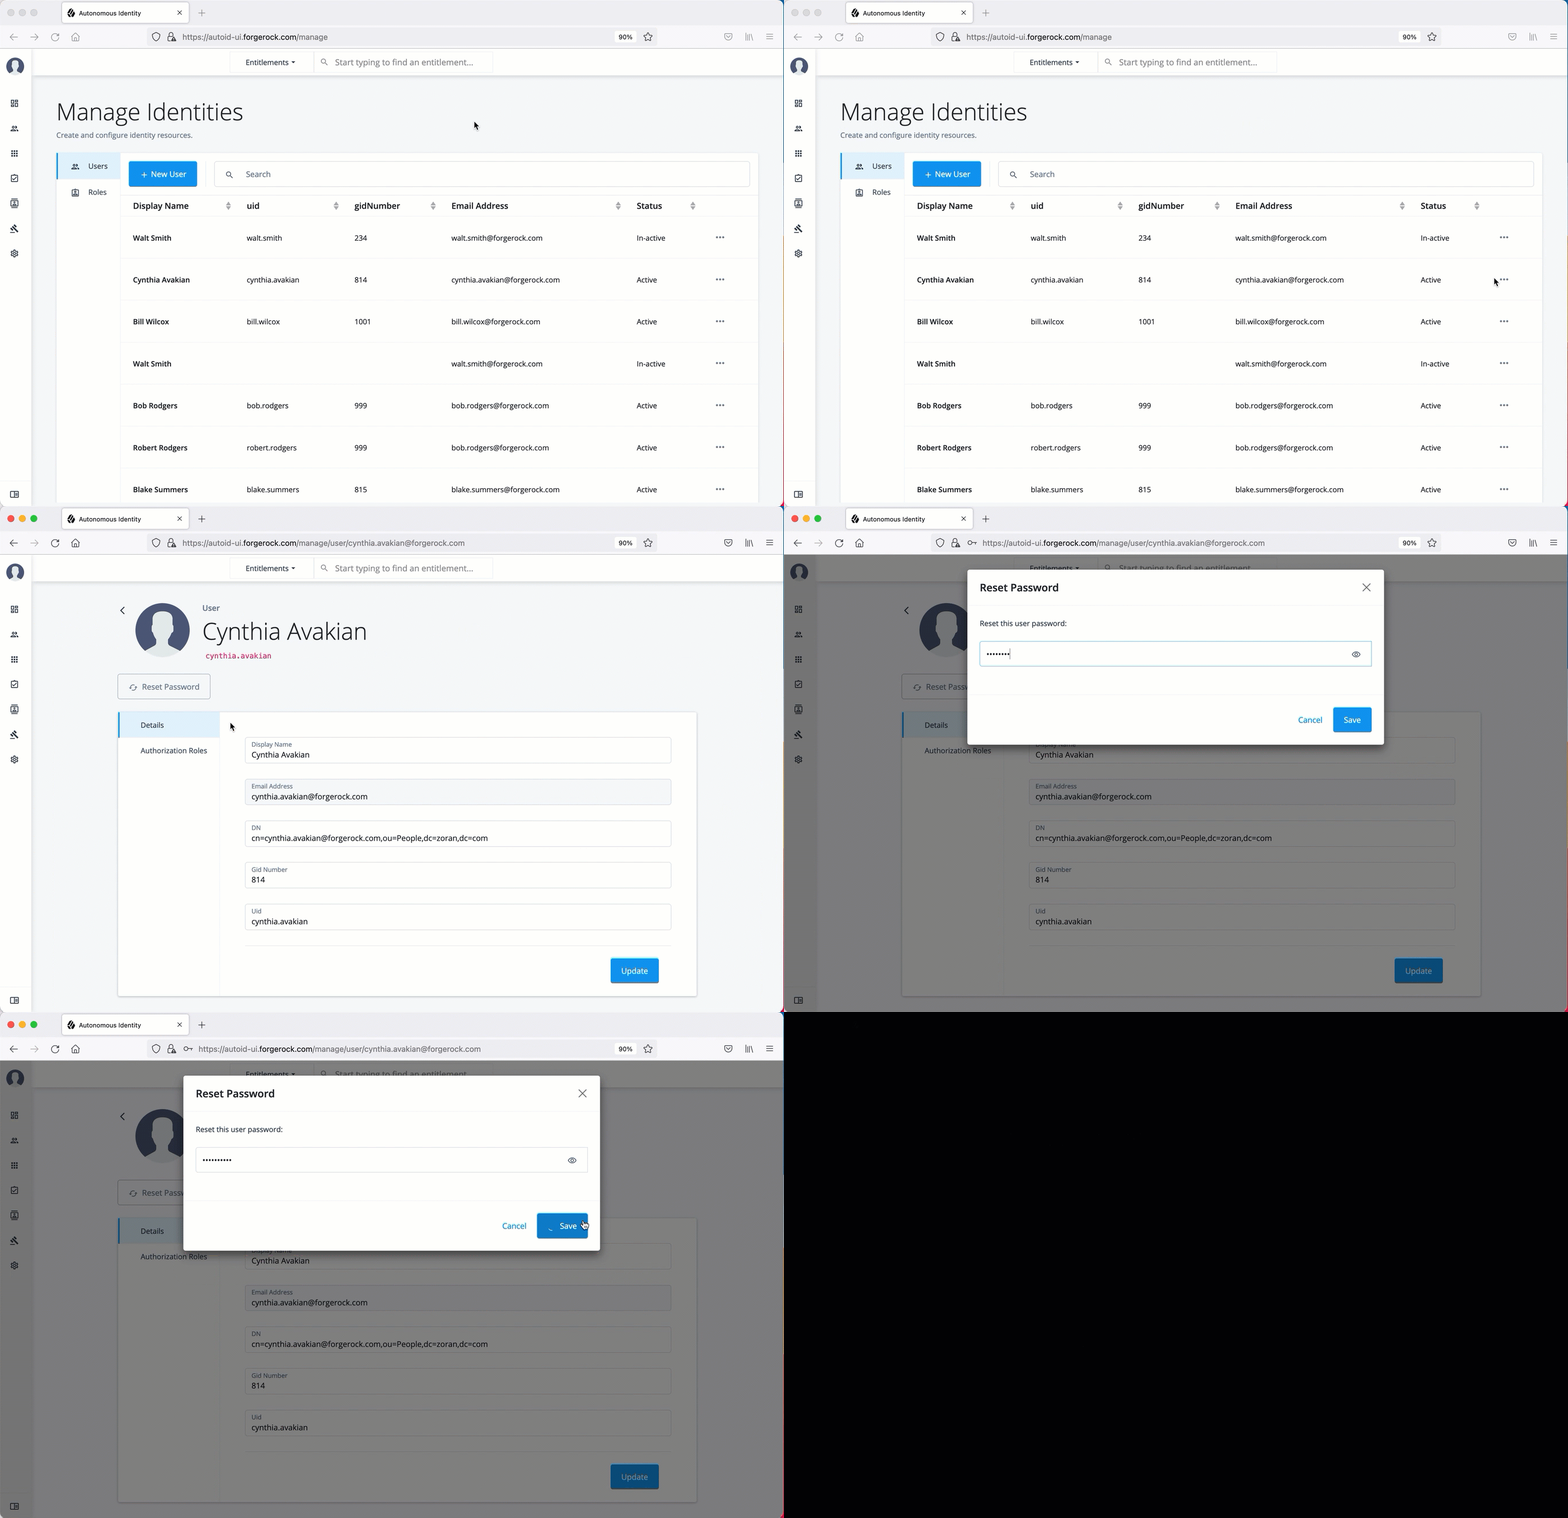
On the Autonomous Identity UI, click the administration icon on the navigation menu, and then click Manage.
-
On the Manage Identities page, search for a user.
-
For a specific user, click Edit.
-
Click Reset Password, enter a temporary password, and then click Save.
Click an example
Add a role to an existing user
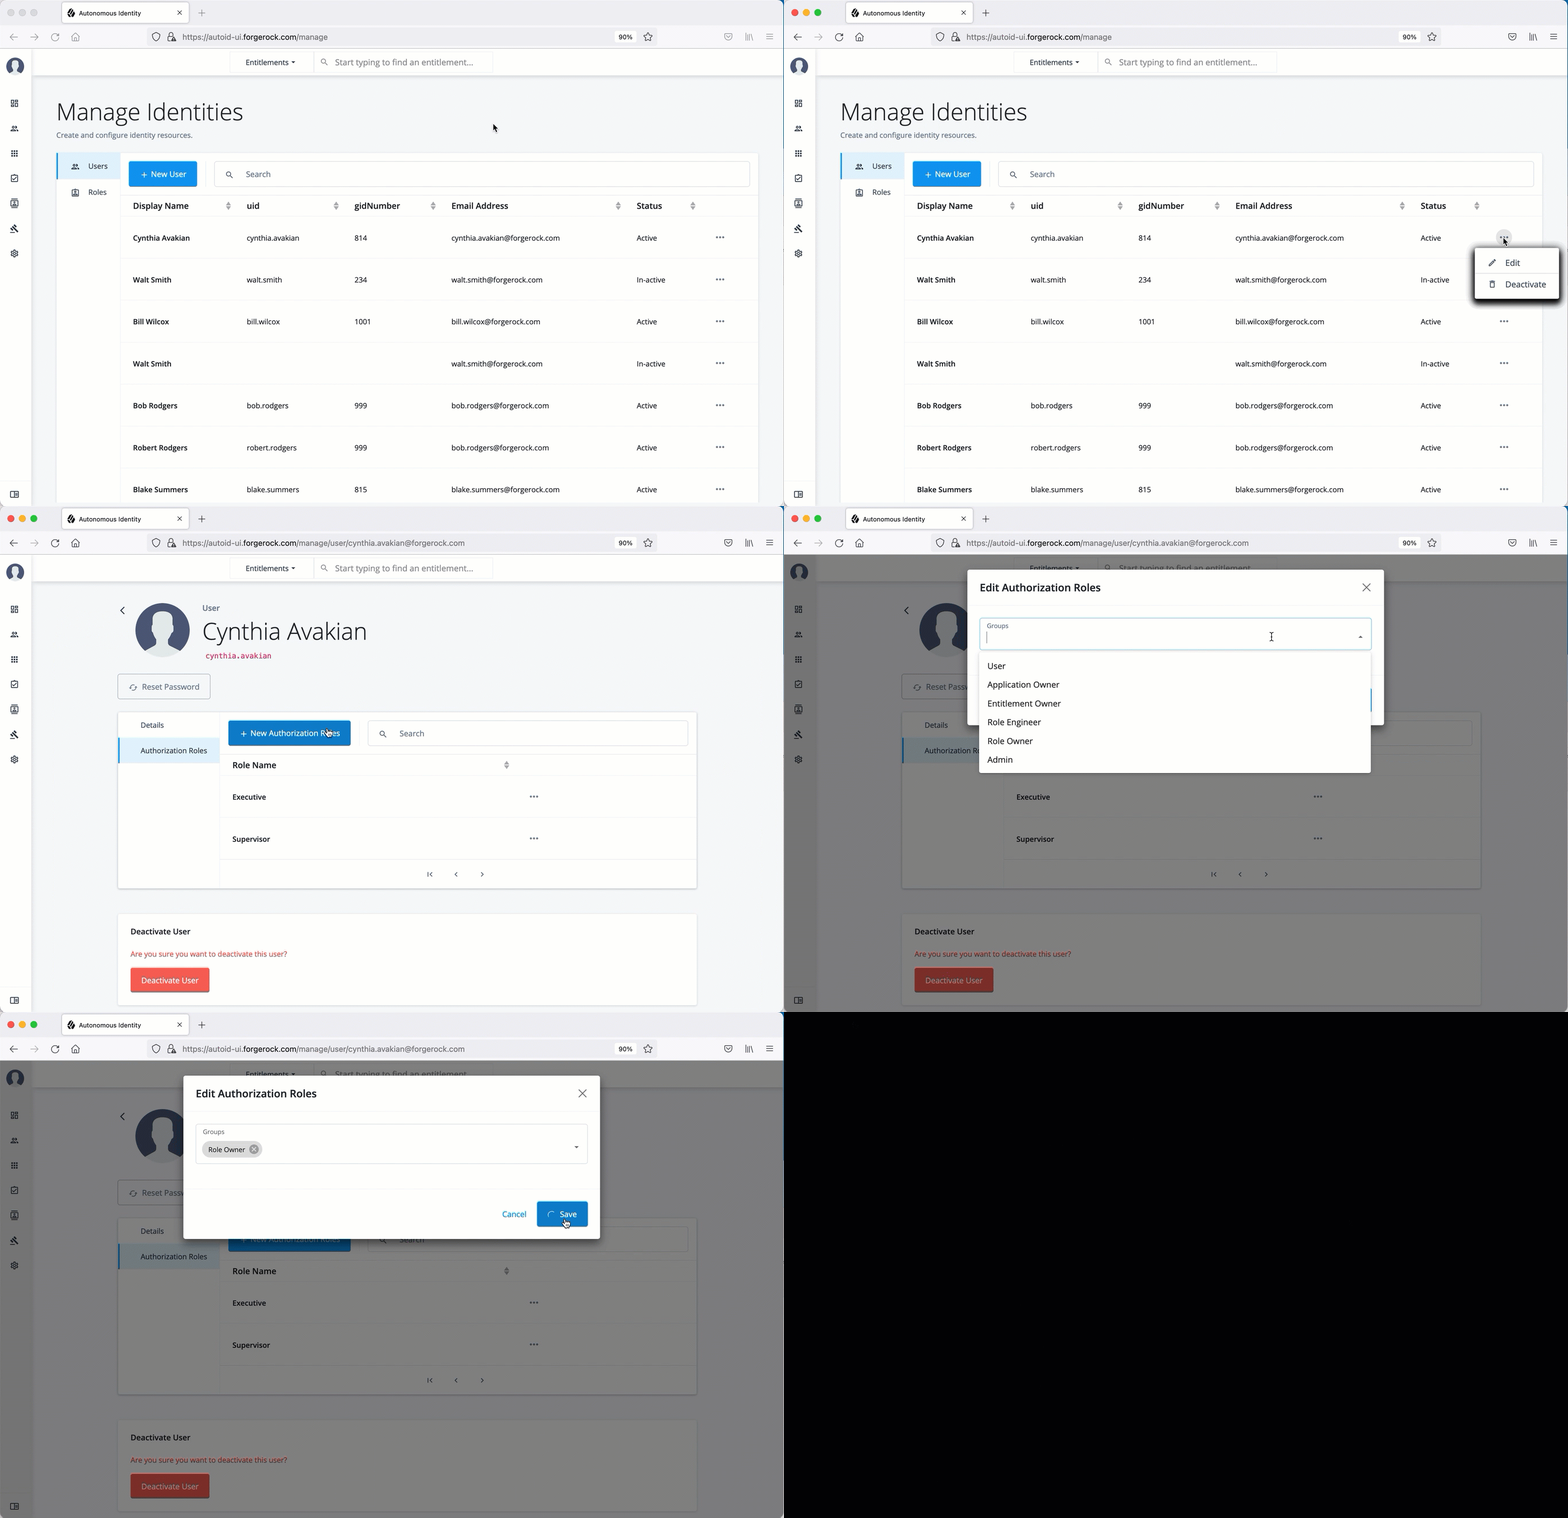
Often administrators need to assign roles to existing members. There are two ways to do this: from the user’s detail page and through the role’s Role Members page (refer to View the default roles).
-
On the Autonomous Identity UI, click the administration icon on the navigation menu, and then click Manage.
-
On the Manage Identities page, search for a user.
-
For a specific user, click Edit.
-
Click Authorization Roles, and then click New Authorization Roles.
-
Select one or more roles to add, and then click Save.
Click an example
Prepare data
Autonomous Identity administrators and deployers must set up additional tasks prior to your installment.
The following are some deployments tasks that may occur:
Data preparation
Once you have deployed Autonomous Identity, you can prepare your dataset into a format that meets the schema.
The initial step is to obtain the data as agreed upon between ForgeRock and your company. The files contain a subset of user attributes from the HR database and entitlement metadata required for the analysis. Only the attributes necessary for analysis are used.
There are a number of steps that must be carried out before your production entitlement data is input into Autonomous Identity. The summary of these steps are outlined below:
Data collection
Typically, the raw client data is not in a form that meets the Autonomous Identity schema. For example, a unique user identifier can have multiple names, such as user_id, account_id, user_key, or key. Similarly, entitlement columns can have several names, such as access_point, privilege_name, or entitlement.
To get the correct format, here are some general rules:
-
Submit the raw client data in
.csvfile format. The data can be in a single file or multiple files. Data includes application attributes, entitlement assignments, entitlements decriptions, and identities data. -
Duplicate values should be removed.
-
Add optional columns for additional training attributes, for example,
MANAGERS_MANAGERandMANAGER_FLAG. You can add these additional attributes to the schema using the Autonomous Identity UI. For more information, refer to Set Entity Definitions. -
Make a note of those attributes that differ from the Autonomous Identity schema, which is presented below. This is crucial for setting up your attribute mappings. For more information, refer to Set Attribute Mappings.
CSV files and schema
The required attributes for the schema are as follows:
| Files | Schema |
|---|---|
applications.csv |
This file depends on the attributes that the client wants to include. Here are some required columns:
|
assignments.csv |
|
entitlements.csv |
|
identities.csv |
|
Deployment tasks
Autonomous Identity administrators and deployers must set up additional tasks during installment.
The following are some deployments tasks that may occur:
Customize the domain and namespace
By default, the Autonomous Identity URL and domain for the UI console is set to autoid-ui.forgerock.com,
and the URL and domain for the self-service feature is autoid-selfservice.forgerock.com.
| These instructions are for new deployments. To change the domain and certificates in existing deployments, refer to Customize domain and namespace (existing deployments). |
Customize domain and namespace (new deployments)
-
Customize the domain name and target environment by editing the
/autoid-config/vars.xmlfile. By default, the domain name is set toforgerock.comand the target environment is set toautoid. The default Autonomous Identity URL will be:https://autoid-ui.forgerock.com. For example, set the domain name to the following:domain_name: example.com target_environment: autoid
-
If you set up your domain name and target environment in the previous step, you need to change the certificates to reflect the changes. Autonomous Identity generates self-signed certificates for its default configuration. You must generate new certificates as follows:
-
Generate the private key (that is,
server.key).openssl genrsa -out server.key 2048
-
Generate the certificate signing request using your key. When prompted enter attributes sent with your certificate request:
openssl req -new -key server.key -out server.csr

Country Name (2 letter code) [XX]:US
State or Province Name (full name) {}:Texas
Locality Name (eg, city) [Default City]:Austin
Organization Name (eg, company) [Default Company Ltd]:Ping
Organizational Unit Name (eg, section) []:Eng
Common Name (eg, your name or your server’s hostname) []:autoid-ui.example.com
Email Address []:

A challenge password []:
An optional company name []:
-
-
Generate the self-signed certificate.
openssl x509 -req -days 365 -in server.csr -signkey server.key -out server.crt
-
Copy the certificate to the
/autoid-config/certsdirectory. Make sure to use the following filename:nginx-jas-wildcard.pem.openssl x509 -in server.crt -out nginx-jas-wildcard.pem cp nginx-jas-wildcard.pem ~/autoid-config/certs
-
Copy the key to the
/autoid-config/certsdirectory. Make sure to use the following filename:nginx-jas.key', depending on where your `/autoid-config/certs/resides.cp -i ~/.ssh/server.key /autoid-config/certs/nginx-jas.key or scp -i ~/.ssh/server.key autoid@remotehost:/autoid-config/certs/nginx-jas.key
-
Run the Autonomous Identity deployer. Make sure that there are no errors after running the
./deployer.sh runcommand../deployer.sh run
-
Make the domain changes on your DNS server or update your
/etc/hosts(Linux/Unix) file orC:\Windows\System32\drivers\etc\hosts(Windows) locally on your machine.
-
Customize domain and namespace (existing deployments)
-
Modify the server name values with your updated domain name in the following files under
/opt/autoid/mounts/nginx/conf.d:-
api.conf
-
ui.conf
-
kibana.conf
-
jas.conf
-
-
Copy the SSL certificate file and corresponding SSL certificate key to the
/opt/autoid/mounts/nginx/certdirectory. The/opt/autoid/mounts/nginx/certdirectory is mounted under/etc/nginx/certin the container. -
Modify
ssl_certificateandssl_certificate_keyin/opt/autoid/mounts/nginx/nginx.confwith the correct filenames. Only the name of the files need to be updated, the path stays the same.When using self-signed certificates, you need to import the new certificates in the JAS keystore and truststore at:
/opt/autoid/certs/jas/jas-client-keystore.jksand/opt/autoid/certs/jas/jas-server-truststore.jks:keytool -importcert -keystore jas-client-keystore.jks -alias myalias -file /opt/autoid/mounts/nginx/cert/cert.crt -noprompt -keypass mypass -storepass mypass keytool -importcert -keystore jas-server-truststore.jks -alias myalias -file /opt/autoid/mounts/nginx/cert/cert.crt -noprompt -keypass mypass -storepass mypass
-
Restart the nginx container:
docker stack rm nginx
docker stack deploy -c /opt/autoid/res/nginx/docker-compose.yml nginx
-
Update the new domain name in your hosts file where an entry exists for
JAS. For example, the default JAS url isautoid-jas.forgerock.com.Change the JAS URL with your domain name. -
Update the
JAS_URLenvironment variable on all nodes by updating and sourcing your.bashrcfile. -
Restart Spark and Livy.
Configuring your filters
The filters on the Applications pages let you focus your searches based on entitlement and user attributes. In most cases, the default filters should suffice for most environments. However, if you need to customize the filters, you can do so by accessing Searchable attribute under entity definitions. For information, refer to Set Entity Definitions.
The default filters for an entitlement are the following:
-
Risk Level
-
Criticality
The default filters for an user attributes are the following:
-
User Department Name
-
Line of Business Subgroup
-
City
-
Jobcode Name
-
User Employee Type
-
Chief Yes No
-
Manager Name
-
Line of Business
-
Cost Center
Change the Vault Passwords
Autonomous Identity uses the ansible vault to store passwords in encrypted files, rather than in plaintext. Autonomous Identity stores the vault file at /autoid-config/vault.yml
saves the encrypted passwords to /config/.autoid_vault_password
. The /config/
mount is internal to the deployer container. The default encryption algorithm used is AES256.
By default, the /autoid-config/vault.yml
file uses the following parameters:
configuration_service_vault:
  basic_auth_password: Welcome123

openldap_vault:
  openldap_password: Welcome123

cassandra_vault:
  cassandra_password: Welcome123
  cassandra_admin_password: Welcome123

mongo_vault:
  mongo_admin_password: Welcome123
  mongo_root_password: Welcome123

elastic_vault:
  elastic_admin_password: Welcome123
  elasticsearch_password: Welcome123
Assume that the vault file is encrypted during the installation. To edit the file:
Set Up single sign-on (SSO)
Autonomous Identity supports single sign-on (SSO) using OpenID Connect (OIDC) JWT tokens. SSO lets you log in once and access multiple applications without the need to re-authenticate yourself. You can use any third-party identity provider (IdP) to connect to Autonomous Identity.
There are two scenarios for SSO configuration:
-
Set up SSO for initial deployments. In this example, we use ForgeRock Access Management (AM) as an OpenID Connect (OIDC) IdP for Autonomous Identity during the original installation of Autonomous Identity. Refer to Set up SSO in initial deployments.
-
Set up SSO for existing deployments. For procedures to set up SSO in an existing Autonomous Identity deployment, see Set up SSO in existing deployments.
|
If you set up SSO-only, be aware that the following services are not deployed with this setting:
If you want to use these services and SSO, set up the authentication as |
Set up SSO in initial deployments
The following procedure requires a running instance of ForgeRock AM. For more information, refer to ForgeRock Access Management Authentication and Single Sign-On Guide.
-
First, set up your hostnames locally in
/etc/hosts(Linux/Unix) file orC:\Windows\System32\drivers\etc\hosts(Windows):35.189.75.99 autoid-ui.forgerock.com autoid-selfservice.forgerock.com 35.246.65.234 openam.example.com
-
Open a browser and point to
http://openam.example.com:8080/openam. Log in with username:amadmin, password:cangetinam. -
In AM, select Realm > Identities > Groups tab, and add the following groups:
-
AutoIdAdmin
-
AutoIdEntitlementOwner
-
AutoIdExecutive
-
AutoIdSupervisor
-
AutoIdUser
-
AutoIdAppOwner
-
AutoIdRoleOwner
-
AutoIdRoleEngineer
The group names above are arbitrary and are defined in the
/autoid-config/vars.ymlfile. Ensure that the groups you create in AM match the values in thevars.ymlfile.
-
-
Add the
demouser to each group. -
Go back to the main AM Admin UI page. Click Configure OAuth Provider.
-
Click Configure OpenID Connect, and then Create.
-
Select desired Realm > Go to Applications > OAuth 2.0, and then click Add Client. Enter the following properties, specific to your deployment:
Client ID:         <autoid>
Client secret:     <password>
Redirection URIs:  https://<autoid-ui>.<domain>/api/sso/finish
Scope(s):          openid profile
For example:
Client ID:         autoid
Client secret:     Welcome123
Redirection URIs:  https://autoid-ui.forgerock.com/api/sso/finish
Scope(s):          openid profile
-
On the New Client page, go to to the Advanced tab, and enable
Implied Consent. Next, change theToken Endpoint Authentication Methodtoclient_secret_post. -
Edit the OIDC claims script to return
roles (groups), so that AM can match the Autonomous Identity groups. Additionally, add the groups as a claim in the script:"groups": { claim, identity -> [ "groups" : identity.getMemberships(IdType.GROUP).collect { group -> group.name }]}In the
utils.setScopeClaimsMapblock, add:groups: ['groups']
For more information about the OIDC claims script, refer to the ForgeRock Knowledge Base. The
id_tokenreturns the content that includes the group names.{ "at_hash": "QJRGiQgr1c1sOE4Q8BNyyg", "sub": "demo", "auditTrackingId": "59b6524d-8971-46da-9102-704694cae9bc-48738", "iss": "http://openam.example.com:8080/openam/oauth2", "tokenName": "id_token", "groups": [ "AutoIdAdmin", "AutoIdSupervisor", "AutoIdUser", "AutoIdExecutive", "AutoIdEntitlementOwner", "AutoIdAppOwner", "AutoIdRoleOwner", "AutoIdRoleEngineer" ], "given_name": "demo", "aud": "autoid", "c_hash": "SoLsfc3zjGq9xF5mJG_C9w", "acr": "0", "org.forgerock.openidconnect.ops": "B15A_wXm581fO8INtYHHcwSQtJI", "s_hash": "bOhtX8F73IMjSPeVAqxyTQ", "azp": "autoid", "auth_time": 1592390726, "name": "demo", "realm": "/", "exp": 1592394729, "tokenType": "JWTToken", "family_name": "demo", "iat": 1592391129, "email": "demo@example.com" }For more information on how to retrieve the id_tokenfor observation, refer to OpenID Connect 1.0 Endpoints.You have successfully configured AM as an OIDC provider.
-
Next, we set up Autonomous Identity. Change to the Autonomous Identity install directory on the deployer machine.
cd ~/autoid-config/
-
Open a text editor, and set the SSO parameters in the
/autoid-config/vars.ymlfile. Make sure to changeLDAPtoSSO.authentication_option: "SSO" oidc_issuer: "http://openam.example.com:8080/openam/oauth2" oidc_auth_url: "http://openam.example.com:8080/openam/oauth2/authorize" oidc_token_url: "http://openam.example.com:8080/openam/oauth2/access_token" oidc_user_info_url: "http://openam.example.com:8080/openam/oauth2/userinfo" oidc_jwks_url: "http://openam.example.com:8080/openam/oauth2/connect/jwk_uri" oidc_callback_url: "https://autoid-ui.forgerock.com/api/sso/finish" oidc_client_scope: 'openid profile' oidc_groups_attribute: groups oidc_uid_attribute: sub oidc_client_id: autoid oidc_client_secret: Welcome1 admin_object_id: AutoIdAdmin entitlement_owner_object_id: AutoIdEntitlementOwner executive_object_id: AutoIdExecutive supervisor_object_id: AutoIdSupervisor user_object_id: AutoIdUser application_owner_object_id: AutoIdAppOwner role_owner_object_id: AutoIdRoleOwner role_engineer_object_id: AutoIdRoleEngineer oidc_end_session_endpoint: "http://openam.example.com:8080/openam/oauth2/logout" oidc_logout_redirect_url: "http://openam.example.com:8088/openam/logout"
-
On the target machine, edit the
/etc/hostsfile or your DNS server, and add an entry foropenam.example.com.35.134.60.234 openam.example.com
-
On the deployer machine, run
deployer.shto push the new configuration.$ deployer.sh run
-
Test the connection now. Access
https://autoid-ui/forgerock.com. The redirect should occur with the following:
Set up SSO in existing deployments
-
First, update the permissions configuration object as follows:
-
Obtain an Autonomous Identity admin level JWT bearer token. You can obtain it using curl and the Autonomous Identity login endpoint with administrator credentials. Use your admin username and password:
curl -X POST \
https://autoid-ui.forgerock.com/api/authentication/login \
-k \
-H 'Content-Type: application/json' \
-d '{
  "username": "bob.rodgers@forgerock.com",
  "password": "Welcome123"
}'
The response is:
{ "user": { "dn": "cn=bob.rodgers@zoran.com,ou=People,dc=zoran,dc=com", "controls": [], "displayName": "Bob Rodgers", "gidNumber": "999", "uid": "bob.rodgers", "_groups": [ "Zoran Admin" ] }, "token": "eyJhbGciOiJIUzI1NiIsInR5 …” } -
Use curl and the bearer token from the previous step to obtain the Autonomous Identity JAS tenant ID:
curl -k -L -X GET 'https://autoid-ui.forgerock.com/jas/tenants' \
-H 'Authorization: Bearer <token_value>'
The response is:
[ { "id": "31092f95-3eed-418e-8ffb-f1b707bc9372", "name": "autonomous-iam", "description": "System Tenancy", "created": "2023-03-02T20:15:30.166Z" } ] -
To open the current permissions object, run the following curl command with the bearer token and tenant ID from the previous steps:
curl -k -L -X POST 'https://autoid-ui.forgerock.com/jas/entity/search/common/config' \
-H 'X-TENANT-ID: <tenant_id>' \
-H 'Content-Type: application/json' \
-H 'Authorization: Bearer <token_value> \
-d '{
  "query": {
    "query": {
      "bool": {
        "must": {
          "match": {
            "name": "PermissionsConf"
          }
        }
      }
    }
  }
}'
An example response is as follows:
You can find the permissions value under the hitsobject >hitsarray >_source>value.{ "took": 1, "timed_out": false, "_shards": { "total": 3, "successful": 3, "skipped": 0, "failed": 0 }, "hits": { "total": { "value": 1, "relation": "eq" }, "max_score": 0.9808291, "hits": [ { "_index": "autonomous-iam_common_config_latest", "_type": "_doc", "_id": "f72a58dd8bf5a38205c2d4c9eeafe85ebbaa1c3a2670b45c57f0219022b90ea6fc50ebf88e720c98410600e427528f0fe702b55f70975c8f49cb73c64ab1e101", "_score": 0.9808291, "_source": { "name": "PermissionsConf", "value": { "permissions": { "Zoran Admin": { "title": "Admin", "can": "*" }, … -
Edit the Permissions object in the template by replacing the "###Zoran_.._Token###" fields with the SSO group ID. For example, the Permissions object would appear as follows before the change:
"###Zoran_Admin_Token###":
{
  "title": "Admin",
  "can": "*"
},
For SSO only setup, the following is used:
f5bd09ca-096c-4a6e-b06d-65decc22cb09is an example group ID for an organization’s administrators."f5bd09ca-096c-4a6e-b06d-65decc22cb09": { "title": "Admin", "can": "*" },For SSO and local setup, use the following:
"###Zoran_Admin_Token###": { "title": "Admin", "can": "*" }, "f5bd09ca-096c-4a6e-b06d-65decc22cb09": { "title": "Admin", "can": "*" }, -
Update the Permissions object in JAS with the edited JSON file:
curl -k -L -X PATCH 'https://autoid-ui.forgerock.com/jas/entity/upsert/common/config' \
-H 'X-TENANT-ID: <tenant_id>' \
-H 'Content-Type: application/json' \
-H 'Authorization: Bearer <token_value>' \
-d @<path/to/SSO.json>
A successful response is:
{ "indexName": "autonomous-iam_common_config_latest", "indices": { "latest": "autonomous-iam_common_config_latest", "log": "autonomous-iam_common_config" } } -
Depending on how you want to configure SSO, use one of the following templates:
The ContextID is an arbitrary UUID that can be any UUID. It is used just to track this transaction. localAndSSO template (
LocalAndSSO.json){ "branch": "actual", "contextId": "ecba1baa-66d1-4548-8c74-6012bea9b838", "indexingRequired": true, "tags": {}, "indexInSync": true, "entityData": [ { "name": "PermissionsConf", "value": { "permissions": { "Zoran Admin": { "title": "Admin", "can": "*" }, "###Zoran_Admin_Token###": { "title": "Admin", "can": "*" }, "Zoran Role Engineer": { "title": "Role Engineer", "can": [ "SHOW__ROLE_PAGE", "SEARCH__ALL_ROLES", "CREATE__ROLE", "UPDATE__ROLE", "DELETE__ROLE", "SHOW__ENTITLEMENT", "SHOW__USER", "SHOW__CERTIFICATIONS", "STATS_ALL__USERS", "SEARCH_ALL__USERS", "SEARCH_ALL__ENTITLEMENTS", "SEARCH__ROLE_USERS", "SEARCH__ROLE_ENTITLEMENTS", "SEARCH__ROLE_JUSTIFICATIONS", "SHOW_JUSTIFICATIONS", "SHOW_ROLE_METADATA", "SHOW_ROLE_ATTRIBUTES", "WORKFLOW__REQUESTS", "WORKFLOW__TASKS", "WORKFLOW__TASK_APPROVE" ] }, "###Zoran_Role_Engineer_Token###": { "title": "Role Engineer", "can": [ "SHOW__ROLE_PAGE", "SEARCH__ALL_ROLES", "CREATE__ROLE", "UPDATE__ROLE", "DELETE__ROLE", "SHOW__ENTITLEMENT", "SHOW__USER", "SHOW__CERTIFICATIONS", "STATS_ALL__USERS", "SEARCH_ALL__USERS", "SEARCH_ALL__ENTITLEMENTS", "SEARCH__ROLE_USERS", "SEARCH__ROLE_ENTITLEMENTS", "SEARCH__ROLE_JUSTIFICATIONS", "SHOW_JUSTIFICATIONS", "SHOW_ROLE_METADATA", "SHOW_ROLE_ATTRIBUTES", "WORKFLOW__REQUESTS", "WORKFLOW__TASKS", "WORKFLOW__TASK_APPROVE" ] }, "Zoran Role Owner": { "title": "Role Owner", "can": [ "SHOW__ROLE_PAGE", "SEARCH__ROLES", "CREATE__ROLE", "UPDATE__ROLE", "DELETE__ROLE", "SHOW__ENTITLEMENT", "SHOW__USER", "SHOW__CERTIFICATIONS", "STATS__USERS", "SEARCH_ALL__USERS", "SEARCH_ALL__ENTITLEMENTS", "SEARCH__ROLES", "SEARCH__ROLE_USERS", "SEARCH__ROLE_ENTITLEMENTS", "SEARCH__ROLE_JUSTIFICATIONS", "SHOW_JUSTIFICATIONS", "SHOW_ROLE_METADATA", "SHOW_ROLE_ATTRIBUTES", "WORKFLOW__REQUESTS", "WORKFLOW__TASKS", "WORKFLOW__TASK_APPROVE" ] }, "###Zoran_Role_Owner_Token###": { "title": "Role Owner", "can": [ "SHOW__ROLE_PAGE", "SEARCH__ROLES", "CREATE__ROLE", "UPDATE__ROLE", "DELETE__ROLE", "SHOW__ENTITLEMENT", "SHOW__USER", "SHOW__CERTIFICATIONS", "STATS__USERS", "SEARCH_ALL__USERS", "SEARCH_ALL__ENTITLEMENTS", "SEARCH__ROLES", "SEARCH__ROLE_USERS", "SEARCH__ROLE_ENTITLEMENTS", "SEARCH__ROLE_JUSTIFICATIONS", "SHOW_JUSTIFICATIONS", "SHOW_ROLE_METADATA", "SHOW_ROLE_ATTRIBUTES", "WORKFLOW__REQUESTS", "WORKFLOW__TASKS", "WORKFLOW__TASK_APPROVE" ] }, "Zoran Role Auditor": { "title": "Role Auditor", "can": [ "SEARCH__ALL_ROLES", "STATS_ALL__USERS", "SEARCH_ALL__USERS", "SEARCH_ALL__ENTITLEMENTS", "SEARCH__ROLE_USERS", "SEARCH__ROLE_ENTITLEMENTS", "SEARCH__ROLE_JUSTIFICATIONS", "SHOW_JUSTIFICATIONS", "SHOW_ROLE_METADATA", "SHOW_ROLE_ATTRIBUTES", "WORKFLOW__REQUESTS", "WORKFLOW__TASKS" ] }, "###Zoran_Role_Auditor_Token###": { "title": "Role Auditor", "can": [ "SEARCH__ALL_ROLES", "STATS_ALL__USERS", "SEARCH_ALL__USERS", "SEARCH_ALL__ENTITLEMENTS", "SEARCH__ROLE_USERS", "SEARCH__ROLE_ENTITLEMENTS", "SEARCH__ROLE_JUSTIFICATIONS", "SHOW_JUSTIFICATIONS", "SHOW_ROLE_METADATA", "SHOW_ROLE_ATTRIBUTES", "WORKFLOW__REQUESTS", "WORKFLOW__TASKS" ] }, "Zoran Application Owner": { "title": "Application Owner", "can": [ "SHOW__APPLICATION_PAGE", "SEARCH__USER", "SEARCH__ENTITLEMENTS_BY_APP_OWNER", "SHOW_OVERVIEW_PAGE", "SHOW__ENTITLEMENT", "SHOW__ENTITLEMENT_USERS", "SHOW__APP_OWNER_FILTER_OPTIONS", "SHOW__ENTT_OWNER_UNSCORED_ENTITLEMENTS", "SHOW__ENTT_OWNER_PAGE", "SHOW__ENTT_OWNER_USER_PAGE", "SHOW__ENTT_OWNER_ENT_PAGE", "SHOW__USER_ENTITLEMENTS", "SHOW__RULES_BY_APP_OWNER", "REVOKE__CERTIFY_ACCESS", "SHOW__USER", "SHOW__CERTIFICATIONS" ] }, "###Zoran_Application_Owner_Token###": { "title": "Application Owner", "can": [ "SHOW__APPLICATION_PAGE", "SEARCH__USER", "SEARCH__ENTITLEMENTS_BY_APP_OWNER", "SHOW_OVERVIEW_PAGE", "SHOW__ENTITLEMENT", "SHOW__ENTITLEMENT_USERS", "SHOW__APP_OWNER_FILTER_OPTIONS", "SHOW__ENTT_OWNER_UNSCORED_ENTITLEMENTS", "SHOW__ENTT_OWNER_PAGE", "SHOW__ENTT_OWNER_USER_PAGE", "SHOW__ENTT_OWNER_ENT_PAGE", "SHOW__USER_ENTITLEMENTS", "SHOW__RULES_BY_APP_OWNER", "REVOKE__CERTIFY_ACCESS", "SHOW__USER", "SHOW__CERTIFICATIONS" ] }, "Zoran Entitlement Owner": { "title": "Entitlement Owner", "can": [ "SEARCH__ENTITLEMENTS_BY_ENTT_OWNER", "SHOW_OVERVIEW_PAGE", "SHOW__ENTITLEMENT", "SHOW__ENTITLEMENT_USERS", "SHOW__ENTT_OWNER_FILTER_OPTIONS", "SHOW__ENTT_OWNER_UNSCORED_ENTITLEMENTS", "SHOW__ENTT_OWNER_PAGE", "SHOW__ENTT_OWNER_USER_PAGE", "SHOW__ENTT_OWNER_ENT_PAGE", "SHOW__USER_ENTITLEMENTS", "SHOW__RULES_BY_ENTT_OWNER", "REVOKE__CERTIFY_ACCESS", "SHOW__USER", "SHOW__CERTIFICATIONS", "LOOKUP_USER", "SEARCH__ROLE_USERS", "SEARCH__ROLE_ENTITLEMENTS", "SEARCH__ROLE_JUSTIFICATIONS", "SHOW_ROLE_METADATA", "SHOW_ROLE_ATTRIBUTES", "WORKFLOW__REQUESTS", "WORKFLOW__TASKS", "WORKFLOW__TASK_APPROVE" ] }, "###Zoran_Entitlement_Owner_Token###": { "title": "Entitlement Owner", "can": [ "SEARCH__ENTITLEMENTS_BY_ENTT_OWNER", "SHOW_OVERVIEW_PAGE", "SHOW__ENTITLEMENT", "SHOW__ENTITLEMENT_USERS", "SHOW__ENTT_OWNER_FILTER_OPTIONS", "SHOW__ENTT_OWNER_UNSCORED_ENTITLEMENTS", "SHOW__ENTT_OWNER_PAGE", "SHOW__ENTT_OWNER_USER_PAGE", "SHOW__ENTT_OWNER_ENT_PAGE", "SHOW__USER_ENTITLEMENTS", "SHOW__RULES_BY_ENTT_OWNER", "REVOKE__CERTIFY_ACCESS", "SHOW__USER", "SHOW__CERTIFICATIONS", "LOOKUP_USER", "SEARCH__ROLE_USERS", "SEARCH__ROLE_ENTITLEMENTS", "SEARCH__ROLE_JUSTIFICATIONS", "SHOW_ROLE_METADATA", "SHOW_ROLE_ATTRIBUTES", "WORKFLOW__REQUESTS", "WORKFLOW__TASKS", "WORKFLOW__TASK_APPROVE" ] }, "Zoran Executive": { "title": "Executive", "can": [ "SEARCH__USER", "SHOW__ASSIGNMENTS_STATS", "SHOW__COMPANY_PAGE", "SHOW__COMPANY_ENTITLEMENTS_DATA", "SHOW__CRITICAL_ENTITLEMENTS", "SHOW__ENTITLEMENT_AVG_GROUPS", "SHOW__USER_ENTITLEMENTS" ] }, "###Zoran_Executive_Token###": { "title": "Executive", "can": [ "SEARCH__USER", "SHOW__ASSIGNMENTS_STATS", "SHOW__COMPANY_PAGE", "SHOW__COMPANY_ENTITLEMENTS_DATA", "SHOW__CRITICAL_ENTITLEMENTS", "SHOW__ENTITLEMENT_AVG_GROUPS", "SHOW__USER_ENTITLEMENTS" ] }, "Zoran Supervisor": { "title": "Supervisor", "can": [ "SEARCH__USER", "SHOW_OVERVIEW_PAGE", "SHOW__SUPERVISOR_FILTER_OPTIONS", "SHOW__SUPERVISOR_PAGE", "SHOW__SUPERVISOR_ENTITLEMENT_USERS", "SHOW__SUPERVISOR_USER_ENTITLEMENTS", "SHOW__SUPERVISOR_UNSCORED_ENTITLEMENTS", "SEARCH__SUPERVISOR_USER_ENTITLEMENTS", "REVOKE__CERTIFY_ACCESS", "SHOW__ENTITLEMENT", "SHOW__USER", "SHOW__CERTIFICATIONS" ] }, "###Zoran_Supervisor_Token###": { "title": "Supervisor", "can": [ "SEARCH__USER", "SHOW_OVERVIEW_PAGE", "SHOW__SUPERVISOR_FILTER_OPTIONS", "SHOW__SUPERVISOR_PAGE", "SHOW__SUPERVISOR_ENTITLEMENT_USERS", "SHOW__SUPERVISOR_USER_ENTITLEMENTS", "SHOW__SUPERVISOR_UNSCORED_ENTITLEMENTS", "SEARCH__SUPERVISOR_USER_ENTITLEMENTS", "REVOKE__CERTIFY_ACCESS", "SHOW__ENTITLEMENT", "SHOW__USER", "SHOW__CERTIFICATIONS" ] }, "Zoran User": { "title": "User", "can": [ "SHOW__ENTITLEMENT", "SHOW__USER", "SHOW__CERTIFICATIONS" ] }, "###Zoran_User_Token###": { "title": "User", "can": [ "SHOW__ENTITLEMENT", "SHOW__USER", "SHOW__CERTIFICATIONS" ] }, "Zoran Service Connector": { "title": "Service Connector", "can": [ "SERVICE_CONNECTOR", "SHOW__API_KEY_MGMT_PAGE", "SHOW__ENTITLEMENT", "SHOW__USER", "SHOW__CERTIFICATIONS", "SHOW__RULES", "REVOKE__CERTIFY_ACCESS" ] }, "###Zoran_Service_Connector_Token###": { "title": "Service Connector", "can": [ "SERVICE_CONNECTOR", "SHOW__API_KEY_MGMT_PAGE", "SHOW__ENTITLEMENT", "SHOW__USER", "SHOW__CERTIFICATIONS", "SHOW__RULES", "REVOKE__CERTIFY_ACCESS" ] } } } } ] }SSO template (
SSO.json){ "branch": "actual", "contextId": "ecba1baa-66d1-4548-8c74-6012bea9b838", "indexingRequired": true, "tags": {}, "indexInSync": true, "entityData": [ { "name": "PermissionsConf", "value": { "permissions": { "###Zoran_Admin_Token###": { "title": "Admin", "can": "*" }, "###Zoran_Role_Engineer_Token###": { "title": "Role Engineer", "can": [ "SHOW__ROLE_PAGE", "SEARCH__ALL_ROLES", "CREATE__ROLE", "UPDATE__ROLE", "DELETE__ROLE", "SHOW__ENTITLEMENT", "SHOW__USER", "SHOW__CERTIFICATIONS", "STATS_ALL__USERS", "SEARCH_ALL__USERS", "SEARCH_ALL__ENTITLEMENTS", "SEARCH__ROLE_USERS", "SEARCH__ROLE_ENTITLEMENTS", "SEARCH__ROLE_JUSTIFICATIONS", "SHOW_JUSTIFICATIONS", "SHOW_ROLE_METADATA", "SHOW_ROLE_ATTRIBUTES", "WORKFLOW__REQUESTS", "WORKFLOW__TASKS", "WORKFLOW__TASK_APPROVE" ] }, "###Zoran_Role_Owner_Token###": { "title": "Role Owner", "can": [ "SHOW__ROLE_PAGE", "SEARCH__ROLES", "CREATE__ROLE", "UPDATE__ROLE", "DELETE__ROLE", "SHOW__ENTITLEMENT", "SHOW__USER", "SHOW__CERTIFICATIONS", "STATS__USERS", "SEARCH_ALL__USERS", "SEARCH_ALL__ENTITLEMENTS", "SEARCH__ROLES", "SEARCH__ROLE_USERS", "SEARCH__ROLE_ENTITLEMENTS", "SEARCH__ROLE_JUSTIFICATIONS", "SHOW_JUSTIFICATIONS", "SHOW_ROLE_METADATA", "SHOW_ROLE_ATTRIBUTES", "WORKFLOW__REQUESTS", "WORKFLOW__TASKS", "WORKFLOW__TASK_APPROVE" ] }, "###Zoran_Role_Auditor_Token###": { "title": "Role Auditor", "can": [ "SEARCH__ALL_ROLES", "STATS_ALL__USERS", "SEARCH_ALL__USERS", "SEARCH_ALL__ENTITLEMENTS", "SEARCH__ROLE_USERS", "SEARCH__ROLE_ENTITLEMENTS", "SEARCH__ROLE_JUSTIFICATIONS", "SHOW_JUSTIFICATIONS", "SHOW_ROLE_METADATA", "SHOW_ROLE_ATTRIBUTES", "WORKFLOW__REQUESTS", "WORKFLOW__TASKS" ] }, "###Zoran_Application_Owner_Token###": { "title": "Application Owner", "can": [ "SHOW__APPLICATION_PAGE", "SEARCH__USER", "SEARCH__ENTITLEMENTS_BY_APP_OWNER", "SHOW_OVERVIEW_PAGE", "SHOW__ENTITLEMENT", "SHOW__ENTITLEMENT_USERS", "SHOW__APP_OWNER_FILTER_OPTIONS", "SHOW__ENTT_OWNER_UNSCORED_ENTITLEMENTS", "SHOW__ENTT_OWNER_PAGE", "SHOW__ENTT_OWNER_USER_PAGE", "SHOW__ENTT_OWNER_ENT_PAGE", "SHOW__USER_ENTITLEMENTS", "SHOW__RULES_BY_APP_OWNER", "REVOKE__CERTIFY_ACCESS", "SHOW__USER", "SHOW__CERTIFICATIONS" ] }, "###Zoran_Entitlement_Owner_Token###": { "title": "Entitlement Owner", "can": [ "SEARCH__ENTITLEMENTS_BY_ENTT_OWNER", "SHOW_OVERVIEW_PAGE", "SHOW__ENTITLEMENT", "SHOW__ENTITLEMENT_USERS", "SHOW__ENTT_OWNER_FILTER_OPTIONS", "SHOW__ENTT_OWNER_UNSCORED_ENTITLEMENTS", "SHOW__ENTT_OWNER_PAGE", "SHOW__ENTT_OWNER_USER_PAGE", "SHOW__ENTT_OWNER_ENT_PAGE", "SHOW__USER_ENTITLEMENTS", "SHOW__RULES_BY_ENTT_OWNER", "REVOKE__CERTIFY_ACCESS", "SHOW__USER", "SHOW__CERTIFICATIONS", "LOOKUP_USER", "SEARCH__ROLE_USERS", "SEARCH__ROLE_ENTITLEMENTS", "SEARCH__ROLE_JUSTIFICATIONS", "SHOW_ROLE_METADATA", "SHOW_ROLE_ATTRIBUTES", "WORKFLOW__REQUESTS", "WORKFLOW__TASKS", "WORKFLOW__TASK_APPROVE" ] }, "###Zoran_Executive_Token###": { "title": "Executive", "can": [ "SEARCH__USER", "SHOW__ASSIGNMENTS_STATS", "SHOW__COMPANY_PAGE", "SHOW__COMPANY_ENTITLEMENTS_DATA", "SHOW__CRITICAL_ENTITLEMENTS", "SHOW__ENTITLEMENT_AVG_GROUPS", "SHOW__USER_ENTITLEMENTS" ] }, "###Zoran_Supervisor_Token###": { "title": "Supervisor", "can": [ "SEARCH__USER", "SHOW_OVERVIEW_PAGE", "SHOW__SUPERVISOR_FILTER_OPTIONS", "SHOW__SUPERVISOR_PAGE", "SHOW__SUPERVISOR_ENTITLEMENT_USERS", "SHOW__SUPERVISOR_USER_ENTITLEMENTS", "SHOW__SUPERVISOR_UNSCORED_ENTITLEMENTS", "SEARCH__SUPERVISOR_USER_ENTITLEMENTS", "REVOKE__CERTIFY_ACCESS", "SHOW__ENTITLEMENT", "SHOW__USER", "SHOW__CERTIFICATIONS" ] }, "###Zoran_User_Token###": { "title": "User", "can": [ "SHOW__ENTITLEMENT", "SHOW__USER", "SHOW__CERTIFICATIONS" ] }, "###Zoran_Service_Connector_Token###": { "title": "Service Connector", "can": [ "SERVICE_CONNECTOR", "SHOW__API_KEY_MGMT_PAGE", "SHOW__ENTITLEMENT", "SHOW__USER", "SHOW__CERTIFICATIONS", "SHOW__RULES", "REVOKE__CERTIFY_ACCESS" ] } } } } ] } -
Verify your changes by opening the permissions object as shown in step 1c.
-
-
Next, update the JAS container environment variables:
-
On the instance where Docker is running, create a backup of the
/opt/autoid/res/jas/docker-compose.ymlfile, and edit the variables in the environment section. For example, change the following variables:From:
- OIDC_ENABLED=False
- GROUPS_ATTRIBUTE=_groups
- OIDC_JWKS_URL=na
To:
- OIDC_ENABLED=True
- GROUPS_ATTRIBUTE=groups
- OIDC_JWKS_URL= <Same value as in the zoran-api. Refer to step 3 below>
The GROUPS_ATTRIBUTEvariable must match theOIDC_GROUPS_ATTRIBUTEvariable used in thedocker-compose.ymlfile. -
Remove the running JAS container and re-deploy:
docker stack rm jas
docker stack deploy --with-registry-auth --compose-file /opt/autoid/res/jas/docker-compose.yml jas
-
-
Next, update the
zoran-apicontainer environment variables:-
On the instance where Docker is running, create a backup of the
/opt/autoid/res/api/docker-compose.ymlfile, and edit the following variables in the file replacing the\$\{…\}placeholders:- OIDC_ISSUER=${OIDC_ISSUER} - OIDC_AUTH_URL=${OIDC_AUTH_URL} - OIDC_TOKEN_URL=${OIDC_TOKEN_URL} - OIDC_USER_INFO_URL=${OIDC_USER_INFO_URL} - OIDC_CLIENT_ID=${OIDC_CLIENT_ID} - OIDC_CLIENT_SECRET=${OIDC_CLIENT_SECRET} - OIDC_CALLBACK_URL=${OIDC_CALLBACK_URL} - OIDC_JWKS_URL=${OIDC_JWKS_URL} - OIDC_CLIENT_SCOPE=${OIDC_CLIENT_SCOPE} - OIDC_GROUPS_ATTRIBUTE=${OIDC_GROUPS_ATTRIBUTE} - OIDC_UID_ATTRIBUTE=${OIDC_UID_ATTRIBUTE} - OIDC_END_SESSION_ENDPOINT=${OIDC_END_SESSION_ENDPOINT} - OIDC_LOGOUT_REDIRECT_URL=${OIDC_LOGOUT_REDIRECT_URL}For example, Autonomous Identity displays something similar below (the example uses Asure links and object IDs):
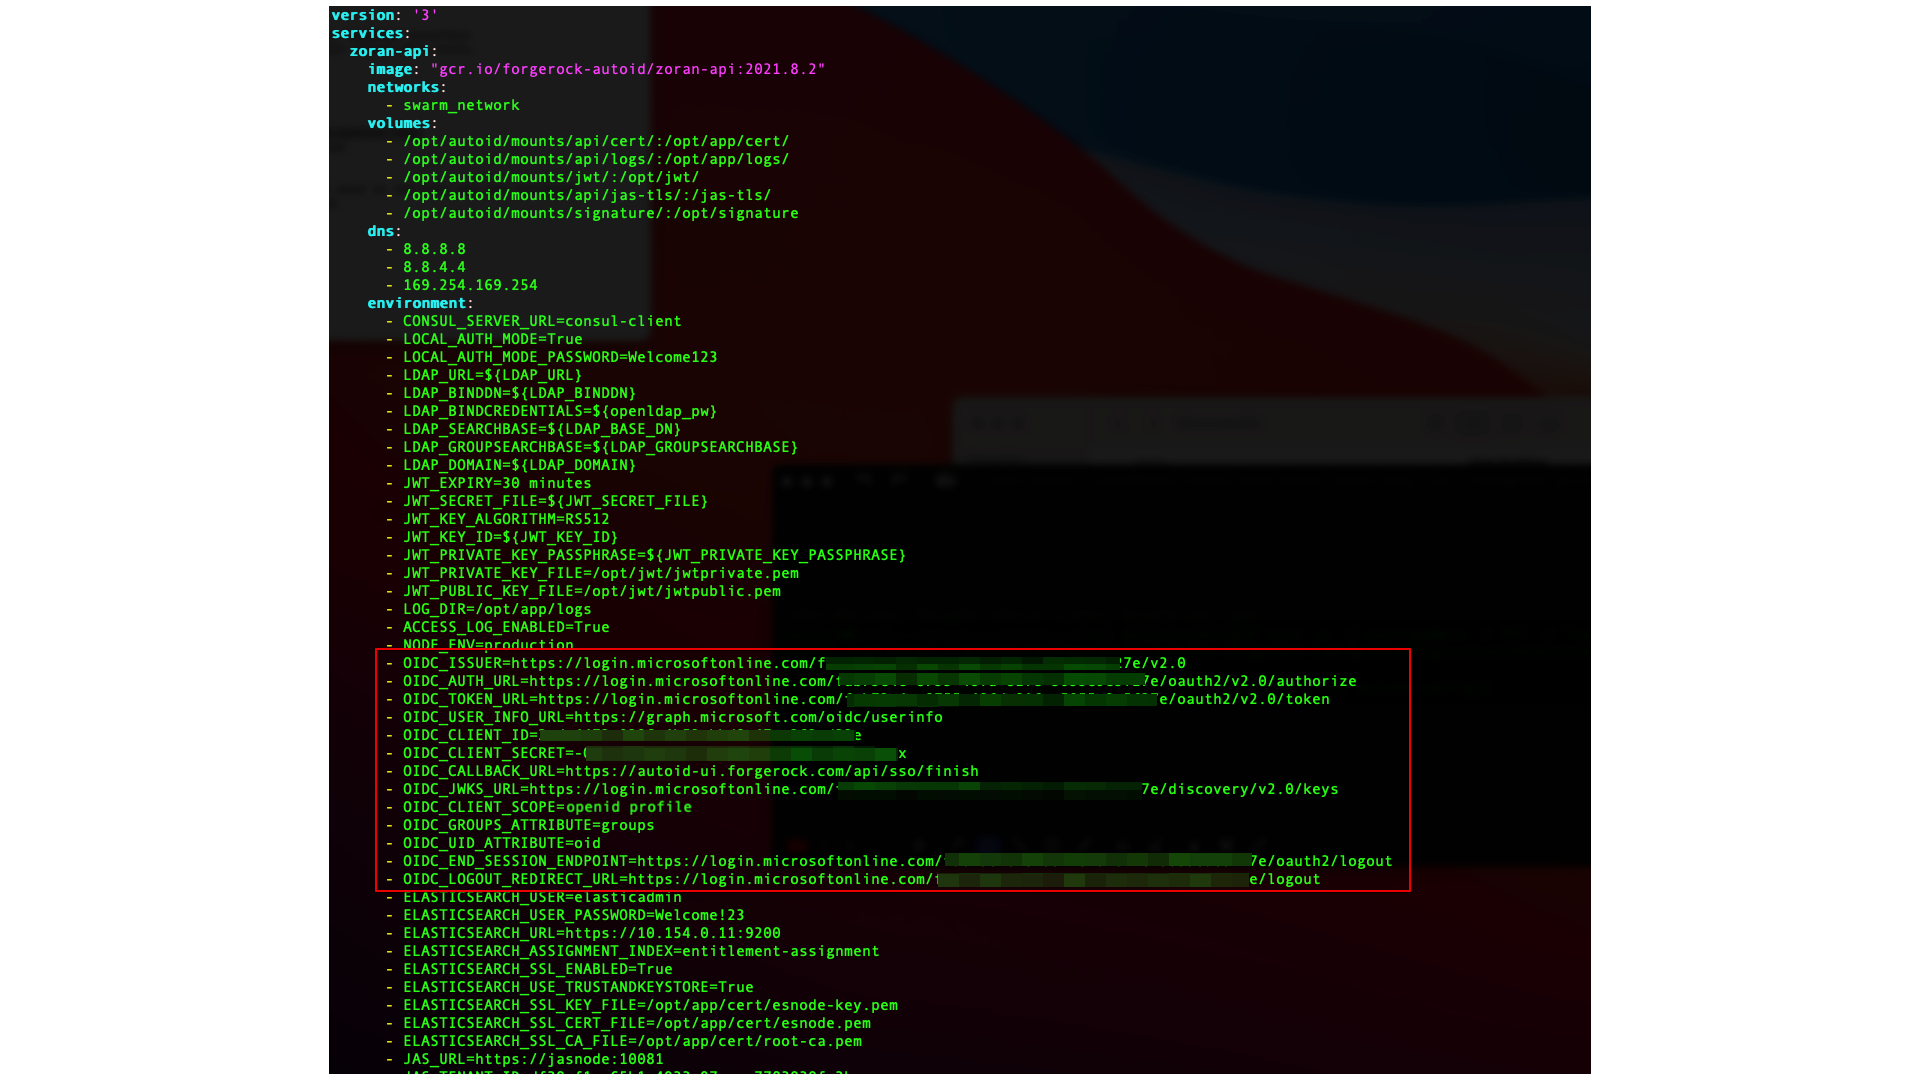
If you are configuring SSO only for the login mode, set LOCAL_AUTH_MODEtofalse(for example, LOCAL_AUTH_MODE=false). If you keepLOCAL_AUTH_MODEtotrue, Autonomous Identity defaults toLocalAndSSO,which uses the OIDC and email options for login. -
Remove the running zoran-api Docker container and re-deploy:
docker stack rm api
docker stack deploy --with-registry-auth --compose-file /opt/autoid/res/api/docker-compose.yml api
-
Restart the UI and Nginx Docker containers:
docker service update --force ui_zoran-ui
docker service update --force nginx_nginx
-
-
Open the Autonomous Identity UI to verify the SSO login.
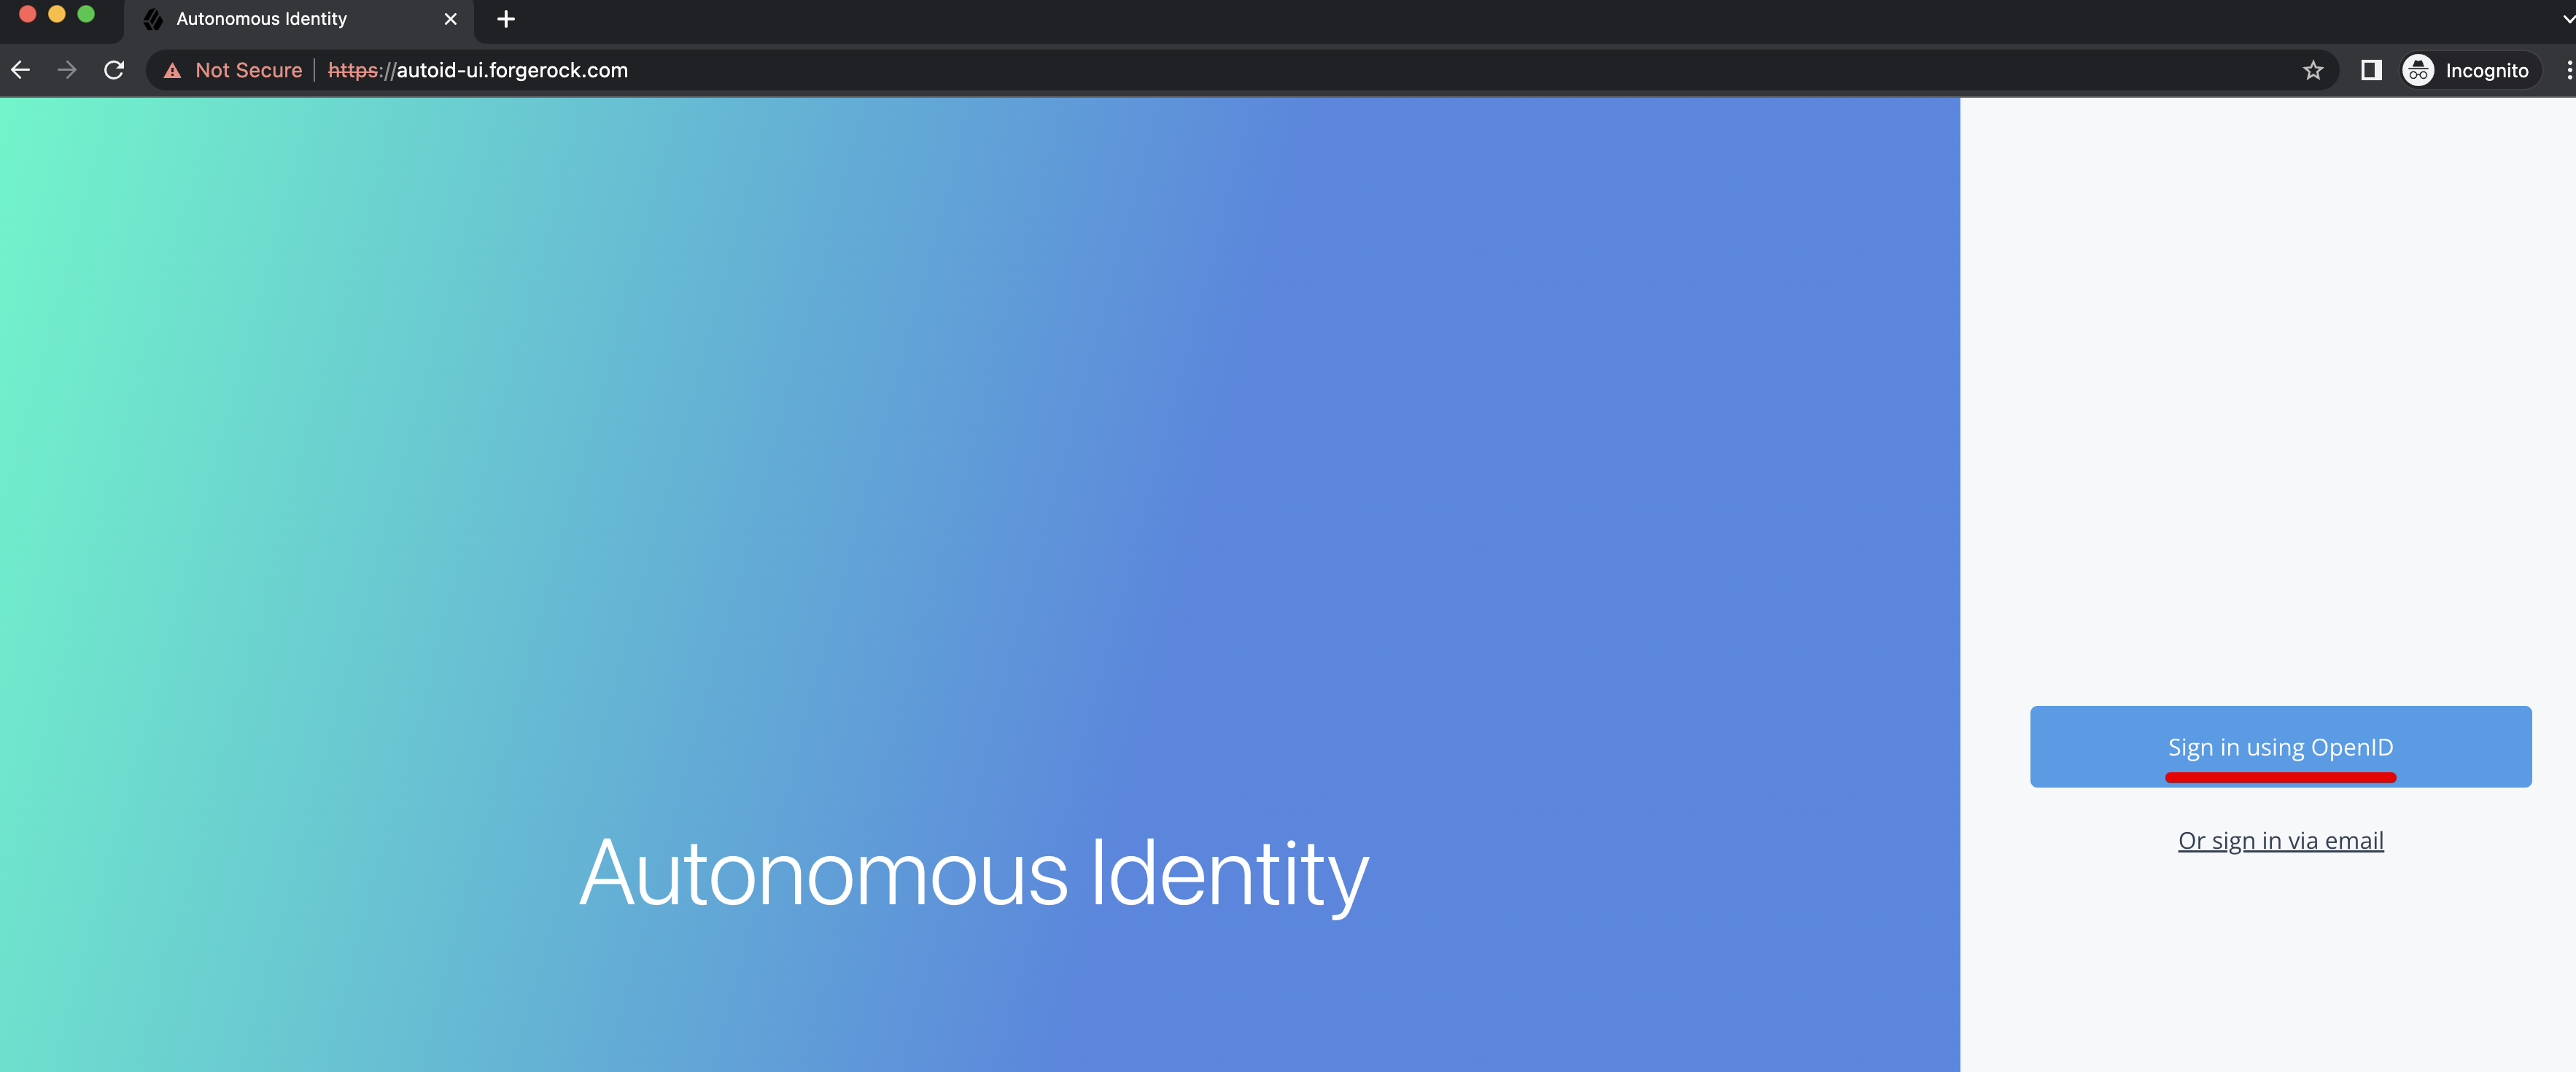
Setting the session duration
By default, the session duration is set to 30 minutes. You can change this value at installation by setting the JWT_EXPIRY property in the /autoid-config/vars.yml
file.
If you did not set the value at installation, you can make the change after installation by setting the JWT_EXPIRY property using the API service.
-
Log in to the Docker manager node.
-
Verify the
JWT_EXPIRYproperty.$ docker inspect api_zoran-api
-
Go to the API folder.
$ cd /opt/autoid/res/api
-
Edit the
docker-compose.ymlfile and update theJWT_EXPIRYproperty. TheJWT_EXPIRYproperty is set to minutes. -
Redeploy the Docker stack API.
$ docker stack deploy --with-registry-auth --compose-file docker-compose.yml api
If the command returns any errors, such as "image could not be accessed by the registry," then try the following command:
$ docker stack deploy --with-registry-auth --resolve-image changed \ --compose-file /opt/autoid/res/api/docker-compose.yml api -
Verify the new
JWT_EXPIRYproperty.$ docker inspect api_zoran-api
-
Log in to the Docker worker node.
-
Stop the worker node.
$ docker stop [container ID]
The Docker manager node re-initiates the worker node. Repeat this step on any other worker node.
Custom certificates
By default, Autonomous Identity uses self-signed certificates in its services. You can replace these self-signed certificates with a certificate issued by a Certificate Authority (CA). This section provides instructions on how to replace your self-signed certificates and also update your existing certificates when expired.
Pre-requisites
The following items were used to test the custom certificate procedures:
-
Private key file. The procedure uses a private key file privkey.pem.
-
Full trust chain. The procedure also uses a full trust certificate chain, fullchain.pem.
-
Keystore password. The procedure was tested using the keystore password is Acc#1234.
-
NGINX certificate. The NGINX certificate must support subject alternative name (SAN) for the following domains:
-
autoid-ui.<domain-name>
-
autoid-jas.<domain-name>
-
autoid-configuration-service.<domain-name>
-
autoid-kibana.<domain-name>
-
autoid-api.<domain-name>
-
-
Domain name. The domain name used in the procedure below is
certupdate.autoid.me.Change the value in various places to the domain name applicable to your deployment. -
Autonomous Identity version. The procedures were tested on Autonomous Identity versions 2021.8.5 and 2021.8.6.
Update certificates on Cassandra
-
Create the Java keystore and truststore files for the server using
keytool.The commands generate two JKS files:cassandra-keystore.jksandcassandra-truststore.jks.You need these files for configuring Cassandra and the Java API Service (JAS).openssl pkcs12 -export -in fullchain.pem -inkey privkey.pem -out server.p12 -name cassandranode keytool -importkeystore -deststorepass Acc#1234 -destkeypass Acc#1234 -destkeystore cassandra-keystore.jks -srckeystore server.p12 -srcstoretype PKCS12 -srcstorepass Acc#1234 -alias cassandranode keytool -importcert -keystore cassandra-truststore.jks -alias rootCa -file fullchain.pem -noprompt -keypass Acc#1234 -storepass Acc#1234
-
Create the client certificate. The client certificate is used by external clients, such as JAS and
cqlshto authenticate to Cassandra. In the following example, use the same client certificate for the Cassandra nodes to authenticate with each other.You can create a different certificate, if desired, using similar steps. # Create client.conf with following contents [ req ] distinguished_name = CA_DN prompt = no default_bits = 2048 [ CA_DN ] C = cc O = eng OU = cass CN = CA_CN # Create client key and CSR openssl req -newkey rsa:2048 -nodes -keyout client.key -out signing_request.csr -config client.conf # Create client certificate openssl x509 -req -CA fullchain.pem -CAkey privkey.pem -in signing_request.csr -out client.crt -days 3650 -CAcreateserial # Import client cert into a Java keystore for JAS openssl pkcs12 -export -in client.crt -inkey client.key -out client.p12 -name jas keytool -importkeystore -deststorepass Acc#1234 -destkeypass Acc#1234 -destkeystore client-keystore.jks -srckeystore client.p12 -srcstoretype PKCS12 -srcstorepass Acc#1234 -alias jas
-
View the files that are needed in later steps:
$ ls -1 .

cassandra-keystore.jks
cassandra-truststore.jks
client.conf
client.crt
client.key
client-keystore.jks
client.p12
fullchain.pem
fullchain.srl
privkey.pem
server.p12
signing_request.csr
-
Copy the following files to the
/opt/autoid/apache-cassandra-3.11.2/conf/certsdirectory on each Cassandra node:-
cassandra-keystore.jks
-
cassandra-truststore.jks
-
client-keystore.jks
-
-
Copy the following files to the
<autoid-user-home-dir>/.cassandradirectory on each Cassandra node:-
client.key
-
client.crt
-
fullchain.pem
-
-
Make the following edits in the
/opt/autoid/apache-cassandra-3.11.2/conf/cassandra.yamlfile on each Cassandra node:-
Change the keystore and truststore paths in the
server_encryption_optionsandclient_encryption_optionssections:keystore: /opt/autoid/apache-cassandra-3.11.2/conf/certs/client-keystore.jks truststore: /opt/autoid/apache-cassandra-3.11.2/conf/certs/cassandra-truststore.jks
-
-
Update the
<autoid-user-home-dir>/.cassandra/cqlshrcfile with the following edits:[authentication] username = zoranuser password = <password> [connection] hostname = <ip address> factory = cqlshlib.ssl.ssl_transport_factory [ssl] certfile = <autoid-user-home-dir>/.cassandra/fullchain.pem validate = false version = SSLv23 # Next 2 lines must be provided when require_client_auth = true in the cassandra.yaml file userkey = <autoid-user-home-dir>/.cassandra/client_key.key usercert = <autoid-user-home-dir>/.cassandra/client.crt
-
Restart Cassandra.
ps auxf | grep cassandra
kill <pid>
cd /opt/autoid/apache-cassandra-3.11.2/bin
nohup ./cassandra >/opt/autoid/apache-cassandra-3.11.2/cassandra.out 2>&1 &
-
Make sure that Cassandra is running normally using
cqlsh.Use your server’s IP. :$ cqlsh --ssl Connected to Zoran Cluster at <server-ip>:9042. [cqlsh 5.0.1 | Cassandra 3.11.2 | CQL spec 3.4.4 | Native protocol v4] Use HELP for help. zoranuser@cqlsh> describe keyspaces; autonomous_iam system_auth system_distributed autoid_analytics autoid system system_traces autoid_base system_schema autoid_meta autoid_staging zoranuser@cqlsh>
Update certificates on MongoDB
-
Create the keystore and truststore using
keytool.openssl pkcs12 -export -in fullchain.pem -inkey privkey.pem -out server.p12 -name mongonode keytool -importkeystore -deststorepass Acc#1234 -destkeypass Acc#1234 -destkeystore mongo-client-keystore.jks -srckeystore server.p12 -srcstoretype PKCS12 -srcstorepass Acc#1234 -alias mongonode keytool -importcert -keystore mongo-server-truststore.jks -alias rootCa -file fullchain.pem -noprompt -keypass Acc#1234 -storepass Acc#1234
-
Create a new mongodb.pem file.
cat fullchain.pem privkey.pem > mongodb.pem
-
Download the
isg root x1root certificate from Lets Encrypt at https://letsencrypt.org/certs/isgrootx1.pem, and save it asrootCA.pem. -
Back up the MongoDB certificates.
cd /opt/autoid/mongo/certs/
mkdir backup
mv mongodb.pem backup/
mv rootCA.pem backup/
mv mongo-*.jks backup
-
Copy the new certificates to the mongodb installation.
cp mongodb.pem /opt/autoid/mongo/certs/
cp rootCA.pem /opt/autoid/mongo/certs/
-
Restart Mongo DB.
sudo systemctl stop mongo-autoid
sudo systemctl start mongo-autoid
-
Check for logs for errors in
/opt/autoid/mongo/mongo-autoid.log.The log may show connection errors until JAS has been updated and restarted. -
Add the hostname to the hosts file. For example, we are using:
autoid-mongo.certupdate.autoid.me. -
Check the MongoDB connection from the command line.
mongo --tls --host autoid-mongo.certupdate.autoid.me --tlsCAFile /opt/autoid/mongo/certs/rootCA.pem --tlsCertificateKeyFile /opt/autoid/mongo/certs/mongodb.pem --username mongoadmin
-
Back up and copy the new keystore and truststore to JAS.
cd /opt/autoid/mounts/jas
mkdir backup
mv mongo-*.jks backup

cp mongo-server-truststore.jks /opt/autoid/mounts/jas
cp mongo-client-keystore.jks /opt/autoid/mounts/jas
-
Update the JAS configuration. On each Docker manager and worker node, copy the following files to the
/opt/autoid/mount/jasdirectory.-
mongo-client-keystore.jks
-
mongo-server-truststore.jks
The certificates must exist on all Docker nodes (all managers and worker nodes).
-
-
On each Docker manager node, update
/opt/autoid/res/jas/docker-compose.ymlfile and set the Mongo keystore, truststore, and host, and add theextra_hostsline as follows:MONGO_KEYSTORE_PATH=/db-certs/mongo-client-keystore.jks MONGO_TRUSTSTORE_PATH=/db-certs/mongo-server-truststore.jks MONGO_HOST=autoid-mongo.certupdate.autoid.me extra_hosts: - "autoid-mongo.certupdate.autoid.me:<ip of mongodb host>"
-
Restart JAS.
docker stack rm jas nginx
docker stack deploy -c /opt/autoid/res/jas/docker-compose.yml jas
docker stack deploy -c /opt/autoid/res/nginx/docker-compose.yml nginx
-
Check JAS logs for errors.
docker service logs -f jas_jasnode
Update certificates on JAS
-
On each Docker manager and worker node, copy the following keystore and truststore files to
/opt/autoid/mounts/jasdirectory:-
client-keystore.jks
-
cassandra-truststore.jks
-
-
On each Docker manager node, update
/opt/autoid/res/jas/docker-compose.ymlwith the correct keystore and truststore paths:CASSANDRA_KEYSTORE_PATH=/db-certs/client-keystore.jks CASSANDRA_TRUSTSTORE_PATH=/db-certs/cassandra-truststore.jks
-
Redeploy the JAS server.
docker stack rm jas
docker stack deploy jas -c /opt/autoid/res/jas/docker-compose.yml
-
Make sure JAS has no errors.
docker service logs -f jas_jasnode
Update the certificates on NGINX
-
Copy the following files to
/opt/autoid/mounts/nginx/cert/:-
privkey.pem
-
fullchain.pem
-
-
In the
/opt/autoid/mounts/nginx/nginx.conffile, update thessl_certificateandssl_certificate_keyproperties as follows:#SSL Settings ssl_certificate /etc/nginx/cert/fullchain.pem; ssl_certificate_key /etc/nginx/cert/privkey.pem;
-
Make sure that the domain names in the configuration files (
/opt/autoid/mounts/nginx/conf.d) matches the domain names used for certificate generation. -
Restart the Docker container.
docker stack rm nginx
docker stack deploy -c /opt/autoid/res/nginx/docker-compose.yml nginx
Update certificates on Opensearch
-
Create a keystore and truststore using
keystore.openssl pkcs12 -export -in fullchain.pem -inkey privkey.pem -out server.p12 -name esnodekey keytool -importkeystore -deststorepass Acc#1234 -destkeypass Acc#1234 -destkeystore elastic-client-keystore.jks -srckeystore server.p12 -srcstoretype PKCS12 -srcstorepass Acc#1234 -alias esnodekey keytool -importcert -keystore elastic-server-truststore.jks -alias rootCa -file fullchain.pem -noprompt -keypass Acc#1234 -storepass Acc#1234
-
Create backups.
cd /opt/autoid/certs/elastic
mkdir backup
mv *.jks backup
-
Copy the new jks files,
fullchain.pem,privkey.pem, andchain.pemto/opt/autoid/certs/elastic. -
Also, copy the
fullchain.pem,privkey.pem, andchain.pemcertificates to/opt/autoid/elastic/Opensearch-1.3.13/config/. -
Update the following attributes in the
/opt/autoid/elastic/Opensearch-1.3.13/config/elasticsearch.ymlfile:Opensearch_security.ssl.transport.pemcert_filepath: fullchain.pem Opensearch_security.ssl.transport.pemkey_filepath: privkey.pem Opensearch_security.ssl.transport.pemtrustedcas_filepath: chain.pem Opensearch_security.ssl.http.pemcert_filepath: fullchain.pem Opensearch_security.ssl.http.pemkey_filepath: privkey.pem Opensearch_security.ssl.http.pemtrustedcas_filepath: chain.pem Opensearch_security.nodes_dn: - CN=elastic.certupdate.autoid.me
-
Restart Opensearch on all Opensearch nodes:
sudo systemctl restart elastic
-
Check
/opt/autoid/elastic/logs/elasticcluster.logfor errors. The file shows any certificate error until all nodes have been restarted. -
In the
/opt/autoid/res/jas/docker-compose.ymlfile, add the following:extra_hosts: - "elastic.certupdate.autoid.me:<ip of ES host>" update ES_HOST env var: ES_HOST=elastic.certupdate.autoid.me
-
Restart the JAS container:
docker stack rm jas
docker stack rm nginx
docker stack deploy -c /opt/autoid/res/jas/docker-compose.yml jas
docker stack deploy -c /opt/autoid/res/nginx/docker-compose.yml nginx
-
Test the connection from the JAS container to Opensearch:
docker container exec -it <jas container id> sh
apk add curl
curl -v --cacert /elastic-certs/fullchain.pem -u elasticadmin https://elastic.certupdate.autoid.me:9200
-
Update the configuration in the JAS service using curl:
-
First log in using
curl.curl -X POST https://autoid-ui.certupdate.autoid.me:443/api/authentication/login -k -H 'Content-Type: application/json' -H 'X-TENANT_ID: <tenant_id >' -d '{ "username": "bob.rodgers@forgerock.com", "password": "Welcome123" }'
-
Pull in the current configuration using
curl.curl -k -H "Content-Type: application/json" -H 'X-TENANT-ID: <tenant_id>' -H 'Authorization: Bearer <bearer_token>' --request GET https://jasnode:10081/config/analytics_env_config
-
Modify value for
elasticsearch" to "host":elastic.certupdate.autoid.me``. -
Push the updated configuration:
curl -k -H "Content-Type: application/json" -H 'X-TENANT-ID: <tenant_id>' -H 'Authorization: Bearer <bearer_token>' --request PUT https://jasnode:10081/config/analytics_env_config -d '<updated json config>'
-
-
Update the environment variable in your
.bashrcon all Opensearch nodes and Spark nodes:ES_HOST=elastic.certupdate.autoid.me
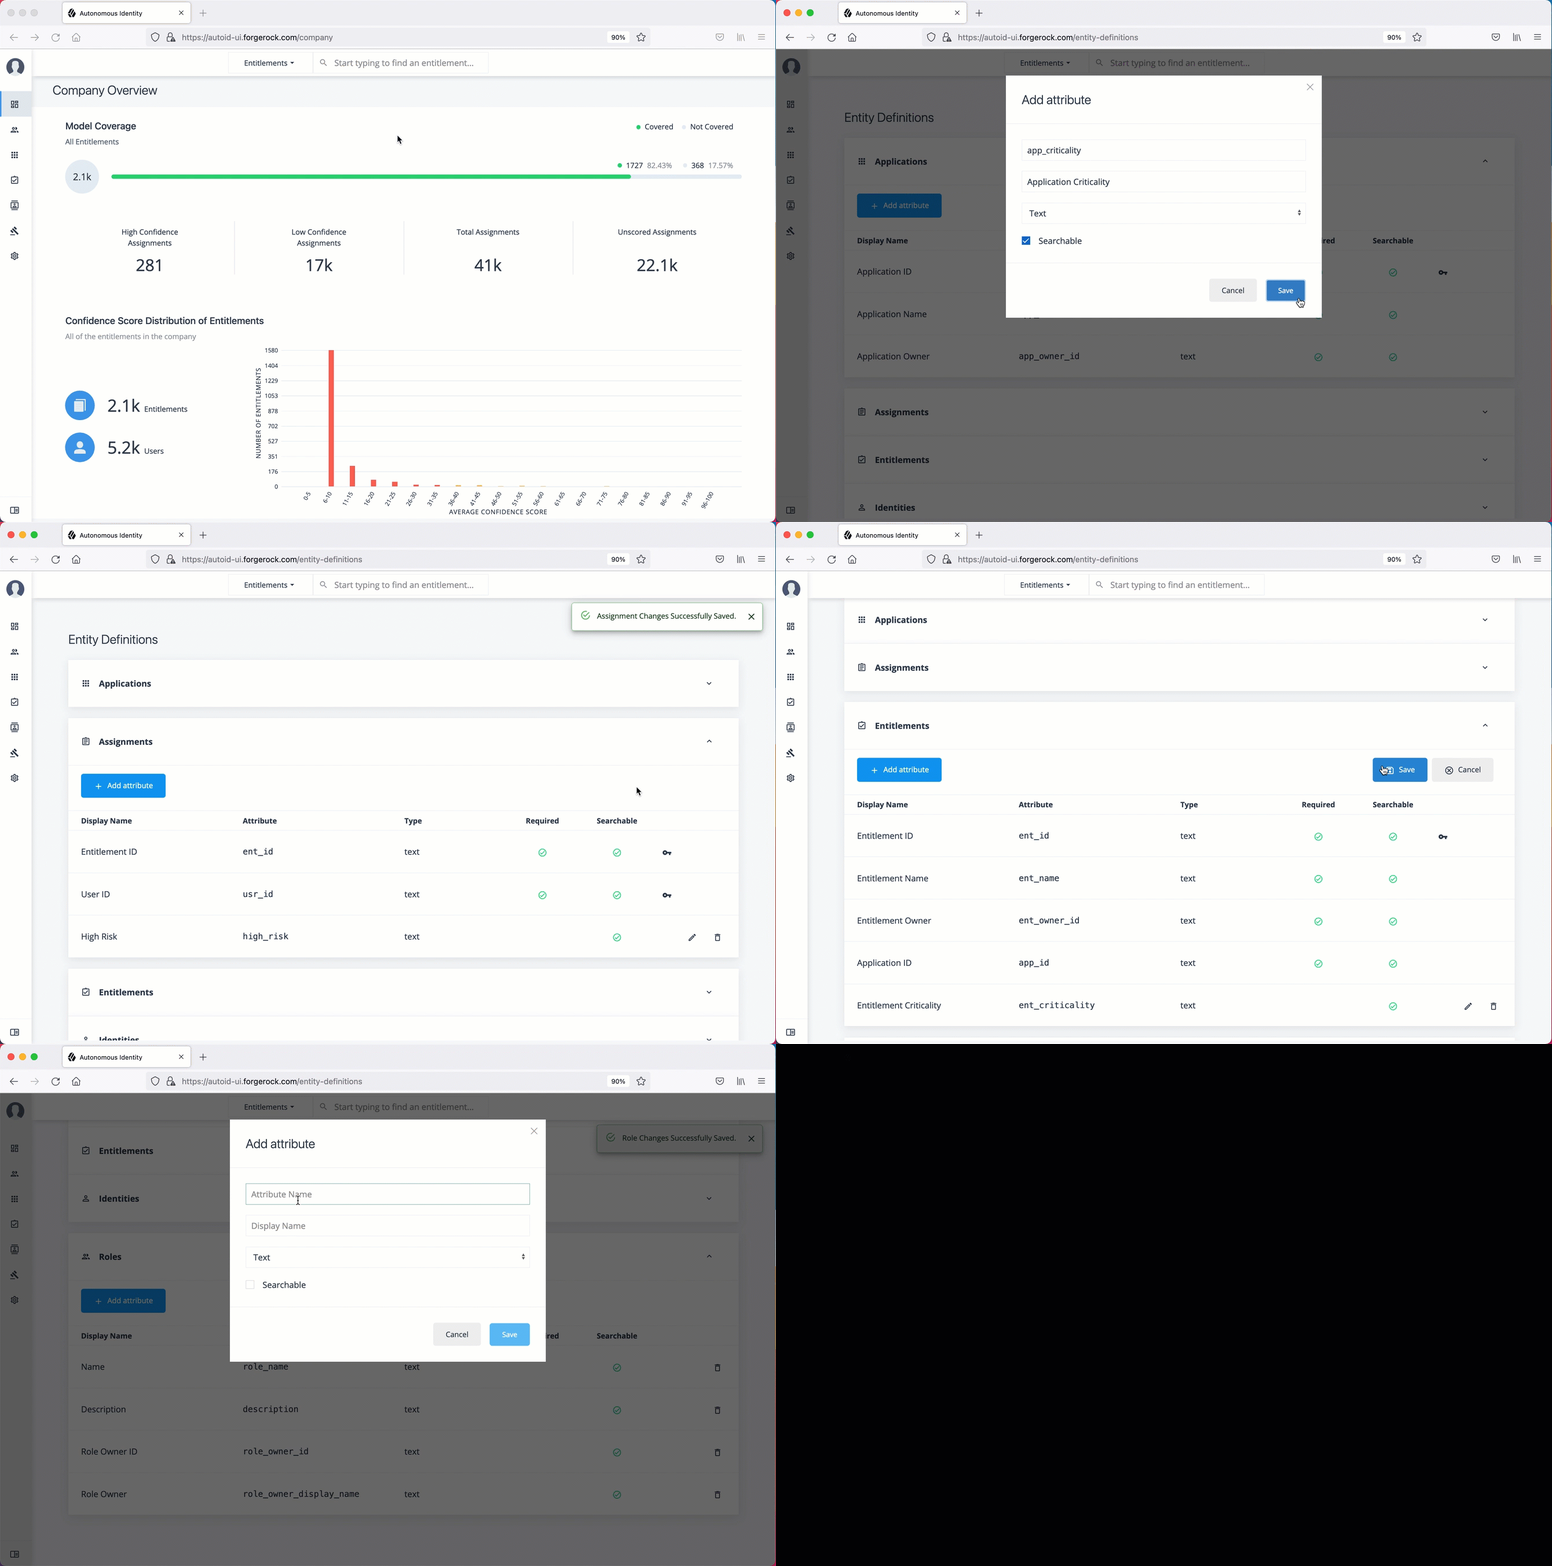
Set entity definitions
Before you run analytics, you can add new attributes to the schema using the Autonomous Identity UI. Only administrators have access to this functionality.
-
Open a browser. If you set up your own url, use it for your login.
-
Log in as an admin user, specific to your system. For example:
test user: bob.rodgers@forgerock.com
password: Welcome123
-
Click the Administration icon, indicated by the sprocket. Then, click Entity Definitions.
-
On the Entity Definitions page, click Applications to add any new attributes to the schema.
-
Click the Add attribute button.
-
In the Attribute Name field, enter the name of the new attribute. For example,
app_owner_id. -
In the Display Name field, enter a human-readable name of the attribute.
-
Select the attribute type. The options are:
Text,Boolean,Integer,Float,Date, andNumber. -
Click Searchable if you want the attribute to be indexed and available in your filters.
-
Click Save.
-
Click Save again to apply your attribute.
-
If you need to edit the attribute, click the Edit icon. If you need to remove the attribute, click the Remove icon. Note that attributes marked as
Requiredcannot be removed.
-
-
Click Assignments, and repeat the previous steps.
-
Click Entitlements, and repeat the previous steps.
-
Click Identities, and repeat the previous steps.
Click an example
-
Next, you must set the data sources. Refer to Set Data Sources.
Set data sources
After defining any new attributes, you must set your data sources, so that Autonomous Identity can import and ingest your data. Autonomous Identity supports three types of data source files:
-
Comma-separated values (CSV). A comma-separated values (CSV) file is a text file that uses a comma delimiter to separate each field value. Each line of text represents a record, consisting of one or more fields of data.
-
Java Database Connectivity (JDBC). Java Database Connectivity (JDBC) is a Java API that connects to and executes queries on databases, like Oracle, MySQL, PostgreSQL, and MSSQL.
-
Generic. Generic data sources are those data types from vendors that have neither CSV nor JDBC-based formats, such as JSON, or others.
Data source sync types
Autonomous Identity supports partial or incremental data ingestion for faster and efficient data uploads. The four types are full, incremental, enrichment, and delete, and are summarized below:
| Sync Type | Data Source | In AutoID | Result |
|---|---|---|---|
Full |
The records from the entity represents the full set of all records that you intend to ingest. For example:
|
An existing table may have the following:
|
After the ingest job runs, all existing records are fully replaced:
|
Incremental |
The records from the entity represents the records that you want to add to AutoID. For example:
|
An existing table may have the following:
|
After the ingest job runs, the records in the data source are added to the existing records:
|
Enrichment |
The records from the entity represents changes to existing data, such as adding a department attribute. No new objects are added, but here you want to edit or "patch" in new attributes to existing records:
|
An existing table may have the following:
|
After the ingest job runs, the attributes in the data source is added to the existing records. If attributes exist, they get updated. If attributes do not exist, they do not get updated, but you can add also attributes using mappings:
|
Delete |
The records from the entity represent records to be deleted, identified by the primary key:
|
An existing table may have the following:
|
After the ingest job completes, the records with the primary key are deleted:
|
CSV data sources
The following are general tips for setting up your comma-separated-values (CSV) files:
-
Make sure you have access to your CSV files:
applications.csv,assignments.csv,entitlements.csv, andidentities.csv. -
You can review the Data Preparation chapter for more tips on setting up your files.
-
Log in to the Autonomous Identity UI as an administrator.
-
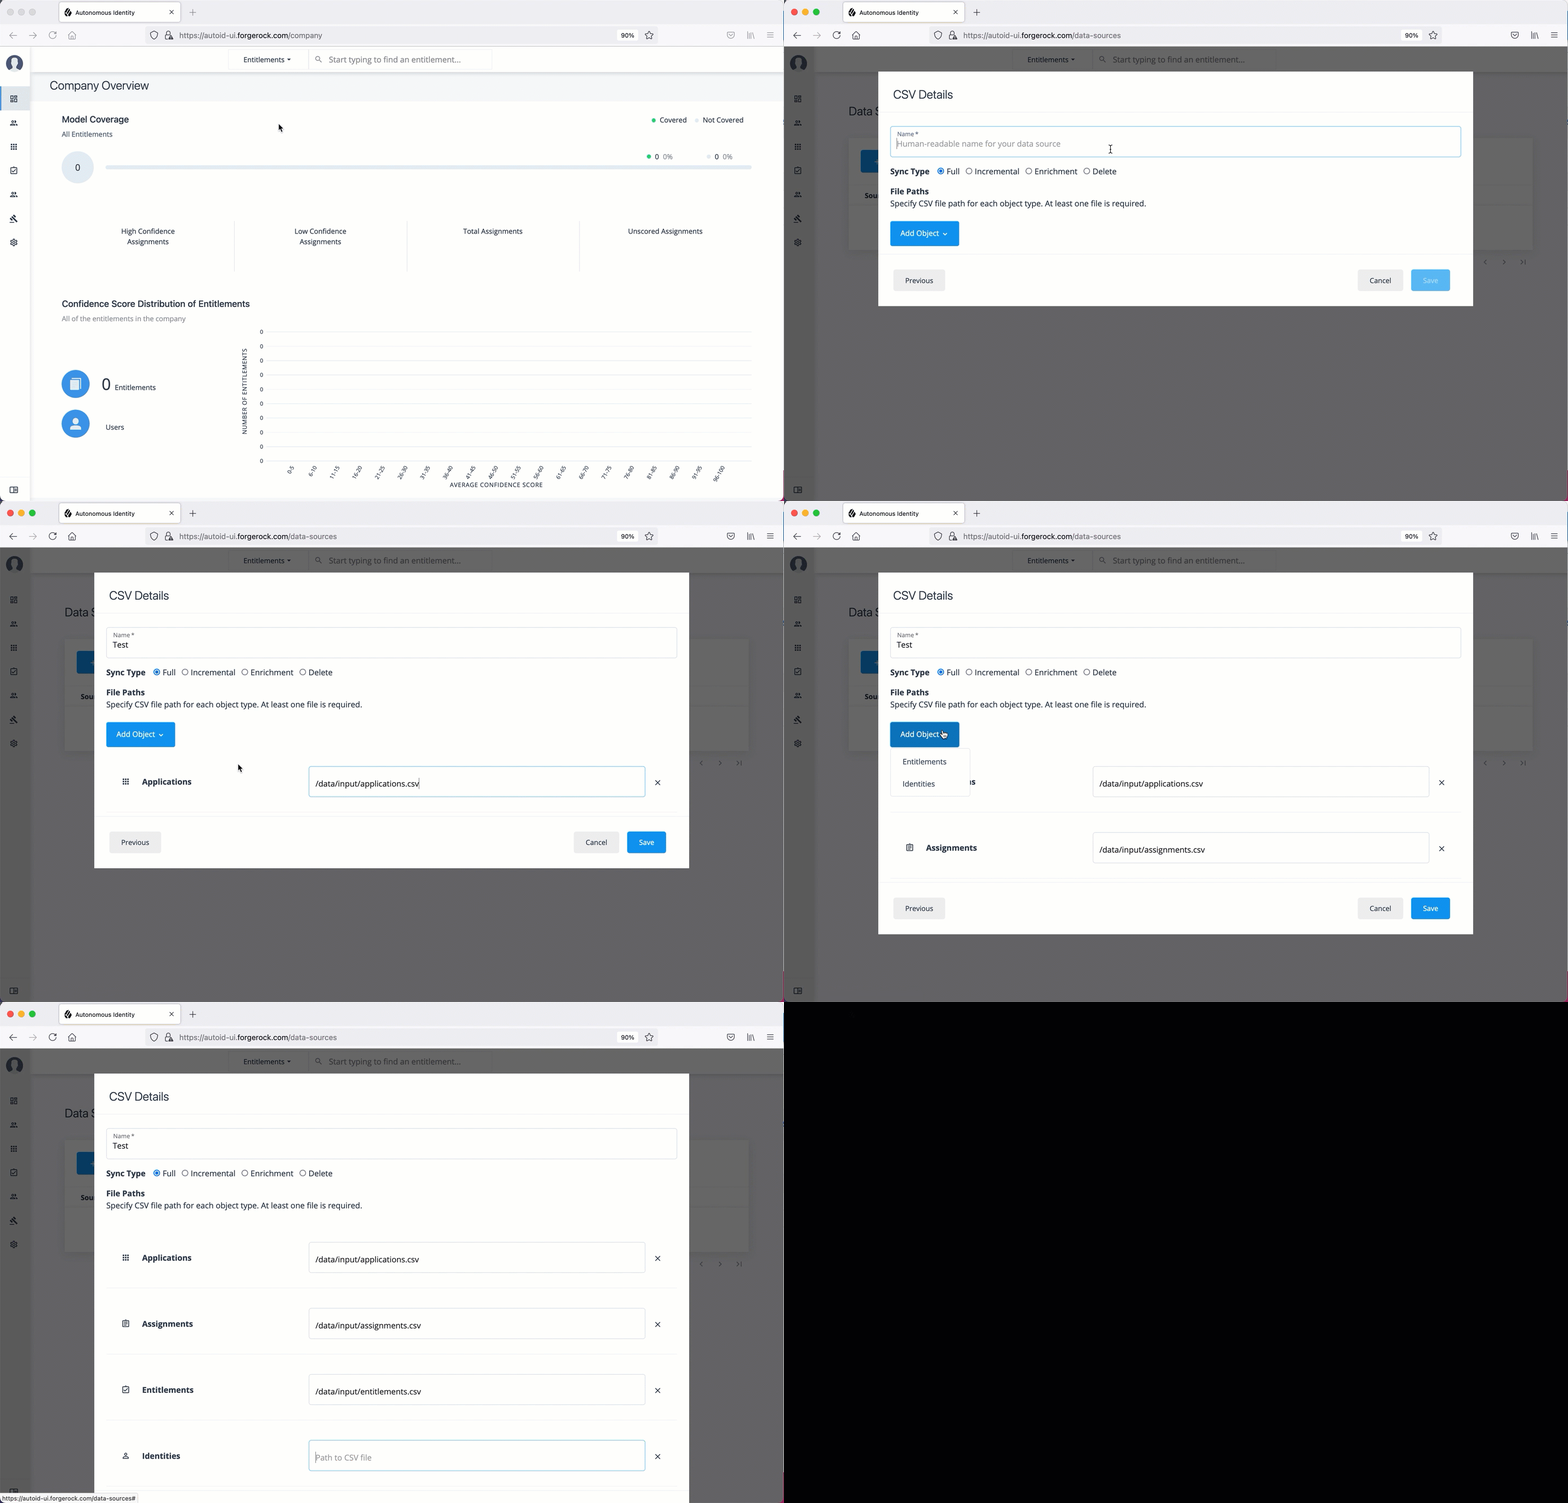
On the Autonomous Identity UI, click the Administration > Data Sources > Add data source > CSV > Next.
-
In the CSV Details dialog box, enter a human-readable name for your CSV file.
-
Select the Sync Type. The options are as follows:
-
Full. Runs a full replacement of data if any.
-
Incremental. Adds new records to existing data.
-
Enrichment. Adds new attributes to existing data records.
-
Delete. Delete any existing data objects.
-
-
Click Add Object, and then select the data source file.
-
Click Applications, enter the path to the
application.csvfile. For example,/data/input/applications.csv. -
Click Assignments, enter the path to the
assignments.csvfile. For example,/data/input/assignments.csv. -
Click Entitlements, enter the path to the
entitlements.csvfile. For example,/data/input/entitlements.csv. -
Click Identities, enter the path to the
identities.csvfile. For example,/data/input/identities.csv.
-
-
Click Save.
Click an example
-
Repeat the previous steps to add more CSV data source files if needed.
-
Next, you must set the attribute mappings. This is a critical step to ensure a successful analytics run. Refer to Set Attribute Mappings.
JDBC Data Sources
The following are general tips for setting up your JDBC data sources (Oracle, MySQL, PostgreSQL, and MSSQL):
-
When configuring your JDBC database, make sure you have properly "whitelisted" the IP addresses that can access the server. For example, you should include your local
autoidinstance and other remote systems, such as a local laptop. -
Make sure you have configured your database tables on your system:
applications,assignments,entitlements, andidentities. -
Make sure to make note of the IP address of your database server.
The following procedure assumes that you have set up Autonomous Identity with connectivity to a database:
-
Log in to the Autonomous Identity UI as an administrator.
-
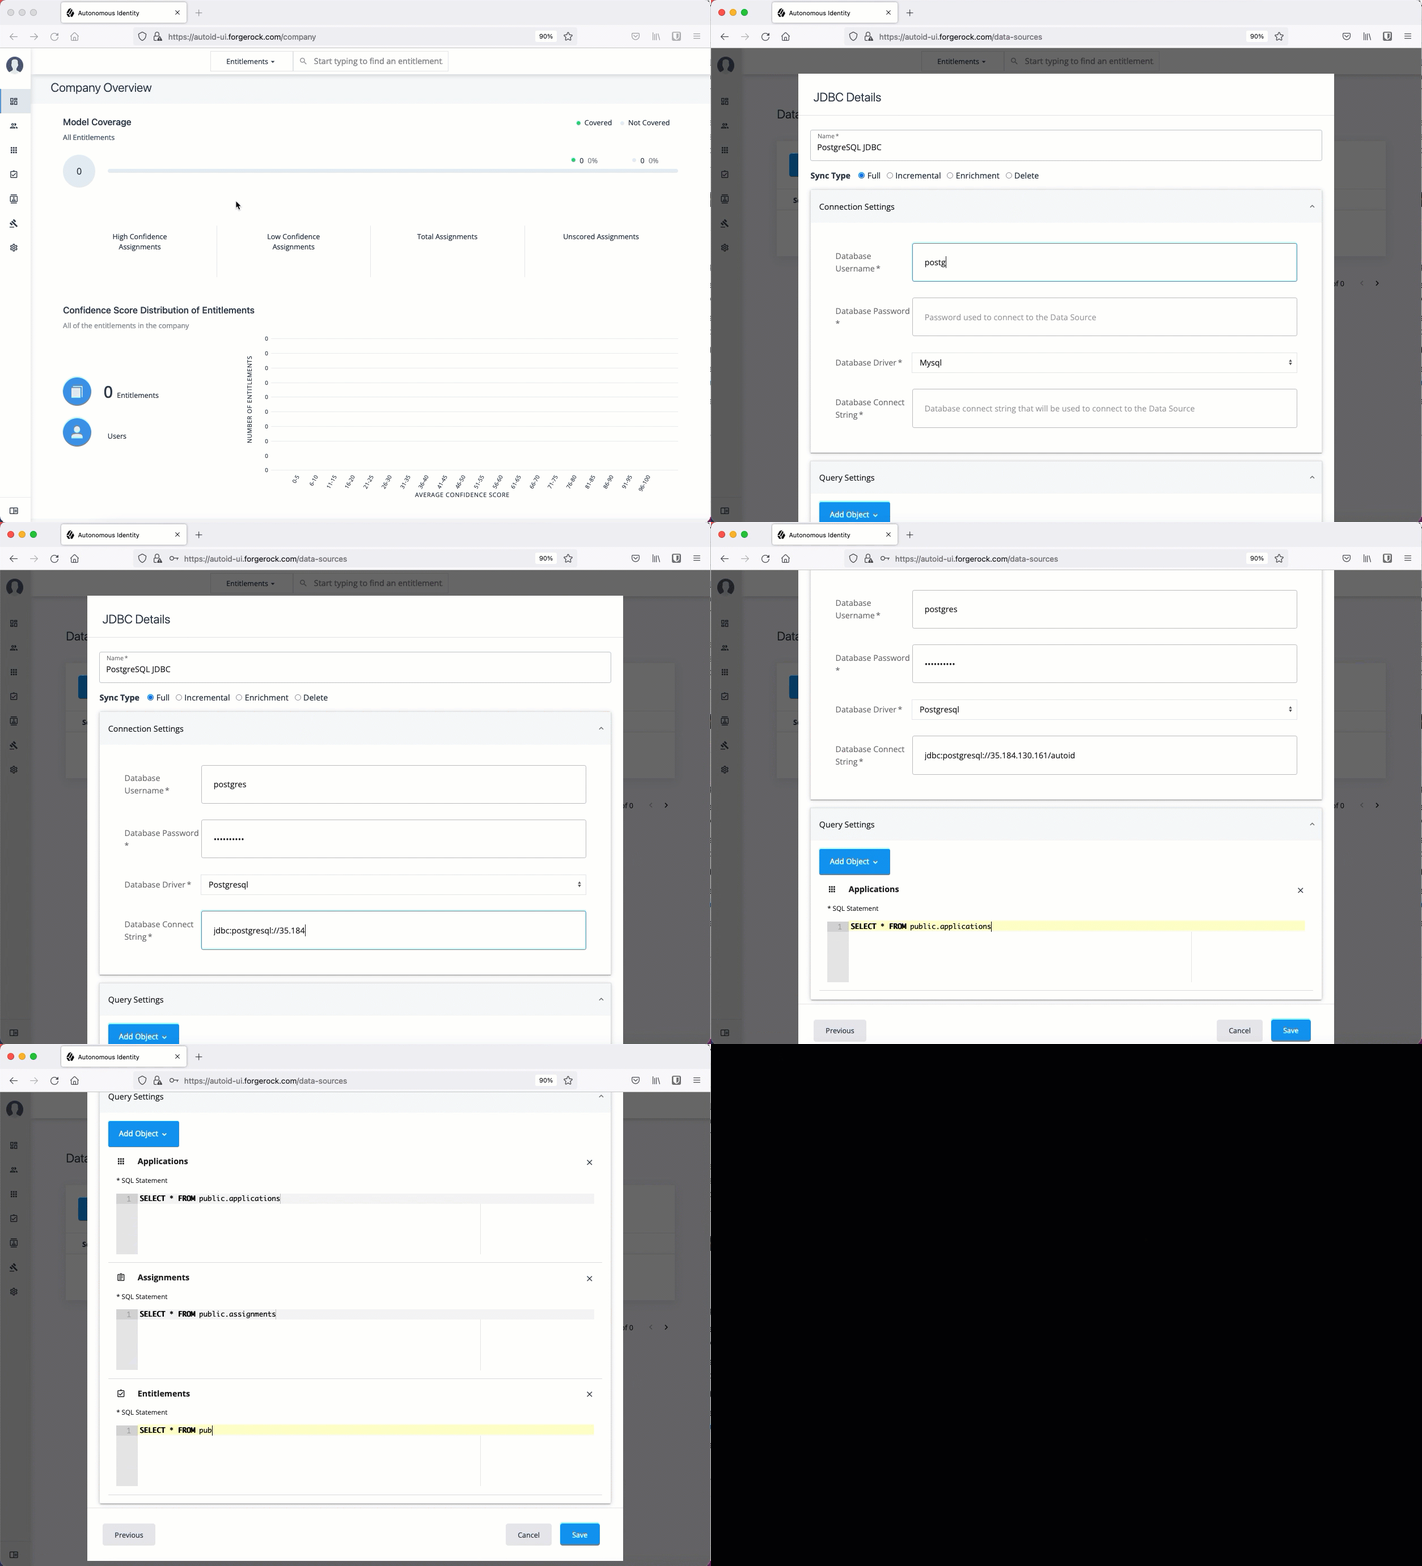
On the Autonomous Identity UI, click the Administration icon > Data Sources > Add data source > JDBC > Next.
-
In the JDBC Details dialog box, enter a human-readable name for your JDBC files.
-
Select the Sync Type. The options are as follows:
-
Full. Runs a full replacement of data if any.
-
Incremental. Adds new records to existing data.
-
Enrichment. Adds new attributes to existing data records.
-
Delete. Delete any existing data objects.
-
-
For Connection Settings, enter the following:
-
Database Username. Enter a user name for the database user that connects to the data source.
-
Database Password. Enter a password for the database user.
-
Database Driver. Select the database driver. Options are:
-
Oracle -
Mysql -
Postgresql -
Mssqlserver
-
-
Database Connect String. Enter the database connection URI to the data source. For example,
jdbc:<Database Type>://<Database IP Address>/<Database Acct Name>, where:-
jdbcis the SQL driver type -
<Database Type>is the database management system type. Options are:oracle,mysql,postgresql, orsqlserver. -
<Database IP Address>is the database IP address -
<Database Acct Name>is the database account name created in the database instance.
-
-
For example:
* Oracle: jdbc:oracle://35.180.130.161/autoid
* MySQL: jdbc:mysql://35.180.130.161/autoid
* PostgreSQL: jdbc:postgresql://35.180.130.161/autoid
* MSSQL: jdbc:sqlserver://35.180.130.161;database=autoid
| There are other properties that you can use for each JDBC connection URI. Refer to the respective documentation for more information. |
-
Click Add Object, and then select the data source file:
-
Click Applications, enter the path to the
APPLICATIONStable. For example, using PostgreSQL,SELECT * FROM public.applications, wherepublicis the PostgreSQL schema. Make sure to use your company’s database schema. -
Click Assignments, enter the path to the
ASSIGNMENTStable. For example,SELECT * FROM public.assignments. -
Click Entitlements, enter the path to the
ENTITLEMENTStable. For example,SELECT * FROM public.entitlements. -
Click Identities, enter the path to the
IDENTITIEStable. For example,SELECT * FROM public.identities.
-
-
Click Save.
Click an example
-
If you are having connection issues, check the Java API Service (JAS) logs to verify the connection failure:
$ docker service logs -f jas_jasnode
The following entry can appear, which possibly indicates the whitelist was not properly set on the database server:
jas_jasnode.1.5gauc33o1nnn@autonomous-base-dev     | java.lang.RuntiimeException: org.postgresql.util.PSQLException: The connection attempt failed.
. . .
  jas_jasnode.1.5gauc33o1nnn@autonomous-base-dev     | Caused by: org.postgresql.util.PSQLException: The connection attempt failed.
  . . .
  Caused by: java.net.SocketTimeoutExceptiion: connect timed out
-
Next, you must set the attribute mappings. This is a critical step to ensure a successful analytics run. Refer to Set Attribute Mappings.
Generic Data Sources
The following are general tips for setting up your generic data sources:
-
Make sure you have configured data source files:
applications,assignments,entitlements, andidentities. -
Make sure you have the metadata (e.g., URL, prefix) required to access your generic data source files.
-
Log in to the Autonomous Identity UI as an administrator.
-
On the Autonomous Identity UI, click the Administration icon > Data Sources > Add data source > Generic > Next.
-
In the Generic Details dialog box, enter a human-readable name for your generic files.
-
Select the Sync Type. The options are as follows:
-
Full. Runs a full replacement of data if any.
-
Incremental. Adds new records to existing data.
-
Enrichment. Adds new attributes to existing data records.
-
Delete. Delete any existing data objects.
-
-
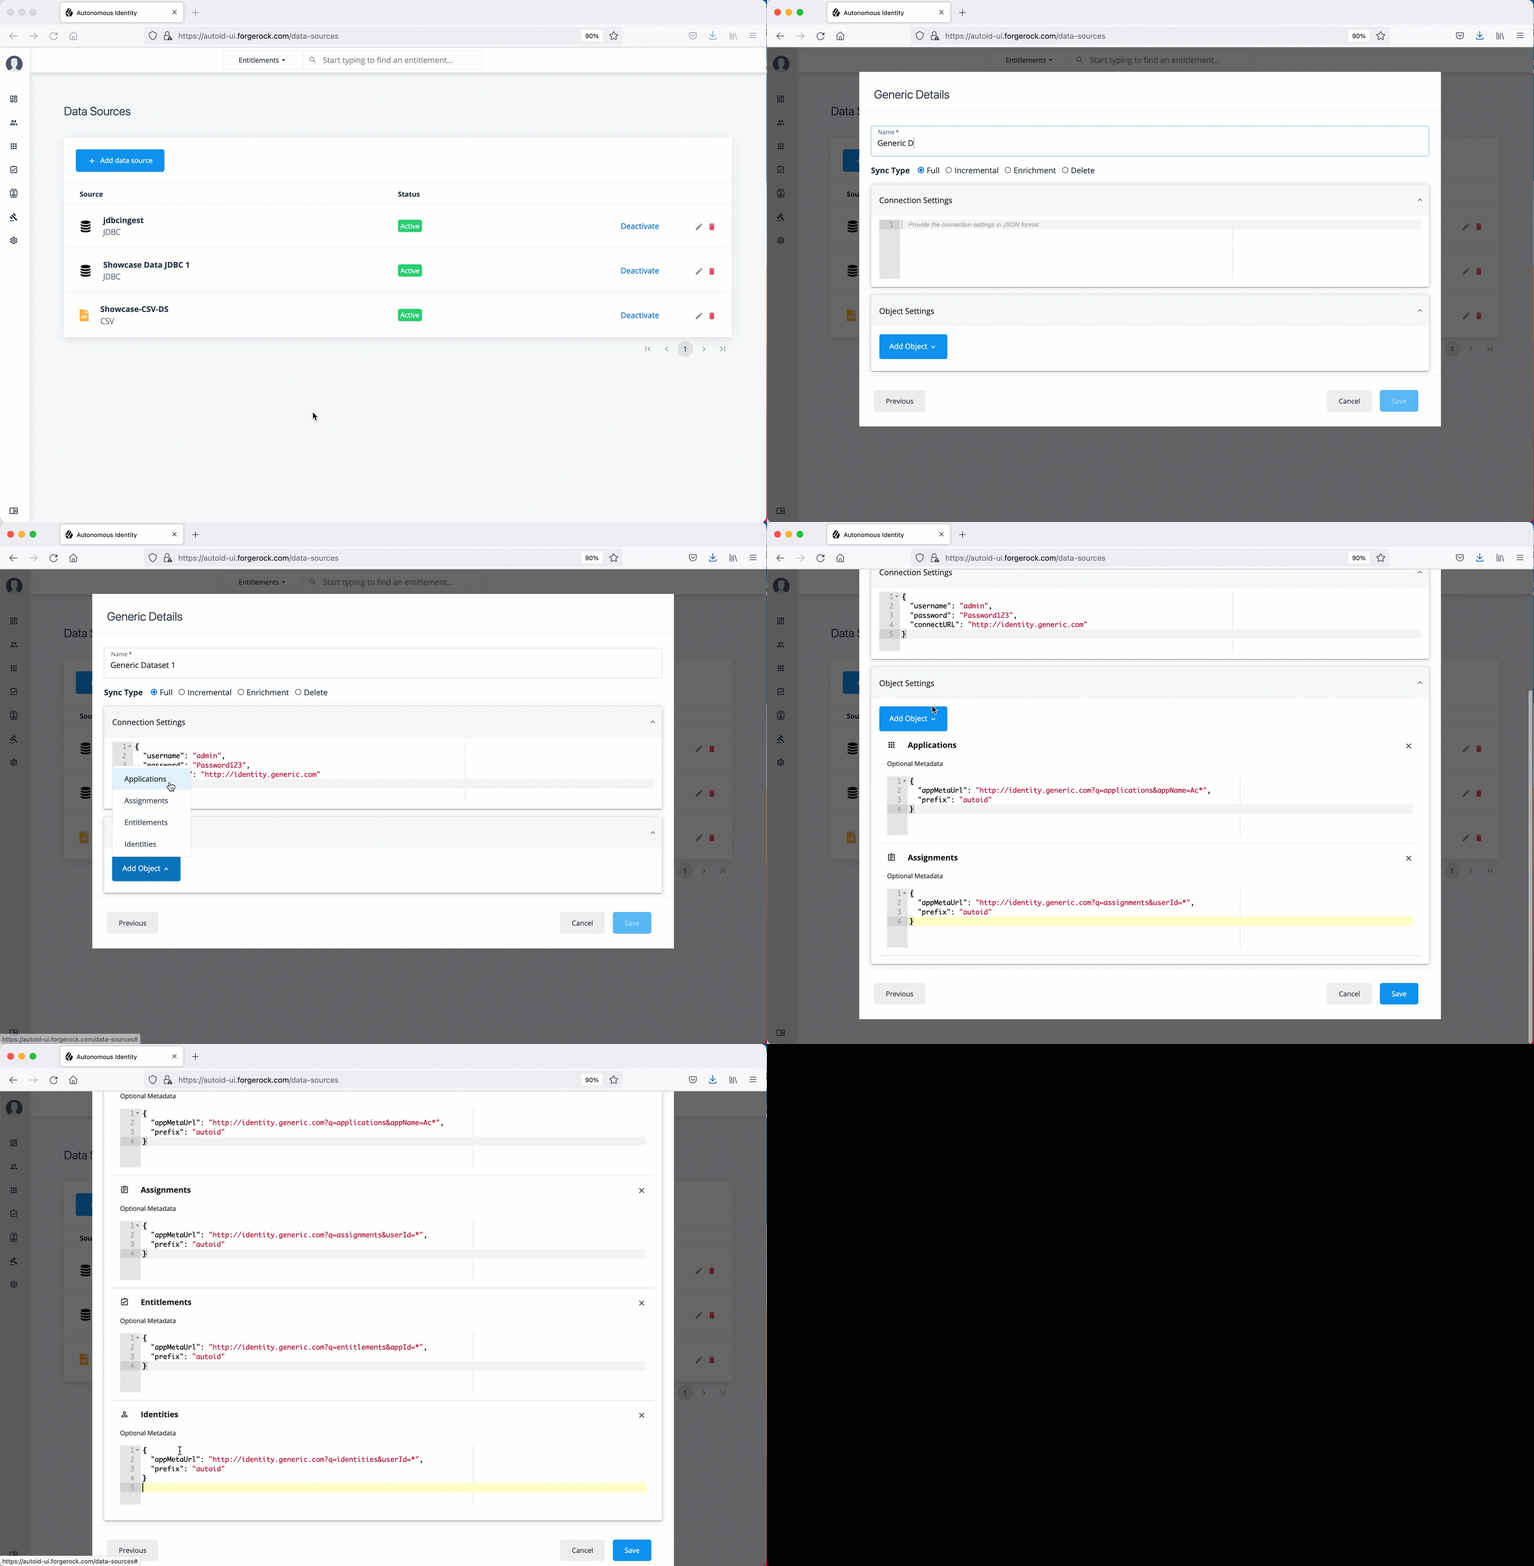
For Connection Settings, enter the settings to connect to your database server. For example:
{ "username": "admin", "password": "Password123", "connectURL": "http://identity.generic.com" } -
Click Add Object, and then select the data source file:
-
Click Applications, enter the metadata for applications file. For example:
{ "appMetaUrl": "http://identity.generic.com?q=applications&appName=Ac*", "prefix": "autoid" } -
Click Assignments, enter the metadata for the assignments file. For example:
{ "appMetaUrl": "http://identity.generic.com?q=assignments&userId=*", "prefix": "autoid" } -
Click Entitlements, enter the metadata for the entitlements file. For example:
{ "appMetaUrl": "http://identity.generic.com?q=entitlements&appId=*", "prefix": "autoid" } -
Click Identities, enter the metadata for the identities file. For example:
{
  "appMetaUrl": "http://identity.generic.com?q=identities&userId=*",
  "prefix": "autoid"
}
-
-
Click Save.
Click an example
-
Repeat the previous steps to add more JDBC data source files if necessary.
-
Next, you must set the attribute mappings. This is a critical step to ensure a successful analytics run. Refer to Set Attribute Mappings.
Set attribute mappings
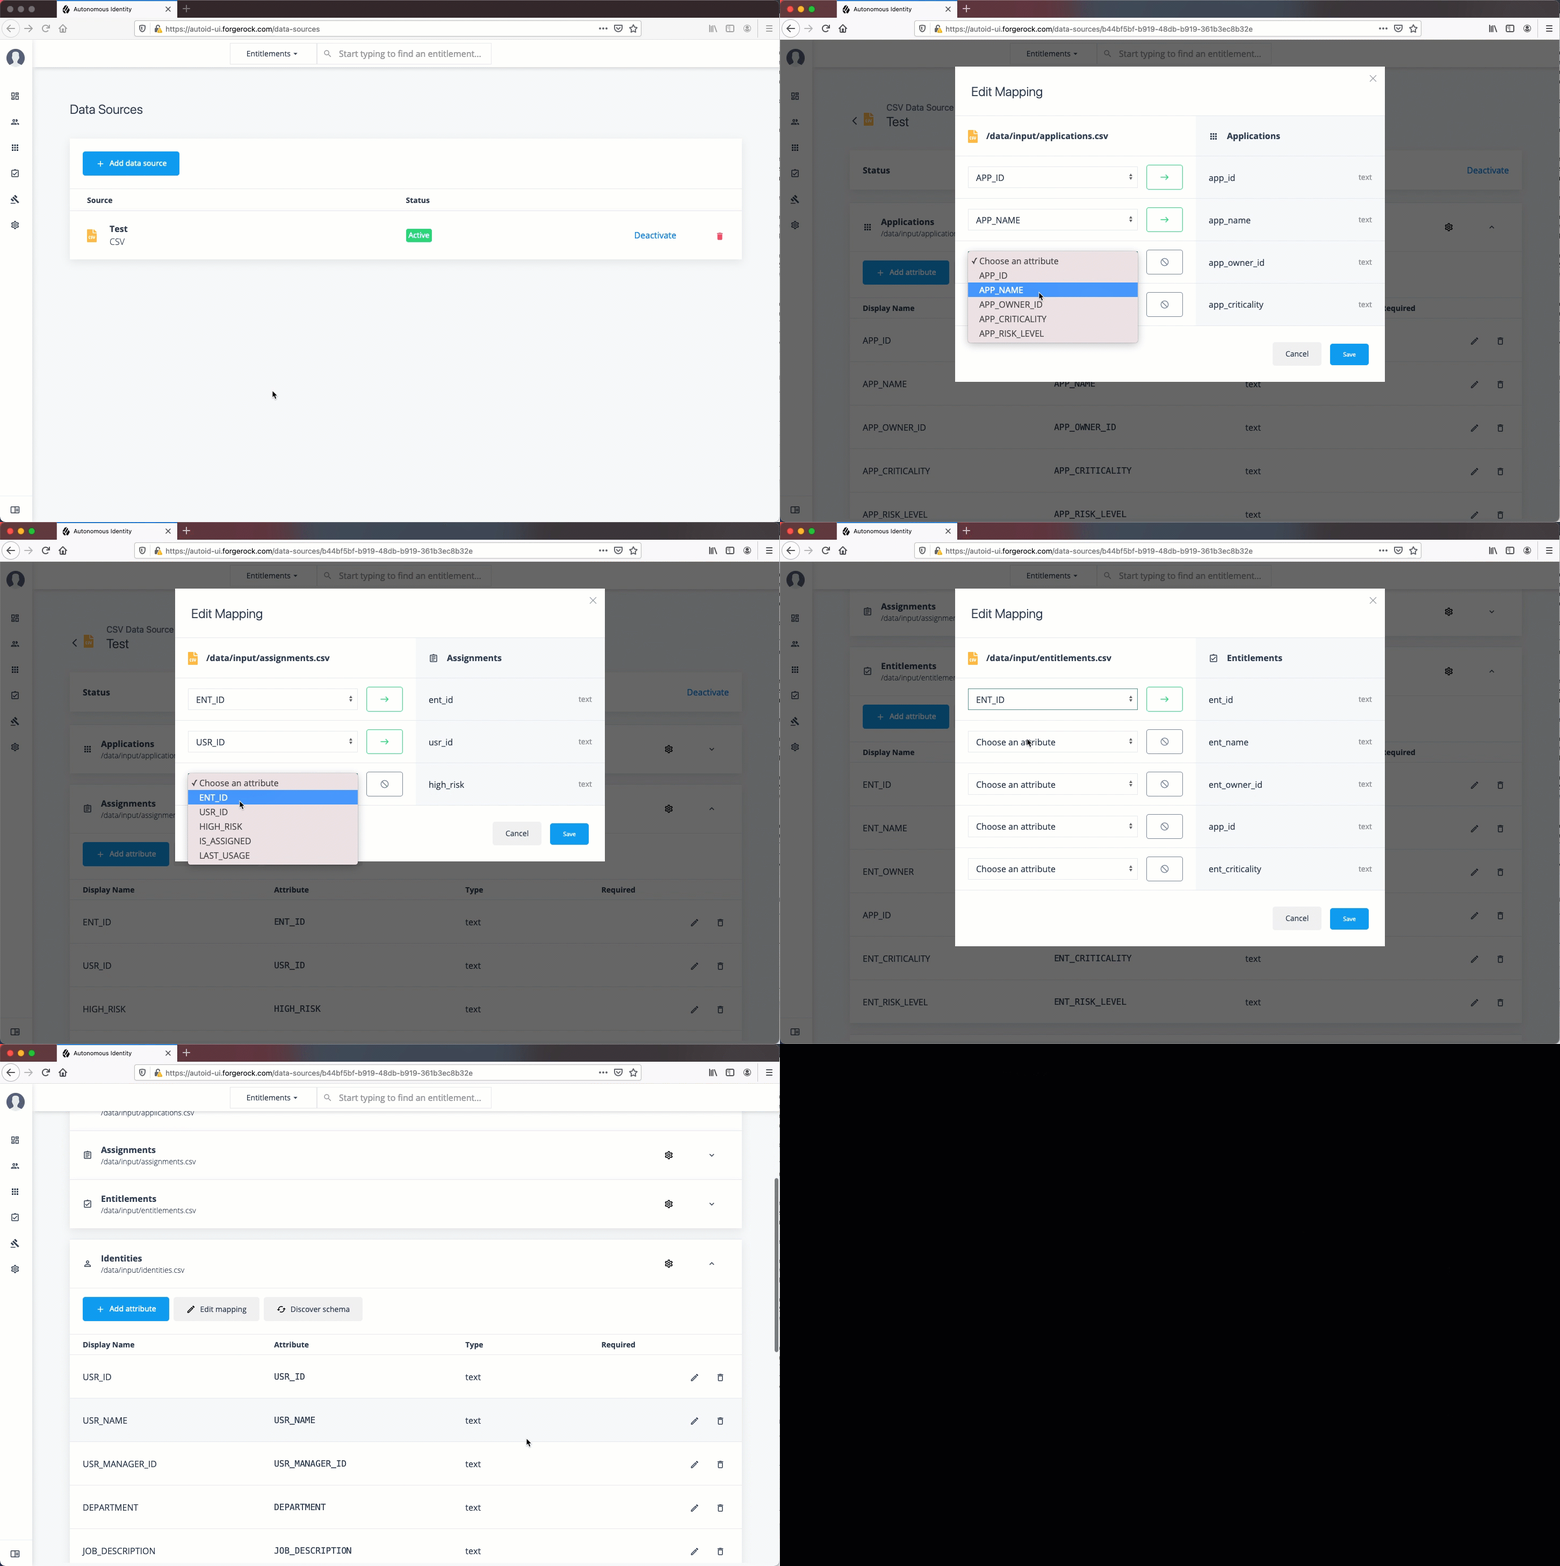
After setting your data sources for your CSV files, you must map any attributes specific to each of your data files to the Autonomous Identity schema.
-
On the Autonomous Identity UI, click the Administration icon > Data Sources.
-
Click the specific data source file to map.
-
Click Applications to set up its attribute mappings.
-
Click Discover Schema to view the current attributes in the schema, and then click Save.
-
Click Edit mapping to set up attribute mappings. On the Choose an attribute menu, select the corresponding attribute to map to the required attributes. Repeat for each attribute.
-
Click Save.
-
-
Click Assignments and repeat the previous steps.
-
Click Entitlements and repeat the previous steps.
-
Click Identities and repeat the previous steps.
-
Repeat the procedures for each data source file that you want to map.
Click an example
-
Optional. Next, adjust the analytics thresholds. Refer to Set Analytic Thresholds.
Set analytics thresholds
The Autonomous Identity UI now supports the configuration of the analytics threshold values to calculate confidence scores, predications, and recommendations.
| In general, there is little reason to change the default threshold values. If you do edit these values, be aware that incorrect threshold values can negatively affect your analytics results. |
There are six types of threshold settings that administrators can edit:
-
Confidence Score Thresholds. Confidence score thresholds lets you define High, Medium, and Low confidence score ranges. Autonomous Identity computes a confidence score for each access assignment based on its machine learning algorithm. The properties are:
Table 1: Confidence Score Thresholds Settings Default Description Confidence Score Thresholds
-
High: 0.75 or 75%
-
Medium: 0.35 or 35%
-
Confidence scores from 75 to 100 are set to High.
-
Confidence scores from 35 to 74 are set to Medium, and scores from 0 to 34 are set to Low.
-
-
Automation Score Threshold. Automation score threshold is a UI setting determining if an approval button and checkbox appears before a justification rule on the Entitlement Details and Rules pages.
Click to display an example image of where the approval button and checkbox are located
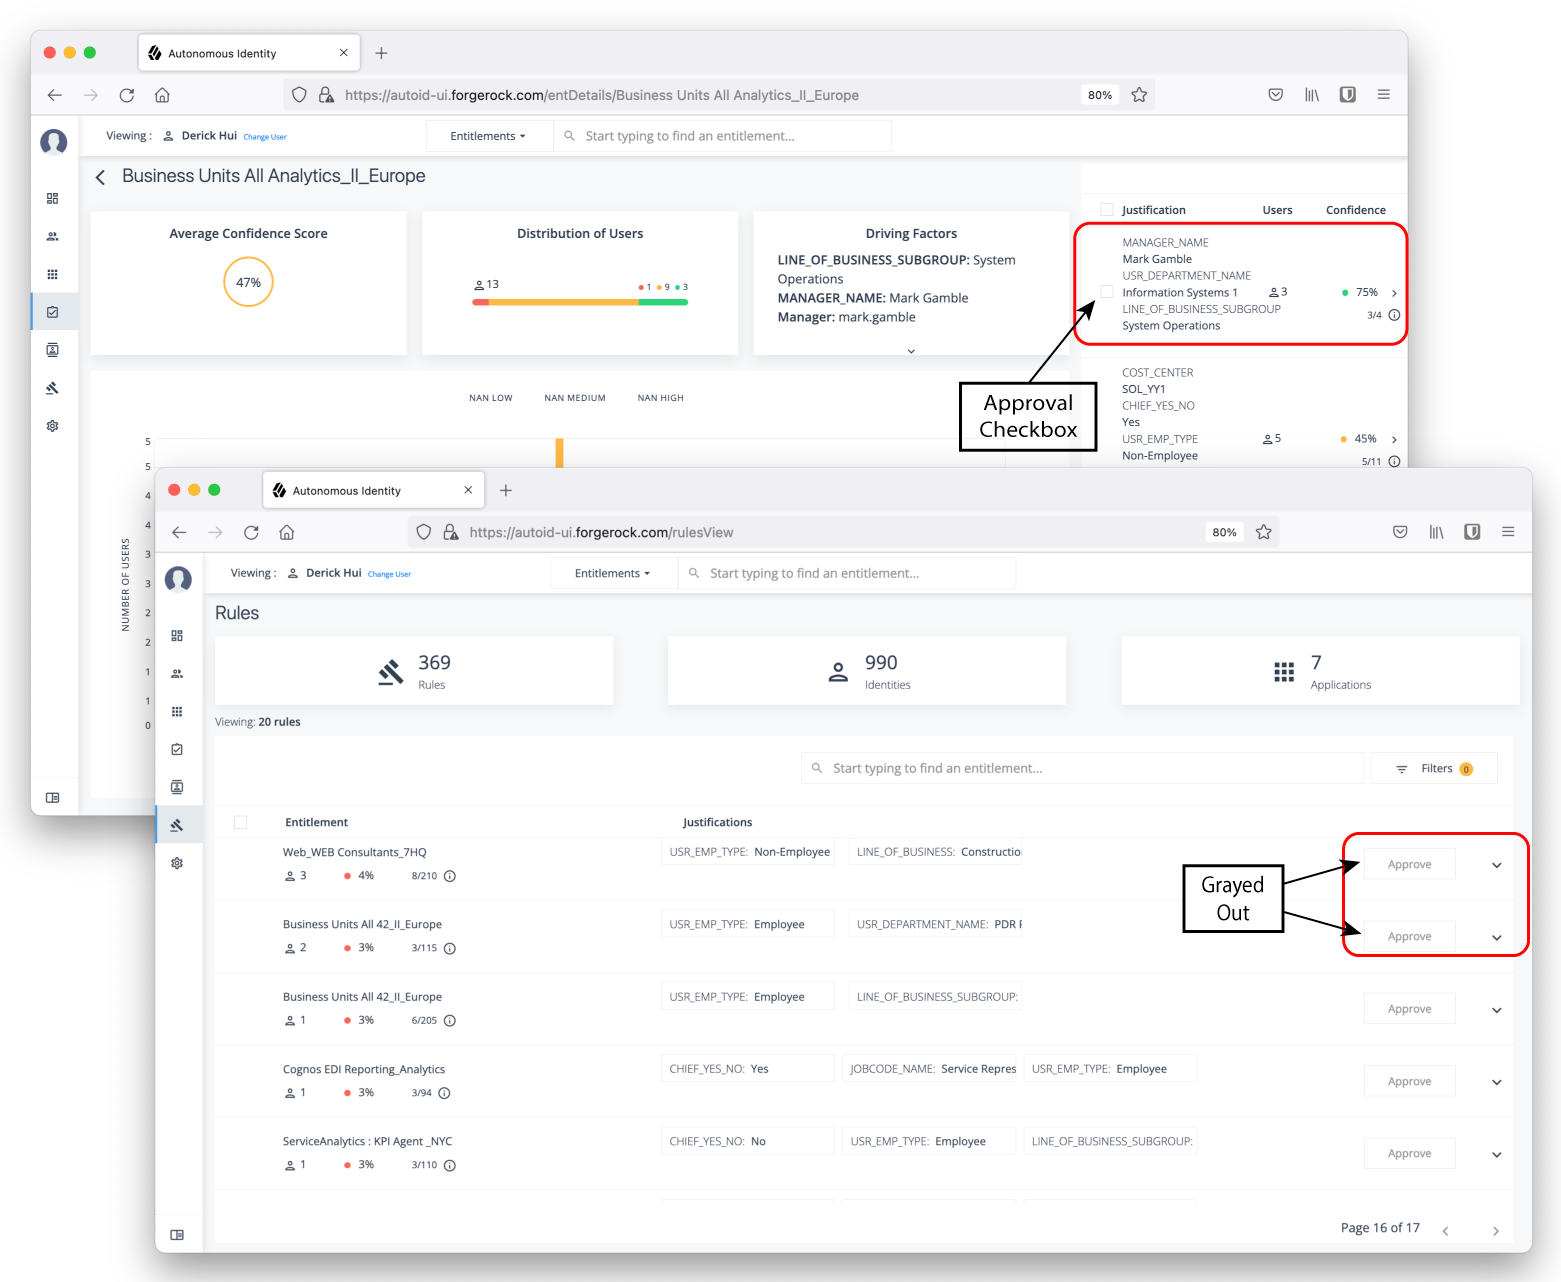
Table 2: Automation Score Threshold Settings Default Description Automation Score Threshold
0.5 or 50%
Specifies if any confidence score less than 50% will not give the user the option to approve the justification or rule.
-
Role Discovery Settings. Role discovery settings determine the key factors for roles for inclusion in the role mining process. Roles are a collection of entitlements and their associated justifications and access patterns. This collection is produced from the output training rules.
Table 3: Role Discovery Settings Default Description Confidence Threshold
0.75 or 75%
Specifies the minimum rule confidence required for inclusion in the role mining process.
Entitlements Threshold
1
Specifies the minimum number of entitlements a role may contain. The Autonomous Identity role mining process does not produce candidate roles below this threshold value. For example, if the threshold is 2, there are no roles that contain only one entitlement.
Minimum Role Membership
30
Specifies the granularity of the role through its membership. For example, the default is 30, which means that no role produced can have fewer than 30 members.
Remove Redundant Access Patterns
Enabled
Specifies a pruning process that removes redundant patterns when more general patterns can be retained.
For example, if a user is an Employee AND in the department, Finance, they receive the Excel access entitlement. However, there may be a more general rule that provisions Excel access by simply being an Employee.
-
[ ENT_Excel | DEPT_Finance, EMP_TYPE_Employee]
-
[ ENT_Excel | EMP_TYPE_Employee]
As a result, Autonomous Identity removes the first pattern and retains the latter more general rule.
-
-
Training Settings. Administrators can set the thresholds for the AI/ML training process, specifically the stemming process and general training properties.
Stemming: During the training process, Autonomous Identity generates rules by searching the data for if-then patterns that have a parent-child relationship in their composition. These if-then patterns are also known as antecedent-consequent relationships, which means rule-entitlement for Autonomous Identity.
Stemming is a process to remove any redundant final association rules output. For a rule to be stemmed, it must match the following criteria:
-
Rule B consequent must match Rule A consequent.
-
Rule B antecedent must be a superset of Rule A antecedent.
-
Rule B confidence score must be within a given range +/- (offset) of Rule A confidence score.
For example, the Payroll Report entitlement has two rules, each that involves the Finance department. All Dublin employees in the Finance department also get the entitlement. Stemming prunes the second rule (B) and retains the more general first rule (A).
ID Consequent (ENT) Antecedent (Rule) Confidence Score A
Payroll report
[Finance]
90%
B
Payroll report
[Dublin,Finance]
89%
Table 4: Training Settings Type Settings Default Description Stemming Predictions
Determines stemming, or pruning, properties.
Stemming Enabled
Enabled
Specifies if stemming occurs or not. Do not disable this feature.
Stemming Offset
0.02
Specifies the confidence range (plus or minus) of one rule to another rule.
Stemming Feature Size
3
Specifies the "up-to" maximum antecedent/justification size that may be the size priority of stemming. Because we want to retain the smallest rules possible, we start by prioritizing rules with an antecedent size of 1. We can then increase the antecedent size, iteratively, until we reach the Stemming Feature Size setting.
Batch Size
15000
Specifies the number of samples viewed is indicated by the batch size. An epoch is defined as the number of passes for a model to iterate through the entire dataset once and update its learning algorithm. To process the entire epoch, the model views a few samples at a time in batches.
Base Minimum Group
2
Specifies the minimum support value used in training. It is referred as Base, because it is used to find the minimum support value for the initial chunk of training.
Minimum Confidence
0.02
Specifies the lowest acceptable confidence score to be included in the entitlement-rule combination.
Number of Partitions
200
Specifies the number of partitions in a Spark configuration. A partition is a smaller chunk of a large dataset. Spark can run one concurrent task in a single partition. As a rule of thumb, the more partitions you have, the more work can be distributed among Spark worker nodes. In this case, small chunks of data are processed by each worker. In the case of fewer partitions, Autonomous Identity can process larger chunks of data.
-
-
Predictions Settings. Administrators can set the thresholds for the recommendation and as-is prediction processes.
Table 5: Predictions Settings Type Settings Default Description Recommendation Settings
Properties for setting the recommendation predictions settings.
Threshold
0.75
Specifies the confidence score threshold to be considered for recommendation.
Batch Size
1000
Specifies the number of rules and user entitlements processed at one time.
Minimum Frequency
0
Specifies the minimum frequency for a rule to appear for consideration as a recommendation. During the first training stage, Autonomous Identity models the frequent itemsets that appear in the HR attributes-only of each user. Only rules that appear a minimum of N times are considered. The value of N is the Minimum Frequency.
As-Is Prediction Settings
Properties for setting the as-is predictions settings.
Batch Size
15000
Specifies the number of rules and user entitlements processed at one time.
Confidence Threshold
0
Specifies the confidence score threshold to be considered for an as-is prediction.
Minimum Rule Length
1
Specifies the minimum justification size for rules to be considered in predictions. You only would increase this property if you don’t want a single rule overriding more specific or granular rules when determining access. For example, if the minimum rule length is 2, Autonomous Identity only uses the rule DEPT_Finance, JOB_TITLE_Account_II. However, if the default is kept at 1, the second and shorter rule can include a broader number of entitlement assignments.
-
[ ENT_AccountingSoftware | DEPT_Finance, JOB_TITLE_Account_II]
-
[ ENT_AccountingSoftware | EMP_TYPE_Employee]
Maximum Rule Length
10
Specifies the maximum justification size for rules to be considered in predictions. This property is a guardrail to keep rules that contain extremely large or complex justifications out of the prediction set.
Prediction Confidence Window
0.05
Specifies the range of acceptable values for a prediction confidence score. Rules with confidence scores outside the prediction confidence window range are filtered out. A confidence window is determined from the values set in the configuration file: max=maxConf, min=maxConf - pred_conf_window.
-
-
Analytics Spark Job Config. Administrators can adjust the Apache Spark job configuration if needed.
Table 6: Analytics Spark Job Configuration Settings Default Description Driver Memory
2G
Specifies the amount of memory for the driver process.
Driver Cores
3
Specifies the number of cores to use for the driver process in cluster mode.
Executor Memory
3G
Specifies the amount of memory to use per executor process.
Executor Cores
6
Specifies the number of executor cores per worker node.
Configure Analytic Settings
-
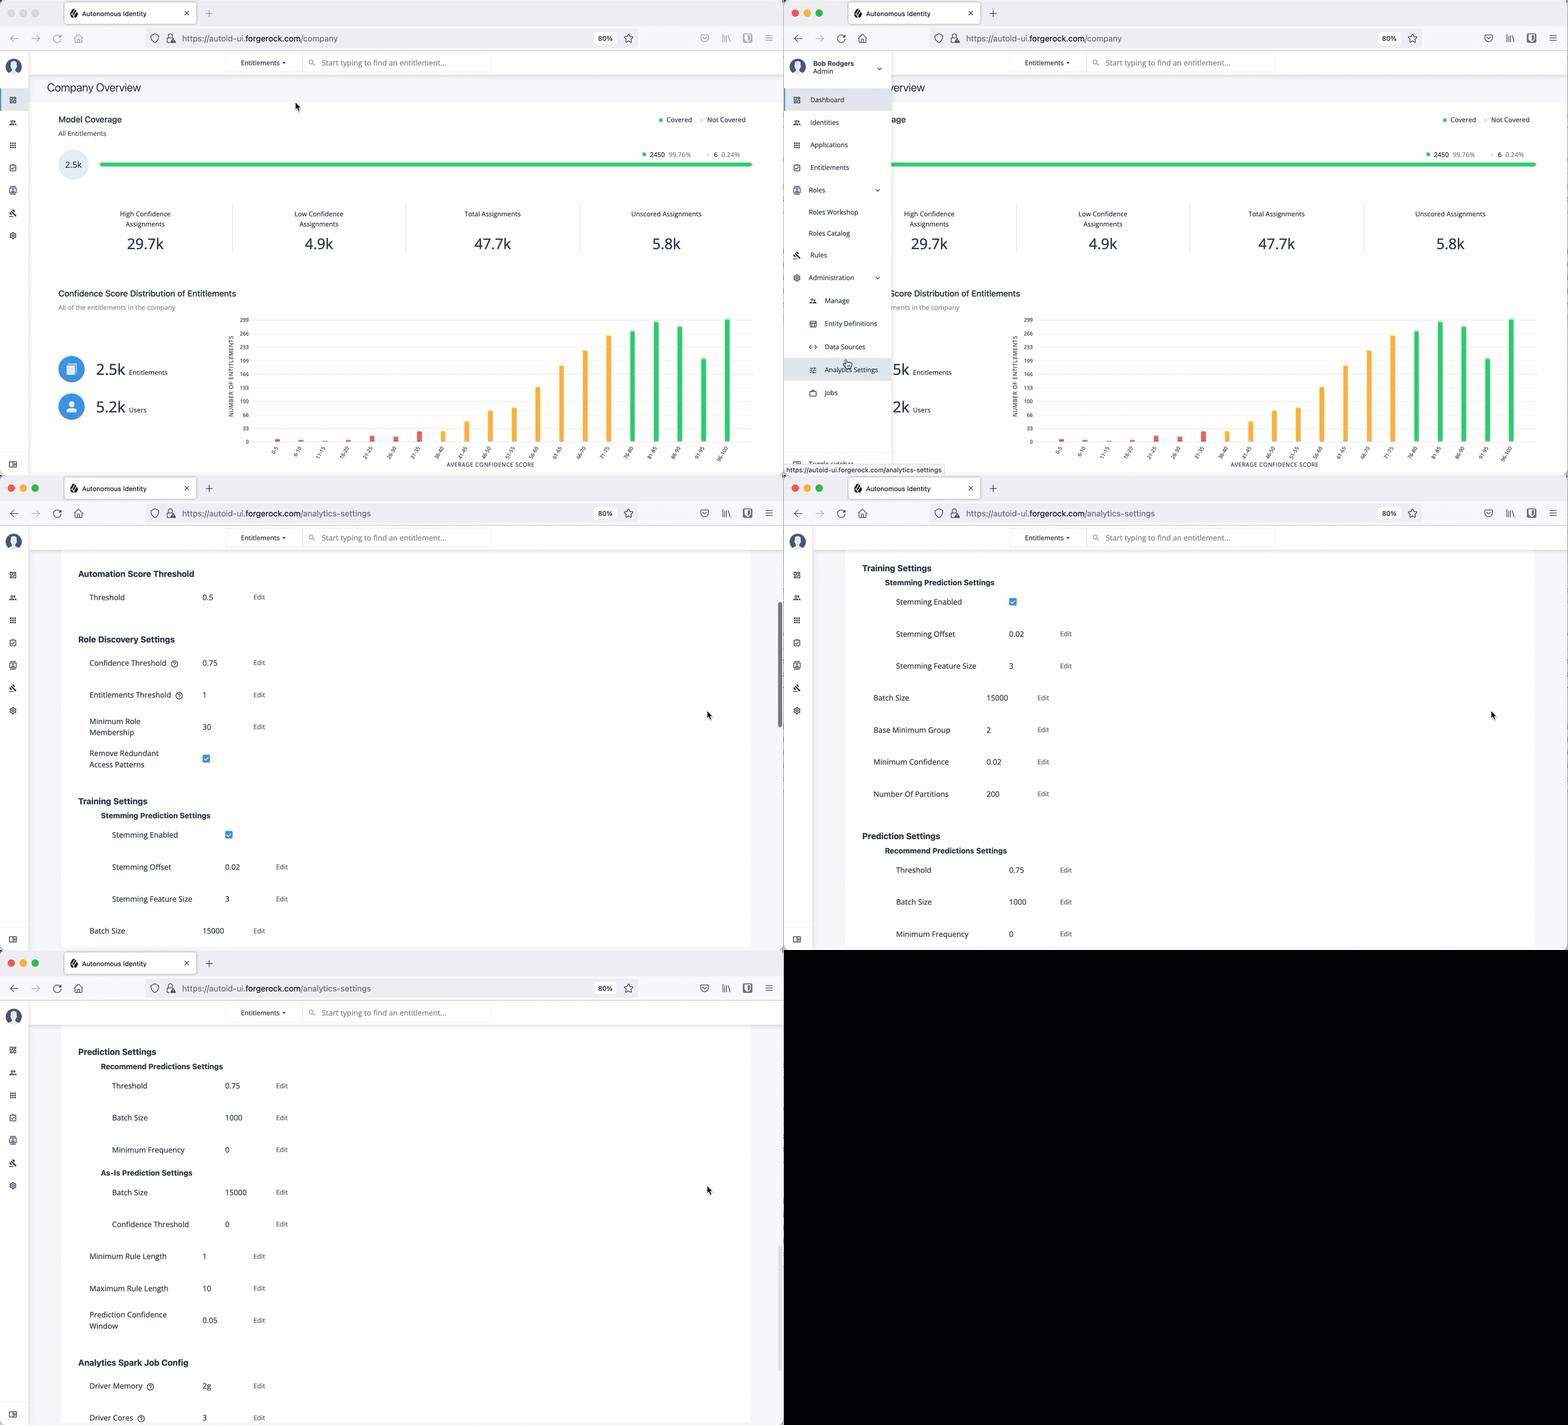
Log in to the Autonomous Identity UI as an administrator.
-
On the Autonomous Identity UI, click Administration.
-
Click Analytics Settings.
-
Under Confidence Score Thresholds, click Edit next to the High threshold value, and then enter a new value. Click Save. Repeat for the Medium threshold value.
-
Under Automation Score Threshold, click Edit next to a threshold value, and then enter a new value.
-
Under Role Discovery Setting, click Edit next to a threshold value, and then enter a new value.
-
Under Training Settings, click Edit next to a threshold value, and then enter a new value.
-
Under Prediction Settings, click Edit next to a threshold value, and then enter a new value.
-
Under Analytics Spark Job Config, click Edit next to a threshold value, and then enter a new value.
-
Click Save.
Click an example
-
Next, you can run the analytics. Refer Run Analytics.
Run analytics
The Analytics pipeline is the heart of Autonomous Identity. The pipeline analyzes, calculates, and determines the association rules, confidence scores, predictions, and recommendations for assigning entitlements and roles to the users.
The analytics pipeline is an intensive processing operation that can take time depending on your dataset and configuration. To ensure an accurate analysis, the data needs to be as complete as possible with little or no null values. Once you have prepared the data, you must run a series of analytics jobs to ensure an accurate rendering of the entitlements and confidence scores.
Pre-analytics tasks
Before running the analytics, you must run the following pre-analytics steps to set up your datasets and schema using the Autonomous Identity UI:
-
Add attributes to the schema. For more information, refer to Set Entity Definitions.
-
Define your datasources. Autonomous Identity supports different file types for ingestion: CSV, JDBC, and generic. You can enter more than one data source file, specifying the dataset location on your target machine. For more information, refer to Set Data Sources.
-
Define attribute mappings between your data and the schema. For more information, refer to Set Attribute Mappings.
-
Configure your analytics threshold values. For more information, refer to Set Analytics Thresholds.
About the analytics process
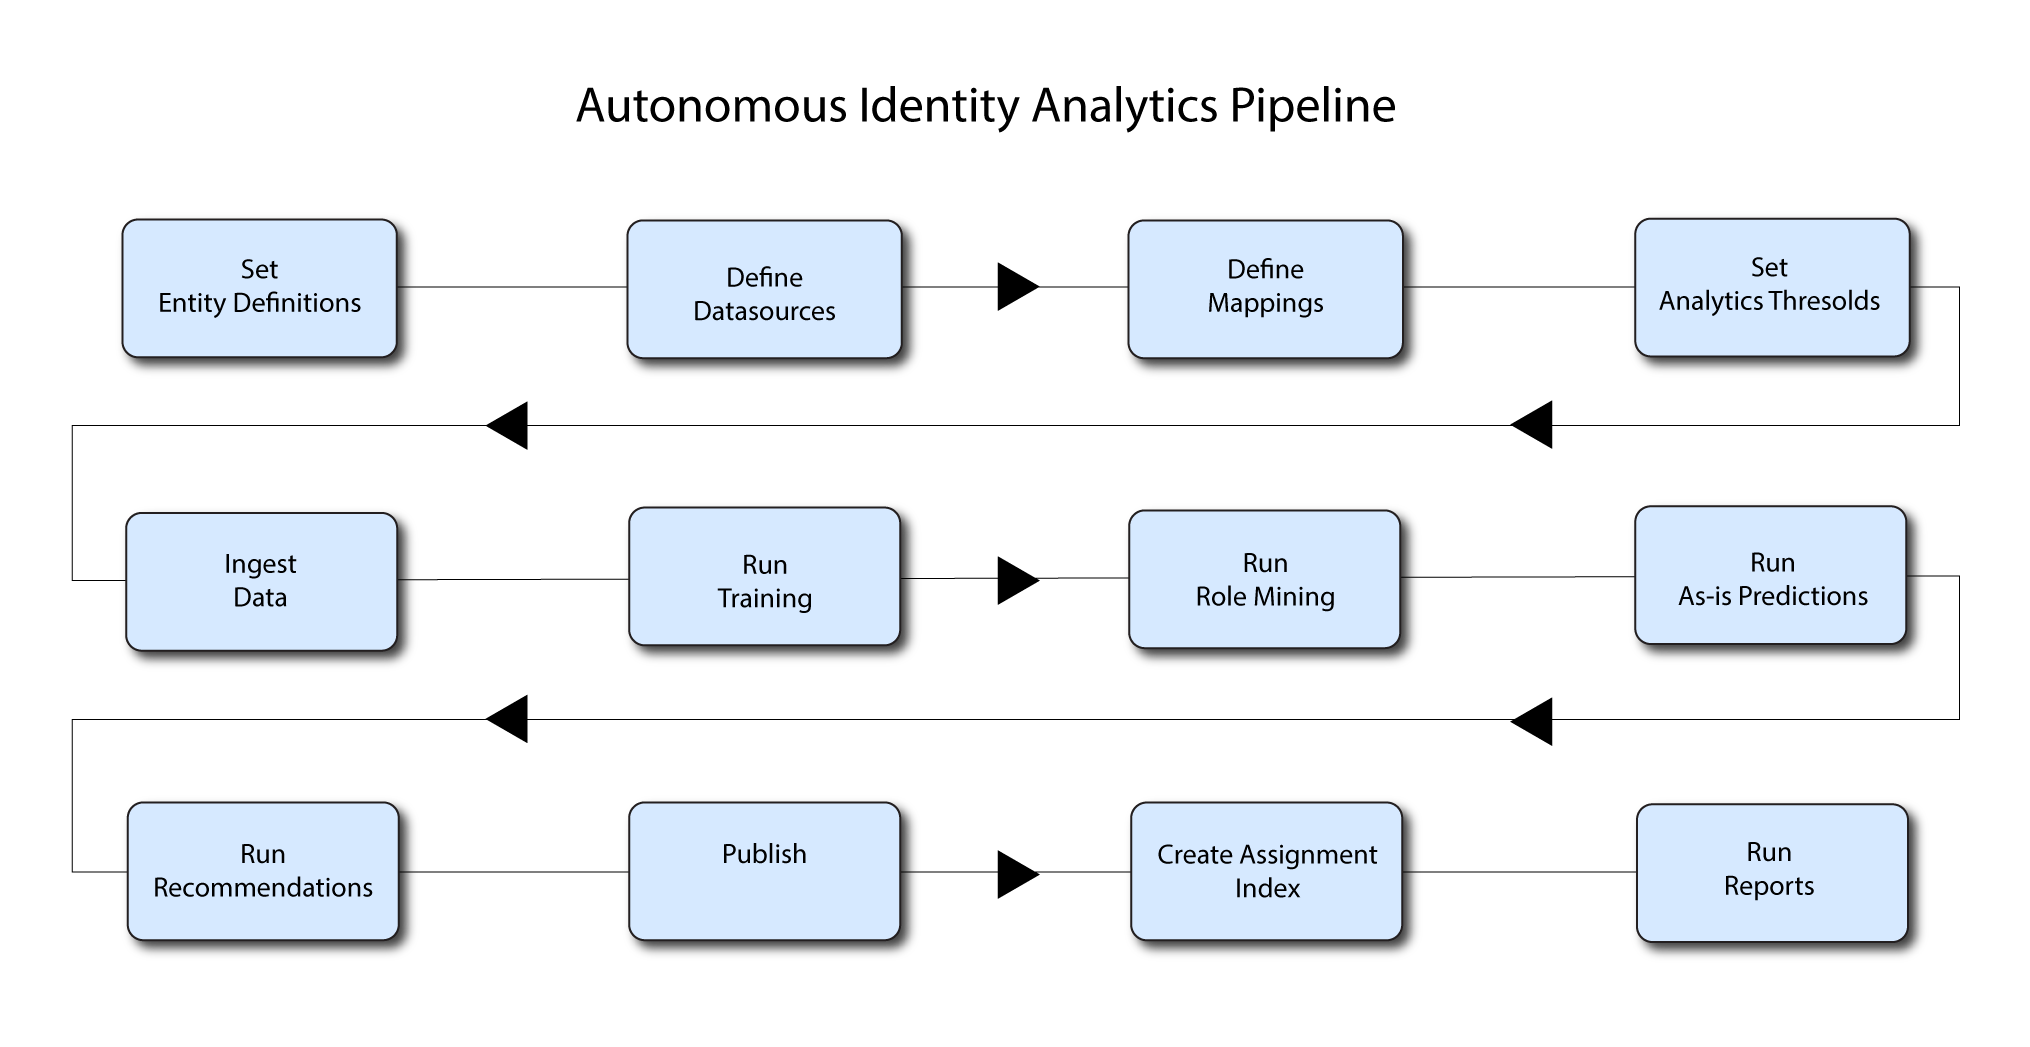
Once you have finished the pre-analytics steps, you can start the analytics. The general analytics process is outlined as follows:
-
Ingest. The ingestion job pulls in data into the system. You can ingest CSV, JDBC, and generic JSON files depending on your system.
-
Training. The training job creates the association rules for each user-assigned entitlement. This is a somewhat intensive operation as the analytics generates a million or more association rules. Once the association rules have been determined, they are applied to user-assigned entitlements.
-
Role Mining. The role mining job analyzes all existing entitlements and analyzes candidate configurations for new roles.
-
Predict As-Is. The predict as-is job determines the current confidence scores for all assigned entitlements.
-
Predict Recommendation. The predict recommendations job looks at all users who do not have a specific entitlement, but are good candidates to receive the entitlement based on their user attribute data.
-
Publish. The publish run publishes the data to the backend Cassandra or MongoDB databases.
-
Create Assignment Index. The create-assignment-index creates the Autonomous Identity index.
-
Run Reports. You can run the create-assignment-index-report (report on index creation), anomaly (report on anomalous entitlement assignments), insight (summary of the analytics jobs), and audit (report on change of data).
|
The analytics pipeline requires that DNS properly resolve the hostname before its start. Make sure to set it on your DNS server or locally in your |
The following sections present the steps to run the analytics pipeline using the Jobs UI.
|
You can continue to use the command-line to run each step of the analytics pipeline. For instructions, refer to Run analytics on the command Line. |
Ingest the data files
At this point, you should have set your data sources and configured your attribute mappings. You can now run the initial analytics job to import the data into the Cassandra or MongoDB database.
Run ingest using the UI:
-
On the Autonomous Identity UI, click the Administration link, and then click Jobs.
-
On the Jobs page, click New Job. Autonomous Identity displays a job schedule with each job in the analytics pipeline.
-
Click Ingest, and then click Next.
-
On the New Ingest Job box, enter the name of the job, and then select the data source file.
-
Click Advanced and adjust any of the Spark properties, if necessary:
-
Driver Memory (GB)
-
Driver Cores
-
Executor Memory (GB)
-
Executor Cores
-
-
Click Save to continue.
-
Click one of the following commands:
-
If you need to edit any of the job settings, click Edit.
-
If you want to remove the job from your Jobs page, click Delete job.
-
-
Click Run Now to start the ingestion run.
-
Next monitor the state of the job by clicking Logs, or click Refresh to update the Jobs page.
-
When the job completes, the change in the status appears.
Click an example
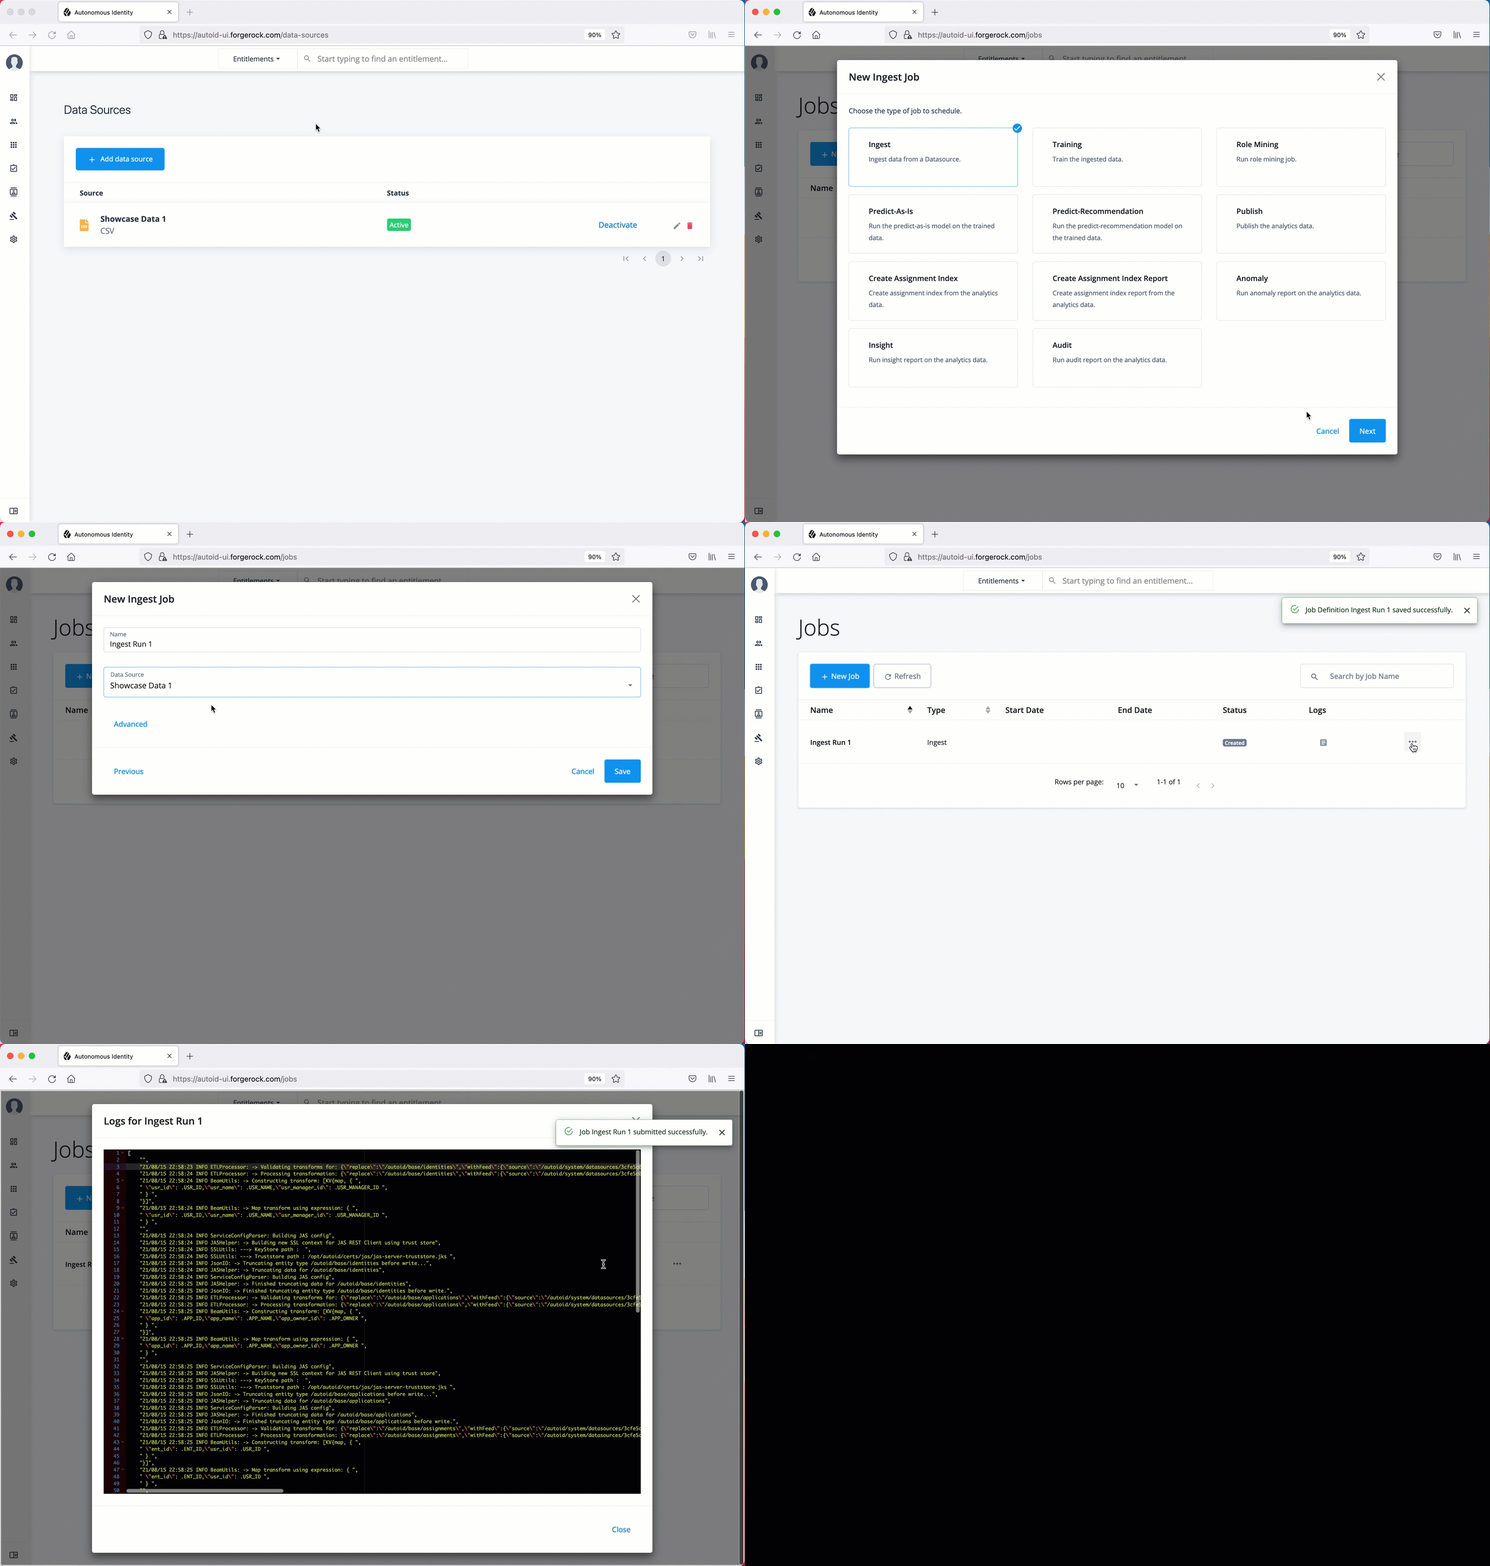
Run training
After you have ingested the data into Autonomous Identity, start the training run.
Training involves two steps:
-
Autonomous Identity starts an initial machine learning run where it analyzes the data and produces association rules, which are relationships discovered within your large set of data. In a typical deployment, you can have several million generated rules. The training process can take time depending on the size of your data set.
-
Each of these rules are mapped from the user attributes to the entitlements and assigned a confidence score.
The initial training run may take time as it goes through the analysis process. Once it completes, it saves the results directly to the database.
Run training using the UI:
-
On the Autonomous Identity UI, click the Administration link, and then click Jobs.
-
On the Jobs page, click New Job. Autonomous Identity displays a job schedule with each job in the analytics pipeline.
-
Click Training, and then click Next.
-
On the New Training Job box, enter the name of the job.
-
Click Advanced and adjust any of the Spark properties, if necessary.
-
Click Save to continue.
-
Click Run Now.
-
Next monitor the state of the job by clicking Logs, or click Refresh to update the Jobs page.
-
When the job completes, the change in the status is displayed.
Click an example
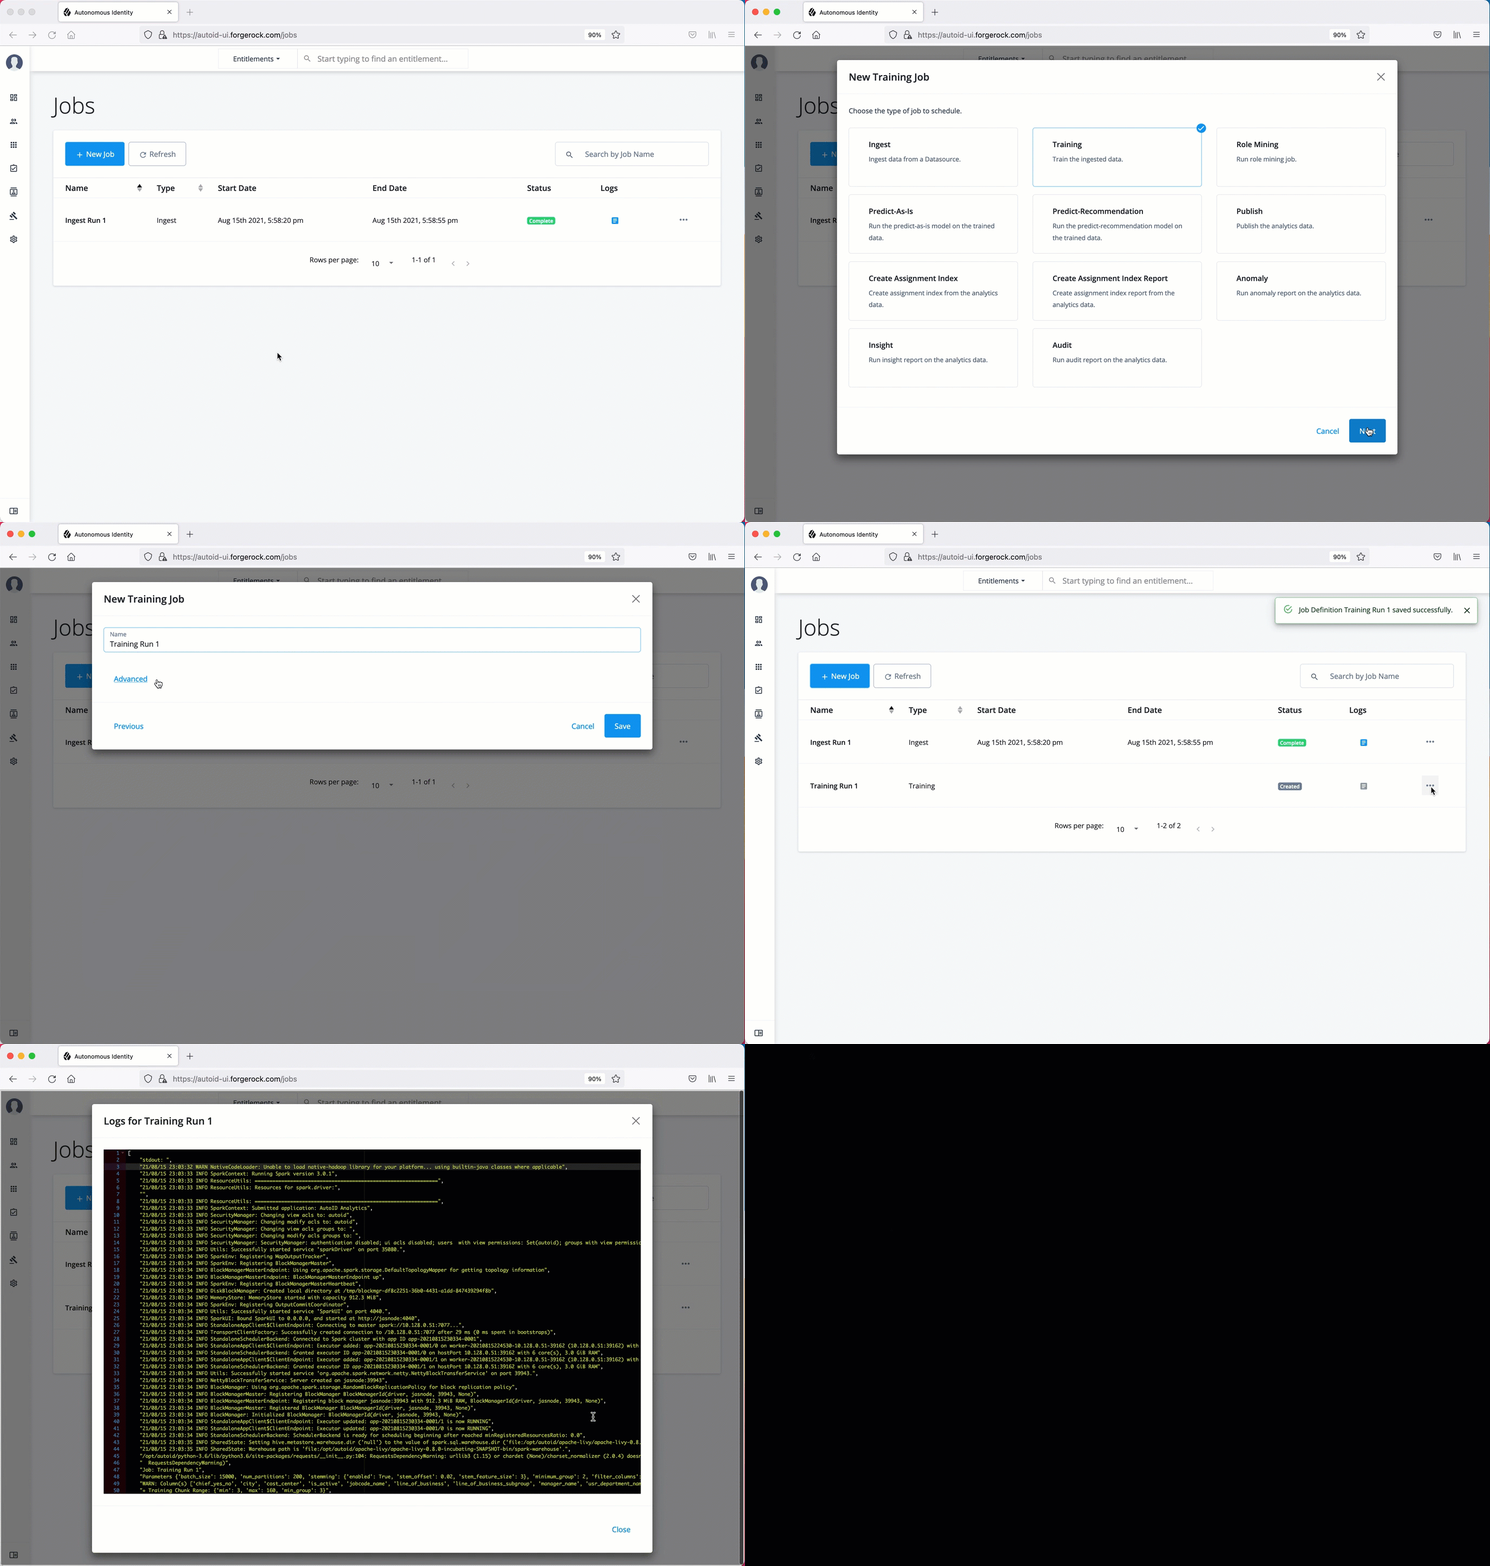
Run role mining
After you have run training, you can now run the role mining job.
If you want to update your role mining data after an initial analytics job, you can minimally run the ingest, train, and mine analytics jobs.
However, we recommend re-running the full analytics pipeline, so that other pages can pick up changes to your access landscape.
|
Run role mining using the UI:
-
On the Autonomous Identity UI, click the Administration link, and then click Jobs.
-
On the Jobs page, click New Job. Autonomous Identity displays a job schedule with each job in the analytics pipeline.
-
Click Role Mining, and then click Next.
-
On the New Role Mining Job box, enter the name of the job.
-
Click Advanced and adjust any of the Spark properties, if necessary.
-
Click Save to continue.
-
Click Run Now.
-
Next monitor the state of the job by clicking Logs, or click Refresh to update the Jobs page.
-
When the job completes, the change in the status appears.
Click an example
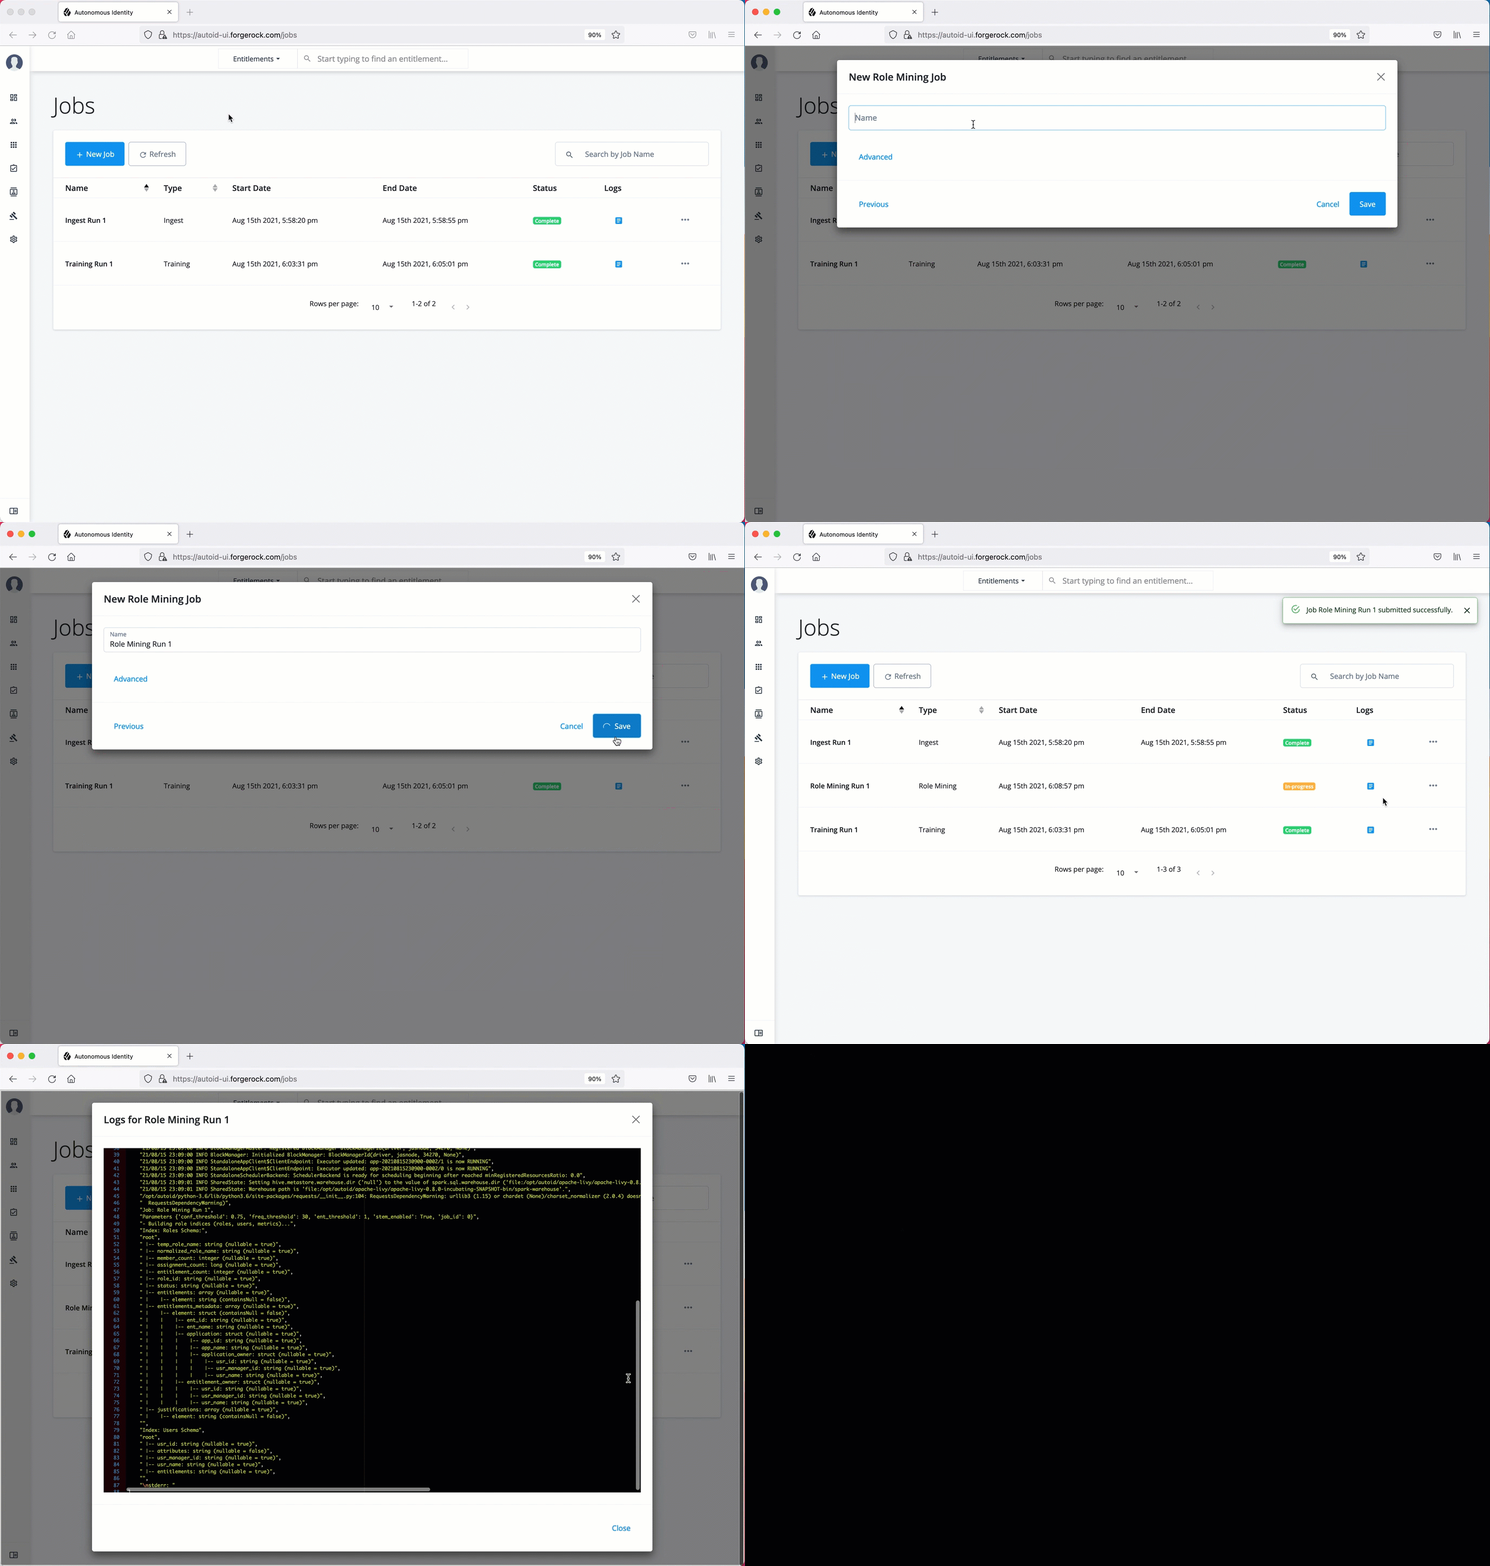
Run as-is predictions
After your initial training run, the association rules are saved to disk. The next phase is to use these rules as a basis for the predictions module.
The predictions module is comprised of two different processes:
-
as-is. During the As-Is Prediction process, confidence scores are assigned to the entitlements that users currently have. The as-is process maps the highest confidence score to the highest
freqUnionrule for each user-entitlement access. These rules will then be displayed in the UI and saved directly to the database. -
Recommendations. Refer to Run recommendations.
Run predict as-is using the UI:
-
On the Autonomous Identity UI, click the Administration link, and then click Jobs.
-
On the Jobs page, click New Job. Autonomous Identity displays a job schedule with each job in the analytics pipeline.
-
Click Predict-As-Is, and then click Next.
-
On the New Predict-As-Is Job box, enter the name of the job.
-
Click Advanced and adjust any of the Spark properties, if necessary.
-
Click Save to continue.
-
Click Run Now.
-
Next monitor the state of the job by clicking Logs, or click Refresh to update the Jobs page.
-
When the job completes, the change in the status is displayed.
Click an example
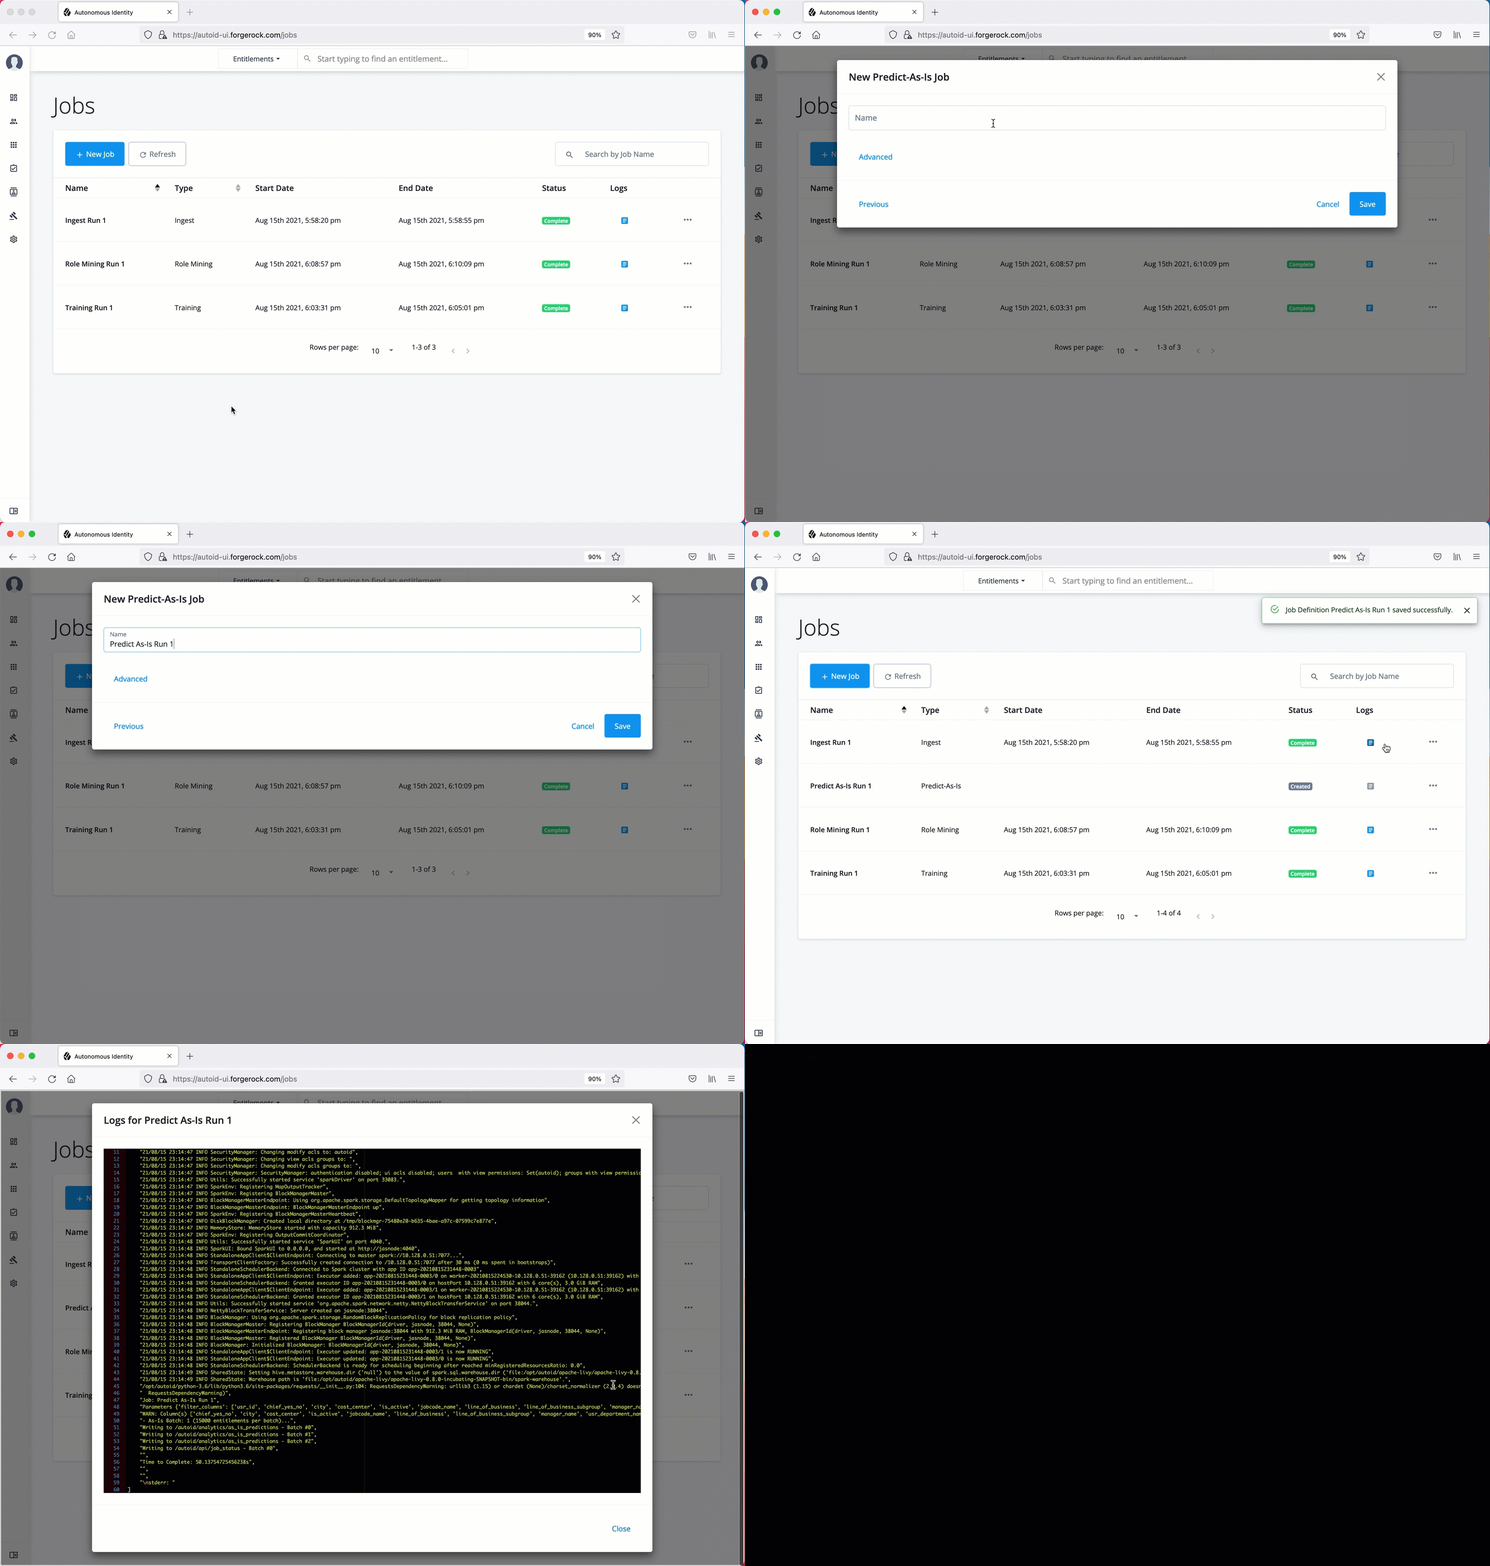
Run recommendations
During the second phase of the predictions process, the recommendations process analyzes each employee who may not have a particular entitlement and predicts the access rights that they should have according to their high confidence score justifications. These rules will then be displayed in the UI and saved directly to the database.
Run predict-recommendation using the UI:
-
On the Autonomous Identity UI, click the Administration link, and then click Jobs.
-
On the Jobs page, click New Job. Autonomous Identity displays a job schedule with each job in the analytics pipeline.
-
Click Predict-Recommendation, and then click Next.
-
On the New Predict-Recommendation Job box, enter the name of the job.
-
Click Advanced and adjust any of the Spark properties, if necessary.
-
Click Save to continue.
-
Click Run Now.
-
Next monitor the state of the job by clicking Logs, or click Refresh to update the Jobs page.
-
When the job completes, the change in the status appears.
Click an example
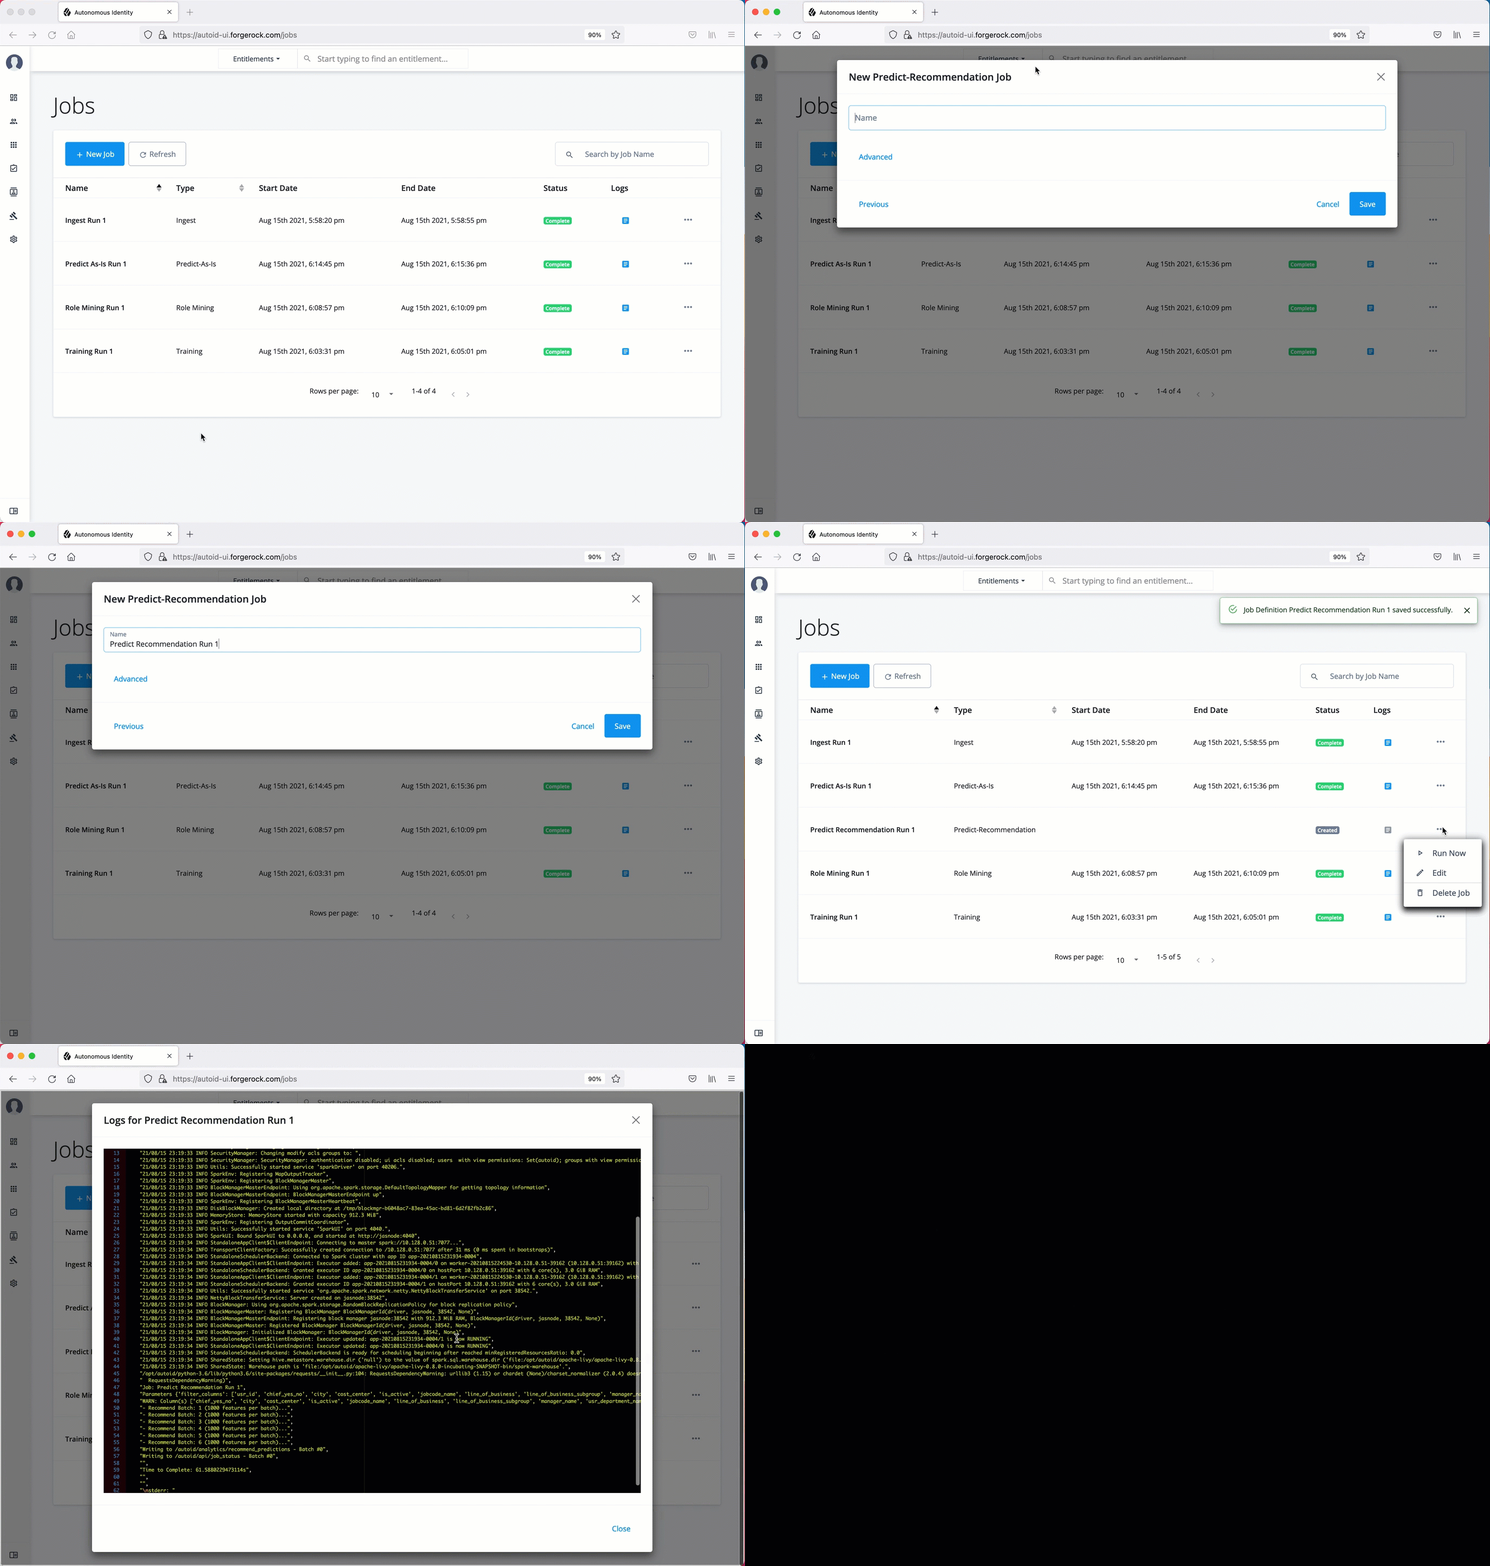
Publish the analytics data
Populate the output of the training, predictions, and recommendation runs to a large table with all assignments and justifications for each assignment. The table data is then pushed to the Cassandra or MongoDB backend.
Run publish using the UI:
-
On the Autonomous Identity UI, click the Administration link, and then click Jobs.
-
On the Jobs page, click New Job. Autonomous Identity displays a job schedule with each job in the analytics pipeline.
-
Click Publish, and then click Next.
-
On the New Publish Job box, enter the name of the job.
-
Click Advanced and adjust any of the Spark properties, if necessary.
-
Click Save to continue.
-
Click one of the following commands:
-
Click Run Now.
-
Next monitor the state of the job by clicking Logs, or click Refresh to update the Jobs page.
-
When the job completes, the change in the status appears.
Click an example
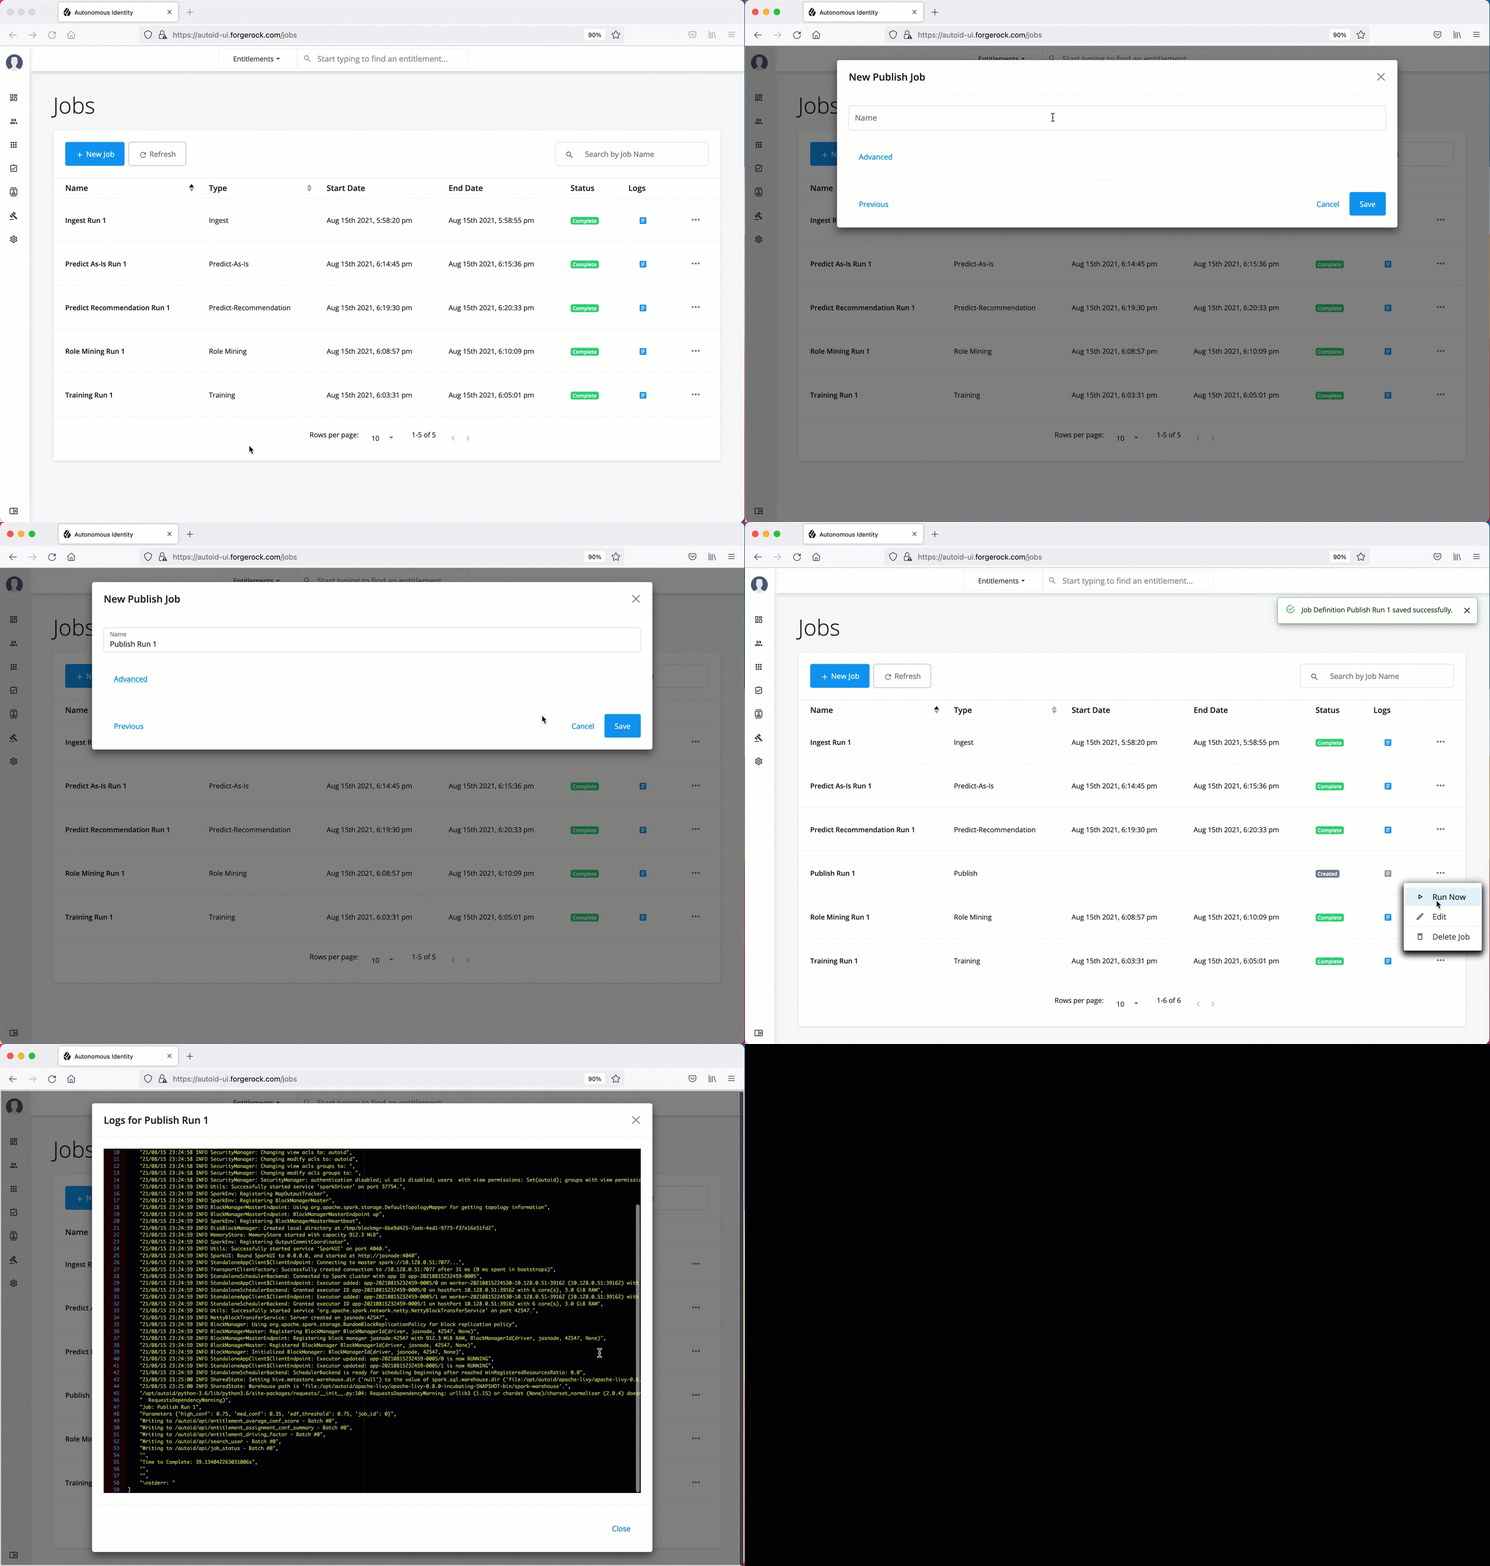
Create assignment index
Next, run the create-assignment-index job. This command creates a master index by joining together all database
tables. The combined index becomes a source index for the APIs.
Run create-assignment-index using the UI:
-
On the Autonomous Identity UI, click the Administration link, and then click Jobs.
-
On the Jobs page, click New Job. Autonomous Identity displays a job schedule with each job in the analytics pipeline.
-
Click Create Assignment Index, and then click Next.
-
On the New Create Assignment Index Job box, enter the name of the job.
-
Click Advanced and adjust any of the Spark properties, if necessary.
-
Click Save to continue.
-
Click Run Now.
-
Next monitor the state of the job by clicking Logs, or click Refresh to update the Jobs page.
-
When the job completes, the change in the status appears.
Click an example
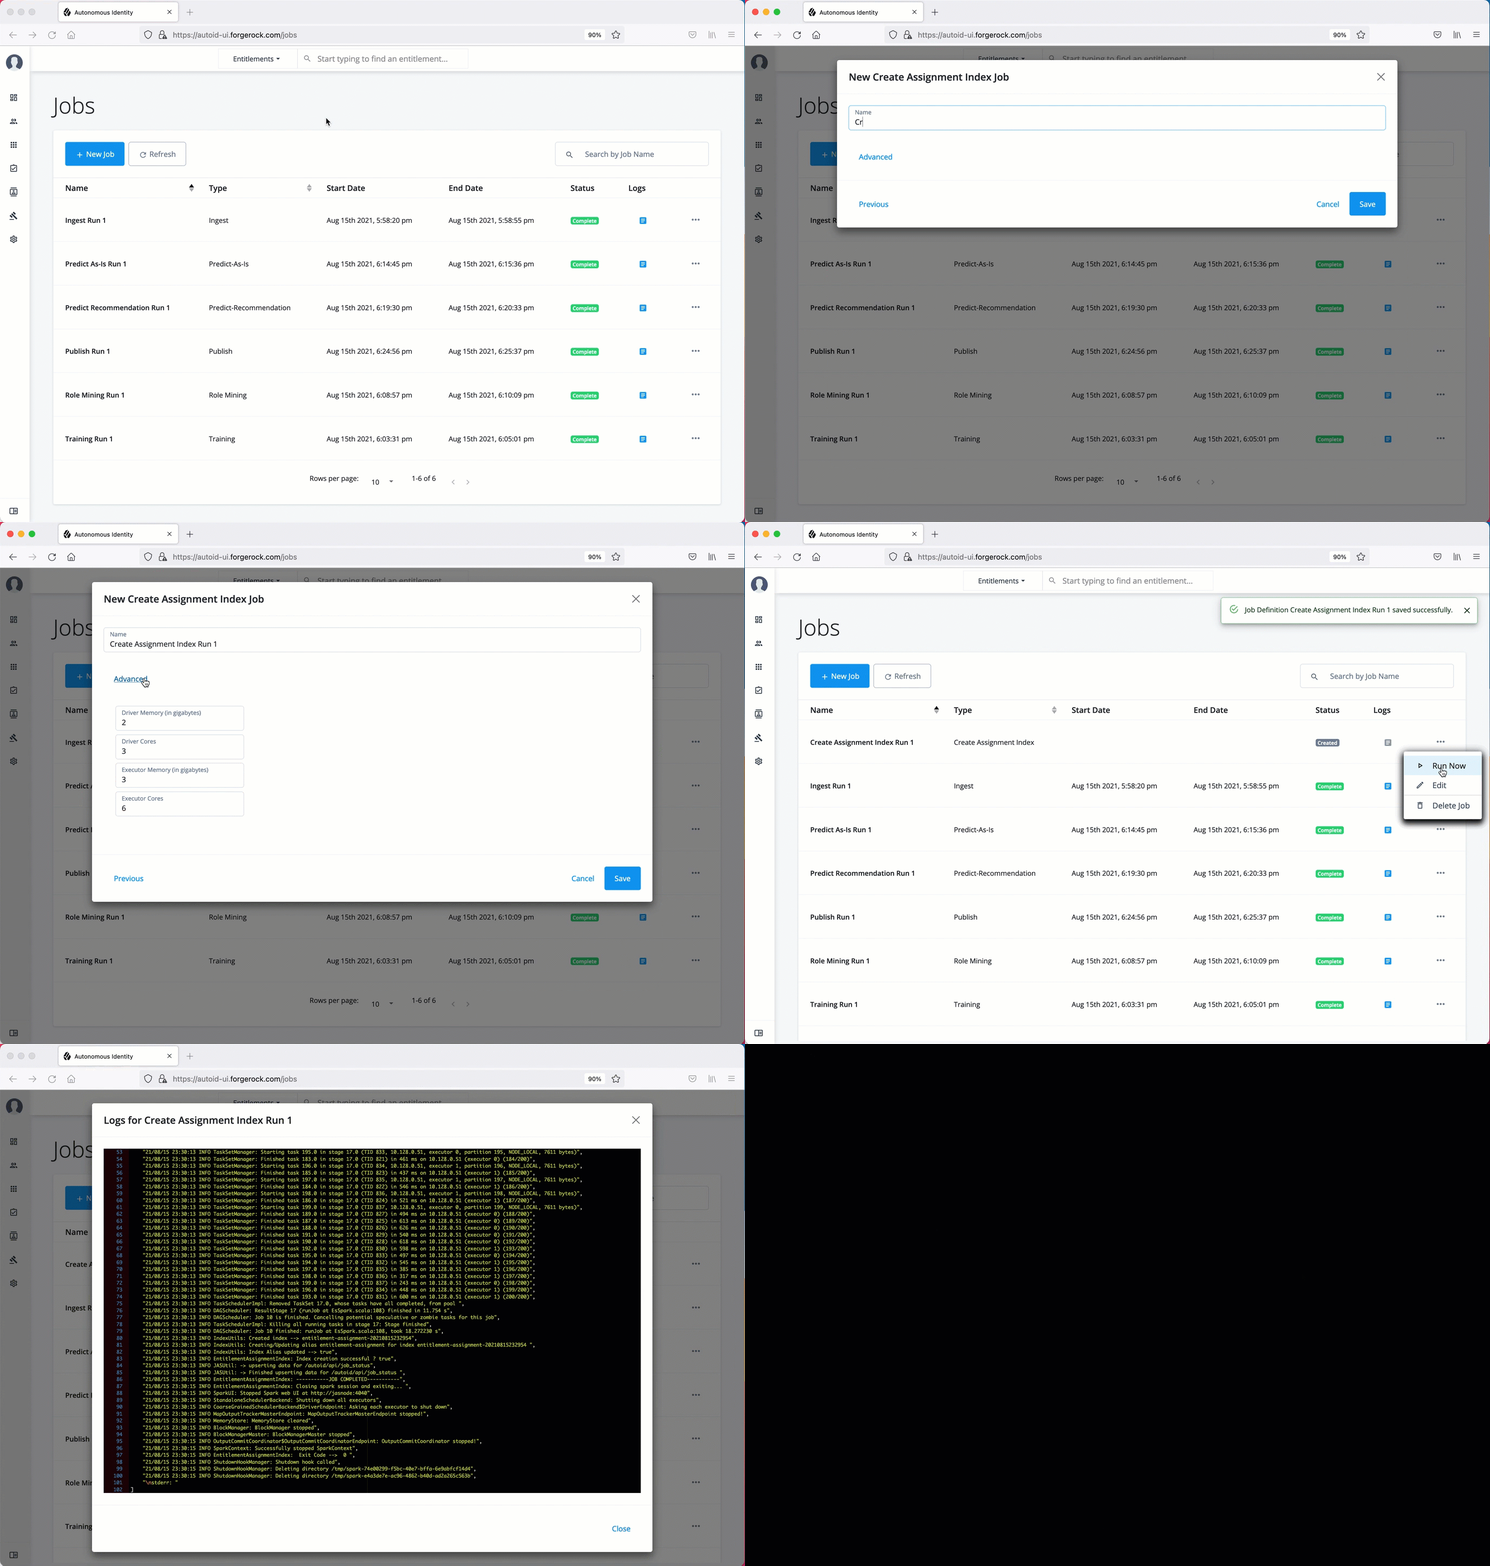
The create-assignment-index-report is an export of the assignment index to a csv file. This allows
users to create custom reports from the master table.
|
Run anomaly report
Autonomous Identity provides a report on any anomalous entitlement assignments that have a low confidence score but are for entitlements that have a high average confidence score. The report’s purpose is to identify true anomalies rather than poorly managed entitlements.
The report generates the following points:
-
Identifies potential anomalous assignments.
-
Identifies the number of users who fall below a low confidence score threshold. For example, if 100 people all have low confidence score assignments to the same entitlement, then it is likely not an anomaly. The entitlement is either missing data or the assignment is poorly managed.
Run the anomaly report using the UI:
-
On the Autonomous Identity UI, click the Administration link, and then click Jobs.
-
On the Jobs page, click New Job. Autonomous Identity displays a job schedule with each job in the analytics pipeline.
-
Click Anomaly, and then click Next.
-
On the New Anomaly Job box, enter the name of the job.
-
Click Advanced and adjust any of the Spark properties, if necessary.
-
Click Save to continue.
-
Click Run Now to start the ingestion run.
-
Next monitor the state of the job by clicking Logs, or click Refresh to update the Jobs page.
-
When the job completes, the change in the status appears.
-
Access the anomaly report. The report is available at
/data/output/reports/anomaly_report/<report-id>.csv.
Run insight report
Next, run an insight report on the generated rules and predictions that were generated during the training and predictions runs. The analytics command generates insight_report.txt and insight_report.xlsx and writes them to the /data/input/spark_runs/reports
directory.
The report provides the following insights:
-
Total number of assignments received, scored, and unscored.
-
Total number of valid assignments received.
-
Total number of invalid assignments received.
-
Total number of assignments received, scored, and unscored.
-
Number of entitlements received, scored, and unscored.
-
Number of assignments scored greater than 80% and less than 5%.
-
Distribution of assignment confidence scores.
-
List of the high volume, high average confidence entitlements.
-
List of the high volume, low average confidence entitlements.
-
Top 25 users with more than 10 entitlements.
-
Top 25 users with more than 10 entitlements and confidence scores greater than 80%.
-
Top 25 users with more than 10 entitlements and confidence scores less than 5%.
-
Breakdown of all applications and confidence scores of their assignments.
-
Supervisors with most employees and confidence scores of their assignments.
-
Top 50 role owners by number of assignments.
-
List of the "Golden Rules," high confidence justifications that apply to a large volume of people.
Run the insight report using the UI:
-
On the Autonomous Identity UI, click the Administration link, and then click Jobs.
-
On the Jobs page, click New Job. Autonomous Identity displays a job schedule with each job in the analytics pipeline.
-
Click Insight, and then click Next.
-
On the New Insight Job box, enter the name of the job.
-
Click Advanced and adjust any of the Spark properties, if necessary.
-
Click Save to continue.
-
Click Run Now.
-
Next monitor the state of the job by clicking Logs, or click Refresh to update the Jobs page.
-
When the job completes, the change in the status appears.
-
Access the insight report. The report is available at
/data/output/reports/insight_report.xlsx.
Run analytics on the command Line
Autonomous Identity supports the ability to run the pipeline from the command-line. Before you run the pipeline commands, you must run the pre-analytic tasks as defined in Pre-Analytics Tasks, and then define the jobs on the Jobs UI.
|
The analytics pipeline CLI commands will be deprecated in a future release. We recommend using the Jobs UI to run the analytics jobs. |
-
Make sure to run the pre-analytics tasks, such as adding attributes to the schema, define your datasources, set up your attribute mappings, and adjusting your analytics threshold values, if necessary:
-
Add attributes to the schema. For more information, refer to Set Entity Definitions.
-
Define your datasources. Autonomous Identity supports different file types for ingestion: CSV, JDBC, and generic. You can enter more than one data source file, specifying the dataset location on your target machine. For more information, refer to Set Data Sources.
-
Define attribute mappings between your data and the schema. For more information, refer to Set Attribute Mappings.
-
Configure your analytics threshold values. For more information, refer to Set Analytics Thresholds.
-
-
Define your job definitions on the UI for each of the following:
You can only define your job definitions on the Autonomous Identity UI. There is no command-line equivalent to define the jobs.
-
Ingest
-
Train
-
Role Mine
-
Predict As-Is
-
Predict Recommendation
-
Publish
-
Create Assignment Index
-
Anomaly Report (Optional)
-
Insight Report (Optional)
-
Audit Report (Optional)
Click an example
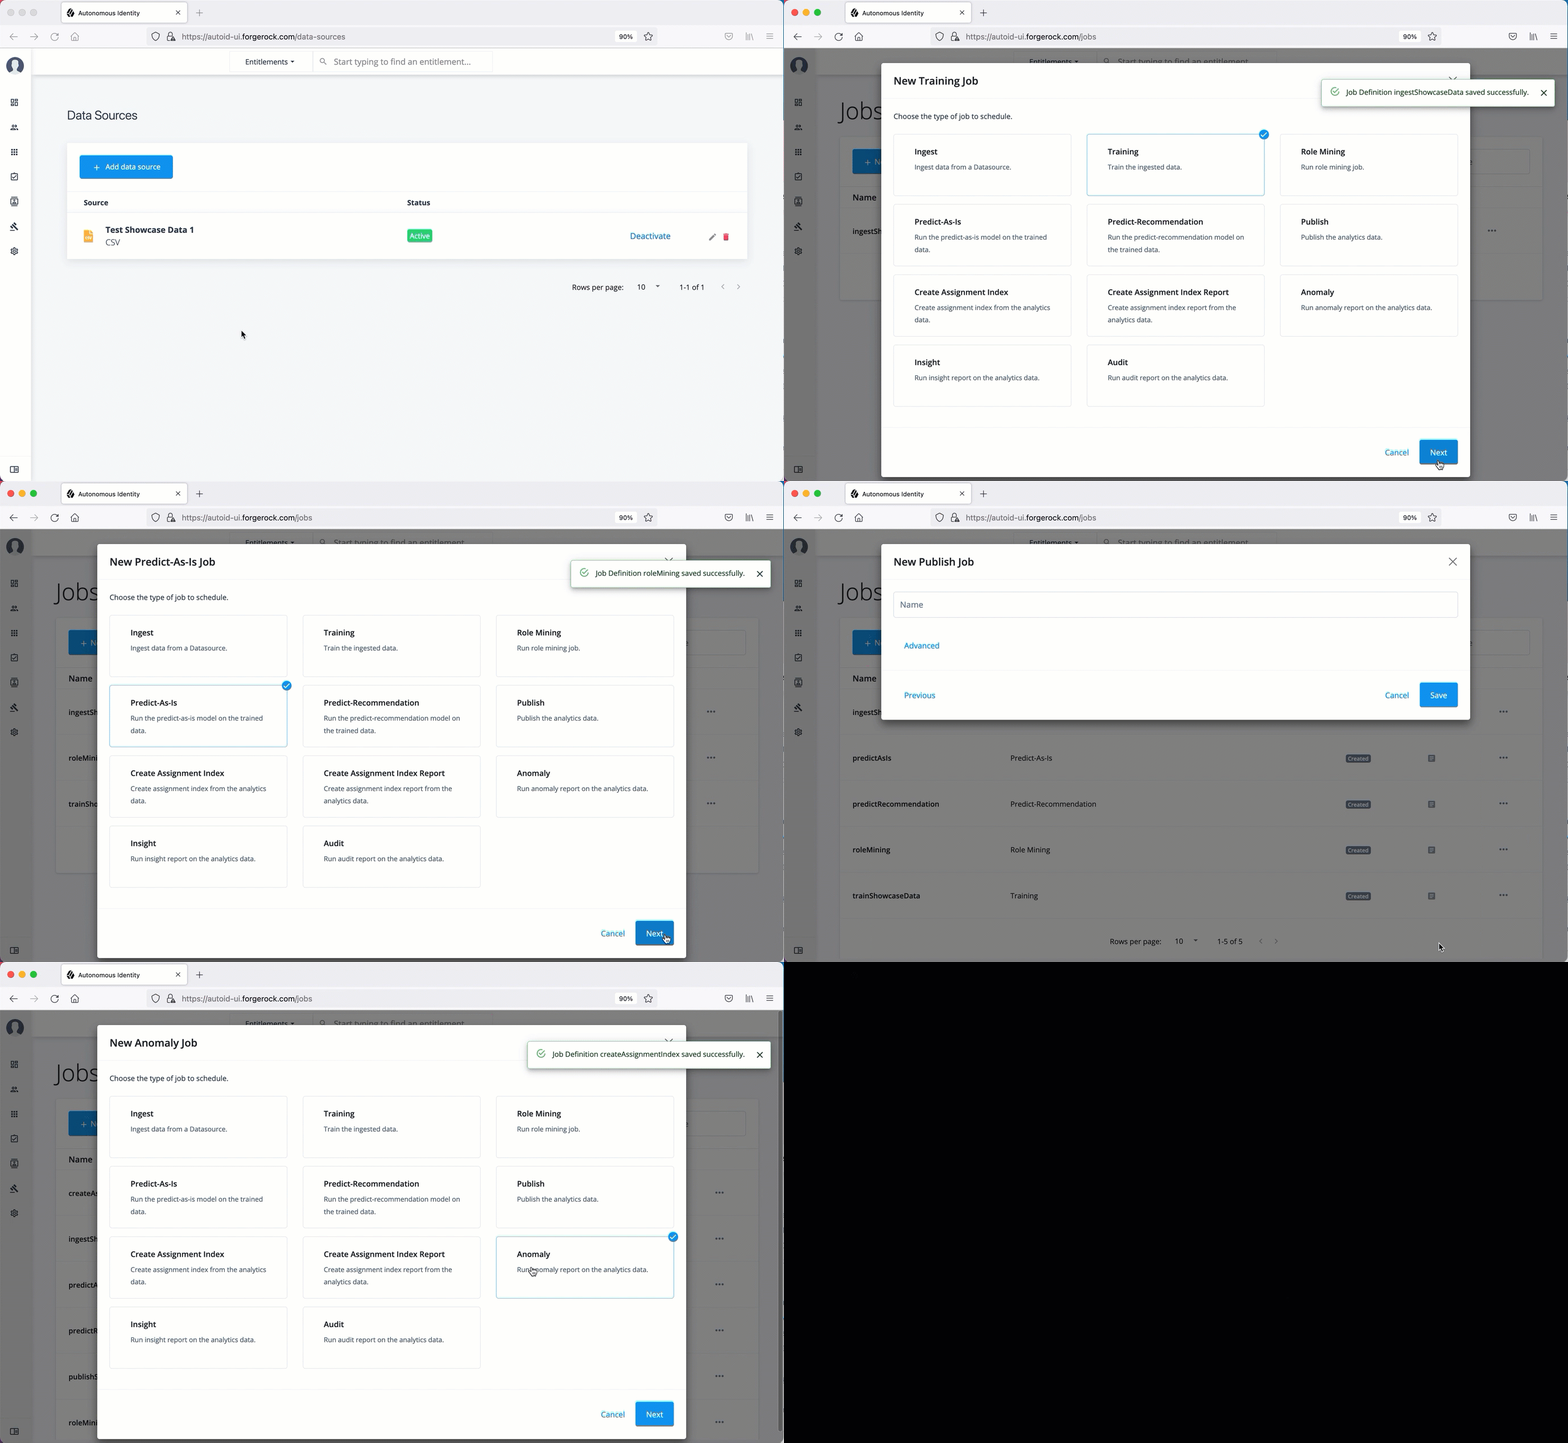
-
-
In a terminal window, SSH to the target server.
-
Change to the
analyticsdirectory.$ cd /opt/autoid/apache-livy/analytics
-
Run each of the following jobs to completion, and then submit the next job.
-
Run the ingest job.
$ analytics run <ingest-job-definition-name>

For example:
$ analytics run ingestShowcaseData
-
When the ingest job completes, you can run a status command to confirm its completion:
$ analytics status ingestShowcaseData

2021-09-20 23:18:55 INFO  AnalyticsJobsClient:104 - → checking analytic job status for --→  ingestShowcaseData
2021-09-20 23:18:55 INFO  ServiceConfigParser:54 - Building JAS config
2021-09-20 23:18:55 INFO  JASHelper:49 - → Building new SSL context for JAS REST Client using trust store
2021-09-20 23:18:55 INFO  SSLUtils:36 - --→ KeyStore path :
2021-09-20 23:18:55 INFO  SSLUtils:44 - --→ Truststore path : /opt/autoid/certs/jas/jas-server-truststore.jks
2021-09-20 23:18:55 INFO  ServiceConfigParser:54 - Building JAS config
 Job Status result
********************************
Job Status for ingestShowcaseData -→  COMPLETED
********************************
-
Run the training job.
$ analytics run <training-job-definition-name>

For example:
$ analytics run trainShowcaseData
-
Run the role mining job.
$ analytics run <role-mining-job-definition-name>

For example:
$ analytics run roleMining
-
Run the predict-as-is job.
$ analytics run <predict-asis-job-definition-name>

For example:
$ analytics run predictAsIs
-
Run the predict-recommendation job.
$ analytics run <predict-recommendation-job-definition-name>

For example:
$ analytics run predictRecommendation
-
Run the publish job.
$ analytics run <publish-job-definition-name>

For example:
$ analytics run publishShowcaseData
-
Run the create assignment index job.
$ analytics run <create-assignment-index-definition-name>

For example:
$ analytics run createAssignmentIndex
-
Optional. Run the anomaly report job.
$ analytics run <anomaly-report-definition-name>

For example:
$ analytics run anomalyReport
-
Optional. Run the insight report job.
$ analytics run <insight-report-definition-name>

For example:
$ analytics run insightReport
-
Optional. Run the audit report job.
$ analytics run <audit-report-definition-name>

For example:
$ analytics run auditReport
-
-
Click the Autonomous Identity UI Dashboard. The page reloads with your data.
Admin user tasks
The Admin user functionality is similar to that of a system administration superuser. Admin users have the access rights to company-wide entitlement data on the Autonomous Identity console. Admin users can approve or revoke a user’s entitlement.
Investigate Most Critical Entitlements
One important task that an administrator must perform is to examine all critical entitlements. Critical entitlements are assigned entitlements that have are highly-assigned but have a low confidence score associated with it. The Autonomous Identity console provides a means to examine these entitlements.
Follow these steps to evaluate the most critical entitlements list:
-
On the Dashboard, scroll down to the Most Critical Entitlements section. This section displays the entitlements that have low confidence scores and a high number of employees who have this entitlement.
-
Click an entitlement to view its details.
-
On the Entitlements detail page, review the key metrics.
-
Click the right arrow in one of the category ranges to view the users, and then click one of the users in the list.
-
On the User’s Entitlements page, scroll down to review the Confidence Score Comparison table to display the differences between the user’s attribute and the driving factor attributes.
-
Click Employees associated with this entitlement to review other uses who have this entitlement.
-
Click Actions, and then click Approve or Revoke for this entitlement. You can also bulk approve more than one entitlement. You can only revoke one entitlement at a time.
Click an example
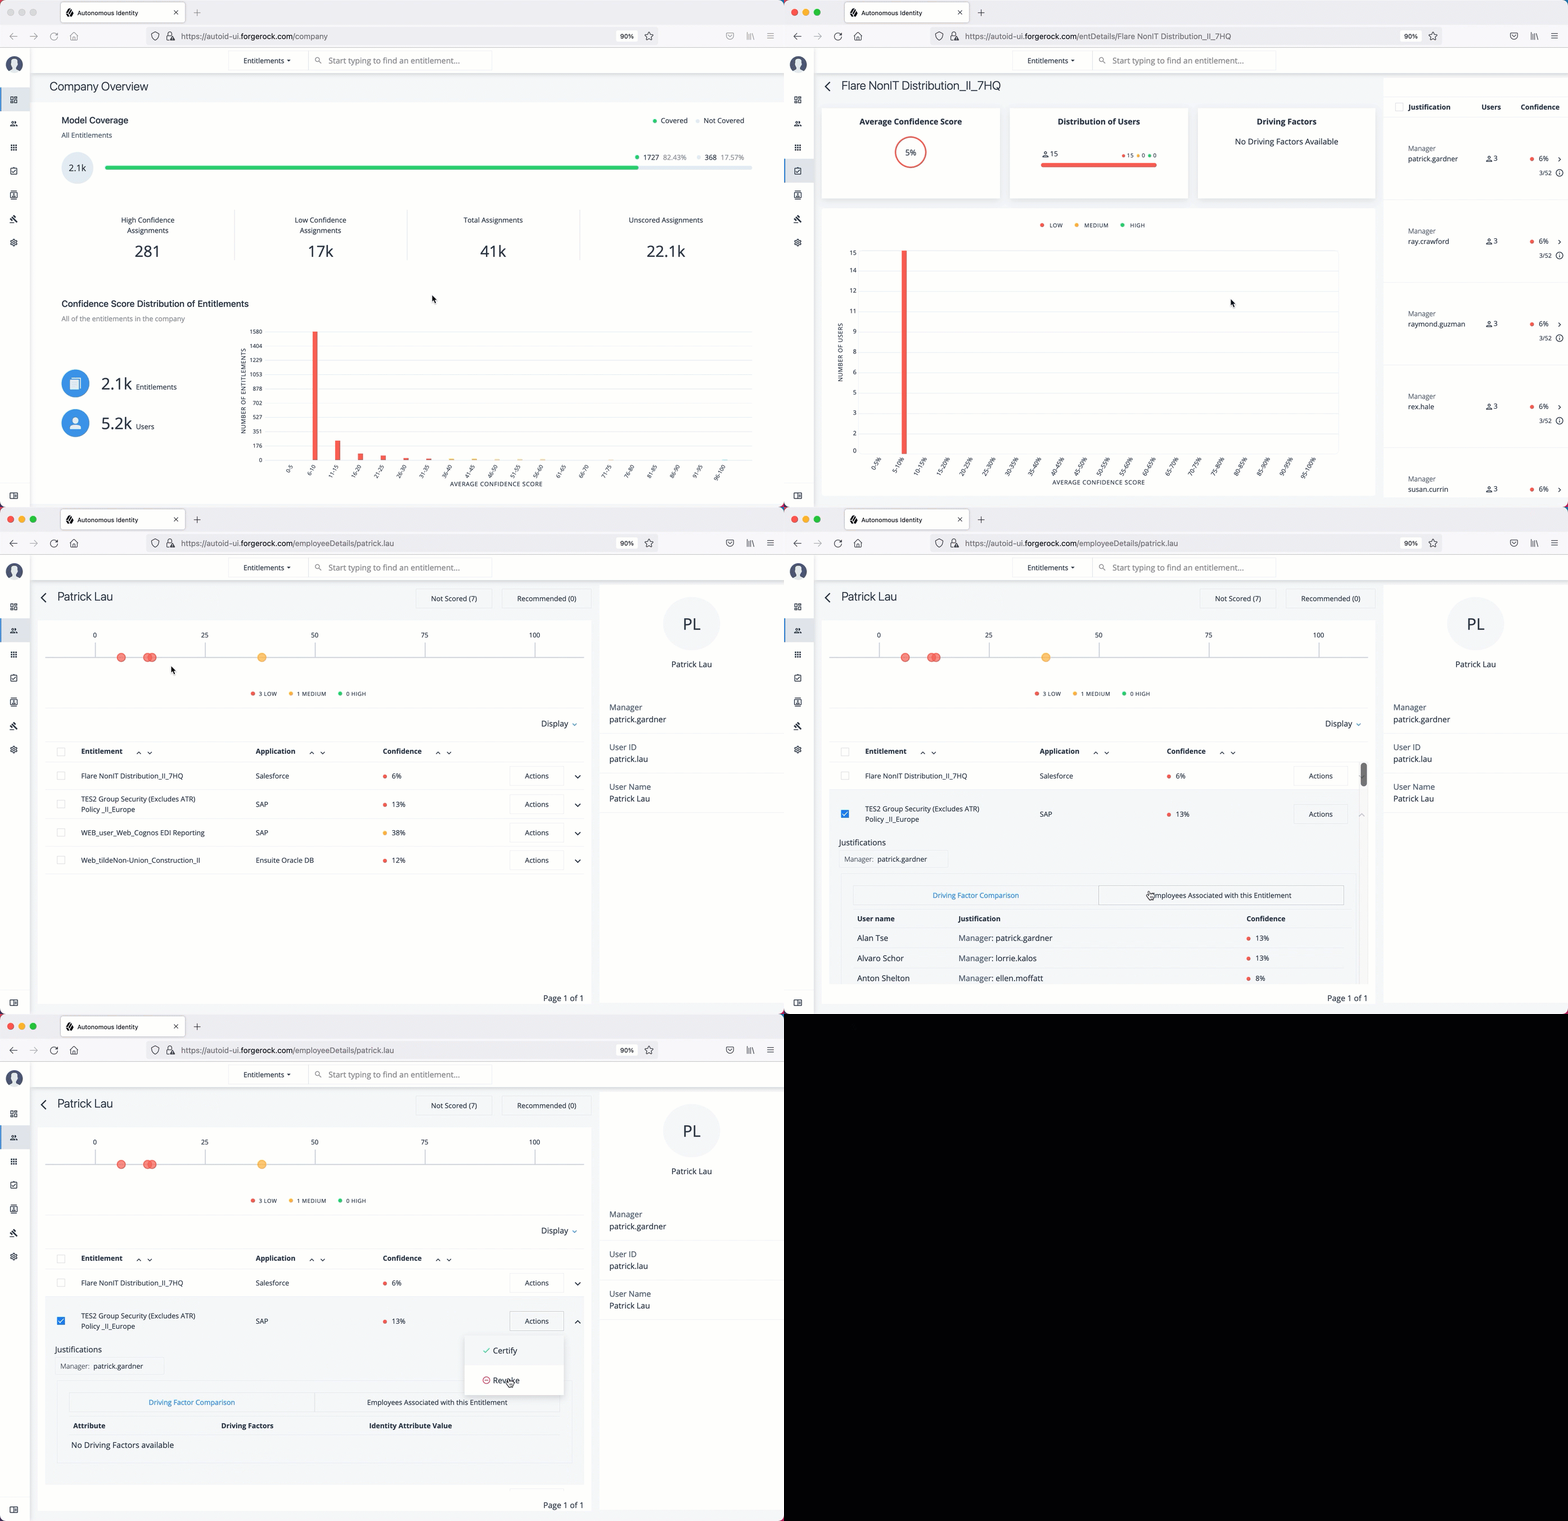
Approve or revoke access an entitlement for a user
Follow these steps to investigate a confidence score and approve or revoke access an entitlement assigned to a specific user:
-
On Autonomous Identity console, click Identities, and enter a name of a supervisor. The only way to access a user’s entitlements is through the Most Critical Entitlements section or the Identities page.
-
On the Identities page, click a circle, and then click the user in the list on the right.
-
On the User Entitlement page, click a confidence circle on the graph to highlight the entitlement below.
-
For the selected entitlement, click the down arrow on the right to view the Driving Factor Comparison.
-
Click Employees associated with this entitlement to view the justifications for those users with high confidence scores with this entitlement.
-
Click Actions, and then click Approve Access or Revoke access. If you have more than one entitlement that you want to approve, select them all and do a bulk Approval. You can only do one Revoke Access at a time.
Click an example
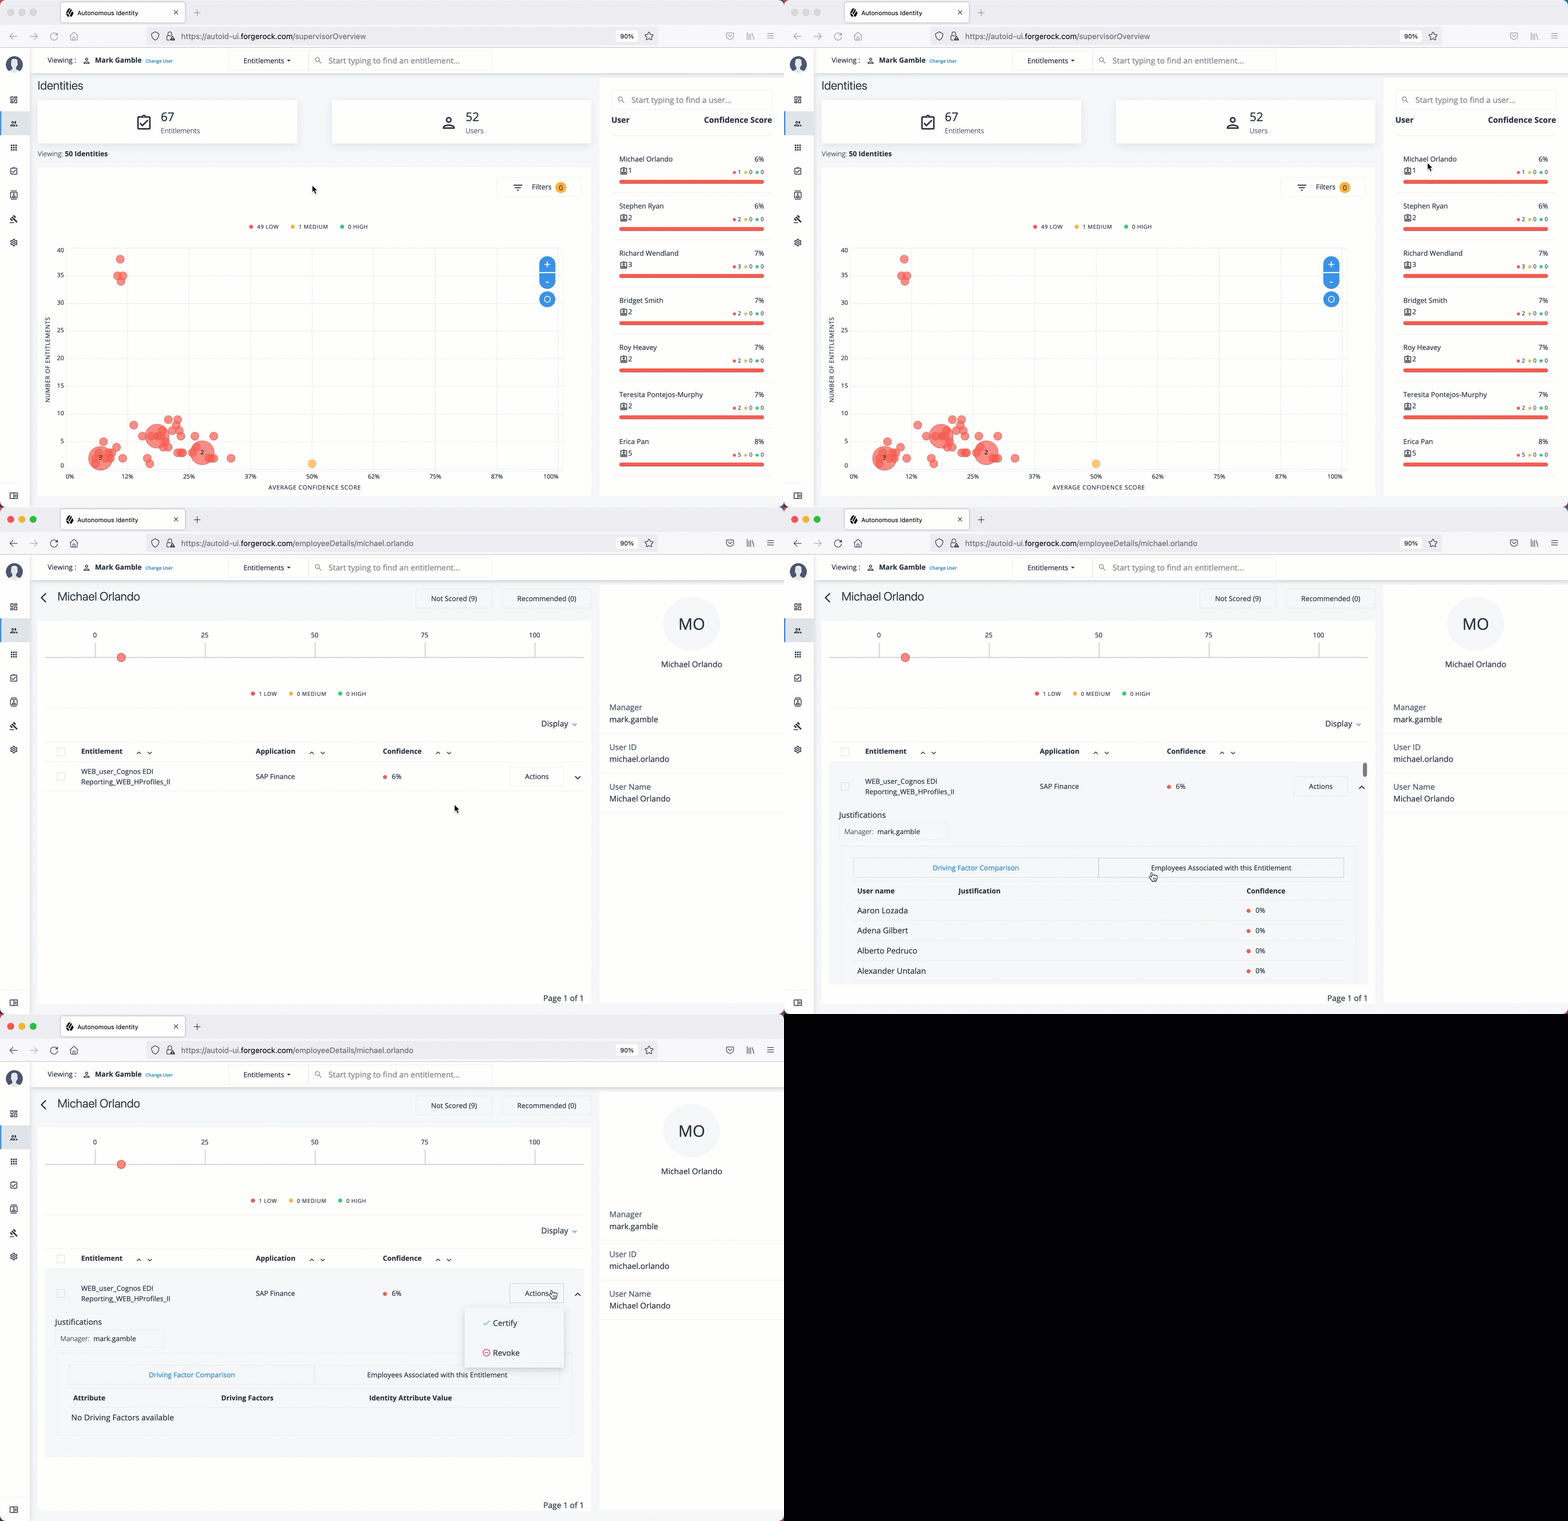
Check not-scored users
Follow these steps to check Not Scored entitlements. Not-scored indicates that it does not have a justification associated with the entitlement:
-
On Autonomous Identity console, click Identities, and enter a name of a supervisor. The only way to access a user’s entitlements is through the Most Critical Entitlements section or the Identities page.
-
On the Identities page, click a circle, and then click the user in the list on the right.
-
On the User Entitlement page, click Not Scored.
-
On the Not Scored Entitlements page, click the down arrow to view the driving factors comparison.
-
Click Employees associated with this entitlement to view the justifications for those users with high confidence scores with this entitlement.
-
Click Actions, and then click Approve Access or Revoke access. At a later date, you can re-click the Approve or Revoke button to cancel the operation.
Click an example
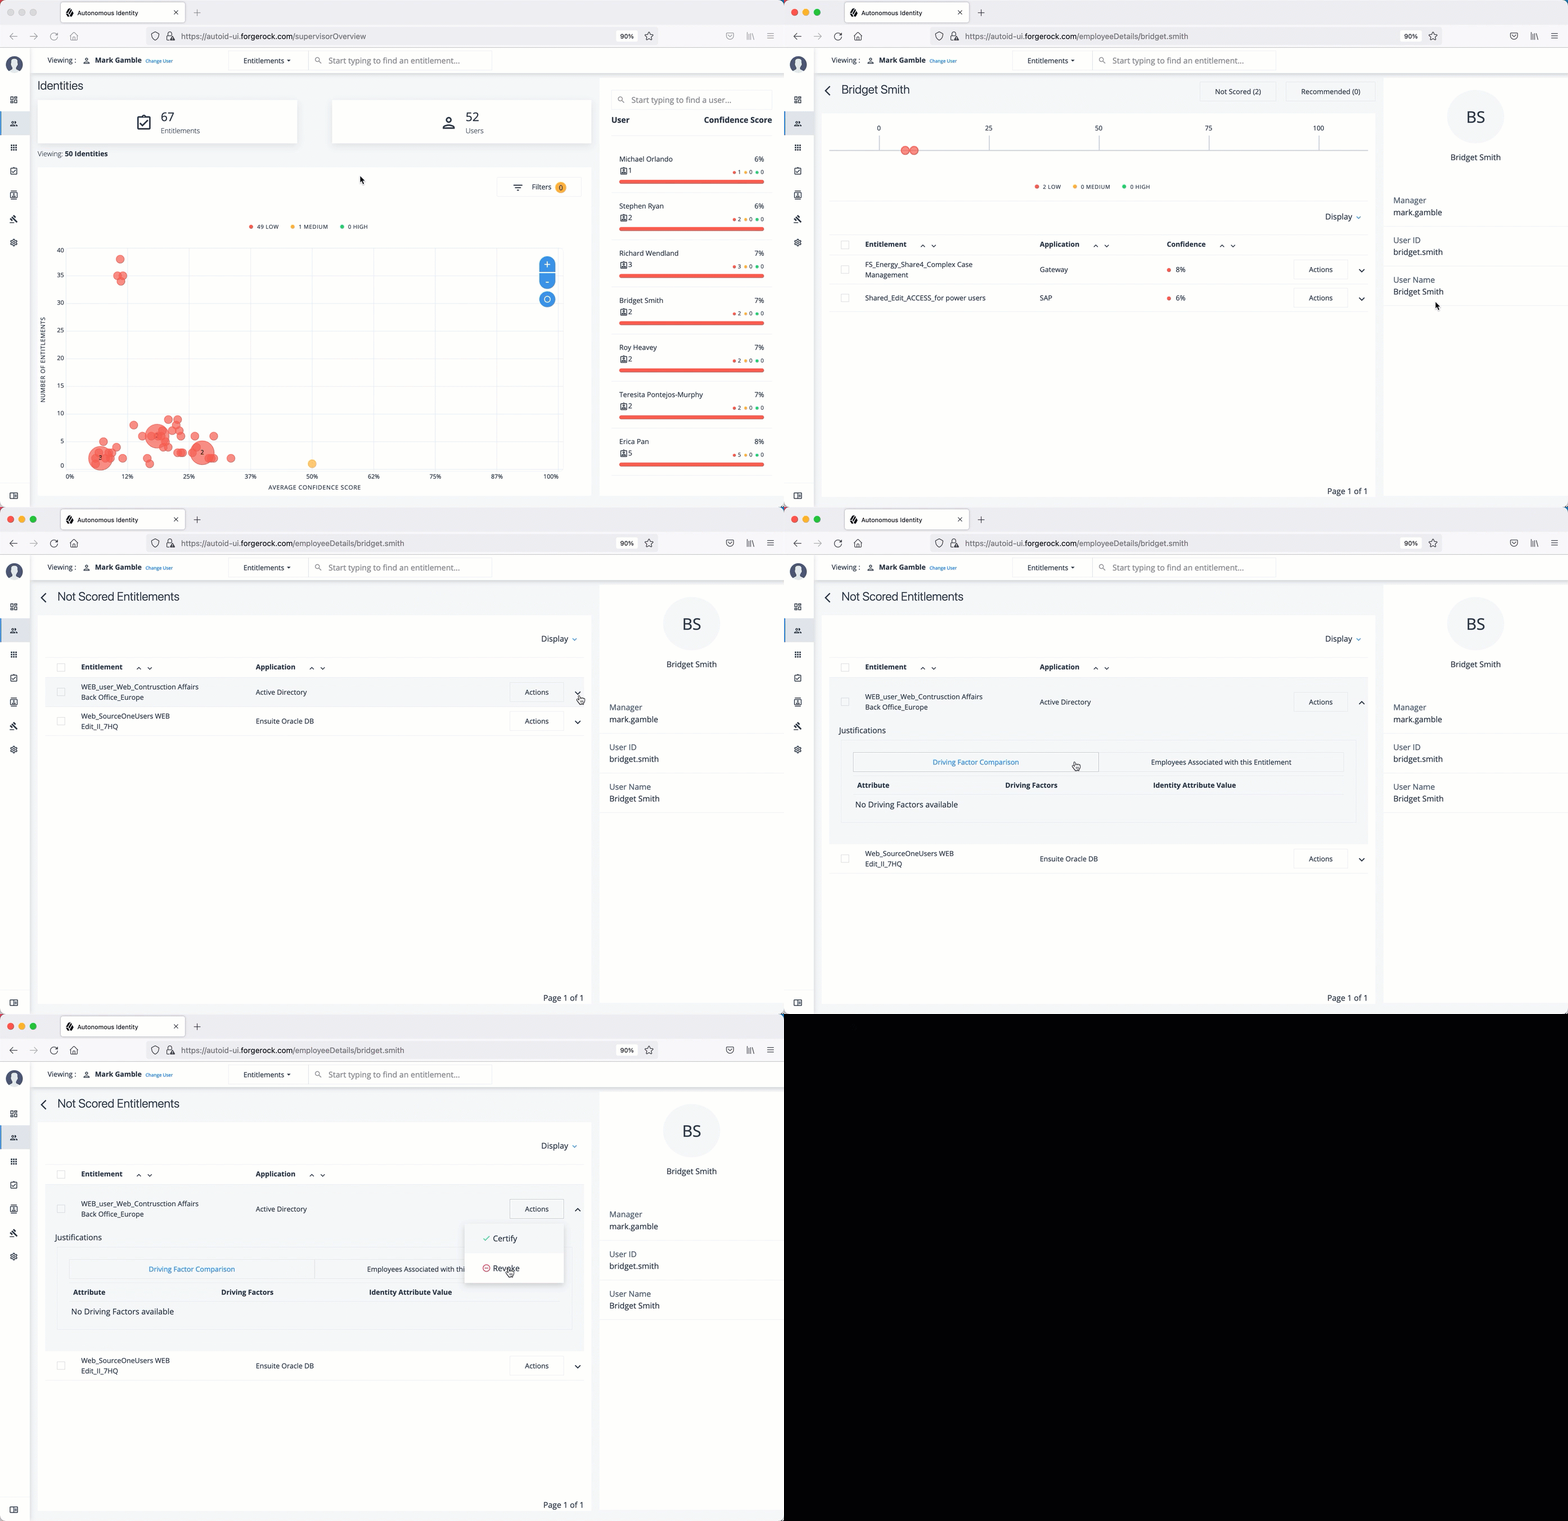
Apply filters
Follow these steps to apply filters to your confidence score graphs on the Identities and Entitlements pages:
| The Filters for the Identities and Entitlements are similar. The filters for the Applications and Rules pages offer different options to filter your searches. |
-
On the Identities or Entitlements page, view the average confidence score graph.
-
On the right, click Filters.
-
Under filters, do one or all of the following:
-
Click Remove High Scores from Average or enable any filter in the Application Filters section.
-
Under Applications, click one or more applications to display the identities or entitlements asssociated with the selected application.
-
Click Add Filters to further display only those identities or entitlements based on a user attribute, such as
city. When ready, click Apply Filters.
-
-
Click Clear Filters to remove your filters.
Click an example
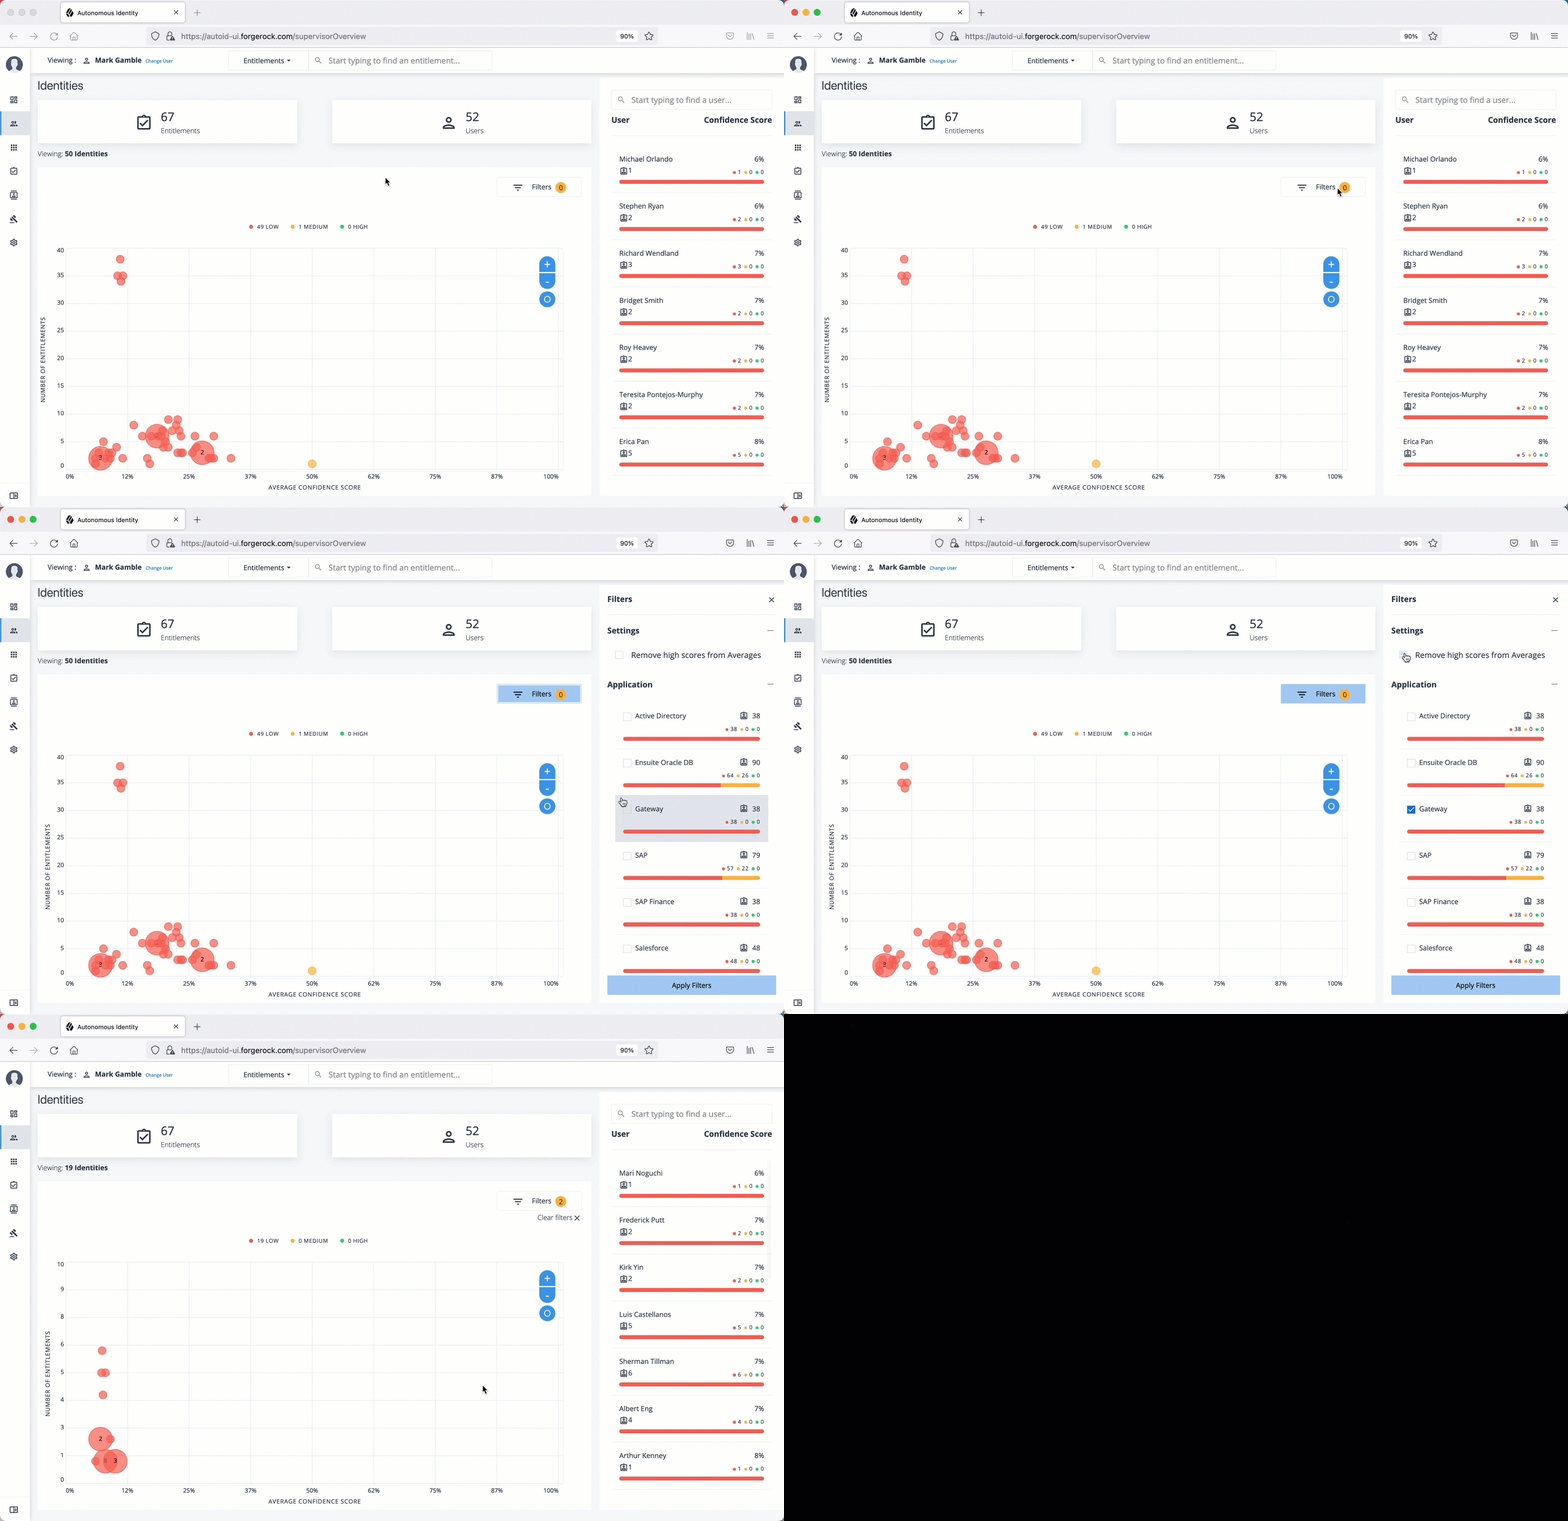
Changing the API’s elasticsearch client request timeout
The following steps outline how to change the Autonomous Identity API’s Elasticsearch client timeout to override the default of 30 seconds.
-
Open the
/opt/autoid/res/api/docker-compose.ymlfile, and edit theELASTICSEARCH_CLIENT_TIMEOUTvariable as necessary (time in milliseconds):environment: … - ELASTICSEARCH_CLIENT_TIMEOUT=30000
For example:
environment: … - ELASTICSEARCH_CLIENT_TIMEOUT=60000
-
Remove the currently running
zoran-apicontainer, and redeploy thezoran-apiDocker image:docker stack rm api docker stack deploy --with-registry-auth --compose-file /opt/autoid/res/api/docker-compose.yml api
-
Restart the
zoran-apiand nginx containers:docker service update --force ui_zoran-ui && docker service update --force nginx_nginx
-
Verity that Autonomous Identity is running by opening the UI in a web browser.
Server maintenance
Autonomous Identity administrators must conduct various tasks to maintain the service for their users.
The following are basic server maintenance tasks that may occur:
Stopping and starting
You can run the following command to stop or start Autonomous Identity components:
Docker
Restart Docker
-
To restart docker, first set the docker to start on boot using the
enablecommand:$ sudo systemctl enable docker
-
To start docker, run the
startcommand:$ sudo systemctl start docker
-
After restarting Docker, restart the JAS service to ensure the service can write to its logs:
$ docker service update --force jas_jasnode
Cassandra
Stop Cassandra
-
On the deployer node, SSH to the target node.
-
Check Cassandra status.
Datacenter: datacenter1
=======================
Status=Up/Down
|/ State=Normal/Leaving/Joining/Moving —  Address      Load       Tokens       Owns (effective)  Host ID                               Rack
UN  10.128.0.38  1.17 MiB   256          100.0%            d134e7f6-408e-43e5-bf8a-7adff055637a  rack1
-
To stop Cassandra, find the process ID and run the kill command.
$ pgrep -u autoid -f cassandra | xargs kill -9
-
Check the status again.
nodetool: Failed to connect to '127.0.0.1:7199' - ConnectException: 'Connection refused (Connection refused)'.
Restart Cassandra
-
On the deployer node, SSH to the target node.
-
Restart Cassandra. When the
No gossip backlog; proceedingmessage is displayed, hitEnterto continue.$ cassandra … INFO [main] 2020-11-10 17:22:49,306 Gossiper.java:1670 - Waiting for gossip to settle… INFO [main] 2020-11-10 17:22:57,307 Gossiper.java:1701 - No gossip backlog; proceeding
-
Check the status of Cassandra. Make sure that it is in
UNstatus ("Up" and "Normal").$ nodetool status
MongoDB
Shut Down MongoDB
-
Check the status of the MongDB
$ ps -ef | grep mongod
-
Connect to the Mongo shell.
$ mongo --tls --tlsCAFile /opt/autoid/mongo/certs/rootCA.pem --tlsCertificateKeyFile /opt/autoid/mongo/certs/mongodb.pem --tlsAllowInvalidHostnames --host <ip-address> MongoDB shell version v4.2.9 connecting to: mongodb://<ip-address>:27017/?compressors=disabled&gssapiServiceName=mongodb 2020-10-08T18:46:23.285+0000 W NETWORK [js] The server certificate does not match the hostname. Hostname: <ip-address> does not match CN: mongonode Implicit session: session { "id" : UUID("22c0123-30e3-4dc9-9d16-5ec310e1ew7b") } MongoDB server version: 4.2.9 -
Switch the admin table.
> use admin

switched to db admin
-
Authenticate using the password set in
vault.ymlfile.> db.auth("root", "Welcome123") 1 -
Start the shutdown process.
> db.shutdownServer() 2020-10-08T18:47:06.396+0000 I NETWORK [js] DBClientConnection failed to receive message from <ip-address>:27017 - SocketException: short read server should be down… 2020-10-08T18:47:06.399+0000 I NETWORK [js] trying reconnect to <ip-address>:27017 failed 2020-10-08T18:47:06.399+0000 I NETWORK [js] reconnect <ip-address>:27017 failed
-
Exit the mongo shell.
$ quit()
or <Ctrl-C>
-
Check the status of the MongDB
$ ps -ef | grep mongod

no instance of mongod found
Restart MongoDB
-
Re-start the MongoDB service.
$ /usr/bin/mongod --config /opt/autoid/mongo/mongo.conf

about to fork child process, waiting until server is ready for connections.
forked process: 31227
child process started successfully, parent exiting
-
Check the status of the MongDB
$ ps -ef | grep mongod

autoid    9245     1  0 18:48 ?        00:00:45 /usr/bin/mongod --config /opt/autoid/mongo/mongo.conf
autoid   22003  6037  0 21:12 pts/1    00:00:00 grep --color=auto mongod
== Apache Spark
-
On the deployer node, SSH to the target node.
-
Check Spark status. Make sure that it is up-and-running.
$ elinks http://localhost:8080
-
Stop the Spark Master and workers.
$ /opt/autoid/spark/spark-2.4.4-bin-hadoop2.7/sbin/stop-all.sh

localhost: stopping org.apache.spark.deploy.worker.Worker
stopping org.apache.spark.deploy.master.Master
-
Check the Spark status again. You should see:
Unable to retrieve htp://localhost:8080: Connection refused.
Restart Spark
-
On the deployer node, SSH to the target node.
-
Start the Spark Master and workers. Enter the user password on the target node when prompted.
$ /opt/autoid/spark/spark-2.4.4-bin-hadoop2.7/sbin/start-all.sh

starting org.apache.spark.deploy.master.Master, logging to /opt/autoid/spark/spark-2.4.4-bin-hadoop2.7/logs/spark-a
utoid-org.apache.spark.deploy.master.Master-1.out
autoid-2 password:
localhost: starting org.apache.spark.deploy.worker.Worker, logging to /opt/autoid/spark/spark-2.4.4-bin-hadoop2.7/l
ogs/spark-autoid-org.apache.spark.deploy.worker.Worker-1.out
-
Check the Spark status again. Make sure that it is up-and-running.
Accessing log files
Autonomous Identity provides different log files to monitor or troubleshoot your system.
Getting Docker container information
-
On the target node, get system wide information about the Docker deployment. The information shows the number of containers running, paused, and stopped containers as well as other information about the deployment.
$ docker info
-
If you want to get debug information, use the
-Doption. The option specifies that all docker commands will output additional debug information.$ docker -D info
-
Get information on all of your containers on your system.
$ docker ps -a
-
Get information on the docker images on your system.
$ docker images
-
Get docker service information on your system.
$ docker service ls
-
Get docker the logs for a service.
$ docker service logs <service-name>
For example, to access the nginx service logs:
$ docker service logs nginx_nginx
Other useful arguments:
-
--details. Show extra details. -
--follow, -f. Follow log output. The command will stream new output from STDOUT and STDERR. -
--no-trunc. Do not truncate output. -
--tail {n|all}. Show the number of lines from the end of log files, wherenis the number of lines orallfor all lines. -
--timestamps, -t. Show timestamps.
-
Getting Cassandra logs
The Apache Cassandra output log is kicked off at startup. Autonomous Identity pipes the output to a log file in the directory, /opt/autoid/.
-
On the target node, get the log file for the Cassandra install.
$ cat /opt/autoid/cassandra/installcassandra.log
-
Get startup information. Cassandra writes to
cassandra.outat startup.$ cat /opt/autoid/cassandra.out
-
Get the general Cassandra log file.
$ cat /opt/autoid/apache-cassandra-3.11.2/logs/system.log
By default, the log level is set to
INFO. You can change the log level by editing the/opt/autoid/apache-cassandra-3.11.2/conf/logback.xmlfile. After any edits, the change will take effect immediately. No restart is necessary. The log levels from most to least verbose are as follows:-
TRACE -
DEBUG -
INFO -
WARN -
ERROR -
FATAL
-
-
Get the JVM garbage collector logs.
$ cat /opt/autoid/apache-cassandra-3.11.2/logs/gc.log.<number>.current
For example:
$ cat /opt/autoid/apache-cassandra-3.11.2/logs/gc.log.0.current
The output is configured in the
/opt/autoid/apache-cassandra-3.11.2/conf/cassandra-env.shfile. Add the following JVM properties to enable them:-
JVM_OPTS="$JVM_OPTS -XX:+PrintGCDetails" -
JVM_OPTS="$JVM_OPTS -XX:+PrintGCDateStamps" -
JVM_OPTS="$JVM_OPTS -XX:+PrintHeapAtGC" -
JVM_OPTS="$JVM_OPTS -XX:+PrintGCApplicationStoppedTime"
-
-
Get the debug log.
$ cat /opt/autoid/apache-cassandra-3.11.2/logs/debug.log
Other useful Cassandra monitoring tools and files
Apache Cassandra has other useful monitoring tools that you can use to observe or diagnose and issue. To access the complete list of options, refer to the Apache Cassandra documentation.
-
View statistics for a cluster, such as IP address, load, number of tokens,
$ /opt/autoid/apache-cassandra-3.11.2/bin/nodetool status
-
View statistics for a node, such as uptime, load, key cache hit, rate, and other information.
$ /opt/autoid/apache-cassandra-3.11.2/bin/nodetool info
-
View the Cassandra configuration file to determine how properties are pre-set.
$ cat /opt/autoid/apache-cassandra-3.11.2/conf/cassandra.yaml
Apache Spark logs
Apache Spark provides several ways to monitor the server after an analytics run.
-
To get an overall status of the Spark server, point your browser to
http://<spark-master-ip>:8080. -
Print the logging message sent to the output file during an analytics run.
$ cat /opt/autoid/spark/spark-2.4.4-bin-hadoop2.7/logs/<file-name>
For example:
$ cat /opt/autoid/spark/spark-2.4.4-bin-hadoop2.7/logs/spark-org.apache.spark.deploy.master.Master-1-autonomous-id-test.out
-
Print the data logs that were written during an analytics run.
$ cat /data/log/files/<filename>
For example:
$ cat /data/log/files/f6c0870e-5782-441e-b145-b0e662f05f79.log
Updating IDP Certificates
When an IDP provider changes their certificates, you can update these certificates in Autonomous Identity.
-
SSH to the target machine.
-
View the current certificate settings in the
docker-compose.ymlfile, and locate theNODE_EXTRA_CA_CERTSproperty$ vi
/opt/autoid/res/api/docker-compose.ymlNODE_EXTRA_CA_CERTS=/opt/app/cert/<customer ID>-sso.pem -
Access your IDP URL, and export the
.cerfile from the browser. -
Convert the
.cerfile into a.pemfile using the following command:$ openssl x509 -in certificatename.cer -outform PEM -out certificatename.pem
-
Open the
docker-compose.ymlfile and update theNODE_EXTRA_CA_CERTSproperty.$ vi
/opt/autoid/res/api/docker-compose.ymlNODE_EXTRA_CA_CERTS=/opt/app/cert/<new-cert>.pem -
Restart the Autonomous Identity services.
$ docker stack rm api
$ docker stack deploy --with-registry-auth --compose-file
$ /opt/autoid/res/api/docker-compose.yml api
$ docker service update --force ui_zoran-ui
$ docker service update --force nginx_nginx
Changing the Cassandra zoran_dba and zoran_user passwords
During deployment, Autonomous Identity creates two user accounts to interact with the Cassandra database: zoran_dba and
zoran_user. The zoran_dba is an administrator or superuser account used by Autonomous Identity to set up the Cassandra
database. The zoran_user is a non-admin account used to log in to the Cassandra command-line interface, cqlsh.
You can change the passwords after deploying Autonomous Identity using cqlsh.
-
Access cqlsh.
$ cqlsh -u zoran_dba -p admin_password
Connected to Zoran Cluster at <server-ip>:9042.
[cqlsh 5.0.1 | Cassandra 3.11.2 | CQL spec 3.4.4 | Native protocol v4]
Use HELP for help.
zoran_dba@cqlsh>
-
In cqlsh, change the
zoran_dbapassword:zoran_dba@cqlsh>ALTER USER zoran_dba WITH PASSWORD 'new_admin_password'; zoran_dba@cqlsh>exit
-
Use a text editor and change the environment variables in the
/opt/autoid/res/jas/docker-compose.ymlfile:- CASSANDRA_DB_PASSWORD=new_admin_password
-
Remove the running container and redeploy it:
$ docker stack rm jas
$ **docker stack deploy --with-registry-auth --compose-file /opt/autoid/res/jas/docker-compose.yml jas
-
Update the
zoran_userpassword:zoran_dba@cqlsh>ALTER USER zoran_user WITH PASSWORD 'new_user_password'; zoran_dba@cqlsh>exit
Change MongoDB password post-deployment
You can update the MongoDB password by running the following steps on a running instance of MongoDB.
|
Update the various parameters for host IP and current root password as pertains to your environment.
Also, the |
-
Open the MongoDB shell. Use your host IP and root password:
mongo admin --host 10.10.10.10 --tls \
--tlsCertificateKeyFile /opt/autoid/certs/mongo/mongodb.pem \
--tlsCAFile /opt/autoid/certs/mongo/rootCA.pem \
--tlsAllowInvalidHostnames \
--username root \
--password 'current_root_password'
-
On the MongoDB shell, run the
changeUserPasswordcommand:db.changeUserPassword("mongoadmin","new_password") -
Update the password as an environment variable in the JAS service. Update the following variable in the
/opt/autoid/res/jas/docker-compose.ymlfile:- MONGO_ROOT_PASSWORD=new_password
-
Delete the currently running JAS container and redeploy:
docker stack rm jas

docker stack deploy \
--with-registry-auth \
--compose-file /opt/autoid/res/jas/docker-compose.yml jas
-
Check that there are no stack errors in the container logs. The logs should show successful connections to MongoDB:
2022-11-21 19:07:40, 257 INFO c.m.d.l.SLF4JLogger
[cluster-ClusterId{value='637bcc764cb8670d06c2feb8',description='null'}-10.10.10.:27017]
Opened connection [connectionId{localValue:2, serverValue:30}] to 10.10.10.10.:27017

2022-11-21 19:07:40, 257 INFO c.m.d.l.SLF4JLogger
[cluster-rtt-ClusterId{value='637bcc764cb8670d06c2feb8',description='null'}-10.10.10.:27017]
Opened connection [connectionId{localValue:1, serverValue:31}] to 10.10.10.10.:27017

2022-11-21 19:07:40, 257 INFO c.m.d.l.SLF4JLogger
[cluster-rtt-ClusterId{value='637bcc764cb8670d06c2feb8',description='null'}-10.10.10.:27017]
Monitor thread successfully connected to server with description
ServerDescription{address=10.10.10.10:27017, type=STANDALONE, State=CONNECTED,
ok=true, minWireVersion=0, maxWireVersion=9, maxDocumentSize=16777216,
logicalSessionTimeoutMinutes=30, roundTripTimeNanos=221098137}

2022-11-21 19:07:45, 383 INFO c.m.d.l.SLF4JLogger [main]
Opened connection [connectionId{localValue:3, serverValue:32}] to 10.10.10.10.:27017
Roles management tasks
Autonomous Identity supports a powerful role analysis and management system that examines all roles and their assigned entitlements within your access landscape. The system uses machine learning rules and analytics thresholds to determine the confidence scores and driving factors for each role.
The central hub of the roles management system is the Roles Workshop. The Roles Workshop lets authorized users review, edit, and test new or existing roles before publishing them to production.
In a typical scenario, an administrator runs a role mining job as part of the analytics pipeline. During a role mining analytics run, Autonomous Identity discovers candidates for any new roles and displays them in the Roles Workshop with confidence scores and driving factors. Authorized users can review these roles, make edits to entitlements, and re-run the role mining analytics until the correct mix of entitlements meets your threshold objectives for given rules.
A month or two later, the administrator can re-run the role mining job to pick up changes in the entitlements landscape. Autonomous Identity re-analyzes each role and recommends updates to existing roles, such as the indication of stale data, or changes in the confidence scores. Based on these recommendations, the authorized user can revoke any active roles, make new configuration changes to a draft, and publish these draft roles to production.
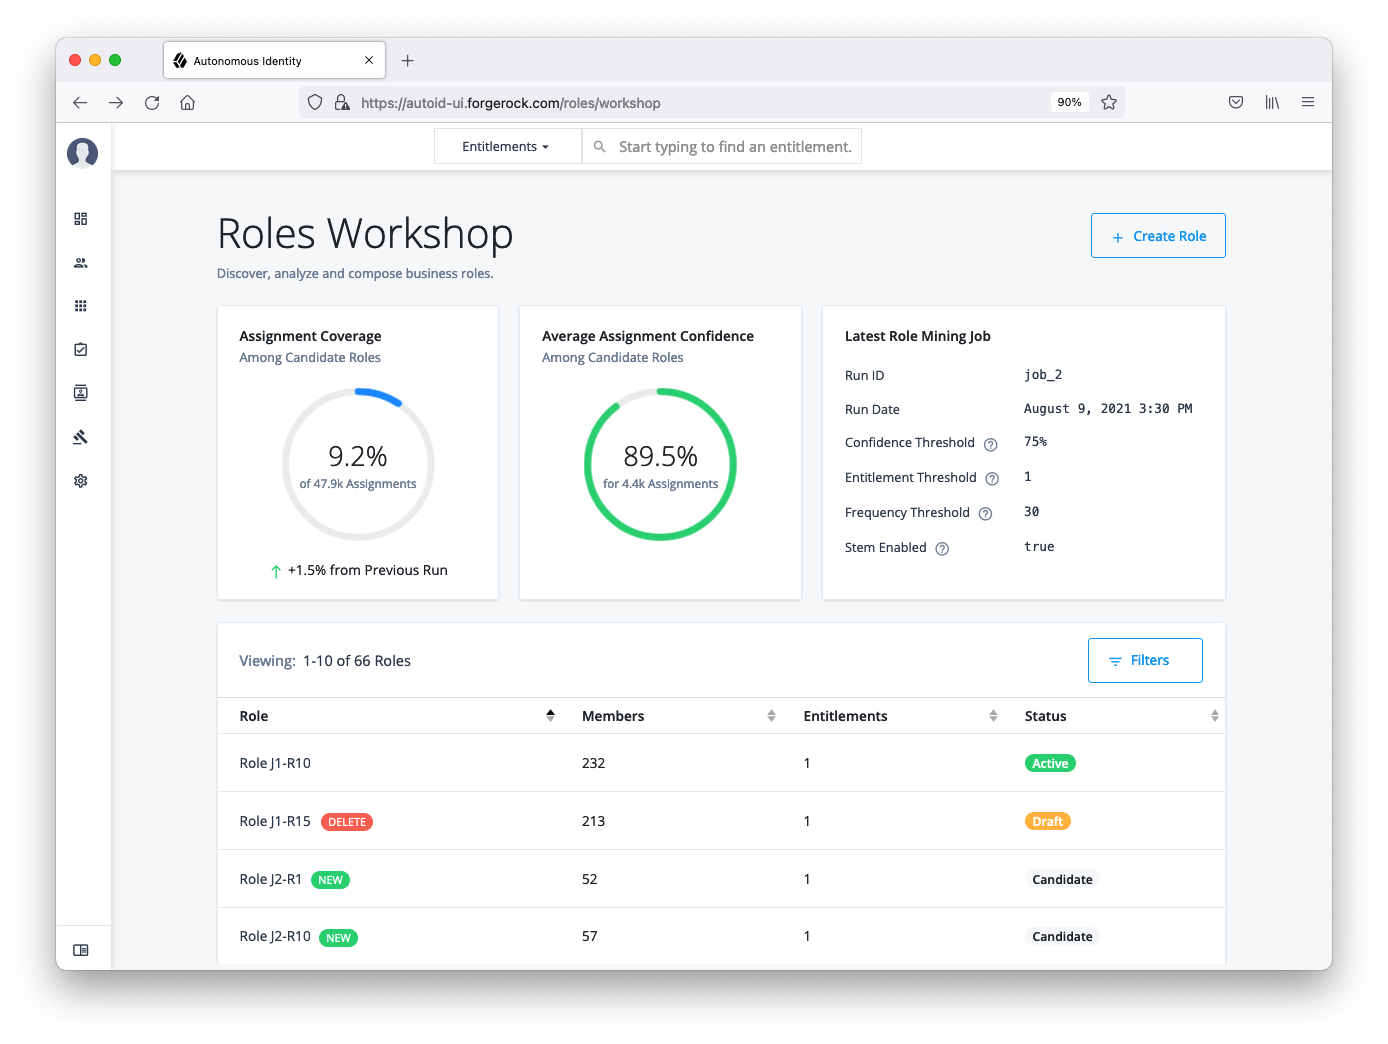
Roles user types
Autonomous Identity supports two types of user role types to manage roles with the system. You can assign these roles using the Manage Identities function.
| User Type | Description |
|---|---|
Role Engineer |
A user who has the ability to view, edit, delete, and export all roles. Role engineers can create drafts from mined candidates and assign role owners to the draft. They can also create custom roles for further evaluation and testing. Autonomous Identity administrators automatically are assigned this role. |
Role Owner |
A user who has the ability to view, edit, delete, and export active and draft roles assigned to them. |
Roles workflow
The Roles Workshop displays roles in three different states: candidate, draft, and active.
-
Candidate. A candidate is a template role that is discovered through the latest role mining analytics job. After each role mining job, all newly mined roles are marked as new and as a candidate. Role engineers can review a candidate, assign a role owner to it, and approve the role as a draft. You cannot edit or remove a candidate role as is, but must create a draft from a candidate to change its details. Candidate roles are retained in the system for later adjustments and for the creation of additional new roles until the next role mining job, where all candidates are deleted and a new candidate pool is rebuilt.
Click to display an image.
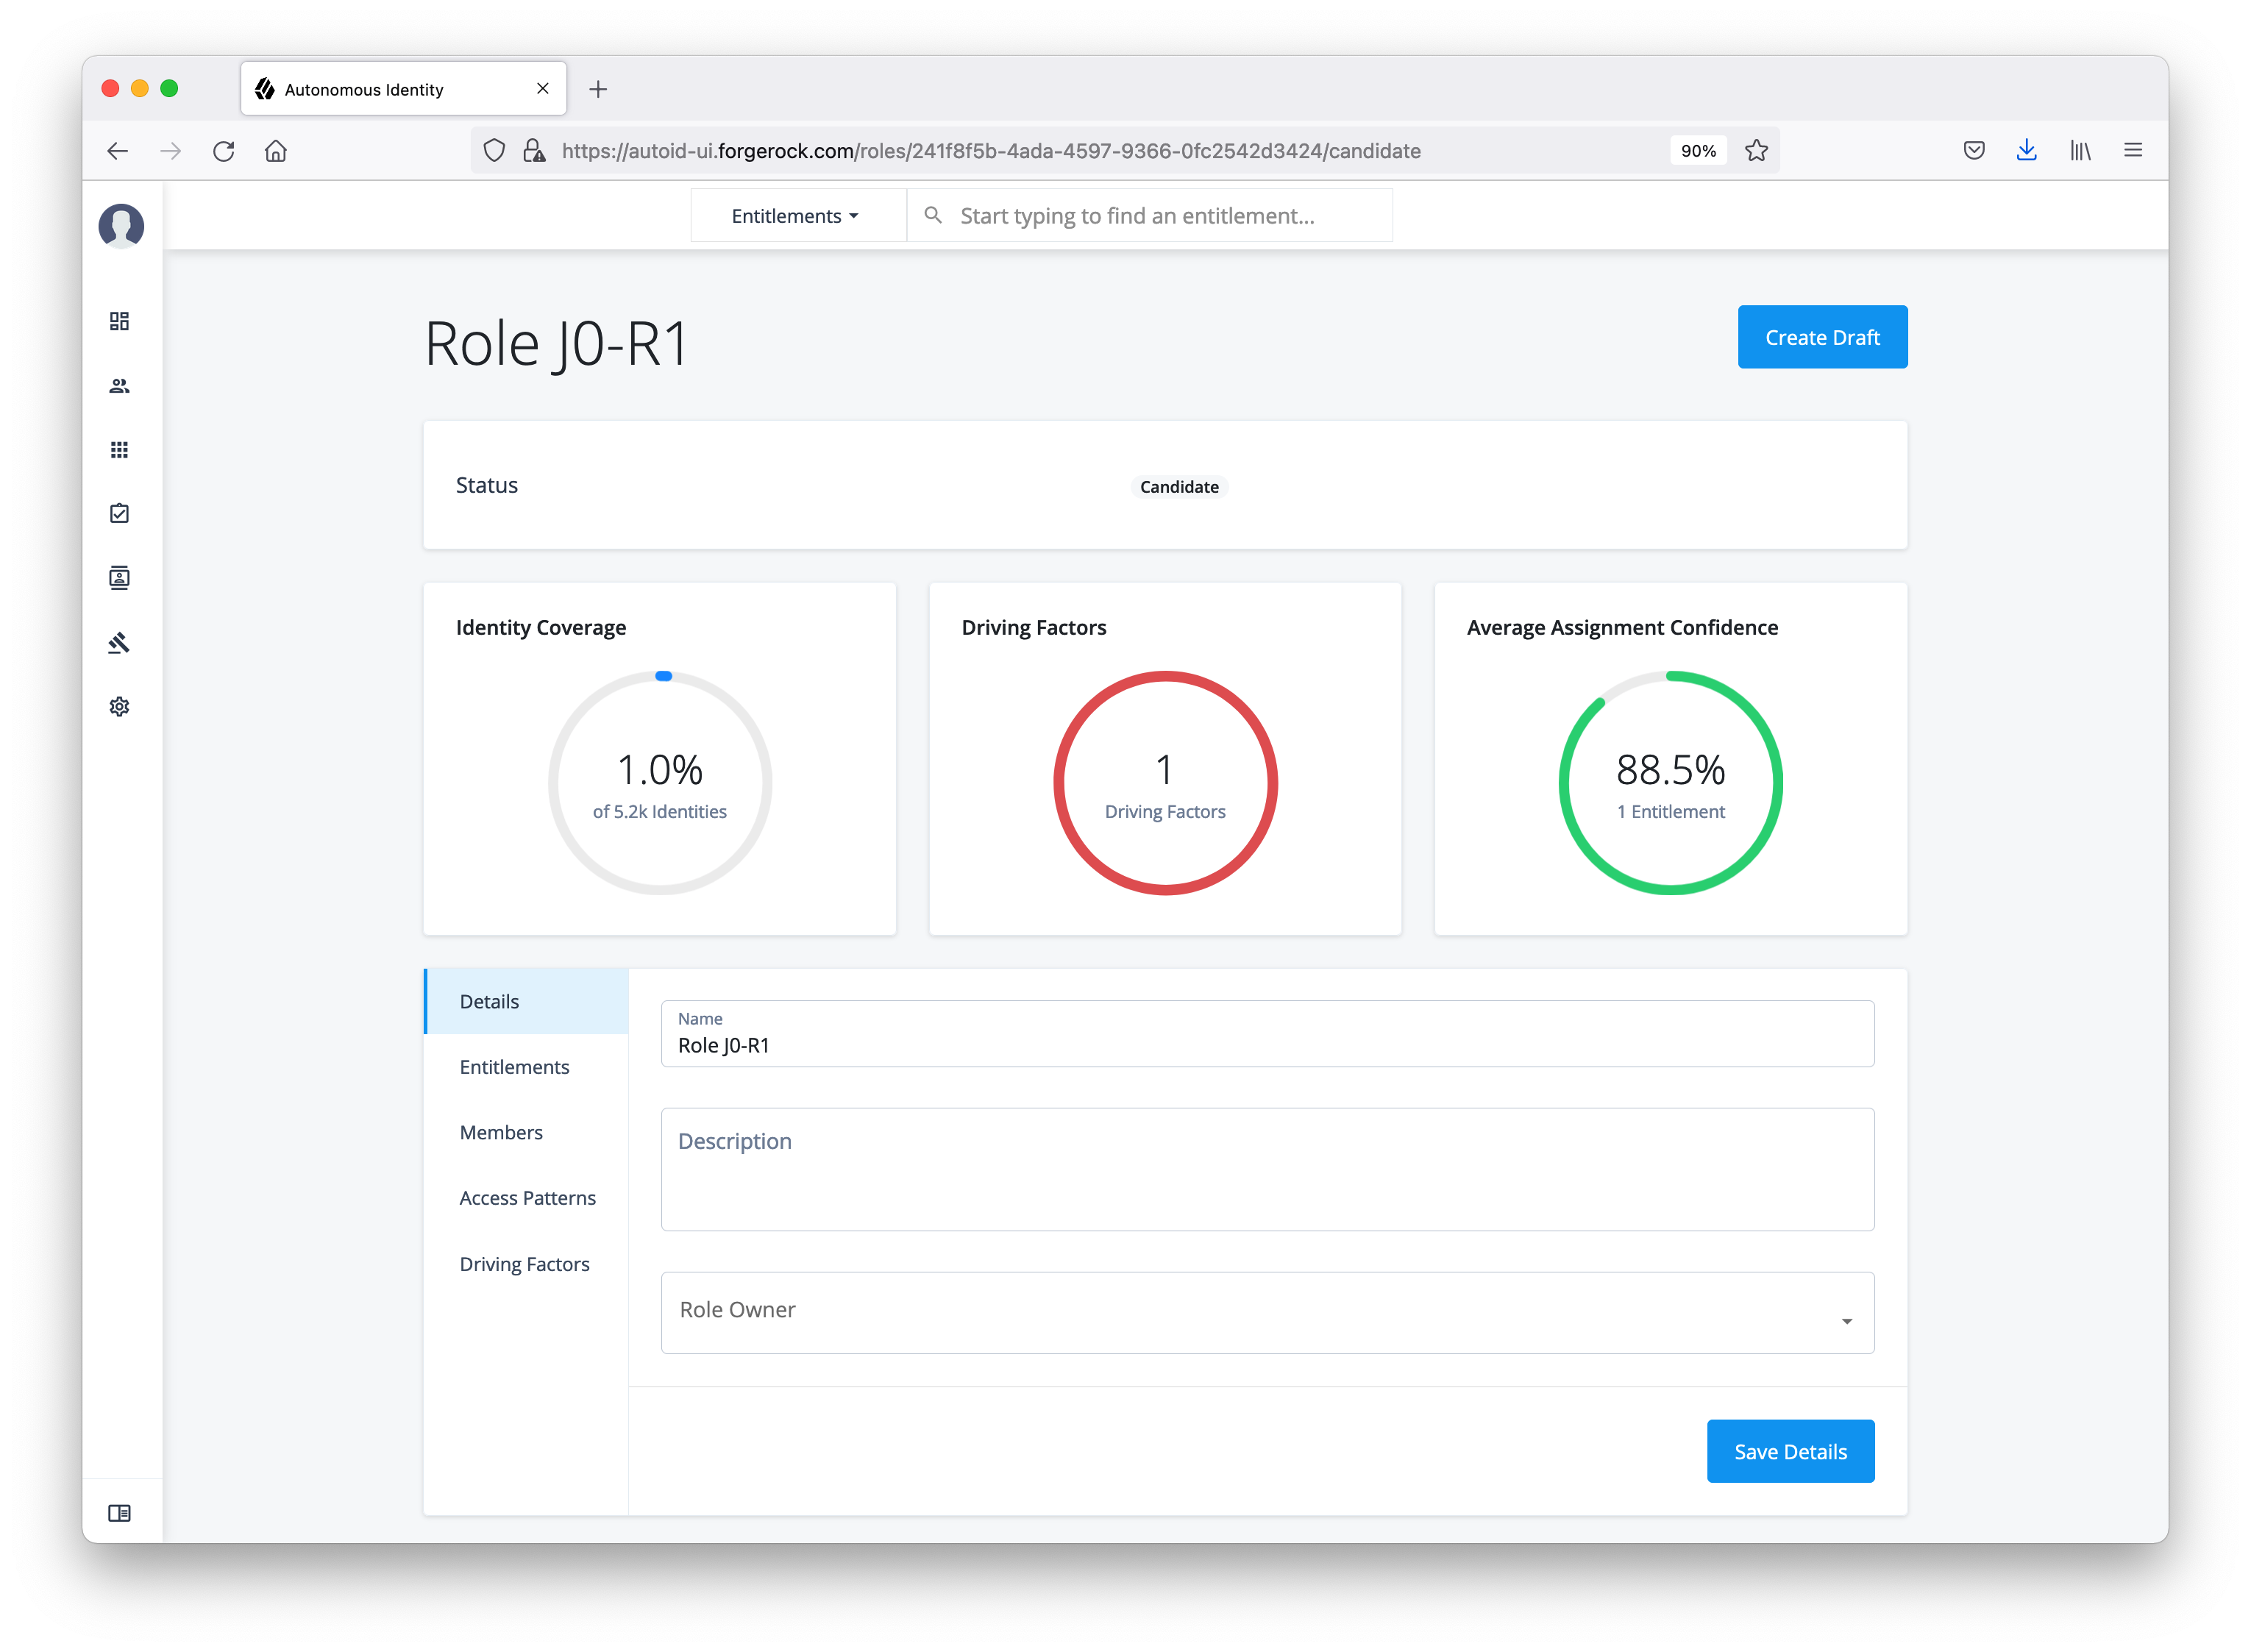
-
Draft. A draft is a role that requires review and approval by an authorized approver to become active. Role engineers can re-run a role mining job to pick up the latest changes in the access landscape. The Roles Workshop displays the latest confidence scores, driving factors, and a Recommended section that shows a suggested course of action for the role. Also, when you create a custom role, Autonomous Identity saves the role in draft status. You can edit the draft, make another custom role from it, publish the role for production, or delete the draft.
Click to display an image.
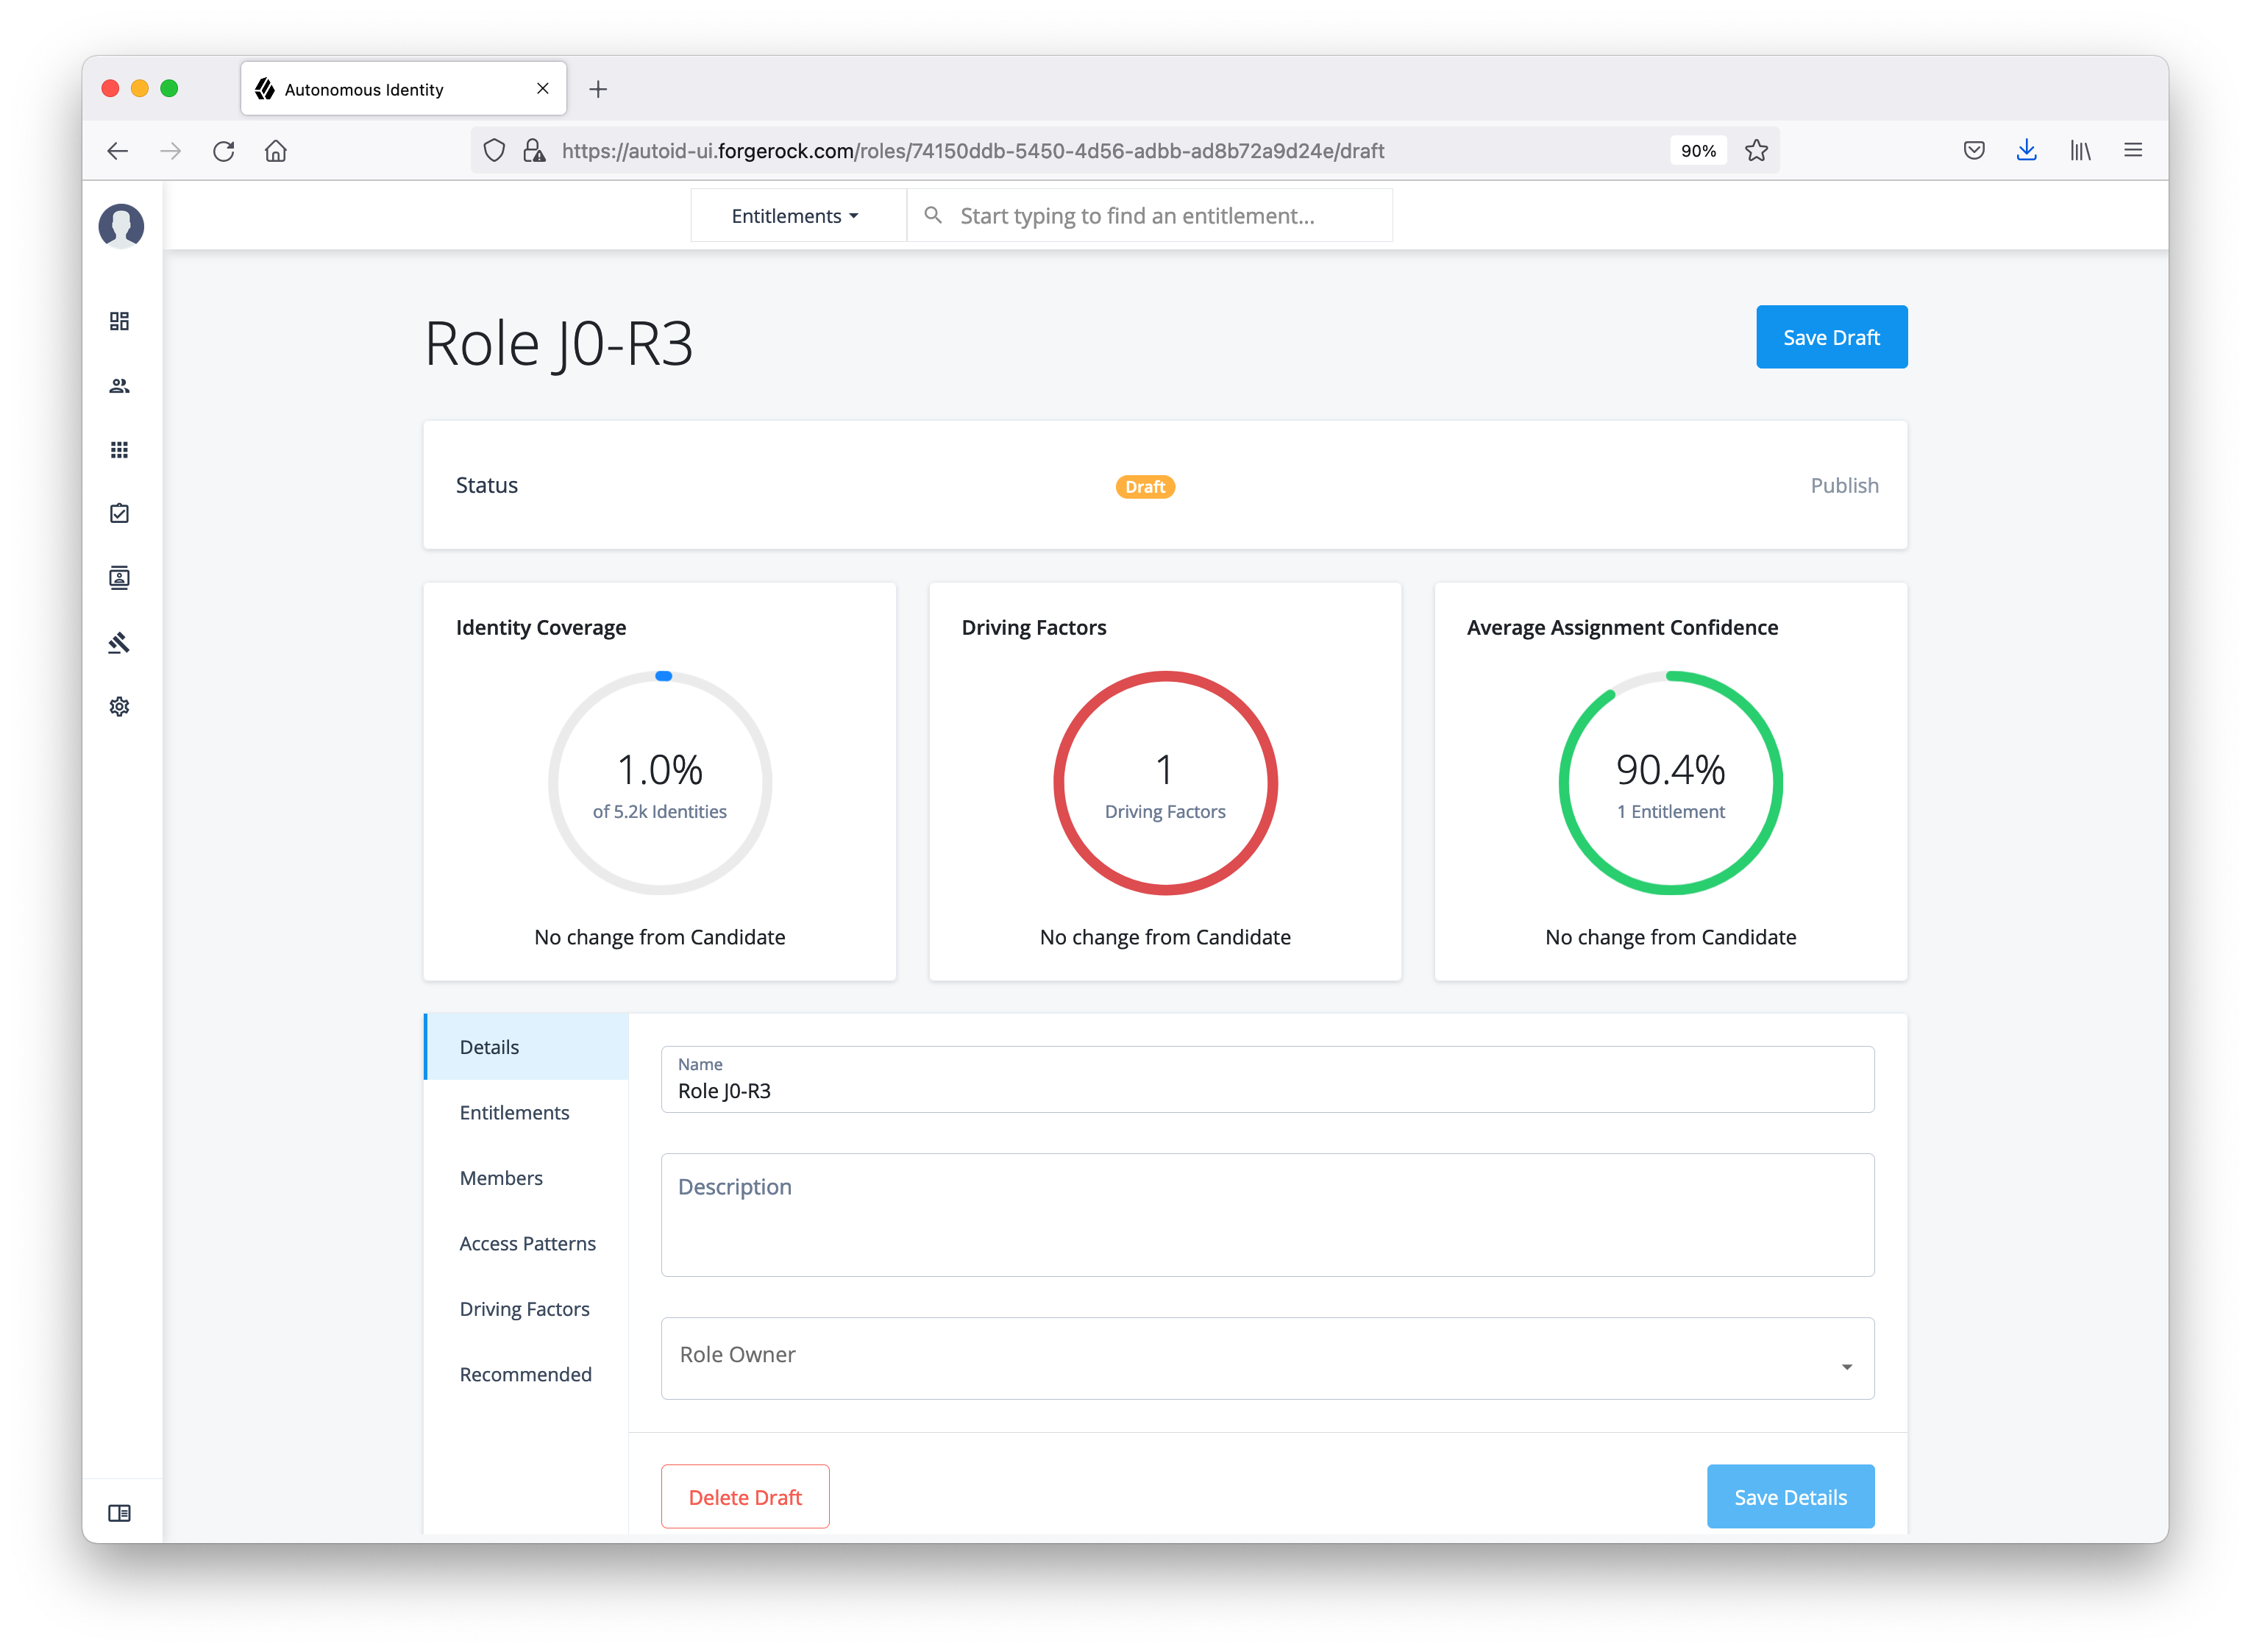
-
Active. Once a draft has been approved, the role is active for production use. The role appears with an Active status and also appears on the Roles Catalog page. The Recommended section presents suggested updates for each role analyzed in the latest mining job. You can create a draft from this active role or unpublish it back to draft status.
Click to display an image.
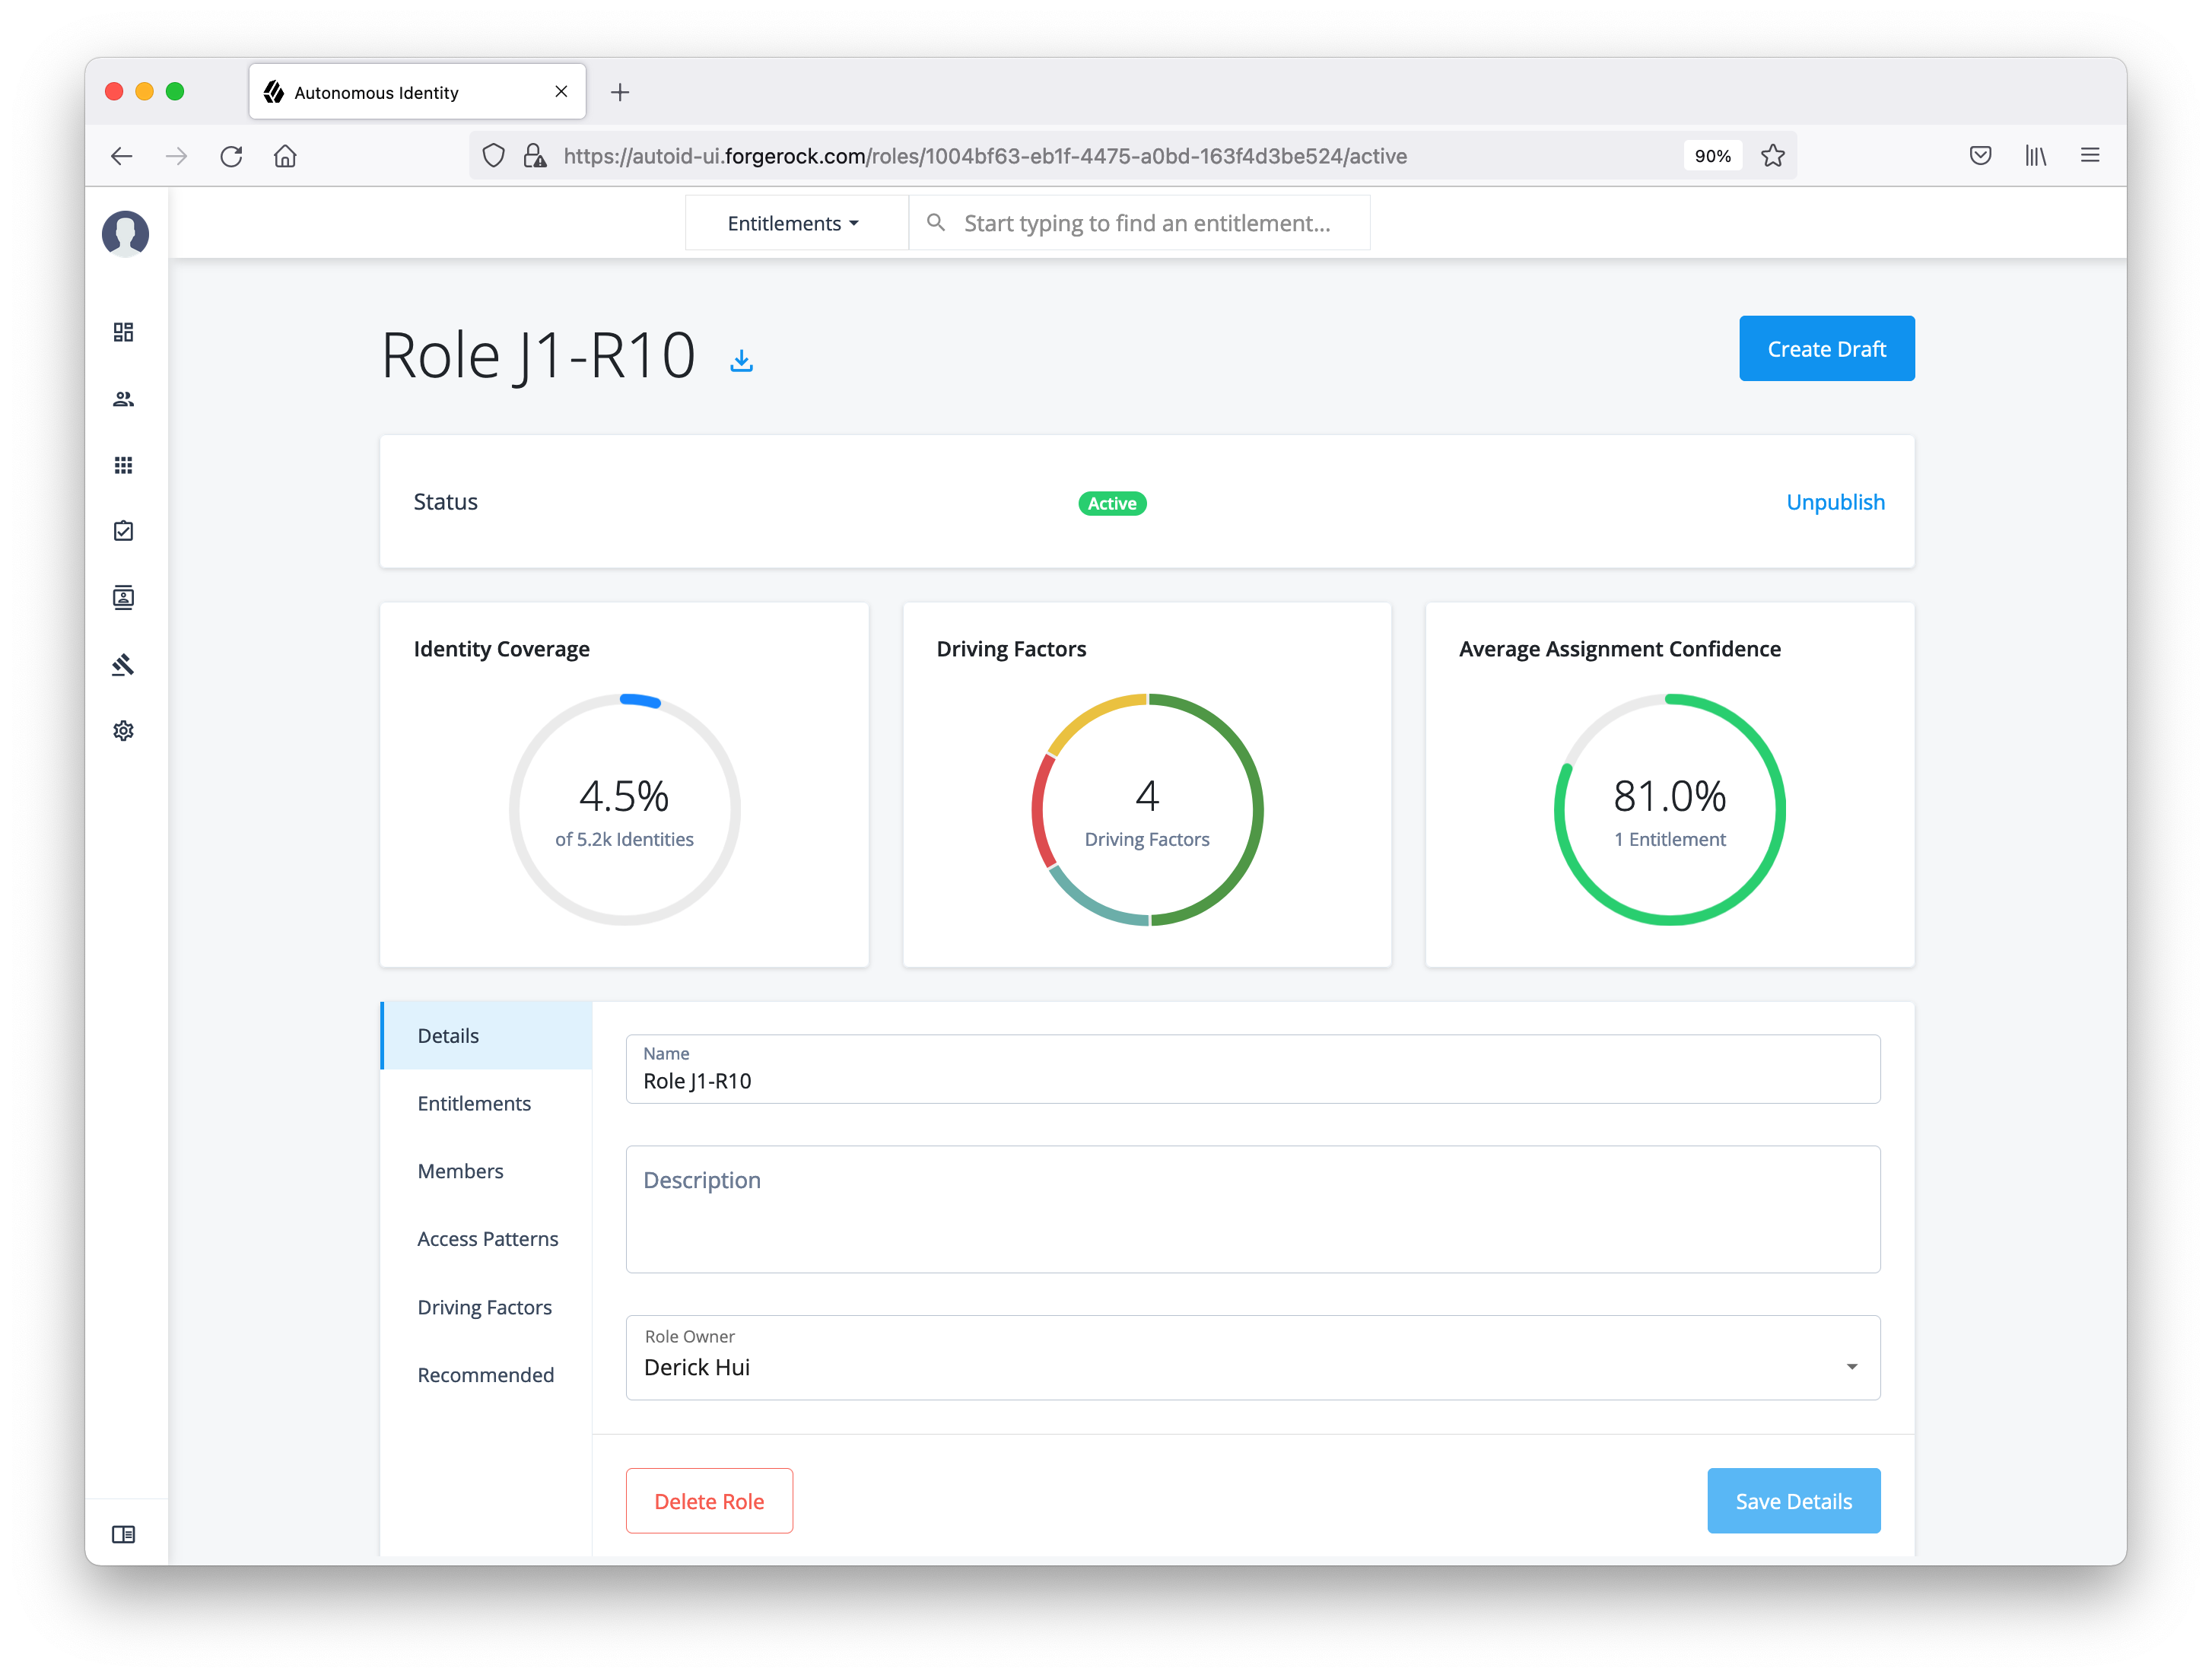
Role-mined vs custom roles
You can originate roles in two different ways: role-mined and custom.
Role-mined roles are discovered through Autonomous Identity’s machine learning process. The result of the role mining run is a generated list of candidates that a role engineer can edit and review on the Roles Workshop page.
Custom roles are created through different workflows:
-
From Scratch. You can create a totally new role on the Roles Workshop using the Create Role function.
-
From Existing. You can create a custom role from an existing draft or active role, which can occur in the following scenarios:
-
When you run a new role-mining job and an existing candidate role is deleted.
-
When you have a draft or an active role that is associated with a deleted candidate, and the recommendation is to delete the draft/active role as role mining determines that it is stale or no longer relevant.
-
| Custom roles do not have recommendations. Recommendations are based on the difference between a mined role and its candidate. |
Create a custom role
Autonomous Identity lets authorized users create new custom role drafts on the Roles Workshop.
-
On the Roles Workshop, click Create Role. Autonomous Identity creates a random label for the role at the top of the page.
-
Click Details. Enter a name, description, and select the Role Owner from the list of authorized users on the drop-down menu.
-
Click Entitlements. On the page, click Add Entitlements. You can search by entitlement name or application.
-
Click Access Patterns. On the page, click Add Access Pattern. Select a User Attribute, and enter an associated value.
-
Review your entries. When ready, click Save Draft.
The role will be saved in the Roles Workshop as a draft. An authorized user must review and approve the role to activate it in production.
Click an example
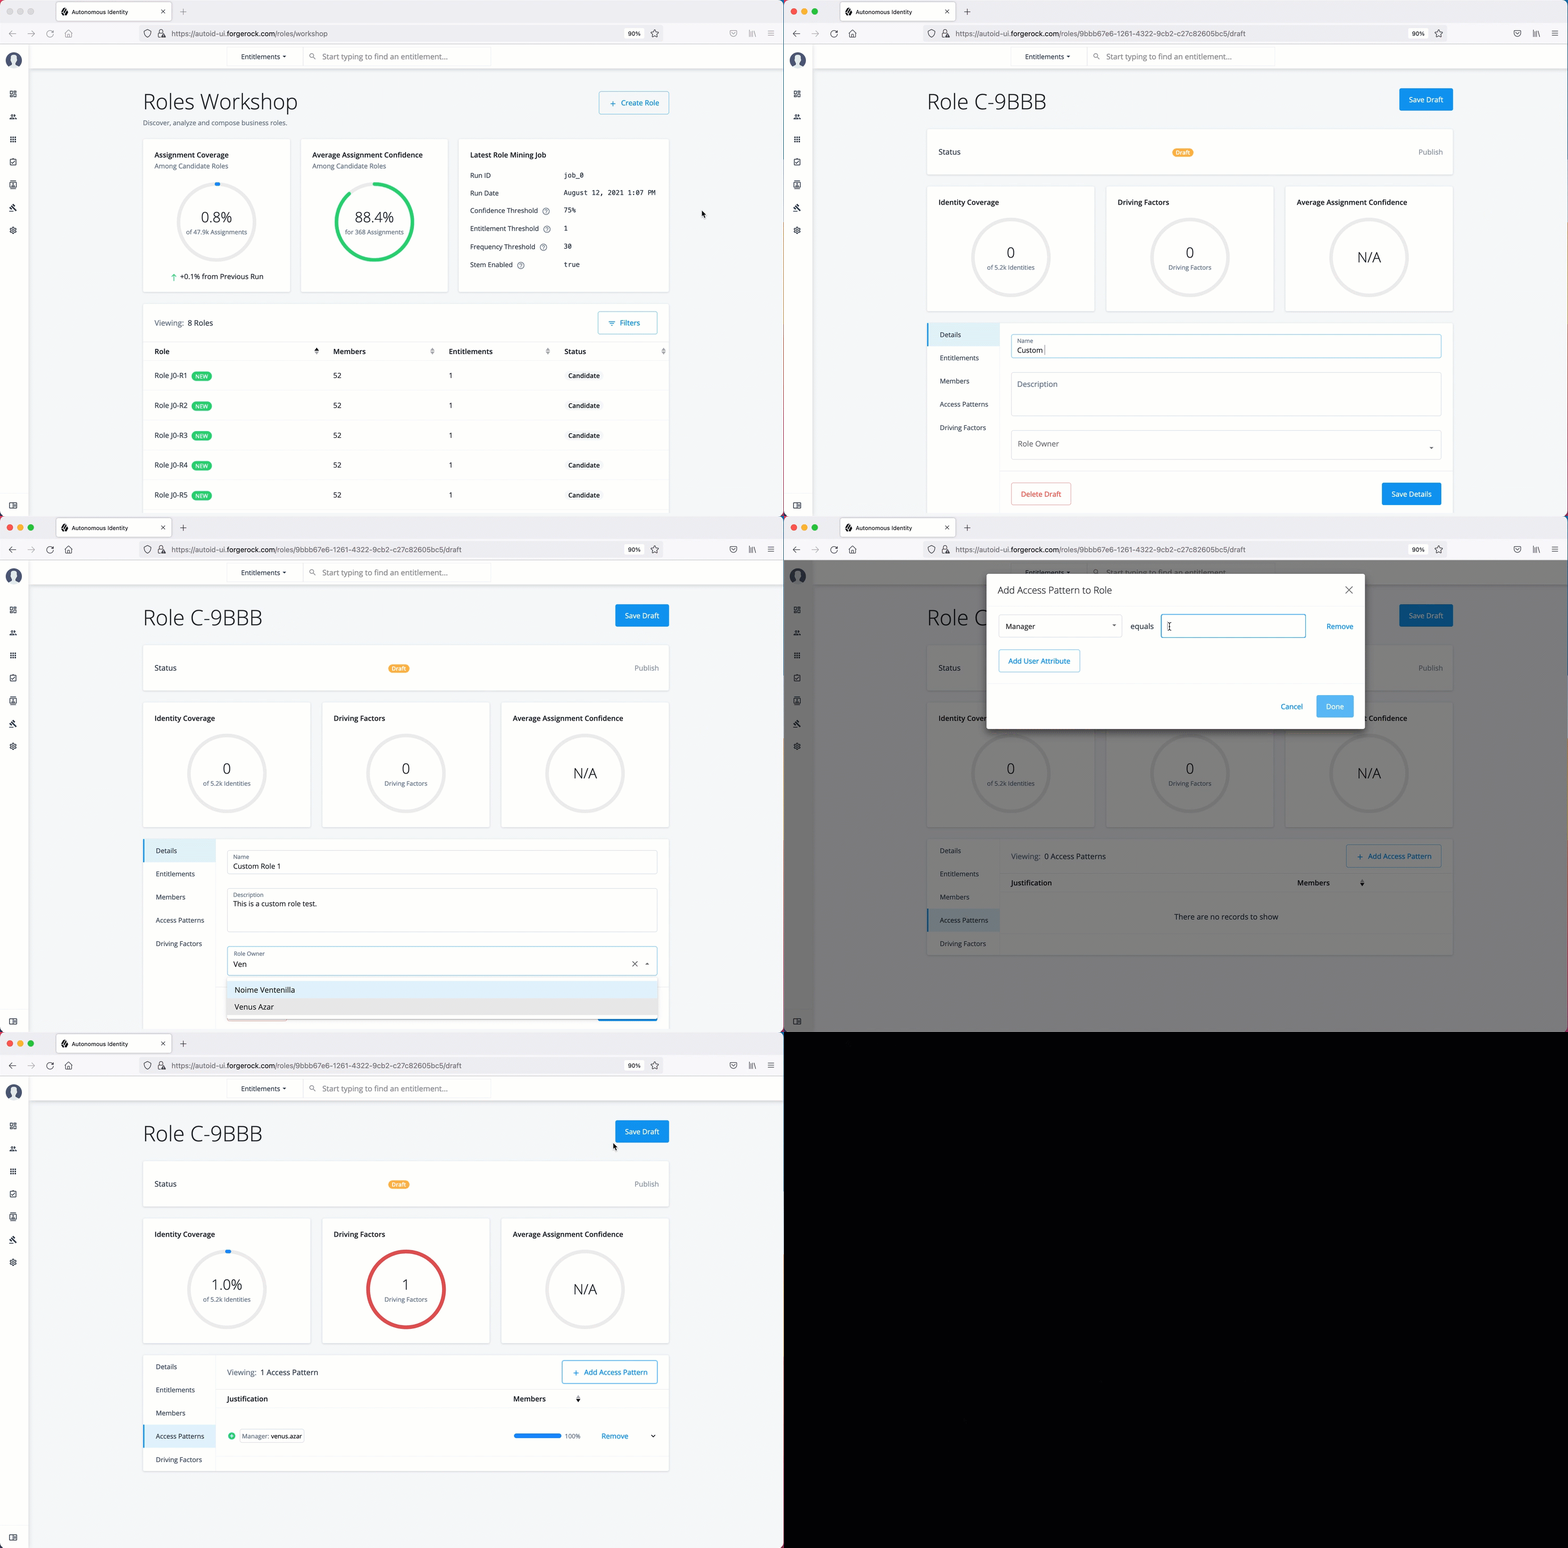
| Do not create a custom role before running an initial analytics pipeline job. Doing so can result in the role mining job failing. |
Search roles using the filter
Many companies have a large number of roles within their system. The Roles Workshop provides a useful filter to locate specific roles.
Search Roles using the filter:
-
On the Roles Workshop, click Filters.
-
Enter any of the following data:
-
Name. Enter a role name.
-
Status. Select
Active,Draft, orCandidate. -
Application. Enter an application with which the role is associated.
-
Role Owner. Enter a role owner.
-
Origin. Select
CustomorRole Mining.
-
-
Click Done.
Click an example
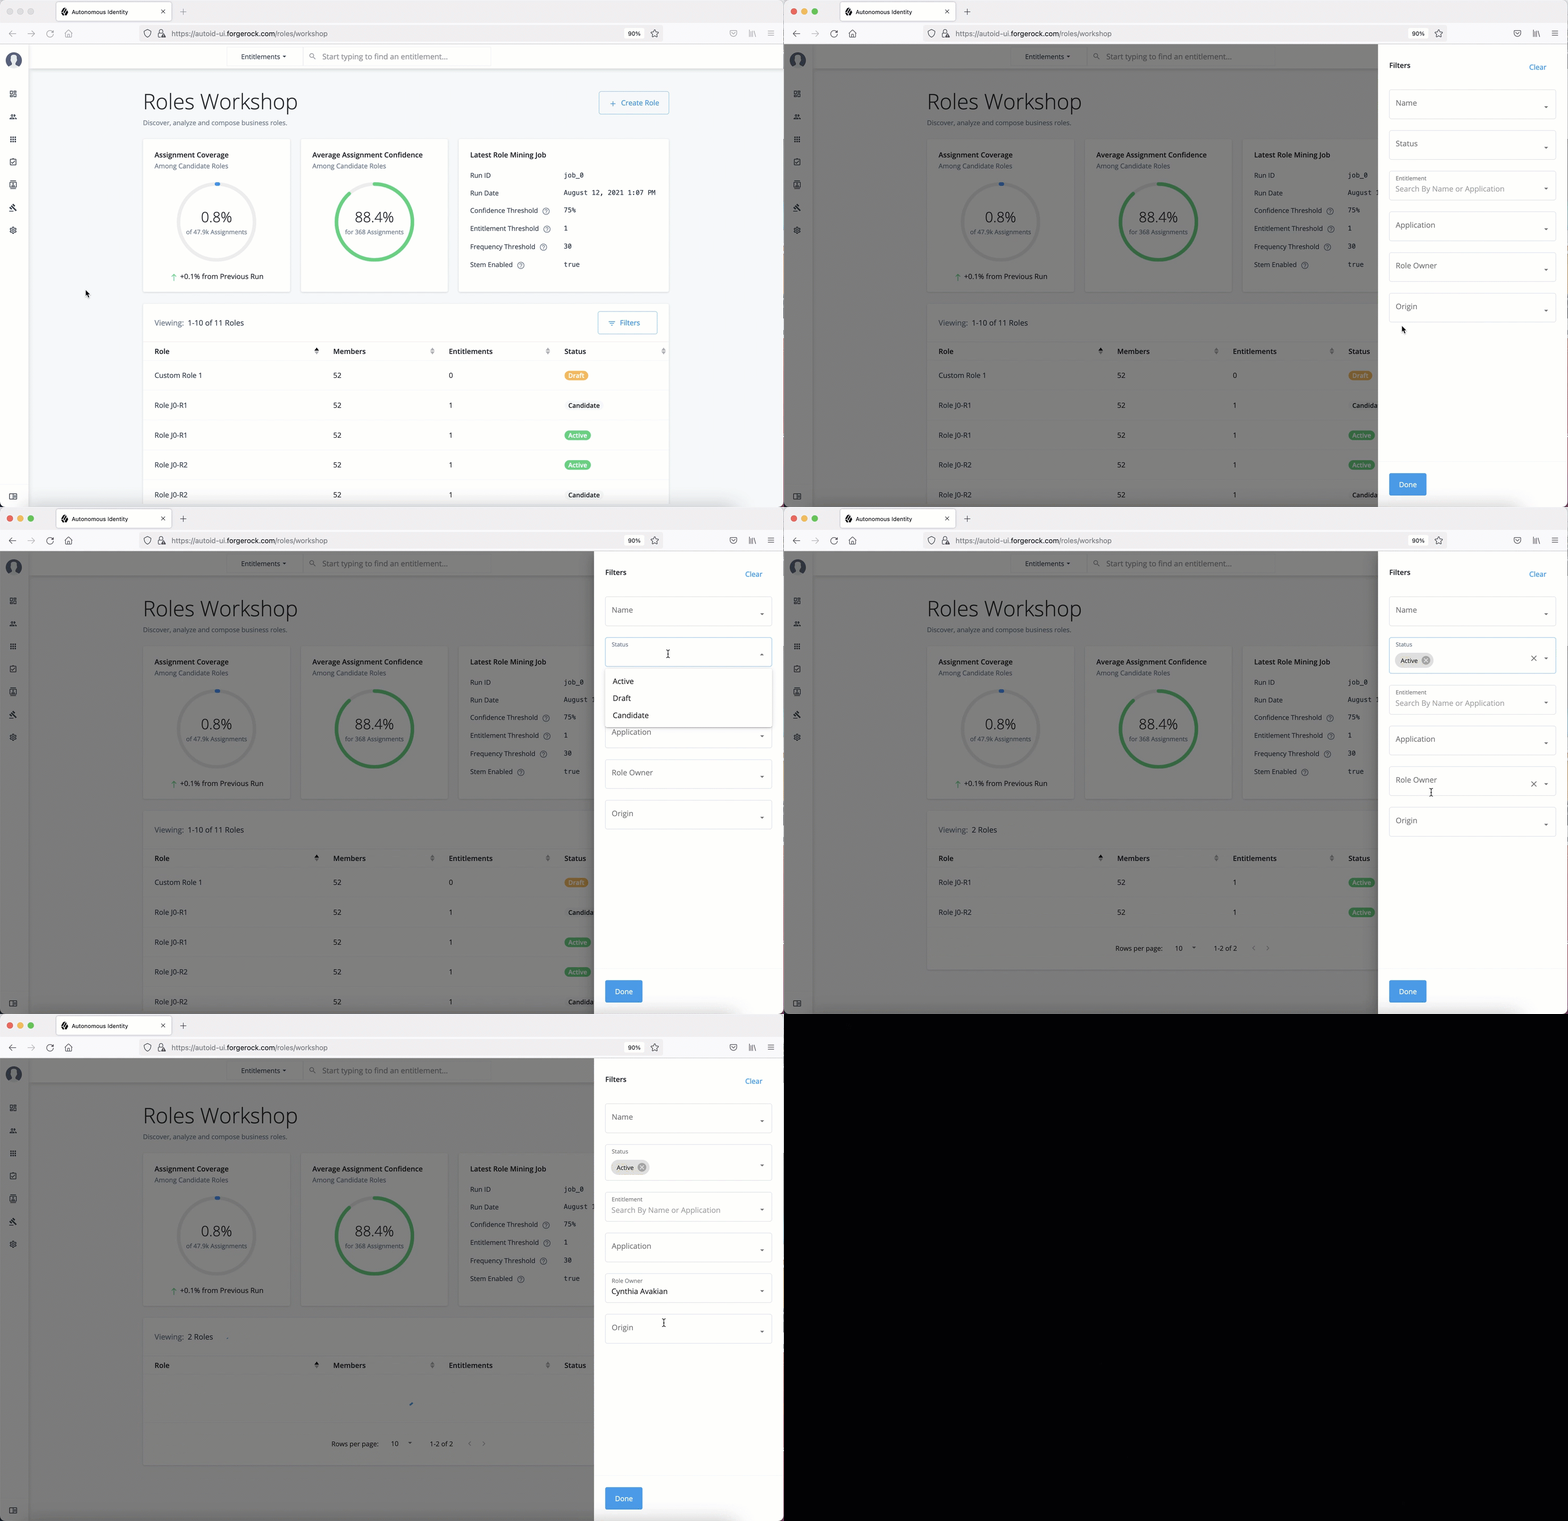
Create a new draft
Autonomous Identity lets authorized users review role-mined candidates on the Roles Workshop. If the role engineer and role owner approves the candidate, the role goes to draft state.
Create a New Draft:
-
On the Roles Workshop, review the list of candidates. Click a candidate role.
-
Change the role name, and then add a description.
-
Add an authorized user as a role owner. All drafts or active roles must have a role owner assigned to it.
Note: The role owner must have the Role Owner role assigned to them. Administrators can add them on the Manage Identities page, or make a request to your adminstrator.
-
Click Entitlements to review the entitlement name, application if assigned, and the average confidence score.
-
Click Members to review the members or users associated with this role.
-
Click Access Patterns to review the access pattern for this role.
-
Click Driving Factors to review the list of attributes, driving factors, frequency, and percentage of members with the role.
-
Click Recommended to review any suggested action on the role. You must run the role mining job several times to pick up new changes in your access landscape. Initial role mining jobs will not have recommendations other than Create Draft.
-
Click Create Draft when all entries are accepted.
Click an example
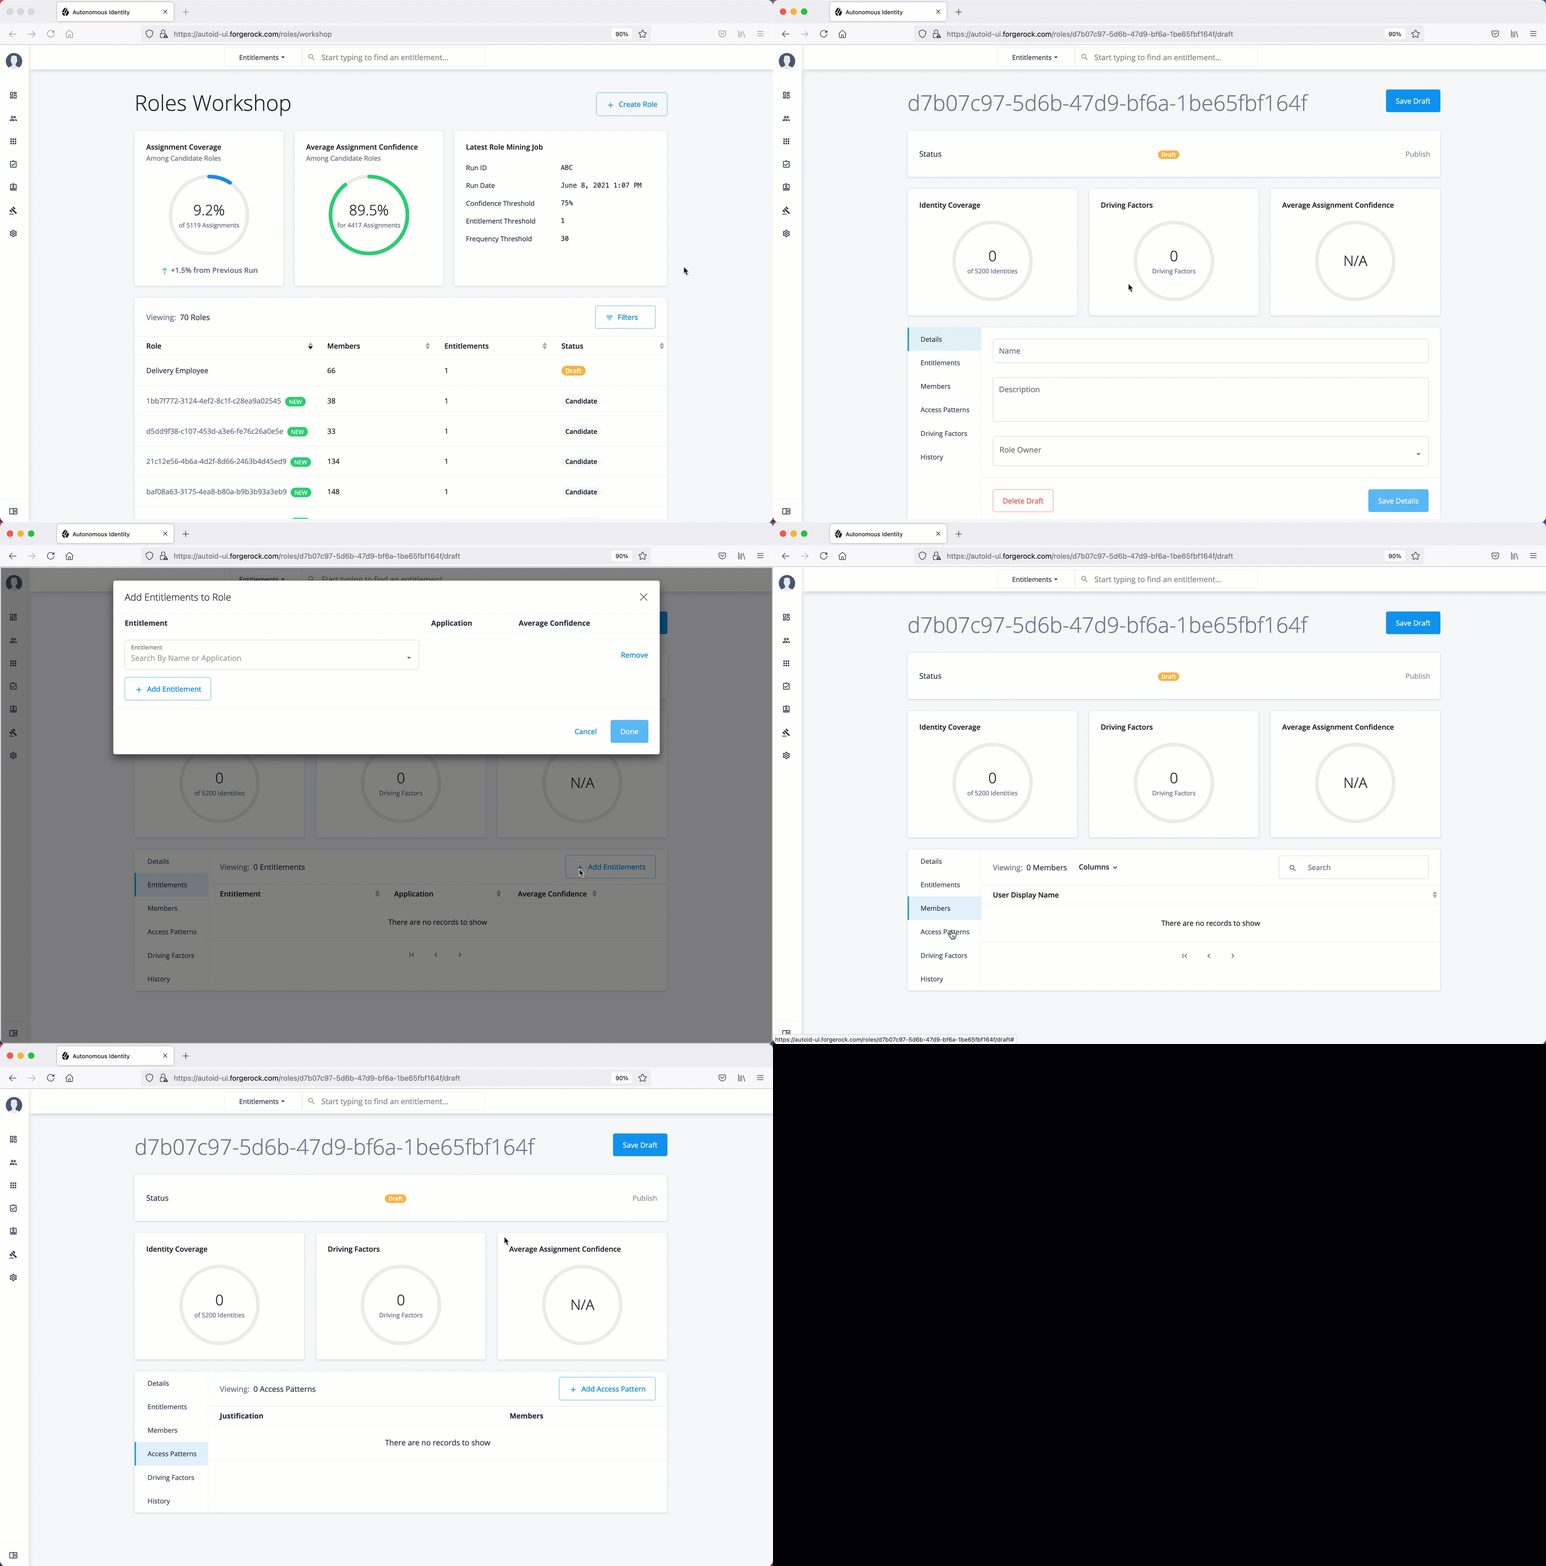
Publish a role
Autonomous Identity lets role engineers and role owners approves a draft and push it into production. The Roles Workshop displays the role in an active state.
Publish a Draft:
-
On the Roles Workshop, review the list of candidates. Click a draft role.
-
Review the role details.
-
Click Publish.
Click an example
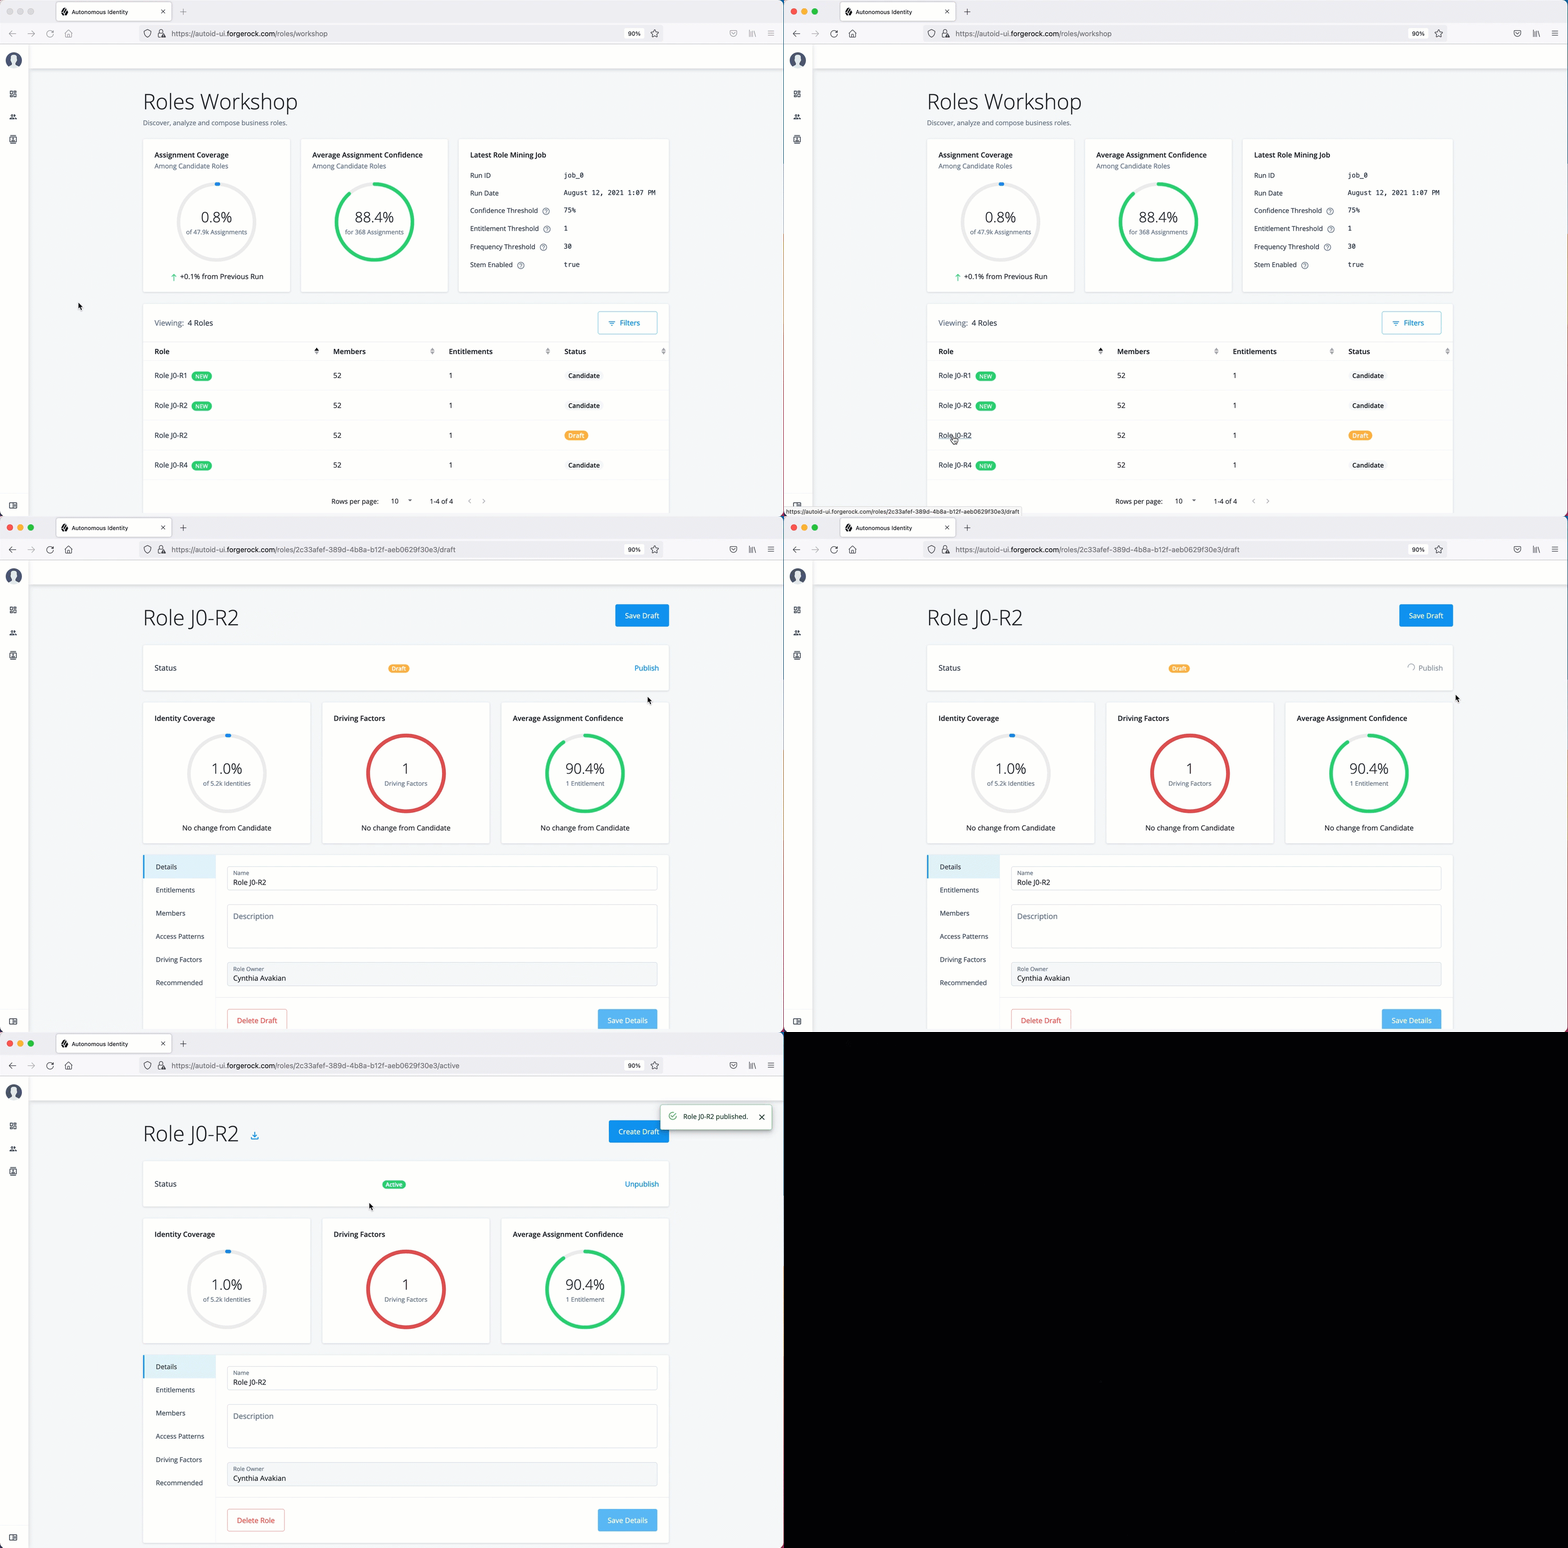
Delete a role
Autonomous Identity lets role engineers and role owners delete a draft or an active role.
Delete a Role:
-
On the Roles Workshop, review the list of candidates. Click a draft or active role.
-
Review the role details.
-
Click Delete Draft.
Click an example
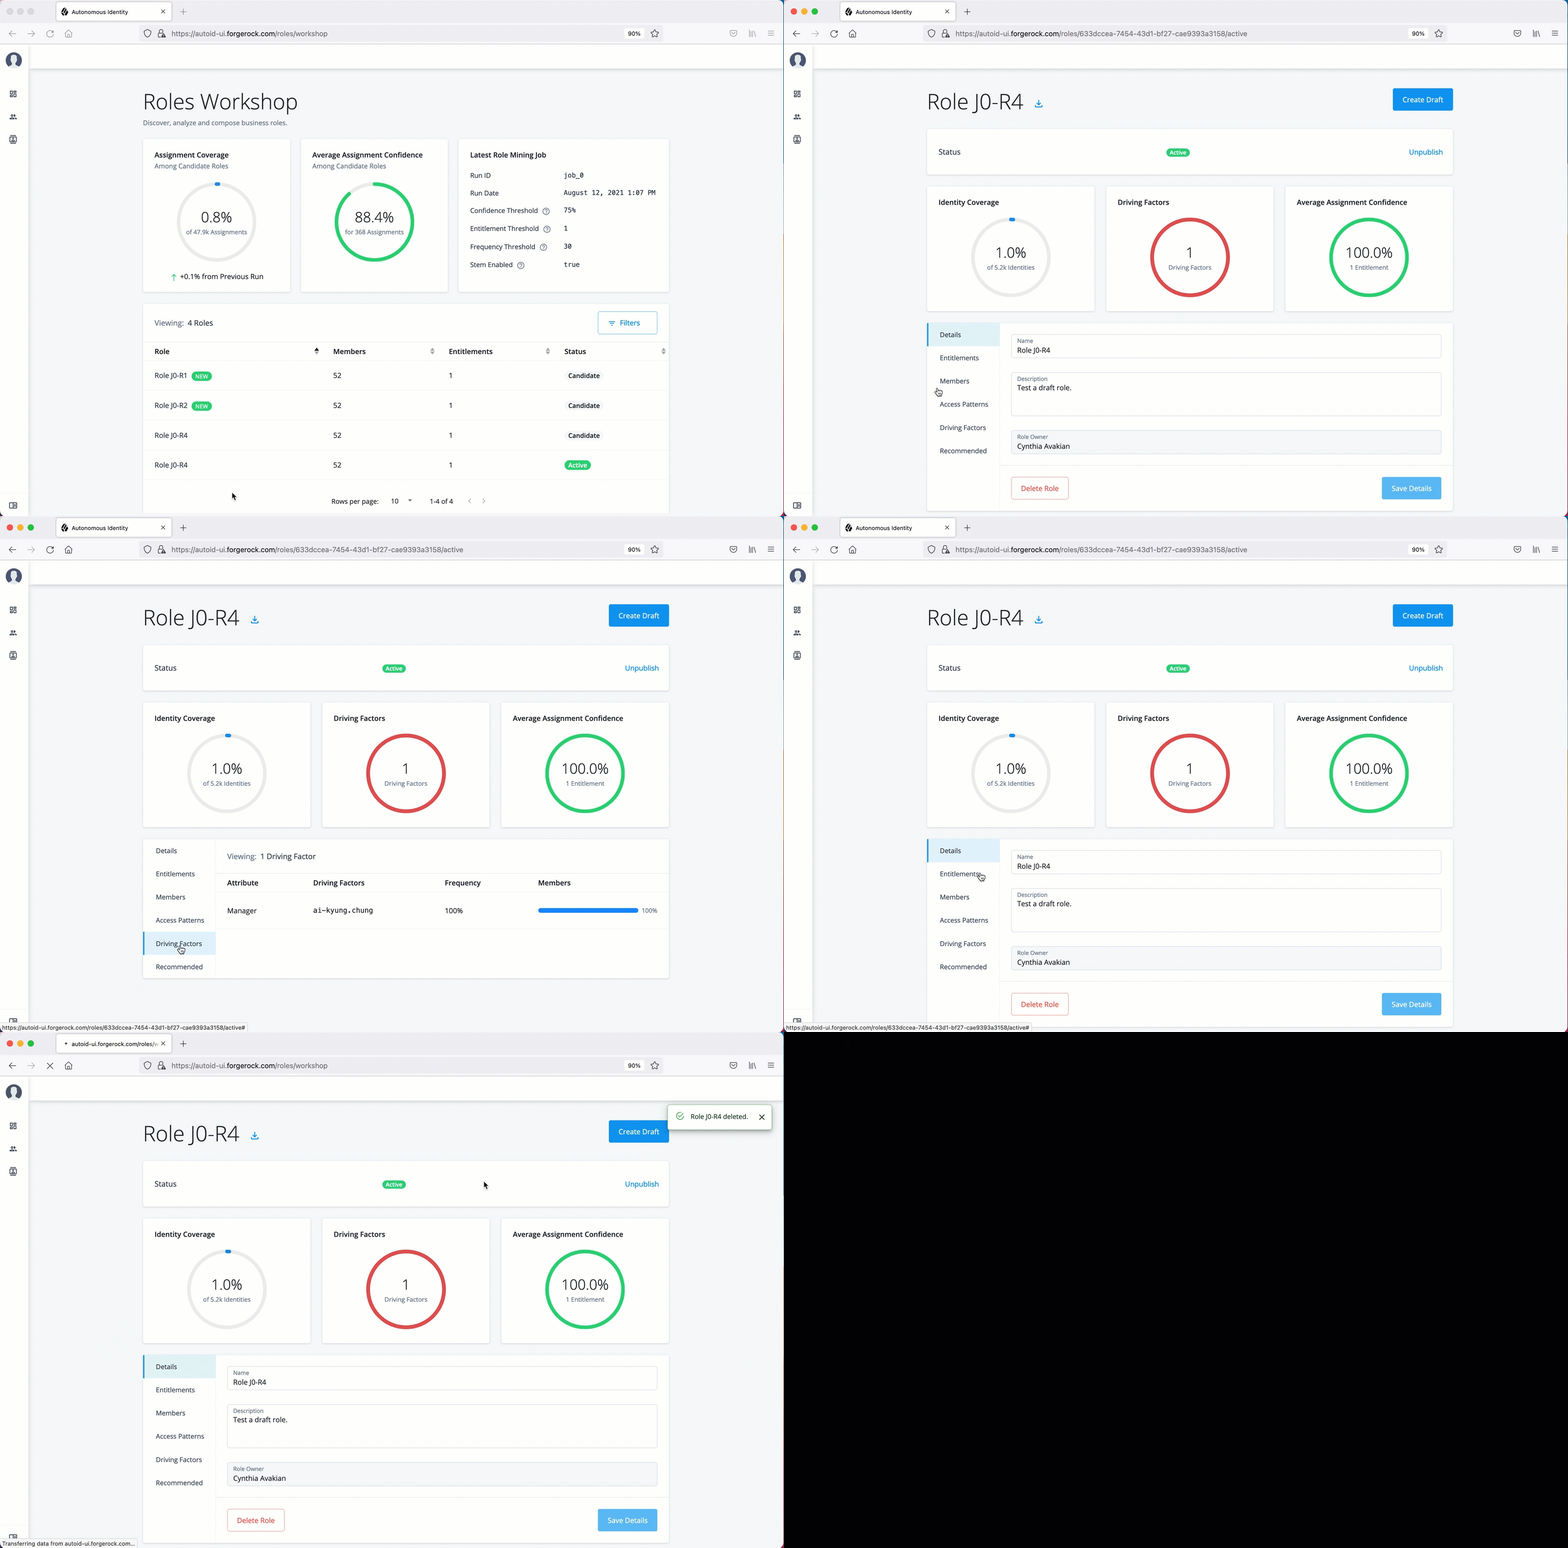
Roles catalog tasks
The Roles Catalog lists all active roles within your system. Role engineers can export any role as a json file, edit, unpublish, and delete the roles if necessary. Role owners can carry out the same tasks on only roles assigned to them.
Export a role
Export a Role to JSON:
-
On the UI Dashboard, click Roles, and then click Roles Catalog.
-
Click the role(s) to export.
-
Click Export Selected. Autonomous Identity sends a JSON file to your local drive.
Filter roles in the catalog
Search the Catalog using the filter:
-
On the UI Dashboard, click Roles, and then click Roles Catalog.
-
Click Filters to view specific roles in your catalog.
-
On the Filters menu, enter and select from the following drop-down lists:
-
Name. Enter a role name.
-
Status. Select
Active,Draft, orCandidate. -
Application. Enter an application with which the role is associated.
-
Role Owner. Enter a role owner.
-
Origin. Select
CustomorRole Mining.
-
-
Click Done.
Troubleshooting
The following section provides information to help you troubleshoot Autonomous Identity. The topics are:
| More troubleshooting tips will be added in the future. |
Where to access the logs
Autonomous Identity captures information in its log files to troubleshoot any problem.
Deployment logs
When running the ansible playbook during the deployment, logs print to your screen (STDOUT). You can access additional
information is available through the -v or --verbose.
For more information, try -vvx. To enable connection debugging, try -vvvv.
The Cassandra install log file (installcassandra.log) is located at /data/opt/autoid/cassandra.
Front-end logs
You can view any output logs of the running services on Docker using the following commands:
docker service logs <SERVICE NAME> --follow
docker service ps <SERVICE NAME> --no-trunc
Cassandra logs
You can view any output logs of the Cassandra database, which is kicked-off at startup. Autonomous Identity pipes the output message to a log file in the standard installation folder.
| Log | Location |
|---|---|
Standard Cassandra log |
/data/opt/autoid/cassandra.out |
Backup Log |
/data/opt/autoid/cassandra/cassandra-backup/cassandra-backup.log |
Other Logs |
/data/opt/autoid/apache-cassandra-<version>/logs |
Spark UI logs
If the Spark UI is not available on port 8080 of the Spark master server, then do the following:
-
Check the Spark start-up logs. Check if the status of Spark UI port 8080 is not the default port, or if there is another service using the port.
-
If the UI is not accessible, run some
curlcommands to check the core and memory in the cluster.curl -s https://<ip-address>:8080 | grep -A 2 'Memory in use' curl -s https://<ip-address>:8080 | grep -A 2 'Cores in use'
For more information, Refer to Spark REST API.
How to change the Docker root folder
Docker stores its images in the root /var folder. Customers who mount /var with low storage can run out of disk space quickly.
How to change the Docker root folder?
-
Stop the Docker service:
sudo systemctl stop docker.service
sudo systemctl stop docker.socket
-
Edit the Docker service file, and add a
-goption to the file to redirect the root folder to another location:sudo vi /usr/lib/systemd/system/docker.service ExecStart=/usr/bin/dockerd -g /opt/autoid/docker -H fd:// --containerd=/run/containerd/containerd.sock
-
Make a new folder for the Docker root if needed:
sudo mkdir -p /opt/autoid/docker
-
Copy all of the content from the old Docker root folder to the new Docker root folder:
sudo rsync -aqxP /var/lib/docker/* /new/path/docker/.
-
Reload the system daemon:
sudo systemctl daemon-reload
-
Start the docker service:
sudo systemctl start docker
-
Make sure Docker is running with right arguments. The output should show Docker is running with right parameters set:
ps aux | grep -i docker | grep -v grep
Tune Cassandra for large data
You can tune Cassandra for large data sets or when Cassandra times out during analytics.
-
Navigate to Cassandra Folder:
cd /opt/autoid/apache-cassandra-3.11.2/conf
-
Edit the
jvm.options, and change the Java heap size and the size of the heap size for young generation as follows:-Xms10G -Xmx10G -Xmn2800M
-
Edit the
cassandra.ymlfile, and change the files as follows:vi cassandra.yml key_cache_size_in_mb: 1000 key_cache_save_period: 34400 max_mutation_size_in_kb: 65536 commitlog_segment_size_in_mb: 128 read_request_timeout_in_ms: 200000 write_request_timeout_in_ms: 200000 request_timeout_in_ms: 200000 counter_write_request_timeout_in_ms: 200000 cas_contention_timeout_in_ms: 50000 truncate_request_timeout_in_ms: 600000 slow_query_log_timeout_in_ms: 50000 concurrent_writes: 256 commitlog_compression: - class_name: LZ4Compressor
-
After saving the file, restart the Cassandra and Docker jobs:
-
First, find the Cassandra job:
ps -ef | grep cassandra. // find the PID
-
Kill the Cassandra PID.
kill -9 PID
-
Make sure no Cassandra process is running:
ps -ef|grep cassandra
-
Restart Cassandra:
cd /opt/autoid/apache-cassandra-3.11.2/bin
nohup cassandra > /opt/autoid/apache-cassandra-3.11.2/cassandra.out 2>&1 &
-
Make sure to check if the following information message or similar is present:
INFO [main] 2022-01-24 23:38:26,207 Gossiper.java:1701 - No gossip backlog; proceeding
-
Restart Docker:
sudo systemctl docker restart
-
