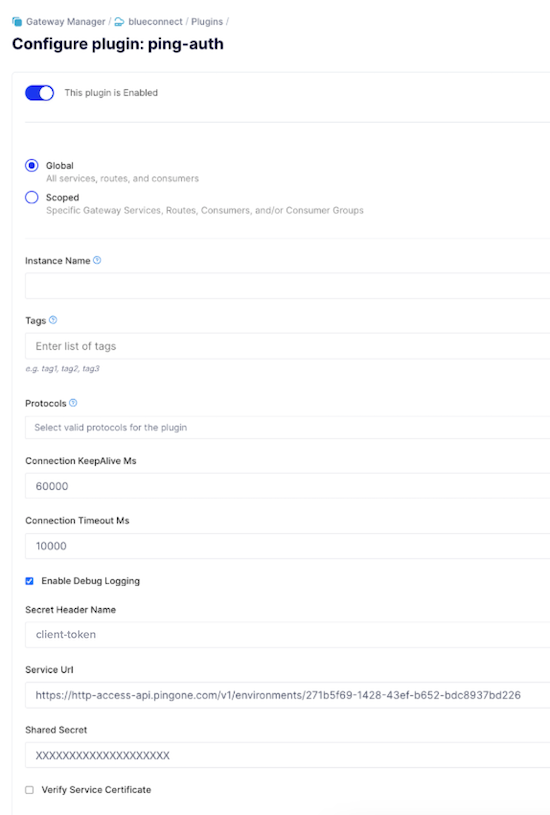
Configuring the plugin using the Gateway Manager UI
Steps
-
In Gateway Manager, open Plugins from the sidebar, then click New Plugin.
-
On the Custom Plugins tab, click the ping-auth plugin.
-
Optional: To enable the plugin for specific consumers, services, or routes, click Scoped, and then enter the Service, Route, and Consumer information.
-
In the Service Url field, enter the host name of your PingAuthorize server and the port of the HTTPS Connection Handler.
To find this port number in the PingAuthorize administrative console, go to Configuration → System → Connection Handlers. For example,
https://pingauthorize:8443. -
In the Shared Secret field, enter the PingAuthorize sideband client’s shared secret.
-
Verify that the Secret Header Name matches the secret header name configured for the Sideband API Servlet Extension in PingAuthorize.

-
Configure the following additional fields:
Option API Field Name Description Connection KeepAlive Ms
connection_keepAlive_msThe duration to keep the connection alive for reuse. The default is
60000.Connection Timeout Ms
connection_timeout_msThe duration to wait before the connection times out. The default is
10000.Enable Debug Logging
enable_debug_loggingControls if the requests and responses are logged at the debug level. The default is
false. For log messages to show inerror.log, you must setlog_level = debuginkong.conf.Verify Service Certificate
verify_service_certificateControls whether the service certificate is verified. This is intended for testing purposes and the default is
true. -
Click Save.
Result
Kong Konnect is now configured to work with PingAuthorize.