Set up PingAM
|
This is not a comprehensive Advanced Identity Software implementation guide. These sample setup instructions show a minimal integration of Advanced Identity Software components to get you started. Ping Advanced Identity Software offers maximum extensibility and flexibility in self-managed deployments. It includes many features and options the sample setup instructions don’t cover. If you don’t need maximum extensibility and flexibility, there are simpler alternatives:
For help with your deployment and to validate your plans before deploying in production, contact Ping Identity. |
When your external data stores are configured, follow these procedures to configure PingAM in an Advanced Identity Software deployment:
Install PingAM
-
Follow the instructions in the PingAM documentation to download PingAM. Make sure you download the
.zipfile, not just the.warfile. -
Stop Apache Tomcat.
-
Extract the
.zipfile, locate the PingAM.warfile, and copy the.warfile to deploy in Apache Tomcat asam.war:cp AM-8.1.1.war /path/to/tomcat/webapps/am.war -
Install PingAM with file-based configuration (FBC).
The following example excerpt configures Apache Tomcat to trust PingDS certificates and PingAM to use PingDS for data storage.
This example uses AM_TEST_MODE=true, which is only for use in evaluations and demonstrations.echo "export AM_TEST_MODE=true" > /path/to/tomcat/bin/setenv.sh echo "export CATALINA_OPTS=\"\$CATALINA_OPTS \ -Dcom.sun.identity.sm.sms_object_filebased_enabled=true \ -Dcom.sun.identity.configuration.directory=/path/to/am-config \ -Dam.server.fqdn=am.example.com \ -Dam.server.port=8081 \ -Dam.stores.application.servers=directory.example.com:1636 \ -Dam.stores.application.password=5up35tr0ng \ -Dam.stores.cts.servers=directory.example.com:1636 \ -Dam.stores.cts.username=uid=openam_cts,ou=admins,ou=famrecords,ou=openam-session,ou=tokens \ -Dam.stores.cts.password=5up35tr0ng \ -Dam.stores.cts.root.suffix=ou=famrecords,ou=openam-session,ou=tokens \ -Dam.stores.user.servers=directory.example.com:1636 \ -Dam.stores.user.username=uid=am-identity-bind-account,ou=admins,ou=identities \ -Dam.stores.user.password=5up35tr0ng \ -Djavax.net.ssl.trustStore=/path/to/openam-security/truststore \ -Djavax.net.ssl.trustStorePassword=changeit \ -Djavax.net.ssl.trustStoreType=jks \ -server \ -Xmx2g \ -XX:MetaspaceSize=256m \ -XX:MaxMetaspaceSize=256m\"" >> /path/to/tomcat/bin/setenv.sh chmod +x /path/to/tomcat/bin/*shLearn more in Passive install with FBC.
-
Start Tomcat.
It can take Apache Tomcat several seconds to deploy PingAM.
Create a realm
The PingAM Top Level Realm should serve administration purposes only.
These steps create an alpha realm for non-administrative identities:
-
If you’re not currently logged in to the AM admin UI as the
amAdminuser, log in. -
Click + New Realm, and create the new realm with the following settings:
-
Name:
alpha -
Keep the defaults for all other settings.
-
For background information, see Realms in the PingAM documentation.
Configure OAuth clients
The deployment depends on the following OAuth 2.0 clients:
| Client ID | Description | In Top Level Realm? | In subrealms? |
|---|---|---|---|
|
PingIDM uses this confidential client to introspect access tokens through the This client is not used for OAuth 2.0 flows, only to introspect tokens. It is not a real OAuth 2.0 client, in the traditional sense. Rather, it is an OAuth 2.0 Resource Server account, used exclusively for token introspection. As such, you do not need to specify redirect URIs or grant types. When you configure the client, PingAM adds the |
|
|
|
PingAM nodes in authentication journeys (trees) use this confidential client to authenticate through PingAM and provision identities through PingIDM. This client uses the client credentials flow, and does not authenticate resource owners other than itself. |
|
|
|
The Advanced Identity Software Admin UI uses this public client to access Advanced Identity Software configuration features, such as identity management and journey (tree) editing. The client uses the implicit flow, and authenticates administrator users who are authorized to perform administrative operations. |
|
|
|
The End User UI uses this public client to access and present end-user profile data. The client uses the implicit flow, and authenticates end users who are authorized to view and edit their profiles. |
|
|
When configuring a client in more than one realm, make sure the client configurations are identical.
Follow these steps to configure the OAuth 2.0 clients:
-
If you’re not currently logged in to the AM admin UI as the
amAdminuser, log in. -
In the Top Level Realm, configure an
idm-resource-serverclient to introspect access tokens:-
Select Applications > OAuth 2.0 > Clients, and click Add Client.
-
Enter the following details:
-
Client ID:
idm-resource-server -
Client secret:
passwordThe value of this field must match the
clientSecretthat you will set in thersFiltermodule in the PingIDM authentication configuration (/path/to/openidm/conf/authentication.json) during your PingIDM setup.The secret shown here is for demonstration purposes only. Use secure secrets in production environments. Find more information in Protect system passwords and secrets. -
Scopes:
am-introspect-all-tokens
am-introspect-all-tokens-any-realm
-
-
Click Create.
-
-
In the Top Level Realm and the
alpharealm, configure identicalidm-provisioningclients to make calls to PingIDM:-
Select Applications > OAuth 2.0 > Clients, and click Add Client.
-
Enter the following details:
-
Client ID:
idm-provisioning -
Client secret:
openidm -
Scopes:
fr:idm:*
-
-
Click Create.
-
On the Advanced tab:
-
Response Types: Check that
tokenis present (it should be there by default). -
Grant Types: Remove
Authorization Codeand addClient Credentials.
-
-
Click Save Changes.
-
-
In the Top Level Realm and the
alpharealm, configure identicalidm-admin-uiclients that will be used by the Advanced Identity Software Admin UI:-
Select Applications > OAuth 2.0 > Clients, and click Add Client.
-
Enter the following details:
-
Client ID:
idm-admin-ui -
Client Secret: (no client secret is required)
-
Redirection URIs:
http://openidm.example.com:8080/platform/appAuthHelperRedirect.html
http://openidm.example.com:8080/platform/sessionCheck.html
http://openidm.example.com:8080/admin/appAuthHelperRedirect.html
http://openidm.example.com:8080/admin/sessionCheck.html
http://admin.example.com:8082/appAuthHelperRedirect.html
http://admin.example.com:8082/sessionCheck.html -
Scopes:
openid
fr:idm:*At a minimum, the scopes that you set here must include the scopes that you will set in the
rsFilterauthentication configuration (/path/to/openidm/conf/authentication.json) during your PingIDM setup.
-
-
Click Create.
-
On the Core tab:
-
Client type: Select
Public. -
Click Save Changes.
-
-
On the Advanced tab:
-
Grant Types: Add
Implicit. -
Token Endpoint Authentication Method: Select
none. -
Implied consent: Enable.
-
Click Save Changes.
-
-
-
In the Top Level Realm and the
alpharealm, configure identicalend-user-uiclients that will be used by the Advanced Identity Software End User UI:-
Select Applications > OAuth 2.0 > Clients , and click Add Client.
-
Enter the following details:
-
Client ID:
end-user-ui -
Client Secret: (no client secret is required)
-
Redirection URIs:
http://enduser.example.com:8888/appAuthHelperRedirect.html
http://enduser.example.com:8888/sessionCheck.html -
Scopes:
openid
fr:idm:*At a minimum, the scopes that you set here must include the scopes that you will set in the
rsFilterauthentication configuration (/path/to/openidm/conf/authentication.json) during your PingIDM setup.
-
-
Click Create.
-
On the Core tab:
-
Client type: Select
Public. -
Click Save Changes.
-
-
On the Advanced tab:
-
Grant Types: Add
Implicit. -
Token Endpoint Authentication Method: Select
none. -
Implied Consent: Enable.
-
Click Save Changes.
-
-
Configure OAuth 2.0 providers
-
If you’re not currently logged in to the AM admin UI as the
amAdminuser, log in. -
Configure a provider for the Top Level Realm:
-
In the Top Level Realm, select Services, and click Add a Service.
-
Under Choose a service type, select OAuth2 Provider.
-
For Client Registration Scope Allowlist, add the following scopes:
am-introspect-all-tokens
am-introspect-all-tokens-any-realm
fr:idm:*
openid -
Click Create.
-
On the Advanced tab, make sure that Response Type Plugins includes the following values:
id_token|org.forgerock.openidconnect.IdTokenResponseTypeHandler
code|org.forgerock.oauth2.core.AuthorizationCodeResponseTypeHandler -
Click Save Changes.
-
On the Consent tab, enable Allow Clients to Skip Consent.
-
Click Save Changes.
-
-
Configure a provider for the
alpharealm:-
In the
alpharealm, select Services, and click Add a Service. -
Under Choose a service type, select OAuth2 Provider.
-
For Client Registration Scope Allowlist, add the following scopes:
fr:idm:*
openid -
Click Create.
-
On the Advanced tab, make sure that Response Type Plugins includes the following values:
id_token|org.forgerock.openidconnect.IdTokenResponseTypeHandler
code|org.forgerock.oauth2.core.AuthorizationCodeResponseTypeHandler -
Click Save Changes.
-
On the Consent tab, enable Allow Clients to Skip Consent.
-
Click Save Changes.
-
Configure a PingIDM provisioning service
-
If you’re not currently logged in to the AM admin UI as the
amAdminuser, log in. -
From the top menu, select Configure > Global Services > IDM Provisioning.
The AM admin UI doesn’t let you configure a PingIDM provisioning service in a realm.
-
Set the following fields:
-
Enabled
-
Deployment URL:
http://openidm.example.com:8080 -
Deployment Path:
openidm -
IDM Provisioning Client:
idm-provisioning
Do not enable the useInternalOAuth2Provider setting in an Advanced Identity Software environment. Doing so can cause other OAuth 2.0 client requests to fail with the following error:
No client profile or more than one profile found. -
-
Click Save Changes.
|
If some resource strings in the AM admin UI don’t resolve properly at setup time, the UI labels mentioned will show internal keys instead of the labels shown in the steps above. Use the following table to check that you have the correct service and fields:
|
Configure a validation service
The Platform UIs need this validation service allow listing for goto redirection.
-
If you’re not currently logged in to the AM admin UI as the
amAdminuser, log in. -
In the
alpharealm, select Services, and click Add a Service. -
Under Choose a service type, select Validation Service.
-
For Valid goto URL Resources, add the URLs for the Platform UI:
http://admin.example.com:8082/*
http://admin.example.com:8082/*?*
http://login.example.com:8083/*
http://login.example.com:8083/*?*
http://enduser.example.com:8888/*
http://enduser.example.com:8888/*?* -
Click Create.
Enable CORS support
Cross-origin resource sharing (CORS) lets user agents make requests across domains.
-
If you’re not currently logged in to the AM admin UI as the
amAdminuser, log in. -
From the top menu, select Configure > Global Services > CORS Service.
-
On the Secondary Configurations tab, click Add a Secondary Configuration.
-
On the New Configuration screen, enter the following values:
-
Name :
Cors Configuration -
Accepted Origins :
http://login.example.com:8083
http://admin.example.com:8082
http://enduser.example.com:8888List only the origins that will be hosting OAuth 2.0 clients (such as the
platform-enduserand Platform admin UIs). -
Accepted Methods:
DELETE
GET
HEAD
PATCH
POST
PUT -
Accepted Headers:
accept-api-version
authorization
cache-control
content-type
if-match
if-none-match
user-agent
x-forgerock-transactionid
x-openidm-nosession
x-openidm-password
x-openidm-username
x-requested-with -
Exposed Headers:
WWW-Authenticate
-
-
Click Create.
-
On the Cors Configuration screen, set the following values:
-
Enable the CORS filter: Enable
-
Max Age:
600 -
Allow Credentials: Enable
-
-
Click Save Changes.
Configure authentication journeys
Advanced Identity Software deployment relies on three authentication trees to enable authentication through PingAM.
When you extract the PingAM .zip file, you’ll get a sample-trees-8.1.zip file
that contains a number of authentication trees, in JSON files.
Use the Amster command-line utility to import these authentication trees into your PingAM configuration:
-
Extract the
sample-trees-8.1.zipfile, and list the sample trees in theroot/AuthTreedirectory:ls /path/to/openam-samples/root/AuthTree Agent.json PlatformForgottenUsername.json Example.json PlatformLogin.json Facebook-ProvisionIDMAccount.json PlatformProgressiveProfile.json Google-AnonymousUser.json PlatformRegistration.json Google-DynamicAccountCreation.json PlatformResetPassword.json HmacOneTimePassword.json PlatformUpdatePassword.json PersistentCookie.json RetryLimit.json -
In all the sample tree files, replace
"realm" : "/"with"realm" : "/alpha". -
Start Amster, then connect to your PingAM instance:
./amster Amster OpenAM Shell (version build build, JVM: version) Type ':help' or ':h' for help. --------------------------------------------------------------------------- am> connect --interactive http://am.example.com:8081/am Sign in User Name: amAdmin Password: password amster am.example.com:8081> :exit -
Import the sample authentication trees and nodes:
amster am.example.com:8081>import-config --path /path/to/openam-samples/root Importing directory /path/to/openam-samples/root/AcceptTermsAndConditions ... Import completed successfully -
If you’re not currently logged in to the AM admin UI as the
amAdminuser, log in. -
Set an end-user success URL for the realm.
-
In the
alpharealm, go to Authentication > Settings > Post Authentication Processing. -
Set Default Success Login URL to
http://enduser.example.com:8888/?realm=alpha. -
Click Save.
-
-
Configure the
PlatformUpdatePasswordtree:-
In the
alpharealm, select Authentication > Trees, and click PlatformUpdatePassword. -
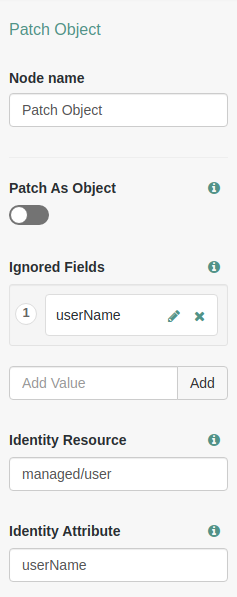
On the
PlatformUpdatePasswordtree, select thePatch Objectnode, and make surePatch As Objectis disabled.Show me
-
Click Save.
-
-
For the authentication trees that require email, set the External Login Page URL.
-
In the
alpharealm, select Authentication > Settings, and click the General tab. -
Set External Login Page URL to
http://login.example.com:8083, then click Save Changes.
-
Map authentication trees
Map the Advanced Identity Software authentication trees to the corresponding Self-Service endpoints.
-
In the
alpharealm, select Services, and click Add a Service. -
Under Choose a service type, select Self Service Trees, and click Create.
-
Add the following tree mappings:
Key Value registrationPlatformRegistrationloginPlatformLoginresetPasswordPlatformResetPassword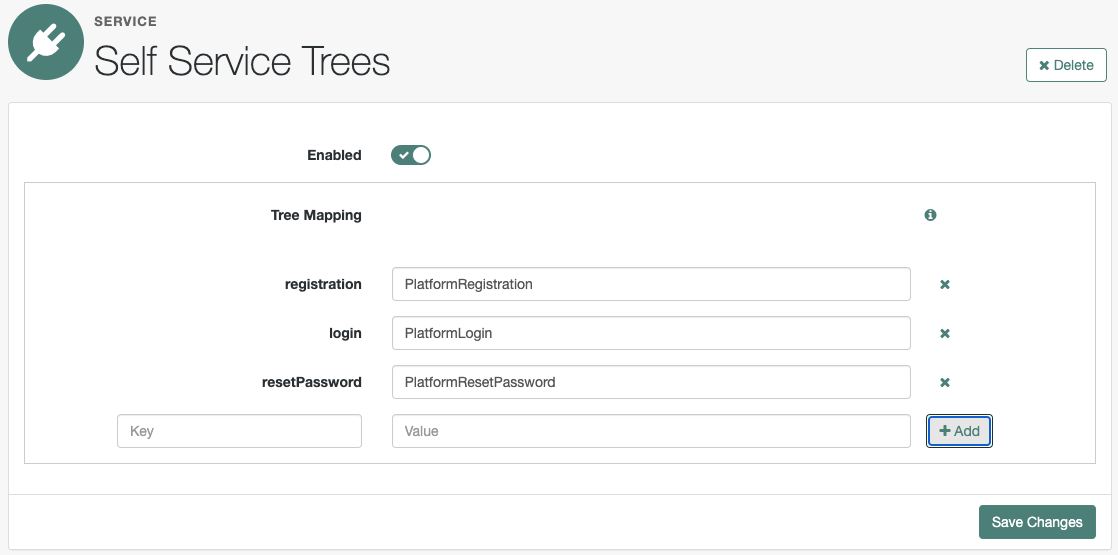
-
Click Save Changes.
Additional PingAM configuration
The PingAM configuration shown is sufficient for this sample deployment. Read the PingAM documentation when using additional features.
For example, if PingAM runs behind a load balancer or a reverse proxy, configure a base URL source service. Adapt the PingAM configuration to use this service when you protect PingAM with PingGateway.