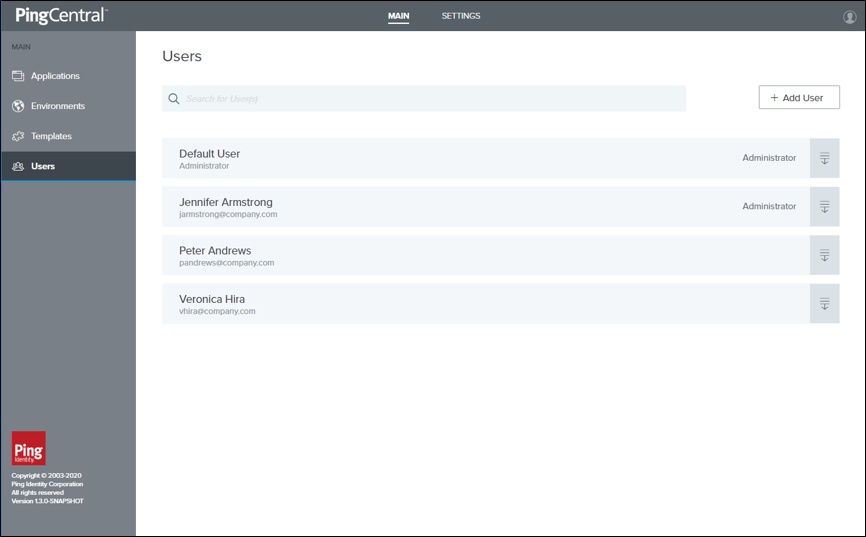
Managing users
You can set up PingCentral so users access the application through single sign-on (SSO), or you can set it up so users access the application directly through a sign-on page.
Managing users through PingCentral
If you have a small number of users, you might want to manually add them to PingCentral and manage their access directly through the application. You need their first and last names, usernames, and the roles they will assume.
Steps
-
On the Users tab, click Add User.
-
Enter the username, first name, last name, and email address in the appropriate fields.
-
Select the user’s role (either Application Owner or Administrator). Click Next.
-
Enter an initial password for the new user in the Password field. Passwords must be at least 8 characters long, contain one upper-case letter, one lower-case letter, and one number.
-
Enter it again in the Confirm Password field. Click Save and Close.
The new user appears in the list of PingCentral users in alphabetical order.
-
Update user information or delete a user by selecting the expandable icon associated with the user and clicking the pencil or delete icon.
Setting up SSO for PingCentral
The SSO method is significantly more secure than the password authentication method. At this time, OpenID Connect (OIDC) is used for SSO.
To set up SSO:
You can also access the PingCentral API with SSO enabled using the OIDC protocol. Learn more in Accessing the PingCentral API with SSO enabled.
|
When SSO access to PingCentral is configured, administrators cannot assign applications to application owners before they access PingCentral. After application owners sign on to PingCentral, administrators can access their account information and assign applications to them. |
Auto-provisioned users
For each SSO user, a local PingCentral user is auto-provisioned the first time they sign on with information obtained from the subject (sub) claim provided by the OpenID provider.
The user’s first name, last name, and role are also recorded. PingCentral derives the user’s name from the given_name and family_name claims defined by the profile scope.
If first-time access to PingCentral is with API access using a bearer token, auto-provisioning occurs if the user’s name and role are available. For performance reasons, subsequent bearer token access doesn’t update the local user information, such as first name and last name.
Although PingCentral administrators can modify or delete auto-provisioned users, doing so results in the SSO user being auto-provisioned again. Because the provisioning process generates a new PingCentral user ID, any application associations with the previous user ID will be lost.
Configuring SSO for PingCentral
With PingCentral, SSO is disabled by default. To configure PingCentral for SSO:
-
Configure OIDC properties to access OIDC configuration information.
-
Define an OAuth client as the OpenID provider.
1. Enabling SSO for PingCentral
Enable SSO for PingCentral
-
Open the
<PingCentral_install>/conf/application.propertiesfile. -
Uncomment the following property and set the value to true.
pingcentral.sso.oidc.enabled=true
-
Save the file.
2. Configuring OIDC for PingCentral
Configure OIDC for PingCentral.
-
In the
<PingCentral_install>/conf/application.propertiesfile, locate thepingcentral.sso.oidc.issuer-uriproperty, uncomment it, and define the Issuer URI.Example:
In this example, PingCentral attempts to access OIDC configuration information at
https://sso.mycompany.com:9031/.well-known/openid-configuration.pingcentral.sso.oidc.issuer-uri=https://sso.<mycompany>.com:9031
-
If PingCentral can’t access the OIDC configuration information, it fails to start. Make sure the OpenID provider is running and accessible before starting PingCentral.
|
In the future, if changes are made on the OpenID Provider that affect the OIDC configuration information used for SSO, you must restart PingCentral to incorporate them. |
3. Defining the OAuth client for PingCentral
Define an OAuth client for PingCentral at the OpenID provider.
-
In the
<PingCentral_install>/conf/application.propertiesfile, locate the following property, uncomment it, and provide the client ID and client secret for the OAuth client.Example:
pingcentral.sso.oidc.client-id=<CLIENT_ID>
pingcentral.sso.oidc.client-secret=<CLIENT_SECRET>
Secure the secret using the obfuscation script available in
bin/obfuscate, and by using output ciphertext rather than the cleartext secret. -
Save the file.
4. Configuring PingCentral role mapping
In PingCentral, two user roles are defined: the IAM Administrator, and the Application Owner. An initial IAM Administrator is created by default and can add other users to PingCentral and assign them to the appropriate role.
When SSO is enabled, the OpenID Provider must indicate the PingCentral role with a claim defined in the ID token or UserInfo endpoint. If this claim isn’t found, or its value is nonsensical, the user is denied access to PingCentral, and auto-provisioning doesn’t occur.
With PingFederate, an attribute can be mapped into the appropriate claim. To configure role mapping:
-
In the
<PingCentral_install>/conf/application.propertiesfile, locate the following attributes and configure them for mapping into the appropriate claim.# The name of the claim which identifies the PingCentral role associated with the user. #pingcentral.sso.oidc.role-claim-name=PingCentral-Role
# The expected value of the role claim which indicates the user is a PingCentral administrator.
#pingcentral.sso.oidc.role-claim-value-admin=IAM-Admin
# The expected value of the role claim which indicates the user is a PingCentral application owner (non-administrator).
#pingcentral.sso.oidc.role-claim-value-app-owner=Application-Owner
-
If these default values can be used with the OpenID Provider, no further configuration is required.
If the defaults can’t be used with the OpenID Provider, set the claim name or values to synchronize PingCentral to the OpenID Provider configuration as shown.
pingcentral.sso.oidc.role-claim-name=UserRole
pingcentral.sso.oidc.role-claim-value-admin=Admin
pingcentral.sso.oidc.role-claim-value-app-owner=Developer
Next steps
Configuring the resource server
PingCentral supports OAuth resource server functionality by validating provided bearer tokens when accessing the Admin API. Only signed JSON Web Token (JWT) tokens are supported in this release, so a JSON Web Key Set (JWKS) endpoint is required to obtain the public keys for signature validation.
If you are using PingFederate 10.1 or later, you can enable the centralized signing key functionality. Additional configuration isn’t required in PingCentral to access the centralized JWKS endpoint.
If the access token manager has been configured with an explicit JWKS endpoint path, you must also specify this path in PingCentral.
|
In PingFederate, this endpoint is exposed as https://<pf_host>:<port>/ext/<JWKS Endpoint Path>. |
Steps
-
To provide the JWKS endpoint to PingCentral, open the
<PingCentral_install>/conf/application.propertiesfile, uncomment thepingcentral.sso.oidc.oauth-jwk-set-uriproperty, and define the JWKS endpoint URI, as in this example.Example:
pingcentral.sso.oidc.oauth-jwk-set-uri=https://sso.<mycompany.com>:9031/ext/oauth/pingcentral/jwks
-
Configure the
username-claimthat PingCentral will use with bearer tokens.pingcentral.sso.oidc.oauth-username-claim-name=UserId
With bearer tokens, PingCentral looks for the Username claim by default.
Although the subject (sub) claim is mandatory with OIDC, it’s not required when using OAuth 2.
-
Configure PingCentral to validate the access token issuer and audience claim values defined in the access token manager.
By default, these claims aren’t validated. Validation for either or both is enabled by setting the following properties:
-
pingcentral.sso.oidc.oauth-iss-claim-value=<myissuer> -
pingcentral.sso.oidc.oauth-aud-claim-value=<myaudience>
-
-
Make sure that the values specified match those defined in the access token manager.
If the values don’t match, the validation fails.
If a blank value is defined in PingFederate, the claim won’t be present in the token, so do not enable the validation of that claim in PingCentral.
Next steps
Now that the resource server is configured, configure the OpenID provider.
Configuring the OpenID provider
PingCentral is an OpenID relying party for browser-based SSO, as well as an OAuth 2 resource server when directly accessing the admin API.
PingCentral has been tested with PingFederate 9.2.x, 9.3.x, 10.0.x and 10.1.x, serving as both the OpenID provider and OAuth 2 authorization server. This section provides tips for integrating PingCentral into an existing OIDC 1.0 SSO infrastructure using PingFederate as the OpenID provider.
|
As long as an OpenID provider is able to provide the endpoints and claims required by PingCentral (most notably the username and role), other OpenID Connect 1.0 providers, can also be used. |
To configure the OpenID provider:
-
Configure the Access Token Manager (ATM) for PingCentral.
-
Configure the OIDC policy for PingCentral.
-
Configure the OAuth client for PingCentral.
This section doesn’t provide all the details of setting up access token managers, OIDC policies, or attribute contracts because these topics are complex and often specific to a customer environment.
-
Step 1. Configuring the Access Token Manager
-
Step 2. Configuring the OIDC policy
-
Step 3. Configuring the OAuth client
Configuring the Access Token Manager for PingCentral
The access token manager associated with the OIDC policy must support signed JWT tokens. To validate the token signature, PingCentral must be able to access a JSON Web Key Set (JWKS) endpoint URL in PingFederate. Learn more in Configuring an access token management instance in the PingFederate documentation.
|
Signing certificates and JWT encryption (symmetric or asymmetric) are not currently supported. |
Steps
-
In PingFederate, go to Applications → OAuth → Access Token Management and click Create New Instance.
-
On the Instance Configuration tab, add one or more symmetric keys, signing certificates, or both.
-
Click Add a new row to… or click Update to modify an existing entry.
The Key ID field values must be unique across all JSON-token management instances, including child instances.
-
If you have not yet created or imported your certificate into PingFederate, click Manage Signing Certificates and complete the task.
To use an RSA-based algorithm for JSON Web Signature (JWS), the key size of the signing certificate must be at least 2,048 bits. For an EC-based JWS algorithm, the key size depends on the chosen algorithm.
-
-
On the Instance Configuration tab, select the Use Centralized Signing Key option.

-
Select Show Advanced Fields and specify the path in the JWKS Endpoint Path field. This setup is optional when an algorithm is selected in the JWE Algorithm list.

This path must be explicitly configured in PingCentral. Learn more about this configuration in Configuring the resource server.
-
If you define either or both of the issuer or audience claim values within the access token manager, you can configure PingCentral to validate them.
These claim values are also defined in the Issuer Claim Value andAudience Claim Value fields.
Configuring the OIDC policy for PingCentral
The OAuth client will be associated with an OIDC policy, which could be the default policy. This policy must map an attribute into the expected claim to signify the user’s PingCentral role, which is defined in the Attribute Contract, Attribute Sources & User Lookup, and Contract Fulfillment in PingFederate.
In addition to the sub claim, the important claim is the PingCentral-Role claim. Optionally, you can also include the given_name and family_name claims with the profile scope.
You can fulfill the sub claim from the access token, and you need to fulfill the PingCentral-Role claim using an OGNL expression based on group memberships in your directory. The following is an example of an OGNL expression used in Contract Fulfillment to map roles.
// Reads the memberOf attribute values from the access token.
#pcrole = #this.get("memberOf"),
// If the values in memberOf contain the IAM administrator's group name, send 'IAM-ADMIN' in the claim value.
#pcrole ==null?"False":#this.get("memberOf").toString().contains("pingcentral-iamadmins")? "IAM-Admin":
// If the values in memberOf contain the application owner's group name, send 'Application-Owner' in the claim value or send 'NoAccess'.
#pcrole ==null?"False":#this.get("memberOf").toString().contains("pingcentral-appowners")? "Application-Owner" :"NoAccess"
|
|
If the default PingCentral role claim name and values need to be altered to match the OIDC policy, update the <PingCentral_install>/conf/application.properties file.
Configuring the OAuth client for PingCentral
Before you begin
Define a PingCentral-specific OAuth client. These steps explain how to configure PingFederate as the OpenID provider. Learn more in Configuring OAuth clients in the PingFederate documentation.
Steps
-
In PingFederate, go to Applications → OAuth → Clients.
-
In the Client ID field, enter a unique identifier the client provides to the resource server (RS) to identify itself. This identifier is included with every request the client makes.
-
In the Name field, enter a descriptive name for the client instance. This name appears when the user is prompted for authorization.
-
In the Client Authentication field, select Client Secret, and manually enter a secret or click Generate Secret to have one created for you.
You will also use this secret when you configure SSO for PingCentral. Learn more about this configuration in Configuring SSO.
-
In the Redirection URIs field, enter this URI:
https://<pc-host>:<pc-port>/login/oauth2/code/pingcentral. -
Locate the Allowed Grant Types field and select Authorization Code.
-
Optional: If you want API access with bearer tokens, locate the field and select the Resource Owner Password Credentials option.
PingCentral doesn’t support ID token encryption.
-
From the Default Access Token Manager list, select your access token manager.
-
In the OpenID Connect section, from the ID Token Signing Algorithm list, select RSA using SHA-256. From the Policy list, select your OIDC policy.
-
Click Save.
Testing the SSO configuration
Verify the security and functionality of your PingCentral SSO configuration through testing.
Before you begin
Before testing your SSO configuration for PingCentral:
-
Configure SSO within PingCentral
-
Set up the resource server
-
Establish the required settings for the OpenID provider
Steps
-
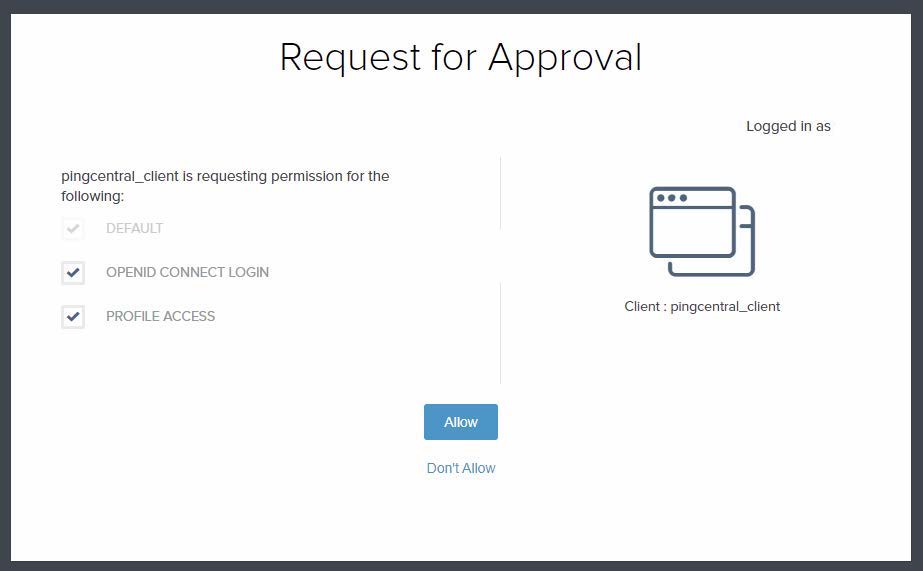
Go to your PingCentral console URL (for example:
https://pingcentral.ad.jibboo.org:9022/pass/login), and after redirection to PingFederate, sign on with your credentials.A Request for Approval window opens. The scopes listed in the window represent the permissions that PingCentral is requesting. These scopes determine what information PingCentral can access and use.
-
Select each check box to approve the scopes for the PingCentral client and click Allow.
After testing is successful, you can set the approval window to Bypass in the OAuth client settings.
Result
-
If you test as an IAM administrator group member in PingCentral, you can access Applications, Environments, Templates, Users, and Management.
-
As an application owner group member, you can access Applications and Management.
-
If you tested as a user in neither group, an error message displays.
Accessing the PingCentral API with SSO enabled
Access PingCentral’s API with enabled using the OIDC protocol.
Before you begin
Ensure you have an authorization server configured to authenticate users and issue access tokens. Learn more about this configuration in Configuring the OpenID provider.
Steps
To access the PingCentral API with SSO enabled:
-
Obtain an access token from the authorization server’s response. This token will authorize your API requests.
The access token is a long string of characters and acts as your proof of authorization to access the requested resources.
-
Include the access token in the API request’s authorization header. The PingCentral API server will verify the token’s validity, authenticity, and scopes to ensure the necessary permissions.
Example:
GET /api/resource HTTP/1.1
Host: pingcentral.example.com
Authorization: Bearer eyJhbGciOiJIUzI1NiIsInR5cCI6IkpXVCJ9.eyJzdWIiOiIxMjM0NTY3ODkwIiwibmFtZSI6IkpvaG4gRG9lIiwiaWF0IjoxNTE2MjM5MDIyLCJhdWQiOiJhcGkiLCJpc3MiOiJpc3N1ZXIifQ.SflKxwRJSMeKKF2QT4fwpMeJf36POk6yJV_adQssw5c
|
When SSO is enabled, local users defined within PingCentral and the default Administrator will not be able to access the application or access the Admin API using HTTP basic authentication. |