Promoting applications
You can promote all applications assigned to you to development environments for testing, and to production environments if your permissions allow.
Learn more in the following:
|
If an environment is offline, or if a PingCentral administrator has set the environment status to Disabled, you cannot promote the application. |
Promoting OAuth and OIDC applications
You can promote the OAuth and OIDC applications assigned to you.
Before you begin
Prepare to provide the following:
-
Redirect URIs, if required. These are the URIs your users will be directed to after they receive authorization to access your application. Redirect URIs are only required when promoting applications that use an authorization code and implicit grant types.
Redirect URIs are not limited to the number of characters they can contain, but cannot include wildcards or some special characters.
-
If a client secret is required to authenticate your application, you can create a custom secret, generate a secret, or leave the field empty and PingCentral will generate a client secret for you.
Steps
-
To promote the application to an environment, click the expandable icon associated with the application, select the Promote tab, and click Promote.
If an environment is offline or if a PingCentral administrator has set the environment status to Disabled, you will be unable to promote the application to a disabled or offline environment.
-
From the Available Environments list, select the environment to which you want to promote the application.
If you have the Application Owner role, you cannot promote applications to protected environments, which have shield icons associated with them. -
If curly brackets ({}) display in the upper right corner of the window, you can edit the underlying application JSON yourself. Or, you can complete the fields in this window.
If you choose to complete the fields in this window, refer to the following:
-
If redirect URIs are required to promote the application, enter them in the Redirect URIs field.
-
If a client secret is required to authenticate your application, you can either:
-
Generate a new secret by selecting the option at the bottom of the modal.
-
Continue using the existing secret. Bypass the Generate New Secret button and promote the application.
-
To edit the JSON yourself:
-
Click the curly brackets.
The application JSON displays in the window.
-
Update the JSON to meet your needs. Built-in JSON syntax validation occurs as you make updates to help prevent mistakes.
-
When you’re finished, promote the application.
PingCentral promotes your application to the designated environment in PingFederate. You will see the new promotion in the History section of the page.
-
-
To configure the SSO connection, provide the following information to your service provider:
-
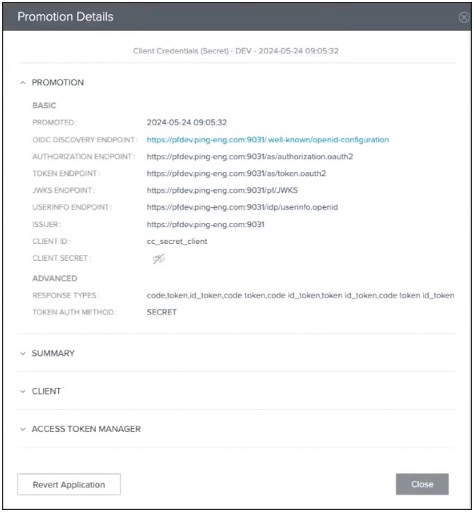
The client ID. Click View Client Details to access the Promotion Details window, which displays the client ID.
-
The OIDC discovery endpoint and client secret are also available in this window.
-
Promoting SAML applications
You can promote the SAML applications assigned to you.
Before you begin
Prepare to provide the following:
-
Entity ID: used to uniquely identify the application and obtained from the service provider ACS URL, the application’s URL to which SAML assertions from the identity provider will be sent after user authentication occurs.
-
ACS URL(s): the application’s URL to which SAML assertions from the identity provider will be sent after user authentication occurs.
-
SLO Service URL(s): the application’s URL utilized for single logout (SLO) functionality.
-
SP certificates: if the template you select is based on a PingFederate connection that requires a certificate.
-
An assertion encryption certificate: required if encryption is enabled for the connection.
When SAML applications are promoted, the connection metadata is exported and stored as part of that application.
This metadata is available to download as a .xml file, which you can use to promote similar SAML applications.
Learn more about this process in Using metadata to promote SAML applications.
Steps
-
To promote the application to an environment, click the Expand icon associated with the application, select the Promote tab, and click Promote.
If an environment is offline or if a PingCentral administrator has set the environment status to Disabled, you will be unable to promote the application to a disabled or offline environment.
-
In the Available Environments list, select the environment to which you want to promote the application.
If you have the Application Owner role, you cannot promote applications to protected environments, which have shield icons associated with them.
-
If curly brackets ({}) display in the upper right corner of the window, you can edit the underlying application JSON yourself. Or, you can complete the fields in this window.
If you choose to complete the fields in this window, refer to the following:
-
In the Entity ID, ACS URL, and SLO Service URL fields, enter the appropriate information.
If you provided a metadata file when you added your application to PingCentral, the Promote to Environment window is prepopulated with the information from the other SAML application. You can modify this information as necessary.
-
In the Signing Certificate list, select the appropriate certificate:
-
If the PingFederate environment contains signing certificates, those certificates display in the list.
The signing certificate that was added to the environment when it was created or last updated displays as the Environment Default certificate.
-
If signing certificates are not available in the PingFederate environment and an environment default certificate isn’t available, or if an environment default certificate is available but expired, the Automatically generate certificate option displays in the list.
If you used signing certificates that were automatically generated to promote applications in PingCentral 1.7 or earlier, and you want to promote those applications to the same environments, you need to locate the signing certificates. Search for a signing certificate with a subject DN that matches the name of the application and select it as the signing certificate.
-
-
Upload SP certificates, if required. SP certificates are required for PingFederate SP connections when:
-
Either of the single logout (SLO) options, IdP-Initiated-SLO or SP-Initiated-SLO, are selected as the SAML profile.
-
Digital signatures are required, and the Signature Policy is set to the Require authn requests to be signed when received via the POST or redirect bindings option.
-
Inbound backchannel authentication is configured. You can find more information in the following topics in the PingFederate documentation:
-
-
If encryption is enabled for the connection, click in the Assertion Encryption Certificate field. Select an assertion encryption certificate used for a previous promotion in the list or provide a new one.
Only whole encryption is currently supported, so if a connection has attributes specified for encryption, the promotion will fail.
To edit the JSON yourself:
-
Click the curly brackets.
The application JSON displays in the window.
-
Update the JSON to meet your needs. Built-in JSON syntax validation occurs as you make updates to help prevent mistakes.
-
-
Verify that the information displayed in the Promote to Environment window is correct and click Promote.
PingCentral promotes your application to the designated environment in PingFederate. The new promotion shows in theHistory section of the page. If the signature verification certificate used during promotion is available in the PingFederate environment, that certificate is used. If not, a new certificate is created.
-
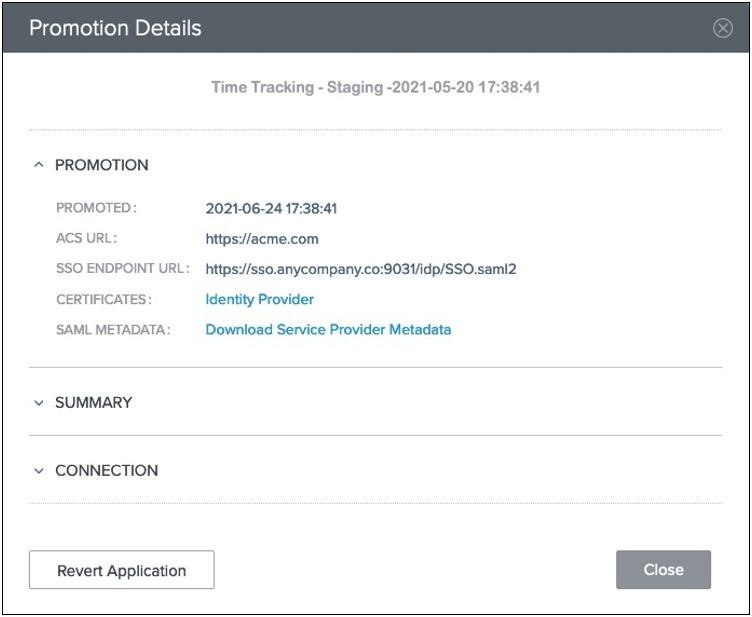
To configure a single sign-on (SSO) connection, provide the application Entity ID and the SSO endpoint URL to your service provider.
To locate the SSO endpoint URL, click the View Connections Detail link associated with the promotion. The URL displays on the Promotion Details window.
Using metadata to promote SAML applications
When SAML applications are promoted, the connection metadata is exported and stored as part of that application.
This metadata is available to download as a .xml file, which you can use to promote similar SAML applications.
Steps
-
On the Applications page, locate an application that has a configuration you want to replicate in a new SAML application and click the expandable icon associated with that application.
-
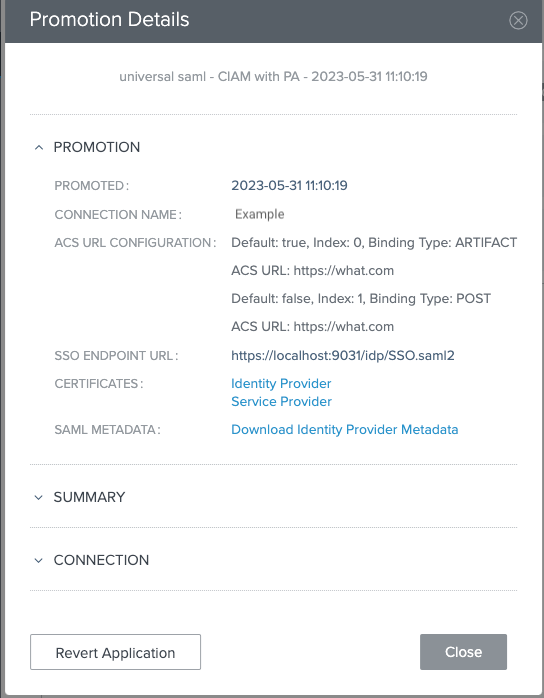
Go to the Promote tab and click the View Connection Details link.
The promotion information displays.
-
Click Download Identity Provider Metadata to download the metadata as a
.xmlfile and click Close. -
Use the metadata on the service provider (SP) side to update the connection to the identity provider (IdP), as appropriate.
Promoting PingAccess applications
Promote the PingAccess applications assigned to you.
Before you begin
The information required to promote PingAccess Web applications, API applications, and Web + API applications varies by type. Prepare to provide the following information:
| Web applications | API applications | Web + API applications |
|---|---|---|
Virtual host (required) |
Virtual host (required) |
Virtual host (required) |
Access validation method (required if an identity mapping is specified) |
Access validation method (required) |
|
Web session (optional) |
Web session (optional) |
Web session (required) |
Identity mapping (optional) |
Identity mapping (optional) |
Identity mapping (optional) |
Site or agent (required) |
Site or agent (required) |
Site or agent (required) |
Learn more about each of these items in Information needed to promote PingAccess applications.
|
Customized authentication challenge responses, which support single-page applications, are available in PingAccess version 6.2 or later. Applications with this type of policy can be added to PingCentral, but cannot be promoted to another environment unless the authentication challenge policy also exists in the target environment. |
Steps
-
To promote the application to an environment, click the Expand icon associated with the application, select the Promote tab, and click Promote.
If an environment is offline or if a PingCentral administrator has set the environment status to Disabled, you will be unable to promote the application to a disabled or offline environment.
-
From the Available Environments list, select the environment to which you want to promote the application.
If you have the Application Owner role, you cannot promote applications to protected environments, which have shield icons associated with them.
-
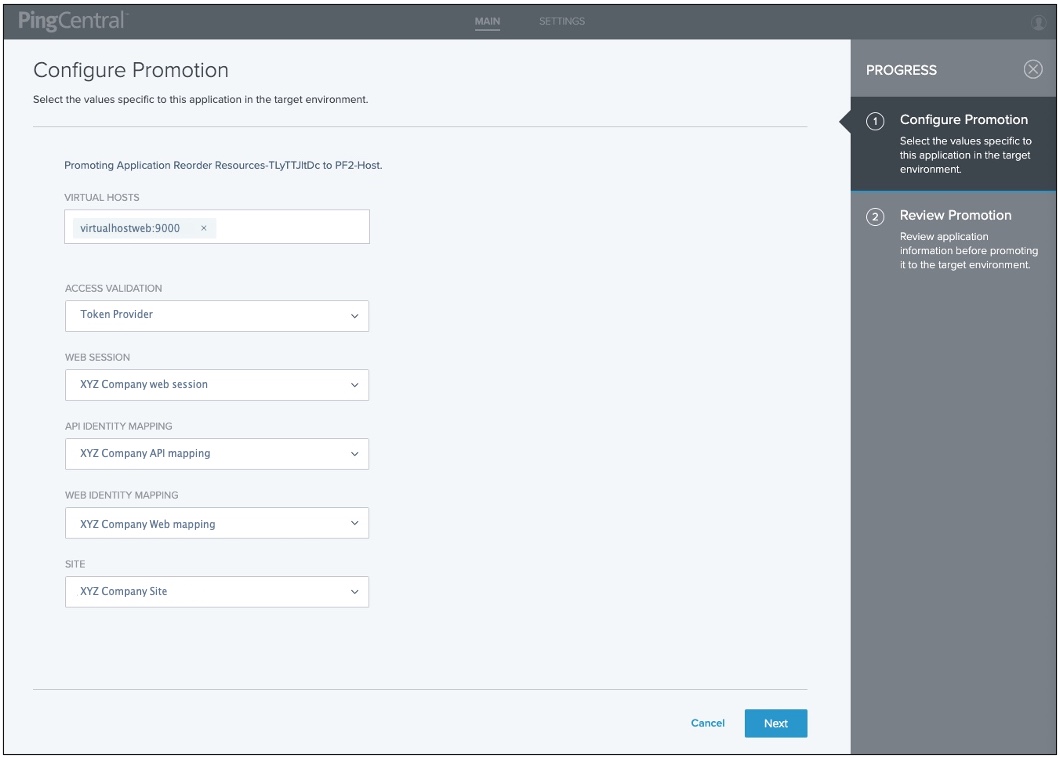
On the Configure Promotion page, click the Virtual Hosts field, and select the virtual hosts you want to add.
To remove a virtual host, click the X icon next to the virtual host name.
-
Complete the remaining fields, which vary, depending on the type of application you are promoting.
The following example shows the fields available to provide information for a Web + API application.
-
Click Next.
-
On the Review Promotion page, review promotion information you added.
Additional detail is available in the Summary and Application sections of the page.
-
Click Promote and Close.
-
To review details regarding the promotion, click the View History Details link associated with the promotion.
Information needed to promote PingAccess applications
When you promote PingAccess applications to PingAccess environments, you provide virtual host, access validation, web session, and identity mapping information, as appropriate.
PingAccess can be deployed in one of two ways:
-
Gateway deployment: In a gateway deployment, the destination is a site. Requests are routed to a PingAccess web server, which then forwards authorized requests to the target application or API on the site.
-
Agent deployment: In an agent deployment, the destination is an agent. Requests are intercepted at the web server hosting the target application or API by the PingAccess agent plugin. The agent communicates with the PingAccess policy server to validate access before allowing the request to proceed to the target application or API.
The key difference between these deployments is where the initial request is directed. In a gateway deployment, the initial request is routed to a PingAccess web server, so the destination is a site. In an agent deployment, the initial request is routed to the web server that hosts the target application or API, so the destination is an agent. When you promote PingAccess applications, you are prompted to provide the name of the site or agent.
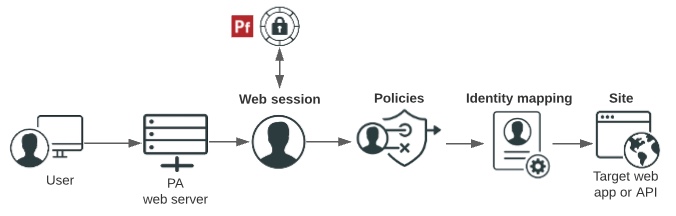
Gateway deployment
This diagram shows how users are authenticated, and how access policies and identity mappings are applied to requests to access applications or APIs with a gateway deployment.
-
Users enter a URL that consists of a unique virtual host and context root.
-
Virtual host: The public-facing host name and host port. For example,
den.ping.com:8443.A wildcard (
*) can be used either to define either any host (*:8443, for example) or any host within a domain (*.ping.com, for example). If a request matches more than one virtual host, the most specific match is used. -
Context root: The common root of all resources, specifies where in the URL path the application begins, and starts with a slash. In the example URL,
den-ping.com:8443/mygreatapp/home,/mygreatapp/is the context root.
PingCentral prompts you for the context root when you add the application, and for the virtual hosts when you promote it.
-
-
The PingAccess web server determines whether a PingAccess session cookie (Web) or an OAuth token (API) exists for the user. If it does not, a web session starts. Web sessions define the policy for web application session creation, lifetime, timeouts, and their scope.
If you promote Web + API applications in PingCentral, you must select a Web session from a list. This information is not required to promote Web or API applications.
-
You can configure API and Web + API applications to use access token validators to locally verify signed and encrypted access tokens. If you are promoting an API or Web + API application in PingCentral, you can specify the access validation method, whether it be a token provider or a token validator, if appropriate.
-
Users are authenticated through the web session.
-
Policies are applied to the request. Policies are rules, or sets of rules, that are applied to application resources. makes policy-based decisions to grant or deny access to the requested resource.
You can customize application and resource policies when you use templates to add applications to PingCentral.
-
Identity mapping is applied to the request if the target application expects user information to be included to further authenticate the user.
PingCentral prompts you for the name of the Web and/or API Identity mapping, as appropriate, when you promote it.
-
The user accesses the target web application or API.
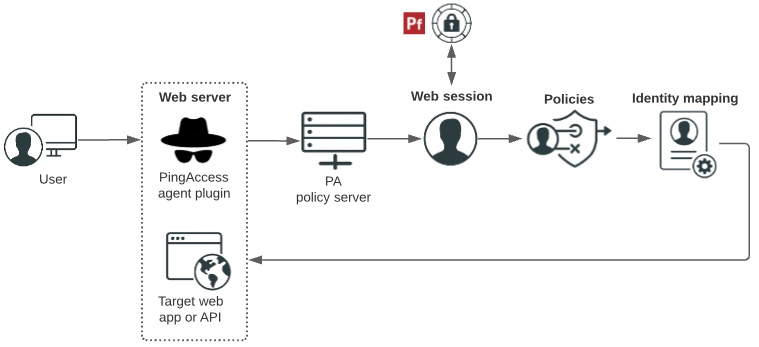
Agent deployment
The following diagram shows how users are authenticated, and how access policies and identity mappings are applied to requests to access applications or APIs with an agent deployment.
-
Users enter a URL to request access to a resource and their requests.
-
The PingAccess agent plugin intercepts the request. Agents use names and shared secrets to authenticate with the policy server. These names and secrets do not need to be unique. Any number of agents can have the same name and secret, and they are all treated equally by the policy server.
-
If the agent does not have previously cached policies for the resource, it contacts the PingAccess policy server for instructions.
-
The PingAccess policy server receives claims from the token provider, which provides instructions for handling the request.
-
Policies are applied to the request and PingAccess makes policy-based decisions to grant or deny access to the requested resource.
-
Identity mapping is applied to the request if the target application expects user information to be included to further authenticate the user.
-
The user accesses the target web application or API.