Adding applications
Before you can promote applications to development environments for testing, you must add them to PingCentral.
To add applications to PingCentral, you can use OAuth, OIDC, SAML, and PingCentral templates to apply security configurations to your applications. Wizards guide you through these processes.
Learn more:
Administrators can also assign applications directly to you. These applications display on your Applications page, where you can promote them, test them on development environments, modify them, and manage them throughout their life cycles.
Selecting a template
IAM Administrators can create OAuth, OpenID Connect (OIDC), Security Assertion Markup Language (SAML), and PingAccess templates and make them available for you to use to apply security configurations to your application.
Steps
-
Click Add Application.
-
Review the template descriptions to determine which template you should use.
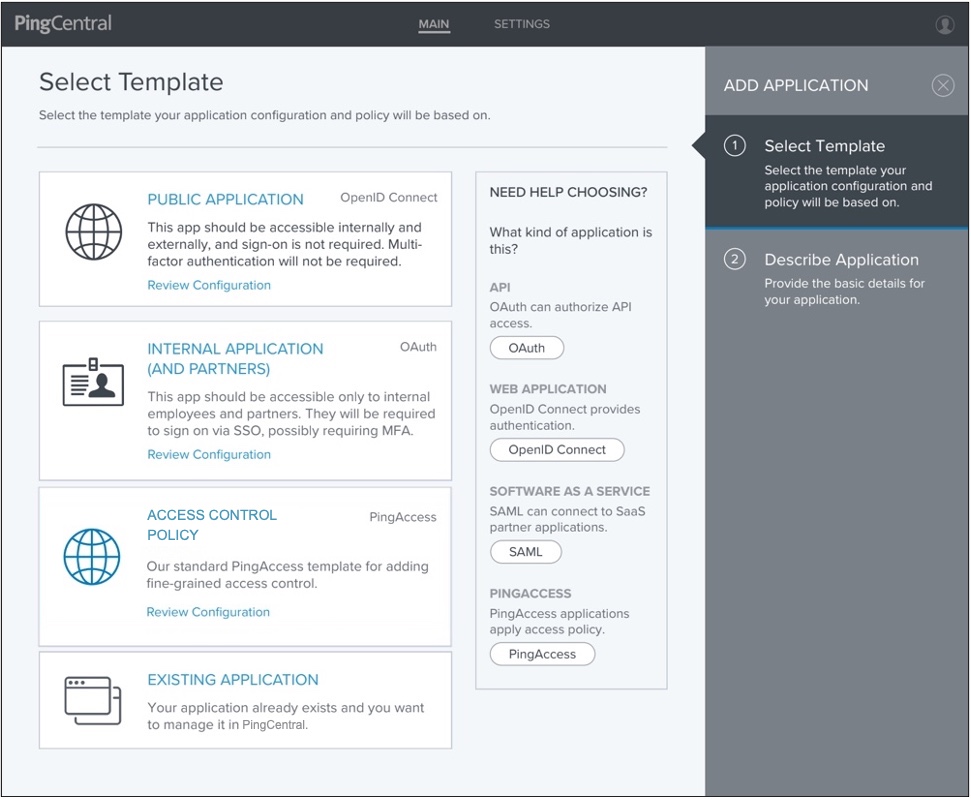
On this page, you can:
-
Select the filtering options to filter OAuth, OpenID Connect, SAML, and PingAccess templates.
-
Click the Review Configuration link within the template description to view the details associated with each template.
If you are unclear about what type of template to select, keep the following in mind:
-
OAuth and OIDC are most commonly used by consumer applications and services so users do not need to sign up for a new username and password. "Sign in with Google," or "Log in with Facebook" are examples of OAuth protocols you are likely familiar with. You might also use OAuth if your application is consumed on a mobile device.
-
SAML is most commonly used by businesses to allow their users to access services they pay for. Salesforce and Gmail are examples of service providers an employee could gain access to after completing a SAML sign on. SAML templates can also be used for web applications created and used within your organization.
-
PingAccess templates can be used to apply access policy to Web and API applications.
-
If an environment is offline or if a PingCentral administrator has set the environment status to Disabled, you will be unable to select a disabled or offline environment for template creation.
-
-
Select the template you want to use, or the existing application you want to add to PingCentral and click Next.
-
To proceed, see the appropriate topic:
Using OAuth and OIDC templates
After selecting an OAuth or OIDC template, use that template to apply user authentication and authorization support to an application.
Before you begin
Prepare to provide the following:
-
Name of the application.
-
A brief, accurate description of your application.
-
Scopes, which are optional and can be customized to meet your needs. See Scopes and scope management in the PingFederate documentation for additional information.
Steps
-
If you want to add scopes to the applications, begin typing the name of the scope you want to add and select it from the list when it displays.
The names of scopes added to applications cannot contain spaces, nor can the Scopes field contain spaces before or after the scope name. If spaces exist, applications cannot be successfully promoted.
When this application is later promoted, the target PingFederate scope management configuration is referenced to satisfy the scope requirements of the client. Any named scope identified as a common scope in the target environment is configured within the client as a restricted scope.
If the named scope does not exist in the target environment, the scope is created as an exclusive scope. In that case, or if the scope already exists as an exclusive scope, then the scope is associated with the client as an exclusive scope.
-
Click Next.
-
On the Describe Application page, enter the name of your application and a description of the application in the Name and Description fields.
You are adding this application to PingCentral, so your name will automatically populate the Owners field.
-
(Optional) To add owners, or groups of owners, select additional owners from the Owners list. If the name you are looking for does not display in the list, contact your PingCentral administrator and request that the person be provisioned.
-
Click Save and Close.
The application appears at the top of the list of applications on the Applications page.
Using SAML 2.0 templates
After selecting a SAML template, use that template to apply user authentication and authorization support to an application.
Before you begin
You must provide:
-
The name of the application.
-
A brief, accurate description of your application.
-
Attribute mapping information, used to map your application attributes to the identity attributes required from the identity provider to verify user identities.
Steps
-
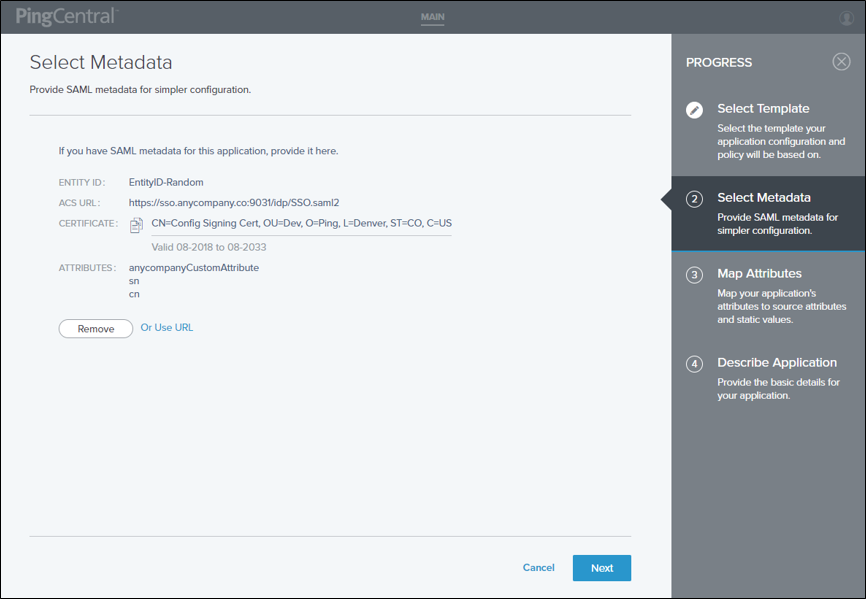
In PingCentral, on the Select Metadata page, complete one of the following tasks:
-
Provide a metadata file from service provider (SP) connections, which might include entity IDs, ACS URLs, and certificates. Click Choose file to provide the file.
-
Provide a URL to the metadata file. Click Or Use URL to provide the URL.
-
Skip this step and provide the Entity ID, ACS URL, certificate, and attributes, or all of this information, during the promotion process.
If you choose to provide a metadata file, the information in the file shows on the page.
-
-
Click Next.
-
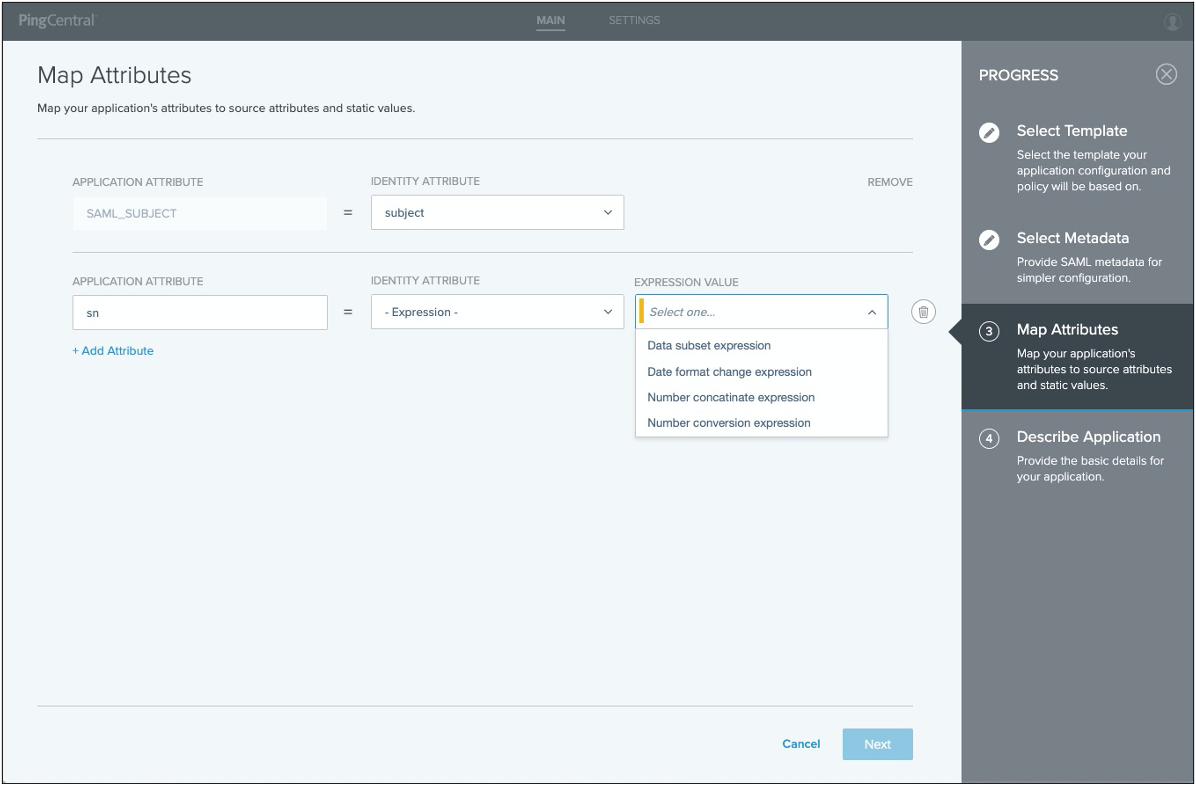
On the Map Attributes page, to map the application attributes to the identity attributes required to fulfill the authentication policy contract in PingFederate, select identity attributes in the Identity Attribute list or click to add static values in the Static Value field.
-
(Optional) If attribute sources are defined in the underlying connection, select the - Data Store - identity attribute option and the applicable data store values.
To ensure successful promotion, the target PingFederate must have the necessary Data Stores with identical names as required for authentication policy contract mapping.
-
(Optional) To define an OGNL expression and fine-tune attribute values to meet your needs, select the - Expression - identity attribute option and enter an Expression Value in the appropriate field.
-
-
When you’re finished, click Next.
-
On the Describe Application page, enter the name of the application and a description in the appropriate fields.
You are adding this application to PingCentral, so your name will automatically populate the Owners field.
-
(Optional) To add owners or groups of owners, click the Owners field and select additional owners in the list. Click Next.
If the name you are looking for isn’t showing in the list, contact your PingCentral administrator and request that the person be provisioned.
-
-
Click Save and Close.
The application is added at the top of the list of applications on the Applications page.
Using PingAccess templates
After selecting a PingAccess template, use that template to apply user authentication and authorization support to an application.
Before you begin
Prepare to define the following as appropriate:
-
The application context root and resources
-
The application policy
-
The resource policy
-
The application name and description
You can find details on each of these items in Information needed to add PingAccess applications.
Steps
-
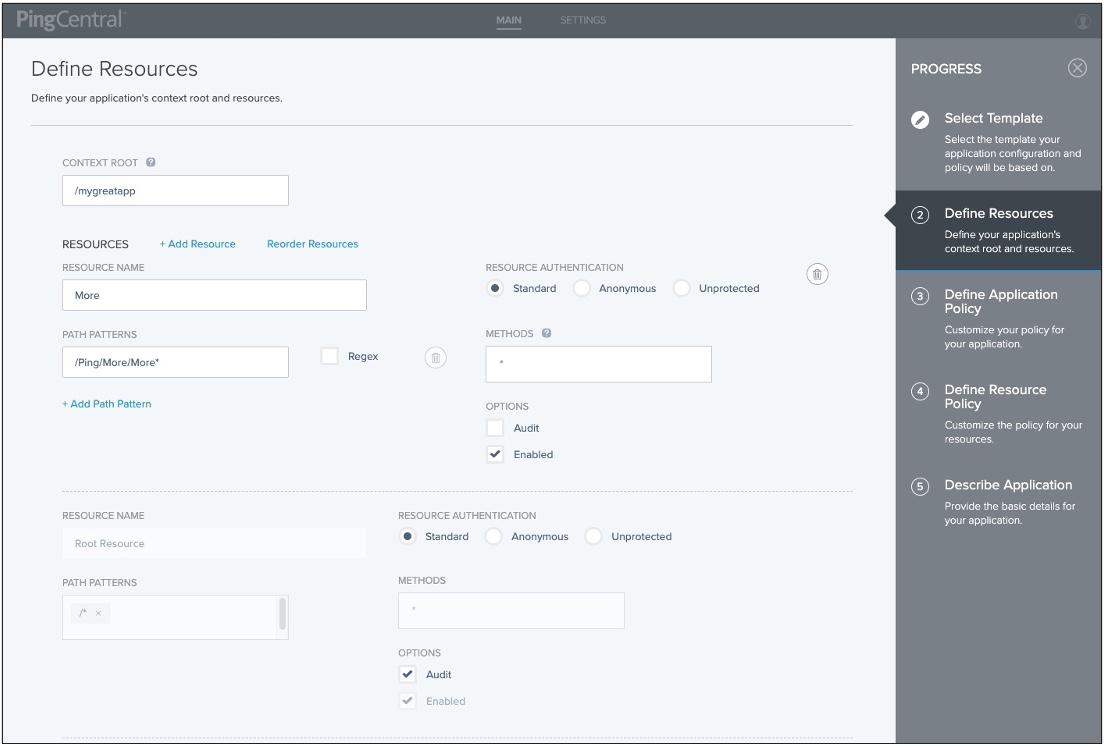
On the Define Resources page, enter the context root for the application.
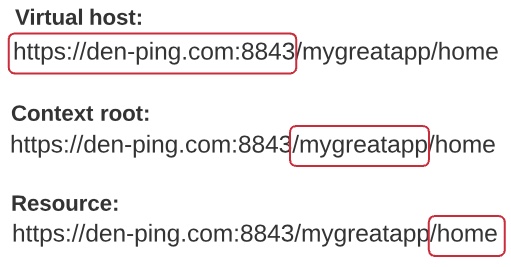
The context root is the common root of all application resources, specifies where in the URL path the application begins, and starts with a slash. In the example URL,
den-ping.com:8443/mygreatapp/home, the/mygreatappis the context root. -
Add, delete, or reorder application resources for your application.
Every application has at least one root resource.
If resource reordering is available, a Reorder Resources link displays on the page, as shown in the following example. If resource ordering was not enabled in the PingAccess application that was used to create this template, it is not enabled in PingCentral.
Virtual resources are available in PingAccess version 6.2 or later, but are not yet supported in PingCentral.
To add a new resource:
-
Click Add Resource and in the Resource Name field, enter the name of the resource.
-
In the Path Patterns field, enter a list of URL path patterns that identify this resource. Path patterns start with a forward slash (/), begin after the context root, and extend to the end of the URL. There are two different types of path patterns: Basic and Regex. Select the Regex option when appropriate.
-
In the Resource Authentication section, select the type of authentication the resource requires.
If the resource requires the same authentication as the root application, select Standard. If authentication is not required to access the resource, select Anonymous or Unprotected.
-
If the application is an API or Web + API application, in the Methods field, select the HTTP methods supported by the resource. Leave this field empty if the resource supports all methods.
-
To log information regarding requests to this resource, select the Audit check box.
-
Resources are enabled when they are added by default. To disable a resource, clear the Enable check box.
-
If resource reordering is available, a Reorder Resources link displays on the page. To change the order of these resources, click the link, rearrange the resources, and click Done.
To delete the resource, click the associated Delete icon.
-
-
On the Define Application Policy page, customize the policy for the application, if needed.
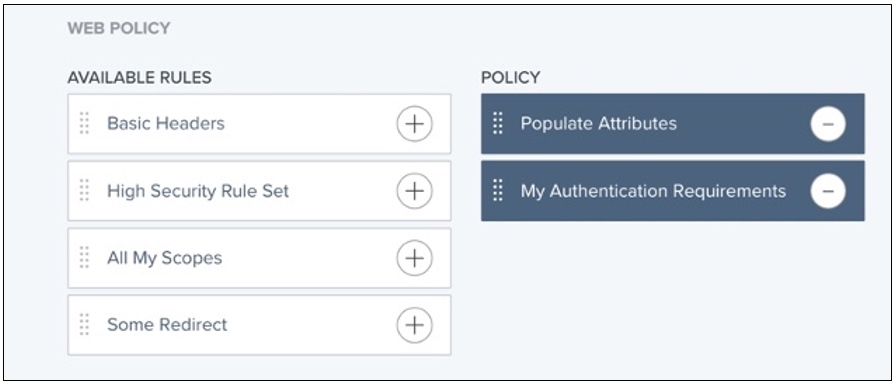
To apply rules or rule sets, drag them from the Available Rules list to the Policy list. Click Next.
-
(Optional) On the Define Resource Policy page, customize the policy for each of your resources.
To apply rules or rule sets to each resource, drag them from the Available Rules list to the Policy list. Click Next.
-
On the Describe Application page, enter the name of the application and a description in the appropriate fields.
By adding this application to PingCentral, your name automatically populates the Owners field.
-
(Optional) To add owners, or groups of owners, click the Owners field and select additional owners from the list. Click Next.
If the name you are looking for does not display in the list, contact your PingCentral administrator and request that the person be provisioned.
-
Click Save and Close.
The application displays at the top of the list of applications on the Applications page.
Information needed to add PingAccess applications
When you use templates to PingAccess applications to PingCentral, you provide the application context root and then define its resources, application policy, and resource policies. This section describes these items in detail and explains why you are prompted to provide this information.
There are three different types of PingAccess applications: Web, API, and Web + API. With Web + API applications, administrators can configure both Web and API settings for an application. These applications can switch between web and API processing behaviors on the fly based on whether the inbound request contains a web session cookie (Web) or an OAuth token (API).
-
Resources
-
Path patterns
-
Rules and policies
Resources
Each application consists of one or more resources, which you define in PingCentral. Resources are components of an application that require different levels of security. When you define resources within an application, you also define security regarding those resources.
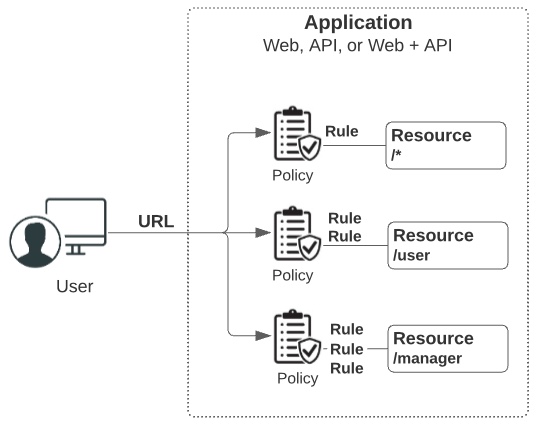
Resources are protected by rules, which let you specify who can access your applications and resources, how and when they can do so, and what modifications can be made to the requested content. When rules, or sets of rules, are applied to applications and resources, they are called policies. Policies are applied to requests, which determine whether users are granted or denied access to the requested resource.
To access an application, users enter a URL. This URL consists of a virtual host, a context root, and the name of the resource they want to access.
When you use a template to add a PingAccess application to PingCentral, you are prompted to provide the context root and define the resources within it. You can find more information in Application resources in the PingAccess documentation.
Path patterns
When handling requests, PingAccess uses resource path patterns to match resources. There are two different types of path patterns: Basic and Regex.
-
Basic patterns: The default path pattern type, which defines a path to a specific resource or a pattern that matches multiple paths. Basic patterns can contain any number of "*" wildcards. For example:
/path/x/*
matches any of these request paths:
/path/x/
/path/x/index.html
/path/x/y/z/index.html
-
Regex patterns: Regex patterns contain regular expressions and allow for more flexibility in resource matching as they support resource ordering. For example:
/[^/]+/[a-z]+\.html
matches any of these request paths:
/images/gallery.html
/search/index.html
However, it would not match any of these request paths:
/images/gallery2.html
/search/pages/index.html
/index.html
Although Regex path patterns function in an agent deployment, system performance might decrease if they are used. Agents are unable to interpret Regex path patterns, so they must consult PingAccess for policy decisions for each resource with a Regex path pattern.
When one or more path patterns match a request, PingAccess uses the first matching pattern it identifies, so the order in which path patterns are evaluated is important. By default, PingAccess orders path patterns automatically so that the most specific patterns are matched first. However, if more explicit control is needed, or if you are using regular expressions, enable resource ordering to manually specify the order in which path patterns are evaluated.
For example, an application might have three resources, such as:
-
/images/logo.png(Basic) -
/images/*(Basic) -
/.+/[a-z]\.png(Regex)
A request to resource /images/logo.png is matched by all 3 path patterns, yet each resource can have different policy requirements. Resource ordering allows you to specify which of these path patterns is parsed first, further allowing you to control the policy that is applied to a particular request.
When you define the application resources in PingCentral, you are prompted to provide path pattern information. For more information, see Path patterns reference in the PingAccess User Interface Reference Guide.
Rules and policies
Rules let you specify who can access your applications and resources, how and when they can do so, and what modifications can be made to the requested content. There are two different types of rules: access control rules and processing rules. Access control rules determine whether users can access a resource, and processing rules determine how requests are processed.
When you put rules together, they are called policies.
-
Application policies: Rules applied to the application as a whole. You can define Web rules and API rules for Web + API applications.
-
Resource policies: Rules applied to specific resources. Every application has at least one resource.
Rules can limit access based on information such as user attributes, client network range, time of day. You can combine rules to create rule sets, which are reusable and can be applied to many different resources and applications. Rule sets grant requests if any or all of the constituent rules are successful:
-
Any: An any rule set is evaluated from top to bottom and stops at the first rule that has its criteria met. If all rules fail, the request is denied.
-
All: An all rule set is evaluated from top to bottom and stops when it gets to the first rule that does not have its criteria met. If one rule fails, the request is denied.
Since rules within a rule set are evaluated from top to bottom, the order in which rules display in rule sets is important. In PingCentral, you can customize policies by dragging rules from the Available Rules list to the Policy list and changing the order to meet your needs.
Learn more in Rules in the PingAccess documentation.