Using PingAccess templates
After selecting a PingAccess template, use that template to apply user authentication and authorization support to an application.
Before you begin
Prepare to define the following, as appropriate:
-
The application context root and resources
-
The application policy
-
The resource policy
-
The application name and description
For details regarding each of these items, see Information needed to add PingAccess applications.
Steps
-
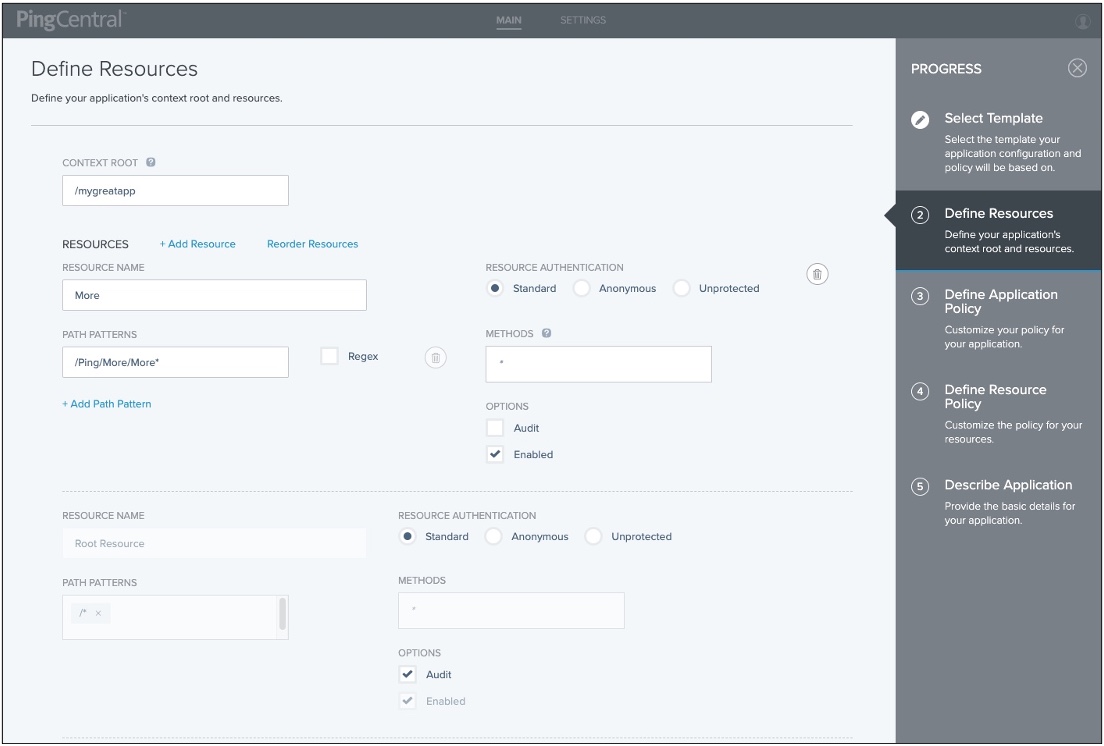
On the Define Resources page, enter the context root for the application.
The context root is the common root of all application resources, specifies where in the URL path the application begins, and starts with a slash. In the example URL,
den-ping.com:8443/mygreatapp/home, the/mygreatappis the context root. -
Add, delete, or reorder application resources for your application.
Every application has at least one root resource.
If resource reordering is available, a Reorder Resources link displays on the page, as shown in the following example. If resource ordering was not enabled in the PingAccess application that was used to create this template, it is not enabled in PingCentral.

Virtual resources are available in PingAccess version 6.2 or later, but are not yet supported in PingCentral.
To add a new resource:
-
Click Add Resource and in the Resource Name field, enter the name of the resource.
-
In the Path Patterns field, enter a list of URL path patterns that identify this resource. Path patterns start with a forward slash (/), begin after the context root, and extend to the end of the URL. There are two different types of path patterns: Basic and Regex. Select the Regex option, when appropriate.
-
In the Resource Authentication section, select the type of authentication the resource requires.
If the resource requires the same authentication as the root application, select Standard. If authentication is not required to access the resource, select Anonymous or Unprotected.
-
If the application is an API or Web + API application, in the Methods field, select the HTTP methods supported by the resource. Leave this field empty if the resource supports all methods.
-
To log information regarding requests to this resource, select the Audit check box.
-
Resources are enabled when they are added, by default. To disable a resource, clear the Enable check box.
-
If resource reordering is available, a Reorder Resources link displays on the page. To change the order of these resources, click the link, rearrange the resources, and click Done.
To delete the resource, click the associated Delete icon.
-
-
On the Define Application Policy page, customize the policy for the application, if needed.
To apply rules or rule sets, drag them from the Available Rules list to the Policy list. Click Next.
-
Optional: On the Define Resource Policy page, customize the policy for each of your resources.
To apply rules or rule sets to each resource, drag them from the Available Rules list to the Policy list. Click Next.
-
On the Describe Application page, enter the name of the application and a description in the appropriate fields.
By adding this application to PingCentral, your name automatically populates the Owners field.
-
Optional: To add owners, or groups of owners, click the Owners field and select additional owners from the list. Click Next.
If the name you are looking for does not display in the list, contact your PingCentral administrator and request that the person be provisioned.
-
Click Save and Close.
Result:
The application displays at the top of the list of applications on the Applications page.