Configuring Trust Framework attribute caching for development
While building and testing policies in a development environment, you can define an external attribute cache for the Trust Framework.
When you set the Policy Decision Service to external policy decision point (PDP) mode, the Policy Editor is configured by default to cache attribute values in memory on the PingAuthorize Server (for any attributes with a defined caching strategy). Alternatively, you can define an external attribute cache using Redis by configuring the options.yml file. The available Redis modes include:
-
Single Redis instance
-
Single Redis instance using TLS
-
Replicated Redis
-
Redis Sentinel
-
Amazon Web Services (AWS) ElastiCache Redis
AWS IAM authentication for ElastiCache Redis
When AWS Identity and Access Management (IAM) authentication is configured, the PDP obtains short-lived authentication tokens from AWS through SigV4 signing and uses them as the Redis AUTH password on every connection.
-
The authentication tokens refresh automatically before they expire.
-
TLS is enforced whenever credentials are configured. This is because ElastiCache rejects unencrypted
AUTHrequests. -
AWS credentials are resolved from the standard AWS SDK provider chain, for example: environment variables, a shared credentials file, AWS IAM roles for service accounts (IRSA), or AWS Instance Metadata Service (IMDS).
To configure IAM authentication for ElastiCache, make sure the IAM principal running the PDP has the following permissions:
-
elasticache:Connectscoped to the user and replication group Amazon Resource Names (ARNs) -
elasticache:DescribeCacheClustersto enable node discovery.Learn more in Using identity-based policies for ElastiCache in the AWS documentation.
Example IAM policy
{
  "Version": "2012-10-17",
  "Statement": [
    {
      "Effect": "Allow",
      "Action": "elasticache:Connect",
      "Resource": [
        "arn:aws:elasticache:us-east-1:123456789012:replicationgroup:my-replication-group-id",
        "arn:aws:elasticache:us-east-1:123456789012:user:my-elasticache-iam-user"
      ]
    },
    {
      "Effect": "Allow",
      "Action": "elasticache:DescribeCacheClusters",
      "Resource": "*"
    }
  ]
}
|
IAM authentication failures can reveal service or attribute cache errors. Learn more about how to resolve these in Troubleshooting AWS IAM authentication issues. |
Steps
-
Make a copy of the default options file:
$ cp config/options.yml my-options.yml -
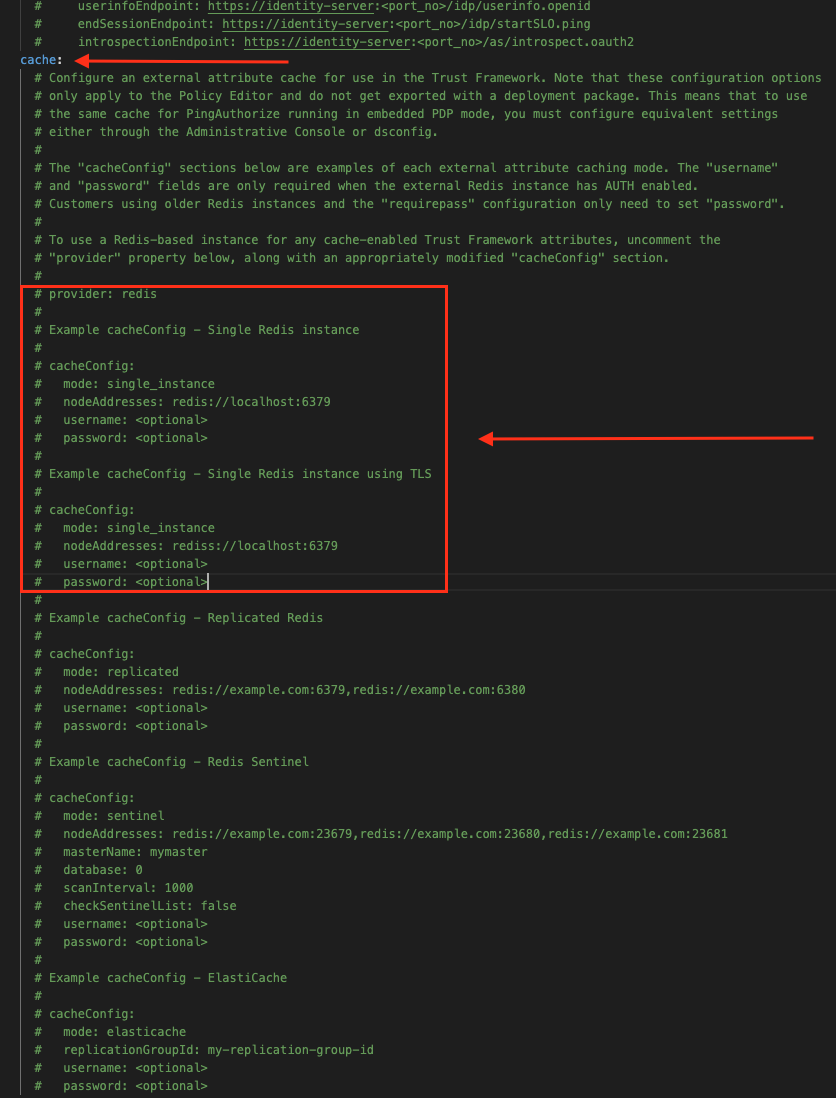
In the
cachesection of the new options file, uncomment the lineprovider: redisto enable the Redis caching options. -
Uncomment the desired Redis
cacheConfigblock, then setmodeandnodeAddressesto reflect your Redis instance settings:cache: provider: redis cacheConfig: mode: single_instance nodeAddresses: redis://localhost:6379 # username: <optional> # password: <optional> -
Choose one of the following methods to authenticate to your Redis instance:
-
Static password: Uncomment
usernameandpasswordand set them to the appropriate values. -
IAM authentication (ElastiCache only): To configure IAM authentication:
-
In the copied
options.ymlfile, uncomment theusernamefield and set it to the ElastiCache User ID. AWS requires an exact match between these values for IAM authentication.Don’t set a value for the
passwordproperty. IAM mode replaces the static Redis password with a short-lived SigV4-signed token that is used as the RedisAUTHpassword on each connection. -
Set
useIamAuthtotrue.Example:
cache:
  provider: redis
  cacheConfig:
    mode: elasticache
    replicationGroupId: <your-replication-group-id>
    username: <your-elasticache-iam-user>
    useIamAuth: true
-
-
-
Stop the Policy Editor:
$ bin/stop-server -
Run
setupusing the--optionsFileargument and customize all other options as appropriate for your needs:$ bin/setup demo \ --adminUsername admin \ --generateSelfSignedCertificate \ --decisionPointSharedSecret pingauthorize \ --hostname <pap-hostname> \ --port <pap-port> \ --adminPort <admin-port> \ --licenseKeyFile <path-to-license> \ --optionsFile my-options.yml -
Start the Policy Editor:
$ bin/start-server
Migrating from static to IAM authentication
PDPs that target the same replication group can mix static and IAM authentication because each PDP resolves its own configuration independently. This supports a phased migration approach:
-
In AWS, create a new ElastiCache user with authentication type set to IAM, and add it to the same user group as the existing static user.
-
Migrate PDPs from static authentication to IAM authentication one at a time.
-
After updating each PDP, confirm it’s connecting successfully before migrating the next one. Check for
pdp-unavailablealerts orWRONGPASSerrors in the logs. Learn more in Troubleshooting AWS IAM authentication issues. -
After confirming that all PDPs are using IAM authentication, remove the static user from the user group.