Configuring a sample use case
Use the following sample setup to configure one of the common use cases where you have two categories of service providers (SPs).
Before you begin
For this sample use case, you must have the following components:
-
An authentication policy contract
-
Multiple SP connections. All connections use the same authentication policy contract as their sole authentication source
-
Instances of the required adapters
-
An instance of the Connection Set Authentication Selector to isolate high-value connections from the rest of the connections
About this task
The Session Authentication Selector lets PingFederate choose a policy path at runtime based on whether the user already has a PingFederate authentication session for a particular source.
You need to enforce authentication requirements on two categories of service provider connections:
-
For high-value connections, users must authenticate using the X.509 Adapter followed by the PingID Adapter.
-
For low-value connections, users can authenticate using the HTML Form Adapter or the X.509 Adapter followed by the PingID Adapter.
To fulfill this use case, follow these configuration steps.
Steps
-
Go to Authentication > Policies > Selectors.
-
Create an instance of the Session Authentication Selector to account for authentication sessions acceptable for low-value connections.
-
Click Create New Instance.
-
On the Type tab, enter a name (for example, Sessions for low-value connections) and an ID. Then select Session Authentication Selector from the list.
-
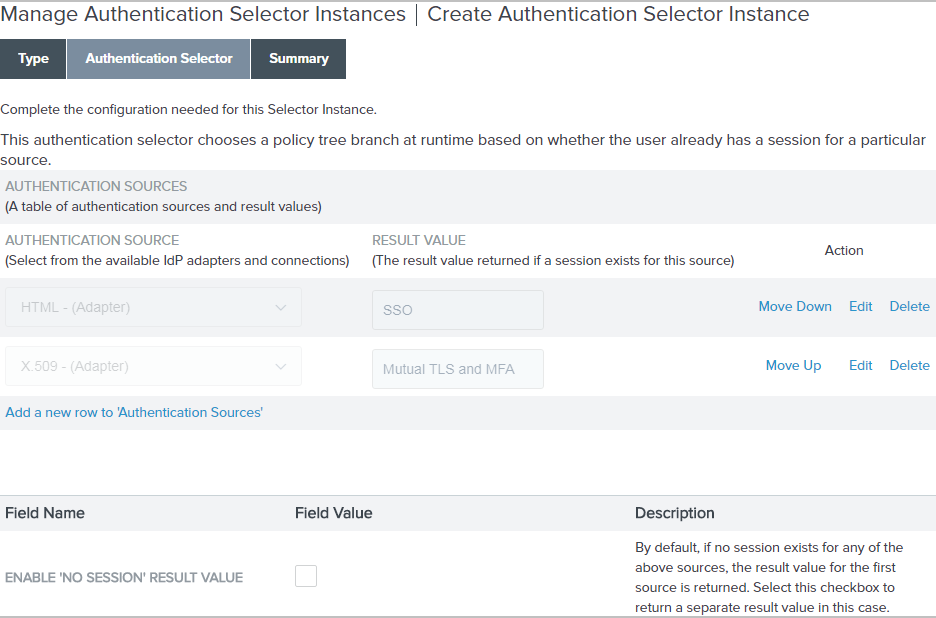
On the Authentication Selector tab, leave the Enable 'No Session' Result Value checkbox clear; then configure the following authentication source-to-result value entries.
Authentication source (adapter instance name) Result value (policy path label) HTML
SSO
X.509
Mutual TLS and MFA
Example:
The following screen capture illustrates the setup.

-
On the Summary tab, click Done.
-
On the Manage Authentication Selector Instances window, click Save to keep the newly configured authentication selector instance.
-
-
Go to Authentication > Policies > Policies.
-
On the Policies window, define an authentication policy for high-value connections.
-
Click Add Policy.
-
In the Name field, enter a name for the policy, such as
High-value connections. -
From the Policy list, select the instance of the Connect Set Authentication Selector that isolates high-value connections from the rest.
-
For the No policy path, select Continue.
-
For the Yes policy path, select the X.509 Adapter instance.
-
For the X.509 Adapter instance > Fail policy path, select Done.
-
For the X.509 Adapter instance > Success policy path, select the PingID Adapter instance.
-
Below the PingID Adapter instance, click Options.
-
On the Incoming User ID window, select the X.509 Adapter instance as the source and
usernameas the attribute.This step applies only to adapters that support a user identifier to be passed in from an earlier authentication source. The PingID Adapter requires this user identifier. For more information, see Specifying incoming user IDs.
-
For the X.509 Adapter instance > Success > PingID Adapter instance > Fail policy path, select Done.
-
For the X.509 Adapter instance > Success > PingID Adapter instance > Success policy path, select the authentication policy contract.
-
Complete the contract mapping for the authentication policy contract.
Example:
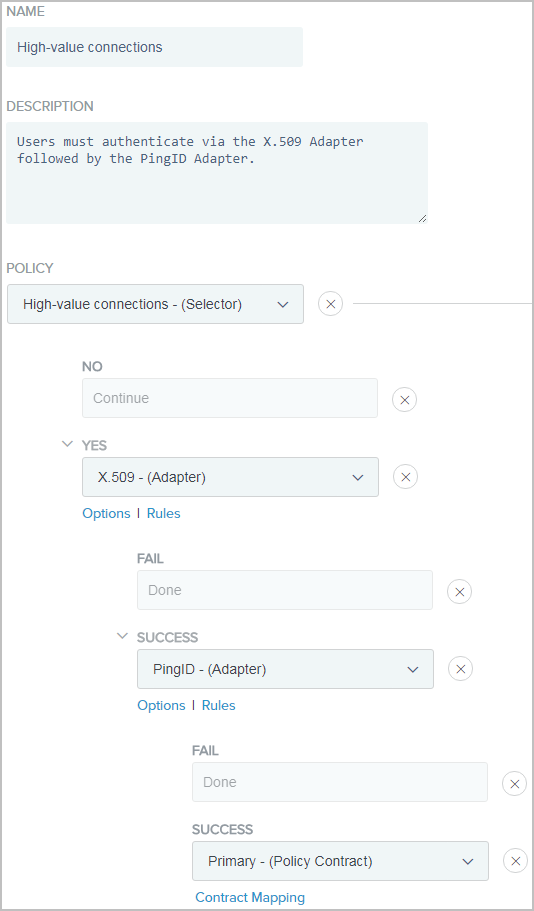
The following illustrates the policy created for high-value connections.

-
Click Done.
-
-
Define an authentication policy for low-value connections.
-
Click Add Policy.
-
Enter a name for the policy, such as Low-value connections.
-
From the Policy list, select the instance of the Session Authentication Selector. For more information, see step 2.
-
For the single sign-on (SSO) policy path, select the HTML Form Adapter instance.
-
For the HTML Form Adapter instance > Fail policy path, select Done.
-
For the HTML Form Adapter instance > Success policy path, select the authentication policy contract.
-
Complete the contract mapping for the authentication policy contract.
-
For the Mutual TLS and MFA policy path, select the X.509 Adapter instance.
-
For the X.509 Adapter instance > Success policy path, select the PingID Adapter instance.
-
Below the PingID Adapter instance, click Options. Select the X.509 Adapter instance as the source and
usernameas the attribute on theIncoming User ID window.This step only applies to adapters that support a user identifier to be passed in from an earlier authentication source. The PingID Adapter requires this user identifier. For more information, see Specifying incoming user IDs.
-
For the X.509 Adapter instance > Success > PingID Adapter instance > Fail policy path, select Done.
-
For the X.509 Adapter instance > Success > PingID Adapter instance > Success policy path, select the authentication policy contract.
-
Complete the contract mapping for the authentication policy contract.
Example:
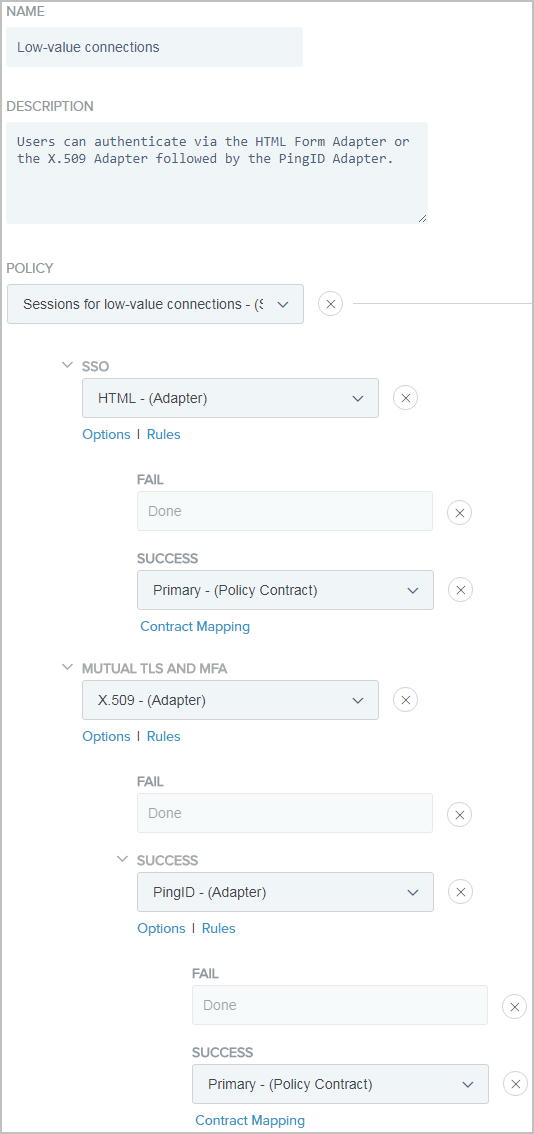
The following illustrates the policy created for low-value connections.

-
Click Done.
-
To activate authentication polices for identity provider (IdP) browser SSO requests, adapter-to-adapter requests, and browser-based OAuth authorization code and implicit flows, select the IdP Authentication Policies checkbox.
Example:
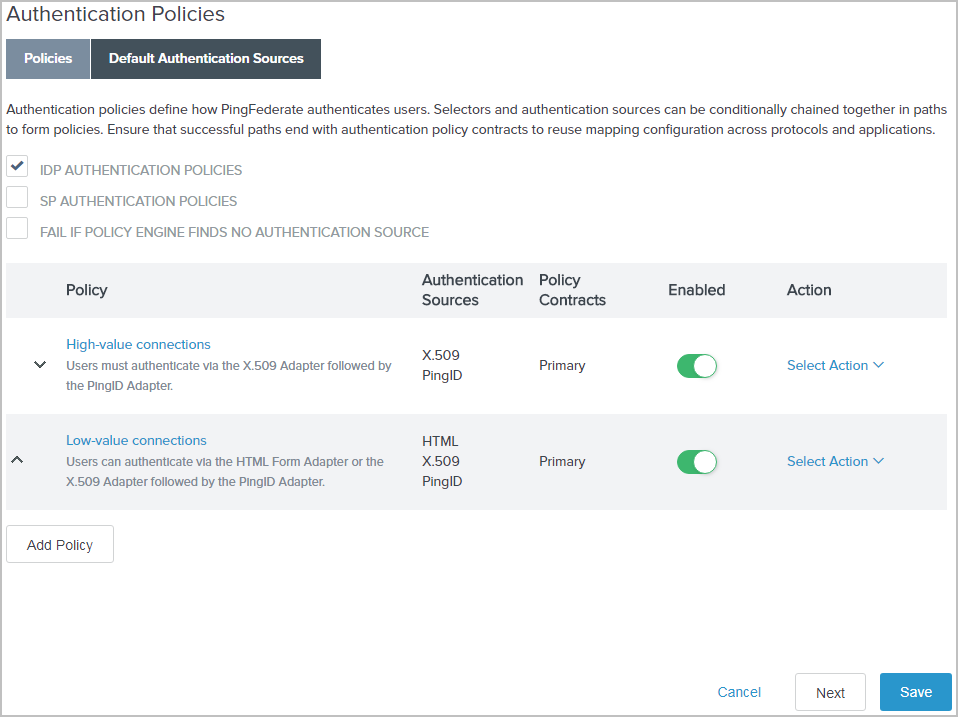
The following screen capture illustrates the policies created this sample use case.

-
-
To keep the newly configured authentication policies, click Save.