Self-service reference
Overview
ForgeRock® Identity Platform serves as the basis for our simple and comprehensive Identity and Access Management solution. We help our customers deepen their relationships with their customers, and improve the productivity and connectivity of their employees and partners. For more information about ForgeRock and about the platform, visit https://www.forgerock.com.
These topics let you set up and configure user self-service processes using the ForgeRock Identity Platform. These processes include self-registration, login, registration using social identity providers, and additional features like progressive profile completion, password reset, and username recovery.
|
This documentation helps you familiarize yourself with using the platform for user self-service. It provides examples of common self-service actions and introduce you to core concepts for implementing self-service; however, this documentation is not exhaustive or prescriptive. The examples provided are simply one approach, and there may be more effective approaches for your specific needs. Use the examples as a starting point to learn from. |
Start here
Learn about self-service using the ForgeRock Identity Platform
Platform configuration
Configure the ForgeRock Identity Platform for self-service
Self-registration
Configure user self-registration
Social registration
Configure registration using external identity providers
Login
Configure the user login flow to use self-service
Progressive profile
Configure progressive profile completion
Password reset
Configure user-driven password reset
Username recovery
Configure user-driven username recovery
Update password
Configure user-driven password updates
Pass-through authentication
Delegate authentication to Active Directory
Scripting tips
Tips for scripts in user self-service.
The ForgeRock Common REST API works across the platform to provide common ways to access web resources and collections of resources.
User self-service overview
User self-service lets users create and manage their own accounts, while you control the available features. You manage features and user journeys through the Identity Platform admin UI. Because this service uses both AM and IDM to work, it requires the platform to function.
|
It is possible to configure authentication journeys through the AM admin UI, where they are called trees; however, this documentation uses the Identity Platform admin UI:
|
Before continuing, make sure you have successfully configured the platform. There are several methods you can use to set up the platform:
-
Configure and set up the platform using Kubernetes.
For more information about setting up the ForgeRock Identity Platform with Kubernetes, refer to the ForgeOps documentation.
-
Alternatively, manually configure the platform integration between AM and IDM.
For details, refer to the sample platform setup pages.
This documentation references sample authentication trees that demonstrate various features of self-service.
Depending on your configuration method, these trees may already be included.
If they aren’t already present, or you deleted the trees and want to re-create them,
find the sample trees in sample-trees-7.5.0.zip included with AM.
For more information about adding these trees to the platform,
refer to Configure authentication trees.
|
This documentation focuses on the platform implementation of user self-service. ForgeRock recommends this implementation for new deployments. To use the IDM-specific or AM-specific implementations, refer to the instructions in the IDM self-service reference and the AM user self-service documentation. |
Nodes for self-service journeys
Self-service nodes
The following nodes are designed for self-service journeys, although you can use them in any journey.
Incompatible nodes
Since user self-service is built using authentication journeys, nearly any authentication node can be used in your self-service flow. The following nodes are not compatible with platform-based self-service, however:
OAuth 2.0 node |
Social Facebook node |
Social Google node |
Social Ignore Profile node |
OpenID Connect node |
Provision IDM Account node |
Create Password node |
Password Collector node |
Username Collector node |
If you are using a third-party node from the ForgeRock Marketplace, check with the developer for compatibility.
Sample journeys include the following:
- Registration
-
The sample Registration journey describes a basic registration flow, where ForgeRock Identity Platform prompts the user to provide several profile attributes, then attempts to create the user and log the user in. You can find this journey in AM samples in
root/AuthTree/PlatformRegistration.json. For details, refer to User self-registration. For more information about configuring registration to include social identity providers, refer to Social authentication. - Login
-
The sample Login journey describes a basic login flow, where the user is prompted to provide a username and password, then passed to a progressive profile journey before being logged in. You can find this journey in AM samples in
root/AuthTree/PlatformLogin.json. For details, refer to Login with self-service. For more information about including social identity providers in a login journey, refer to Social authentication. - Progressive Profiles
-
The sample Progressive Profile journey is called by the Login journey sample. It checks the login count to check whether further action is needed. If no action is required, it returns to the Login journey to complete logging in. If the specified number of logins is reached, it instead checks whether user preferences have been set, and if not, prompts the user to set those preferences. It then returns to the Login journey to finish logging in. You can find this journey in AM samples in
root/AuthTree/PlatformProgressiveProfile.json. For more information about using progressive profiling, refer to Progressive profile. - Password Reset
-
The Password Reset sample journey provides a method for users to reset their password by providing their email and answering some security questions. If the questions are answered correctly, the user is emailed a password reset link, which they must click to proceed. They are then presented with a password prompt to enter a new password. You can find this journey in AM samples in
root/AuthTree/PlatformResetPassword.json. For more information, refer to Password reset. - Forgotten Username
-
The Forgotten Username sample journey gives users a method to recover their username by entering an email address. If the email address is associated with a user account, the account’s username will be emailed to the user. The email includes a link to log in, which will take the user through the Login journey. You can find this journey in AM samples in
root/AuthTree/PlatformForgottenUsername.json. For more information, refer to Username recovery. - Update Password
-
The Update Password sample journey lets users change their passwords. The journey assumes that the user has already logged in successfully. It checks the user’s session data and, if the session is valid, prompts the user to update their password. You can find this journey in AM samples in
root/AuthTree/PlatformUpdatePassword.json. For more information, refer to Password updates.
Platform configuration
Some configuration is necessary to enable self-service for the platform. Depending on your method of deployment, some or all of these steps may already be complete, but should be checked to make sure everything is set up correctly.
For details, refer to:
Configure self-service endpoints
AM includes a service to map journeys to endpoints in self-service. To reach this service in the AM admin UI, go to Services and select the Self Service Trees service. If the service isn’t already present, add it using the Add Service button at the top of the page.
You can add multiple endpoints to handle different behavior you want to include.
For instance, if you wanted a separate registration journey for registering devices,
you could create a journey called Device Registration,
then add a new endpoint here called device-registration, with "Device Registration" as the value.
|
The |
The platform End User UI depends on the journeys mapped through the Self Service Trees service for self-service options:
-
Configure a
connectSocialjourney to let users connect to social identity providers through their profile page. -
Configure an
updatePasswordjourney to let users reset their password through their profile page.
To delete an existing endpoint over REST, call this service’s endpoint to update the treeMapping object.
The following example updates the treeMapping object:
curl \
--request PUT \
--header 'accept: application/json, text/javascript, /; q=0.01' \
--header 'accept-api-version: protocol=1.0,resource=1.0' \
--header 'accept-language: en-US' \
--header 'content-type: application/json' \
--header 'cookie: <omitted for length>' \
--header 'x-requested-with: XMLHttpRequest' \
--cookie '<omitted for length>' \
--data '{
  "treeMapping":{
    "resetPassword":"PlatformResetPassword",
    "updatePassword":"PlatformUpdatePassword",
    "forgottenUsername":"PlatformForgottenUsername",
    "registration":"PlatformRegistration",
  },
  "_id":"",
  "_type":{
    "_id":"selfServiceTrees",
    "name":"Self Service Trees",
    "collection":false
  }
}' \
'https://platform.example.com:8443/am/json/realms/root/realm-config/services/selfServiceTrees'
Configure self-service policies
You can set up policies to determine how different features in self-service should behave, such as determining password requirements, or confirming that required fields have been filled out. Policies are configured in IDM. For details, refer to Use policies to validate data.
Configure which policies apply
-
Open the IDM admin UI, and select Configure > Managed Objects, then select the type of managed object you want to configure, such as User. This will take you to a list of properties which are part of that object type.
-
Select the property you want to configure, such as
password, then click on the Validation tab. This will list any policies currently in place. -
You can add, remove, or edit policies that are available in IDM. To create a custom policy, refer to Extend the policy service.
You cannot create custom policies through the UI, but you can set them through the IDM admin UI after creation.
|
It is also possible to configure password policies in DS. If policies are set in both IDM and DS, make sure the policies match. If the DS password policy is more restrictive than the IDM policy, the user may get an error when updating their password, despite satisfying the policy set in IDM. |
Configure email for self-service
The Email Template node and Email Suspend node make use of the email service in IDM. To use email in platform self-service, you must configure the email service.
Configure email
-
Open the IDM admin UI, then select Configure > Email Settings.
-
If the email service is not yet enabled, select Enable. It will then prompt you to fill out the settings for the email service you intend to use. For more information about configuring email, refer to Configure outbound email.
-
Once email service is configured, set up the email templates used in self-service by selecting the Templates tab in Email Settings. There are five templates used in default self-service journeys:
- Forgotten Username
-
Used in the Forgotten Username journey. When calling this template in a node, the template name is
forgottenUsername. - Registration
-
This template is not used in any of the example journeys, but is available if you want to configure registration to include email verification. When calling this template in a node, the template name is
registration. - Reset Password
-
Used in the Reset Password journey. When calling this template in a node, the template name is
resetPassword. - Update Password
-
This template is not used in any of the example journeys, but is available if you want to configure the Update Password journey to include an email step. When calling this template in a node, the template name is
updatePassword. - Welcome
-
This template is not used in any of the example journeys, but is available if you want to include a welcome email after the user is registered. When calling this template in a node, the template name is
welcome.
It is possible to set up additional email templates according to your needs. For example, you may want to set up an email notification when the user’s password is updated. This functionality is not currently available in the UI, however.
Create an email template
-
In your IDM
conf/directory, create a new file calledemailTemplate-newTemplateName.json. For example, to send a password change notification when a user updates their password, createemailTemplate-changedPassword.json. -
In the new file you created, add the template information. For example, if you wanted to create an
changedPasswordemail template:{ "enabled" : true, "from" : "", "subject" : { "en" : "Password Change Notification" }, "message" : { "en" : "<html><body>Your password has just been changed.<br/> If you did not change your password, or believe you received this email in error, please contact Customer Support.</body></html>" }, "defaultLocale" : "en", "mimeType" : "text/html" }jsonNote that both
subjectandmessageare localized, and can include HTML tags allowed in HTML emails. -
Once you add the template, you can then reference the email template in your Email Template node or Email Suspend node using the template name.
In the preceding example, this is
changedPassword.
The following nodes are associated with platform email services:
- Email Suspend node
-
The Email Suspend node emails the user using an email template that you have configured in IDM. It then pauses the journey it is used in, until it receives a response from a link the email that was sent. This can be useful in cases of registration, where you want to include an email verification step, or in a password reset journey, where you want additional verification before proceeding with the password reset.
When using this node, make sure the email template you are using includes a resume link, so the node can continue after the email is received. This is done using the
{{object.resumeURI}}template variable. - Email Template node
-
The Email Template node emails the user using an email template that you have configured in IDM. Unlike the Email Suspend node, this node does not pause the journey. This makes it more useful for cases where you don’t need to wait for feedback from the user, such as a welcome email, or when recovering a username.
There are two possible outcomes: the email is successfully sent, or the email is not sent. An email may not be sent for different reasons, but the most common reason is that the email doesn’t exist on any known user. For security reasons, send both Email Sent and Email Not Sent the same response (Success).
User self-registration
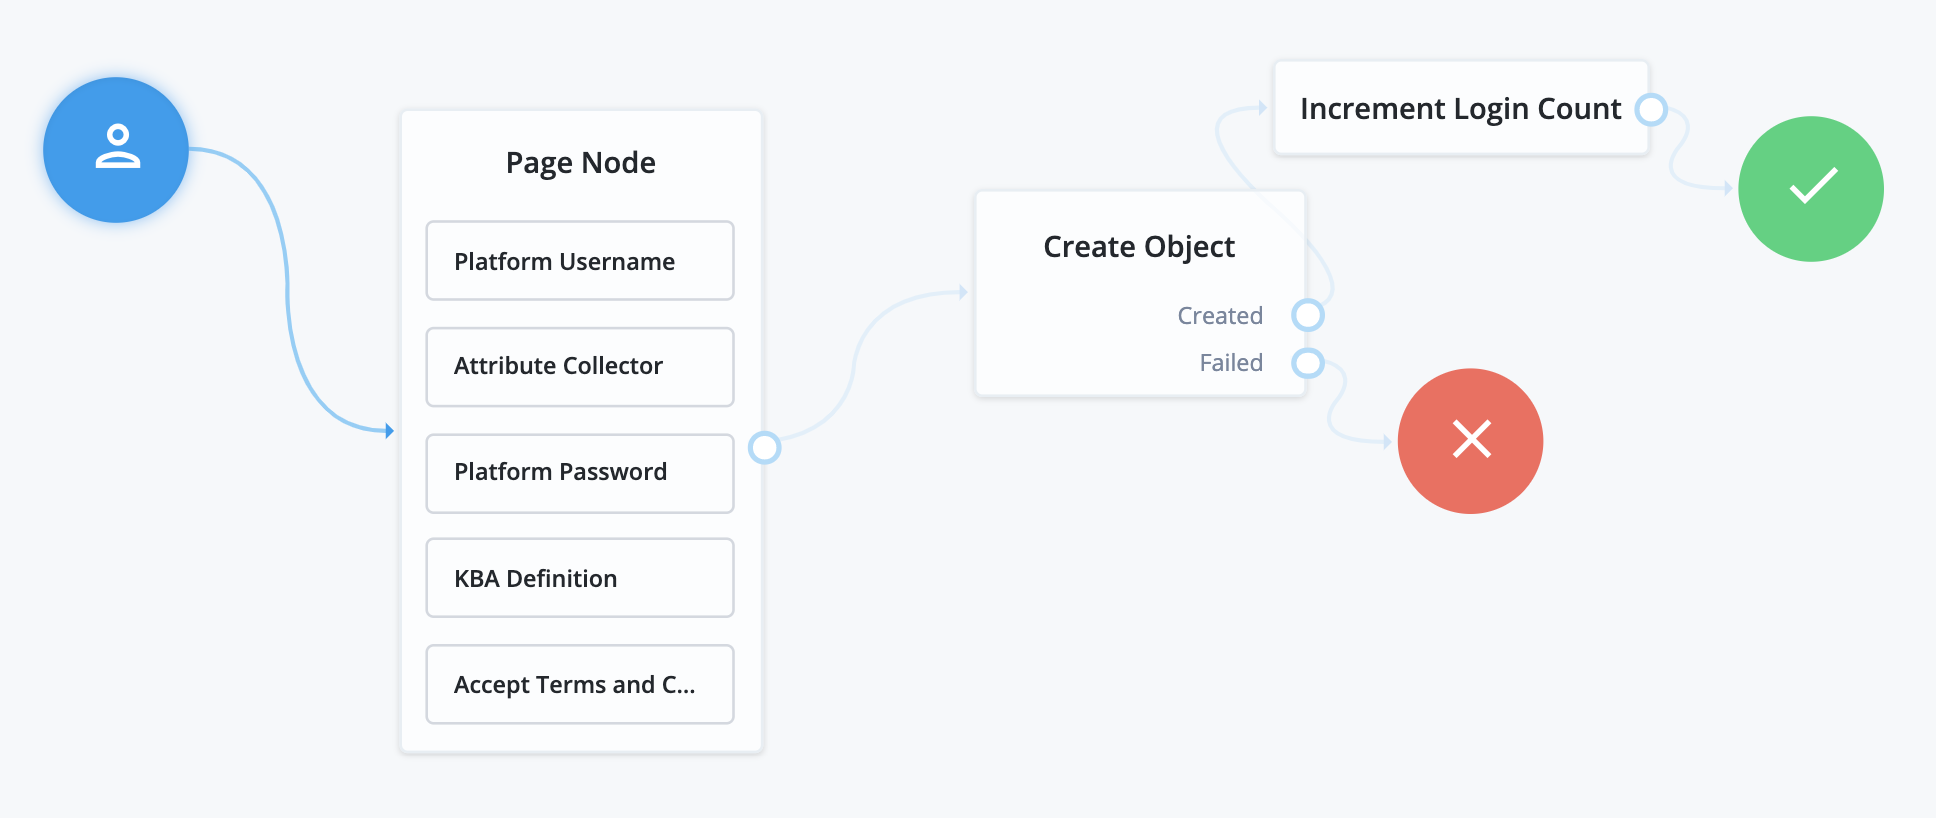
User self-registration lets your users create their own accounts. To configure registration, your registration journey requires at least the following nodes:
- Platform Username node
-
If you have changed the
userNameattribute to something else, you must configure this node to use the new attribute; for example, if you changed your configuration to use themailattribute instead. - Attribute Collector node
-
This collects information from the user for any attributes that are required to create the user profile.
By default, required attributes include
userName,givenName,sn(surname), andmail(email). The node can collect optional attributes as well, as long as any required attributes are collected. - Create Object node
-
This creates the user in IDM.
All other nodes are technically optional. Some are strongly encouraged; for example, if you don’t include a Platform Password node, the user won’t have a password to sign in. The Platform Password node isn’t necessary, however, when you provide some other authentication method, such as social identity providers, or you generate a password for the user.
Nodes that present or collect information each display on their own page by default. To collect multiple nodes into one page, place these nodes in a Page node. There are some limitations to consider when adding nodes to a Page node:
-
Only add nodes that require interaction with the user to a Page node.
-
At most, add one node with multiple possible outcomes in a Page node.
-
Do not add the Email Suspend node or the Social Provider Handler node to a Page node.
Common nodes in a registration journey include:
-
The CAPTCHA node, discussed in CAPTCHA services.
-
The KBA Definition node, discussed in Security questions.
-
The Accept Terms and Conditions node, discussed in Terms and conditions.
-
The Consent Collector node, discussed in Privacy and consent.
CAPTCHA services
CAPTCHA is a way to challenge a user to verify that they are human, and includes a number of different services. Choose the CAPTCHA service that best suits your requirements. The default configuration in the CAPTCHA node is for Google’s reCAPTCHA service. The node has been tested for use with reCAPTCHA v2 and hCaptcha v1. Other services should work, as long as they follow a similar configuration pattern.
You will need to provide a CAPTCHA Site Key and CAPTCHA Secret Key. The rest of CAPTCHA configuration is done through the service that you are using.
Security questions
Security questions let a user provide answers to questions that can later be used to verify their identity. This process is also called Knowledge-Based Authentication (KBA).
Configuration
To configure security questions, select Security > Security Questions. From here, you can configure the questions that are presented to users, and how they should be handled.
-
Click Add Question to set additional questions for the user.
On the Add a Security Question form, select a locale, and provide the question text for that locale. When you have added the localized text for your question, click Add, then repeat for each locale. When you have completed the new question, click Done.
-
On the Settings tab, set the following:
-
Must define refers to the minimum number of security questions the user must set up during registration.
-
Must answer refers to the minimum number of questions the user must answer to satisfy a security prompt.
-
Lockout specifies the number of failed attempts to answer a security question before the user is unable to try again.
-
-
If you are using an explicit mapping for managed user objects, you must add the property name you set to your database schema and to the
objectToColumnmapping in your repository configuration file.Also, create a new column in the
openidm.managed_usertable with the name of your new property, and a datatype ofVARCHAR.
| Once you deploy these security questions, never remove or change existing security questions, as users might have included those questions during the user self-registration process. |
Associated nodes
There are three nodes associated with KBA:
- KBA Definition node
-
The KBA Definition node is used during registration. It prompts the user to choose security questions, and define answers to these questions for use during identity verification. The questions are selectable from a list. The list also includes an option to define their own question, if they want.
- KBA Verification node
-
The KBA Verification node is used to verify a user’s identity using security questions, such as during a Reset Password journey. It displays the number of questions set in the Must Answer field in the Security Questions settings. If the user has defined answers for more questions than is required, which questions will be displayed are randomized.
- KBA Decision node
-
The KBA Decision node is primarily used in cases of a Progressive Profile journey, where you ensure a user has defined answers to the minimum number of questions required by the system. This can be useful if the number of questions changes, so the user can be prompted to fill out any necessary additional questions when they next log in. In this case, the KBA Decision node would be used together with the KBA Definition node; if the KBA Decision node evaluates false, the user would then be taken to the KBA Definition node.
Terms and conditions
Terms and conditions display the terms and conditions for using your service. Terms and conditions are not considered optional; users must accept the terms before they are able to progress in the account creation process.
Configuration
To set up terms and conditions:
-
Select Terms & Conditions and click + New Version.
-
Enter a version number for the new terms and conditions, then click Next.
Terms and conditions are tracked using versioning. The default placeholder set of terms and conditions has a version of
0.0, but the versioning can follow other patterns, such as dates. -
Enter the locale for which these terms and conditions apply, expressed as its ISO 639-1 code (for example,
enorfr), then click Add. -
Enter the text of your terms and conditions:
-
Terms and conditions content is formatted using Markdown. You can also use HTML formatting, which is converted into Markdown when you save or publish. Refer to Terms and conditions content formatting.
When using HTML formatting,
idandstyleattributes are stripped out when Identity Cloud converts the HTML formatting to Markdown. However, you can use the following techniques to emulateidandstyleattributes:-
To link to different parts of the terms and conditions content, use the formatted header IDs in the HTML output. Refer to Link to terms and conditions content.
-
To apply CSS styles to the terms and conditions content, use the styles editor.
-
-
Click Styles to switch to the styles editor. Then, enter additional CSS styles to apply to the HTML that is rendered from the Markdown.
-
The text supports localization. When you have added the terms and conditions for this locale, click Locale: locale-name, then click + Add locale to add the text for another locale.
-
Click Try it out to check how your terms and conditions appear to users.
-
-
Save or publish the new version.
When you have published a version, the terms and conditions cannot be edited. Be sure to proofread your text before publishing. -
Click Save as Draft to save this version for future publication. You can edit a draft version.
-
Click Publish to publish this version.
Select Set as Active Version to make this the active version of your terms and conditions. Only one version of terms and conditions can be active at a time, for each locale. Selecting this option will deactivate the currently active version, and make this version active instead.
-
Associated nodes
There are two nodes associated with terms and conditions:
- Accept Terms and Conditions node
-
The Accept Terms and Conditions node presents the user with a notice that continuing means they agree with the terms and conditions you have set, along with a link to view the terms and conditions, and a button to continue. Because this node includes a button to continue by default, it should generally be the last node in a Page node, or on its own page. It will automatically make use of the terms and conditions version that is currently active; you do not need to specify the version in the node.
- Terms and Conditions Decision node
-
The Terms and Conditions Decision node is used in progressive profile journeys, where you want to confirm that the user has accepted the currently active terms and conditions. If the terms and conditions version has been updated, the decision will evaluate to
false, which when connected to the Accept Terms and Conditions node, will present the user an opportunity to accept the new terms and conditions.
Terms and conditions content formatting
The editor primarily uses Markdown to format the terms and conditions content.
You can also use HTML to add formatting to all or part of the content,
but HTML is only a convenient input method, and the editor converts it to Markdown when you save or publish the content.
This strips out any attributes in your HTML formatting, including id and style attributes.
|
Some HTML elements, such as definition lists, cannot be converted into Markdown, as there is no Markdown equivalent. These HTML elements are not converted and remain as HTML in the terms and conditions content. |
Link to terms and conditions content
To display the terms and conditions content to the end user, the UI renders it from Markdown into HTML.
When it renders the HTML output, it creates id attributes, but only on the header elements.
To create a formatted value for each id attribute, it starts with the header element value,
converts it to lower case, and then removes spaces and special characters (except underscores).
Here are some examples:
| Markdown | Formatted header ID | HTML output |
|---|---|---|
|
|
|
|
|
|
|
|
|
|
|
|
|
|
|
To link to different parts of the terms and conditions content, you must therefore find the formatted header IDs in the HTML output and use them in your HTML anchors.
Privacy and consent
Privacy and consent, in the context of registration and self-service, refers to presenting users with information about which external resources their information may be shared with, such as sales and marketing services. The ForgeRock Identity Platform manages these connections in IDM, where consent is configured per external connection, or mapping. A mapping refers to the user’s information, mapped to related fields in an external service, which is then synchronized by IDM. For more information, refer to Mapping data between resources.
Configuration
To enable consent for a mapping:
-
Select Configure > Mappings, then select Edit on the mapping that you want to configure.
-
Select the Advanced tab, then enable Enable Privacy & Consent.
|
The above steps assume you have already created at least one mapping. You can also enable privacy and consent when creating the mapping: the same Enable Privacy & Consent switch is present when you click Create Mapping during the mapping creation process. |
Associated nodes
There is one node associated with privacy and consent:
- Consent Collector node
-
The Consent Collector node presents the user with a list of all the mappings the user is affected by that have privacy and consent enabled. Each mapping can be individually selected or disabled; if you require all mappings to be allowed, there is an option in the node to make all mappings required.
The node can be used during registration or during progressive profile journeys. If using this node in a progressive profile journey, you will need to use the Query Filter Decision node to check for the presence of your desired mappings in the user’s
consentedMappingsattribute.
Example registration REST output
When calling a registration self-service endpoint, you will receive a JSON object back, containing callbacks for each of the nodes included in the registration journey.
Sample JSON callbacks
{
"authId": "<omitted for length>",
"callbacks": [
{
"type": "ValidatedCreateUsernameCallback",
"output": [
{
"name": "policies",
"value": {
"policyRequirements": [
"REQUIRED",
"MIN_LENGTH",
"VALID_TYPE",
"UNIQUE",
"CANNOT_CONTAIN_CHARACTERS"
],
"fallbackPolicies": null,
"name": "userName",
"policies": [
{
"policyRequirements": [
"REQUIRED"
],
"policyId": "required"
},
{
"policyRequirements": [
"REQUIRED"
],
"policyId": "not-empty"
},
{
"policyRequirements": [
"MIN_LENGTH"
],
"policyId": "minimum-length",
"params": {
"minLength": 1
}
},
{
"policyRequirements": [
"VALID_TYPE"
],
"policyId": "valid-type",
"params": {
"types": [
"string"
]
}
},
{
"policyId": "unique",
"policyRequirements": [
"UNIQUE"
]
},
{
"policyId": "no-internal-user-conflict",
"policyRequirements": [
"UNIQUE"
]
},
{
"policyId": "cannot-contain-characters",
"params": {
"forbiddenChars": [
"/"
]
},
"policyRequirements": [
"CANNOT_CONTAIN_CHARACTERS"
]
}
],
"conditionalPolicies": null
}
},
{
"name": "failedPolicies",
"value": []
},
{
"name": "validateOnly",
"value": false
},
{
"name": "prompt",
"value": "Username"
}
],
"input": [
{
"name": "IDToken1",
"value": ""
},
{
"name": "IDToken1validateOnly",
"value": false
}
],
"_id": 0
},
{
"type": "StringAttributeInputCallback",
"output": [
{
"name": "name",
"value": "givenName"
},
{
"name": "prompt",
"value": "First Name"
},
{
"name": "required",
"value": true
},
{
"name": "policies",
"value": {
"policyRequirements": [
"REQUIRED",
"VALID_TYPE"
],
"fallbackPolicies": null,
"name": "givenName",
"policies": [
{
"policyRequirements": [
"REQUIRED"
],
"policyId": "required"
},
{
"policyRequirements": [
"VALID_TYPE"
],
"policyId": "valid-type",
"params": {
"types": [
"string"
]
}
}
],
"conditionalPolicies": null
}
},
{
"name": "failedPolicies",
"value": []
},
{
"name": "validateOnly",
"value": false
},
{
"name": "value",
"value": ""
}
],
"input": [
{
"name": "IDToken2",
"value": ""
},
{
"name": "IDToken2validateOnly",
"value": false
}
],
"_id": 1
},
{
"type": "StringAttributeInputCallback",
"output": [
{
"name": "name",
"value": "sn"
},
{
"name": "prompt",
"value": "Last Name"
},
{
"name": "required",
"value": true
},
{
"name": "policies",
"value": {
"policyRequirements": [
"REQUIRED",
"VALID_TYPE"
],
"fallbackPolicies": null,
"name": "sn",
"policies": [
{
"policyRequirements": [
"REQUIRED"
],
"policyId": "required"
},
{
"policyRequirements": [
"VALID_TYPE"
],
"policyId": "valid-type",
"params": {
"types": [
"string"
]
}
}
],
"conditionalPolicies": null
}
},
{
"name": "failedPolicies",
"value": []
},
{
"name": "validateOnly",
"value": false
},
{
"name": "value",
"value": ""
}
],
"input": [
{
"name": "IDToken3",
"value": ""
},
{
"name": "IDToken3validateOnly",
"value": false
}
],
"_id": 2
},
{
"type": "StringAttributeInputCallback",
"output": [
{
"name": "name",
"value": "mail"
},
{
"name": "prompt",
"value": "Email Address"
},
{
"name": "required",
"value": true
},
{
"name": "policies",
"value": {
"policyRequirements": [
"REQUIRED",
"VALID_TYPE",
"VALID_EMAIL_ADDRESS_FORMAT"
],
"fallbackPolicies": null,
"name": "mail",
"policies": [
{
"policyRequirements": [
"REQUIRED"
],
"policyId": "required"
},
{
"policyRequirements": [
"VALID_TYPE"
],
"policyId": "valid-type",
"params": {
"types": [
"string"
]
}
},
{
"policyId": "valid-email-address-format",
"policyRequirements": [
"VALID_EMAIL_ADDRESS_FORMAT"
]
}
],
"conditionalPolicies": null
}
},
{
"name": "failedPolicies",
"value": []
},
{
"name": "validateOnly",
"value": false
},
{
"name": "value",
"value": ""
}
],
"input": [
{
"name": "IDToken4",
"value": ""
},
{
"name": "IDToken4validateOnly",
"value": false
}
],
"_id": 3
},
{
"type": "BooleanAttributeInputCallback",
"output": [
{
"name": "name",
"value": "preferences/marketing"
},
{
"name": "prompt",
"value": "Send me special offers and services"
},
{
"name": "required",
"value": true
},
{
"name": "policies",
"value": {}
},
{
"name": "failedPolicies",
"value": []
},
{
"name": "validateOnly",
"value": false
},
{
"name": "value",
"value": false
}
],
"input": [
{
"name": "IDToken5",
"value": false
},
{
"name": "IDToken5validateOnly",
"value": false
}
],
"_id": 4
},
{
"type": "BooleanAttributeInputCallback",
"output": [
{
"name": "name",
"value": "preferences/updates"
},
{
"name": "prompt",
"value": "Send me news and updates"
},
{
"name": "required",
"value": true
},
{
"name": "policies",
"value": {}
},
{
"name": "failedPolicies",
"value": []
},
{
"name": "validateOnly",
"value": false
},
{
"name": "value",
"value": false
}
],
"input": [
{
"name": "IDToken6",
"value": false
},
{
"name": "IDToken6validateOnly",
"value": false
}
],
"_id": 5
},
{
"type": "ValidatedCreatePasswordCallback",
"output": [
{
"name": "echoOn",
"value": false
},
{
"name": "policies",
"value": {
"policyRequirements": [
"REQUIRED",
"MIN_LENGTH",
"VALID_TYPE",
"AT_LEAST_X_CAPITAL_LETTERS",
"AT_LEAST_X_NUMBERS",
"CANNOT_CONTAIN_OTHERS"
],
"fallbackPolicies": null,
"name": "password",
"policies": [
{
"policyRequirements": [
"REQUIRED"
],
"policyId": "not-empty"
},
{
"policyRequirements": [
"MIN_LENGTH"
],
"policyId": "minimum-length",
"params": {
"minLength": 8
}
},
{
"policyRequirements": [
"VALID_TYPE"
],
"policyId": "valid-type",
"params": {
"types": [
"string"
]
}
},
{
"policyId": "at-least-X-capitals",
"params": {
"numCaps": 1
},
"policyRequirements": [
"AT_LEAST_X_CAPITAL_LETTERS"
]
},
{
"policyId": "at-least-X-numbers",
"params": {
"numNums": 1
},
"policyRequirements": [
"AT_LEAST_X_NUMBERS"
]
},
{
"policyId": "cannot-contain-others",
"params": {
"disallowedFields": [
"userName",
"givenName",
"sn"
]
},
"policyRequirements": [
"CANNOT_CONTAIN_OTHERS"
]
}
],
"conditionalPolicies": null
}
},
{
"name": "failedPolicies",
"value": []
},
{
"name": "validateOnly",
"value": false
},
{
"name": "prompt",
"value": "Password"
}
],
"input": [
{
"name": "IDToken7",
"value": ""
},
{
"name": "IDToken7validateOnly",
"value": false
}
],
"_id": 6
},
{
"type": "KbaCreateCallback",
"output": [
{
"name": "prompt",
"value": "Select a security question"
},
{
"name": "predefinedQuestions",
"value": [
"What's your favorite color?",
"Who was your first employer?"
]
}
],
"input": [
{
"name": "IDToken8question",
"value": ""
},
{
"name": "IDToken8answer",
"value": ""
}
],
"_id": 7
},
{
"type": "KbaCreateCallback",
"output": [
{
"name": "prompt",
"value": "Select a security question"
},
{
"name": "predefinedQuestions",
"value": [
"What's your favorite color?",
"Who was your first employer?"
]
}
],
"input": [
{
"name": "IDToken9question",
"value": ""
},
{
"name": "IDToken9answer",
"value": ""
}
],
"_id": 8
},
{
"type": "TermsAndConditionsCallback",
"output": [
{
"name": "version",
"value": "0.0"
},
{
"name": "terms",
"value": "Example terms..."
},
{
"name": "createDate",
"value": "2019-10-28T04:20:11.320Z"
}
],
"input": [
{
"name": "IDToken10",
"value": false
}
],
"_id": 9
}
],
"header": "Sign Up",
"description": "Signing up is fast and easy.<br>Already have an account? <a href='#/service/Login'>Sign In</a>"
}Social authentication
You can configure user self-registration to include social identity providers as an option for users. This lets users register and log in to ForgeRock Identity Platform using an account they have through another trusted service.
These topics describe the high-level steps to configure social authentication.
Configure social identity providers
ForgeRock Identity Platform supports social identity providers that are OAuth 2.0 or OpenID Connect (OIDC) 1.0-compliant. A number of social identity providers are configured by default:
Default social identity provider configurations
| Identity provider | Specification |
|---|---|
Amazon |
OAuth 2.0 |
Apple |
OIDC |
OAuth 2.0 |
|
OIDC |
|
OAuth 2.0 |
|
itsme(1) |
OIDC |
OAuth 2.0 |
|
Microsoft |
OAuth 2.0 |
Salesforce |
OAuth 2.0 |
OAuth 2.0 |
|
VK (Vkontakte) |
OAuth 2.0 |
OAuth 2.0 |
|
WordPress |
OAuth 2.0 |
Yahoo |
OIDC |
(1) To integrate with itsme, you must obtain an Organization Validation (OV) certificate. You must also configure it in the container where AM runs, or in the reverse proxy offloading SSL.
You can add providers that are not configured by default, as long as these providers use OAuth 2.0 or OpenID Connect.
Add identity providers
-
Register a service in the identity provider, and keep the provider’s documentation within reach. You will use it during this procedure.
At minimum, you must have a client ID and a redirect URL.
A redirect URL is a path in ForgeRock Identity Platform (AM) where the identity provider redirects the user on successful authentication; for example,
https://platform.example.com:8443/am.Depending on the social identity provider and on your environment, you change the redirect URL later.
The redirect URL in the identity provider service and in the ForgeRock Identity Platform client configuration must match.
Some providers require you enable a specific API in their service:
-
Enable the
Gmail APIin the Google Cloud Platform. - Apple
-
You must have access to the Apple Development Program (Enterprise program is not eligible), and you must enable
Sign In With Applein the Apple Developer site.
-
In the AM admin UI, go to Realms > Realm Name > Services.
-
Check that the
Social Identity Provider Serviceappears in the list of services configured for the realm.If it does not, click Add a Service, select
Social Identity Provider Servicein the drop-down list, and create the service configuration. -
Check that Enabled is selected.
-
Go to the Secondary Configurations tab.
ForgeRock Identity Platform includes scripts and configurations for several common identity providers.
-
In the Add a Secondary Configuration drop-down list, select the required identity provider.
If the required provider does not appear, select one of the following to add a custom identity provider client:
-
Client Configuration for providers that implement the OAuth2 specification
-
Client Configuration for providers that implement the OpenID Connect specification
-
-
Provide the client’s required configuration details, such as the Client ID, Client Secret (for confidential clients), the Scope Delimiter (usually an empty space), and the Redirect URL.
Don’t worry if some details are missing. You can edit the configuration later, after saving the client profile for the first time.
Save your changes to access all the configuration fields for the client.
-
Provide the client’s advanced configuration details, and edit any required configuration details if needed.
To find the required identity provider information:
-
Refer to the provider’s documentation.
Providers must specify their integration needs in their documentation, as well as their API endpoints.
For example, providers usually have different scopes that you can configure depending on your service’s needs.
Financial-grade providers usually also require additional security-related configuration, such as
acrvalues, PKCE-related settings, and more.Keep their documentation close while configuring the client profile.
-
Visit the provider’s
.well-knownendpoint.OAuth 2.0/OpenID Connect-compliant providers will display much of the information you need to configure the identity provider client in their
.well-knownendpoint. For example, the endpoint should expose their endpoint URLs, and the signing and encryption algorithms they support.ForgeRock Identity Platform is preconfigured, but you must make sure the settings for the provider have not changed. Key preconfigured fields include:
-
The provider’s URLs.
For example, Authentication Endpoint URL, Access Token Endpoint URL, and User Profile Service URL.
-
The OAuth Scopes field.
-
The configuration in the UI Config Properties section.
-
The script selected in the Transform Script drop-down list.
This script is responsible for mapping attributes provided by the identity providers to a profile format compatible with ForgeRock Identity Platform.
For details, refer to Transform Script.
Some features require choosing algorithms from those supported by the provider, as well as creating secrets. Consider the following points before configuring the client:
-
Several capabilities in the identity provider client share the same secret IDs. For example, signing request objects and signing client authentication JWTs.
-
Every identity provider client in a realm shares the same secrets.
Therefore, ensure that you configure features requiring secrets in a way that they are compatible across clients in the same realm.
For more information, refer to the page about the
/oauth2/connect/rp/jwk_uriendpoint.For details about client configuration settings, refer to Client configuration reference.
-
-
-
Save your changes.
Proceed to Configure basic social registration journeys.
|
To let AM contact Internet services through a proxy, refer to Configuring AM for outbound communication. You can control the behavior of the connection factory that AM uses as a client of the social identity providers. The following AM advanced server properties control different aspects of the connection factory:
They have sensible defaults. For details, refer to Advanced Properties. |
Configure basic social registration journeys
There are two nodes associated with identity providers:
- Select Identity Provider node
-
The Select Identity Provider node prompts the user to select a social identity provider for registration or sign in, or (optionally) to continue with local registration or sign in.
When the user selects a provider, the journey continues to the Social Provider Handler node.
- Social Provider Handler node
-
The Social Provider Handler node communicates with the selected provider and collects the information provided after the user has authorized the service. It runs the provider’s configured normalization script to map the information into a format that ForgeRock Identity Platform can consume.
Next, the node uses a transformation script provided by ForgeRock Identity Platform called
Normalized Profile to Managed Userto transform the profile information into a managed object.The node then queries the identity store available for the realm to check whether the user already exists. If the user exists, they are logged in. If the user does not exist, the user will need to be created.
Set up a basic social registration journey
-
In your realm, go to Journeys.
You can create a new journey, modify an existing journey, or duplicate an existing journey.
-
Decide whether users can log in with their local credentials, and add the relevant nodes to the journey:
-
Social authentication journeys allowing local authentication might look like the following:
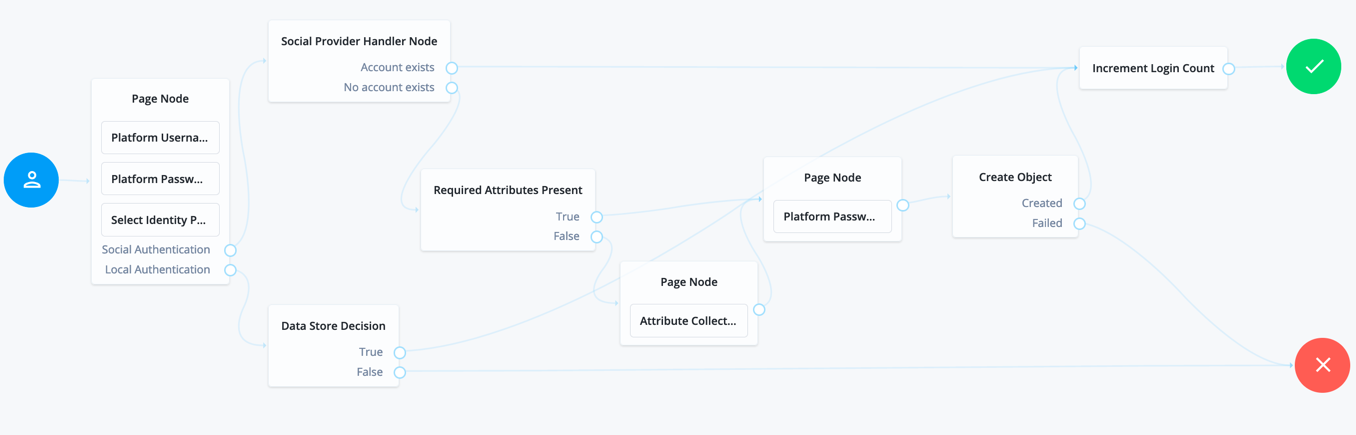
-
Social authentication journeys enforcing social authentication login might look like the following:
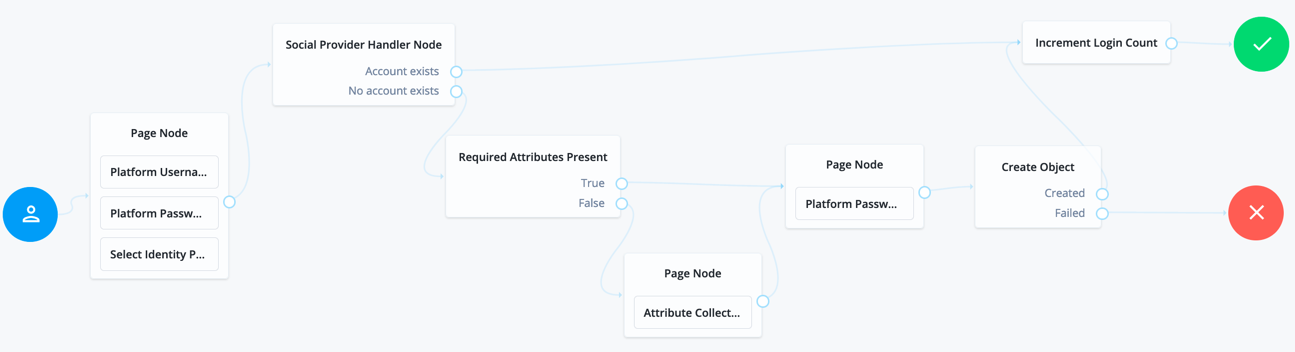
To configure either option, set Include local authentication in the Select Identity Provider node. To support both local and social authentication in the same page, use the Page node as shown in the example.
-
-
Configure the Social Provider Handler node:
-
In the Transformation Script field, select
Normalized Profile to Managed User. This script transforms the normalized identity provider’s profile object into a format that ForgeRock Identity Platform can use.To view the script and the available bindings, refer to normalized-profile-to-managed-user.js.
-
In Client Type, select
BROWSERwhen using the ForgeRock Identity Platform UI or ForgeRock SDK for JavaScript, orNATIVEwhen using the ForgeRock SDKs for Android or iOS.
-
-
Configure the Required Attributes Present node and the Create Object node:
In the Identity Resource fields of each, configure the relevant managed identity resource type, such as
managed/user.To check for the available managed identity resource types, go to the IDM admin UI, and open the Manage drop-down list.
Identity managed object types are preceded by the icon.
-
Configure the Attribute Collector node adding at least the
mail,givenName, andsnattributes.
Configure social registration with account claiming
If your users have one or more social identity provider accounts, they can link them to the same ForgeRock Identity Platform account. For more information, refer to Account claiming: links between accounts and social identity providers.
The following example builds on the basic social registration journey shown in Set up a basic social registration journey:
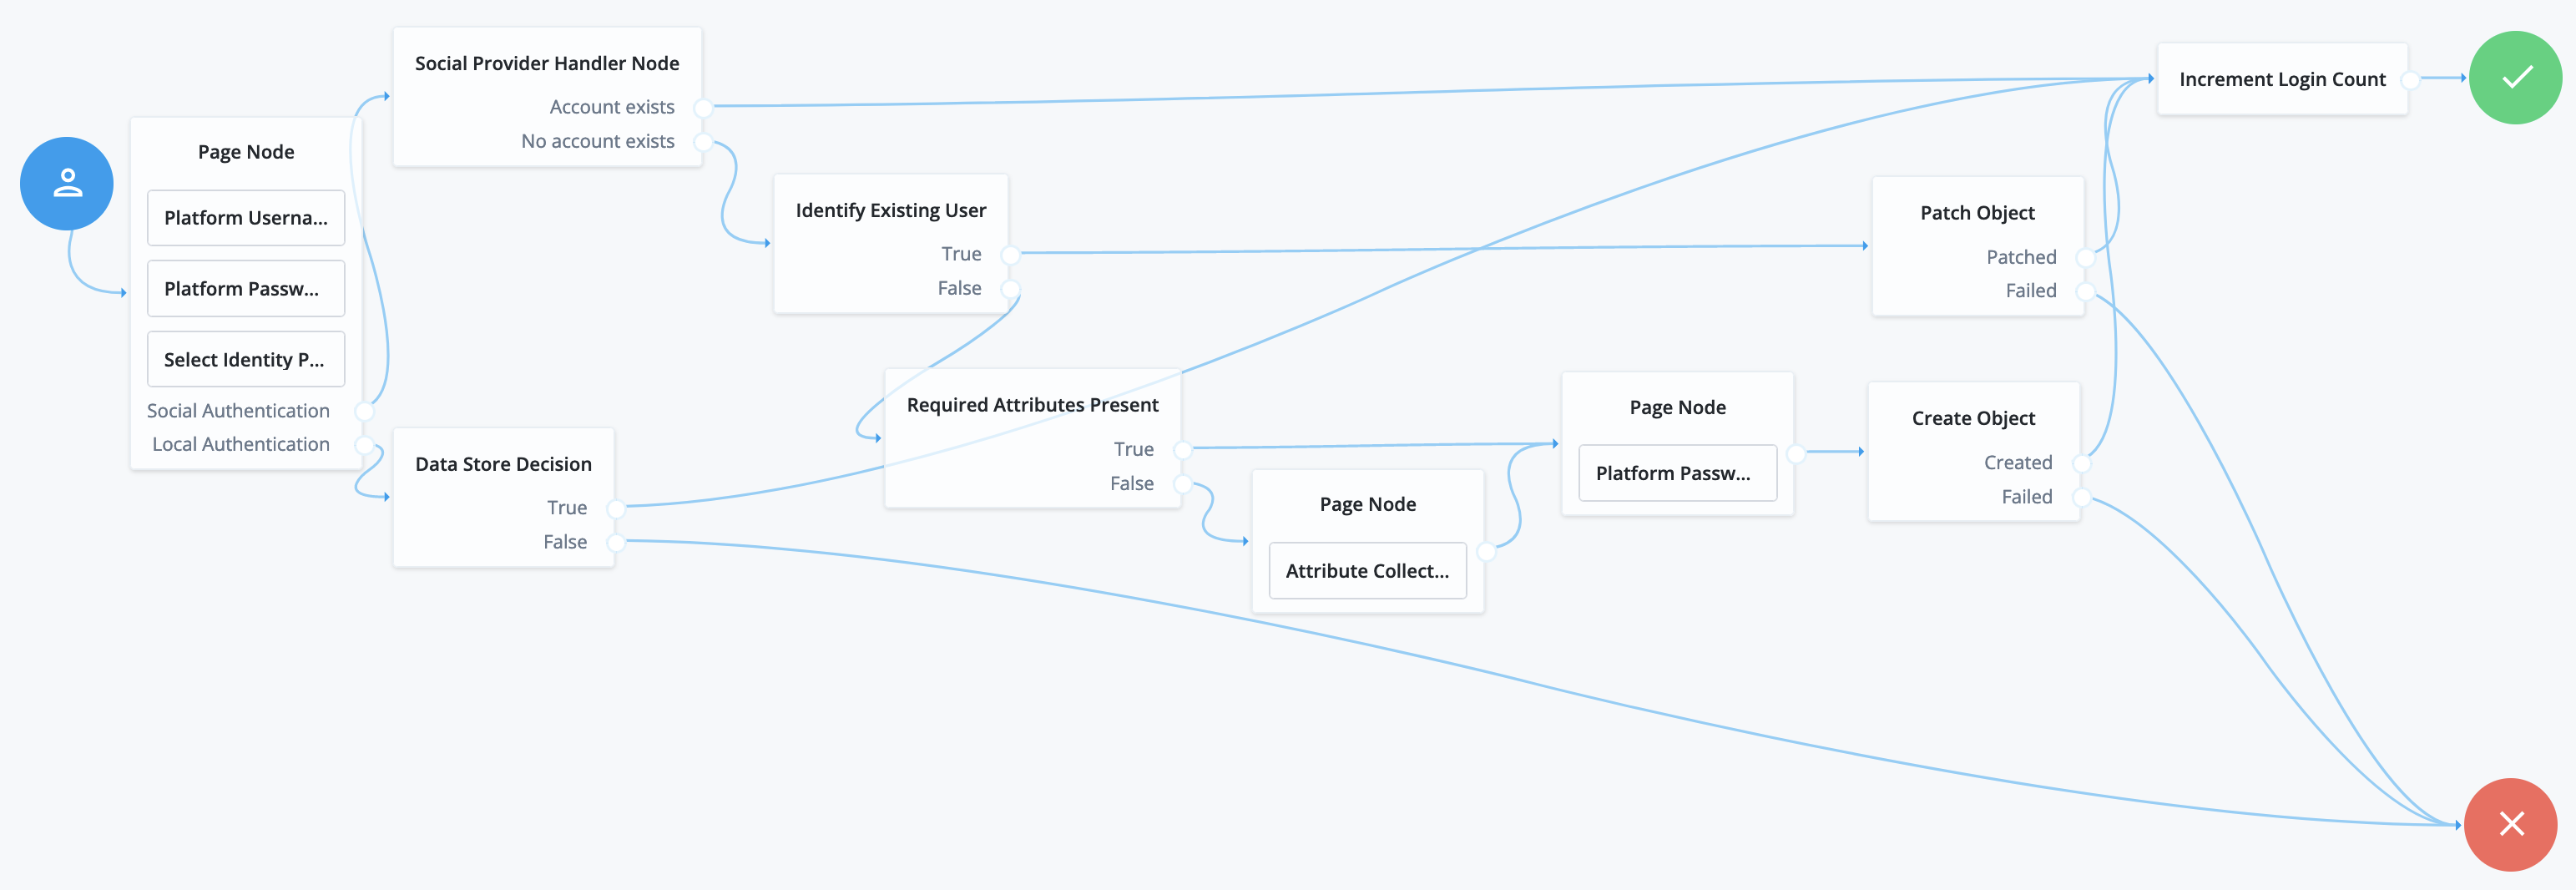
The journey uses the Identify Existing User node to determine if the user is already registered in ForgeRock Identity Platform. By default, the node checks that the email address associated with the account is already registered in ForgeRock Identity Platform.
Ensure that you configure the Transformation Script in the Social Provider Handler node, and the Identity Resource field in the Patch Object node.
Refer to Set up a basic social registration journey for tips.
Let users connect through their profile page
To let users connect to social identity providers through the End User UI profile page, add a mapping for your social authentication journey:
-
Log in to the AM admin UI and switch to the relevant realm.
-
From the left navigation pane, click Services.
-
Select Self Service Trees.
-
Set a new key and value and click + Add:
- Key
-
connectSocial - Value
-
The name of the journey
-
Click Save Changes.
Login with self-service
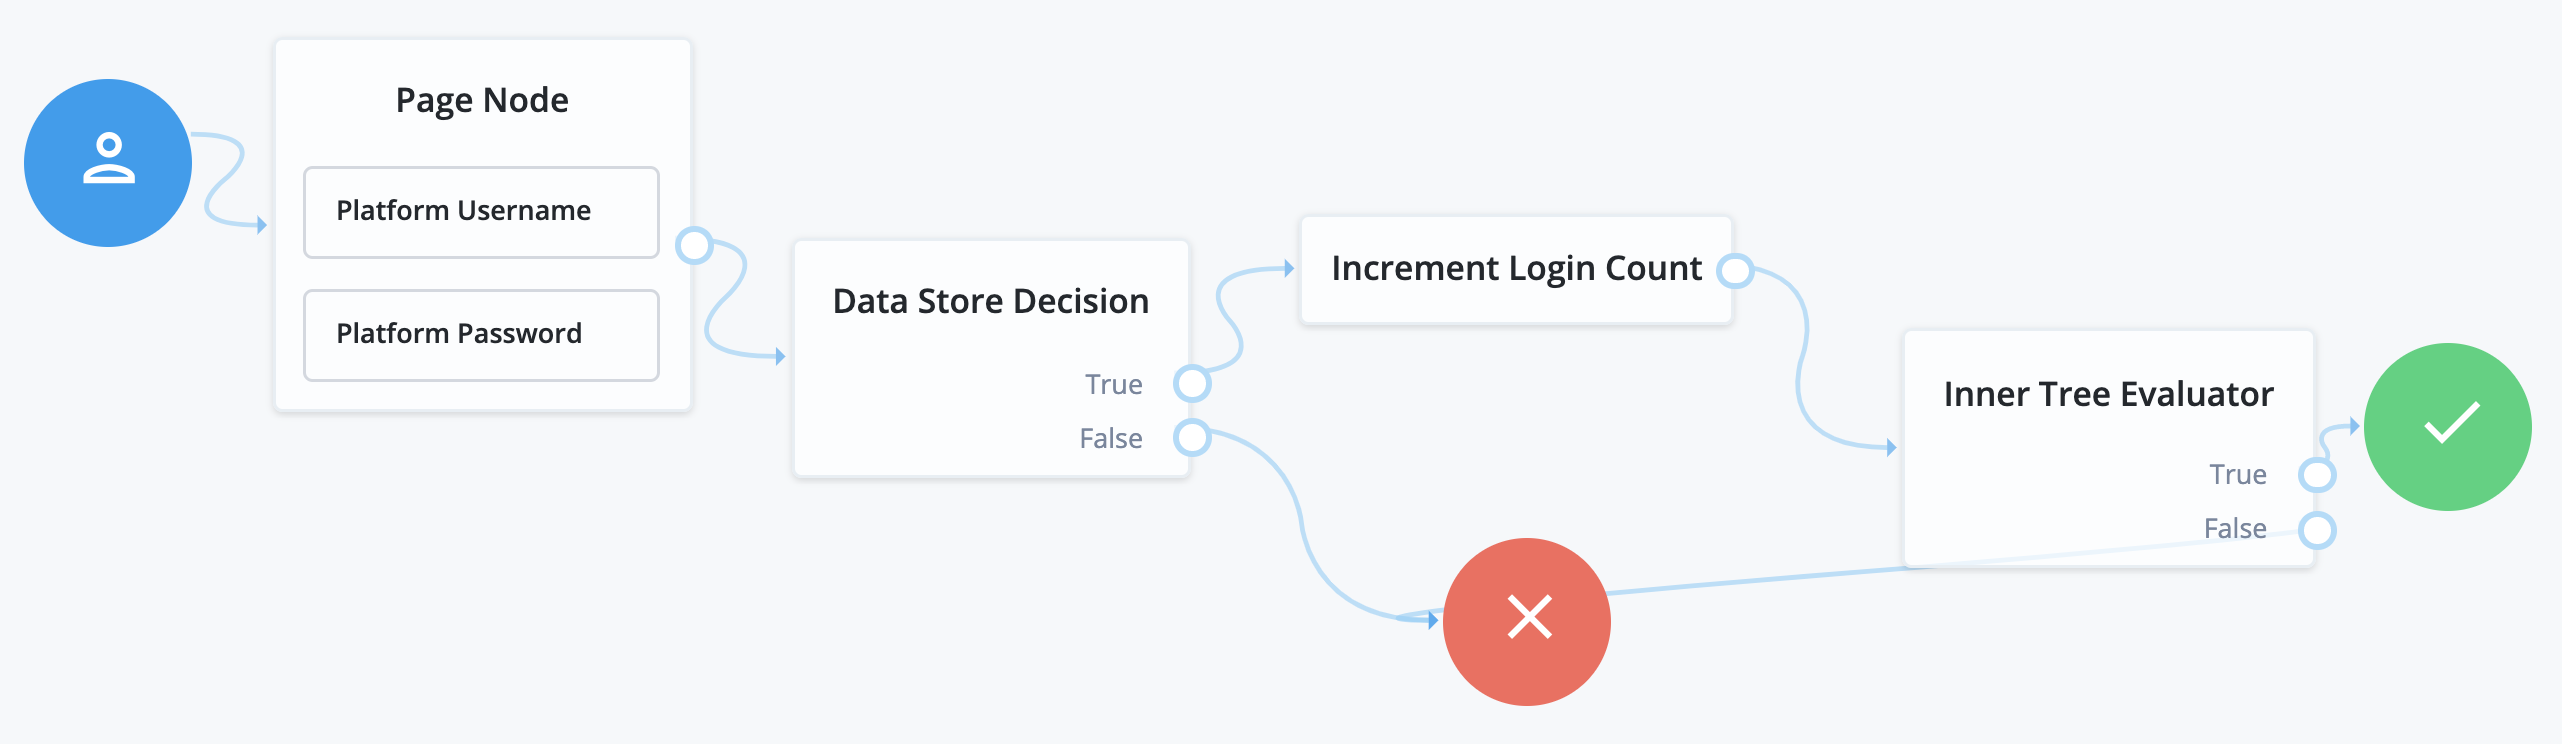
The ForgeRock Identity Platform login flow is set up to use self-service, as in the sample Login journey. This journey lets end users log in using their ForgeRock Identity Platform credentials and increment a login counter. End users are then sent through a separate progressive profile journey. The login journey can be expanded to include other features, such as support for identity providers. For more details, refer to Social authentication.
The following nodes are associated with login journeys:
- Platform Username node
-
The Platform Username node is used in both login and registration journeys. It collects the username of the end user.
- Platform Password node
-
The Platform Password node is used in both login and registration journeys. It collects the password of the end user.
- Data Store Decision node
-
The Data Store Decision node takes a username and password and validates they match an existing user in the configured data store (in this case, an IDM managed user).
Configure social identity providers
To include social identity providers as a method of authentication, configure the Social Identity Provider Service in AM to include either some form of social registration or social account claiming. For more information, refer to Social authentication. Once this is set up, add social identity provider support to your login journey.
-
To get started with social logins, you can create a new journey, modify the existing login journey, or duplicate the login journey and modify that.
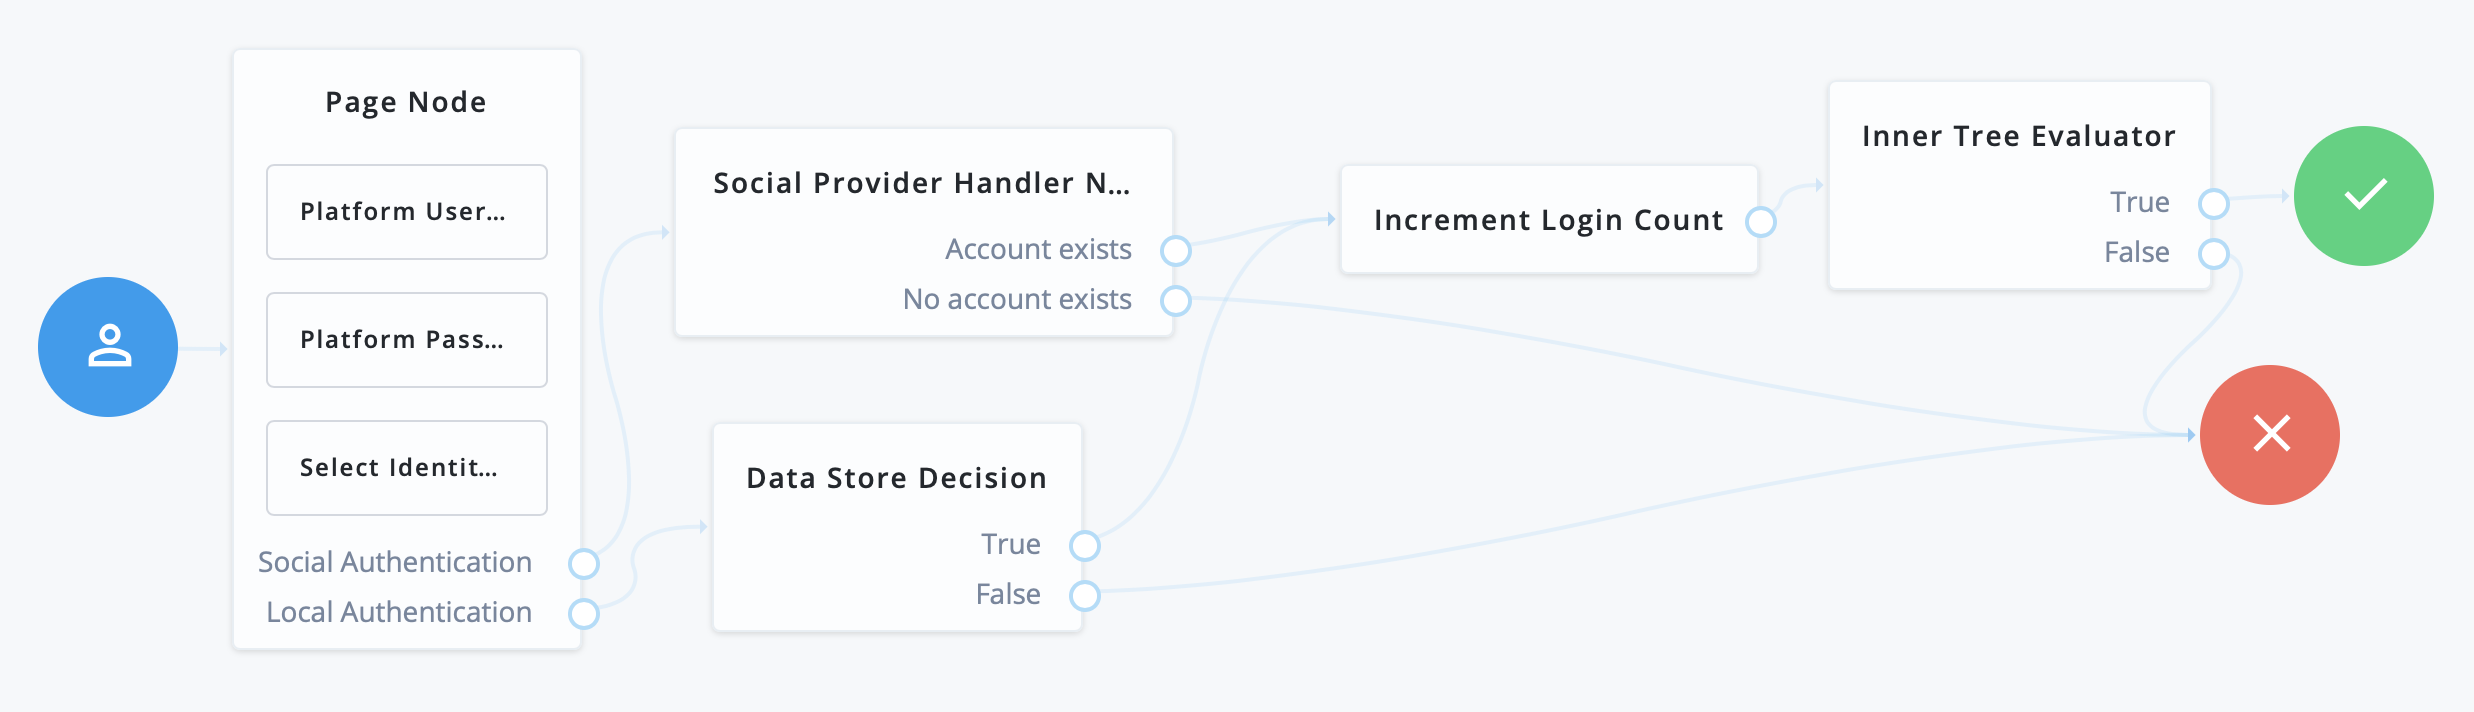
This example uses the following nodes:
-
Connect the starting node to the Page node.
-
Connect the Social Authentication output on the Page node to the Social Provider Handler node.
-
On the Social Provider Handler node, connect the Account Exists output to the Increment Login Count node. Connect the No Account Exists output to the Failure node.
-
On the Page node, connect the Local Authentication node to the Data Store Decision node.
-
On the Data Store Decision node, connect the True output to the Increment Login Count node. Connect the False output to the Failure node.
-
Connect the Increment Login Count node to the Inner Tree Evaluator node node.
-
The Inner Tree Evaluator node node points to another journey, letting you chain multiple journeys together.
By default, this is set to point to the
ProgressiveProfilejourney. For more information about progressive profiles, refer to Progressive profile.Connect the Inner Tree Evaluator node node to the Success node.
The resulting login journey will look something like this:
Example login REST output
When calling a login self-service endpoint, you will receive a JSON object back, containing callbacks for each of the nodes included in the login journey.
Sample JSON callbacks
{
  "authId": "<omitted for length>",
  "callbacks": [
    {
      "type": "ValidatedCreateUsernameCallback",
      "output": [
        {
          "name": "policies",
          "value": {}
        },
        {
          "name": "failedPolicies",
          "value": []
        },
        {
          "name": "validateOnly",
          "value": false
        },
        {
          "name": "prompt",
          "value": "Username"
        }
      ],
      "input": [
        {
          "name": "IDToken1",
          "value": ""
        },
        {
          "name": "IDToken1validateOnly",
          "value": false
        }
      ],
      "_id": 0
    },
    {
      "type": "ValidatedCreatePasswordCallback",
      "output": [
        {
          "name": "echoOn",
          "value": false
        },
        {
          "name": "policies",
          "value": {}
        },
        {
          "name": "failedPolicies",
          "value": []
        },
        {
          "name": "validateOnly",
          "value": false
        },
        {
          "name": "prompt",
          "value": "Password"
        }
      ],
      "input": [
        {
          "name": "IDToken2",
          "value": ""
        },
        {
          "name": "IDToken2validateOnly",
          "value": false
        }
      ],
      "_id": 1
    }
  ],
  "header": "Sign In",
  "description": "New here? <a href=\"#/service/Registration\">Create an account</a><br><a href=\"#/service/ForgottenUsername\">Forgot username?</a> <a href=\"#/service/ResetPassword\">Forgot password?</a>"
}Progressive profile
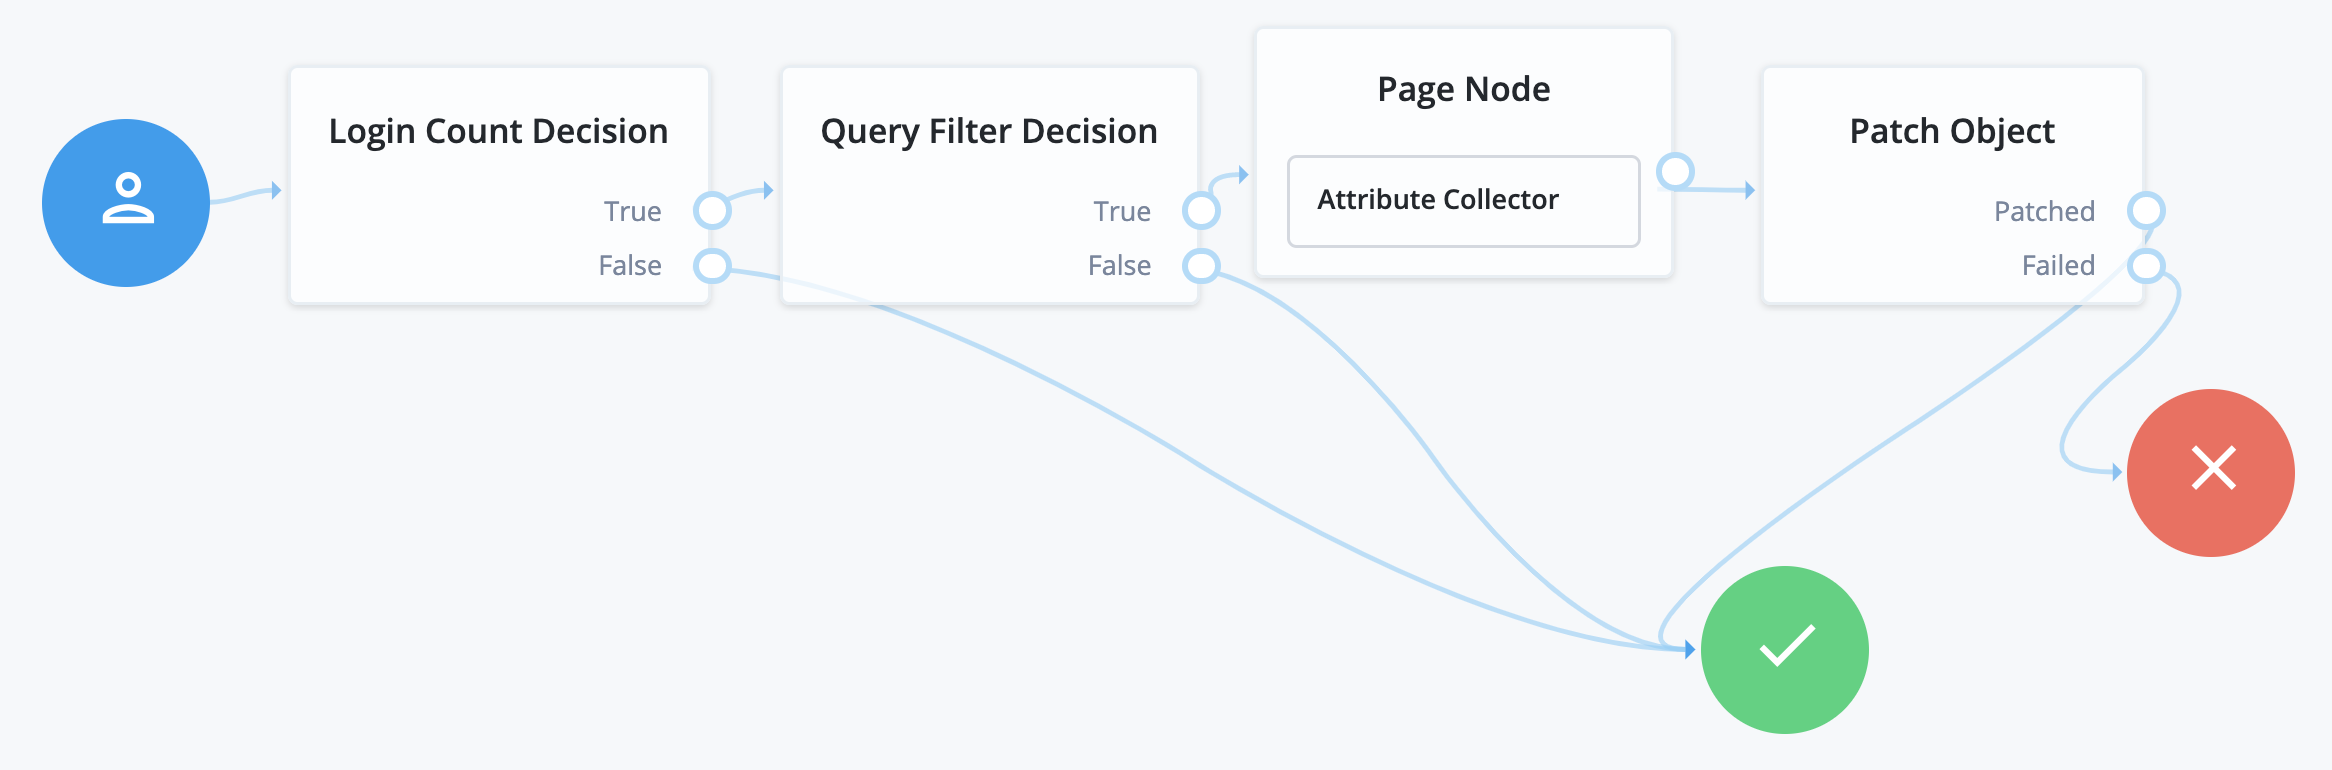
Progressive profile refers to the ability to ask users to provide additional profile information over time, or to update existing information when needed. The sample Progressive Profile journey checks the number of logins, and prompts the user to add their marketing preferences if they haven’t already. There are a wide variety of other ways you can configure a progressive profile flow, however.
Progressive profile journeys generally aren’t directly linked. Instead, they are included inside other journeys, using the Inner Tree Evaluator node. You can connect multiple Inner Tree Evaluator nodes together, which can help you keep different progressive profile behaviors organized into their own journeys.
The following nodes are associated with progressive profiles:
- Attribute Present Decision node
-
The Attribute Present Decision node checks whether the specified attribute is present. It does not check the value of the attribute, only that the attribute exists. This can include attributes that might otherwise be private. A common use case for this node is when you want to check for the presence of a password.
- Attribute Value Decision node
-
The Attribute Value Decision node checks the value of the specified attribute, and determines if it satisfies the conditions configured in the node. It can perform two types of comparison operations:
-
Check whether an attribute is present.
-
Check whether the value of an attribute equals a value specified in the node.
Like the Attribute Present Decision node, one of the possible conditions you can set is whether an attribute is present. Unlike the Attribute Present Decision node, this will not work on private attributes.
-
- KBA Decision node
-
The KBA Decision node is primarily used in a progressive profile journey where you want to ensure a user has defined answers to the minimum number of questions required by the system. This can be useful if the number of questions changes, so the user can be prompted for any necessary additional responses when they next log in. In this case, the KBA Decision node would be used together with the KBA Definition node: if the KBA Decision node evaluates false, the user would then be taken to the KBA Definition node.
- Login Count Decision node
-
The Login Count Decision node checks whether the user has logged in the specified number of times. It can either be triggered once (using the
ATinterval), or triggered repeatedly after a set number of logins (using theEVERYinterval). The login count is not automatically incremented: be sure to include the Increment Login Count node in your login journey if you plan to use this node. - Profile Completeness Decision node
-
The Profile Completeness Decision node checks how complete a user’s profile is, and compares that amount with a percentage value set in the node. The value for profile completeness is based on the number of visible, user-editable attributes in their profile that have been filled out.
- Query Filter Decision node
-
The Query Filter Decision node uses a query filter to check a user’s profile for specific information. Use this to check whether a particular field has been filled out, or that the contents of a field match a specific pattern. For instance, you can use this in progressive profile journeys to check if marketing preferences are set on a user’s profile. For more information on constructing effective query filters, refer to Construct queries.
- Terms and Conditions Decision node
-
The Terms and Conditions Decision node verifies the user has accepted the currently active set of terms and conditions. Use this node when you want to verify the user has accepted your current terms and conditions before proceeding. Use this with the Accept Terms and Conditions node: connect the Terms and Conditions Decision node False output to an Accept Terms and Conditions node.
- Time Since Decision node
-
The Time Since Decision node checks the user’s creation date against a specified amount of time. This is used when you want to have a time-based reminder for users to check an attribute. Once the specified amount of time has elapsed, the node evaluates to
Truethe next time the node is triggered, for example, by the user logging in and going through a progressive profile journey.
Password reset
Password reset lets users reset their password without assistance from an administrator. The ForgeRock Identity Platform includes a sample reset password journey, which requests a user’s email address, checks if a user with that email exists, and if so, emails a reset link to the user. The journey then waits until the user clicks the link before presenting a password reset prompt.
Make sure the Patch Object node's Patch As Object field is not selected (equivalent to false).
Example reset password REST output
When calling a reset password self-service endpoint, you will receive a JSON object back, containing callbacks for each of the nodes included in the reset password journey.
Sample JSON callbacks
{
  "authId": "<omitted for length>",
  "callbacks": [
    {
      "type": "StringAttributeInputCallback",
      "output": [
        {
          "name": "name",
          "value": "mail"
        },
        {
          "name": "prompt",
          "value": "Email Address"
        },
        {
          "name": "required",
          "value": true
        },
        {
          "name": "policies",
          "value": {}
        },
        {
          "name": "failedPolicies",
          "value": []
        },
        {
          "name": "validateOnly",
          "value": false
        },
        {
          "name": "value",
          "value": ""
        }
      ],
      "input": [
        {
          "name": "IDToken1",
          "value": ""
        },
        {
          "name": "IDToken1validateOnly",
          "value": false
        }
      ],
      "_id": 0
    }
  ],
  "header": "Reset Password",
  "description": "Enter your email address or <a href=\"#/service/Login\">Sign in</a>"
}Username recovery
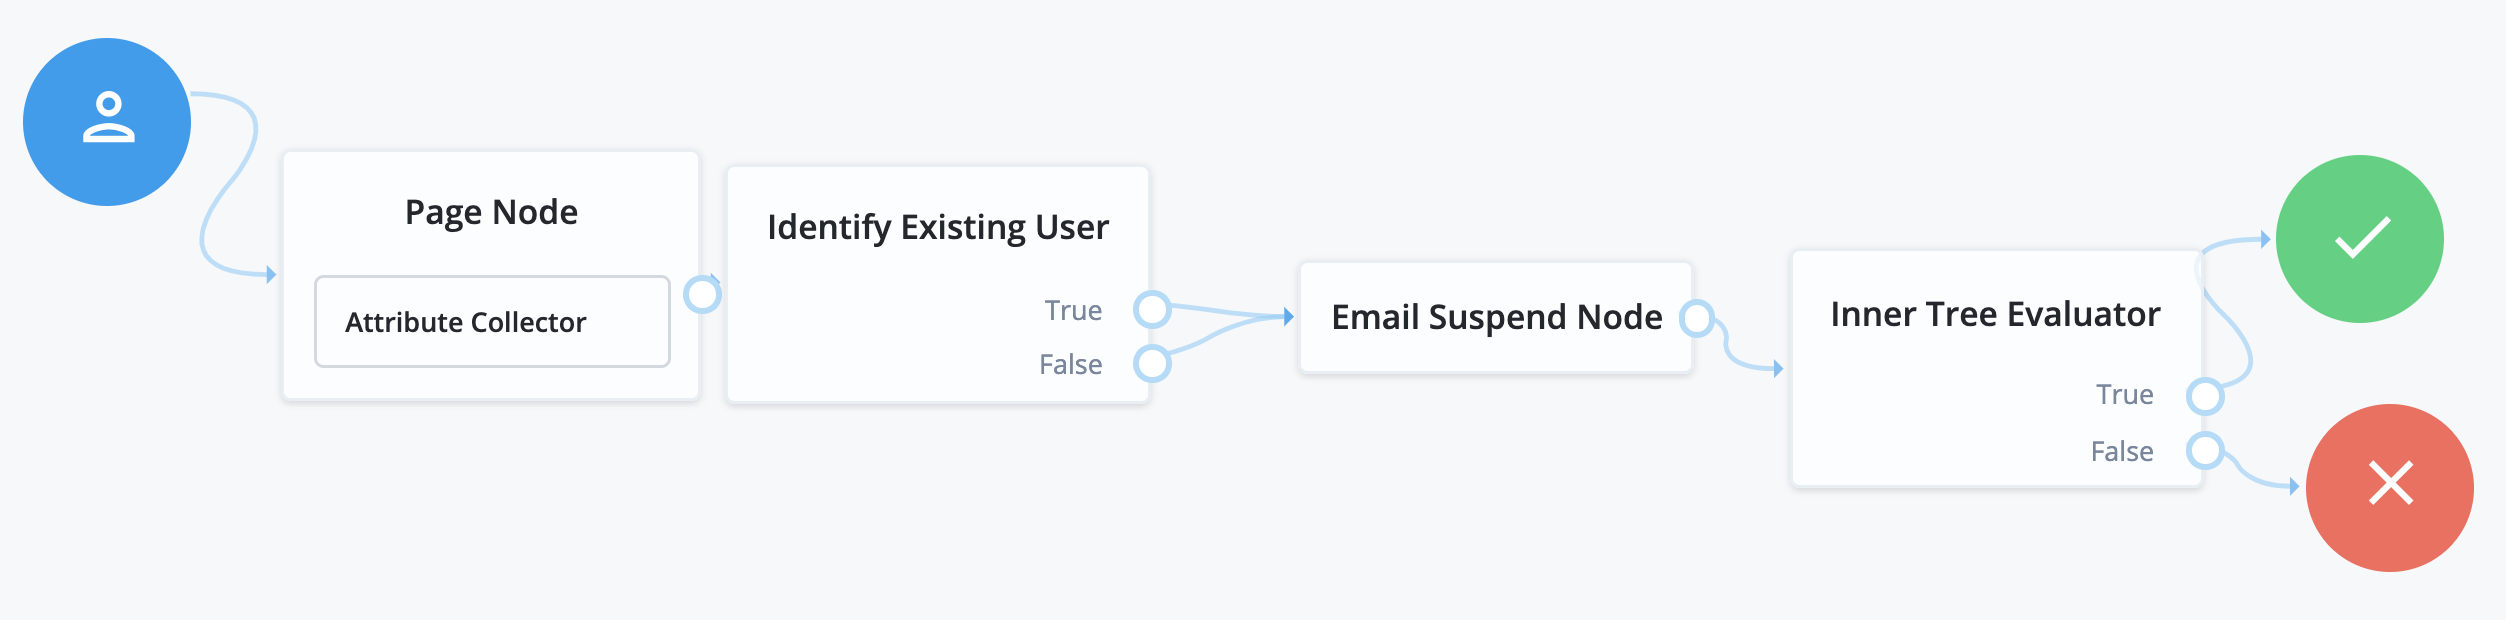
Username recovery lets the user recover their username, using other information they remember, such as their email address. The ForgeRock Identity Platform includes a sample Forgotten Username journey that is used for this purpose. It collects a user’s email address, then uses that to search for a user with that address. It then emails the user the username associated with that email address. An alternative journey is to send a verification link, then use the Display Username node once the user returns from the email.
|
When reviewing the sample journey, notice that both Identify Existing User node outputs connect to the Email Suspend node. This is recommended behavior for security reasons. If you return different outcomes, you can potentially expose which users have accounts in your system. |
Example forgotten username REST output
When calling a username recovery self-service endpoint, you will receive a JSON object back, containing callbacks for each of the nodes included in the username recovery journey.
Sample JSON callbacks
{
  "authId": "<omitted for length>",
  "callbacks": [
    {
      "type": "StringAttributeInputCallback",
      "output": [
        {
          "name": "name",
          "value": "mail"
        },
        {
          "name": "prompt",
          "value": "Email Address"
        },
        {
          "name": "required",
          "value": true
        },
        {
          "name": "policies",
          "value": {}
        },
        {
          "name": "failedPolicies",
          "value": []
        },
        {
          "name": "validateOnly",
          "value": false
        },
        {
          "name": "value",
          "value": ""
        }
      ],
      "input": [
        {
          "name": "IDToken1",
          "value": ""
        },
        {
          "name": "IDToken1validateOnly",
          "value": false
        }
      ],
      "_id": 0
    }
  ],
  "header": "Forgotten Username",
  "description": "Enter your email address or <a href=\"#/service/Login\">Sign in</a>"
}Password updates
Password updates provide a method for the user to update their password without assistance from an administrator. The ForgeRock Identity Platform includes a sample Update Password journey. Unlike the other sample self-service journeys, the update password journey assumes the user is already logged in, and gets the user’s current session data to identify the user. It then presents a prompt to update the user’s password, and uses a Patch Object node to update the password in IDM. An example of where you might use a journey like this is in an update password link placed in the user’s profile or settings.
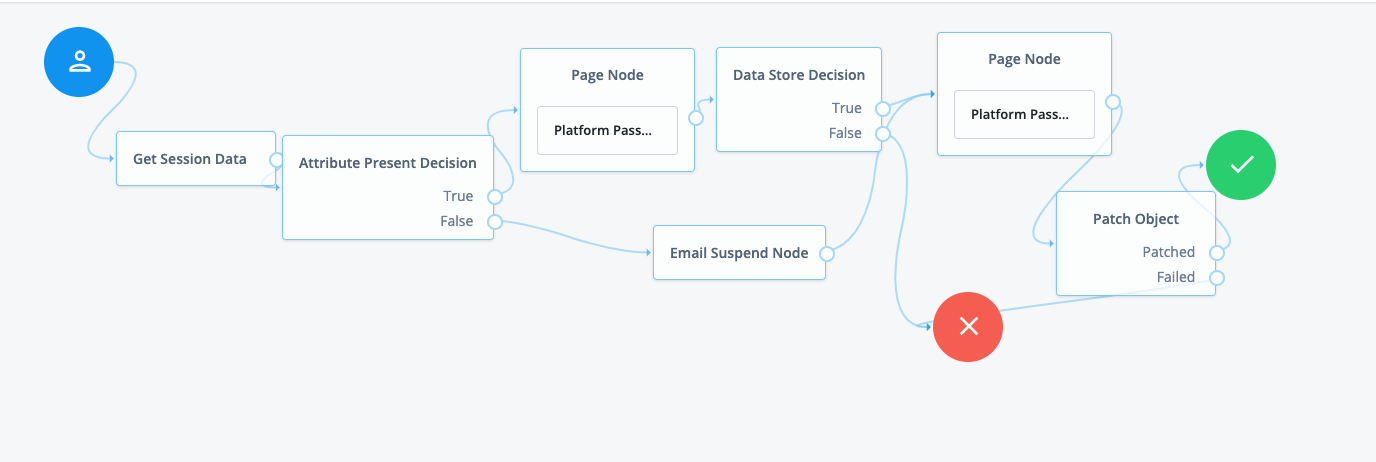
Make sure that the Patch Object node's Patch As Object field is not selected (equivalent to false).
To allow users to update their password through the End User UI profile page using the Reset link, set a self-service tree for the password update journey:
-
Log in to the AM admin UI and switch to the relevant realm.
-
From the left navigation pane, click Services.
-
Select Self Service Trees.
-
Set a new key and value and click + Add:
- Key
-
updatePassword - Value
-
The name of the journey
-
Click Save Changes.
Pass-through authentication
Pass-through authentication lets you validate passwords with a remote service.
Overview
Secure systems typically store passwords using one-way hash algorithms to make the passwords hard to crack. Unless all systems support the same one-way hash algorithms, however, using this security measure alone can impede password synchronization.
A better security practice is to synchronize hashed passwords only between services that support the same password storage schemes. This ensures that the target service will always get passwords that it can read or compare. Only synchronize hashed passwords directly between services that support the same password storage schemes; otherwise, the target service will get passwords that it cannot read or compare!
For example, Active Directory stores passwords using a hash algorithm that DS doesn’t support, and when you import identities based on Active Directory accounts, IDM can’t synchronize the users' passwords. As a result, these users have no local credentials to authenticate to ForgeRock Identity Platform.
The Pass-through Authentication node uses a connector to validate credentials against the remote Active Directory service. The remote system verifies the user’s password even if ForgeRock Identity Platform doesn’t support the hash algorithm.
Prepare for pass-through authentication
Before using pass-through authentication:
-
Set up a connector to the remote authentication service.
-
If ForgeRock Identity Platform saves a copy of the password on successful authentication, align password policies so the remote password is certain to pass password validation.
-
If you synchronize ForgeRock Identity Platform profiles from the remote accounts, do not synchronize the passwords from the remote service to ForgeRock Identity Platform.
ForgeRock Identity Platform uses the local account to find the appropriate identifier, and the connector to authenticate remotely.
Migrate passwords
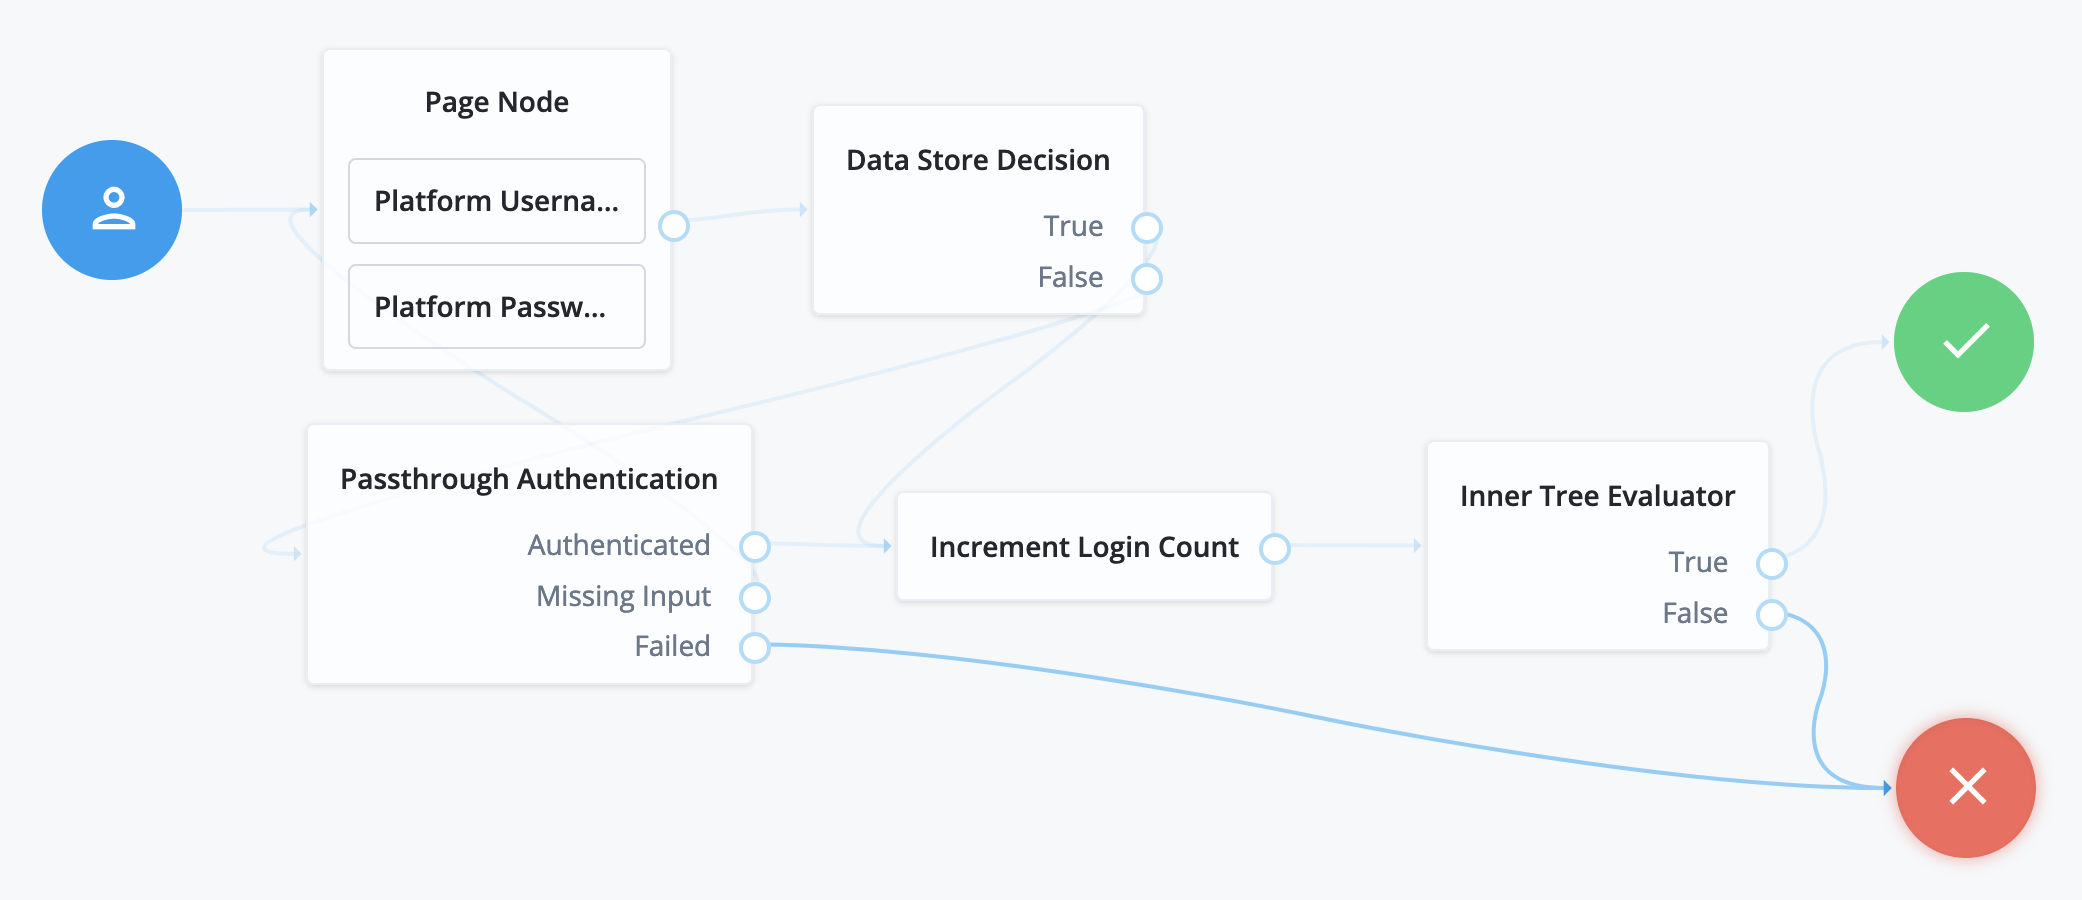
When you cannot synchronize hashed passwords, you can use the pass-through authentication node to capture them. The following example journey demonstrates password capture and storage.
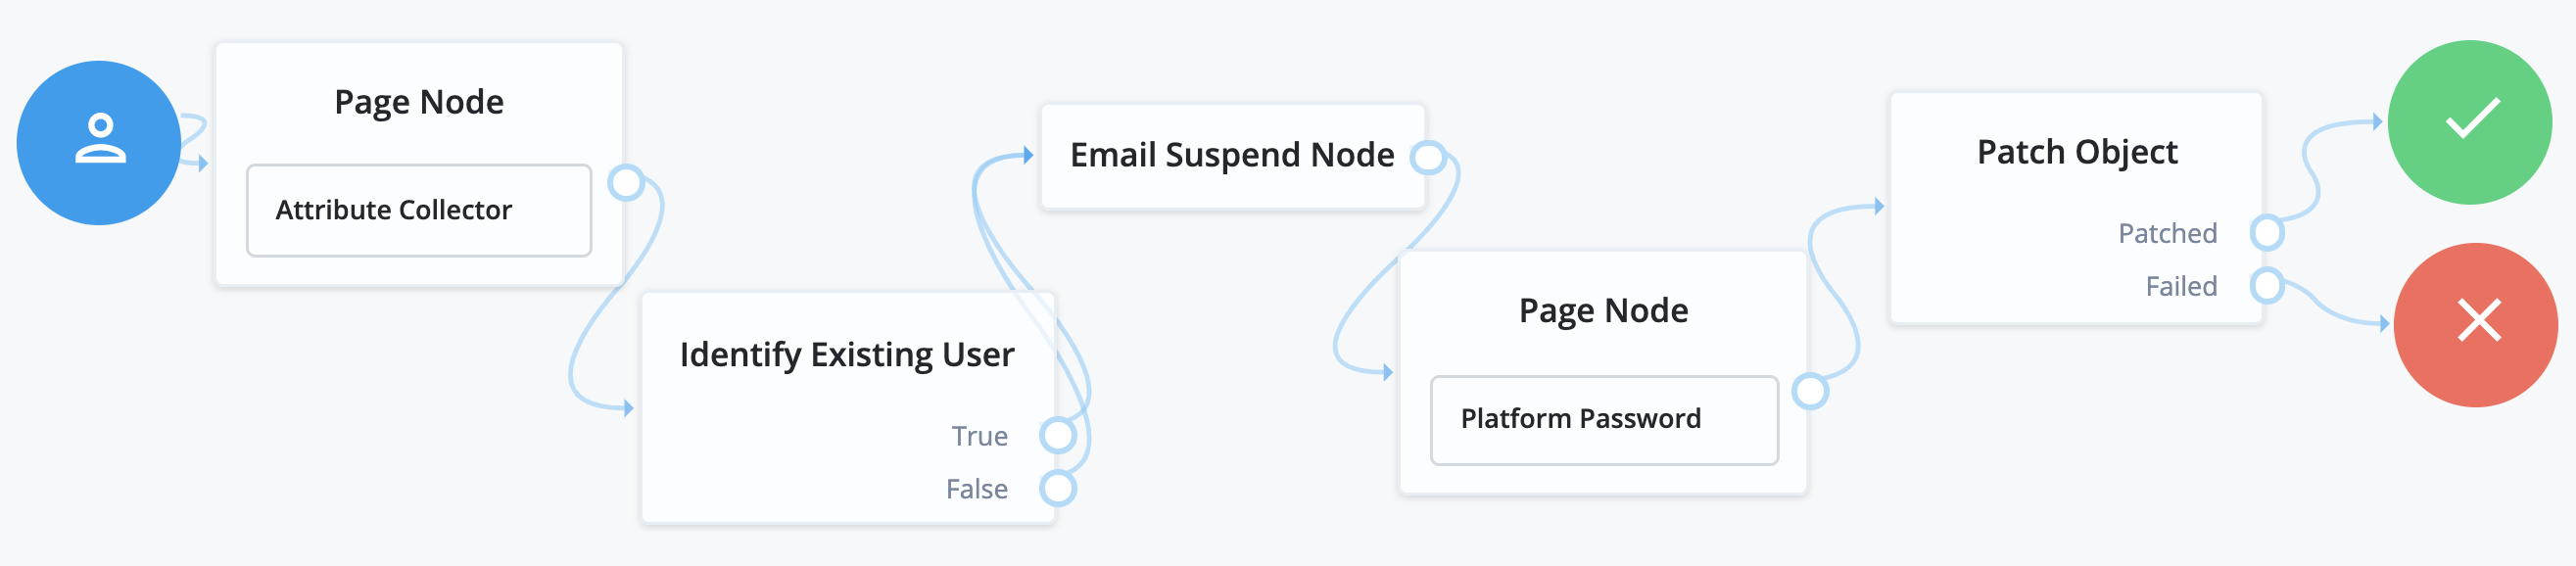
ForgeRock Identity Platform performs authentication through a connector. It also stores the captured password securely using a strong, one-way hash algorithm. ForgeRock Identity Platform can then act as the service of record for authentication of that account. After the user has authenticated successfully through this journey, the user can authenticate locally in ForgeRock Identity Platform. The user no longer needs to authenticate using the remote service:
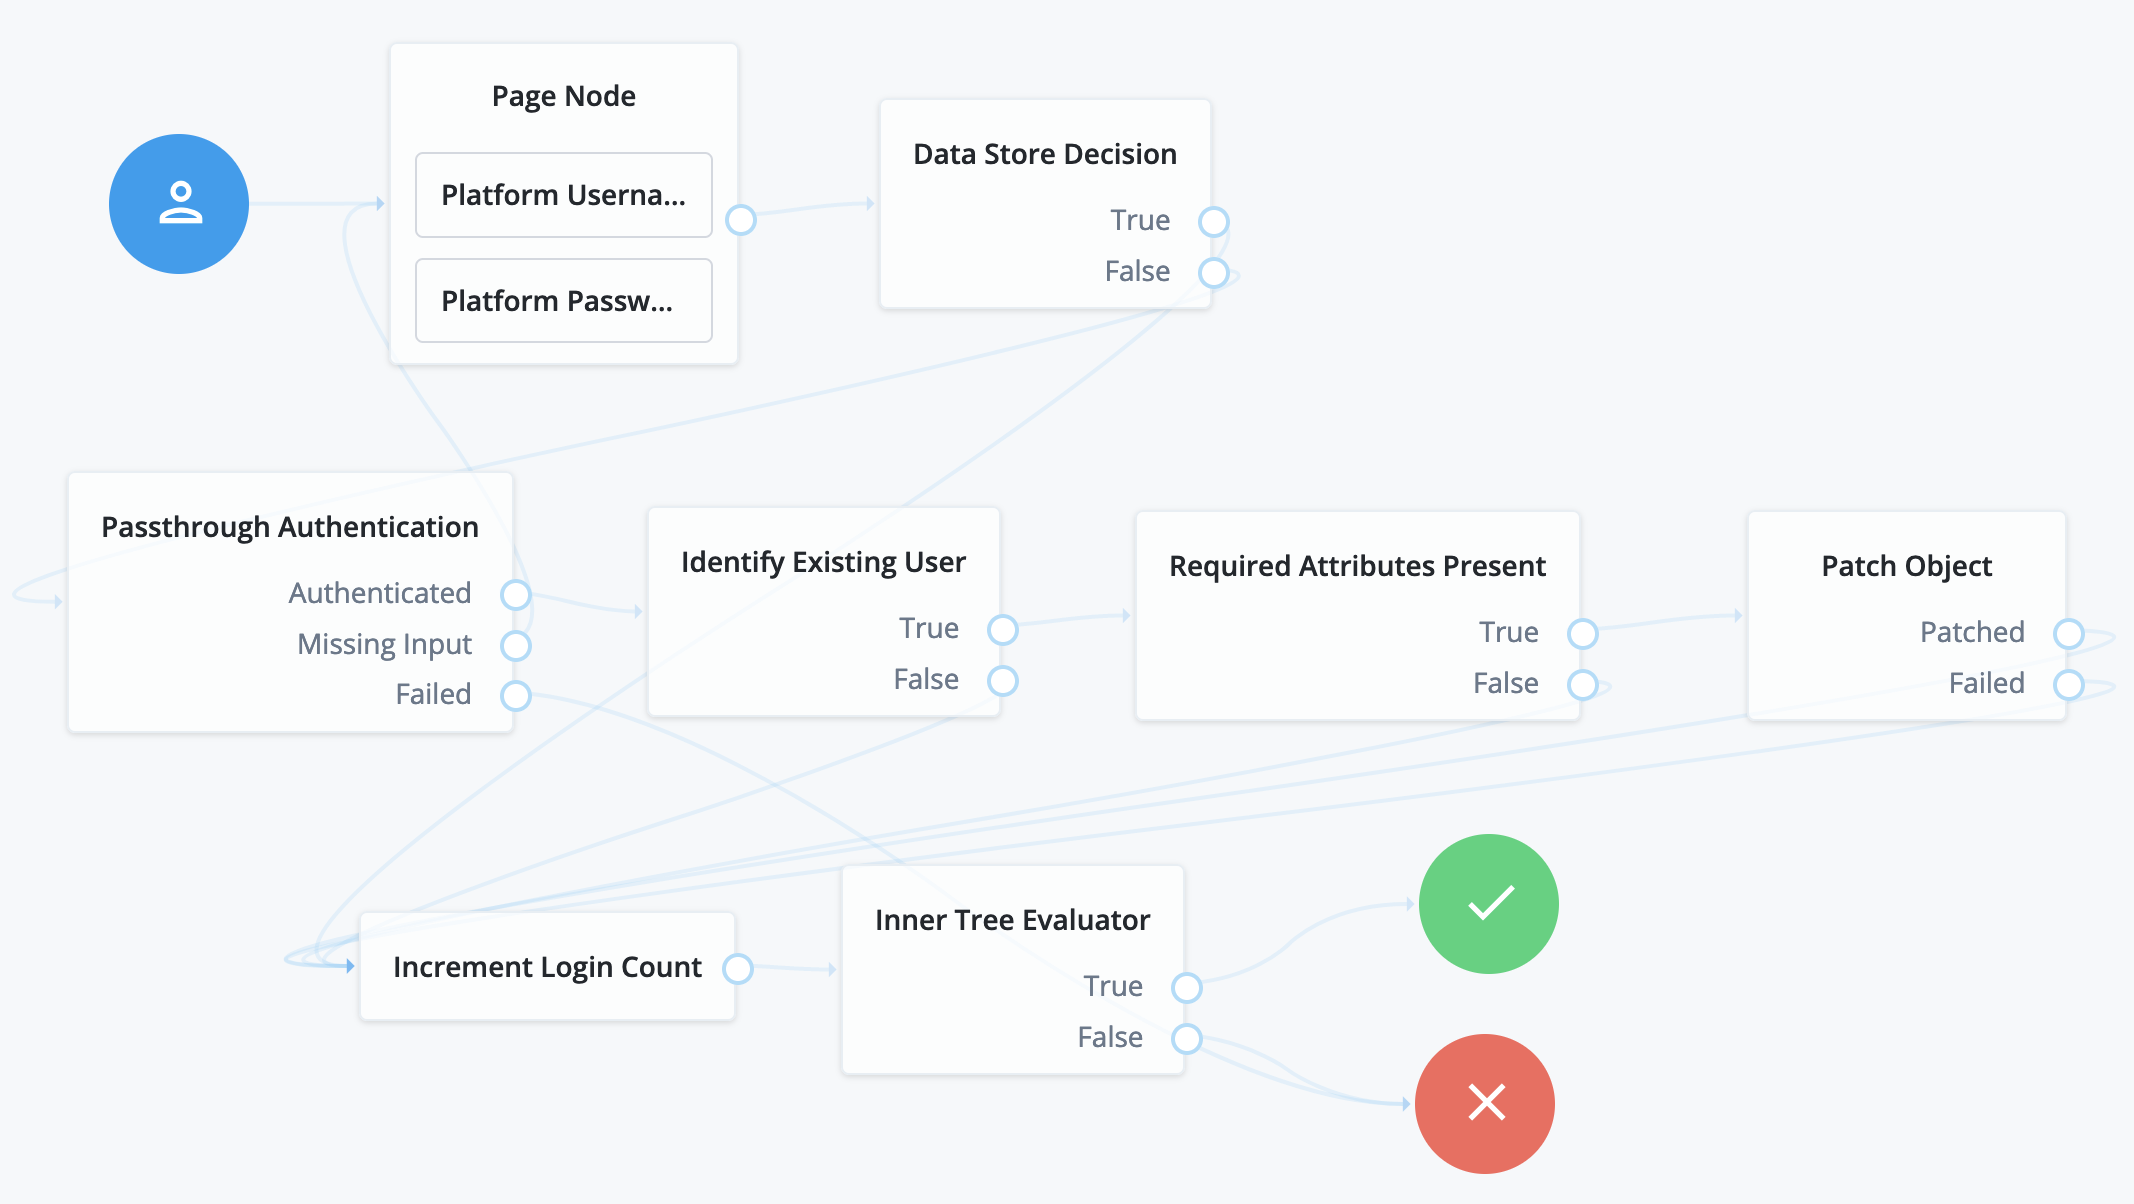
Here’s what happens in this example journey:
-
The Platform Username node and Platform Password node in the Page node prompt the user for credentials.
-
The Data Store Decision node attempts local authentication.
-
If authentication succeeds, the Data Store Decision node processes the authentication like the sample login journey.
-
If authentication fails, the Pass-through Authentication node attempts remote authentication.
When configuring the Pass-through Authentication node, you must identify the connector to the remote authentication service in the node’s System Endpoint field.
-
-
The Identify Existing User node and Required Attributes Present node ensure that ForgeRock Identity Platform has the data needed to update the account.
-
The Patch Object node updates the account with the password used for successful remote authentication.
When configuring this node, be sure to select
Patch As Object. -
The rest of the journey processes the authentication like the sample login journey.
|
This journey can fail when the remote password does not respect the password policy. This results in a 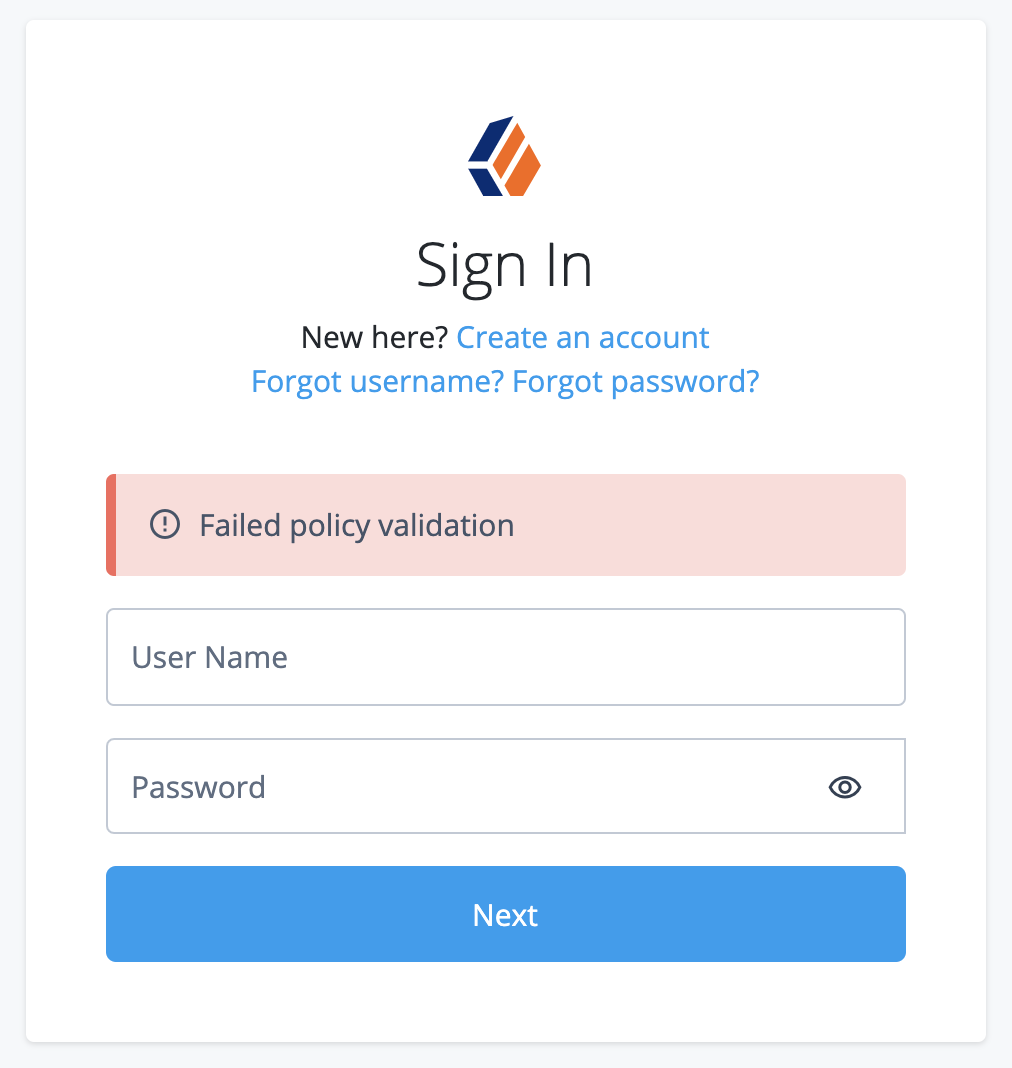
To avoid this problem, align password policies so that the remote password is sure to pass password validation. |
Remote authentication
You can use the Pass-through Authentication node for remote authentication. This is useful when you cannot synchronize hashed passwords or use ForgeRock Identity Platform as the service of record for authentication.
The example journey below does not capture the password on successful authentication, but you could adapt the journey to capture the password. Then you could the cache authentication credentials in ForgeRock Identity Platform temporarily. ForgeRock Identity Platform then serves as a backup authentication service when the remote service is not available. If you adapt the journey in this way, be sure to configure the journey to authenticate periodically with the remote service, and to refresh the cached password.
The following journey demonstrates remote authentication when local authentication fails:
-
The Platform Username node and Platform Password node in the Page node prompt the user for credentials.
-
The Data Store Decision node attempts local authentication.
-
If authentication succeeds, the Data Store Decision node processes the authentication like the sample login journey.
-
If authentication fails, the Pass-through Authentication node attempts remote authentication.
-
-
The rest of the journey processes the authentication like the sample login journey.
Scripting tips
Access IDM properties in scripts
User self-service journeys primarily use Identity Management nodes.
Nodes save data in the shared state of journeys. Identity Management nodes save data in the shared state differently than other nodes.
You can extend the functionality of journeys using scripts you write in the Scripted Decision node.
When you use a Scripted Decision node node to access properties saved in the shared state by Identity Management nodes, you must reference the IDM properties using the objectAttrbutes object.
For example, to access the first name (givenName) from the shared state, returned from an Identity Management node, you would use the syntax:
var firstName = objectAttributes.get("givenName").asString();For information on the shared state, refer to access shared state data.