Creating an OpenID Connect IdP connection
In the IdP Connections page, create an OpenID Connect (OIDC) identity provider (IdP) connection to take advantage of your existing last-mile integration. This connection expands your applications to additional partners using the OIDC protocol.
Steps
-
In the PingFederate admin console, go to Authentication > Integration > IdP Connections, and create a new IdP connection.
-
On the Connection Type tab, select the Browser SSO Profiles checkbox.
-
In the Protocol list, select OpenID Connect.
When you select OpenID Connect, the other connection types become unavailable.
-
Click Next.
-
On the Connection Options tab, you can enable just-in-time (JIT) provisioning, OAuth attribute mapping, or both. OAuth attribute mapping requires the OAuth 2.0 authorization server role.
-
Click Next.
For simplicity, this topic focuses on managing OIDC IdP connection settings.
-
On the General Info tab, provide the required information, including:
- Issuer
-
The Issuer Identifier of the OpenID Provider (OP).
- Connection Name
-
A plain-language identifier for the connection. For example, a company or department name. The admin console displays this name in the connection list.
- Client ID
-
The client ID to communicate with the OP. This client represents PingFederate. The OP creates and manages this client at the OP. Learn more in the documentation provided by the OP.
- Client Secret
-
The client secret to communicate with the OP. This applies only when the client representing PingFederate supports the Basic Client profile. Learn more in step 10.
-
(Optional) Click Load Metadata.
Loading metadata from the OP expedites the connection setup. You can also update an existing connection by reloading metadata.
-
-
Click Next.
-
On the Browser SSO tab, click Configure Browser SSO.
-
On the User-Session Creation tab, click Configure User-Session Creation.
-
On the Identity Mapping tab, choose from the following options:
Choose from:
-
Select the No Mapping checkbox if you plan to pass end-user claims to the target application. You pass these claims through an authentication policy contract in an service provider (SP) authentication policy.
-
Select the Account Mapping checkbox if you plan to pass end-user claims to the target application through an SP adapter instance or an authentication policy contract. Use this if your PingFederate server is a federation hub that bridges an OP to an SP.
-
Select the Account Linking checkbox if your target application requires account linking.
End-user claims are user attributes found in ID tokens or obtained from the
UserInfoendpoint at the OP.
This topic uses the Account Mapping configuration as an example.
-
-
On the Attribute Contract tab, extend the attribute contract. To mask the attribute values in the log, select the relevant checkbox for each applicable end-user claim.
If you loaded the metadata from the OP on the General Info tab, the attribute contract populates automatically.
-
Click Next.
-
On the Target Session Mapping tab, click Map New Adapter Instance. This maps end-user claims to the target application through an SP adapter instance or an authentication policy contract.
The Target Session Mapping configuration does not apply when you select the No Mapping option on the Identity Mapping tab.
-
Follow the admin console to fulfill the SP adapter contract or the authentication policy contract. Like other IdP connections, you can query additional attributes from a datastore, specify issuance criteria, or both.
-
On the Adapter Contract Fulfillment tab, select
Provider Claimsfrom the Source list to map the attribute to an end-user claim. -
If your target application requires the associated access token, select
Contextas the source andAccess Tokenas the value.If the client representing PingFederate supports the Basic Client profile, PingFederate always receives an access token from the OP to retrieve an ID token.
If the client supports the Implicit Client profile, you must select the Form POST with access token option in step 10. The OP returns an access token and an ID token as part of the authentication and authorization flow.
-
Click Done.
-
To save the connection settings and go to the Protocol Settings tab, click Done.
-
On the Protocol Settings tab, click Configure Protocol Settings.
-
On the OpenID Provider Info tab, provide the scopes, the endpoints, and the authentication scheme.
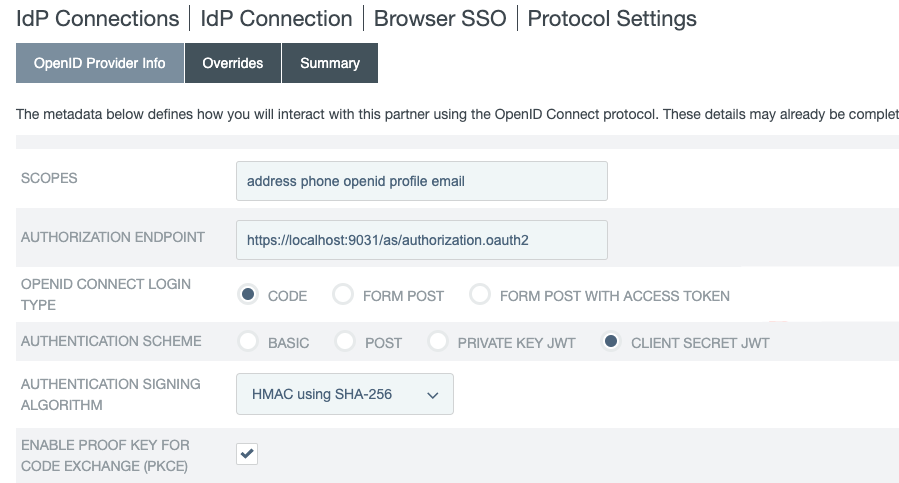
If you clicked Load Metadata from the OP on the General Info tab, the system pre-populates the Scopes field and all endpoints if the metadata contains the information.
Field Description Scopes
The scopes to include in the OIDC authentication and OAuth token requests to the OP. Multiple space-separated values are allowed.
The default value, without loading metadata from the OP, is
openid.You can find a list of OIDC defined scopes in the Requesting Claims using Scope Values section of the OpenID Connection specification.
Authorization Endpoint
The authorization endpoint at the OP. You can enter a relative path, starting with a forward slash (/), if you provide base URL on the General Info tab.
There is no default value without loading metadata from the OP.
OpenID Connect Login Type
The OIDC client profile. The OP creates and manages this client, which represents PingFederate.
-
If the client supports the Basic Client profile, select Code. The resulting value of the
response_typeparameter iscode. -
If the client supports the Implicit Client profile, select Form POST. The resulting value of the
response_typeparameter isid_token. -
If the client supports the Implicit Client profile and the target application requires the associated access token, select Form POST with access token. The resulting values of the
response_typeparameter areid_token token.
The default selection, without loading metadata from the OP, is Code.
Authentication Scheme
The client authentication method that PingFederate uses. This applies and is visible only to clients supporting the Basic Client profile.
-
Select Basic to submit credentials with HTTP Basic authentication.
-
Select POST to submit credentials with POST.
-
Select Private Key JWT to authenticate with the
private_key_jwtClient Authentication method. Learn more in Client Authentication in the OpenID Connect specification. -
Select Client Secret JWT to authenticate with the
client_secret_jwtClient Authentication method. Learn more in Client Authentication in the OpenID Connect specification.
The default selection, without loading metadata from the OP, is Basic.
Authentication Signing Algorithm
If you choose Private Key JWT or Client Secret JWT as the authentication scheme, select the algorithm that PingFederate uses to sign the JSON Web Token (JWT).
If PingFederate is deployed to run in a Java 8 or Java 11 runtime environment, or is integrated with a g and configured to use static keys for OAuth and OIDC, additional RSASSA-PSS signing algorithms become available to select. Learn more about HSM integration and static keys in Supported hardware security modules and Keys for OAuth and OpenID Connect.
If you enable static keys for OAuth and OIDC, the system hides elliptic-curve cryptography (ECC) algorithms lacking active static keys.
Changes made in the static-key configuration might affect runtime transactions and require additional changes to the Authentication Signing Algorithm selection. Learn more in Keys for OAuth and OpenID Connect.
Based on the chosen signing algorithm, PingFederate selects the signing JSON Web Key (JWK) from its JWK Set (JWKS) at runtime.
For the OP to validate the signed JWT, ensure that the OP can access the PingFederate JWKS endpoint, which returns the current JWKS. The PingFederate JWKS endpoint is located at
<Base URL>/pf/JWKS, where Base URL is defined on System > Server > Protocol Settings > Federation Info.For example, if the Base URL field value is https://www.example.com, the PingFederate JWKS endpoint is https://www.example.com/pf/JWKS. You can pass the PingFederate JWKS endpoint directly to the OP or have the OP contact the PingFederate OP configuration endpoint to obtain the information.
Learn more in OpenID Provider configuration endpoint.
If Client Secret JWT is the chosen authentication scheme, the signing algorithms are
HS256,HS384, andHS512.Enable Proof Key for Code Exchange (PKCE)
Select this checkbox to enable PingFederate to send a SHA256 code challenge and corresponding code verifier to the OP. It sends these as a Proof Key for Code Exchange (PKCE) during the authorization code flow.
This checkbox applies and is visible only when the OpenID Connect Login Type is Code.
When you click Load Metadata on the General Info tab, PingFederate displays the Enable PKCE checkbox if S256 is listed as a supported method in the
code_challenge_methods_supportedby the OP.Pushed Authorization Request Endpoint
The Pushed Authorization Request (PAR) endpoint at the OP. When you configure a PAR endpoint, the IdP connection sends authorization requests directly to this endpoint. All parameters associated with an authorization request are transmitted to the PAR endpoint. Learn more about the PAR protocol in OAuth 2.0 Pushed Authorization Requests on the IETF website.
You can enter the relative path,
/par, starting with a forward slash (/), if you provide the base URL on the General Info tab.If you clicked Load Metadata from the OP on the General Info tab, the system prepopulates the Pushed Authorization Request Endpoint field if the metadata contains the information. PAR requests are the new default behavior.
Token Endpoint, UserInfo Endpoint, and JWKS URL
OAuth 2.0 and OpenID Connect 1.0 endpoints at the OP. Learn more in openid.net/connect.
- Token Endpoint
-
The Token Endpoint field is only visible and required for clients supporting the Basic Client profile. This applies when the OpenID Connect Login Type field is set to Code.
- UserInfo Endpoint
-
The UserInfo Endpoint field is optional. If you omit it, PingFederate only has access to the end-user claims from the ID tokens.
- JWKS URL
-
The JWKS URL is required for PingFederate to validate the inbound ID tokens from the OP. If the OP signs its JWTs using an RSASSA-PSS signing algorithm, PingFederate must be deployed to run in a Java 8 or Java 11 runtime environment, or integrated with an HSM and a static-key configuration for OAuth and OIDC. Learn more about HSM integration and static keys in Supported hardware security modules and Keys for OAuth and OpenID Connect, respectively.
There are no default values without loading metadata from the OP.
Sign Request
Select this checkbox to send request parameters as claims in a request object. This is a self-contained, signed JWT sent as one
requestquery parameter to the OP.When enabled, the OP can validate the integrity of the request parameters based on the digital signature found in the signed JWT. Learn more about passing a request object by value in the OpenID Connect specification.
When enabled, the JWT signed request object includes the
jti(JWT ID) value.This checkbox is cleared by default. If cleared, PingFederate sends request parameters with multiple query parameters, unsigned.
Request Signing Algorithm
Select the algorithm that PingFederate uses to sign the request object.
This applies and is visible only when you select the Sign Request checkbox.
If PingFederate is deployed to run in a Java 8 or Java 11 runtime environment, or is integrated with an HSM and configured to use static keys for OAuth and OIDC, additional RSASSA-PSS signing algorithms are available for selection. Learn more about HSM integration and static keys in Supported hardware security modules and Keys for OAuth and OpenID Connect.
If you enable static keys for OAuth and OIDC, PingFederate hides ECC algorithms lacking active static keys.
Changes made in the static-key configuration might affect runtime transactions and require additional changes to the Request Signing Algorithm selection. Learn more in Keys for OAuth and OpenID Connect.
PingFederate automatically selects the signing JWK based on the selected signing algorithm from its JWKS.
For the OP to validate the signed request object, ensure that the OP can access your PingFederate’s JWKS URL, which returns the current set of JWKs. The PingFederate JWKS URL is located at
<Base URL>/pf/JWKS, where Base URL is defined on System > Server > Protocol Settings > Federation Info.For example, if the Base URL field value is https://www.example.com, the PingFederate JWKS URL is https://www.example.com/pf/JWKS. You can pass the JWKS URL directly to the OP or have the OP contact the PingFederate OpenID Provider configuration endpoint for it. Learn more in OpenID Provider configuration endpoint.
Track User Sessions for Logout
When selected, PingFederate tracks logout entries in the user session to support backchannel logout requests. Additionally, the Back-Channel Logout URI displays on the Summary & Activation tab of the IdP Connection page.
This checkbox is cleared by default.
-
-
(Optional) On the OpenID Provider Info tab, in the Request Parameters section, specify the request parameters allowed in the authentication requests to the OP. Learn more in Configuring request parameters and SSO URLs.
-
(Optional) On the Overrides tab, specify a default target URL and authentication context overrides.
-
On the Activation & Summary tab, review your connection settings.
When you finish setting up a connection, you can activate it immediately. You can deactivate a connection at any time. When a connection is inactive, all transactions to or from this partner are disabled.
Regardless of when you choose to activate a new connection, you must click Save on the Summary & Activation tab for a new connection to keep the configuration.
Next steps
After saving the connection, complete the following registration and integration tasks.
Register PingFederate with the OP
Because PingFederate acts as an OAuth client in this use case, you must register the Redirect URI, found on the Summary & Activation tab, with the OP authorization server. This registration must be associated with the client representing PingFederate that you provided on the General Info tab. Learn more in the documentation provided by your OP.
Invoke single sign-on (SSO)
You can invoke single sign-on (SSO) for the connection using the following endpoints:
-
SSO Application Endpoint: Use the sample URL at the
/sp/startSSO.pingapplication endpoint. Webmasters or developers can use this to initiate SSO. Learn more about supported parameters in Viewing SP application endpoints.If you selected the No Mapping option on the Identity Mapping tab, the Summary & Activation tab does not display the SSO Application Endpoint sample URL.
-
SP Protocol Endpoint: Target applications can also invoke SSO requests by contacting the
/sp/init_login.pingprotocol endpoint. Learn more in Configuring request parameters and SSO URLs.