Windows Workstation Authentication
Windows Workstation Authentication provides your organization with the capability to secure Windows workstations or servers with rich multi-factor authentication (MFA) either via SMS/email/voice call or push/one-time passcode (OTP) notifications through the ForgeRock Authenticator application.
Benefits of Windows Workstation Authentication:
-
Provides the fastest and safest way to close the desktop security gap. The first desktop MFA solution to integrate fully with the ForgeRock directory and ForgeRock Authenticator application.
-
Offers unprecedented endpoint security using the familiar ForgeRock Authenticator. The solution offers end users the best MFA experience while relieving IT teams from the expensive and cumbersome deployment of OTP tokens and security keys to protect workstations.
-
A plug-and-play solution that is easy to install on employee endpoints. No dedicated server is required, enabling fast deployment for the entire workforce. Your organization can now dramatically boost their domain security, improve user experience, and take the first step toward becoming fully passwordless in the future.
| To support MFA (push or OATH OTP) in Windows Workstation Authentication, end users must download the ForgeRock Authenticator application to their smartphone via the Apple store or Google Play store. |
-
Download and install the binaries from Backstage (you must be logged in). This includes the base MSI file as well as the MSI Updater client.
-
Pre-configure the relevant journey(s).
-
Install the MSI Updater client on an administrative Windows machine.
-
Configure the MSI Updater client specific to your organization’s needs.
-
(Optional) Consider additional configurations.
-
Deploy the generated MSI file through your desired mechanism.
-
Verify and test your deployment.
Prerequisites
Before beginning installation, verify that:
-
Workstations support TPM version 2.0.
-
You decide if the Windows workstation will be domain-joined or standalone. Windows Workstation Authentication supports both.
Ensure all usernames (profiles/accounts) match from Windows (or the authoritative source) > ForgeRock and vice versa.
Set up a connector from ForgeRock to the datastore (for example, AD) and sync the data.
Credentials entered are always verified against the local Windows machine (or AD if configured). You can configure the credentials (via the Use credentials setting) to be validated against ForgeRock as well.
-
End users install the ForgeRock Authenticator application.
-
Establish connectivity between the ForgeRock environment and the end user’s Windows workstations.
Communication with the ForgeRock environment is crucial for Windows Workstation Authentication to function properly. Adjust your network settings appropriately.
-
Pre-configure journeys and services, as described in Create authentication journey(s).
-
End users must pre-register in the appropriate journey, if the push MFA method is an option the organization desires.
It is crucial for users to pre-register for push notifications, otherwise, this authentication method will not work on Windows login.
-
For HOTP journeys using out-of-band (OOB) channels, such as SMS, email, or voice call, the user profile in ForgeRock must have their phone number and email populated accordingly.
-
Create authentication journey(s)
To enable workstation authentication integration, you need to create relevant journeys to support the MFA authentication method(s) you want. These journeys allow workstation authentication to work directly with the ForgeRock environment.
Since Enterprise Connect integrates with Identity Cloud or self-managed Access Management, the examples that follow depict the various UI changes between the two.
|
Do not deviate from the following journeys when you configure Enterprise Connect or use the journeys you create for any other purpose (including repurposing the journeys). You must strictly follow the placement of the nodes to ensure the product works correctly. Failure to do so or the addition of other nodes could result in unexpected behavior. |
Example of push journey
The push journeys for Enterprise Connect allow users to approve a push notification from the ForgeRock Authenticator application. End users must download the ForgeRock Authenticator application and pre-register (from another journey you define) to be able to use the push journeys.
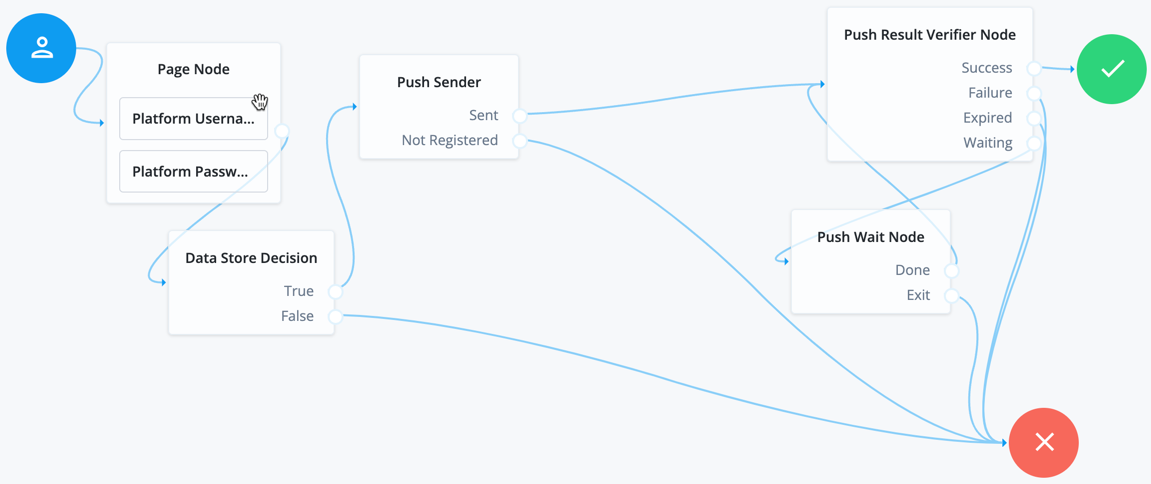
If you configure Use credentials in the MSI Updater client, then you must include the Platform Password and Data Store Decision nodes. Otherwise, you must omit these nodes in your journey configuration.
| When configuring the push journey in Identity Cloud, you must enable services in the AM admin UI (native console). For more information, refer to Create a push authentication journey. |
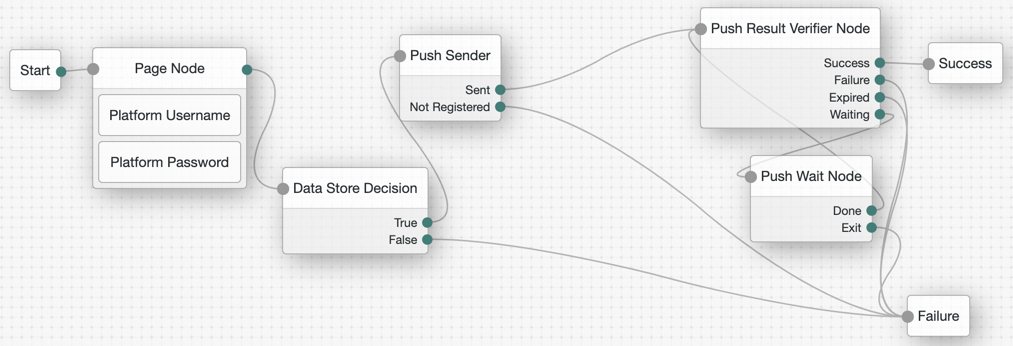
If you configure Use credentials in the MSI Updater client, then you must include the Platform Password and Data Store Decision nodes. Otherwise, you must omit these nodes in your journey configuration.
| When configuring the push journey in Access Management, you must enable services in the AM admin UI (self managed). For more information, refer to Create a push authentication journey. |
Example of OTP from authenticator app journey
The following journeys show the OTP that is presented from the ForgeRock Authenticator application. End users must download the ForgeRock Authenticator application and pre-register (from another journey you define) to be able to use the OTP journeys.

If you configure Use credentials in the MSI Updater client, then you must include the Platform Password and Data Store Decision nodes. Otherwise, you must omit these nodes in your journey configuration.

If you configure Use credentials in the MSI Updater client, then you must include the Platform Password and Data Store Decision nodes. Otherwise, you must omit these nodes in your journey configuration.
Example of OTP SMS/email/voice call journey
The following journeys show the OATH OTP (HOTP) that can be presented to an end user via SMS/email/voice. Ensure end users have the appropriate data in their user profile to facilitate the MFA method(s) you allow an end user to select.

If you configure Use credentials in the MSI Updater client, then you must include the Platform Password and Data Store Decision nodes. Otherwise, you must omit these nodes in your journey configuration.
|
In the Choice Collector node, the options correlate to the following MFA methods within Windows Workstation Authentication:
Therefore, ensure SMS is the first choice in the node, followed by email. If voice call is a method you configure, it must be the third option. Do not deviate from this order. |
If you choose to use the voice option, you could use the Twilio nodes (you must have a valid subscription with Twilio).
Example of SSO journey
The following journeys depict the flow that Enterprise Connect uses after a user authenticates to their workstation. The end user ForgeRock environment opens in a default browser.
If you configure the Enable SSO setting in the MSI Updater client, then this journey applies to you. In this setting, you must supply the journey URL.
An example SSO URL to enter in this field is http://<tenant-env-fqdn>/am/XUI/?realm=alpha&authIndexType=service&authIndexValue=sso-journey&ForceAuth=true.
The authIndexValue references the journey to use for SSO. Ensure to add ForceAuth=true to the end of your SSO URL.
|

The Check for ValidSession node (shown in the image above) is the Scripted Decision node. In this example, it references a simple authentication JavaScript script:
if (typeof existingSession !== 'undefined')
{
  outcome = "hasSession";
}
else
{
  outcome = "noSession";
}
The Check for ValidSession node (shown in the image above) is the Scripted Decision node. In this example, it references a simple authentication JavaScript script:
if (typeof existingSession !== 'undefined')
{
  outcome = "hasSession";
}
else
{
  outcome = "noSession";
}-
Download and install the binaries from Backstage (you must be logged in). This includes the base MSI file as well as the MSI Updater client.
-
Pre-configure the relevant journey(s).
-
Install the MSI Updater client on an administrative Windows machine.
-
Configure the MSI Updater client specific to your organization’s needs.
-
(Optional) Consider additional configurations.
-
Deploy the generated MSI file through your desired mechanism.
-
Verify and test your deployment.
Windows client installation with MSI Updater
To add MFA functionality to Windows Workstation Authentication, complete the following steps:
Install the MSI Updater client for workstation authentication
The MSI Updater client provides a tool for a basic MSI with specific customizable parameters to support different use cases. This enables MSI silent installation to Windows clients.
The output of the MSI Updater client is an MSI package, which is to be installed on workstations. A base MSI file is referenced by the MSI Updater client to output the customized MSI package for your organization.
Before beginning, verify that you meet all prerequisites.
-
Download the MSI Updater client and base MSI file binaries from Backstage.
You must have a Backstage account and be logged in to view the download.
-
Run Workstation Authentication MSI Updater - version.exe as an administrator.
-
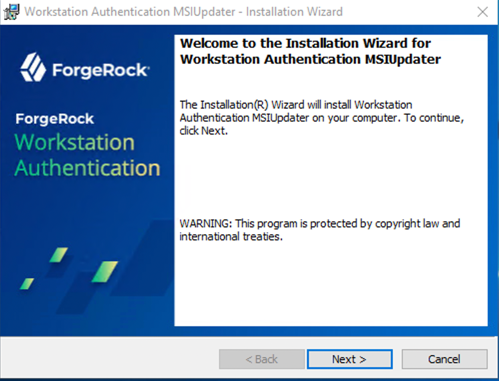
On the Welcome page, click Next.
-
On the page that opens, accept the license agreement, and then click Next.
-
To start installation, click Install.
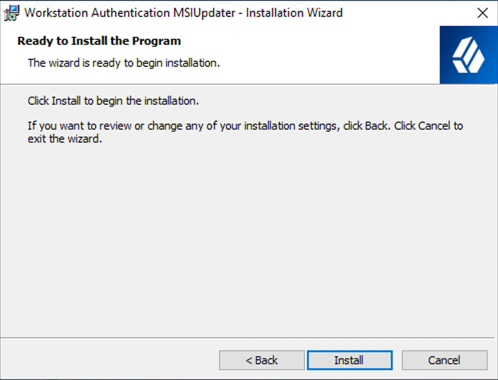
The window displays a progress message during the installation process. After completion, a confirmation message displays.
-
To exit the wizard, click Finish. If you would like for the MSI Updater client to auto-launch tick the Launch Workstation Authenticator MSI Updater box.
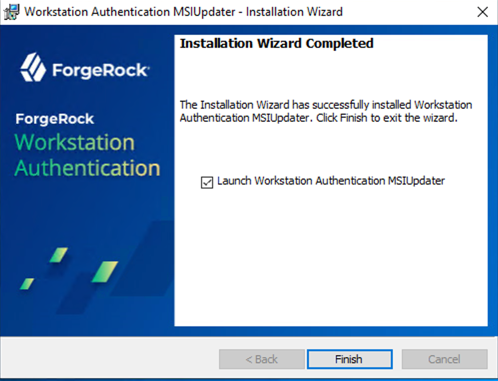
When installation is complete, the next step is to configure the MSI Updater client.
-
Download and install the binaries from Backstage (you must be logged in). This includes the base MSI file as well as the MSI Updater client.
-
Pre-configure the relevant journey(s).
-
Install the MSI Updater client on an administrative Windows machine.
-
Configure the MSI Updater client specific to your organization’s needs.
-
(Optional) Consider additional configurations.
-
Deploy the generated MSI file through your desired mechanism.
-
Verify and test your deployment.
Configure the MSI Updater client
The MSI Updater client can launch automatically (if the option is selected at the last installation screen) after you exit the installer and updates the Windows Workstation Authentication MSI with relevant ForgeRock environment details. You can then configure various settings related to authentication and the Windows login experience.
Before you begin working with the MSI Updater, verify the following information is available:
-
Server URL: Environment URL for the ForgeRock environment.
-
Realm: The realm in ForgeRock that corresponds to where the journeys reside.
-
Push journey name: Name of the journey for push notifications. For more information on the journey, refer to Example of push journey.
-
OTP journey Name: Name of the journey for TOTPs (OATH). For more information on the journey, refer to Example of OTP journey.
-
SMS/email/voice journey name: Name of the journey for SMS/email/voice. For more information on the journey, refer to Example of SMS/email journey.
-
SSO URL (optional): ForgeRock SSO URL. If enabled and supplied, on successful login to the Windows machine, the default browser opens a logged-in session into the specified ForgeRock environment.
-
With this URL, an additional journey can be referenced. For example, to check for an existing session. For more information, refer to Example of SSO journey.
-
| Tab name | Description |
|---|---|
Select the base MSI file to update, as well as which MFA methods to allow on Windows login. |
|
Configure various settings, such as caching the last used username to pre-populate on next login or enabling trace logs by default. |
|
Enable MFA settings, such as allowing a Windows group to bypass MFA login or enabling Offline OTP (TOTP/OATH). |
|
Change the UI text of the MFA method(s) that users select on Windows login. |
|
Select scenarios in which you can bypass MFA on Windows login. |
|
ForgeRock specific settings, such as the ForgeRock URL or the names of the journeys that correspond to each MFA method. |
To begin the configurations, launch the MSI Updater client as an administrator.
In the Parameters tab, configure the relevant settings:
-
With the MSI Updater client launched, at the top of the Parameters tab, click Browse and upload the workstation authentication MSI file to be updated. This is the base MSI file that came with the downloads.
-
If preferred, enter an uninstall password in the Uninstall field.
Entering an uninstall password ensures end users cannot uninstall the MSI package without the administrator password. -
Select one or more of the following authentication options:
Authenticator Description ForgeRock Push
Select this checkbox to enable login to Windows using ForgeRock’s push notification authentication.
This is used in conjunction with the ForgeRock Authenticator application.
OTP
Select this checkbox to enable authentication with TOTP (OATH). This corresponds to the journey used for TOTP (OATH).
This is also referred to as Offline OTP. This is used in conjunction with the ForgeRock Authenticator application.
SMS
Select this checkbox to enable authentication with OTP via SMS. This corresponds to the journey used for OTP over SMS.
Email
Select this checkbox to enable authentication with OTP via email. This corresponds to the journey used for OTP via email.
Voice Call
Select this checkbox to enable a two-factor authentication voice call. This corresponds to the journey used for OTP via a voice call.
SMS, email, and voice call all utilize the same journey configuration. -
Click Next to open the Settings tab.
-
In the Settings tab, configure the relevant settings:
The MSI Updater version appears at the top of the tab.
Setting Description Show Default Credential Providers
Determines whether Windows default credential providers (Windows and Active Directory) are displayed when logging into Windows.
Select this option for testing or debugging. Do not use this in production (the MSI deployed on your end user’s workstation).
Use Last Username
When selected, the username of the user who logged in most recently is saved and automatically presented for the next login.
TPM Support
If TPM 2.0 is enabled, selecting this option allows TPM to store the private key for BLE password encryption.
Local User Support
When selected, workstation authentication for Windows will be enabled for local users and will verify that the local user matches with the corresponding user in ForgeRock.
This setting is relevant for non-domain users only.
POC Mode
When selected, workstation authentication for Windows will not check the certificate with the server. This setting is used mainly for POC.
Azure AD Joined Machine
Select this checkbox when the workstations are configured to connect with the Azure AD domain. When the setting is selected, users will be prompted to log in with UPN and not their username.
Enable Trace
Select this checkbox to enable the logs by default immediately after installation. For more information on Windows Workstation Authentication logging, refer to Log files with Windows Workstation Authentication.
-
Click Next.
-
In the MFA tab, configure the relevant settings:
Setting Description MFA Change Password Support
When selected, users are able to change the password on the Windows workstation without the Workstation Authentication credential provider (CP) intercepting the process. When the checkbox is cleared, the workstation authentication CP controls the password change process.
Bypass Local User Login
When selected, administrators with a local user account can bypass workstation authentication and log in with their username and password.
Use Offline OTP
When selected, users are able to log into Windows using a one time password that is stored locally. When Offline OTP is activated, a list of OTPs is securely stored on the Windows workstation to allow users to authenticate to the workstation when not connected to the network. The OTPs are timed-based and use the standard TOTP mechanism. For more information, refer to Offline OTP enrollment.
Force Offline OTP After Installation
When selected, users are unable to perform offline authentication until they complete at least one online login successfully.
Bypass MFA on Unlock when Connected to AD
When selected, users connected to the organization network who have already authenticated with MFA are not required to authenticate with 2nd factor again when unlocking the workstation. This will work as long as you are inside the network (no time limit).
When selecting this option, verify that the Bypass MFA Groups checkbox is NOT selected.
Force Lock After Offline OTP
When selected, workstations that were unlocked using an Offline OTP and then connected back to the organization network (online) are automatically locked, and the user is asked to authenticate. This setting prevents users from using weak authentication to log into the organization network (online).
Bypass MFA from NLA Login
When selected, users who are members of the Bypass MFA Group will not require MFA authentication when using a Network Level Authentication (NLA) login.
Bypass MFA Groups
When selected, you can specify ONE group in the AD that will not require MFA authentication. Enter <Domain>\>Group Name> in the field to the right.
When selecting this option, verify that the Bypass MFA on Unlock when Connected to AD checkbox is NOT selected.
Offline OTP Buffer Period
If Use Offline OTP is selected, enter the maximum period of time (in days) that users will be able to continue authenticating offline without performing an online login. Once expired, users will be forced to authenticate online before being able to use the Offline OTP option again.
-
Click Next.
-
In the Advanced tab, configure the relevant settings:
Setting Description Change OTP Name
Allows you to change the default name of the TOTP (OATH or Offline OTP) displayed in the Windows credential provider’s login authentication method selection list. After selecting the checkbox, enter the desired name in the field (for example, ForgeRock OTP).
This setting is available only when the OTP checkbox in the Parameters tab is selected.Change ForgeRock Push Name
Allows you to change the default name of the authenticator displayed in the Windows credential provider’s login authentication method selection list. After selecting the checkbox, enter the desired name in the field.
This setting is available only when the ForgeRock Push checkbox in the Parameters tab is selected.Change SMS Name
Allows you to change the default name of the SMS option displayed in the Windows credential provider’s login authentication method selection list. After selecting the checkbox, enter the desired name in the field.
Change Email Name
Allows you to change the default name of the Email option displayed in the Windows credential provider’s login authentication method selection list. After selecting the checkbox, enter the desired name in the field.
Change Voice Call Name
Allows you to change the default name of the Voice Call option displayed in the Windows credential provider’s login authentication method selection list. After selecting the checkbox, enter the desired name in the field.
Enable CP Bypass List
Allows you to specify credential providers (in addition to ForgeRock) that will be available for Windows login. After selecting the checkbox, paste the registry key(s) representing the relevant credential provider(s) in the field to the right. The specified providers will be displayed as login options on the Windows Login screen.
-
If desired, customize the Windows login experience by replacing the default organization logo with your own image.
The images must be 448x448 in 24-bit BMP (bitmap image file) format. For Windows Servers, the images must be 448x448 in 16-bit BMP format.
-
Click Next.
-
In the CredUI tab, select the scenarios in which an additional MFA credential, for example, push or OTP, will not be required. When a Bypass is selected, the default Windows login screen is presented and end users authenticate by entering their username and password.
Selecting Bypass All activates MFA bypass for all the scenarios listed below in the tab.
-
Click Next.
-
In the ForgeRock tab, configure the relevant settings:
Setting Description Use credentials
When selected, user credentials are sent to ForgeRock for validation. You must configure the journey to support the validation of the user credentials.
Use failureUrl for error message
When selected, error descriptions are displayed on the Windows Login screen (in the event of error/authentication failure). This means that your journey, in the event of a failure, must reference the Failure URL node.
Server URL
Enter the URL of your ForgeRock authentication server. For example,
http://<tenant-env-fqdn>/openam.Ensure to include the path to AM in the URL.
Realms
Enter the name of the ForgeRock realm to authenticate to.
For example,
alpha.There is no leading
/when defining the realm for Windows Workstation Authentication.Push Tree Name
Enter the name of the push journey.
For example,
windows-push.OTP Tree Name
Enter the name of the OTP journey.
For example,
windows-otp.SMS/Email Tree Name
Enter the name of the SMS/email/voice call journey.
For example,
windows-sms-email-voice.Enable SSO
When selected, the SSO Portal opens automatically upon successful login to Windows. This will open, in the default browser on the Windows machine, a logged in instance to the specified ForgeRock environment. Enter the SSO URL in the field to the right. If this box is selected, the URL box becomes available for editing. This is also known as a transfer of trust.
An example SSO URL to enter in this box is
http://<tenant-env-fqdn>/am/XUI/?realm=alpha&authIndexType=service&authIndexValue=sso-journey&ForceAuth=true.The authIndexValuereferences the journey to use for SSO. Ensure to addForceAuth=trueto the end of your SSO URL.For examples of the pre-configured journeys to have in your environment, refer to Create authentication journey(s).
-
At the bottom of the ForgeRock tab, click Apply.
A confirmation screen will appear.
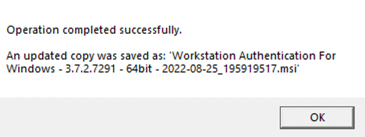
A new modified MSI file is created in the same location as the original MSI file. The name of the new file will include Workstation Authentication for Windows 64-bit and the timestamp of file creation.
|
The base (original) MSI file will not be updated and can be reused. Do not use the base MSI file for deployment. Use the deployment specific MSI file generated as the output of the MSI Updater configurations. |
-
Download and install the binaries from Backstage (you must be logged in). This includes the base MSI file as well as the MSI Updater client.
-
Pre-configure the relevant journey(s).
-
Install the MSI Updater client on an administrative Windows machine.
-
Configure the MSI Updater client specific to your organization’s needs.
-
(Optional) Consider additional configurations.
-
Deploy the generated MSI file through your desired mechanism.
-
Verify and test your deployment.
MSI deployment of Windows Workstation Authentication
Once the MSI package is generated post the MSI Updater client, it is ready to be deployed to your end user’s workstations.
The three options for deployment are:
-
Through a silent installation. This installation type should be used for organizational and other large-scale deployments.
-
Through the Installation Wizard.
-
Through your preferred distribution tool.
|
The MSI package to be used is generated from the MSI Updater client, as described in Configure the MSI Updater client. The following sections will reference a |
Perform silent installation
Silent installation allows administrators to manually install workstation authentication or push the installation to all client workstations from a central tool silently without disturbing the end user’s workstation.
This is the preferred method for organizational and other large-scale deployments.
Before performing installation with software distribution tools, make sure the Visual C++ 2017 (or later) Redistributable (x64)/(x86) - 14.30.30704.0 is installed. If this package is not installed, the installation will abort and an error message will be displayed.
|
Administrator permissions are required to run the workstation authentication for Windows MSI. |
To perform silent installation:
-
Open the command prompt as an administrator, and run
workstation authentication.msi. -
Run
Workstation Authentication.msi:C:\>msiexec -i Workstation Authentication – xx_xxx_xx.msi /qn -
If you want the workstation authentication credential provider to be disabled on some workstations after installation (allowing for gradual deployment), refer to Enable/disable the workstation authentication CP post-installation.
Perform deployment using the Installation Wizard
This method deploys the MSI package using the workstation authentication installation wizard. All required components (including the Visual C++ Redistributable) are automatically installed as part of the deployment.
|
This deployment option must be run directly from the end user’s workstation. |
To deploy workstation authentication using the installation wizard:
-
To launch the wizard, run the updated workstation authentication MSI file. This is the outputted file from the MSI Updater client, as described in configuring-windows-msiupdater.adoc#configure_the_msiupdater_client.
A warning screen from Windows Defender can pop up stating "Windows Protected your PC". Click More Info > Run anyway to continue to run the MSI file.
-
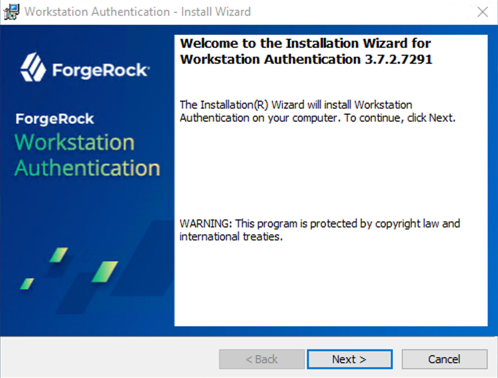
On the Welcome page, click Next.
-
On the page that opens, accept the license agreement, and then click Next.
-
To begin the installation, click Install.
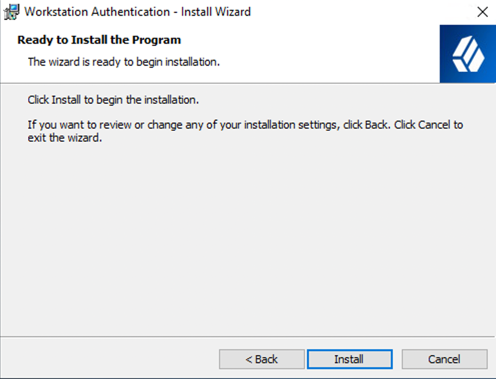
A status bar is displayed during the installation process.
-
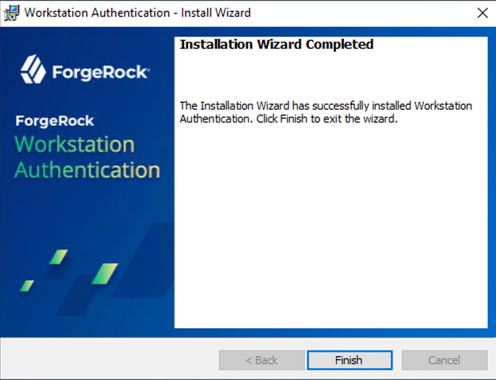
To exit the wizard, click Finish.
Perform installation through distribution tools
Follow the steps below to push the installation through your endpoint management or software distribution tool.
|
Administrator permissions are required to run the workstation authentication for Windows MSI. |
To push installation through distribution tools:
-
Open and run your distribution software.
-
Install Visual C++ 2017 (or later) Redistributable (x64)/(x86) - 14.30.30704.0.
-
Open the command prompt as Admin, and run
Workstation Authentication.msi:C:\> Workstation Authentication – xx_xxx_xx.msi /qnSubstitute the file name with your outputted, deployment specific, MSI file.
Windows Registry Keys post-deployment
Upon deployment of your specific MSI file, registry keys are created/updated on the target Windows machine. To reference the specific registry keys pertaining to Windows Workstation Authentication:
-
Open Registry Editor as an administrator.
-
Navigate to Enterprise Connect specific registry keys by going to HKEY_LOCAL_MACHINE > SOFTWARE > SecretDoubleOctopus.
-
From here, select the various tabs to see the specific values of the Registry Keys. You will notice values that you configured during the Configure the MSI Updater client process.
MSI Updater - ForgeRock tab registry keys
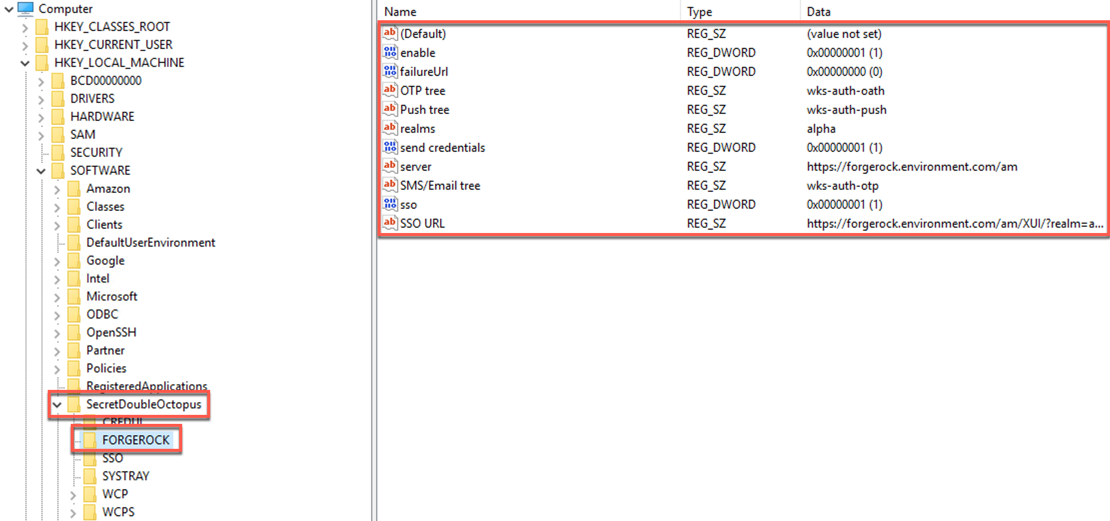
During the MSI Updater client configurations, on the ForgeRock tab, the corresponding registry key and values (under the ForgeRock directory) are shown below:
MSI Updater - Advanced tab registry keys
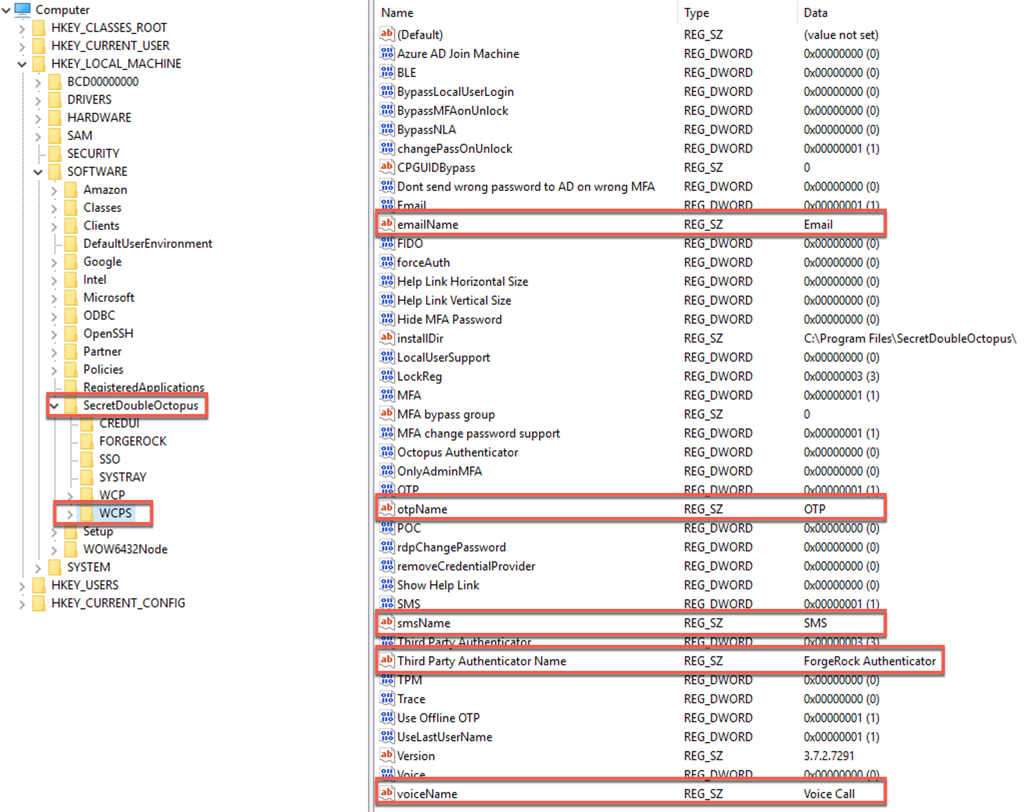
During the MSI Updater client configurations, on the advanced tab. The corresponding registry key and values (under the WCPS directory) are shown below:
|
Changing the registry key values must only take place if required (for example, resetting the Offline OTP process). Otherwise, all configurations should come through configuring the MSI Updater client for consistent values on all Windows workstations. |
-
Download and install the binaries from Backstage (you must be logged in). This includes the base MSI file as well as the MSI Updater client.
-
Pre-configure the relevant journey(s).
-
Install the MSI Updater client on an administrative Windows machine.
-
Configure the MSI Updater client specific to your organization’s needs.
-
(Optional) Consider additional configurations.
-
Deploy the generated MSI file through your desired mechanism.
-
Verify and test your deployment.
Verify functionality
Following installation, configuration, and deployment (on a test machine first), it is recommended to test the functionality of workstation authentication to verify that the Windows login process proceeds as expected.
Before beginning the verification process, make sure that the following prerequisites are met:
-
You can access the local machine with administrative permissions.
-
Users whose authentication will be tested are enrolled, enabled and allowed to log into the local machine.
-
Users to be tested have a smartphone with the ForgeRock Authenticator application installed.
-
User to be tested has been successfully enrolled to the relevant journey(s), such as push, TOTP (OATH or Offline OTP), or SMS/email/voice call, as defined as a prerequisite and in MSI Updater client configurations.
-
The ForgeRock Server URL (as defined in the MSI Updater client configurations) can be accessed from the test machine.
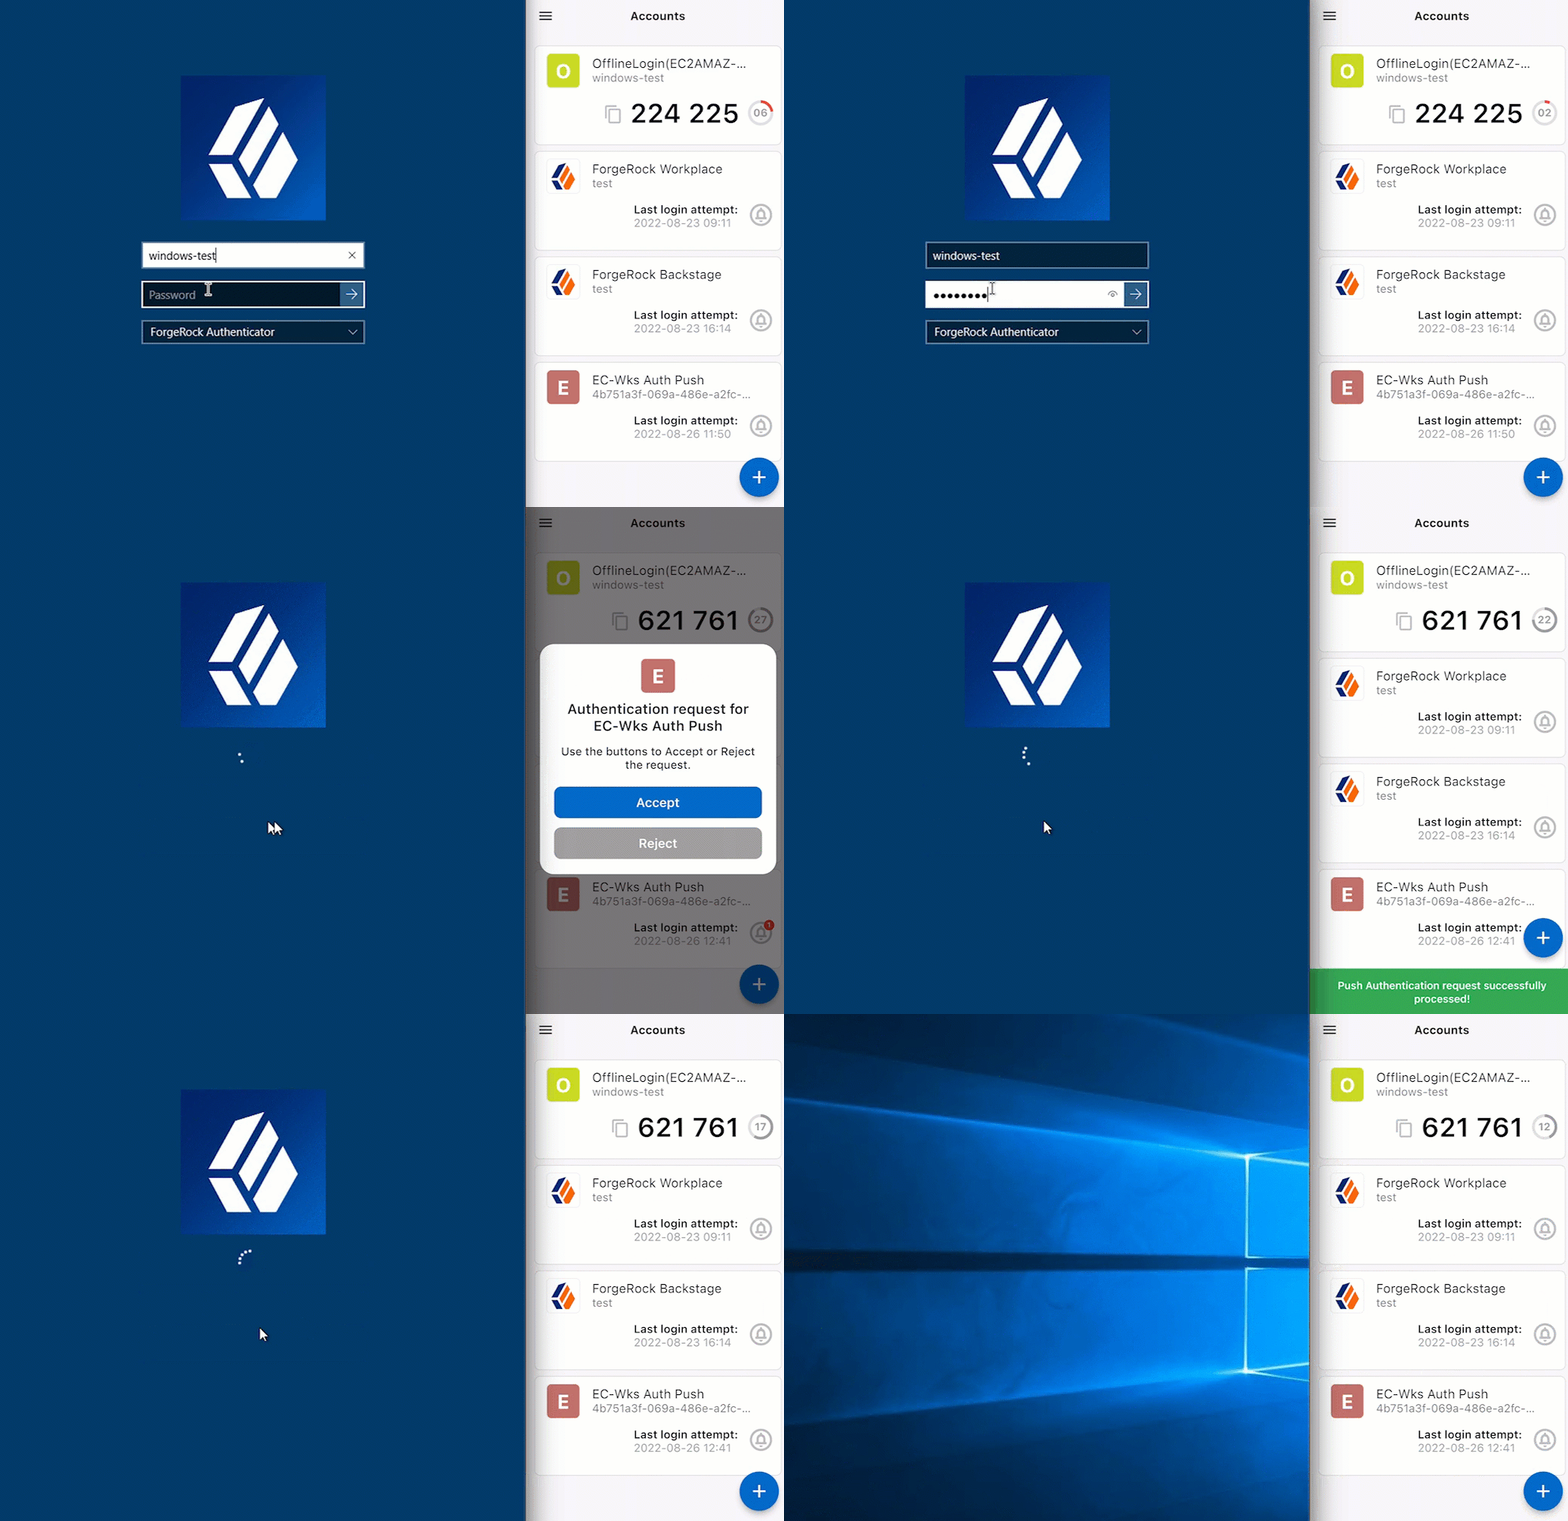
Test Windows login:
Display an example
-
Access the Windows Login screen and select the authentication option.
-
Enter the appropriate username and password.
-
Select the relevant MFA method (Push, OTP or SMS).
Then, provide the required MFA factor and verify successful login.
|
If Use Offline OTP was enabled during the MSI Updater client configuration, then post the first login (either using push, OTP email, or OTP SMS), an additional screen will appear to scan a QR code for an offline account to be created. 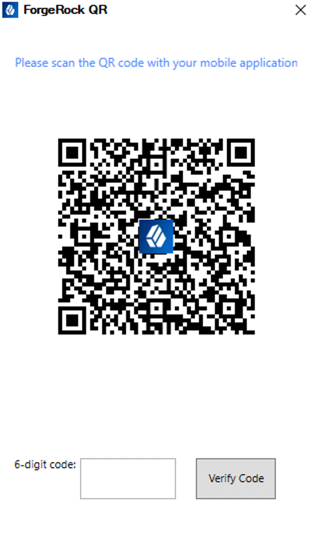
Once scanned and the account is created in the ForgeRock Authenticator application, the end user must input the 6-digit code (as shown in the image above) and click Verify Code. For more information, refer to Offline OTP enrollment. |
-
Repeat steps 1-3 for each available MFA method assigned to the current user.
-
Download and install the binaries from Backstage (you must be logged in). This includes the base MSI file as well as the MSI Updater client.
-
Pre-configure the relevant journey(s).
-
Install the MSI Updater client on an administrative Windows machine.
-
Configure the MSI Updater client specific to your organization’s needs.
-
(Optional) Consider additional configurations.
-
Deploy the generated MSI file through your desired mechanism.
-
Verify and test your deployment.
You have completed the checklist. Congratulations!
Offline OTP enrollment
The Offline OTP (TOTP/OATH) option enables users to authenticate to Windows when they are not connected to a network.
|
Use Offline OTP must be enabled during the MSI Updater client configuration, otherwise, the end user will not be able to enroll in Offline OTP. |
-
The invitation QR code is initiated and presented to the end user after the first successful login (either push, SMS, or email).

The screens presented correspond to the OTP journey, as described in Example OTP journey and configured in MSI Updater ForgeRock tab.
-
Using the ForgeRock Authenticator application, scan the invitation QR code.
When the end user scans the QR code, an offline account is created in the ForgeRock Authenticator application. 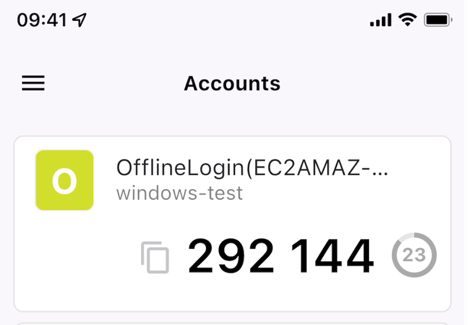
-
Tap the offline account to view the six-digit code.
-
Enter the code in the field below the QR code and click Verify Code.
|
Offline mode will be enabled following the next online login. To verify that the system is ready and offline mode is enabled, it is recommended to sign out and login again. |
Reset Offline OTP process
In the event that an end user loses their phone or needs to have their Offline OTP reset, as an administrator, follow the below steps:
-
Go to the appropriate directory of registry keys as described in Windows Workstation Authentication registry keys.
-
Select the WCP directory.
-
On this page, there are two registry keys with the names prefixed with the user’s username:
-
username:lastOnlineLogin -
usernameOTPSThere can be multiple sets of these keys if there are multiple users on the same workstation, and they have enrolled in Offline OTP.
-
-
Delete these two keys.
-
If the end user has the previous OTP profile on their ForgeRock Authenticator application, they must delete the profile.
-
Upon the next successful initial login to their Windows machine, the end user will be re-prompted to enroll in the Offline OTP process, as described in Offline OTP enrollment.
Additional reference
The subsequent sections explore additional uses of the Windows Workstation Authentication.
-
Download and install the binaries from Backstage (you must be logged in). This includes the base MSI file as well as the MSI Updater client.
-
Pre-configure the relevant journey(s).
-
Install the MSI Updater client on an administrative Windows machine.
-
Configure the MSI Updater client specific to your organization’s needs.
-
(Optional) Consider additional configurations.
-
Deploy the generated MSI file through your desired mechanism.
-
Verify and test your deployment.
Perform MSI upgrade
When substantial changes need to be made to the deployed MSI file, you need to "upgrade" the MSI.
An upgrade is also applicable if there is a newer version of the MSI Updater.
Upgrade MSI
-
Create your new deployment specific MSI file.
-
Rename the outputted deployment specific MSI file to the original deployment specific file you first deployed on the Windows machine(s).
To perform an MSI upgrade successfully, the MSI file must have the same filename as the one used for the original installation. The MSI updater creates an MSI file with the update date in the filename. This file needs to be renamed to match the name of the original installation file (the outputted deployment specific MSI file from the MSI Updater configurations).
If you try to upgrade using an MSI file that is named differently from the original installation file, the following error message will appear:
Error 1316: The specified account already exists
This message is a notification that you are trying to install an MSI file with a different name from the one that is already installed.
If you are not sure of the name of the original installation file, follow these steps:
-
Navigate to
C:\Windows\Installer. -
Open the following file:
SourceHash{F04AB2CC-5585-4069-9B95-AABB3CD21DF0} -
Search for the name of the file that was used for installation. You will find it at the end of the SourceHash file.
-
To upgrade an MSI, run the following command:
C:\> msiexec /I "workstation authentication.msi" REINSTALL=ALL
REINSTALLMODE=vomus IS_MINOR_UPGRADE=1 /norestart /qn
|
The |
For more information and a list of additional optional installation parameters, refer to Microsoft’s documentation.
Log files with Windows Workstation Authentication
By default, log files are disabled, but if you need to troubleshoot, logging can be enabled.
-
Open Regsitry Editor as an administrator.
-
Navigate to Enterprise Connect specific registry keys by going to HKEY_LOCAL_MACHINE > SOFTWARE > SecretDoubleOctopus.
-
Click on the WCPS tab.
-
To turn logging on, change the value of the Trace key to
4. -
To turn logging off, change the value of the Trace key to
0. -
Once enabled, logging will begin.
-
Log files are stored in
C:\Windows\Tempand consist of:The log files start with
sdo, followed by a function, date, and a serial number. For example,sdorest06.09.2022190447.txt.-
sdocred: Records front-end UI activities. -
sdoguard: Records Workstation authentication service activities. -
sdorest: Records REST API activitiesTo access the log files, you must first temporarily stop the Workstation Authentication service running on the Windows machine. The services holds a lock on the log files and must be suspended for you to view them.

-
-
When you have finished troubleshooting, change the Trace key back to
0and start the Workstation Authentication service back up.
Remote Desktop Windows Login
To enable MFA for a remote desktop login (RDP), the following additional configurations are required.
Editing the remote desktop script
Edits are required to the RDP script.
-
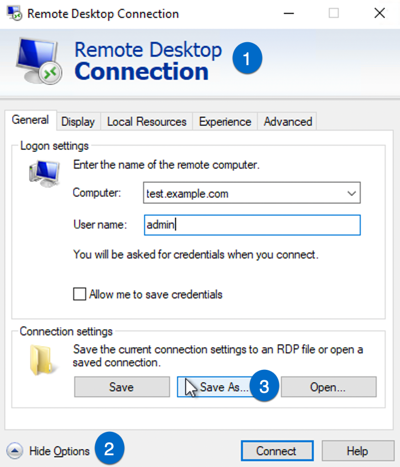
Launch a Remote Desktop Connection.
-
Select the remote computer and click Show Options.
-
Under Connection Settings, click Save As and save the RDP script.
-
Add the following line to the end of the script:
enablecredsspsupport:i:0
To open the RDP file in a text editor, you must first open the text editor and then open up the RDP file from there. If you select the RDP file directly in Windows, it will attempt to run the RDP application.
-
Save the script.
Configuring Windows system properties
System protection settings need to be in place for the remote desktop.
-
Log into the relevant remote desktop Windows machine.
-
Go to Control Panel > System and Security > System.
-
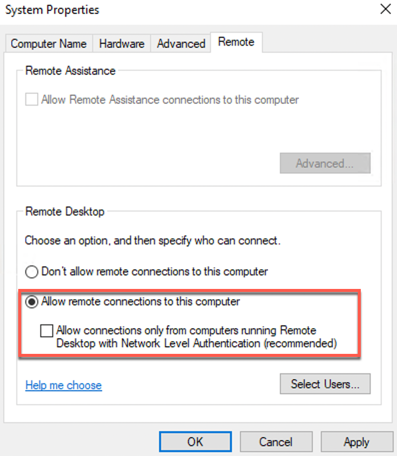
Click Remote settings.
-
Under Remote Desktop:
-
Select the Allow remote connections to this computer radio button.
-
Verify that the Allow connections only from computers running Remote Desktop with Network Level Authentication checkbox is NOT selected.
-
-
Click Apply.
|
Administrative privileges are required to perform this action. |
Enable/disable the workstation authentication CP post-installation
Windows Workstation Authentication supports the ability to control availability of the workstation authentication credential provider (CP) on target workstations after installation.
Considerations for enabling or disabling the workstation authentication CP:
-
This feature allows for bulk installation, followed by gradual deployment on group or user workstations.
-
Workstations on which the workstation authentication CP is manually disabled post-installation will not support workstation authentication as a means of logging into Windows.
-
The installation of workstation authentication is transparent to users, who will not see the Workstation CP on the login screen and will continue to login as they did prior to installation.
-
If it is crucial for your organization to be able to control the workstation authentication CP, it needs to be enabled.
-
To enable or disable the workstation authentication CP post-installation, the Windows registry must be updated.
|
Administrative privileges might be required. |
To disable the workstation authentication CP post-installation:
-
Open Registry Editor application and navigate to
Computer\HKEY_LOCAL_MACHINE\SOFTWARE\Microsoft\Windows\CurrentVersion\Authentication\Credential Providers{a95d85be-778f-4ed1-9ded-9f62ecc8a744}.The hexadecimal GUID {a95d85be-778f-4ed1-9ded-9f62ecc8a744}is subject to change and could be different in your environment. -
Change the
REG_DWORDdata value to1.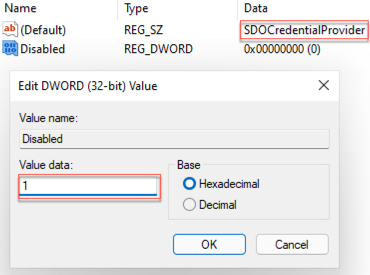
-
Click OK.
To enable workstation authentication CP, change the value to 0.
|
Uninstall Windows Workstation Authentication
To uninstall Windows Workstation Authentication, keep the following in mind:
-
If the Uninstall field of the Parameters tab was filled out during the configuration of the MSI Updater client, then the MSI is protected with an administrator password. If this is the case, then Admin permissions are required to uninstall. For more information regarding this configuration, refer to Configure the MSI Updater client.
-
Uninstalling Windows Workstation Authenticationcan be done from the command line only. Uninstalling the application from the System Settings can result in an error, as shown below.
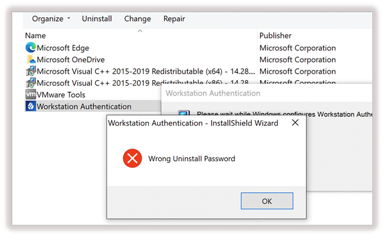
To uninstall workstation authentication, open the command prompt as an Admin and run:
C:\> msiexec /x \ {F04AB2CC-5585-4069-9B95-AABB3CD21DF0}
PASSWORD=”AdminPassword!!”
|
Replace "AdminPassword!!" with the password used during the MSI Updater client configuration. |