Environment-specific Trust Framework attributes
With dynamic authorization, policies must be able to retrieve attributes frequently from policy information providers (PIPs) at runtime.
The services and datastores from which additional policy information is retrieved range from development and testing environments to preproduction and production environments.
For example, you might use a Trust Framework service to retrieve a user’s consent from the PingDirectory Consent API. This service depends on the URL of the Consent API, the username and password that are used for authentication, and other items that vary between development, preproduction, and production environments.
About policy configuration keys
To avoid hard-coding values such as URLs, usernames, or passwords, Trust Framework attributes can refer to policy configuration keys, which are key/value pairs defined outside of the Trust Framework and provided to the policy engine at runtime.
To define a Trust Framework attribute that uses a policy configuration key, configure the attribute with a Configuration Key resolver and the name of the policy configuration key.
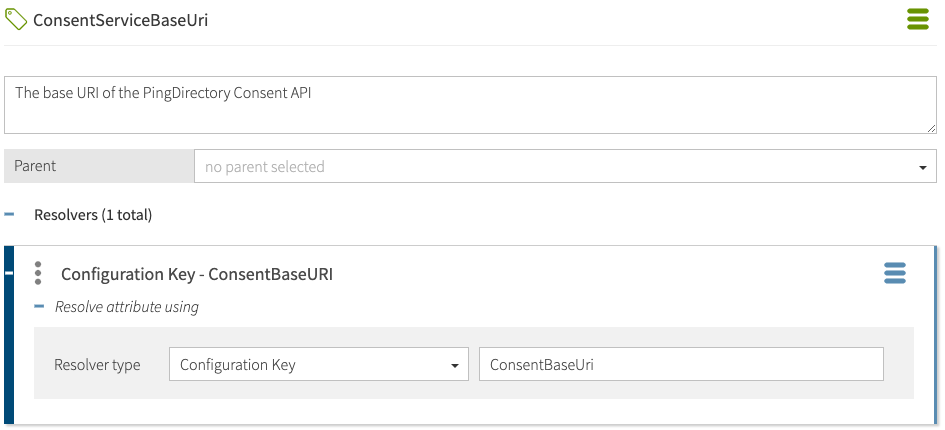
For example, in the following image, an attribute called ConsentServiceBaseUri is configured to use a policy configuration key called ConsentBaseUri.
The means by which policy configuration keys are provided to the policy engine differ based on whether the PingAuthorize Server is configured to use external PDP mode or embedded PDP mode, as shown in the following table.
| Mode | Where to define policy configuration keys |
|---|---|
External PDP mode |
An options file and run the Policy Editor’s |
Embedded PDP mode |
The PingAuthorize Server configuration. |
Example
In this example, you define a policy information provider (PIP) in the Trust Framework so that various properties needed to connect to the PIP can be changed from those needed for a development environment to those needed for a preproduction environment.
You can complete the PIP definition without needing to update the Trust Framework.
Define a policy information provider for the PingDirectory Consent API that uses the following policy configuration keys:
ConsentBaseUri-
The base URL to use when making requests to the Consent API.
ConsentUsername-
The username for a privileged Consent API account.
ConsentPassword-
The password for a privileged Consent API account.
Define the policy information provider in the Trust Framework
Complete the following steps to define the policy information provider (PIP).
Steps
-
Define an attribute in the Trust Framework for the Consent API’s base HTTPS URL.
-
Go to Trust Framework and then click[.label]Attributes.
-
Add a new attribute.
-
Name the attribute
ConsentServiceBaseUri. -
Add a resolver.
-
Set the Resolver type to Configuration Key.
-
Set the Resolver value to
ConsentBaseUri. -
Save the attribute.
The following image shows the attribute configuration.
-
-
-
Repeat the previous steps for
ConsentUsernameandConsentPassword.Result:
When complete, you should have defined the following attributes.
Attribute name Policy configuration key name ConsentServiceBaseUriConsentBaseUriConsentServiceUsernameConsentUsernameConsentServicePasswordConsentPasswordBoth the attribute names and the policy configuration key names that you use are arbitrary, and you can use any names that you like. For the sake of this example, attribute names do not match configuration key names, but they do not need to differ.
-
Define the policy information provider using the attributes that you just defined.
-
Go to Trust Framework and then Services.
-
Add a new service.
-
Name the service Consent API.
-
Leave the Parent value blank. If a value is already present, clear it.
-
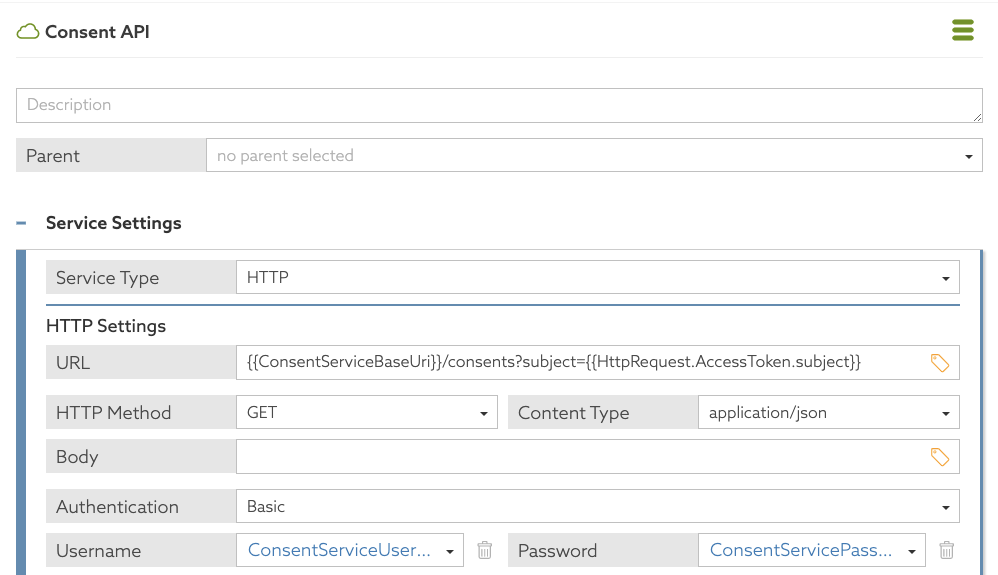
Set Service Type to HTTP.
-
Set the URL to \{{ConsentServiceBaseUri}}/consents?subject=\{\{HttpRequest.AccessToken.subject}}.
-
Set Authentication to Basic.
-
For Username, select the attribute
ConsentServiceUsername. -
For Password, select the attribute
ConsentServicePassword.
-
-
Save the new service.
The following image shows the attributes being used.
Result:
You can use the new Consent API policy information provider to build policies.
-
Define policy configuration keys in a development environment
Before you can use any policies that you developed with the Consent API policy information provider (PIP), you must configure the Policy Editor to provide values for the PIP’s base URL, username, and password.
About this task
To configure the Policy Editor to provide these values, re-run the setup tool using an options file to generate a new configuration, as shown in the following steps.
|
See Policy Editor configuration with runtime environment variables for an example of defining policy configuration keys at runtime. |
Steps
-
Make a copy of the default options file.
Example:
$ cp config/options.yml my-options.ymlshell -
Edit the new options file and define the policy configuration keys in the
coresection.Example:
core:
  ConsentBaseUri: https://consent-us-east.example.com/consent/v1
  ConsentUsername: cn=consent admin
  ConsentPassword: Passw0rd123
# Other options omitted for brevity...
-
Stop the Policy Editor.
$ bin/stop-servershell -
Run
setupusing the--optionsFileargument, and then customize all other options as appropriate for your needs.Example:
$ bin/setup demo \
 --adminUsername admin \
 --generateSelfSignedCertificate \
 --decisionPointSharedSecret pingauthorize \
 --hostname <pap-hostname> \
 --port <pap-port> \
 --adminPort  <admin-port>  \
 --licenseKeyFile <path-to-license> \
 --optionsFile my-options.yml
shell -
Start the Policy Editor.
Example:
$ bin/start-servershell
Define policy configuration keys in a preproduction environment
Do not use the Policy Editor in a pre-production or production environment. Define policy configuration keys in the PingAuthorize Server configuration.
About this task
When using embedded PDP mode, policy configuration keys are stored in the PingAuthorize Server configuration, and the server provides the policy configuration key values to the policy engine at runtime. You can use either the administrative console or dsconfig to define policy configuration keys.
|
Policy configuration key values are stored in encrypted form in the PingAuthorize Server configuration, so they are suitable for storing sensitive values such as server credentials. |
Define policy configuration keys using the administrative console by following these steps:
Steps
-
In the administrative console, under Authorization and Policies, click Policy Decision Service.
-
Click New Policy Configuration Key.
-
For Name, enter
ConsentBaseUri. -
For Policy Configuration Value, type the base URI. For example,
https://consent-us-east.example.com/consent/v1.Example:

-
-
Save the policy configuration key.
-
Repeat the previous steps for the policy configuration keys
ConsentUsernameandConsentPassword.
Example
The following example shows how to use dsconfig to create a policy configuration key named ConsentServiceBaseUri with the value https://example.com/consent/v1.
dsconfig create-policy-configuration-key \
 --key-name ConsentServiceBaseUri \
 --set policy-configuration-value:https://example.com/consent/v1