Tutorial 2: Configuring fine-grained access control for an API
This tutorial shows you how to set up PingAuthorize for attribute-based access control of a JavaScript Object Notation (JSON) REST application programming interface (API).
API access control is often categorized in terms of granularity.
| Access control granularity type | Description |
|---|---|
Coarse-grained |
Users or clients have access to all of or none of an application or API. |
Medium-grained |
Users or clients have access to some pages or resources within an application or API. |
Fine-grained |
Users or clients can take specific actions on an application page or an API resource when action-specific conditions are met. For example, a request to transfer bank funds might be denied if the amount exceeds the average of recent transfers by 20% or more. |
Scenario
For this tutorial, you are the producer of an online game in which players compete with friends to create the funniest meme. When starting a new game, the first player optionally invites other players using their email addresses. To prevent email spam, you must create a policy that blocks a user from starting a new game with other players if the user’s email address comes from a generic mail domain.
Game activities are represented using an example Meme Game API.
|
The above link directs you to the Meme Game API Git project, where you can build and run the API. You can access the API server with specific API paths, such as meme-game.com/api/v1/answers. |
Tasks
This tutorial teaches you how to configure two fine-grained API access control rules by walking you through the following tasks:
-
Configure a reverse proxy for the Meme Game API.
-
Test the reverse proxy.
-
Add a policy for the Meme Game API’s Create Game endpoint.
-
Test the policy from the Policy Editor.
-
Test the reverse proxy by making an HTTP request.
-
Modify the rule for the Meme Game API’s Create Game endpoint.
The following sections provide the details for completing these tasks.
Configuring a reverse proxy for the Meme Game API
Configure a reverse proxy by configuring an API External Server and a Gateway API Endpoint. The API reverse proxy acts as an intermediary between your HTTP client and the HTTP API, providing fine-grained access control for the API.
Steps
-
Configure an API External Server for the Meme Game API. An API External Server controls how PingAuthorize Server handles connections to an HTTPS API server, including configuration related to TLS. In this case, we simply need to provide a base URL.
-
Sign on to the administrative console using the URL and credentials from Accessing the GUIs.
-
Click External Servers.
-
Click New External Server and choose API External Server.
-
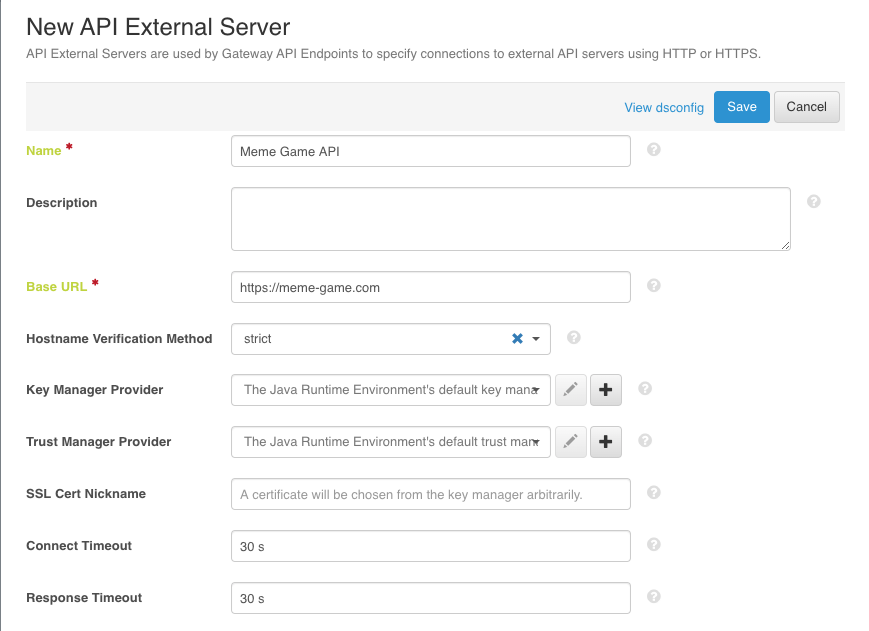
For Name, specify
Meme Game API. -
For Base URL, specify
https://meme-game.com.The following image shows this configuration.
-
Click Save.
-
-
Configure a Gateway API Endpoint. A Gateway API Endpoint controls how PingAuthorize Server proxies incoming HTTP client requests to an upstream API server.
-
In the administrative console, click Configuration and then Gateway API Endpoints.
-
Click New Gateway API Endpoint.
-
For Name, specify
Meme Game - Games. -
For Inbound Base Path, specify
/meme-game/api/v1/games.The inbound base path defines the base request path for requests to be received by PingAuthorize Server.
-
For Outbound Base Path, specify
/api/v1/games.The outbound base path defines the base request path for requests that PingAuthorize Server forwards to an API server.
-
For API Server, specify
Meme Game API. This is the API External Server you defined previously.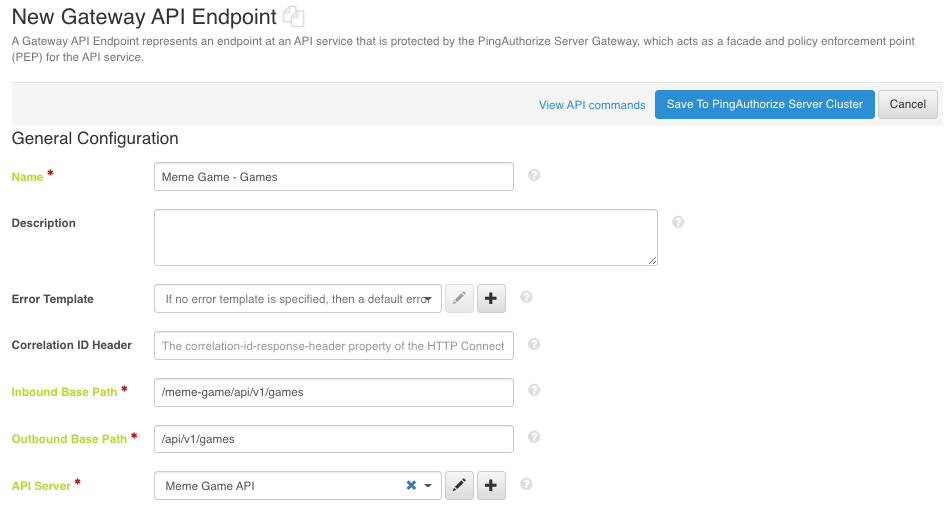
-
Save your changes.
-
Testing the reverse proxy
PingAuthorize Server is now configured to accept HTTP requests beginning with the path /meme-games/api/v1/games and forward them to the Meme Game API. Before proceeding, we will confirm that this configuration is working by making a request to the Meme Game API through the PingAuthorize Server.
About this task
These tutorials use curl to make HTTP requests.
The Meme Game API provides an API to create a new game, which looks like this:
POST /api/v1/games
{
    "data": {
        "type": "game",
        "attributes": {
            "invitees": ["friend@example.com"]
        }
    }
}
We configured a Gateway API Endpoint to forward any requests to /meme-game/api/v1/games to the Meme Game API endpoint.
Steps
-
Send a request using
curl.curl --insecure --location --request POST 'https://localhost:7443/meme-game/api/v1/games' \ --header 'Authorization: Bearer { "active": true, "sub": "user.99@example.com" }' \ --header 'Content-Type: application/json' \ --data-raw '{ "data": { "type": "game", "attributes": { "invitees": [ "user.99@example.com" ] } } }'This example uses Bearer token authorization with a mock access token. For an explanation of this authorization, see For further consideration: The PingAuthorize API security gateway, part 1.
Result:
If the PingAuthorize Server is configured correctly, then the response status should be
201 Createdwith a response body like the following.{ "data": { "id": "130", "type": "games" }, "meta": {} }
For further consideration: The PingAuthorize API security gateway, part 1
Additional concepts to consider include request routing and Bearer token authorization.
- Request routing
-
You configure request routing by defining a Gateway API Endpoint in the PingAuthorize Server configuration. Each Gateway API Endpoint determines which incoming HTTP requests are proxied to an API server and how PingAuthorize Server translates the HTTP request into a policy decision request.
- Bearer token authorization
-
The testing in Testing the reverse proxy uses this authorization. The token itself is a mock access token, which is a special kind of Bearer token that a PingAuthorize Server in test environments can accept. A mock Bearer token is formatted as a single line of JSON, with the same fields used in standard JWT access tokens, plus a boolean
"active"field, which indicates whether the token should be considered valid. When you use mock access tokens, you do not need to obtain an access token from an actual OAuth 2 auth server, which saves you time during testing.
Adding a policy for the Create Game endpoint
Now that we have confirmed that PingAuthorize Server is correctly configured to act as a reverse proxy to the Meme Game API, we can define a policy to try out its access control capabilities. This policy will accept or deny a request to create a game based on the identity making the request.
About this task
First, we define a service in the Trust Framework. Services have various uses, but at their most basic level, you use them to define a specific API that can be governed by your policies. By defining different services in your Trust Framework, you can target each policy specifically to their applicable APIs.
Then, we define a policy. This policy will reject any requests to start a new meme game if the user’s identifier ends with @example.com. We will identify users using the subject of the request’s access token.
Steps
-
Define the service.
-
Sign on to the Policy Editor using the URL and credentials from Accessing the GUIs.
-
Go to Trust Framework and click Services.
-
From the menu, select Add new Service.
-
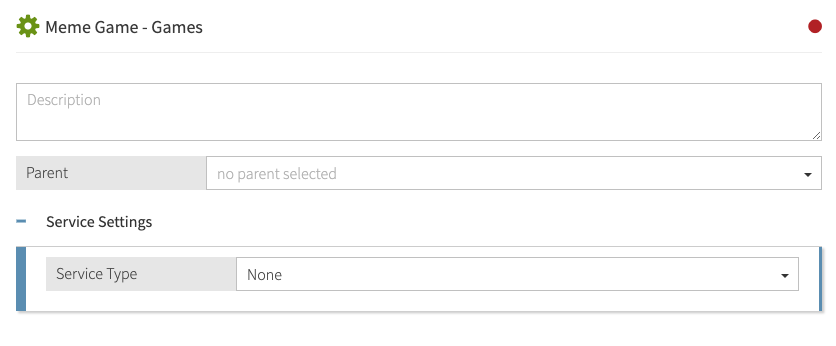
For the name, replace Untitled with
Meme Game - Games.The service name must match the endpoint name. To understand why, see For further consideration: The PingAuthorize API security gateway, part 2.
-
Verify that in the Parent field, no parent is selected.
To remove a parent, click the delete icon to the right of the Parent field.
-
Click Save changes.
-
-
Define the policy.
-
In the Policy Editor, go to Policies in the left pane and then click Policies along the top.
-
Select Global Decision Point.
-
From the menu, select Add Policy.
-
For the name, replace Untitled with
Users starting a new game. -
Click next to Applies to.
-
In the upper-right corner of the left pane, click Components. This reveals a tree of items to target the policy and restrict the types of requests to which the policy applies.
-
From the Actions list, drag inbound-POST to the Add definitions and targets, or drag from Components box.
-
From the Services list, drag Meme Games - Games to the Add definitions and targets, or drag from Components box.
Using these components restricts the policy to incoming POST requests and the Meme Games - Games service.
-
Set the Combining Algorithm to Unless one decision is deny, the decision will be permit.
-
Click Add Rule. This reveals an interface to define a condition. Define the rule as follows.
-
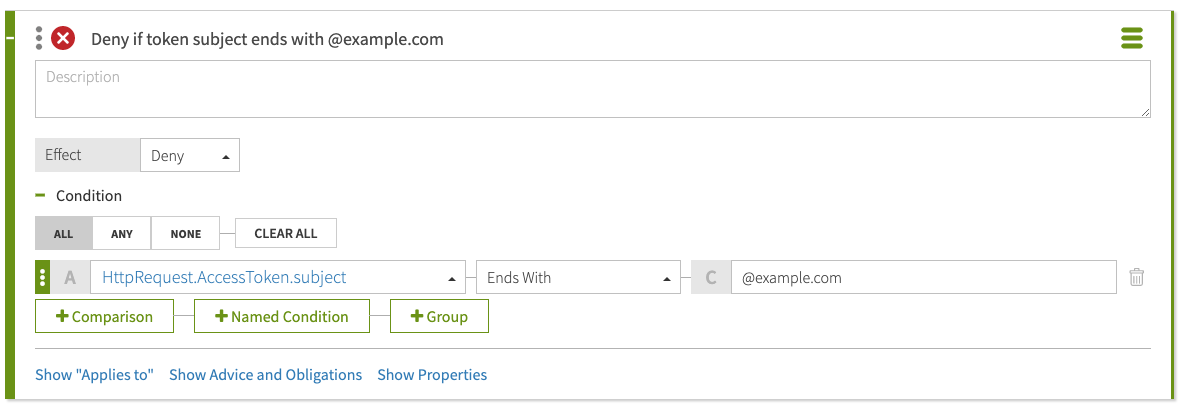
For the name, replace Untitled with
Deny if token subject ends with @example.com. -
For Effect, select Deny.
-
Specify the condition.
-
Click Comparison.
-
From the Select an Attribute list, select HttpRequest.AccessToken.subject.
-
In the second field, select Ends With.
-
In the third field, type
@example.com.The following screen shows the rule.
-
-
-
Click Save changes.
For more information about API security gateway processing, see For further consideration: The PingAuthorize API security gateway, part 2.
-
For further consideration: The PingAuthorize API security gateway, part 2
Additional concepts to consider include the phases of API security gateway processing and the need for the service name to match the Gateway API Endpoint name.
API security gateway processing occurs in two phases
- The inbound phase
-
When the API security gateway receives an HTTP request, it generates a policy request with an action label including the phase and the HTTP method, such as
inbound-POSTorinbound-GET. Based on the result returned by the policy engine, the request might be rejected immediately or it might be forwarded to the API server, potentially with modifications.
The following diagram illustrates the inbound request processing.
- The outbound phase
-
When the API server returns an HTTP response to the API security gateway, another policy request is generated, again with an action label including the phase and HTTP method, such as
outbound-POSToroutbound-GET. Based on the result returned by the policy engine, the response might be modified, and then it is forwarded back to the HTTP client.
The following diagram illustrates the outbound request processing.
Service name must match Gateway API Endpoint name
In Adding a policy for the Create Game endpoint, we named the service to match the name of the Gateway API Endpoint in the PingAuthorize configuration. This is important. When PingAuthorize receives an HTTP request, it generates a policy request that represents the HTTP request and sends it to its policy engine for processing. The policy request will include a service field, and its name will be the name of the Gateway API Endpoint that handled the HTTP request.
Testing the policy from the Policy Editor
We can now test the policy and make sure that it works as we intend. First, we test the policy directly from the Policy Editor’s test interface.
Steps
-
In the Policy Editor, click the Test tab at the top of the main pane to display the test interface.
-
Fill out the Request section. The test uses this information to simulate the policy request that PingAuthorize Server makes when it receives an HTTP request.
Description Details Service
Meme Games - Games
Action
inbound-POST
Attributes
HttpRequest.AccessToken
{ "active": true, "sub": "user.99@example.com"
												}
The following image shows the test.

-
Click Execute.
Result:
The policy test result displays. If the policy worked as expected, the leftmost result is red, indicating a
DENYresult.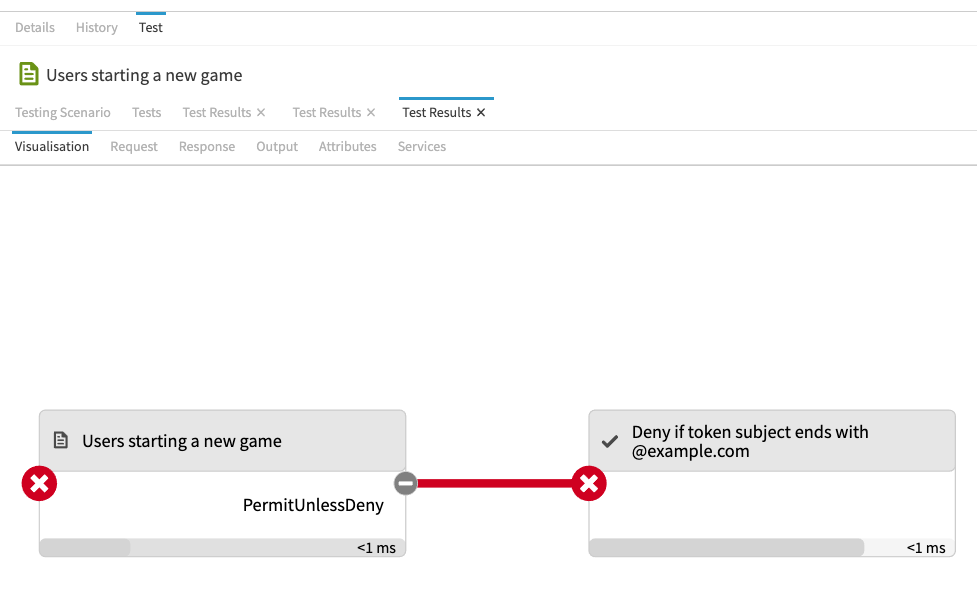
-
Optional: Experiment with testing.
Click the Testing Scenario tab and try different inputs to see how the policy result changes. For example, change the HttpRequest.AccessToken attribute value to
{ "active": true, "sub": "user.99@my-company.com" }. The policy result is nowPERMIT, as shown in the following image.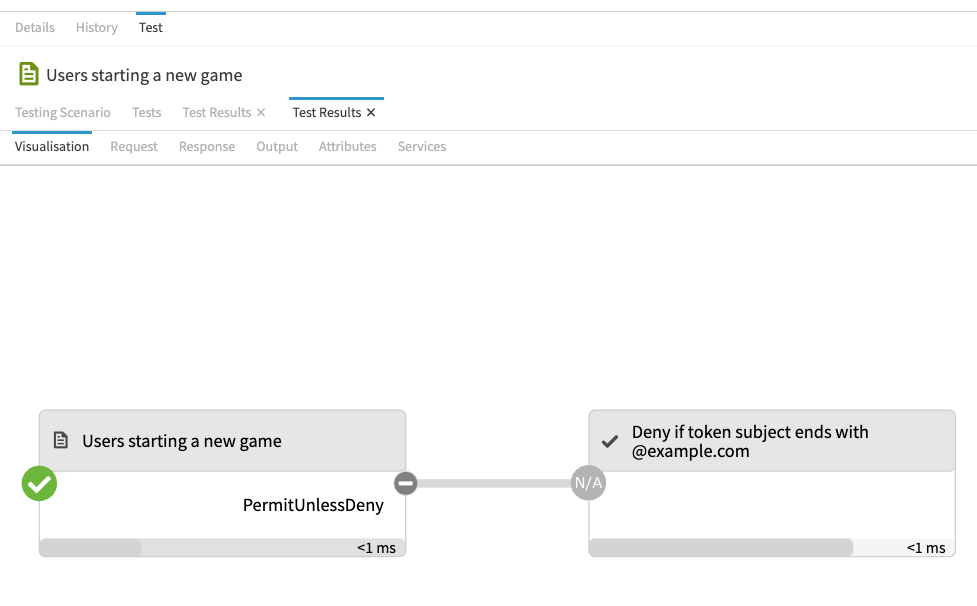
Testing the policy by making an HTTP request
Having tested the policy from the Policy Editor to prove the policy works as intended, we can confirm that policy enforcement from end-to-end by sending an HTTP request through the PingAuthorize Server reverse proxy.
Steps
-
Send a request using
curl.curl --insecure --location --request POST 'https://localhost:7443/meme-game/api/v1/games' \ --header 'Authorization: Bearer { "active": true, "sub": "user.99@example.com" }' \ --header 'Content-Type: application/json' \ --data-raw '{ "data": { "type": "game", "attributes": { "invitees": [ "user.99@example.com" ] } } }'Result:
You should receive an error response with a response status of
403 Forbidden.The request has an access token value of
{ "active": true, "sub":
"user.99@example.com" }
. Thesubfield of the access token corresponds to theHttpRequest.AccessToken.subjectTrust Framework attribute that your policy uses to make its decision. -
As an experiment, edit the access token value in
curlto change thesubvalue to an email address for a different domain. What should happen with this new request?Send a request using
curl.curl --insecure --location --request POST 'https://localhost:7443/meme-game/api/v1/games' \ --header 'Authorization: Bearer { "active": true, "sub": "user.99@my-company.com" }' \ --header 'Content-Type: application/json' \ --data-raw '{ "data": { "type": "game", "attributes": { "invitees": [ "user.99@example.com" ] } } }'Result:
The HTTP response status should now be
201 Created.To better understand how policy decisions work, see For further consideration: Decision Visualiser.
For further consideration: Decision Visualiser
Returning to the Policy Editor, we can view a log of how the policy engine handled the HTTP request.
Steps
-
In the Policy Editor, go to Policies and click Decision Visualiser.
-
Click the Recent Decisions tab. The two most recent items listed correspond to your last HTTP request and response. The first item should correspond to the HTTP response, while the second item should correspond to the HTTP request.
-
Click the second decision. Its visualization appears.
-
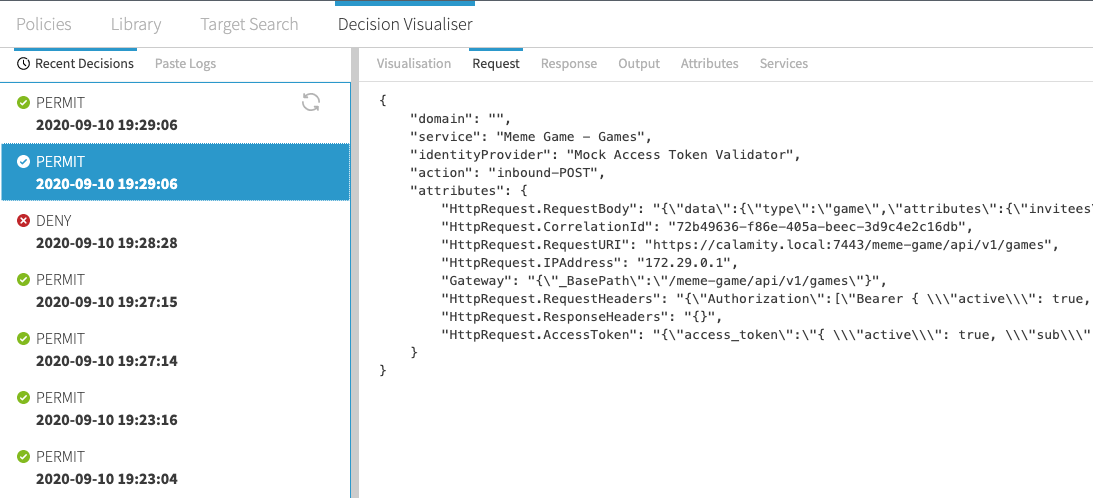
Click the Request tab. This displays a JSON representation of the policy request that PingAuthorize generated to represent your HTTP request.
Here is a request example.
-
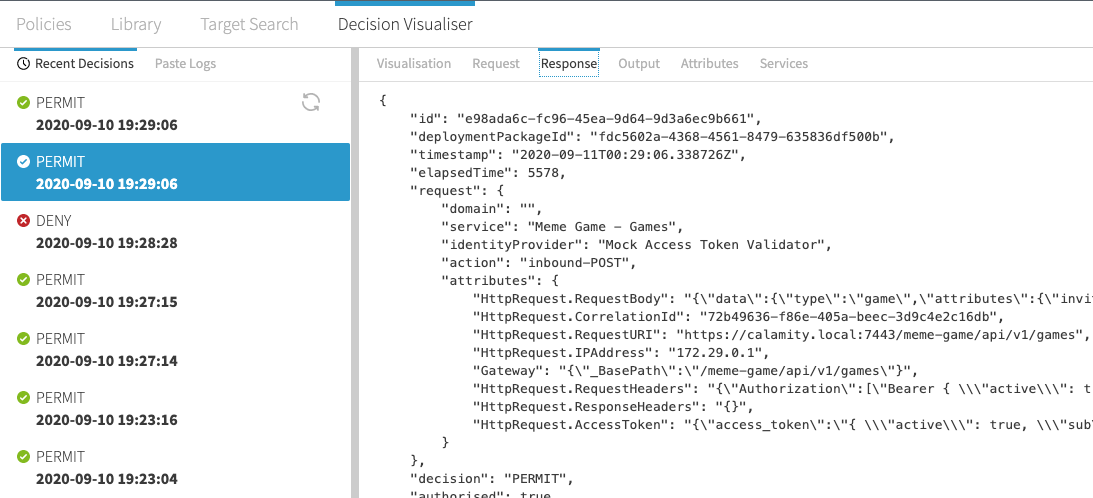
Click the Response tab. This displays a JSON representation of the policy response that the policy engine returned after evaluating your policy.
Here is a response example.
Both the policy request and the policy response might be hard to understand at the moment, but as you become familiar with PingAuthorize and its policy engine, you will find that the Decision Visualiser is indispensable for troubleshooting and understanding your policies.
Modifying the rule for the Create Game endpoint
Now that we have defined a policy that permits or denies the ability to create a game based on the email address of the person creating the game, we will modify the rule so that any user can create a game, but only those with real email addresses can create games with invitees. This section demonstrates how a policy can take an action based on data in the request body.
About this task
To review, the Meme Game API offers a game creation endpoint that looks like this:
POST /api/v1/games
{
    "data": {
        "type": "game",
        "attributes": {
            "invitees": ["friend@example.com"]
        }
    }
}
The requester specifies one or more invitees using the data.attributes.invitees field. We will update our policy with a second rule that disallows a new game if anybody else is invited to it.
Steps
-
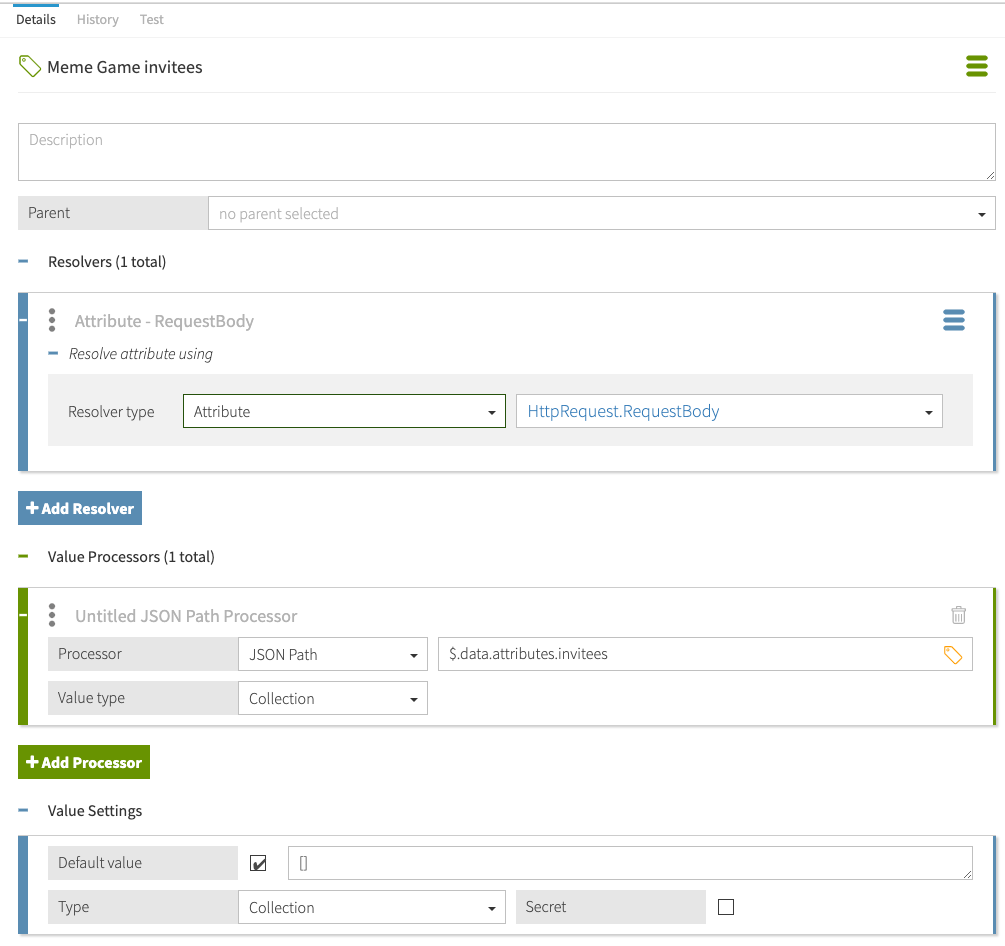
Define a Trust Framework attribute to represent the
data.attributes.inviteesfield.-
In the Policy Editor, go to Trust Framework and click Attributes.
-
From the menu, select Add new Attribute.
-
For the name, replace Untitled with
Meme Game invitees. -
Verify that in the Parent field, no parent is selected.
To remove a parent, click the delete icon to the right of the Parent field.
-
Click the next to Resolvers and click Add Resolver.
-
Set Resolver type to Attribute.
-
Select the attribute HttpRequest.RequestBody.
-
Click the next to Value Processors and click Add Processor.
-
Set Processor to JSON Path.
-
Set the value to
$.data.attributes.invitees. -
Set Value type to Collection.
-
For Value Settings, select Default value and specify square brackets (
[]) to indicate an empty collection. -
Set Type to Collection.
-
Click Save changes.
The following image shows the new attribute.
This Trust Framework attribute introduces resolvers and value processors, which are two important components. To better understand these components, see For further consideration: Resolvers and value processors.
-
-
Modify a rule to use the Meme Game invitees attribute we just created.
-
In the Policy Editor, go to Policies.
-
Select the Users starting a new game policy.
-
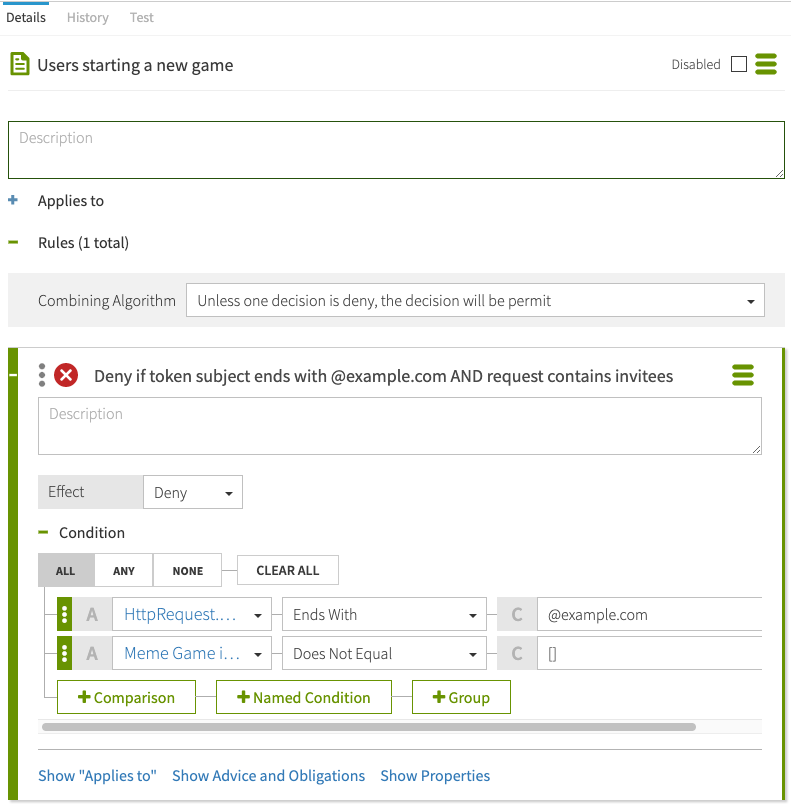
Rename the Deny if token subject ends with @example.com rule to
Deny if token subject ends with @example.com AND request contains invitees. -
Expand the rule by clicking its icon.
-
For Effect, select Deny.
-
Specify a second comparison.
-
Click Comparison.
-
From the Select an Attribute list, select Meme Game invitees.
-
In the second field, select Does Not Equal.
-
In the third field, type
[].
-
-
Click Save changes.
The following image shows the rule.
-
-
Test the policy.
As before, you can test your policy by sending an HTTP request or using the Policy Editor test interface. Try testing using the following combinations of inputs:
-
An access token with the subject
user.0@example.comand with invitees.This should be denied.
-
An access token with the subject
user.0@my-company.comand with invitees.This should be permitted.
-
An access token with the subject
user.0@example.comand no invitee list.This should be permitted.
-
An access token with the subject
user.0@my-company.comand no invitee list.This should be permitted.
-
For further consideration: Resolvers and value processors
Resolvers and value processors are key components in defining policies.
Modifying the rule for the Create Game endpoint introduces their use. Here is more about how you use them in your policies.
-
Resolvers
A resolver defines the source of an attribute’s value. In this case, the source is the HttpRequest.RequestBody policy request attribute, which is set automatically by PingAuthorize Server. Many other types of sources are available; for example, a resolver might define an attribute value using a constant, or a resolver might call out to an external API to obtain the attribute value.
-
Value Processors
Value processors extract and transform values from the source value provided by the resolver. In this case, a value processor uses a JSONPath expression to extract the value of a specific field from the HTTP request body provided by the resolver.
Conclusion
In this tutorial about fine-grained access control, you added anti-spam protections to the Meme Game API by blocking requests using certain email addresses. In doing so, you learned how to configure PingAuthorize Server to act as a reverse proxy to a JSON API. You then learned how to use the PingAuthorize Policy Editor to create a fine-grained access control policy with rules that take effect based on the access token and body of an HTTP request. You also learned how to test policies and inspect policy requests using the Policy Editor.
You also learned:
-
Gateway API Endpoint names in the PingAuthorize Server configuration must match Trust Framework Service names in the Policy Editor.
-
Policies can pinpoint different API services and HTTP verbs.
-
Policies can PERMIT or DENY transactions based on any combination of attributes.
-
Mock access tokens make testing very easy.
-
Trust Framework attributes obtain their values using resolvers and transform their values using processors.
-
PingAuthorize Server supplies Attributes for HTTP metadata, request data, and OAuth 2 access token attributes.
-
You can test policies directly from the Policy Editor.
-
The Policy Editor’s Decision Visualiser gives you a detailed view of recent policy decisions.