Overview
The ForgeRock® Identity Platform is the only offering for access management, identity management, user-managed access, directory services, and an identity gateway, designed and built as a single, unified platform.
The platform serves as the basis for our simple and comprehensive Identity and Access Management solution. We help our customers deepen their relationships with their customers, and improve the productivity and connectivity of their employees and partners. For more information about ForgeRock and about the platform, visit https://www.forgerock.com.
The ForgeRock Common REST API works across the platform to provide common ways to access web resources and collections of resources.
|
This is not a comprehensive platform implementation guide. These sample setup instructions show a minimal integration of platform components to get you started. The ForgeRock Identity Platform offers maximum extensibility and flexibility in self-managed deployments. The platform includes many features and options these sample setup instructions do not cover. If you don’t need maximum extensibility and flexibility, there are simpler alternatives:
For help with your deployment and to validate your plans before deploying in production, contact ForgeRock. |
Choose your sample
This page describes the sample deployment alternatives and how the platform components interact.
|
This is not a comprehensive platform implementation guide. These sample setup instructions show a minimal integration of platform components to get you started. The ForgeRock Identity Platform offers maximum extensibility and flexibility in self-managed deployments. The platform includes many features and options these sample setup instructions do not cover. If you don’t need maximum extensibility and flexibility, there are simpler alternatives:
For help with your deployment and to validate your plans before deploying in production, contact ForgeRock. |
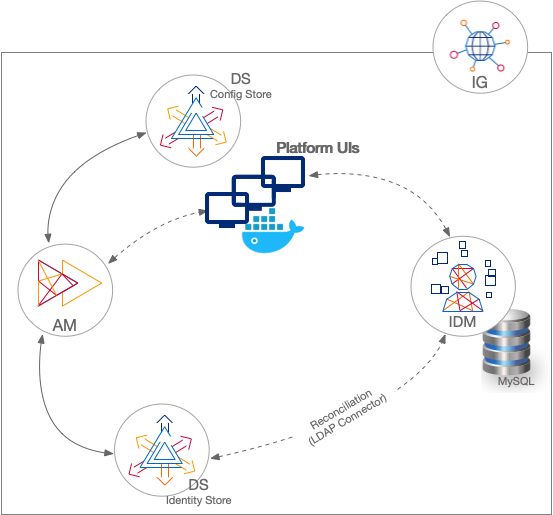
Sample: separate identity stores
This sample deployment has an external DS server configured as the AM configuration store and AM identity store (shown separately in the illustration). The IDM repository is an external JDBC database. The sample was tested with MySQL. The deployment uses an LDAP connector to synchronize the identities between IDM and AM.
IG serves as a single-point of entry for platform UI access:
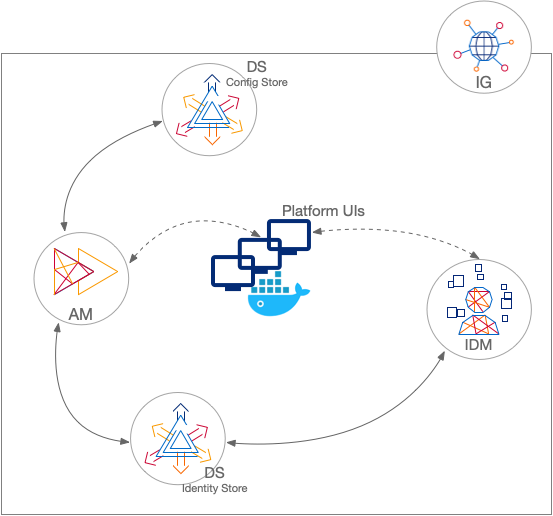
Sample: shared identity store
This sample deployment has an external DS server configured as the AM configuration store and shared by the AM and IDM servers share an external DS server as the identity store (shown separately in the illustration). No synchronization configuration is required.
IG serves as a single-point of entry for platform UI access:
|
In both sample deployments, the Platform UIs can run in separate Docker containers. If you want to run the Platform UIs in containers, get Docker before you start. |
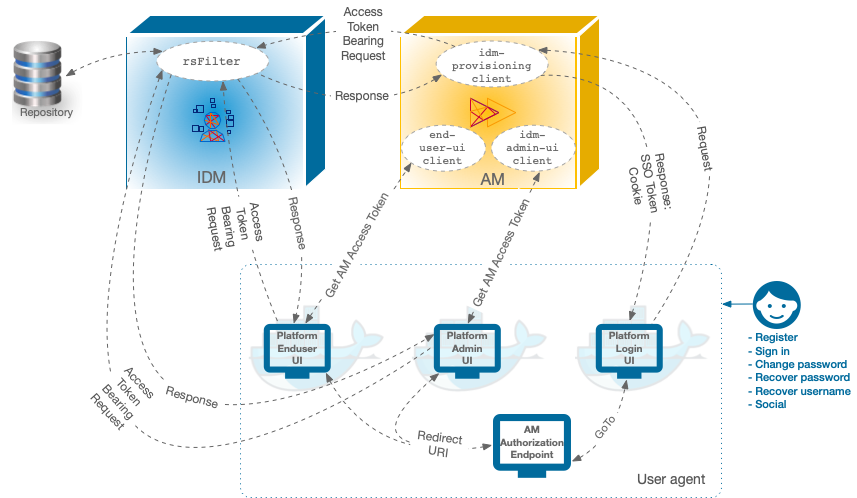
Component interaction
A platform configuration relies on multiple components working together.
The following image shows how the AM OAuth 2 clients interact
with the IDM resource server filter (rsFilter) to grant access through the Platform UIs:
-
The Platform UIs send a request to the AM Authorization Endpoint.
-
If the end user is authenticated, the user agent is redirected back to the UI, according to the Redirection URI request parameter.
-
If the end user is not authenticated, the AM Authorization Endpoint redirects the user agent to the Platform Login UI.
-
After successful authentication, the Platform Login UI redirects the user agent back to the AM Authorization Endpoint, according to the GoTo request parameter.
|
Prepare the servers
|
This is not a comprehensive platform implementation guide. These sample setup instructions show a minimal integration of platform components to get you started. The ForgeRock Identity Platform offers maximum extensibility and flexibility in self-managed deployments. The platform includes many features and options these sample setup instructions do not cover. If you don’t need maximum extensibility and flexibility, there are simpler alternatives:
For help with your deployment and to validate your plans before deploying in production, contact ForgeRock. |
Downloads
The sample deployments use software from the ForgeRock Download Center and other locations.
Download the required files for your sample deployment:
| Component | Downloads |
|---|---|
AM |
|
DS |
|
IDM |
|
IG |
|
Platform UI3 |
|
1 Download this from the Apache site; ForgeRock does not ship Apache software.
2 Separate identity stores deployment only. Download these from the MySQL site; ForgeRock does not ship MySQL software.
3 (Optional) The alternative is to pull the Platform IU Docker images.
Basic requirements
These basic evaluation requirements concern the sample deployments.
Before deploying the platform in production, make sure the deployment meets all the requirements for each server component product. For details, refer to the release notes for each product.
Memory and disk space
These are basic sizing requirements for each sample deployment:
-
Reserve 1 GB RAM for each server product you install.
-
Reserve at least 10 GB disk space for the files.
-
For DS, reserve 5% + 1 GB of the filesystem size as free disk space.
| Production deployments may have very different requirements. |
Operating systems
Common supported operating systems for the server component products include:
-
Microsoft Windows Server
-
Red Hat Enterprise Linux and Rocky Linux
-
Ubuntu Linux
For details, refer to the release notes for each product.
| Although it is not a supported operating system for the platform, you can try the sample deployments on Apple macOS. |
Java
Supported Java versions for the sample deployments include:
-
Java 17.0.8 or later
Before installing the servers, set the JAVA_HOME environment variable.
Keep your Java installation up-to-date with the latest security fixes. Some security features may require later updates.
For details, refer to the release notes for each product.
Hosts and ports
The sample deployments use these hostnames and port numbers:
| Component | Hostname | Port numbers |
|---|---|---|
AM |
|
HTTP: |
DS |
|
Admin: LDAP: LDAPS: |
IDM |
|
HTTP: HTTPS: |
IG |
|
HTTP: HTTPS: |
Platform Admin UI |
|
HTTP: |
Platform End User UI |
|
HTTP: |
Platform Login UI |
|
HTTP: |
Sample deployment on a single computer
The sample deployments assume all servers are deployed on their own hosts.
|
To try a sample deployment on a single computer, the recommended alternative is to use the ForgeOps Cloud Developer’s Kit (CDK) on Minikube. If you nevertheless choose to demonstrate these sample deployments on your computer,
add aliases for the fully qualified domain names used for the servers and platform UIs
to your none |
Separate identity stores
|
This is not a comprehensive platform implementation guide. These sample setup instructions show a minimal integration of platform components to get you started. The ForgeRock Identity Platform offers maximum extensibility and flexibility in self-managed deployments. The platform includes many features and options these sample setup instructions do not cover. If you don’t need maximum extensibility and flexibility, there are simpler alternatives:
For help with your deployment and to validate your plans before deploying in production, contact ForgeRock. |
This sample deployment uses the following data stores:
-
An external DS server as the AM configuration store and the AM identity store.
-
A MySQL repository as the IDM data store.
|
The IDM End User UI is not supported in a platform deployment, as it does not support authentication through AM. You can use the Set up the platform UIs with this deployment, or create your own UIs that support authentication through AM. |
Download DS
Follow the instructions in the DS documentation to download DS, and prepare for installation.
The instructions that follow assume you download the cross-platform .zip distribution.
Set up DS
-
Unpack the DS files you downloaded.
-
Generate and save a unique DS deployment ID:
/path/to/opendj/bin/dskeymgr create-deployment-id --deploymentIdPassword passwordbashYou will need the deployment ID and password to install DS, and to export the server certificate.
Set the deployment ID in your environment:
export DEPLOYMENT_ID=deployment-idbash -
Install a DS server with the necessary setup profiles:
-
am-config -
am-cts -
am-identity-store
For more information about DS setup profiles, refer to setup profiles in the DS documentation.
/path/to/opendj/setup \ --deploymentId $DEPLOYMENT_ID \ --deploymentIdPassword password \ --rootUserDN uid=admin \ --rootUserPassword str0ngAdm1nPa55word \ --monitorUserPassword str0ngMon1torPa55word \ --hostname directory.example.com \ --adminConnectorPort 4444 \ --ldapPort 1389 \ --enableStartTls \ --ldapsPort 1636 \ --profile am-config \ --set am-config/amConfigAdminPassword:5up35tr0ng \ --profile am-cts \ --set am-cts/amCtsAdminPassword:5up35tr0ng \ --set am-cts/tokenExpirationPolicy:am-sessions-only \ --profile am-identity-store \ --set am-identity-store/amIdentityStoreAdminPassword:5up35tr0ng \ --acceptLicensebashFor simplicity, this sample deployment uses a standalone directory server that:
-
Does not replicate directory data (no
--replicationPortor--bootstrapReplicationServeroptions).In production deployments, always replicate directory data for availability and resilience.
-
Consolidates all directory data in the same replicas.
In very high-volume production deployments, test whether this meets your performance requirements and adjust your directory deployment if necessary.
-
Keeps AM identity data and IDM repository data under distinct base DNs.
Both AM and IDM expect exclusive access to their data. Keep their data separate with distinct base DNs and domains in your setup profiles. Don’t accidentally mix their data by choosing a base DN under the other base DN.
For details, refer to the DS installation documentation.
-
-
Start the DS server:
/path/to/opendj/bin/start-dsbash
Set up a container
Install a Java container to deploy AM.
These deployment examples assume that you are using Apache Tomcat:
-
Follow the instructions in the AM documentation to prepare your environment.
-
Use a supported version of Apache Tomcat as the web application container:
-
Configure Tomcat to listen on port
8081.This non-default port requires that you update Tomcat’s
conf/server.xmlfile. Instead of the default line,<Connector port="8080" protocol="HTTP/1.1">, use:<Connector port="8081" protocol="HTTP/1.1">xml -
Create a Tomcat
bin/setenv.shorbin\setenv.batfile to hold your environment variables. -
Follow the instructions in the AM documentation to prepare Tomcat as the web application container.
-
For complete instructions on setting up Tomcat, see Apache Tomcat in the AM documentation.
Secure connections
|
From DS 7 onwards, you must secure connections to DS servers. |
-
Create a new directory that will house a dedicated truststore for AM:
mkdir -p /path/to/openam-security/bash -
Export the DS server certificate.
You must run this command on
directory.example.comin the terminal window where you set theDEPLOYMENT_IDvariable:/path/to/opendj/bin/dskeymgr export-ca-cert \ --deploymentId $DEPLOYMENT_ID \ --deploymentIdPassword password \ --outputFile ds-ca-cert.pembash -
Import the DS server certificate into the dedicated AM truststore.
If you are not testing this example on a single host, you might need to copy each certificate file onto the AM host machine first:
keytool \
-importcert \
-trustcacerts \
-alias ds-ca-cert \
-file /path/to/ds-ca-cert.pem \
-keystore /path/to/openam-security/truststore \
-storepass changeit \
-storetype JKS
Owner: CN=Deployment key, O=ForgeRock.com
Issuer: CN=Deployment key, O=ForgeRock.com
...
Trust this certificate? [no]:  yes
Certificate was added to keystore
bash -
List the certificates in the new truststore and verify that the certificate you added is there:
keytool \
-list \
-keystore /path/to/openam-security/truststore \
-storepass changeit
bash -
Point Apache Tomcat to the path of the new truststore so that AM can access it.
Append the truststore settings to the
CATALINA_OPTSvariable in the Tomcatbin/setenv.shfile; for example:CATALINA_OPTS="-Djavax.net.ssl.trustStore=/path/to/openam-security/truststore \ -Djavax.net.ssl.trustStorePassword=changeit \ -Djavax.net.ssl.trustStoreType=jks"propertiesRefer to your specific container’s documentation for information on configuring truststores.
-
Verify secure authentication to the DS server with the dedicated AM accounts.
If you deployed AM and DS on separate computers, first copy the AM truststore to
/path/to/openam-security/truststoreon the computer where DS runs. Use the DSldapsearchcommand to connect to DS using the local copy of the AM truststore:/path/to/opendj/bin/ldapsearch \ --hostname directory.example.com \ --port 1636 \ --useSsl \ --useJavaTrustStore /path/to/openam-security/truststore \ --trustStorePassword changeit \ --bindDn uid=am-config,ou=admins,ou=am-config \ --bindPassword 5up35tr0ng \ --baseDn ou=am-config \ "(&)" \ 1.1 dn: ou=am-config dn: ou=admins,ou=am-config dn: uid=am-config,ou=admins,ou=am-config /path/to/opendj/bin/ldapsearch \ --hostname directory.example.com \ --port 1636 \ --useSsl \ --useJavaTrustStore /path/to/openam-security/truststore \ --trustStorePassword changeit \ --bindDn uid=am-identity-bind-account,ou=admins,ou=identities \ --bindPassword 5up35tr0ng \ --baseDn ou=identities \ "(&)" \ 1.1 dn: ou=identities dn: ou=people,ou=identities dn: ou=groups,ou=identities dn: ou=admins,ou=identities dn: uid=am-identity-bind-account,ou=admins,ou=identitiesbash
Set up AM
|
This is not a comprehensive platform implementation guide. These sample setup instructions show a minimal integration of platform components to get you started. The ForgeRock Identity Platform offers maximum extensibility and flexibility in self-managed deployments. The platform includes many features and options these sample setup instructions do not cover. If you don’t need maximum extensibility and flexibility, there are simpler alternatives:
For help with your deployment and to validate your plans before deploying in production, contact ForgeRock. |
When your external data stores are configured, follow these procedures to configure AM with the ForgeRock Identity Platform:
Install AM
-
Follow the instructions in the AM documentation to download AM. Make sure you download the
.zipfile, not just the.warfile. -
Copy the AM
.warfile to deploy in Apache Tomcat asam.war:cp AM-7.5.0.war /path/to/tomcat/webapps/am.warbash -
Start Tomcat if it is not already running.
-
Navigate to the deployed AM application; for example, http://am.example.com:8081/am/.
-
Select Create New Configuration to create a custom configuration.
-
Accept the license agreement, and click Continue.
-
Set a password for the default user,
amAdmin.These instructions assume that the
amAdminpassword isPassw0rd. -
On the Server Settings screen, enter your AM server settings; for example:
-
Server URL:
http://am.example.com:8081 -
Cookie Domain:
example.com -
Platform Locale:
en_US -
Configuration Directory:
/path/to/am
-
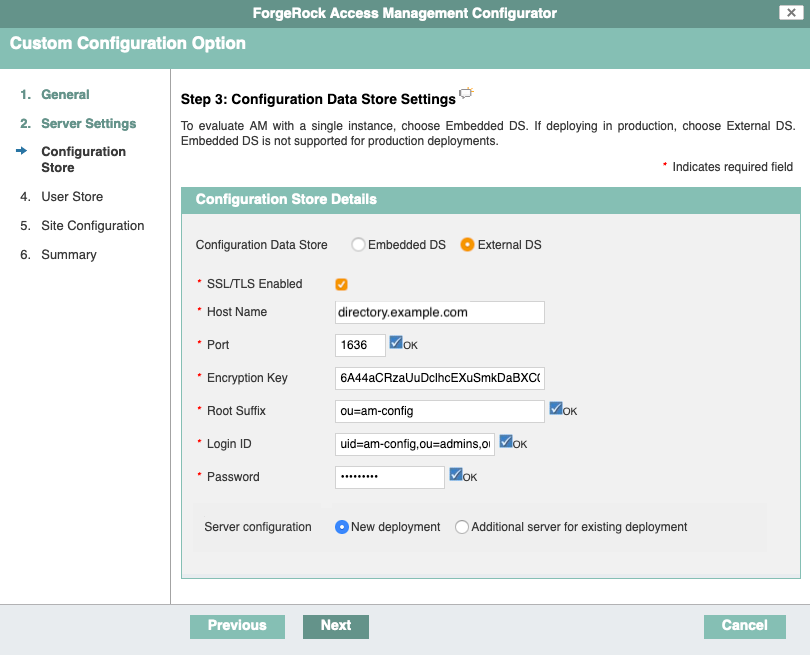
-
On the Configuration Data Store Settings screen, select External DS, and enter the details for the DS instance that you set up as a configuration store.
This list reflects the DS configuration store installed with the listed server settings.
-
SSL/TLS:
Enabled(DS requires TLS.) -
Host Name:
directory.example.com -
Port:
1636 -
Encryption Key: (generated encryption key)
-
Root Suffix:
ou=am-config -
Login ID:
uid=am-config,ou=admins,ou=am-config -
Password:
5up35tr0ng -
Server configuration:
New deployment
-
-
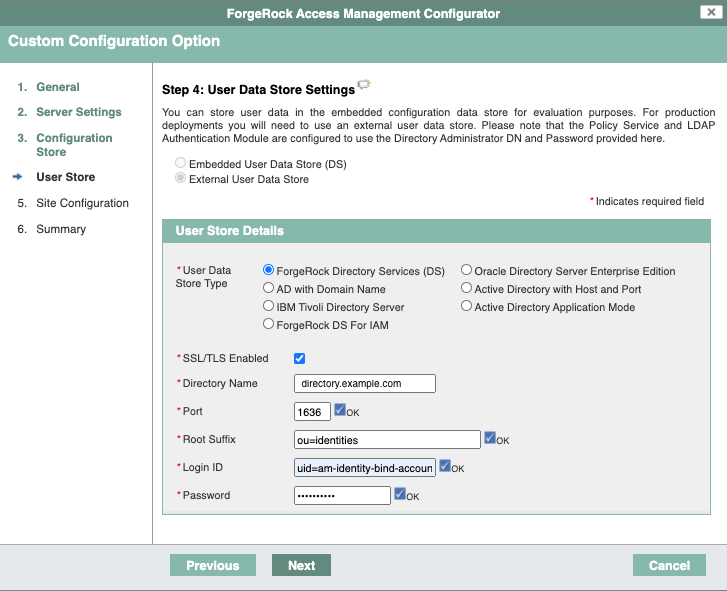
On the User Data Store Settings screen, select External User Data Store, and enter the details for the DS instance that you set up as an identity store.
The AM setup process requires that you configure an identity store.
You will use this store later in an
alpharealm for non-administrative identities.This list reflects the DS identity store installed with the listed server settings.
-
User Data Store Type:
ForgeRock Directory Services (DS) -
SSL/TLS:
Enabled(DS requires TLS.) -
Host Name:
directory.example.com -
Port:
1636 -
Root Suffix:
ou=identities -
Login ID:
uid=am-identity-bind-account,ou=admins,ou=identities -
Password:
5up35tr0ng
-
-
On the Site Configuration screen, select No, then click Next.
-
Review the Configurator Summary Details, then click Create Configuration.
Use the external CTS store
Update the AM configuration to use DS as an external token store:
-
Log in to the AM admin UI as the
amAdminuser. -
Browse to Configure > Server Defaults > CTS.
-
Make the following changes, saving your work before switching tabs:
Setting Choice CTS Token Store > Store Mode
External Token Store
CTS Token Store > Root Suffix
ou=famrecords,ou=openam-session,ou=tokensExternal Store Configuration > SSL/TLS Enabled
Selected
External Store Configuration > Connection String(s)
localhost:1636External Store Configuration > Login Id
uid=openam_cts,ou=admins,ou=famrecords,ou=openam-session,ou=tokensExternal Store Configuration > Password
5up35tr0ngKeep the defaults for all other settings.
Create a realm
The AM Top Level Realm should serve administration purposes only.
These steps create an alpha realm for non-administrative identities:
-
If you’re not currently logged in to the AM admin UI as the
amAdminuser, log in. -
Click + New Realm, and create the new realm with the following settings:
-
Name:
alpha -
Keep the defaults for all other settings.
-
For background information, see Realms in the AM documentation.
Configure OAuth clients
The deployment depends on the following OAuth 2.0 clients:
| Client ID | Description | In Top Level Realm? | In subrealms? |
|---|---|---|---|
|
IDM uses this confidential client to introspect access tokens through the This client is not used for OAuth 2.0 flows, only to introspect tokens. It is not a real OAuth 2.0 client, in the traditional sense. Rather, it is an OAuth 2.0 Resource Server account, used exclusively for token introspection. As such, you do not need to specify redirect URIs or grant types. When you configure the client, AM adds the |
|
|
|
AM nodes in authentication journeys (trees) use this confidential client to authenticate through AM and provision identities through IDM. This client uses the client credentials flow, and does not authenticate resource owners other than itself. |
|
|
|
The Platform Admin UI uses this public client to access platform configuration features, such as identity management and journey (tree) editing. The client uses the implicit flow, and authenticates administrator users who are authorized to perform administrative operations. |
|
|
|
The End User UI uses this public client to access and present end-user profile data. The client uses the implicit flow, and authenticates end users who are authorized to view and edit their profiles. |
|
|
When configuring a client in more than one realm, make sure that the client configurations are identical.
Follow these steps to configure the OAuth 2.0 clients:
-
If you’re not currently logged in to the AM admin UI as the
amAdminuser, log in. -
In the Top Level Realm, configure an
idm-resource-serverclient to introspect access tokens:-
Select Applications > OAuth 2.0 > Clients, and click Add Client.
-
Enter the following details:
-
Client ID:
idm-resource-server -
Client secret:
passwordThe value of this field must match the
clientSecretthat you will set in thersFiltermodule in the IDM authentication configuration (/path/to/openidm/conf/authentication.json) during your IDM setup. -
Scopes:
am-introspect-all-tokens
am-introspect-all-tokens-any-realm
-
-
Click Create.
-
-
In the Top Level Realm and the
alpharealm, configure identicalidm-provisioningclients to make calls to IDM:-
Select Applications > OAuth 2.0 > Clients, and click Add Client.
-
Enter the following details:
-
Client ID:
idm-provisioning -
Client secret:
openidm -
Scopes:
fr:idm:*
-
-
Click Create.
-
On the Advanced tab:
-
Response Types: Check that
tokenis present (it should be there by default). -
Grant Types: Remove
Authorization Codeand addClient Credentials.
-
-
Click Save Changes.
-
-
In the Top Level Realm and the
alpharealm, configure identicalidm-admin-uiclients that will be used by the Platform Admin UI:-
Select Applications > OAuth 2.0 > Clients, and click Add Client.
-
Enter the following details:
-
Client ID:
idm-admin-ui -
Client Secret: (no client secret is required)
-
Redirection URIs:
http://openidm.example.com:8080/platform/appAuthHelperRedirect.html
http://openidm.example.com:8080/platform/sessionCheck.html
http://openidm.example.com:8080/admin/appAuthHelperRedirect.html
http://openidm.example.com:8080/admin/sessionCheck.html
http://admin.example.com:8082/appAuthHelperRedirect.html
http://admin.example.com:8082/sessionCheck.html -
Scopes:
openid
fr:idm:*At a minimum, the scopes that you set here must include the scopes that you will set in the
rsFilterauthentication configuration (/path/to/openidm/conf/authentication.json) during your IDM setup.
-
-
Click Create.
-
On the Core tab:
-
Client type: Select
Public. -
Click Save Changes.
-
-
On the Advanced tab:
-
Grant Types: Add
Implicit. -
Token Endpoint Authentication Method: Select
none. -
Implied consent: Enable.
-
Click Save Changes.
-
-
-
In the Top Level Realm and the
alpharealm, configure identicalend-user-uiclients that will be used by the Platform End User UI:-
Select Applications > OAuth 2.0 > Clients , and click Add Client.
-
Enter the following details:
-
Client ID:
end-user-ui -
Client Secret: (no client secret is required)
-
Redirection URIs:
http://enduser.example.com:8888/appAuthHelperRedirect.html
http://enduser.example.com:8888/sessionCheck.html -
Scopes:
openid
fr:idm:*At a minimum, the scopes that you set here must include the scopes that you will set in the
rsFilterauthentication configuration (/path/to/openidm/conf/authentication.json) during your IDM setup.
-
-
Click Create.
-
On the Core tab:
-
Client type: Select
Public. -
Click Save Changes.
-
-
On the Advanced tab:
-
Grant Types: Add
Implicit. -
Token Endpoint Authentication Method: Select
none. -
Implied Consent: Enable.
-
Click Save Changes.
-
-
Configure OAuth 2.0 providers
-
If you’re not currently logged in to the AM admin UI as the
amAdminuser, log in. -
Configure a provider for the Top Level Realm:
-
In the Top Level Realm, select Services, and click Add a Service.
-
Under Choose a service type, select OAuth2 Provider.
-
For Client Registration Scope Allowlist, add the following scopes:
am-introspect-all-tokens
am-introspect-all-tokens-any-realm
fr:idm:*
openid -
Click Create.
-
On the Advanced tab, make sure that Response Type Plugins includes the following values:
id_token|org.forgerock.openidconnect.IdTokenResponseTypeHandler
code|org.forgerock.oauth2.core.AuthorizationCodeResponseTypeHandler -
Click Save Changes.
-
On the Consent tab, enable Allow Clients to Skip Consent.
-
Click Save Changes.
-
-
Configure a provider for the
alpharealm:-
In the
alpharealm, select Services, and click Add a Service. -
Under Choose a service type, select OAuth2 Provider.
-
For Client Registration Scope Allowlist, add the following scopes:
fr:idm:*
openid -
Click Create.
-
On the Advanced tab, make sure that Response Type Plugins includes the following values:
id_token|org.forgerock.openidconnect.IdTokenResponseTypeHandler
code|org.forgerock.oauth2.core.AuthorizationCodeResponseTypeHandler -
Click Save Changes.
-
On the Consent tab, enable Allow Clients to Skip Consent.
-
Click Save Changes.
-
Configure an IDM provisioning service
-
If you’re not currently logged in to the AM admin UI as the
amAdminuser, log in. -
From the top menu, select Configure > Global Services > IDM Provisioning.
The AM admin UI does not let you configure an IDM provisioning service in a realm.
-
Set the following fields:
-
Enabled
-
Deployment URL:
http://openidm.example.com:8080 -
Deployment Path:
openidm -
IDM Provisioning Client:
idm-provisioning
-
-
Click Save Changes.
|
If some resource strings in the AM admin UI do not resolve properly at setup time, the UI labels mentioned will show internal keys instead of the labels shown in the steps above. Use the following table to check that you have the correct service and fields:
|
Configure a validation service
The Platform UIs need this validation service allow listing for goto redirection.
-
If you’re not currently logged in to the AM admin UI as the
amAdminuser, log in. -
In the
alpharealm, select Services, and click Add a Service. -
Under Choose a service type, select Validation Service.
-
For Valid goto URL Resources, add the URLs for the Platform UI:
http://admin.example.com:8082/*
http://admin.example.com:8082/*?*
http://login.example.com:8083/*
http://login.example.com:8083/*?*
http://enduser.example.com:8888/*
http://enduser.example.com:8888/*?* -
Click Create.
Enable CORS support
Cross-origin resource sharing (CORS) lets user agents make requests across domains.
-
If you’re not currently logged in to the AM admin UI as the
amAdminuser, log in. -
From the top menu, select Configure > Global Services > CORS Service.
-
On the Secondary Configurations tab, click Add a Secondary Configuration.
-
On the New Configuration screen, enter the following values:
-
Name :
Cors Configuration -
Accepted Origins :
http://login.example.com:8083
http://admin.example.com:8082
http://enduser.example.com:8888
http://openidm.example.com:8080
https://openidm.example.com:8443List only the origins that will be hosting OAuth 2.0 clients (such as the
platform-enduserand IDM admin UIs). -
Accepted Methods:
DELETE
GET
HEAD
PATCH
POST
PUT -
Accepted Headers:
accept-api-version
authorization
cache-control
content-type
if-match
if-none-match
user-agent
x-forgerock-transactionid
x-openidm-nosession
x-openidm-password
x-openidm-username
x-requested-with -
Exposed Headers:
WWW-Authenticate
-
-
Click Create.
-
On the Cors Configuration screen, set the following values:
-
Enable the CORS filter: Enable
-
Max Age:
600 -
Allow Credentials: Enable
-
-
Click Save Changes.
Configure authentication trees
The platform deployment relies on three authentication trees to enable authentication through AM.
When you extract the AM .zip file, you will get a sample-trees-7.5.0.zip file
that contains a number of sample authentication trees, in JSON files.
Use the Amster command-line utility to import the platform authentication trees into your AM configuration:
-
Extract the
sample-trees-7.5.0.zipfile, and list the sample trees in theroot/AuthTreedirectory:ls /path/to/openam-samples/root/AuthTree Agent.json PlatformForgottenUsername.json Example.json PlatformLogin.json Facebook-ProvisionIDMAccount.json PlatformProgressiveProfile.json Google-AnonymousUser.json PlatformRegistration.json Google-DynamicAccountCreation.json PlatformResetPassword.json HmacOneTimePassword.json PlatformUpdatePassword.json PersistentCookie.json RetryLimit.jsonbash -
In all the sample tree files, replace
"realm" : "/"with"realm" : "/alpha". -
Start Amster, then connect to your AM instance:
./amster
Amster OpenAM Shell (version build build, JVM: version)
Type ':help' or ':h' for help.
---------------------------------------------------------------------------
am> connect --interactive http://am.example.com:8081/am
Sign in
User Name: amAdmin
Password: Passw0rd
amster am.example.com:8081> :exit
bash -
Import the sample authentication trees and nodes:
amster am.example.com:8081>import-config --path /path/to/openam-samples/root
Importing directory /path/to/openam-samples/root/AcceptTermsAndConditions
...
Import completed successfully
bash -
If you’re not currently logged in to the AM admin UI as the
amAdminuser, log in. -
Configure the
PlatformRegistrationtree:-
In the
alpharealm, select Authentication > Trees, and click PlatformRegistration. -
On the
PlatformRegistrationtree, add aSuccess URLnode betweenIncrement Login CountandSuccess, and set its value tohttp://enduser.example.com:8888/?realm=alpha.Show me
-
Click Save.
-
-
Configure the
PlatformLogintree:-
In the
alpharealm, select Authentication > Trees, and click PlatformLogin. -
On the
PlatformLogintree, add aSuccess URLnode betweenInner Tree EvaluatorandSuccess, and set its value tohttp://enduser.example.com:8888/?realm=alpha.Show me
-
Click Save.
-
-
Configure the
PlatformResetPasswordtree:-
In the
alpharealm, select Authentication > Trees, and click PlatformResetPassword. -
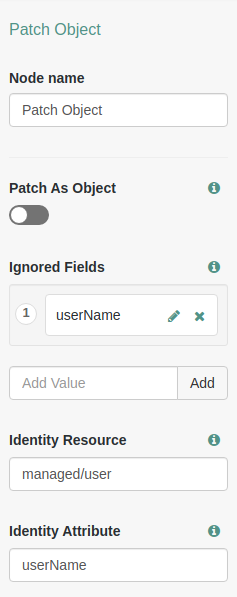
On the
PlatformResetPasswordtree, add aSuccess URLnode betweenPatch ObjectandSuccess, and set its value tohttp://enduser.example.com:8888/?realm=alpha.Show me
-
Click Save.
-
-
Configure the
PlatformUpdatePasswordtree:-
In the
alpharealm, select Authentication > Trees, and click PlatformUpdatePassword. -
On the
PlatformUpdatePasswordtree, select thePatch Objectnode, and make surePatch As Objectis disabled.Show me
-
Click Save.
-
-
For the authentication trees that require email, set the External Login Page URL.
-
In the
alpharealm, select Authentication > Settings, and click the General tab. -
Set External Login Page URL to
http://login.example.com:8083, then click Save Changes.
-
Map authentication trees
Map the platform authentication trees to the corresponding Self-Service endpoints. For more information about this step, refer to Configure self-service trees endpoints.
-
In the
alpharealm, select Services, and click Add a Service. -
Under Choose a service type, select Self Service Trees, and click Create.
-
Add the following tree mappings:
Key Value registrationPlatformRegistrationloginPlatformLoginresetPasswordPlatformResetPassword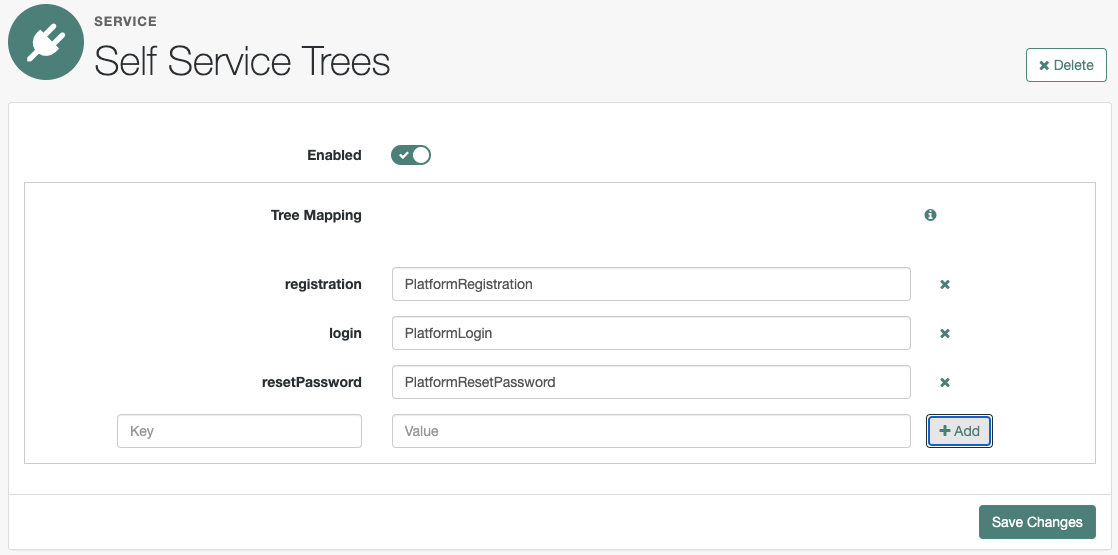
-
Click Save Changes.
Additional AM configuration
The AM configuration shown is sufficient for this sample deployment. Read the AM documentation when using additional features.
For example, if AM runs behind a load balancer or a reverse proxy, configure a base URL source service. Adapt the AM configuration to use this service when you protect AM with IG.
Restart Tomcat
Restart Tomcat to take all the configuration changes into account:
$ /path/to/tomcat/bin/shutdown.sh
# Wait a moment for Tomcat to shut down cleanly before starting it again.
$ /path/to/tomcat/bin/startup.shSet up IDM
|
This is not a comprehensive platform implementation guide. These sample setup instructions show a minimal integration of platform components to get you started. The ForgeRock Identity Platform offers maximum extensibility and flexibility in self-managed deployments. The platform includes many features and options these sample setup instructions do not cover. If you don’t need maximum extensibility and flexibility, there are simpler alternatives:
For help with your deployment and to validate your plans before deploying in production, contact ForgeRock. |
This procedure sets up IDM with an external MySQL repository. The procedure reflects the listed server settings for installing IDM.
-
Follow the instructions in the IDM documentation to download, install, and run IDM.
Before running IDM, make sure you set the
JAVA_HOMEenvironment variable. -
Edit the
/path/to/openidm/resolver/boot.propertiesfile to set the hostname:openidm.host=openidm.example.com
-
Configure your IDM repository. This procedure was tested with a MySQL repository. Follow the instructions in the IDM documentation to set up a MySQL repository.
-
Configure social authentication.
In your project’s
conf/managed.jsonfile:-
Add an
aliasListproperty to theuserobject:{ "objects": [ { "name": "user", ... "schema": { "properties": { ... "aliasList": { "title": "User Alias Names List", "description": "List of identity aliases used primarily to record social IdP subjects for this user", "type": "array", "items": { "type": "string", "title": "User Alias Names Items" }, "viewable": false, "searchable": false, "userEditable": true, "returnByDefault": false, "isVirtual": false } ... ] }json -
Update the
passwordproperty to ensure that users update their passwords through the self-service APIs, not directly:"userEditable" : falsejson
-
-
Change the authentication mechanism to
rsFilteronly:-
Replace the default
conf/authentication.jsonfile with this authentication.json file. -
Check that the
clientSecretmatches theClient secretthat you set for theidm-resource-serverclient in AM (see Configure OAuth Clients). -
Check that the
rsFilter>subjectMapping>propertyMapping>subproperty is correctly configured.The
authentication.jsonfile aligns with the default AM configuration for subject claim uniqueness. AM refers to the subject by its unique identifier, and so IDM does, too.If AM has its advanced server property,
org.forgerock.security.oauth2.enforce.sub.claim.uniqueness, set tofalse, for example, because you upgraded from a previous release of AM, use this property mapping instead:"propertyMapping": { "sub": "userName" }jsonAM refers to the subject by its username in this case. For details, see the /pingam/7.5/reference/deployment-configuration-reference.html#adv-property-sub-claim[reference for the setting] in the AM documentation.
For more information about authenticating using the
rsFilter, see Authenticate through AM in the IDM documentation. -
-
Edit the IDM admin UI configuration so that you can still authenticate through the IDM admin UI:
-
In your
conf/ui-configuration.jsonfile, insert aplatformSettingsobject into theconfigurationobject:{ "configuration" : { "platformSettings" : { "adminOauthClient" : "idm-admin-ui", "adminOauthClientScopes" : "fr:idm:*", "amUrl" : "http://am.example.com:8081/am", "loginUrl" : "" } } }jsonThis object tells the IDM admin UI that it is operating in "platform mode" (that is, as an OAuth 2.0 client of AM).
-
In your
conf/ui.context-admin.jsonfile, check thatX-Frame-Optionsis set toSAMEORIGIN:Sample ui.context-admin.json
{
  "enabled" : true,
  "cacheEnabled" : true,
  "urlContextRoot" : "/admin",
  "defaultDir" : "&{idm.install.dir}/ui/admin/default",
  "extensionDir" : "&{idm.install.dir}/ui/admin/extension",
  "responseHeaders" : {
      "X-Frame-Options" : "SAMEORIGIN"
  }
}
json
You should now be able to access the IDM admin UI at http://openidm.example.com:8080/admin. When you log in to the Admin UI, use the default AM administrative user (
amAdmin), and notopenidm-admin. -
-
Configure the CORS servlet filter.
Replace the default
conf/servletfilter-cors.jsonfile with this servletfilter-cors.json file. -
Configure synchronization between the IDM repository and the AM identity store.
-
Add a configuration for the LDAP connector.
Create a configuration file named
provisioner.openicf-ldap.jsonin the/path/to/openidm/confdirectory. Use this provisioner.openicf-ldap.json file as a template.Pay particular attention to the connection properties,
host,port,principal, andcredentials. These must match the configuration of the DS server that you set up as the identity store. -
Add a mapping between IDM managed user objects, and AM identities stored in DS.
Create a mapping file named
sync.jsonin the/path/to/openidm/confdirectory. Use this sync.json file as a template.
-
-
Secure the connection to the DS server.
This step assumes that you have set up DS and exported the DS CA certificate from
directory.example.com(as shown in Step 4 of Secure connections).Import the DS CA certificate into the IDM truststore:
keytool \
-importcert \
-alias ds-ca-cert \
-file /path/to/ds-ca-cert.pem \
-keystore /path/to/openidm/security/truststore \
-storepass:file /path/to/openidm/security/storepass
Owner: CN=Deployment key, O=ForgeRock.com
Issuer: CN=Deployment key, O=ForgeRock.com
...
Trust this certificate? [no]:  yes
Certificate was added to keystore
bash -
Add the configuration to enable theming for hosted UI pages.
-
Copy this ui-themerealm.json file to the
conf/directory. -
In your
conf/access.jsonfile, insert a configuration object for the theme in theconfigsarray:{ "configs": [{ "pattern": "config/ui/themerealm", "roles": "*", "methods": "read", "actions": "*" }] }json
-
-
If you want to use the
PlatformForgottenUsernameorPlatformResetPasswordtrees, configure outbound email.After you have installed the Platform UI, you can configure email through the UI at
http://openidm.example.com:8080/admin.
IDM is now configured for this deployment.
Shared identity store
|
This is not a comprehensive platform implementation guide. These sample setup instructions show a minimal integration of platform components to get you started. The ForgeRock Identity Platform offers maximum extensibility and flexibility in self-managed deployments. The platform includes many features and options these sample setup instructions do not cover. If you don’t need maximum extensibility and flexibility, there are simpler alternatives:
For help with your deployment and to validate your plans before deploying in production, contact ForgeRock. |
This sample deployment uses a single external DS server as:
-
The AM configuration store.
-
The AM identity store.
-
The IDM identity store.
|
The IDM End User UI is not supported in a platform deployment, as it does not support authentication through AM. You can use the Set up the platform UIs with this deployment, or create your own UIs that support authentication through AM. |
Download DS
Follow the instructions in the DS documentation to download DS, and prepare for installation.
The instructions that follow assume you download the cross-platform .zip distribution.
Set up DS
-
Unpack the DS files you downloaded.
-
Generate and save a unique DS deployment ID:
/path/to/opendj/bin/dskeymgr create-deployment-id --deploymentIdPassword passwordbashYou will need the deployment ID and password to install DS, and to export the server certificate.
Set the deployment ID in your environment:
export DEPLOYMENT_ID=deployment-idbash -
Install a DS server with the necessary setup profiles:
-
am-config -
am-cts -
am-identity-store -
idm-repo
For more information about DS setup profiles, refer to setup profiles in the DS documentation.
/path/to/opendj/setup \ --deploymentId $DEPLOYMENT_ID \ --deploymentIdPassword password \ --rootUserDN uid=admin \ --rootUserPassword str0ngAdm1nPa55word \ --monitorUserPassword str0ngMon1torPa55word \ --hostname directory.example.com \ --adminConnectorPort 4444 \ --ldapPort 1389 \ --enableStartTls \ --ldapsPort 1636 \ --profile am-config \ --set am-config/amConfigAdminPassword:5up35tr0ng \ --profile am-cts \ --set am-cts/amCtsAdminPassword:5up35tr0ng \ --set am-cts/tokenExpirationPolicy:am-sessions-only \ --profile am-identity-store \ --set am-identity-store/amIdentityStoreAdminPassword:5up35tr0ng \ --profile idm-repo \ --set idm-repo/domain:forgerock.io \ --acceptLicensebashFor simplicity, this sample deployment uses a standalone directory server that:
-
Does not replicate directory data (no
--replicationPortor--bootstrapReplicationServeroptions).In production deployments, always replicate directory data for availability and resilience.
-
Consolidates all directory data in the same replicas.
In very high-volume production deployments, test whether this meets your performance requirements and adjust your directory deployment if necessary.
-
Keeps AM identity data and IDM repository data under distinct base DNs.
Both AM and IDM expect exclusive access to their data. Keep their data separate with distinct base DNs and domains in your setup profiles. Don’t accidentally mix their data by choosing a base DN under the other base DN.
For details, refer to the DS installation documentation.
-
-
Start the DS server:
/path/to/opendj/bin/start-dsbash
Set up a container
Install a Java container to deploy AM.
These deployment examples assume that you are using Apache Tomcat:
-
Follow the instructions in the AM documentation to prepare your environment.
-
Use a supported version of Apache Tomcat as the web application container:
-
Configure Tomcat to listen on port
8081.This non-default port requires that you update Tomcat’s
conf/server.xmlfile. Instead of the default line,<Connector port="8080" protocol="HTTP/1.1">, use:<Connector port="8081" protocol="HTTP/1.1">xml -
Create a Tomcat
bin/setenv.shorbin\setenv.batfile to hold your environment variables. -
Follow the instructions in the AM documentation to prepare Tomcat as the web application container.
-
For complete instructions on setting up Tomcat, see Apache Tomcat in the AM documentation.
Secure connections
|
From DS 7 onwards, you must secure connections to DS servers. |
-
Create a new directory that will house a dedicated truststore for AM:
mkdir -p /path/to/openam-security/bash -
Export the DS server certificate.
You must run this command on
directory.example.comin the terminal window where you set theDEPLOYMENT_IDvariable:/path/to/opendj/bin/dskeymgr export-ca-cert \ --deploymentId $DEPLOYMENT_ID \ --deploymentIdPassword password \ --outputFile ds-ca-cert.pembash -
Import the DS server certificate into the dedicated AM truststore.
If you are not testing this example on a single host, you might need to copy each certificate file onto the AM host machine first:
keytool \
-importcert \
-trustcacerts \
-alias ds-ca-cert \
-file /path/to/ds-ca-cert.pem \
-keystore /path/to/openam-security/truststore \
-storepass changeit \
-storetype JKS
Owner: CN=Deployment key, O=ForgeRock.com
Issuer: CN=Deployment key, O=ForgeRock.com
...
Trust this certificate? [no]:  yes
Certificate was added to keystore
bash -
List the certificates in the new truststore and verify that the certificate you added is there:
keytool \
-list \
-keystore /path/to/openam-security/truststore \
-storepass changeit
bash -
Point Apache Tomcat to the path of the new truststore so that AM can access it.
Append the truststore settings to the
CATALINA_OPTSvariable in the Tomcatbin/setenv.shfile; for example:CATALINA_OPTS="-Djavax.net.ssl.trustStore=/path/to/openam-security/truststore \ -Djavax.net.ssl.trustStorePassword=changeit \ -Djavax.net.ssl.trustStoreType=jks"propertiesRefer to your specific container’s documentation for information on configuring truststores.
-
Verify secure authentication to the DS server with the dedicated AM accounts.
If you deployed AM and DS on separate computers, first copy the AM truststore to
/path/to/openam-security/truststoreon the computer where DS runs. Use the DSldapsearchcommand to connect to DS using the local copy of the AM truststore:/path/to/opendj/bin/ldapsearch \ --hostname directory.example.com \ --port 1636 \ --useSsl \ --useJavaTrustStore /path/to/openam-security/truststore \ --trustStorePassword changeit \ --bindDn uid=am-config,ou=admins,ou=am-config \ --bindPassword 5up35tr0ng \ --baseDn ou=am-config \ "(&)" \ 1.1 dn: ou=am-config dn: ou=admins,ou=am-config dn: uid=am-config,ou=admins,ou=am-config /path/to/opendj/bin/ldapsearch \ --hostname directory.example.com \ --port 1636 \ --useSsl \ --useJavaTrustStore /path/to/openam-security/truststore \ --trustStorePassword changeit \ --bindDn uid=am-identity-bind-account,ou=admins,ou=identities \ --bindPassword 5up35tr0ng \ --baseDn ou=identities \ "(&)" \ 1.1 dn: ou=identities dn: ou=people,ou=identities dn: ou=groups,ou=identities dn: ou=admins,ou=identities dn: uid=am-identity-bind-account,ou=admins,ou=identitiesbash
Set up AM
|
This is not a comprehensive platform implementation guide. These sample setup instructions show a minimal integration of platform components to get you started. The ForgeRock Identity Platform offers maximum extensibility and flexibility in self-managed deployments. The platform includes many features and options these sample setup instructions do not cover. If you don’t need maximum extensibility and flexibility, there are simpler alternatives:
For help with your deployment and to validate your plans before deploying in production, contact ForgeRock. |
When your external data stores are configured, follow these procedures to configure AM with the ForgeRock Identity Platform:
Install AM
-
Follow the instructions in the AM documentation to download AM. Make sure you download the
.zipfile, not just the.warfile. -
Copy the AM
.warfile to deploy in Apache Tomcat asam.war:cp AM-7.5.0.war /path/to/tomcat/webapps/am.warbash -
Start Tomcat if it is not already running.
-
Navigate to the deployed AM application; for example, http://am.example.com:8081/am/.
-
Select Create New Configuration to create a custom configuration.
-
Accept the license agreement, and click Continue.
-
Set a password for the default user,
amAdmin.These instructions assume that the
amAdminpassword isPassw0rd. -
On the Server Settings screen, enter your AM server settings; for example:
-
Server URL:
http://am.example.com:8081 -
Cookie Domain:
example.com -
Platform Locale:
en_US -
Configuration Directory:
/path/to/am
-
-
On the Configuration Data Store Settings screen, select External DS, and enter the details for the DS instance that you set up as a configuration store.
This list reflects the DS configuration store installed with the listed server settings.
-
SSL/TLS:
Enabled(DS requires TLS.) -
Host Name:
directory.example.com -
Port:
1636 -
Encryption Key: (generated encryption key)
-
Root Suffix:
ou=am-config -
Login ID:
uid=am-config,ou=admins,ou=am-config -
Password:
5up35tr0ng -
Server configuration:
New deployment
-
-
On the User Data Store Settings screen, select External User Data Store, and enter the details for the DS instance that you set up as an identity store.
The AM setup process requires that you configure an identity store.
You will use this store later in an
alpharealm for non-administrative identities.This list reflects the DS identity store installed with the listed server settings.
-
User Data Store Type:
ForgeRock Directory Services (DS) -
SSL/TLS:
Enabled(DS requires TLS.) -
Host Name:
directory.example.com -
Port:
1636 -
Root Suffix:
ou=identities -
Login ID:
uid=am-identity-bind-account,ou=admins,ou=identities -
Password:
5up35tr0ng
-
-
On the Site Configuration screen, select No, then click Next.
-
Review the Configurator Summary Details, then click Create Configuration.
Use the external CTS store
Update the AM configuration to use DS as an external token store:
-
Log in to the AM admin UI as the
amAdminuser. -
Browse to Configure > Server Defaults > CTS.
-
Make the following changes, saving your work before switching tabs:
Setting Choice CTS Token Store > Store Mode
External Token Store
CTS Token Store > Root Suffix
ou=famrecords,ou=openam-session,ou=tokensExternal Store Configuration > SSL/TLS Enabled
Selected
External Store Configuration > Connection String(s)
localhost:1636External Store Configuration > Login Id
uid=openam_cts,ou=admins,ou=famrecords,ou=openam-session,ou=tokensExternal Store Configuration > Password
5up35tr0ngKeep the defaults for all other settings.
Create a realm
The AM Top Level Realm should serve administration purposes only.
These steps create an alpha realm for non-administrative identities:
-
If you’re not currently logged in to the AM admin UI as the
amAdminuser, log in. -
Click + New Realm, and create the new realm with the following settings:
-
Name:
alpha -
Keep the defaults for all other settings.
-
For background information, see Realms in the AM documentation.
Change the identity store configuration for IDM
-
In the
alpharealm, select Identity Stores then click OpenDJ. -
On the Server Settings tab, set LDAPv3 Plug-in Search Scope to
SCOPE_ONE, then click Save Changes. -
On the User Configuration tab, set LDAP Users Search Attribute to
fr-idm-uuid, then click Save Changes. -
On the Authentication Configuration tab, check that the Authentication Naming Attribute is set to
uid, then click Save Changes. -
In the Top Level Realm, under Identity Stores, delete the configuration for OpenDJ.
The deployment will store non-administrative identities in the
alpharealm.
Configure OAuth clients
The deployment depends on the following OAuth 2.0 clients:
| Client ID | Description | In Top Level Realm? | In subrealms? |
|---|---|---|---|
|
IDM uses this confidential client to introspect access tokens through the This client is not used for OAuth 2.0 flows, only to introspect tokens. It is not a real OAuth 2.0 client, in the traditional sense. Rather, it is an OAuth 2.0 Resource Server account, used exclusively for token introspection. As such, you do not need to specify redirect URIs or grant types. When you configure the client, AM adds the |
|
|
|
AM nodes in authentication journeys (trees) use this confidential client to authenticate through AM and provision identities through IDM. This client uses the client credentials flow, and does not authenticate resource owners other than itself. |
|
|
|
The Platform Admin UI uses this public client to access platform configuration features, such as identity management and journey (tree) editing. The client uses the implicit flow, and authenticates administrator users who are authorized to perform administrative operations. |
|
|
|
The End User UI uses this public client to access and present end-user profile data. The client uses the implicit flow, and authenticates end users who are authorized to view and edit their profiles. |
|
|
When configuring a client in more than one realm, make sure that the client configurations are identical.
Follow these steps to configure the OAuth 2.0 clients:
-
If you’re not currently logged in to the AM admin UI as the
amAdminuser, log in. -
In the Top Level Realm, configure an
idm-resource-serverclient to introspect access tokens:-
Select Applications > OAuth 2.0 > Clients, and click Add Client.
-
Enter the following details:
-
Client ID:
idm-resource-server -
Client secret:
passwordThe value of this field must match the
clientSecretthat you will set in thersFiltermodule in the IDM authentication configuration (/path/to/openidm/conf/authentication.json) during your IDM setup. -
Scopes:
am-introspect-all-tokens
am-introspect-all-tokens-any-realm
-
-
Click Create.
-
-
In the Top Level Realm and the
alpharealm, configure identicalidm-provisioningclients to make calls to IDM:-
Select Applications > OAuth 2.0 > Clients, and click Add Client.
-
Enter the following details:
-
Client ID:
idm-provisioning -
Client secret:
openidm -
Scopes:
fr:idm:*
-
-
Click Create.
-
On the Advanced tab:
-
Response Types: Check that
tokenis present (it should be there by default). -
Grant Types: Remove
Authorization Codeand addClient Credentials.
-
-
Click Save Changes.
-
-
In the Top Level Realm and the
alpharealm, configure identicalidm-admin-uiclients that will be used by the Platform Admin UI:-
Select Applications > OAuth 2.0 > Clients, and click Add Client.
-
Enter the following details:
-
Client ID:
idm-admin-ui -
Client Secret: (no client secret is required)
-
Redirection URIs:
http://openidm.example.com:8080/platform/appAuthHelperRedirect.html
http://openidm.example.com:8080/platform/sessionCheck.html
http://openidm.example.com:8080/admin/appAuthHelperRedirect.html
http://openidm.example.com:8080/admin/sessionCheck.html
http://admin.example.com:8082/appAuthHelperRedirect.html
http://admin.example.com:8082/sessionCheck.html -
Scopes:
openid
fr:idm:*At a minimum, the scopes that you set here must include the scopes that you will set in the
rsFilterauthentication configuration (/path/to/openidm/conf/authentication.json) during your IDM setup.
-
-
Click Create.
-
On the Core tab:
-
Client type: Select
Public. -
Click Save Changes.
-
-
On the Advanced tab:
-
Grant Types: Add
Implicit. -
Token Endpoint Authentication Method: Select
none. -
Implied consent: Enable.
-
Click Save Changes.
-
-
-
In the Top Level Realm and the
alpharealm, configure identicalend-user-uiclients that will be used by the Platform End User UI:-
Select Applications > OAuth 2.0 > Clients , and click Add Client.
-
Enter the following details:
-
Client ID:
end-user-ui -
Client Secret: (no client secret is required)
-
Redirection URIs:
http://enduser.example.com:8888/appAuthHelperRedirect.html
http://enduser.example.com:8888/sessionCheck.html -
Scopes:
openid
fr:idm:*At a minimum, the scopes that you set here must include the scopes that you will set in the
rsFilterauthentication configuration (/path/to/openidm/conf/authentication.json) during your IDM setup.
-
-
Click Create.
-
On the Core tab:
-
Client type: Select
Public. -
Click Save Changes.
-
-
On the Advanced tab:
-
Grant Types: Add
Implicit. -
Token Endpoint Authentication Method: Select
none. -
Implied Consent: Enable.
-
Click Save Changes.
-
-
Configure OAuth 2.0 providers
-
If you’re not currently logged in to the AM admin UI as the
amAdminuser, log in. -
Configure a provider for the Top Level Realm:
-
In the Top Level Realm, select Services, and click Add a Service.
-
Under Choose a service type, select OAuth2 Provider.
-
For Client Registration Scope Allowlist, add the following scopes:
am-introspect-all-tokens
am-introspect-all-tokens-any-realm
fr:idm:*
openid -
Click Create.
-
On the Advanced tab, make sure that Response Type Plugins includes the following values:
id_token|org.forgerock.openidconnect.IdTokenResponseTypeHandler
code|org.forgerock.oauth2.core.AuthorizationCodeResponseTypeHandler -
Click Save Changes.
-
On the Consent tab, enable Allow Clients to Skip Consent.
-
Click Save Changes.
-
-
Configure a provider for the
alpharealm:-
In the
alpharealm, select Services, and click Add a Service. -
Under Choose a service type, select OAuth2 Provider.
-
For Client Registration Scope Allowlist, add the following scopes:
fr:idm:*
openid -
Click Create.
-
On the Advanced tab, make sure that Response Type Plugins includes the following values:
id_token|org.forgerock.openidconnect.IdTokenResponseTypeHandler
code|org.forgerock.oauth2.core.AuthorizationCodeResponseTypeHandler -
Click Save Changes.
-
On the Consent tab, enable Allow Clients to Skip Consent.
-
Click Save Changes.
-
Configure an IDM provisioning service
-
If you’re not currently logged in to the AM admin UI as the
amAdminuser, log in. -
From the top menu, select Configure > Global Services > IDM Provisioning.
The AM admin UI does not let you configure an IDM provisioning service in a realm.
-
Set the following fields:
-
Enabled
-
Deployment URL:
http://openidm.example.com:8080 -
Deployment Path:
openidm -
IDM Provisioning Client:
idm-provisioning
-
-
Click Save Changes.
|
If some resource strings in the AM admin UI do not resolve properly at setup time, the UI labels mentioned will show internal keys instead of the labels shown in the steps above. Use the following table to check that you have the correct service and fields:
|
Configure a validation service
The Platform UIs need this validation service allow listing for goto redirection.
-
If you’re not currently logged in to the AM admin UI as the
amAdminuser, log in. -
In the
alpharealm, select Services, and click Add a Service. -
Under Choose a service type, select Validation Service.
-
For Valid goto URL Resources, add the URLs for the Platform UI:
http://admin.example.com:8082/*
http://admin.example.com:8082/*?*
http://login.example.com:8083/*
http://login.example.com:8083/*?*
http://enduser.example.com:8888/*
http://enduser.example.com:8888/*?* -
Click Create.
Enable CORS support
Cross-origin resource sharing (CORS) lets user agents make requests across domains.
-
If you’re not currently logged in to the AM admin UI as the
amAdminuser, log in. -
From the top menu, select Configure > Global Services > CORS Service.
-
On the Secondary Configurations tab, click Add a Secondary Configuration.
-
On the New Configuration screen, enter the following values:
-
Name :
Cors Configuration -
Accepted Origins :
http://login.example.com:8083
http://admin.example.com:8082
http://enduser.example.com:8888
http://openidm.example.com:8080
https://openidm.example.com:8443List only the origins that will be hosting OAuth 2.0 clients (such as the
platform-enduserand IDM admin UIs). -
Accepted Methods:
DELETE
GET
HEAD
PATCH
POST
PUT -
Accepted Headers:
accept-api-version
authorization
cache-control
content-type
if-match
if-none-match
user-agent
x-forgerock-transactionid
x-openidm-nosession
x-openidm-password
x-openidm-username
x-requested-with -
Exposed Headers:
WWW-Authenticate
-
-
Click Create.
-
On the Cors Configuration screen, set the following values:
-
Enable the CORS filter: Enable
-
Max Age:
600 -
Allow Credentials: Enable
-
-
Click Save Changes.
Configure authentication trees
The platform deployment relies on three authentication trees to enable authentication through AM.
When you extract the AM .zip file, you will get a sample-trees-7.5.0.zip file
that contains a number of sample authentication trees, in JSON files.
Use the Amster command-line utility to import the platform authentication trees into your AM configuration:
-
Extract the
sample-trees-7.5.0.zipfile, and list the sample trees in theroot/AuthTreedirectory:ls /path/to/openam-samples/root/AuthTree Agent.json PlatformForgottenUsername.json Example.json PlatformLogin.json Facebook-ProvisionIDMAccount.json PlatformProgressiveProfile.json Google-AnonymousUser.json PlatformRegistration.json Google-DynamicAccountCreation.json PlatformResetPassword.json HmacOneTimePassword.json PlatformUpdatePassword.json PersistentCookie.json RetryLimit.jsonbash -
In all the sample tree files, replace
"realm" : "/"with"realm" : "/alpha". -
Start Amster, then connect to your AM instance:
./amster
Amster OpenAM Shell (version build build, JVM: version)
Type ':help' or ':h' for help.
---------------------------------------------------------------------------
am> connect --interactive http://am.example.com:8081/am
Sign in
User Name: amAdmin
Password: Passw0rd
amster am.example.com:8081> :exit
bash -
Import the sample authentication trees and nodes:
amster am.example.com:8081>import-config --path /path/to/openam-samples/root
Importing directory /path/to/openam-samples/root/AcceptTermsAndConditions
...
Import completed successfully
bash -
If you’re not currently logged in to the AM admin UI as the
amAdminuser, log in. -
Configure the
PlatformRegistrationtree:-
In the
alpharealm, select Authentication > Trees, and click PlatformRegistration. -
On the
PlatformRegistrationtree, add aSuccess URLnode betweenIncrement Login CountandSuccess, and set its value tohttp://enduser.example.com:8888/?realm=alpha.Show me
-
Click Save.
-
-
Configure the
PlatformLogintree:-
In the
alpharealm, select Authentication > Trees, and click PlatformLogin. -
On the
PlatformLogintree, add aSuccess URLnode betweenInner Tree EvaluatorandSuccess, and set its value tohttp://enduser.example.com:8888/?realm=alpha.Show me
-
Click Save.
-
-
Configure the
PlatformResetPasswordtree:-
In the
alpharealm, select Authentication > Trees, and click PlatformResetPassword. -
On the
PlatformResetPasswordtree, add aSuccess URLnode betweenPatch ObjectandSuccess, and set its value tohttp://enduser.example.com:8888/?realm=alpha.Show me
-
Click Save.
-
-
Configure the
PlatformUpdatePasswordtree:-
In the
alpharealm, select Authentication > Trees, and click PlatformUpdatePassword. -
On the
PlatformUpdatePasswordtree, select thePatch Objectnode, and make surePatch As Objectis disabled.Show me
-
Click Save.
-
-
For the authentication trees that require email, set the External Login Page URL.
-
In the
alpharealm, select Authentication > Settings, and click the General tab. -
Set External Login Page URL to
http://login.example.com:8083, then click Save Changes.
-
Map authentication trees
Map the platform authentication trees to the corresponding Self-Service endpoints. For more information about this step, refer to Configure self-service trees endpoints.
-
In the
alpharealm, select Services, and click Add a Service. -
Under Choose a service type, select Self Service Trees, and click Create.
-
Add the following tree mappings:
Key Value registrationPlatformRegistrationloginPlatformLoginresetPasswordPlatformResetPassword
-
Click Save Changes.
Additional AM configuration
The AM configuration shown is sufficient for this sample deployment. Read the AM documentation when using additional features.
For example, if AM runs behind a load balancer or a reverse proxy, configure a base URL source service. Adapt the AM configuration to use this service when you protect AM with IG.
Restart Tomcat
Restart Tomcat to take all the configuration changes into account:
$ /path/to/tomcat/bin/shutdown.sh
# Wait a moment for Tomcat to shut down cleanly before starting it again.
$ /path/to/tomcat/bin/startup.shSet up IDM
|
This is not a comprehensive platform implementation guide. These sample setup instructions show a minimal integration of platform components to get you started. The ForgeRock Identity Platform offers maximum extensibility and flexibility in self-managed deployments. The platform includes many features and options these sample setup instructions do not cover. If you don’t need maximum extensibility and flexibility, there are simpler alternatives:
For help with your deployment and to validate your plans before deploying in production, contact ForgeRock. |
This procedure sets up IDM with an external DS instance as the repository. The DS instance is shared with AM as the identity store. The procedure reflects the listed server settings for installing IDM and DS.
-
Follow the instructions in the IDM documentation to download and install IDM.
-
Edit the
/path/to/openidm/resolver/boot.propertiesfile to set the hostname:openidm.host=openidm.example.comproperties -
Configure the shared IDM repository.
This step assumes that you have set up DS and exported the DS CA certificate from
directory.example.com(as shown in Step 4 of Secure connections).-
Import the DS CA certificate into the IDM truststore:
keytool \
-importcert \
-alias ds-ca-cert \
-file /path/to/ds-ca-cert.pem \
-keystore /path/to/openidm/security/truststore \
-storepass:file /path/to/openidm/security/storepass
Owner: CN=Deployment key, O=ForgeRock.com
Issuer: CN=Deployment key, O=ForgeRock.com
...
Trust this certificate? [no]:  yes
Certificate was added to keystore
bash -
Replace the default
conf/repo.ds.jsonfile with this repo.ds.json file.Replace the values of
fileBasedTrustManagerFileandfileBasedTrustManagerPasswordFilewith the path to your IDM truststore and truststore password file.Check that the properties under
ldapConnectionFactoriesmatch the DS server that you set up as the identity store.
-
-
It is worth starting IDM at this point, to make sure that it can connect to the external DS repository.
-
Set the
JAVA_HOMEenvironment variable. -
Start IDM, and wait until you see
OpenIDM readyin the output:/path/to/openidm/startup.sh -> OpenIDM version "7.5.0" <build-info> OpenIDM readybash
-
-
Update the
userobject in your managed object configuration by making the following changes to yourconf/managed.jsonfile.All changes are made to the object
user>schema>properties:{ "objects": [ { "name": "user", ... "schema": { "properties": { ... } ... } ] }json-
Remove encryption from the
passwordproperty. Remove:"encryption" : { "purpose": "idm.password.encryption" }jsonPassword encryption is not supported in a shared identity store setup. Instead, the shared identity store supports only hashed passwords, a format that both AM and IDM can use. This differs from Separate identity stores, where AM and IDM do not share the identity store, and so each service can store passwords in different formats.
-
Update the
passwordproperty to ensure that users update their passwords through the self-service APIs, not directly:"userEditable" : falsejson -
Add a
cnproperty to theuserobject:{ "objects": [ { "name": "user", ... "schema": { "properties" : { "_id" : { ... }, "cn": { "title": "Common Name", "description": "Common Name", "type": "string", "viewable": false, "searchable": false, "userEditable": false, "scope": "private", "isPersonal": true, "isVirtual": true, "onStore": { "type": "text/javascript", "source": "object.cn || (object.givenName + ' ' + object.sn)" } }, ... } ... } ] }json -
Configure social authentication.
Add an
aliasListproperty to theuserobject:"aliasList": { "title": "User Alias Names List", "description": "List of identity aliases used primarily to record social IdP subjects for this user", "type": "array", "items": { "type": "string", "title": "User Alias Names Items" }, "viewable": false, "searchable": false, "userEditable": true, "returnByDefault": false, "isVirtual": false },json
-
-
Change the authentication mechanism to
rsFilteronly:-
Replace the default
conf/authentication.jsonfile with this authentication.json file. -
Check that the
clientSecretmatches theClient secretthat you set for theidm-resource-serverclient in AM (see Configure OAuth Clients). -
Check that the
rsFilter>subjectMapping>propertyMapping>subproperty is correctly configured.The
authentication.jsonfile aligns with the default AM configuration for subject claim uniqueness. AM refers to the subject by its unique identifier, and so IDM does, too.If AM has its advanced server property,
org.forgerock.security.oauth2.enforce.sub.claim.uniqueness, set tofalse, for example, because you upgraded from a previous release of AM, use this property mapping instead:"propertyMapping": { "sub": "userName" }jsonAM refers to the subject by its username in this case. For details, see the /pingam/7.5/reference/deployment-configuration-reference.html#adv-property-sub-claim[reference for the setting] in the AM documentation.
For more information about authenticating using the
rsFilter, see Authenticate through AM in the IDM documentation. -
-
Edit the IDM admin UI configuration so that you can still authenticate through the IDM admin UI:
-
In your
/path/to/openidm/conf/ui-configuration.jsonfile, insert aplatformSettingsobject into theconfigurationobject:{ "configuration" : { "platformSettings" : { "adminOauthClient" : "idm-admin-ui", "adminOauthClientScopes" : "fr:idm:*", "amUrl" : "http://am.example.com:8081/am", "loginUrl" : "" } } }jsonThis object tells the IDM admin UI that it is operating in "platform mode" (that is, as an OAuth 2.0 client of AM).
-
In your
conf/ui.context-admin.jsonfile, check thatX-Frame-Optionsis set toSAMEORIGIN:Sample ui.context-admin.json
{
    "enabled" : true,
    "cacheEnabled": true,
    "urlContextRoot" : "/admin",
    "defaultDir" : "&{idm.install.dir}/ui/admin/default",
    "extensionDir" : "&{idm.install.dir}/ui/admin/extension",
    "responseHeaders" : {
        "X-Frame-Options" : "SAMEORIGIN"
    }
}
json
-
-
Configure the CORS servlet filter.
Replace the default
conf/servletfilter-cors.jsonfile with this servletfilter-cors.json file. -
Add the configuration to enable theming for hosted UI pages.
-
Copy this ui-themerealm.json file to the
conf/directory. -
In your
conf/access.jsonfile, insert a configuration object for the theme in theconfigsarray:{ "configs": [{ "pattern": "config/ui/themerealm", "roles": "*", "methods": "read", "actions": "*" }] }json
-
-
If you have not already started IDM, start it now, and test that you can access the IDM admin UI at http://openidm.example.com:8080/admin.
When you log in to the IDM admin UI, use the default AM administrative user (
amAdmin), and notopenidm-admin. -
If you want to use the
PlatformForgottenUsernameorPlatformResetPasswordtrees, configure outbound email.After you have installed the Platform UI, you can configure email through the UI at
http://openidm.example.com:8080/admin.
IDM is now configured for this deployment.
Protect the deployment
|
This is not a comprehensive platform implementation guide. These sample setup instructions show a minimal integration of platform components to get you started. The ForgeRock Identity Platform offers maximum extensibility and flexibility in self-managed deployments. The platform includes many features and options these sample setup instructions do not cover. If you don’t need maximum extensibility and flexibility, there are simpler alternatives:
For help with your deployment and to validate your plans before deploying in production, contact ForgeRock. |
Before you start
After you set up a sample deployment according to Separate identity stores or Shared identity store, you have a functionally complete ForgeRock Identity Platform installation.
Your deployment still lacks key features:
- Security
-
Except when connecting to the directory service, connections use HTTP, not HTTPS. Users send their login credentials in unprotected cleartext.
- Single entry point
-
The Platform UI component applications don’t all run on the same host and port. This means cookies and iframes don’t always share the same host and origin, a potential problem for modern browsers.
The instructions that follow show how to add ForgeRock Identity Gateway (IG) to your deployment, providing a single point of entry to ForgeRock Identity Platform, and securing communications from outside with HTTPS.
|
The instructions that follow are sufficient to add IG to your sample deployment. For in-depth documentation on using IG, see the IG product documentation.
Prepare keys
HTTPS requires a server key pair for IG.
In a public deployment where IG is the entry point, get the IG server certificate signed by a well-known CA. A server certificate signed by a well-known CA will be trusted by other systems and browsers, because the CA certificate is distributed with the system or the browser.
|
The examples that follow do not use a well-known CA. Instead, they use an IG server certificate generated with one of the DS deployment ID and password combinations that you used to set up the deployment. You will generate an IG server key pair using the DS |
Generate the keys on a system where you installed DS:
-
Save a password file for the keystore:
mkdir -p /path/to/security/ touch /path/to/security/keystore.pin chmod 600 /path/to/security/keystore.pin echo -n password > /path/to/security/keystore.pinbashBe sure to use
echo -n, as IG cannot use the secret if the file has a newline character at the end. -
Set the deployment ID in an environment variable that you will use in
dskeymgrcommands:export DEPLOYMENT_ID=deployment-idbash -
Generate a server key pair for IG to use for HTTPS:
/path/to/opendj/bin/dskeymgr \
 create-tls-key-pair \
 --deploymentId $DEPLOYMENT_ID \
 --deploymentIdPassword password \
 --keyStoreFile /path/to/security/keystore \
 --keyStorePassword:file /path/to/security/keystore.pin \
 --hostname localhost \
 --hostname platform.example.com \
 --subjectDn CN=platform.example.com,O=ForgeRock
bash -
Inspect the contents of the keystore you just created to find the key alias is
ssl-key-pair:keytool -list -keystore /path/to/security/keystore -storepass:file /path/to/security/keystore.pin Keystore type: PKCS12 Keystore provider: SUN Your keystore contains 1 entry ssl-key-pair, <date>, PrivateKeyEntry, Certificate fingerprint (SHA-256): <fingerprint>bash -
Copy the keystore and password to the system where IG runs.
-
Export the deployment ID CA certificate to trust:
/path/to/opendj/bin/dskeymgr \ export-ca-cert \ --deploymentId $DEPLOYMENT_ID \ --deploymentIdPassword password \ --outputFile ca-cert.pembashUse this
ca-cert.pemfile when you need to trust the IG server certificate. You can import it into your browser to trust the platform URLs in this example.
Install IG
This example uses IG in standalone mode. In standalone mode, IG runs in the web container provided in the .zip file.
-
Download IG-2024.3.0.zip.
-
Unpack the files.
This example shows the files unpacked in the
/path/to/identity-gateway-2024.3directory. -
Create a configuration directory for IG:
mkdir -p $HOME/.openig/config/bashThe default IG configuration directory is
$HOME/.openig/configon Linux and UNIX, and%appdata%\OpenIG\configon Windows. -
Add an admin.json configuration file for HTTPS support at the root of the IG configuration directory.
Sample admin.json
This example expects the keystore and
keystore.pinfile in the/path/to/security/directory:{ "heap": [ { "name": "TlsConf", "type": "ServerTlsOptions", "config": { "keyManager": { "type": "SecretsKeyManager", "config": { "signingSecretId": "key.manager.secret.id", "secretsProvider": "ServerIdentityStore" } } } }, { "name": "SecretsPasswords", "type": "FileSystemSecretStore", "config": { "directory": "/path/to/security/", "format": "PLAIN" } }, { "name": "ServerIdentityStore", "type": "KeyStoreSecretStore", "config": { "file": "/path/to/security/keystore", "storePasswordSecretId": "keystore.pin", "secretsProvider": "SecretsPasswords", "mappings": [ { "secretId": "key.manager.secret.id", "aliases": [ "ssl-key-pair" ] } ] } } ], "connectors": [ { "port": 9080 }, { "port": 9443, "tls": "TlsConf" } ] }json -
Start IG:
/path/to/identity-gateway-2024.3bin/start.sh
...
[main] INFO ... started in XXXXms on ports : [9080, 9443]
bash -
Test that you can use the IG "ping" endpoint over HTTP:
curl -v http://platform.example.com:9080/openig/pingbashThe output should include an HTTP
200status code indicating success, and an empty reply from IG. -
When you can successfully ping IG over HTTP, try HTTPS using your CA certificate file:
curl -v --cacert ca-cert.pem https://platform.example.com:9443/openig/pingbashThe
ca-cert.pemfile is the one you exported with thedskeymgrcommand. If it is not in the current directory, include the path to the file.As before, you should receive an empty success response. This demonstrates that you successfully connected to IG over HTTPS.
Now that you are sure the HTTPS connection works, you can edit
admin.jsonto stop using port 9080 for HTTPS.
Trust the deployment ID certificate
|
You generated a deployment ID CA certificate used in this example with the Make sure this certificate is trusted when negotiating SSL and HTTPS connections. |
As long as no one else knows your deployment ID and password combination, this is safe, because only you have the secrets to generate this CA certificate, or to generate signed keys:
-
Trust the deployment ID CA certificate by importing the
ca-cert.pemfile as a certificate authority trusted for SSL and HTTPS connections.Some browsers refer to "Authorities" in the browser settings. See the browser help for details.
Configure IG
IG terminates HTTPS for your deployment. All access to your deployment goes through IG.
Configure IG to route traffic through to the components of the deployment and back to clients. The settings in the following steps depend on the settings you will use to set up the Platform UI:
-
Add a config.json configuration file at the root of the IG configuration directory.
Sample config.json
This example configures the capture decorator and a router with a default route:
{ "heap": [ { "name": "capture", "type": "CaptureDecorator" }, { "name": "DefaultRoute", "type": "StaticResponseHandler", "config": { "status": 200, "headers": { "Content-Type": [ "text/html" ] }, "entity": "<html><p><a href='/enduser-login/?realm=/alpha#/service/PlatformLogin'>End user access</a></p><p><a href='/platform-login/?realm=/#/'>Admin access</a></p></html>" } }, { "type": "Router", "name": "_router", "config": { "defaultHandler": "DefaultRoute" } } ], "handler": "_router", "audit": "global" }jsonThe default route in the sample file defines a simple static HTML page to present when a user accesses the platform before logging in, or after logging out.
In this example, the page includes a link for each of the two user flows:
-
An end user logs in to access their applications and profile page through the End User UI.
-
An admin logs in to configure the platform through the Platform Admin UI, AM admin UI, or IDM admin UI.
You can configure IG to redirect users to your site if desired. IG can also serve static pages, so you can add an entry point that matches your site.
-
-
Create a
routesdirectory under the IG configuration file directory:mkdir $HOME/.openig/config/routesbash -
Add a login.json route file in the
routesdirectory.This route consumes the paths specified in the links on the default, static page to route users to the correct URL on the Login UI:
Sample login.json
{
    "name": "login",
    "condition": "${find(request.uri.path, '^/enduser-login|^/platform-login')}",
    "baseURI": "http://login.example.com:8083",
    "handler": {
        "type": "Chain",
        "config": {
            "filters": [
                {
                    "type": "UriPathRewriteFilter",
                    "config": {
                        "mappings": {
                            "/enduser-login": "/",
                            "/platform-login": "/"
                        },
                        "failureHandler": "DefaultRoute"
                    }
                }
            ],
            "handler": "ReverseProxyHandler"
        }
    }
}
json -
Add an
enduser-ui.jsonroute file in theroutesdirectory.This route sends end users to the End User UI:
Sample for End User UI from a Docker image
{ "name": "enduser-ui", "condition": "${find(request.uri.path, '^/enduser-ui')}", "baseURI": "http://enduser.example.com:8888", "handler": { "type": "Chain", "config": { "filters": [ { "type": "UriPathRewriteFilter", "config": { "mappings": { "/enduser-ui": "/" }, "failureHandler": "DefaultRoute" } } ], "handler": "ReverseProxyHandler" } } }jsonSample for End User UI from a .zip file
{
    "name": "enduser-ui",
    "condition": "${find(request.uri.path, '^/enduser-ui')}",
    "baseURI": "http://am.example.com:8081",
    "handler": {
        "type": "Chain",
        "config": {
            "filters": [
                {
                    "type": "UriPathRewriteFilter",
                    "config": {
                        "mappings": {
                            "/enduser-ui": "/enduser"
                        },
                        "failureHandler": "DefaultRoute"
                    }
                }
            ],
            "handler": "ReverseProxyHandler"
        }
    }
}
json -
Add a
platform-ui.jsonroute file in theroutesdirectory.This route sends administrators to the Admin UI:
Sample for Admin UI from Docker images
{ "name": "platform-ui", "condition": "${find(request.uri.path, '^/platform-ui')}", "baseURI": "http://admin.example.com:8082", "handler": { "type": "Chain", "config": { "filters": [ { "type": "UriPathRewriteFilter", "config": { "mappings": { "/platform-ui": "/" }, "failureHandler": "DefaultRoute" } } ], "handler": "ReverseProxyHandler" } } }jsonSample for Admin UI from a .zip file
{
    "name": "platform-ui",
    "condition": "${find(request.uri.path, '^/platform-ui')}",
    "baseURI": "http://am.example.com:8081",
    "handler": {
        "type": "Chain",
        "config": {
            "filters": [
                {
                    "type": "UriPathRewriteFilter",
                    "config": {
                        "mappings": {
                            "/platform-ui": "/platform"
                        },
                        "failureHandler": "DefaultRoute"
                    }
                }
            ],
            "handler": "ReverseProxyHandler"
        }
    }
}
json -
Add an am.json route file in the
routesdirectory.This route handles requests to AM, ensuring that the browser gets redirected through IG:
Sample am.json
{
    "name": "am",
    "baseURI": "http://am.example.com:8081",
    "condition": "${find(request.uri.path, '(?:^/am(?!/XUI))')}",
    "handler": {
        "type": "Chain",
        "config": {
            "filters": [
                {
                    "comment": "Always redirect to IG rather than AM",
                    "type": "LocationHeaderFilter",
                    "config": {
                        "baseURI": "https://platform.example.com:9443/"
                    }
                }
            ],
            "handler": "ReverseProxyHandler"
        }
    }
}
json -
Add an idm.json route file in the
routesdirectory.This route handles requests to IDM, ensuring that the browser gets redirected through IG:
Sample idm.json
{
    "name": "idm",
    "baseURI": "http://openidm.example.com:8080",
    "condition": "${find(request.uri.path, '(?:^/openidm)|(?:^/admin)|(?:^/upload)|(?:^/export)')}",
    "handler": {
        "type": "Chain",
        "config": {
            "filters": [
                {
                    "comment": "Always redirect to IG rather than IDM",
                    "type": "LocationHeaderFilter",
                    "config": {
                        "baseURI": "https://platform.example.com:9443/"
                    }
                }
            ],
            "handler": "ReverseProxyHandler"
        }
    }
}
json -
Restart IG to take all your changes into account.
Verify in the server output that all your routes load successfully.
When troubleshooting and developing routes, you can change an IG route configuration while IG is running, and IG will reload changed routes every 10 seconds by default.
The IG capture decorator is particularly useful when troubleshooting routes.
To use it quickly, add "capture": "all" to an object in a route, and let IG reload the route before you try it.
It logs messages in the server output about incoming requests at any point until IG sends the request,
and outgoing responses at any point until IG delivers the response.
For more information, see the IG product documentation.
Adapt the AM configuration
A sample deployment configured according to Separate identity stores or Shared identity store does not route the traffic through IG. Adapt the AM and OAuth 2.0 client configurations to use IG.
The following minimal changes are sufficient to use the sample deployment. Add any additional changes necessary for your deployment:
-
If you’re not currently logged in to the AM admin UI as the
amAdminuser, log in.The password used in the documentation to set up the platform is
Passw0rd. -
In the Top Level Realm and the
alpharealm, add redirect URIs for theend-user-uiOAuth 2.0 client:https://platform.example.com:9443/enduser-ui/appAuthHelperRedirect.html
https://platform.example.com:9443/enduser-ui/sessionCheck.html -
In the Top Level Realm and the
alpharealm, add redirect URIs for theidm-admin-uiOAuth 2.0 client:https://platform.example.com:9443/platform/appAuthHelperRedirect.html
https://platform.example.com:9443/platform/sessionCheck.html
https://platform.example.com:9443/admin/appAuthHelperRedirect.html
https://platform.example.com:9443/admin/sessionCheck.html
https://platform.example.com:9443/platform-ui/appAuthHelperRedirect.html
https://platform.example.com:9443/platform-ui/sessionCheck.html -
In the
alpharealm, edit Success URLs for the following AM trees:- PlatformLogin
-
Success URL:
https://platform.example.com:9443/enduser-ui/?realm=/alpha - PlatformRegistration
-
Success URL:
https://platform.example.com:9443/enduser-ui/?realm=/alpha - PlatformResetPassword
-
Success URL:
https://platform.example.com:9443/enduser-ui/?realm=/alpha
-
Update these settings:
- Top Level Realm > Authentication > Settings > General
-
External Login Page URL:
https://platform.example.com:9443/platform-login - Top Level Realm > Services
-
-
+ Add a Service > Validation Service.
-
In Valid goto URL Resources, set:
https://platform.example.com:9443/*
https://platform.example.com:9443/*?*
-
- Top Level Realm > Services
-
-
+ Add a Service > Base URL Source.
-
In Base URL Source, choose
Fixed value. -
In Fixed value base URL, set
https://platform.example.com:9443.
-
alphaRealm > Authentication > Settings > General-
External Login Page URL:
https://platform.example.com:9443/enduser-login alphaRealm > Services > Validation Service-
To Valid goto URL Resources, add:
https://platform.example.com:9443/*
https://platform.example.com:9443/*?* alphaRealm > Services-
-
+ Add a Service > Base URL Source.
-
In Base URL Source, choose
Fixed value. -
In Fixed value base URL, set
https://platform.example.com:9443.
-
- Configure > Global Services > CORS Service > Secondary Configurations > Cors Configuration
-
To Accepted Origins, add:
https://platform.example.com:9443.
Adapt the IDM configuration
In the /path/to/openidm/conf/ui-configuration.json file, change configuration > platformSettings > amUrl
to access the IDM UI through IG:
{
    "configuration" : {
        "platformSettings" : {
            "adminOauthClient" : "idm-admin-ui",
            "adminOauthClientScopes" : "fr:idm:*",
            "amUrl" : "https://platform.example.com:9443/am",
            "loginUrl" : ""
        }
    }
}Once you make this change, you can no longer access the IDM admin UI directly over HTTP. Use the link in the Platform Admin UI to access the IDM admin UI.
Set up the platform UIs
|
This is not a comprehensive platform implementation guide. These sample setup instructions show a minimal integration of platform components to get you started. The ForgeRock Identity Platform offers maximum extensibility and flexibility in self-managed deployments. The platform includes many features and options these sample setup instructions do not cover. If you don’t need maximum extensibility and flexibility, there are simpler alternatives:
For help with your deployment and to validate your plans before deploying in production, contact ForgeRock. |
This page describes two ways to set up the UIs for the sample deployments.
Either deploy the Platform UI by running Docker images or by installing a .zip file.
Do not attempt to deploy the UI both ways:
The platform UIs
The ForgeRock® Identity Platform includes three UIs:
- Admin UI
-
Lets platform administrators manage applications, identities, end-user journeys, and so on.
- End User UI
-
An example UI that demonstrates profile maintenance, consent management, workflow, and delegated administration capabilities. This UI makes REST calls to IDM (using an OAuth 2 bearer token) and to AM (using an SSO cookie).
This UI is not the same as the standalone IDM End User UI.
The platform End User UI is designed specifically for an integrated platform deployment.
The IDM end-user UI should be used only in a standalone IDM deployment.
- Login UI
-
A unified Login UI that lets both administrators and end users log in to the platform.
Run Docker images
|
If you have already deployed the Platform UI by installing a |
In this sample deployment, the three UIs are deployed from three Docker images.
-
Download the Docker images:
-
Download the Admin UI:
docker pull gcr.io/forgerock-io/platform-admin-ui:7.5.0bash -
Download the End User UI:
docker pull gcr.io/forgerock-io/platform-enduser-ui:7.5.0bash -
Download the Login UI:
docker pull gcr.io/forgerock-io/platform-login-ui:7.5.0bash
-
-
Create an environment file named
platform_envthat will be passed to thedockercommand.The file should have the following contents:
AM_URL=https://platform.example.com:9443/am AM_ADMIN_URL=https://platform.example.com:9443/am/ui-admin IDM_REST_URL=https://platform.example.com:9443/openidm IDM_ADMIN_URL=https://platform.example.com:9443/admin IDM_UPLOAD_URL=https://platform.example.com:9443/upload IDM_EXPORT_URL=https://platform.example.com:9443/export ENDUSER_UI_URL=https://platform.example.com:9443/enduser-ui PLATFORM_ADMIN_URL=https://platform.example.com:9443/platform-ui/ ENDUSER_CLIENT_ID=end-user-ui ADMIN_CLIENT_ID=idm-admin-ui THEME=default PLATFORM_UI_LOCALE=enpropertiesWhen you deploy multiple Platform UI Docker containers with the same hostname, use the
SUBFOLDERenvironment variable to prefix a base URL path for each UI.For example, if you deploy all the UIs on
ui.example.com, use the following settings to make the End User UI accessible under/enduser:In the End User UI configuration, set:
SUBFOLDER=enduser
In all Platform UI environments, set:
ENDUSER_UI_URL=http://ui.example.com:8888/enduser
Adapt your configuration to account for the path changes.
-
Start each Docker container, specifying the environment file:
-
Change to the directory in which you saved the
platform_envfile, then start the Login UI:docker run -t -i --rm -p 8083:8080 --env-file=platform_env \ gcr.io/forgerock-io/platform-login-ui:7.5.0 Replacing env vars in JS Setting AM URL as https://platform.example.com:9443/am Setting AM ADMIN URL as https://platform.example.com:9443/am/ui-admin Setting IDM REST URL as https://platform.example.com:9443/openidm Setting IDM ADMIN URL as https://platform.example.com:9443/admin ...bashThe --rmoption causes thedocker runcommand to remove the container on exit. Remove this option if you want to keep a container when it exits. -
In a new terminal, change to the directory in which you saved the
platform_envfile, then start the Admin UI:docker run -t -i --rm -p 8082:8080 --env-file=platform_env \ gcr.io/forgerock-io/platform-admin-ui:7.5.0 Replacing env vars in JS Setting AM URL as https://platform.example.com:9443/am Setting AM ADMIN URL as https://platform.example.com:9443/am/ui-admin Setting IDM REST URL as https://platform.example.com:9443/openidm Setting IDM ADMIN URL as https://platform.example.com:9443/admin ...bash -
In a new terminal, change to the directory in which you saved the
platform_envfile, then start the End User UI:docker run -t -i --rm -p 8888:8080 --env-file=platform_env \ gcr.io/forgerock-io/platform-enduser-ui:7.5.0 Replacing env vars in JS Setting AM URL as https://platform.example.com:9443/am Setting AM ADMIN URL as https://platform.example.com:9443/am/ui-admin Setting IDM REST URL as https://platform.example.com:9443/openidm Setting IDM ADMIN URL as https://platform.example.com:9443/admin ...bash
-
Install a .zip file
|
If you have already deployed the Platform UI by running Docker images, do not perform these steps. |
In this sample deployment, you obtain the three UIs from a .zip file that you get
from ForgeRock. Then, you install them in the AM web container. You also
tweak the AM and IDM configurations so that they work with this
UI installation.
-
Get the UI
.zipfile, and unzip it into the tmp directory:-
Create the /tmp/ui-zip directory.
-
Download the most recent version of the 7.5.x UI
.zipfile from the Platform section of the ForgeRock downloads site. -
Copy the UI
.zipfile into the /tmp/ui-zip directory. -
Unzip the UI
.zipfile.
-
-
Replace URLs in the UI application with URLs for your ForgeRock Identity Platform deployment:
-
Change to the /tmp/ui-zip/PlatformUI directory.
-
Run the following commands:
export AM_URL=https://platform.example.com:9443/am
export AM_ADMIN_URL=https://platform.example.com:9443/am/ui-admin
export IDM_REST_URL=https://platform.example.com:9443/openidm
export IDM_ADMIN_URL=https://platform.example.com:9443/admin
export IDM_UPLOAD_URL=https://platform.example.com:9443/upload
export IDM_EXPORT_URL=https://platform.example.com:9443/export
export ENDUSER_UI_URL=https://platform.example.com:9443/enduser-ui
export PLATFORM_ADMIN_URL=https://platform.example.com:9443/platform-ui/
export ENDUSER_CLIENT_ID=end-user-ui
export ADMIN_CLIENT_ID=idm-admin-ui
export THEME=default
export PLATFORM_UI_LOCALE=en
bash -
Run the variable_replacement.sh script.
This script replaces variables in the
.zipfile’s UI web application with the values of the environment variables that you set in the previous step:./variable_replacement.sh www/platform/js/*.js www/enduser/js/*.js www/login/js/*.js Replacing env vars in JS Setting AM URL as https://platform.example.com:9443/am Setting AM ADMIN URL as https://platform.example.com:9443/am/ui-admin Setting IDM REST URL as https://platform.example.com:9443/openidm Setting IDM ADMIN URL as https://platform.example.com:9443/admin ...bash
-
-
Install the UI:
-
Install the
platformandenduserweb applications into AM’s web container:cd /path/to/tomcat/webapps cp -r /tmp/ui-zip/PlatformUI/www/platform . cp -r /tmp/ui-zip/PlatformUI/www/enduser .bash -
Modify AM to use the new Login UI:
cd /path/to/tomcat/webapps/am/XUI
cp -r /tmp/ui-zip/PlatformUI/www/login/* .
bash
-
-
Revise the AM and IDM configurations to work with the new UI installation:
-
If you’re not currently logged in to the AM admin UI as the
amAdminuser, log in. -
Revise the success URL for three authentication trees, so that they refer to the End User UI:
-
Change the success URL for the
Platform Regstrationtree.In the
alpharealm, select Authentication > Trees, and click on PlatformRegistration. Select the Success URL node. Change the Success URL value to http://am.example.com:8081/enduser, and then click Save. -
Use the same technique to change the Success URL value for the
PlatformLogintree to http://am.example.com:8081/enduser. -
Use the same technique to change the Success URL value for the
PlatformResetPasswordtree to http://am.example.com:8081/enduser.
-
-
Clear the External Login Page URL value.
In the
alpharealm, select Authentication > Settings, and click the General tab. Set External Login Page URL to an empty string, and then click Save Changes. -
Log out of the AM admin UI.
-
If no
/path/to/openidm/conf/ui-themerealm.jsonfile exists, create it with the following contents:{ "realm": {} }json
-
Redirect on signout
When the test user signs out of the End User UI, the browser redirects to the AM XUI login page:
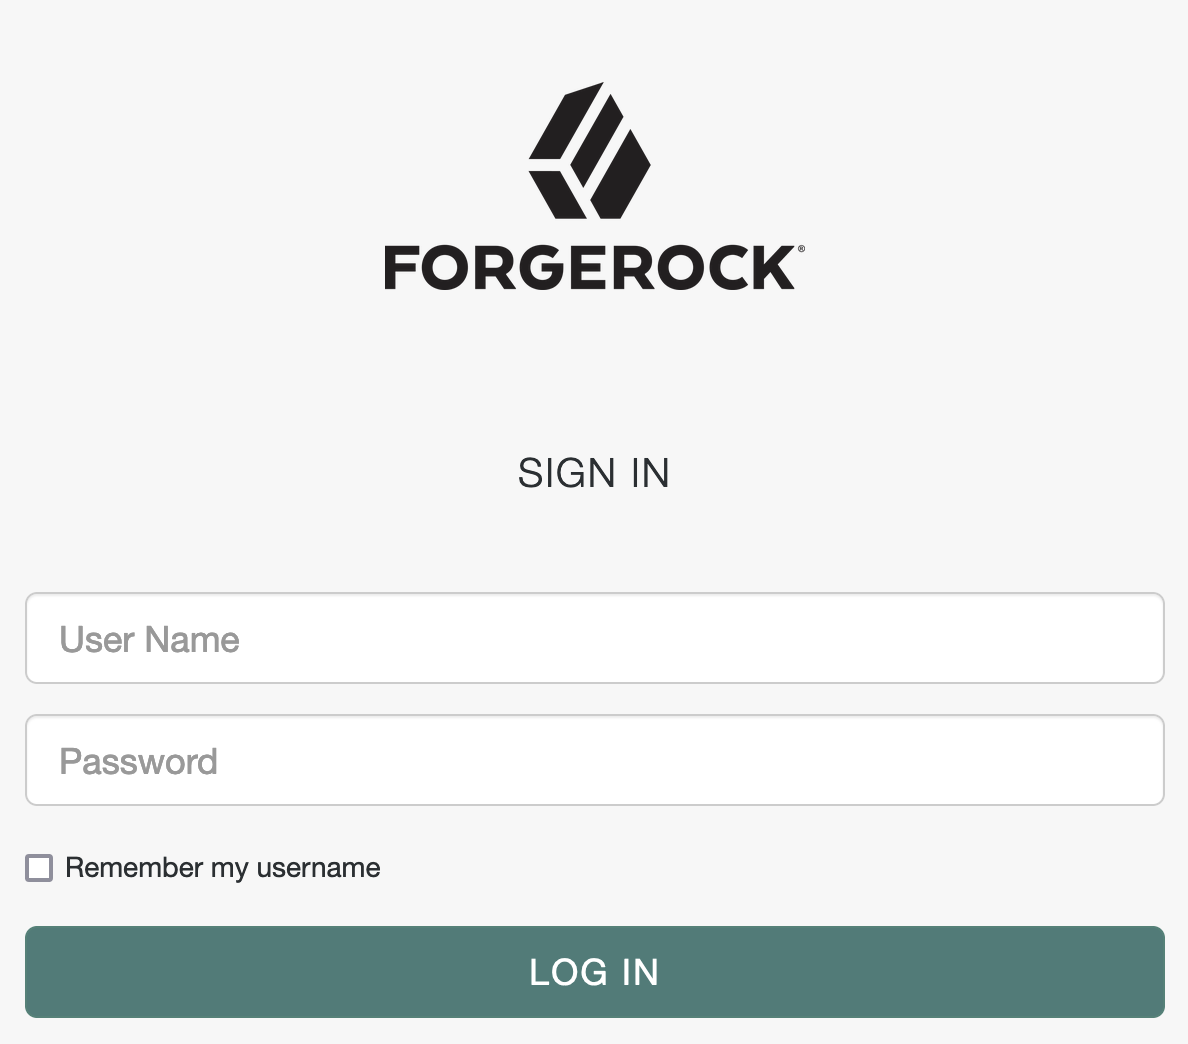
You can change this behavior to redirect to your application. Options for managing redirection on sign out include:
-
(Recommended) Use IG, as described in Protect the deployment, with a route to redirect the browser from the XUI to your application.
If you choose this option, skip the steps that follow.
-
Script a
post_logout_urlclaim that AM returns to the End User UI through the user’s ID token. When the user signs out, the End User UI redirects the browser to the URL specified in the claim.
Follow these steps to configure a post_logout_url claim:
-
If you’re not currently logged in to the AM admin UI as the
amAdminuser, log in. -
Under Scripts, find the OIDC Claims Script, and click to view the script.
This script lets you customize the OpenID Connect 1.0 claims in the user’s ID token.
-
Add a
post_logout_urlclaim method to the array ofclaimAttributes.The following Groovy example adds a final item to
claimAttributesto returnhttps://forgerock.comas thepost_logout_urlclaim. Adapt the method used to return the appropriate URL for your application:claimAttributes = [ //..., "post_logout_url": { claim, identity -> return [(claim.getName()): "https://forgerock.com"] } ]groovy -
Add the claim for the
fr:idm:*scope as a final item in thescopeClaimsMap:scopeClaimsMap = [ //..., "fr:idm:*": [ "post_logout_url" ] ]groovy -
Click Validate, correct any errors accidentally introduced, and then click Save Changes.
-
Under Services > OAuth2 Provider, search for
Always Return Claims in ID Tokens, then enable the option, and click Save Changes.AM can now return the custom claim in the user’s ID token.
-
Test the changes you have made:
-
Log out of the AM admin UI.
-
Sign in as a test user at http://login.example.com:8083/?realm=/alpha#/service/PlatformLogin.
-
Sign out.
The End User UI redirects the browser to the URL you configured for the
post_logout_urlclaim, in this case the main ForgeRock site.
-
Test your deployment
After configuring your sample deployment, test your work:
-
Log out of any open platform applications.
-
Browse https://platform.example.com:9443/.
Your browser displays the default route page:
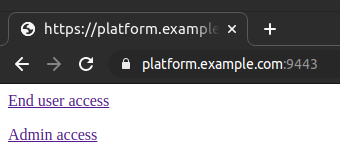
If a page warns the connection isn’t private, the page poses a security risk, or your browser does not trust the IG server certificate, read Trust the deployment ID certificate again.
-
Test the flow for an administrator:
-
Click the Admin access link.
-
Sign in as
amAdmin.The password in the documentation to set up the platform is
Passw0rd.Your browser redirects to the Identity Platform admin UI page:
https://platform.example.com:9443/platform-ui/?realm=root#/dashboard/overview
-
Browse around the Identity Platform admin UI, making sure to open the AM admin UI and IDM admin UI.
The browser address shows a secure connection through
https://platform.example.com:9443/for all pages. -
(Optional) Switch to the
alpharealm and create a new end-user account under Identities > Manage. -
Sign out.
Your browser redirects to the platform default page.
-
-
Test the flow for an end user:
-
Click the End user access link.
-
Sign in as an end user.
If you have not yet created an end-user account, follow the Create an account link, and register an end user with the platform.
In the end, your browser redirects to the end-user page:
https://platform.example.com:9443/enduser-ui/?realm=alpha#/dashboard
-
Sign out.
Your browser redirects to the platform default page.
-
Your sample deployment now routes traffic through IG to the platform. If you get the IG server certificate signed by a well-known CA, instead of the private CA, other browsers and systems can connect without additional configuration.
Upgrade
|
Platform upgrade complexity depends on the deployment. Upgrades for heavily customized deployments using many advanced features require far more care and planning than an upgrade for a sample evaluation deployment. Make sure you plan and test appropriately before attempting to upgrade a production deployment. |
Upgrade process
To upgrade your sample deployment from 7.4 to 7.5, follow these high-level steps:
-
Upgrade the platform UIs.
Use the new UIs described in Set up the platform UIs.
-
Upgrade IG.
For details, refer to Upgrade in the IG documentation.
-
Upgrade DS.
For details, refer to Upgrade in the DS documentation.
-
Upgrade AM.
For details, refer to Upgrade in the AM documentation.
-
Upgrade IDM.
For details, refer to Upgrade in the IDM documentation.
When upgrading from earlier versions of the sample deployment, read the earlier upgrade instructions and Migration and customization.
Changes from 7.4 to 7.5
-
Use Java 17.
-
The sample deployments now require IG.
The Platform UI component applications don’t all run on the same host and port. This means cookies and iframes don’t always share the same host and origin, a potential problem for modern browsers.
IG protects access to the platform and ensures a single host and port for all browser-based interactions.
-
The procedures to configure AM now demonstrate how to use DS as an external token store.
-
The IG config.json configuration file has changed. IG 2024.3 requires you to declare objects directly in the heap before referencing them.
Changes from 7.3 to 7.4
-
The Amster
.zipfileAmster-7.5.0.zipnow includes a root folder namedamster. -
The Platform UI Docker image version format has changed. For details, refer to Run Docker images.
-
The procedures for configuring IDM now include:
-
A new ui-themerealm.json file to enable theming for hosted UI pages.
This addition makes it possible to edit authentication journeys through the Platform Admin UI.
-
An update to the repo.ds.json file to support password policies with Force Password Change enabled.
This update adds the following settings to
dsconfig/passwordPolicies>properties:{ "allowExpiredPasswordChanges": { "type": "simple", "ldapAttribute": "ds-cfg-allow-expired-password-changes" }, "expirePasswordsWithoutWarning": { "type": "simple", "ldapAttribute": "ds-cfg-expire-passwords-without-warning" }, "passwordExpirationInterval": { "type": "simple", "ldapAttribute": "ds-cfg-password-expiration-warning-interval" } }jsonYou can find the Force Password Change option in the Platform Admin UI under Security > Password Policy.
-
Migration and customization
|
This is not a comprehensive platform implementation guide. These sample setup instructions show a minimal integration of platform components to get you started. The ForgeRock Identity Platform offers maximum extensibility and flexibility in self-managed deployments. The platform includes many features and options these sample setup instructions do not cover. If you don’t need maximum extensibility and flexibility, there are simpler alternatives:
For help with your deployment and to validate your plans before deploying in production, contact ForgeRock. |
Previous versions of the ForgeRock Identity Platform provided a sample deployment called the Full stack sample. This kind of deployment is not supported for new integrations between IDM and AM, and you should follow the steps outlined here to set up a new deployment. There is no automated migration facility for an existing deployment based on the full stack sample, but you can follow the tips in this chapter help you move to a new integrated deployment.
|
This is not an exhaustive list and you will have additional configuration changes to make, based on how you deployed the full stack sample. |
- Self-service configuration
-
All self-service configuration is now done in the AM UI, with the exception of the following elements:
-
KBA
-
Terms & Conditions
-
Policies
-
Privacy & Consent
-
Email templates and services
You can therefore delete all the IDM
selfservice*files from your configuration, apart fromselfservice.kba.jsonandselfservice.terms.json. These two files are still used by the new AM authentication trees.You will need to rebuild all existing self-service processes as AM authentication trees. Note that tree nodes are more modular than the legacy IDM self-service stages. It might take more than one node to replace a self-service stage.
In a platform configuration, you can optionally customize the IDM admin UI to hide or remove all of the self-service functions that are no longer configured through IDM (such as registration and password reset).
-
- Authentication
-
Integrated deployments now use a single
rsFilterauthentication module that allows authentication using AM bearer tokens. You must replace your project’sconf/authentication.jsonfile with this authentication.json file and customize it, according to your setup.Configure OAuth clients and the IDM provisioning service in the AM UI.
- UI customization
-
The UI retrieves access tokens from AM. If you have customized your Self-Service UI for a full-stack deployment, it is recommended that you start a new customization, based on the Platform UI. Your existing UI customizations will not work in a new platform deployment.
- Migration for shared identities
-
As shown in Shared identity store,AM and IDM can share a DS identity store. Since version 7, this is a well-supported and recommended deployment pattern.
Previously, as shown in Separate identity stores and Reconciliation and AM in the IDM 6.5 documentation, AM used a DS-based identity store, IDM used a relational database for its repository, and IDM synchronized identities between them.
When you migrate shared identities to a shared DS identity store, follow these high-level steps:
-
Add any custom identity attributes to the shared identity store and platform components.
Many deployments define custom attributes that serve in profiles or security tokens, which are critical to authentication and authorization, such as OAuth 2.0 access tokens, OpenID Connect ID tokens, and SAML assertions.
For detailed instructions, see Custom attributes.
-
Use IDM to migrate identity data to the shared DS identity store.
Make sure that any operations to modify managed objects, such as managed users, performed as part of the mapping (in
sync.json), are reflected in the managed object schema (inmanaged.json).For more on the migration operation, see Migrate data in the IDM documentation.
-
UI customization
In version 7 of ForgeRock Identity Platform, the AM and IDM component products continue to provide their own, separate UIs, so you can deploy one independently of the other. Version 7 changes the model for deploying AM and IDM together in a ForgeRock Identity Platform configuration. Key changes to the platform deployment model concern OAuth 2.0 and platform UIs.
When you use AM and IDM together in a ForgeRock Identity Platform configuration:
-
AM centralizes authentication and authorization services for the platform.
IDM acts as an OAuth 2.0 client of AM. Even when you log in to administer IDM, you authenticate through AM.
More generally, all new client applications are expected to obtain an access token from AM, and present it to IDM for authorization; for example, when calling IDM REST endpoints.
This is why the authentication configuration for IDM includes an
rsFilter(OAuth 2.0 resource server) configuration. -
IDM centralizes identity management services.
IDM relies on the platform UI, which calls AM trees that integrate with IDM for user self-service operations.
New platform UI components replace functions of the AM and IDM native UIs:
| Platform UI | Characteristics |
|---|---|
Admin UI |
|
End User UI |
|
Login UI |
|
High-level instructions for customizing the platform Enduser and Login UIs:
-
Clone the platform UI repository.
-
Carefully review the README.
-
Develop your customizations.
-
For each UI that you customize, adjust the variables found in the
.env.productionfile to match your production deployment. -
Build the customized UIs.
You will find the resulting single-page application files in the
dist/folder of each UI. -
Deploy the files in your environment.
For details, keep reading.
End User UI customization
The platform End User UI replaces the IDM end-user UI in a platform deployment. IDM still includes the end-user UI files, as they are useful in standalone deployments.
Choose how to deploy your customized version of the platform End User UI:
-
Deploy your customized End User UI in a separate web server.
In the AM OAuth 2.0 client profile for the End User UI, set the redirection URIs to reflect the URL to your End User UI.
This approach is reflected in the sample deployments in this documentation.
-
Copy the contents of the
dist/*folder of your customized end-user UI over the files in the expanded IDMui/enduserfolder, overwriting existing files.The End User UI is then in the same domain as IDM.
If you use a path that is different from
ui/enduserfor the files, also update theconf/ui.context-enduser.jsonconfiguration to match.
Login UI customization
The platform Login UI replaces the AM login UI (XUI) in a platform deployment. AM still includes the login UI files, as they are useful in standalone deployments.
The Login UI operates as a native AM client, capable of working with authentication trees. It is not an OAuth 2.0 client, but instead a component used in OAuth 2.0 flows. AM, acting as an OAuth 2.0 authorization server, relies on the platform Login UI for resource owner authentication operations.
The Login UI leverages the AM authentication trees that are compatible with ForgeRock Identity Platform,
as described in the self-service documentation.
The Login UI translates the AM /json/authenticate challenges into web pages for users,
and translates user responses back into REST calls.
Choose how to deploy your customized version of the platform Login UI:
| If you… | How to deploy |
|---|---|
Use only OAuth 2.0 clients of AM, not others such as SAML or same-domain policy agents. |
Deploy your customized login UI in a separate web server. In AM admin UI, for each realm, browse to Authentication > Settings, and click the General tab. Set the External Login Page URL value to the URL of your customized Login UI. If necessary, update the AM CORS and Validation Service configurations. This approach is reflected in the sample deployments in this documentation. |
Customize the AM .war file for your deployment. |
Copy the contents of the |
Run AM behind a reverse proxy. |
Deploy your customized Login UI A few of the JavaScript files from the AM XUI serve to properly render OAuth 2.0 UI screens. Therefore, in addition, customize the AM .war file to move AM XUI files, and specify that location when starting AM.
|
Hosted pages
Overview
Identity Cloud hosts default web pages, known as hosted pages, that you can use in end-user journeys. Hosted pages support localization, and have customizable themes. The pages are designed to help you quickly create and test common user self-service operations.
For example, the default login journey starts with a sign-in page for capturing the username and password. The journey ends with the end user’s profile page.
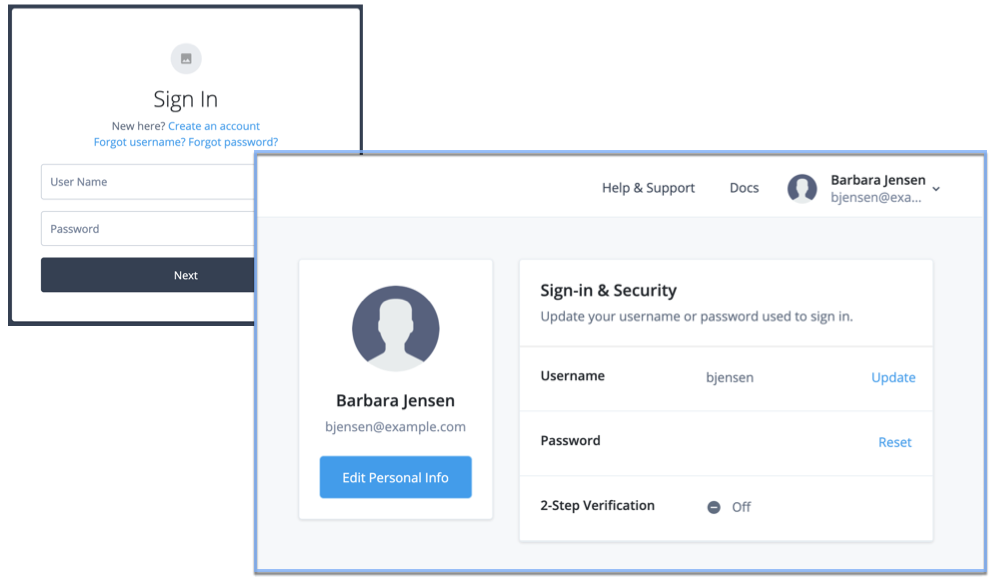
If you don’t want to risk exposing information contained in the default end-user profile, deactivate its hosted page. You can use the ForgeRock SDKs or your own APIs to create your own custom web pages.
When hosted pages are deactivated, this web page is displayed to unauthorized users:
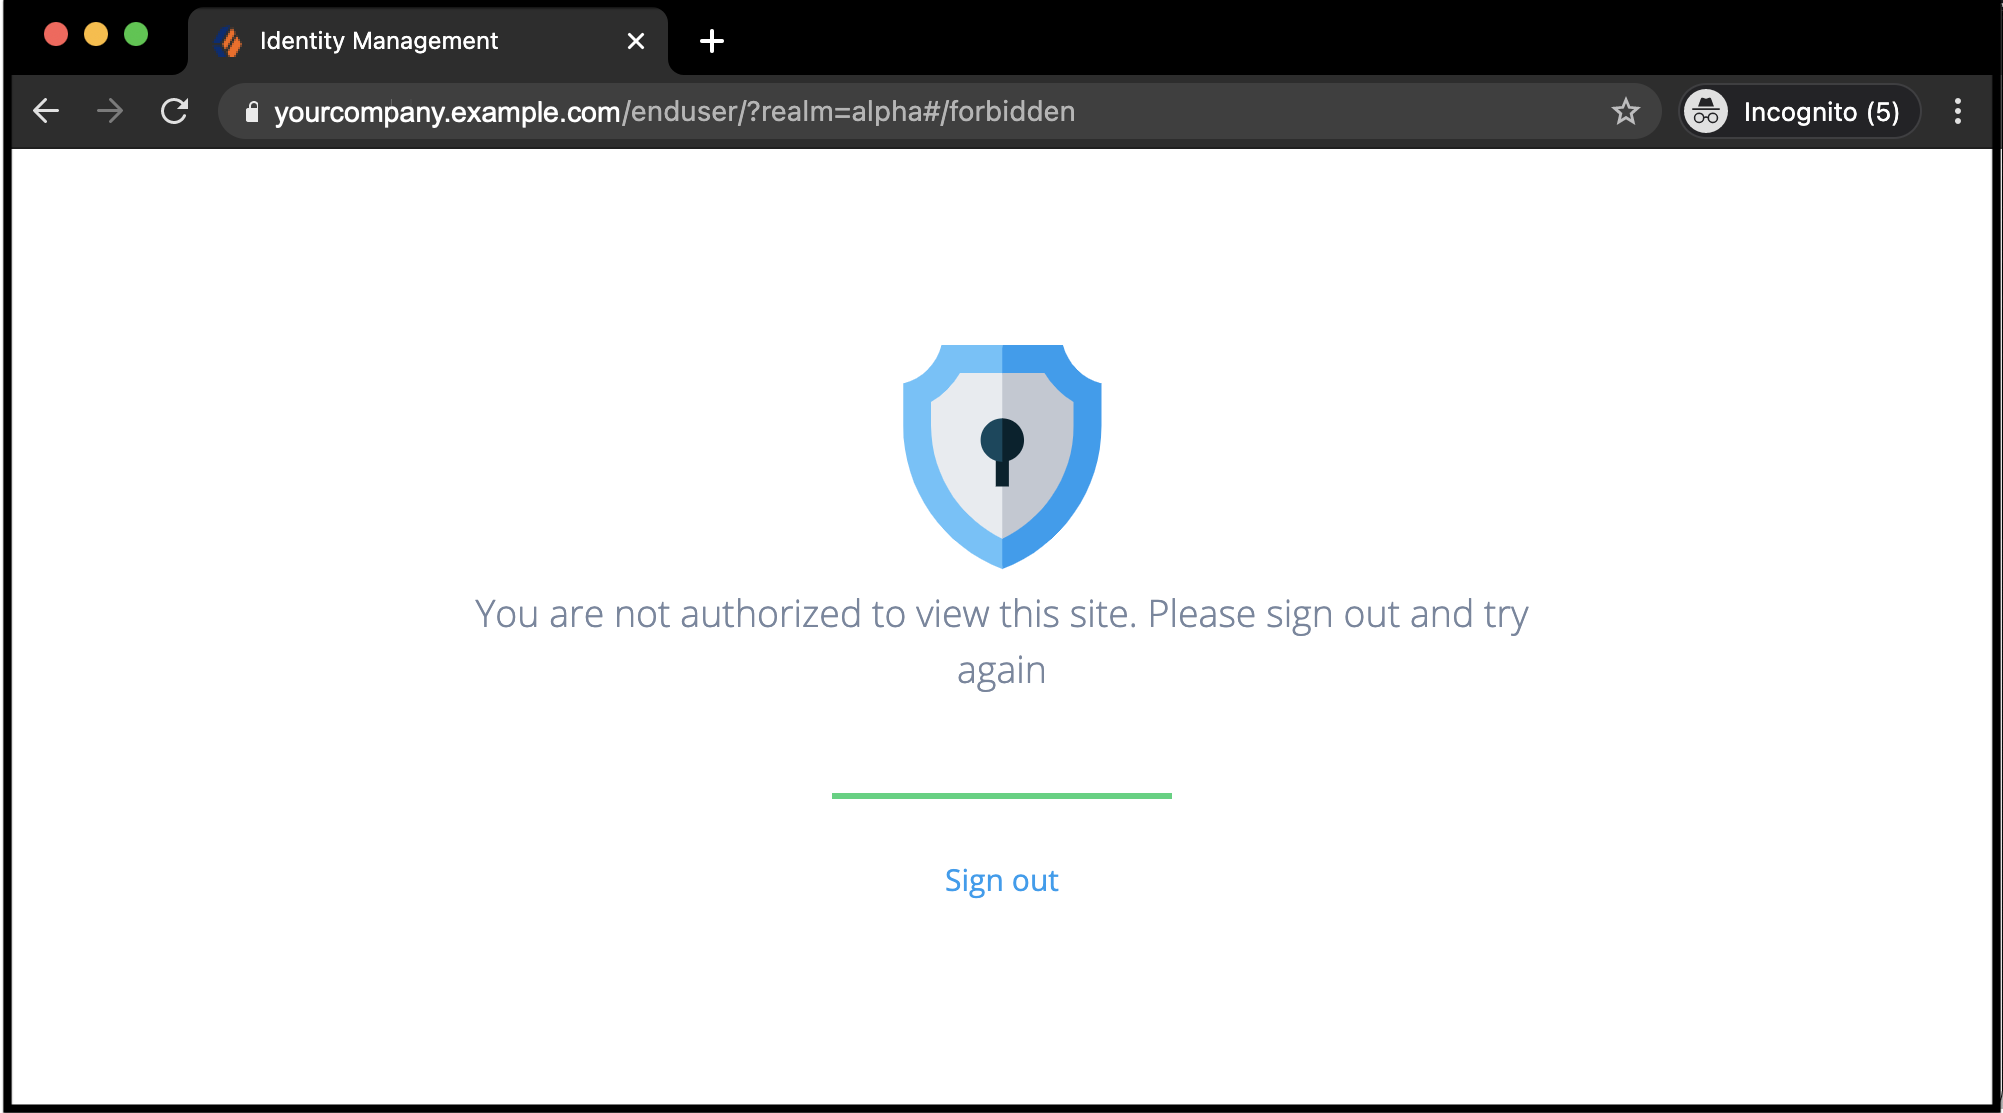
By deactivating the default end-user profile, you can still use the hosted end-user journey UI, while denying unauthorized access to end-user profiles. Your customers manage only their own profiles, or delegate administration, using your application.
When you deactivate hosted pages, all hosted pages are deactivated.
Activate or deactivate hosted pages
Manage the setting through the IDM UI configuration:
-
Get the current configuration for the Identity Platform admin UI using an administrator’s OAuth 2.0 access token.
To get an access token, open your browser’s developer tools before logging in as an administrator, and examine the response to a request to the
access_tokenendpoint.curl \ --header 'Authorization: Bearer <access-token>' \ https://platform.example.com:9443/openidm/config/ui/configurationbashThe endpoint returns the configuration as JSON.
-
Copy and edit the JSON to set the value of the boolean field,
configuration>platformSettings>hosted-pages:- Activate
-
"hostedPages": true - Deactivate
-
"hostedPages": false
-
Replace the configuration with your updated copy:
curl \ --request PUT \ --header 'Authorization: Bearer <access-token>' \ --data '<updated-configuration-json>' https://platform.example.com:9443/openidm/config/ui/configurationbashThe change takes effect immediately.
|
When you deactivate hosted pages, all hosted pages are deactivated. |
Localize end-user and login UIs
You can localize the End User and Login UIs to support the different languages of your end users. You do this with translation configuration, defining a locale-specific set of key/phrase translation pairs to override the default set of key/phrase pairs. You can override some, or all of the default keys, in as many locales as you need. The translation configuration has an effect in all realms.
The UIs try to find a translation configuration for the locale requested by the end user’s browser.
If none is available, they default to the en locale.
To manage translation configuration, use the /openidm/config/uilocale/* endpoint in the REST API.
Translation configuration format
The translation configuration format for each locale is as follows:
{
    "enduser": { (1)
        "pages": {
            "dashboard": {
                "widgets": {
                    "welcome": {
                        "greeting": "Translation for predefined 'greeting' key", (2)
                    }
                }
            }
        }
    },
    "login": { (1)
        "login": {
            "next": "Translation for predefined 'next' key" (2)
        },
        "overrides": {
            "UserName": "Translation for literal phrase 'User Name'", (3)
            "Password": "Translation for literal phrase 'Password'" (3)
        }
    },
    "shared": { (1)
        "sideMenu": {
            "dashboard": "Translation for predefined 'dashboard' key" (2)
        }
    }
}| 1 | Top-level blocks
The |
||
| 2 | Key/phrase translation pairs with predefined keys
Most of the key/phrase translation pairs are predefined in the You can translate some or all of the keys.
To create different translations in the |
||
| 3 | Key/phrase translation pairs with literal keys
Key/phrase translation pairs defined within an These translation pairs with literal keys are designed as a catch-all solution for undefined UI phrases, and for any unlocalized phrases that come directly from the backend servers. The example shows two literal keys that translate the placeholder text from input fields in an authentication journey. Use this approach to translate server output from authentication messages and journey nodes.
|
Translation precedence and fall back
The UIs translate each key/phrase pair in a particular order.
They determine a primary locale using the requested language from an end user’s browser.
If no translation is available for the primary locale, they fall back to the default en locale.
The translation precedence for an end user with a browser locale of fr (French) is as follows:
-
Attempt to use the primary
frlocale:-
Look for the translation key in the configuration for the
frlocale,/openidm/config/uilocale/fr.This returns HTTP 404 Not Found if the configuration is missing. Refer to Translation 404 responses.
-
Look for the translation key in any translation files for the
frlocale:-
platform-enduser/src/locales/fr.json -
platform-login/src/locales/fr.json -
platform-shared/src/locales/fr.json
-
-
-
Fall back to the default
enlocale:-
Look for the translation key in the configuration for the
enlocal,/openidm/config/uilocale/en.This returns HTTP 404 Not Found if the configuration is missing. Refer to Translation 404 responses.
-
Look for the translation key in the translation files for the
enlocale :-
platform-enduser/src/locales/en.json
-
platform-login/src/locales/en.json
-
platform-shared/src/locales/en.json
-
-
Translation 404 responses
One or more 404 responses may display in the browser console for the /openidm/config/uilocale/* endpoint.
These are expected and do not indicate a UI error;
the 404 responses mean that the UI cannot locate a translation configuration override,
which is perfectly valid if you have not added one.
To suppress the 404 responses, create a translation configuration with an empty body for each locale reporting a 404 response.
REST API
Create or replace translation configuration
-
Get an administrator access token.
To get an access token, open your browser’s developer tools before logging in as an administrator, and examine the response to a request to the
access_tokenendpoint. -
Create or replace the translation configuration for each locale:
Show request
curl \ --request PUT 'http://openidm.example.com:8080/openidm/config/uilocale/<locale>' \ (1) --header 'Authorization: Bearer <access-token>' \ (2) --header 'Content-Type: application/json' \ --data-raw '{ (3) "enduser": { "pages": { "dashboard": { "widgets": { "welcome": { "greeting": "Bonjour" } } } } }, "login": { "login": { "next": "Suivant" }, "overrides": { "UserName": "Nom d'\''utilisateur", "Password": "Mot de passe" } }, "shared": { "sideMenu": { "dashboard": "Tableau de bord" } } } 'text1 Replace <locale> with a locale identifier. Some examples are: -
en(English) -
es(Spanish) -
fr(French) -
en-us(English - United States) -
es-ar(Spanish - Argentina) -
fr-ca(French - Canada)
2 Replace <access-token> with the access token. 3 Replace the example translation configuration with your own translation configuration. Show response
{
    "_id": "uilocale/fr",
    "enduser": {
        "pages": {
            "dashboard": {
                "widgets": {
                    "welcome": {
                        "greeting": "Bonjour"
                    }
                }
            }
        }
    },
    "login": {
        "login": {
            "next": "Suivant"
        },
        "overrides": {
            "UserName": "Nom d'\''utilisateur",
            "Password": "Mot de passe"
        }
    },
    "shared": {
        "sideMenu": {
            "dashboard": "Tableau de bord"
        }
    }
}
json -
View translation configuration
| An access token is not needed to view the translation configuration as it is publicly accessible. |
-
View the translation configuration using a GET request:
Show request
curl \ --request GET 'http://openidm.example.com:8080/openidm/config/uilocale/<locale>' (1)1 Replace <locale> with a locale identifier. Show response
{
    "_id": "uilocale/fr",
    "enduser": {
        "pages": {
            "dashboard": {
                "widgets": {
                    "welcome": {
                        "greeting": "Bonjour"
                    }
                }
            }
        }
    },
    "login": {
        "login": {
            "next": "Suivant"
        },
        "overrides": {
            "UserName": "Nom d'\''utilisateur",
            "Password": "Mot de passe"
        }
    },
    "shared": {
        "sideMenu": {
            "dashboard": "Tableau de bord"
        }
    }
}
json
Delete translation configuration
-
Get an access token for the realm where the translations are applied.
Open your browser’s developer tools before logging in to the realm as an administrator, and examine the response to a request to the
access_tokenendpoint. -
Delete the translation configuration:
Show request
curl \ --request DELETE 'http://openidm.example.com:8080/openidm/config/uilocale/<locale>' \ (1) --header 'Authorization: Bearer <access_token>' \ (2)1 Replace <locale> with a locale identifier. 2 Replace <access-token> with the access token. Show response
{
    "_id": "uilocale/fr",
    "enduser": {
        "pages": {
            "dashboard": {
                "widgets": {
                    "welcome": {
                        "greeting": "Bonjour"
                    }
                }
            }
        }
    },
    "login": {
        "login": {
            "next": "Suivant"
        },
        "overrides": {
            "UserName": "Nom d'\''utilisateur",
            "Password": "Mot de passe"
        }
    },
    "shared": {
        "sideMenu": {
            "dashboard": "Tableau de bord"
        }
    }
}
json
Customize end-user and login UI themes
Overview
Realms have a default theme that includes the colors of buttons and links, typefaces, and so on. This default theme applies to the End User and Login UIs. You can add custom themes so the screens displayed to the end users are specific to their authentication journey.
Custom themes let you create a different look and feel for each brand you support, including different profile page layouts, logos, headers, and footers.
A theme is followed throughout an authentication journey. This means that if a user logs in through the login UI with a specific theme, the remaining pages in the journey use the same theme.
Add a custom theme
In the Identity Platform admin UI:
-
Select Hosted Pages > + New Theme.
Duplicate an existing theme by clicking next to the theme, then selecting Duplicate.
-
Enter a theme name that describes the theme’s purpose; for example, the brand associated with an authentication journey.
-
Use the tabs and options to customize various aspects of the theme:
Tab Option What you can customize Global
Styles
Colors of the text, links, menus, buttons, and background pages across all journey and user account pages
Favicon
Favicon logo displayed for all journey and account pages
Settings
Theme name and linked trees
Journey Pages
Styles
Colors of the text, links, menus, buttons, and background pages of authentication and registration journey pages
Logo
Logo to display on sign-in and registration pages
Layout
Layout of the authentication and registration journey pages, including custom headers and footers
Account Pages
Styles
Colors of the text, links, menus, buttons, and background pages of customer-facing pages, such as account profile and dashboard
Logo
Logo to display on customer-facing pages
Layout
Layout of customer-facing pages, including custom footers; categories of information that appear on the account profile page
Apply a custom theme to a journey
In the Identity Platform admin UI:
-
Select Journeys, then select the journey for the custom theme, and click Edit.
-
Click … > Edit Details then select Override theme.
-
Select the custom theme to apply, then click Save.
Custom headers and footers
Each theme lets you configure localized custom headers and footers:
| Header | Footer | |
|---|---|---|
Journey pages |
||
Account pages |
n/a |
Headers and footers can take HTML or inline CSS to insert links, classes, and so on. Scripting is not currently supported in headers and footers.
The account footer is separate from the journey footer. This lets you set up different buttons, links, and so on, that are displayed to a user after they log in.
Enable headers and footers for a theme
-
In the Identity Platform admin UI, go to Hosted Pages, then select a theme.
-
Select either Journey Pages or Account Pages.
-
In the panel on the right-hand side, click Layout.
-
Find the Header section (journey pages only), then enable the switch.
-
Find the Footer section, then enable the switch.
-
Edit headers and footers
-
Follow the steps in Enable headers and footers for a theme to find the appropriate Header or Footer section, then click the preview to open the editor.
-
If you do not need localized content, edit the HTML as appropriate, then go to step 4.
-
If you need localized content:
-
Follow the steps in Localize headers and footers to add as many locales as you need.
-
Use the locale selector to change locales, and edit the HTML in each locale as appropriate.
-
-
Click Save.
Localize headers and footers
-
Follow the steps in Enable headers and footers for a theme to find the appropriate Header or Footer section, then click the preview to open the editor.
-
To add an initial locale for the existing header or footer content:
-
Click + Specify a Locale to open a secondary modal.
-
In the Add a Locale secondary modal, enter a locale identifier; for example,
fr(French), orfr-ca(French - Canada). -
Click Add to add the locale and close the secondary modal.
-
The + Specify a Locale link is replaced by a locale selector, with the new locale preselected.
-
-
To add another locale:
-
Click the locale selector, then click + Add Locale to open a secondary modal.
-
In the Add a Locale secondary modal, enter a locale identifier; for example,
es(Spanish), ores-ar(Spanish - Argentina). -
Click Add to add the locale and close the secondary modal.
-
The new locale is now available in the locale selector, and is preselected. The header or footer content for the new locale is a copy of the header or footer content from the initial locale.
-
Translate the header or footer content for the new locale.
Repeat the steps to add as many locales as you need.
-
-
Click Save.
Custom attributes
These sample deployments demonstrate using DS as a shared identity store for AM and IDM. The DS setup profile that configures DS as a shared identity store defines all the platform attributes required by AM and IDM.
Many deployments use additional custom attributes in identity profiles. The following examples show how to add a custom attribute, and how to configure AM and IDM to use it.
|
This example adds a custom attribute that the platform can retrieve with a user profile. This custom attribute is not searchable, and therefore not indexed. |
Before you start, create a demo account for test purposes in your sample deployment:
-
Browse to the platform End User UI page of the sample deployment, and click Create an account.
-
Create a user with user identifier
demo, and whatever other attributes you like. -
Find this user’s entry in the DS shared identity repository:
/path/to/opendj/bin/ldapsearch \ --hostname directory.example.com \ --port 1636 \ --useSsl \ --usePkcs12TrustStore /path/to/opendj/config/keystore \ --trustStorePassword:file /path/to/opendj/config/keystore.pin \ --bindDn uid=admin \ --bindPassword str0ngAdm1nPa55word \ --baseDn ou=identities \ "(uid=demo)"bashNotice that the user’s entry is named for its
fr-idm-uuidattribute.
Define the attribute in DS
You define the attribute in DS as an attribute type in the LDAP schema. In LDAP, an entry’s object classes define which attributes it can have. You therefore also define an object class that lets the entry have the custom attribute.
The example custom attribute is a multi-valued directory string attribute named customAttribute.
The auxiliary object class that lets the entry have the attribute is named customAttributeOC:
-
In DS, add LDAP schema for the new attribute and object class alongside other LDAP schema definitions:
/path/to/opendj/bin/ldapmodify \ --hostname directory.example.com \ --port 1636 \ --useSsl \ --usePkcs12TrustStore /path/to/opendj/config/keystore \ --trustStorePassword:file /path/to/opendj/config/keystore.pin \ --bindDn uid=admin \ --bindPassword str0ngAdm1nPa55word << EOF dn: cn=schema changetype: modify add: attributeTypes attributeTypes: ( customAttribute-oid NAME 'customAttribute' EQUALITY caseIgnoreMatch ORDERING caseIgnoreOrderingMatch SUBSTR caseIgnoreSubstringsMatch SYNTAX 1.3.6.1.4.1.1466.115.121.1.15 USAGE userApplications ) - add: objectClasses objectClasses: ( customAttributeOC-oid NAME 'customAttributeOC' SUP top AUXILIARY MAY customAttribute ) EOFbashBy default, DS writes these definitions to the file
/path/to/opendj/db/schema/99-user.ldif. -
Test that you can add a custom attribute to the
demouser entry.Use the
fr-idm-uuidthat you got when searching foruid=demoinou=identities:/path/to/opendj/bin/ldapmodify \ --hostname directory.example.com \ --port 1636 \ --useSsl \ --usePkcs12TrustStore /path/to/opendj/config/keystore \ --trustStorePassword:file /path/to/opendj/config/keystore.pin \ --bindDn uid=admin \ --bindPassword str0ngAdm1nPa55word << EOF dn: fr-idm-uuid=<fr-idm-uuid-for-demo-user>,ou=people,ou=identities changetype: modify add: objectClass objectClass: customAttributeOC - add: customAttribute customAttribute: Testing 1, 2... EOFbash -
Read the
demouser entry to check your work:/path/to/opendj/bin/ldapsearch \ --hostname directory.example.com \ --port 1636 \ --useSsl \ --usePkcs12TrustStore /path/to/opendj/config/keystore \ --trustStorePassword:file /path/to/opendj/config/keystore.pin \ --bindDn uid=admin \ --bindPassword str0ngAdm1nPa55word \ --baseDn ou=identities \ "(uid=demo)" \ customAttribute dn: fr-idm-uuid=<fr-idm-uuid-for-demo-user>,ou=people,ou=identities customAttribute: Testing 1, 2...bashNotice that the value of
customAttributeis set toTesting 1, 2....
LDAP schema features are much richer than this simple example can demonstrate. For details about LDAP schema in DS, see LDAP schema.
Update AM to use the attribute
Update the AM configuration to make AM aware of the new object class and attribute:
-
Sign in to the platform admin UI as
amAdmin.The password used in the documentation to set up the platform is
Passw0rd. -
Under Native Consoles, select Access Management to open the AM admin console.
-
In the
alpharealm, under Identity Stores > OpenDJ > User Configuration, update these settings:- LDAP User Object Class
-
Add
customAttributeOC. - LDAP User Attributes
-
Add
customAttribute.
-
Save your work.
For additional details, see Adding user profile attributes.
Update IDM to use the attribute
Update the IDM configuration to make IDM aware of the attribute:
-
In the
conf/managed.jsonfile, underuser>schema>order, add the custom attribute to the list:"customAttribute",json -
In the
conf/managed.jsonfile, underuser>schema>properties, define a property corresponding to the custom attribute:"customAttribute" : { "title" : "Custom Attribute", "type" : "string", "viewable" : true, "searchable" : false, "userEditable" : true },jsonNotice that this property is not searchable; meaning, it does not need to be indexed.
-
In the
conf/repo.ds.jsonfile, underresourceMapping>explicitMapping>managed/user>objectClasses, add the object class:"customAttributeOC",json -
In the
conf/repo.ds.jsonfile, underresourceMapping>explicitMapping>managed/user>properties, add a mapping for the attribute:"customAttribute" : { "type" : "simple", "ldapAttribute" : "customAttribute" },json -
Restart IDM to take the changes to the
conf/repo.ds.jsonfile into account.
For additional details, see Create and modify object types, and Explicit mappings (DS).
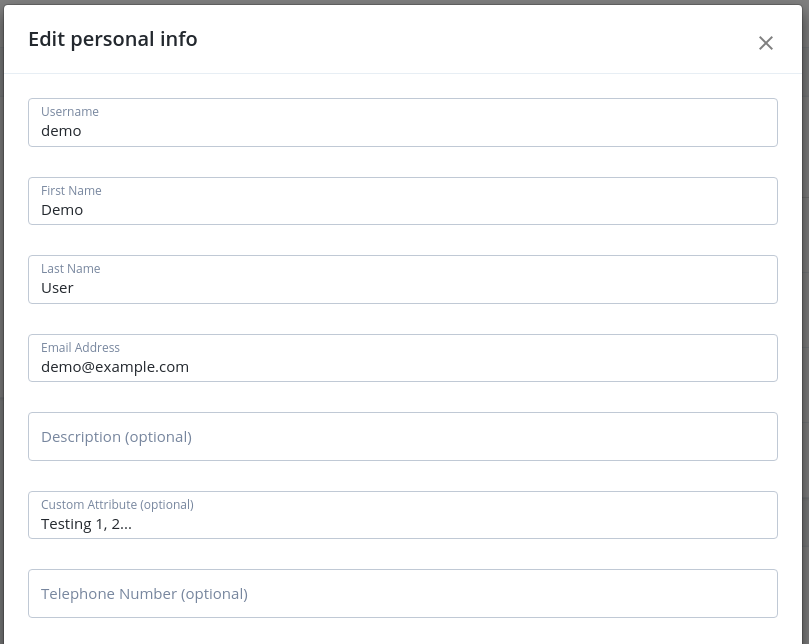
Groups
|
This is not a comprehensive platform implementation guide. These sample setup instructions show a minimal integration of platform components to get you started. The ForgeRock Identity Platform offers maximum extensibility and flexibility in self-managed deployments. The platform includes many features and options these sample setup instructions do not cover. If you don’t need maximum extensibility and flexibility, there are simpler alternatives:
For help with your deployment and to validate your plans before deploying in production, contact ForgeRock. |
Groups are an important tool for identity management. They greatly simplify managing collections of users, applying permissions and authorizations to all members of a group, rather than to individual users. These groups might follow an organization structure, but might instead be based on the needs and privileges for an otherwise arbitrary set of users.
The managed group object is an optional managed object type and is defined defined in managed.json like any other managed object type. Managed groups simplify management by using common groups across the entire platform.
Users are made members of groups through the relationships mechanism. You should understand how relationships work before you read about IDM groups.
Add groups as a managed object
To add groups as a managed object type, update managed.json and repo.ds.json in your IDM conf/ directory:
managed.json:-
Add
groupsto theorderproperty in theusermanaged object:... "stateProvince", "roles", "groups", "manager", ... -
Add a
groupsproperty to theusermanaged object type:"groups" : { "description" : "Groups", "title" : "Group", "id" : "urn:jsonschema:org:forgerock:openidm:managed:api:User:groups", "viewable" : true, "userEditable" : false, "returnByDefault" : false, "usageDescription" : "", "isPersonal" : false, "type" : "array", "relationshipGrantTemporalConstraintsEnforced" : false, "items" : { "type" : "relationship", "id" : "urn:jsonschema:org:forgerock:openidm:managed:api:User:groups:items", "title" : "Groups Items", "reverseRelationship" : true, "reversePropertyName" : "members", "notifySelf" : true, "validate" : true, "properties" : { "_ref" : { "description" : "References a relationship from a managed object", "type" : "string" }, "_refProperties" : { "description" : "Supports metadata within the relationship", "type" : "object", "title" : "Groups Items _refProperties", "properties" : { "_id" : { "description" : "_refProperties object ID", "type" : "string" }, "_grantType" : { "description" : "Grant Type", "type" : "string", "label" : "Grant Type" } } } }, "resourceCollection" : [ { "path" : "managed/group", "label" : "Group", "conditionalAssociationField" : "condition", "query" : { "queryFilter" : "true", "fields" : [ "name" ], "sortKeys" : [ "name" ] } } ] } },json -
Add the
groupmanaged object type:{ "name" : "group", "schema" : { "id" : "urn:jsonschema:org:forgerock:openidm:managed:api:Group", "title" : "Group", "icon" : "fa-group", "mat-icon" : "group", "viewable" : true, "$schema" : "http://json-schema.org/draft-03/schema", "order" : [ "_id", "name", "description", "condition", "members" ], "required" : [ "name" ], "properties" : { "_id" : { "description" : "Group ID", "type" : "string", "viewable" : false, "searchable" : false, "userEditable" : false, "usageDescription" : "", "isPersonal" : false }, "name" : { "title" : "Name", "description" : "Group Name", "type" : "string", "viewable" : true, "searchable" : true }, "description" : { "title" : "Description", "description" : "Group Description", "type" : "string", "viewable" : true, "searchable" : true, "userEditable" : false }, "condition" : { "description" : "A filter for conditionally assigned members", "title" : "Condition", "viewable" : false, "searchable" : false, "isConditional" : true, "type" : "string" }, "members" : { "description" : "Group Members", "title" : "Members", "viewable" : true, "searchable" : false, "userEditable" : false, "policies" : [ ], "returnByDefault" : false, "type" : "array", "items" : { "type" : "relationship", "id" : "urn:jsonschema:org:forgerock:openidm:managed:api:Group:members:items", "title" : "Group Members Items", "reverseRelationship" : true, "reversePropertyName" : "groups", "validate" : true, "properties" : { "_ref" : { "description" : "References a relationship from a managed object", "type" : "string" }, "_refProperties" : { "description" : "Supports metadata within the relationship", "type" : "object", "title" : "Group Members Items _refProperties", "properties" : { "_id" : { "description" : "_refProperties object ID", "type" : "string" }, "_grantType" : { "description" : "Grant Type", "type" : "string", "label" : "Grant Type" } } } }, "resourceCollection" : [ { "notify" : true, "conditionalAssociation" : true, "path" : "managed/user", "label" : "User", "query" : { "queryFilter" : "true", "fields" : [ "userName", "givenName", "sn" ] } } ] } } } } }json
repo.ds.json:-
Add groups as a property for
managed/user:"managed/user" : { "dnTemplate" : "ou=user,ou=managed,dc=openidm,dc=forgerock,dc=com", ... "properties" : { ... "groups" : { "type" : "reference", "ldapAttribute" : "fr-idm-managed-user-groups", "primaryKey" : "cn", "resourcePath" : "managed/group", "isMultiValued" : true }, ...json -
Add the
managed/groupobject type:"managed/group" : { "dnTemplate" : "ou=groups,ou=identities", "namingStrategy" : { "type" : "clientDnNaming", "dnAttribute" : "cn" }, "nativeId" : false, "objectClasses" : [ "top", "groupOfURLs", "fr-idm-managed-group" ], "jsonAttribute" : "fr-idm-managed-group-json", "jsonQueryEqualityMatchingRule" : "caseIgnoreJsonQueryMatch", "properties" : { "_id" : { "primaryKey" : true, "type" : "simple", "ldapAttribute" : "cn", "writability" : "createOnly" }, "_rev" : { "type" : "simple", "ldapAttribute" : "etag" }, "description" : { "type" : "simple", "ldapAttribute" : "description" }, "condition" : { "type" : "simple", "ldapAttribute" : "fr-idm-managed-group-condition" }, "memberURL" : { "type" : "simple", "ldapAttribute" : "memberURL", "isMultiValued" : true, "writability" : "createOnly" }, "members" : { "type" : "reverseReference", "resourcePath" : "managed/user", "propertyName" : "groups", "isMultiValued" : true } } },json
User group attributes in use
A group can be assigned to a user manually, as a static value of the user’s groups attribute, or dynamically, as a result of a condition or script. For example, a user might be assigned to a group such as sales dynamically, if that user is in the sales organization.
A user’s groups attribute takes an array of references as a value, where the references point to the managed groups. For example, if user bjensen has been assigned to two groups (employees and supervisors), the value of bjensen’s groups attribute would look something like the following:
"groups": [
    {
        "_ref": "managed/group/supervisors",
        "_refResourceCollection": "managed/group",
        "_refResourceId": "supervisors",
        "_refProperties": {
            "_id": "61315165-9269-4944-8db9-98f681c6b0a9",
            "_rev": "00000000586a94fd"
        }
    },
    {
        "_ref": "managed/group/employees",
        "_refResourceCollection": "managed/group",
        "_refResourceId": "employees",
        "_refProperties": {
            "_id": "2a965519-5788-428c-92d1-19fac497db8f",
            "_rev": "000000001e1793bc"
        }
    }
]The _refResourceCollection is the container that holds the group. The _refResourceId is the ID of the group. The _ref property is a resource path that is derived from the _refResourceCollection and the URL-encoded _refResourceId. _refProperties provides more information about the relationship.
|
In most cases, IDM uses UUIDs as the |
While managed groups appear in the AM admin UI and can serve the same function as a static group created in AM, they are not the same. A managed group supports dynamic, conditional membership and can be leveraged in other parts of the platform. We recommend using managed objects for all data management in the platform.
Manage groups
The following sections show the REST calls to create, read, update, and delete groups, and to assign groups to users.
They are set up to use the default configuration for groups as a managed object type, discussed in Groups; if you made further customizations to your configuration, your calls may vary.
Authentication for REST
When you set up the platform as described in this documentation, you configure IDM to act as a resource server for AM OAuth 2.0 clients. The IDM OAuth 2.0 clients present a bearer access token to IDM when requesting an operation, and IDM makes the request to AM to introspect the token and reach an authorization decision.
To provision identities, use the idm-provisioning client,
whose client secret shown in this documentation is openidm.
The idm-provisioning client uses the client credentials grant to request an access token from AM:
curl \
--request POST \
--data "grant_type=client_credentials" \
--data "client_id=idm-provisioning" \
--data "client_secret=openidm" \
--data "scope=fr:idm:*" \
"http://am.example.com:8081/am/oauth2/realms/root/realms/alpha/access_token"
{
  "access_token": "<access_token>",
  "scope": "fr:idm:*",
  "token_type": "Bearer",
  "expires_in": 3599
}Use the bearer access_token to authorize REST calls to IDM to provision identity data, such as groups.
Create a group
Using the Admin UI
-
From the navigation bar, click Identities > Manage > Groups.
-
On the Groups page, click New Group.
-
On the New Group page, enter a name and description, and click Save.
Using REST
To create a group, send a PUT or POST request to the /openidm/managed/group context path.
The following example creates a group named employees, with ID employees:
curl \
--header "Authorization: Bearer <access_token>" \
--header "Accept-API-Version: resource=1.0" \
--header "Content-Type: application/json" \
--request POST \
--data '{
  "name": "employees",
  "description": "Group that includes temporary and permanent employees"
}' \
"http://openidm.example.com:8080/openidm/managed/group?_action=create"
{
  "_id": "employees",
  "_rev": "ae6e63c4-94f5-463b-8bef-7a359b8e3004-1028",
  "name": "employees",
  "condition": null,
  "description": "Group that includes temporary and permanent employees"
}To get an access_token, see Authentication for REST.
You can also omit ?_action=create and achieve the same result:
curl \
--header "Authorization: Bearer <access_token>" \
--header "Accept-API-Version: resource=1.0" \
--header "Content-Type: application/json" \
--request POST \
--data '{
  "name": "employees2",
  "description": "Second group that includes temporary and permanent employees"
}' \
"http://openidm.example.com:8080/openidm/managed/group"
{
  "_id": "employees2",
  "_rev": "ae6e63c4-94f5-463b-8bef-7a359b8e3004-1053",
  "name": "employees2",
  "condition": null,
  "description": "Second group that includes temporary and permanent employees"
}List groups
To list groups over REST, query the openidm/managed/group endpoint.
The following example shows the employees group that you created in the previous example:
curl \
--header "Authorization: Bearer <access_token>" \
--header "Accept-API-Version: resource=1.0" \
--request GET \
"http://openidm.example.com:8080/openidm/managed/group?_queryFilter=true"
{
  "result": [
    {
      "_id": "employees",
      "_rev": "ae6e63c4-94f5-463b-8bef-7a359b8e3004-1028",
      "name": "employees",
      "condition": null,
      "description": "Group that includes temporary and permanent employees"
    },
    {
      "_id": "employees2",
      "_rev": "ae6e63c4-94f5-463b-8bef-7a359b8e3004-1053",
      "name": "employees2",
      "condition": null,
      "description": "Second group that includes temporary and permanent employees"
    }
  ],
  "resultCount": 2,
  "pagedResultsCookie": null,
  "totalPagedResultsPolicy": "NONE",
  "totalPagedResults": -1,
  "remainingPagedResults": -1
}To get an access_token, see Authentication for REST.
To list the managed groups in the Admin UI, select Identities > Manage > Groups.
If you have a large number of groups, use the search box to display only the groups you want.
Add users to a group
You add users to a group through the relationship mechanism. Relationships are essentially references from one managed object to another; in this case, from a user object to a group object. For more information about relationships, refer to Relationships between objects.
You can add group members statically or dynamically.
To add members statically, you must do one of the following:
-
Update the value of the user’s
groupsproperty to reference the group. -
Update the value of the group’s
membersproperty to reference the user.
Dynamic groups use the result of a condition or script to update a user’s list of groups.
Add group members statically
Add a user to a group statically, using the REST interface or the Admin UI as follows:
Using REST
Use one of these methods to add group members over REST.
To get an access_token, see Authentication for REST:
-
Add the user as a group member.
The following example adds the user with ID
808cca7b-6c7f-40e5-b890-92b7b6eda08cas a member of the group you created,employees:curl \ --header "Authorization: Bearer <access_token>" \ --header "Accept-API-Version: resource=1.0" \ --header "Content-Type: application/json" \ --request POST \ --data '{ "_ref":"managed/user/808cca7b-6c7f-40e5-b890-92b7b6eda08c", "_refProperties":{} }' \ "http://openidm.example.com:8080/openidm/managed/group/employees/members?_action=create" { "_id": "393916e8-e43b-4e83-b372-7816b5e18fac", "_rev": "ce85fb00-1c27-47da-9d7a-8b6d4fcedb16-4792", "_ref": "managed/user/808cca7b-6c7f-40e5-b890-92b7b6eda08c", "_refResourceCollection": "managed/user", "_refResourceId": "808cca7b-6c7f-40e5-b890-92b7b6eda08c", "_refProperties": { "_id": "393916e8-e43b-4e83-b372-7816b5e18fac", "_rev": "ce85fb00-1c27-47da-9d7a-8b6d4fcedb16-4792" } }bashThis is the preferred method as it does not incur an unnecessary performance cost for groups with many members. -
Update the user’s
groupsproperty.The following example adds the
employees2group to the same user:curl \ --header "Authorization: Bearer <access_token>" \ --header "Accept-API-Version: resource=1.0" \ --header "Content-Type: application/json" \ --request PATCH \ --data '[ { "operation": "add", "field": "/groups/-", "value": {"_ref" : "managed/group/employees2"} } ]' \ "http://localhost:8080/openidm/managed/user/808cca7b-6c7f-40e5-b890-92b7b6eda08c" { "_id": "808cca7b-6c7f-40e5-b890-92b7b6eda08c", "_rev": "ae6e63c4-94f5-463b-8bef-7a359b8e3004-1569", "country": null, "telephoneNumber": null, "mail": "scarter@example.com", "memberOfOrgIDs": [], "city": null, "displayName": null, "assignedDashboard": [], "effectiveAssignments": [], "postalCode": null, "description": null, "profileImage": null, "expireAccount": null, "accountStatus": "active", "aliasList": [], "kbaInfo": [], "inactiveDate": null, "activeDate": null, "consentedMappings": [], "sn": "Carter", "effectiveGroups": [ { "_refResourceCollection": "managed/group", "_refResourceId": "employees", "_ref": "managed/group/employees" }, { "_refResourceCollection": "managed/group", "_refResourceId": "employees2", "_ref": "managed/group/employees2" } ], "preferences": null, "organizationName": null, "givenName": "Sam", "stateProvince": null, "userName": "scarter", "postalAddress": null, "effectiveRoles": [], "activateAccount": null }bashWhen you update a user’s existing groups array, use the
-special index to add the new value to the set. For more information, see Set semantic arrays in Patch operation: add. -
Update the group’s
membersproperty to refer to the user.The following sample command makes the user a member of the group you created:
curl \ --header "Authorization: Bearer <access_token>" \ --header "Accept-API-Version: resource=1.0" \ --header "Content-Type: application/json" \ --request PATCH \ --data '[ { "operation": "add", "field": "/members/-", "value": {"_ref" : "managed/user/808cca7b-6c7f-40e5-b890-92b7b6eda08c"} } ]' \ "http://openidm.example.com:8080/openidm/managed/group/employees" { "_id": "employees", "_rev": "ae6e63c4-94f5-463b-8bef-7a359b8e3004-1028", "name": "employees", "condition": null, "description": "Group that includes temporary and permanent employees" }bashThe
membersproperty of a group is not returned by default in the output. To show all members of a group, you must specifically request the relationship properties (*_ref) in your query. The following example lists the members of the group you created:curl \ --header "Authorization: Bearer <access_token>" \ --header "Accept-API-Version: resource=1.0" \ --request GET \ "http://openidm.example.com:8080/openidm/managed/group/employees?_fields=name,members" { "_id": "employees", "_rev": "ce85fb00-1c27-47da-9d7a-8b6d4fcedb16-4160", "name": "employees", "members": [{ "_ref": "managed/user/808cca7b-6c7f-40e5-b890-92b7b6eda08c", "_refResourceCollection": "managed/user", "_refResourceId": "808cca7b-6c7f-40e5-b890-92b7b6eda08c", "_refProperties": { "_id": "245c9009-a812-4d54-ae6c-02756243f7cb", "_rev": "ce85fb00-1c27-47da-9d7a-8b6d4fcedb16-4898" } }] }bash
Using the UI
Use one of the following UI methods to add members to a group:
-
Update the user entry:
-
Select Identities > Manage > Users and select the user that you want to add.
-
Select the Group tab and click Add Groups.
-
Select the group from the dropdown list and click Add.
-
-
Update the group entry:
-
Select Identities > Manage > Groups and select the group to which you want to add members.
-
Select the Members tab and click Add Members.
-
Select the user from the dropdown list and click Add.
-
Add group members dynamically
To add a member to a group dynamically, use a condition, expressed as a query filter, in the group definition. If the condition is true for a particular member, that member is added to the group.
A group whose membership is based on a defined condition is called a conditional group. To create a conditional group, include a query filter in the group definition.
|
Properties that are used as the basis of a conditional group query must be configured as For more information, see Create and modify object types. |
To add a condition to a group using the admin UI, select Set up on the group Settings tab, then define the query filter that will be used to assess the condition.
To create a conditional group over REST,
include the query filter as a value of the condition property in the group definition.
The following example creates a group whose members are only users who live in France,
meaning their country property is set to FR:
curl \
--header "Authorization: Bearer <access_token>" \
--header "Accept-API-Version: resource=1.0" \
--header "Content-Type: application/json" \
--request POST \
--data '{
  "description": "Group for employees resident in France",
  "condition": "/country eq \"FR\""
}' \
"http://openidm.example.com:8080/openidm/managed/group?_action=create"
{
  "_id": "fr-employees",
  "_rev": "ae6e63c4-94f5-463b-8bef-7a359b8e3004-1898",
  "name": "fr-employees",
  "condition": "/country eq \"FR\"",
  "description": "Group for employees resident in France"
}To get an access_token, see Authentication for REST.
When a conditional group is created or updated, IDM assesses all managed users,
and recalculates the value of their groups property, if they are members of that group.
When a condition is removed from a group, that is, when the group becomes an unconditional group,
all members are removed from the group.
So, users who became members based on the condition, have that group removed from their groups property.
|
When a conditional group is defined in an existing data set, every user entry (including the mapped entries on remote systems) must be updated with the relationships implied by that conditional group. The time that it takes to create a new conditional group is impacted by the number of managed users affected by the condition. In a data set with a very large number of users, creating a new conditional group can incur a significant performance cost when you create it. If possible, set up your conditional groups at the beginning of your deployment to avoid performance issues later. |
Query a user’s group memberships
To list a user’s groups, query their groups property.
The following example shows a user who is a member of two groups:
curl \
--header "Authorization: Bearer <access_token>" \
--header "Accept-API-Version: resource=1.0" \
--request GET \
"http://openidm.example.com:8080/openidm/managed/user/808cca7b-6c7f-40e5-b890-92b7b6eda08c/groups?_queryFilter=true&_fields=_ref/*,name"
{
  "result": [
    {
      "_id": "38a23ddc-1345-48d6-b753-ad97f472a90e",
      "_rev": "ae6e63c4-94f5-463b-8bef-7a359b8e3004-1692",
      "_refResourceCollection": "managed/group",
      "_refResourceId": "employees",
      "_refResourceRev": "ae6e63c4-94f5-463b-8bef-7a359b8e3004-1028",
      "name": "employees",
      "_ref": "managed/group/employees",
      "_refProperties": {
        "_id": "38a23ddc-1345-48d6-b753-ad97f472a90e",
        "_rev": "ae6e63c4-94f5-463b-8bef-7a359b8e3004-1692"
      }
    },
    {
      "_id": "0fabd212-f0c2-4d91-91f2-2b211bb58e89",
      "_rev": "ae6e63c4-94f5-463b-8bef-7a359b8e3004-1974",
      "_refResourceCollection": "managed/group",
      "_refResourceId": "supervisors",
      "_refResourceRev": "ae6e63c4-94f5-463b-8bef-7a359b8e3004-1965",
      "name": "supervisors",
      "_ref": "managed/group/supervisors",
      "_refProperties": {
        "_id": "0fabd212-f0c2-4d91-91f2-2b211bb58e89",
        "_rev": "ae6e63c4-94f5-463b-8bef-7a359b8e3004-1974"
      }
    }
  ],
  "resultCount": 2,
  "pagedResultsCookie": null,
  "totalPagedResultsPolicy": "NONE",
  "totalPagedResults": -1,
  "remainingPagedResults": -1
}To get an access_token, see Authentication for REST.
To view a user’s group membership in the Admin UI:
-
Select Identities > Manage > Users, then select the user whose groups you want to see.
-
Select the Groups tab.
If you have a large number of groups, use the search box to display only the groups you want.
Remove a member from a group
To remove a static group membership from a user entry, do one of the following:
-
Update the value of the user’s
groupsproperty to remove the reference to the role. -
Update the value of the group’s
membersproperty to remove the reference to that user.
You can use both of these methods over REST, or use the Admin UI.
|
A delegated administrator must use PATCH to add or remove relationships. Conditional group membership can only be removed when the condition is changed or removed, or when the group itself is deleted. |
Using REST
Use one of the following methods to remove a member from a group.
To get an access_token, see Authentication for REST:
-
DELETE the group from the user’s
groupsproperty, including the reference ID (the ID of the relationship between the user and the group) in the DELETE request.The following example removes a group from a user. Note that ID required in the DELETE request is not the ID of the group but the reference
_idof the relationship:curl \ --header "Authorization: Bearer <access_token>" \ --header "Accept-API-Version: resource=1.0" \ --request DELETE \ "http://openidm.example.com:8080/openidm/managed/user/808cca7b-6c7f-40e5-b890-92b7b6eda08c/groups/e450a32c-e289-49e3-8de5-b0f84e07c740" { "_id": "e450a32c-e289-49e3-8de5-b0f84e07c740", "_rev": "ae6e63c4-94f5-463b-8bef-7a359b8e3004-2122", "_ref": "managed/group/employees", "_refResourceCollection": "managed/group", "_refResourceId": "employees", "_refProperties": { "_id": "e450a32c-e289-49e3-8de5-b0f84e07c740", "_rev": "ae6e63c4-94f5-463b-8bef-7a359b8e3004-2122" } }bash -
PATCH the user entry to remove the group from the array of groups, specifying the value of the group object in the JSON payload.
When you remove a group in this way, you must include the entire object in the value, as shown in the following example:
curl \ --header "Authorization: Bearer <access_token>" \ --header "Content-type: application/json" \ --header "Accept-API-Version: resource=1.0" \ --request PATCH \ --data '[ { "operation" : "remove", "field" : "/groups", "value" : { "_ref": "managed/group/0bf541d3-e7da-478a-abdd-41cdb74b2cbb", "_refResourceCollection": "managed/group", "_refResourceId": "0bf541d3-e7da-478a-abdd-41cdb74b2cbb", "_refProperties": { "_id": "8174332d-b448-4fe1-b507-b8e4751e08ba", "_rev": "ce85fb00-1c27-47da-9d7a-8b6d4fcedb16-5015" } } } ]' \ "http://openidm.example.com:8080/openidm/managed/user/808cca7b-6c7f-40e5-b890-92b7b6eda08c" { "_id": "808cca7b-6c7f-40e5-b890-92b7b6eda08c", "_rev": "ce85fb00-1c27-47da-9d7a-8b6d4fcedb16-5245", "userName": "demo", "customAttribute": "Testing 1, 2…", "accountStatus": "active", "givenName": "Demo", "sn": "User", "mail": "demo@example.com" }bash -
DELETE the user from the group’s
membersproperty, including the reference ID (the ID of the relationship between the user and the role) in the delete request.The following example first queries the members of the group to obtain the ID of the relationship, then removes the user’s membership from that group:
curl \
--header "Authorization: Bearer <access_token>" \
--header "Accept-API-Version: resource=1.0" \
--request GET \
"http://openidm.example.com:8080/openidm/managed/group/employees/members?_queryFilter=true&_fields=_ref/*,name"
{
  "result": [{
    "_id": "ef3261cd-a66f-4d3e-aad8-c0850e0b4a0e",
    "_rev": "ae6e63c4-94f5-463b-8bef-7a359b8e3004-2430"
    "_refResourceCollection": "managed/user",
    "_refResourceId": "808cca7b-6c7f-40e5-b890-92b7b6eda08c",
    "_refResourceRev": "ce85fb00-1c27-47da-9d7a-8b6d4fcedb16-5245",
    "_ref": "managed/user/808cca7b-6c7f-40e5-b890-92b7b6eda08c",
    "_refProperties": {
      "_id": "245c9009-a812-4d54-ae6c-02756243f7cb",
      "_rev": "ce85fb00-1c27-47da-9d7a-8b6d4fcedb16-4898"
    }
  }],
  "resultCount": 1,
  "pagedResultsCookie": null,
  "totalPagedResultsPolicy": "NONE",
  "totalPagedResults": -1,
  "remainingPagedResults": -1
}

curl \
--header "Authorization: Bearer <access_token>" \
--header "Accept-API-Version: resource=1.0" \
--request DELETE \
"http://openidm.example.com:8080/openidm/managed/group/employees/members/245c9009-a812-4d54-ae6c-02756243f7cb"
{
  "_id": "245c9009-a812-4d54-ae6c-02756243f7cb",
  "_rev": "ce85fb00-1c27-47da-9d7a-8b6d4fcedb16-4898",
  "_ref": "managed/user/808cca7b-6c7f-40e5-b890-92b7b6eda08c",
  "_refResourceCollection": "managed/user",
  "_refResourceId": "808cca7b-6c7f-40e5-b890-92b7b6eda08c",
  "_refProperties": {
    "_id": "245c9009-a812-4d54-ae6c-02756243f7cb",
    "_rev": "ce85fb00-1c27-47da-9d7a-8b6d4fcedb16-4898"
  }
}
bash
Using the UI
Use one of the following methods to remove a group member:
-
Select Identities > Manage > Users and select the user whose group or groups you want to remove.
Select the Groups tab, select the group that you want to remove, then select Remove.
-
Select Identities > Manage > Groups, and select the group whose members you want to remove.
Select the Members tab, select the member or members that you want to remove, then select Remove.
Delete a group
To delete a group over the REST interface, simply delete that managed object.
The following command deletes the group you created:
curl \
--header "Authorization: Bearer <access_token>" \
--header "Accept-API-Version: resource=1.0" \
--request DELETE \
"http://openidm.example.com:8080/openidm/managed/group/employees"
{
  "_id": "employees",
  "_rev": "ae6e63c4-94f5-463b-8bef-7a359b8e3004-1028",
  "name": "employees",
  "condition": null,
  "description": "Group that includes temporary and permanent employees"
}To get an access_token, see Authentication for REST.
To delete a group using the Admin UI, select Identities > Manage > Groups, select the group you want to remove, then Delete Group.
HSMs and ForgeRock software
This page covers how you can use a Hardware Security Module (HSM) to protect ForgeRock software private and secret keys.
On protecting secrets
You must protect private keys and secret keys that servers use for cryptographic operations:
- Operating system protections
-
In many deployments, operating system protections are sufficient. Operating systems are always sufficient for public keys and keystores that do not require protection.
Isolate the server account on the operating system where it runs, and allow only that account to access the keys. If you store the keys with version control software, also control access to that.
This deployment option generally offers a better performance/cost ratio. You must take more care to prevent private and secret keys from being exposed, however.
- HSM
-
For stronger protection, you can use an HSM.
An HSM is a secure device that holds the keys, and protects them from unauthorized access. With an HSM, no one gets direct access to the keys. If an attacker does manage to break into an HSM and theoretically get access to the keys, HSM are designed to make the tampering evident, so you can take action.
To put a private or secret key on an HSM, you have the HSM generate the key. The key never leaves the HSM. Instead, if you need the result of a cryptographic operation involving the key, you authenticate to the HSM and request the operation. The HSM performs the operation without ever exposing any private or secret keys. It only returns the result.
An HSM can be certified to comply with international standards, including FIPS-140 and Common Criteria. An HSM that is certified to comply with these standards can be part of your supported ForgeRock software solution.
ForgeRock software uses the HSM through standard PKCS#11 interfaces, and supports the use of compliant cryptographic algorithms.
An HSM generally offers higher security, but with a significant cost and impact on performance. Good HSMs and standards compliance come with their own monetary costs.
In terms of performance, each cryptographic operation incurs at minimum a round trip on a secure connection, compared with an operation in local memory for keys on the system. Even if the deployment may guarantee the same throughput, take the latency into account when deciding to deploy with HSMs.
- Key management services
-
Key management services, such as Google Cloud KMS and others, offer similar advantages and tradeoffs as HSMs.
Latency for online key management services can be very high.
Performance
Throughput, the rate of operations completed, might or might not be impacted by your choice of protecting secrets.
Latency, how long individual operations take, will be impacted by your choice of protecting secrets.
For example, suppose you want a system that signs one million JWTs per second. As long as you can distribute the signing key across enough hardware, your system can sign one million JWTs a second. This is true even if each signing operation takes ten seconds. You simply need ten million systems, and the network hardware to use them in parallel. Throughput therefore depends mainly on how much you can spend.
Suppose, however, that each signing operation must take no longer than ten milliseconds. Furthermore, suppose you have an HSM that can perform a signing operation in one millisecond, but that the network round trip from the system to the HSM takes an average of eleven milliseconds. In this case, you cannot fix performance by buying a faster HSM, or by somehow speeding up the software. You must first reduce the network time if you want to meet your latency requirements.
Perhaps the same signing operation with a key stored on the operating system takes two milliseconds. Consider the options based on your cost and security requirements.
Performance also depends on the following:
-
The impact of latency is greater when performing symmetric cryptographic operations (AES, HMAC) compared to public key cryptography (RSA, EC).
-
For public key cryptography, only operations that use the private key must contact the HSM (signing, decryption).
Operations using the public key (verifying a signature, encryption) retrieve the public key from the HSM once, and then use it locally.
-
Most public key cryptography uses hybrid encryption, where only a small operation must be done on the HSM, and the rest can be done locally.
For example, when decrypting a large message, typically, the HSM is only used to decrypt a per-message AES key that is then used to decrypt the rest of the message locally.
Similarly, for signing, the message to sign is first hashed in-memory using a secure hash algorithm, and only the short hash value is sent to the HSM to be signed.
In contrast, when using symmetric key algorithms directly with an HSM, the entire message must be streamed to and from the HSM.
How ForgeRock services interact with HSMs
ForgeRock services built with Java interact with HSMs through Java PKCS#11 providers.
The PKCS#11 standard defines a cryptographic token interface, a platform-independent API for accessing an HSM, for example. ForgeRock services support the use of the Sun PKCS11 provider.
The Sun PKCS11 provider does not implement every operation and algorithm supported by every HSM. For details on the Sun PKCS11 provider’s capabilities, refer to the JDK Providers Documentation, and the JDK PKCS#11 Reference Guide.
How you configure the JVM to use your HSM depends on the Java environment and on your HSM. ForgeRock services do not implement or manage this configuration, but they do depend on it. Before configuring ForgeRock services to use your HSM, you must therefore configure the JVM’s Sun PKCS11 provider to access your HSM. For details on how to configure the Java Sun PKCS11 provider with your HSM, refer to the documentation for your HSM, and the JDK PKCS#11 Reference Guide.
Sun PKCS11 provider hints
The provider configuration depends on your provider.
Compare the following hints for ForgeRock software with the documentation for your HSM:
name = FooHsm-
The name used to produce the Sun PKCS11 provider instance name for your HSM.
FooHsmis just an example. CKA_TOKEN = false-
Keys generated using the Java
keytoolcommand effectively have this set totrue. They are permanent keys, to be shared across the deployment.Set this to
falseto prevent temporary keys for RSA hybrid encryption used by some platform components from exhausting HSM storage. CKA_PRIVATE = true-
The key can only be accessed after authenticating to the HSM.
CKA_EXTRACTABLE = falseCKA_SENSITIVE = true-
CKA_EXTRACTABLE = falsemeans the key cannot be extracted unless it is encrypted.CKA_SENSITIVE = truemeans do not let the secret key be extracted out of the HSM. Set this totruefor long-term keys.Only change these settings to back up keys to a different HSM, when you cannot use a proprietary solution. For example, you might change these settings if the HSMs are from different vendors.
CKA_ENCRYPT = true-
The key can be used to encrypt data.
CKA_DECRYPT = true-
The key can be used to decrypt data.
CKA_SIGN = true-
The key can be used to sign data.
CKA_VERIFY = true-
The key can be used to verify signatures.
CKA_WRAP = true-
The key can be used to wrap another key.
CKA_UNWRAP = true-
The key can be used to unwrap another key.
When using keytool
When using the Java keytool command to generate or access keys on the HSM, set the following options appropriately:
-aliasalias-
If key pair generation fails, use a new alias for the next try. This prevents the conflicts where the previous attempt to create a key was only a partial failure, leaving part of key pair using the previous alias.
-keystore none-
Required setting.
-providernameproviderName-
Required setting.
Prefix
SunPKCS11-to the name in the configuration. If, in the Sun PKCS11 configuration,name = FooHSM, then the providerName isSunPKCS11-FooHSM. -storetype pkcs11-
Required setting.
If necessary, add the following settings:
-providerClass sun.security.pkcs11.SunPKCS11-
Use this to install the provider dynamically.
-providerArg/path/to/config/file.conf-
Use this to install the provider dynamically.
The exact configuration depends on your HSM.
When Java cannot find keys
When keys generated with one Java PKCS#11 provider are later accessed using the Sun PKCS11 provider, the providers may have different naming conventions.
Java’s KeyStore abstraction requires that all private key objects have a corresponding Certificate object. SecretKey objects, such as AES or HMAC keys, are excluded from this requirement.
The Sun PKCS11 KeyStore provider loops through all defined private key entries in the HSM (class = private key),
and tries to match them up with a corresponding certificate entry (class = certificate)
by comparing the CKA_ID of the certificate entry to the CKA_ID of the private key entry.
There may be multiple certificates using the same private key pair
The matching process can take several seconds at startup time if you have many keys.
If keys are not found, it is likely that the private key entry CKA_ID does not match the certificate entry CKA_ID.
HSM features and ForgeRock services
This part outlines how some ForgeRock platform features support HSMs.
JWT encryption algorithms
| JWT Encryption Algorithm | Java Algorithm Equivalent | Supported by Sun PKCS11 Provider? |
|---|---|---|
RSA1_5 |
RSA/ECB/PKCS1Padding(1) |
Yes |
RSA-OAEP |
RSA/ECB/OAEPWithSHA-1AndMGF1Padding |
No |
RSA-OAEP-256 |
RSA/ECB/OAEPWithSHA-256AndMGF1Padding |
No |
ECDH-ES (+A128KW, and so on)(2) |
ECDH (KeyAgreement vs. Cipher) |
Yes |
dir with A128GCM, A192GCM, A256GCM |
AES/GCM/NoPadding |
Yes |
dir with A128CBC-HS256, and so on |
AES/CBC/PKCS5Padding + HmacSHA256, and so on |
No |
A128KW, A192KW, A256KW |
AESWrap |
No |
(1) PKCS#1 version 1.5 padding has known vulnerabilities and should be avoided.
(2) The Sun PKCS11 implementation of ECDH KeyAgreement requires that the derived key be extractable. This is not a security issue, as the derived key is unique to each message, and therefore no more sensitive than the message it is protecting, due to the use of fresh ephemeral keys for each message (ECIES). To ensure that the derived keys are extractable, add the following to the PKCS11 configuration file:
attributes(*,CKO_PRIVATE_KEY,CKK_EC) = {
  CKA_SIGN = true
  CKA_DERIVE = true
  CKA_TOKEN = true
}

attributes(generate,CKO_SECRET_KEY,CKK_GENERIC_SECRET) = {
  CKA_SENSITIVE = false
  CKA_EXTRACTABLE = true
  CKA_TOKEN = false
}This also ensures that EC keys generated with the keytool command are marked as allowing ECDH key derivation.
The derived keys are also marked as CKA_TOKEN = false,
which ensures that the derived keys are only created as session keys,
and automatically deleted when the session ends to prevent filling up the HSM with temporary keys.
JWT signing algorithms
| JWT Signing Algorithm | Java Algorithm Equivalent | Supported by Sun PKCS11 Provider? |
|---|---|---|
HS256, HS384, HS512 |
HmacSHA256, HmacSHA384, HmacSHA512 |
Yes |
RS256, RS384, RS512 |
SHA256WithRSA, SHA384WithRSA, SHA512WithRSA |
Yes |
PS256, PS384, PS512 |
RSASSA-PSS or SHA256WithRSAAndMGF1, and so on |
No |
ES256, ES384, ES512 |
SHA256WithECDSA, and so on |
Yes |
EdDSA |
Under development |
No |
Configure ForgeRock services to use an HSM
Once you have configured the Java environment to use your HSM through the Sun PKCS11 Provider, you can configure ForgeRock software to use the HSM:
-
AM: Refer to /pingam/7.5/security-guide/secrets-certs-keys.html[Configuring secrets, certificates, and keys].
-
DS: Refer to /pingds/7.5/security-guide/pki-hsm.html[PKCS#11 hardware security module].
-
IDM: Refer to /pingidm/7.5/security-guide/security-hsm.html[ Configuring IDM for a hardware security module (HSM) device].
-
IG: Refer to /pingig/2024.3/gateway-guide/about.html#about-secrets[Secrets], and /pingig/2024.3/reference/HsmSecretStore.html[HsmSecretStore].