IDV Bridge on-premise
Introduction
IDV Bridge allows customers to take the user portraits ("selfies") of their users that have been captured in previous identity processes and use these to register them into the PingOne Recognize system. They can be leveraged to support future facial biometric authentication without customers having to take any additional steps.
This guide takes you through the key features and elements within IDV Bridge on-premise ("PingOne Recognize Agent"), including:
-
An integration runbook, which runs PingOne Recognize Agent
-
An optimization guide that explains options and expectations.
Offline and online enrollment
There are two modes that the PingOne Recognize agent can run in:
-
Offline Enrollment
-
As the name suggests, this mode ensures that at the moment of processing, PingOne Recognize Agent isn’t connected to the internet. This is particularly critical if your PII policies dictate that services that access user images can’t have internet access while doing so.
-
Note that in this case, it’s critical to handle PingOne Recognize server state.
-
-
Online Enrollment
-
Still 100% privacy-preserving. All user images are processed within your own infrastructure, ensuring that PingOne Recognize never sees the selfie or biometric template. The registration and creation of the PingOne Recognize ID takes place automatically, ready for a user to authenticate against.
-
Client and server state
After you select the appropriate method, the PingOne Recognize agent processes a user’s selfie (JPEG, PNG, BMP) and provides two critical outputs that you need to store:
-
Client State: Used to initialize a PingOne Recognize device through the PingOne Recognize SDK.
-
Server State: Transmitted to the PingOne Recognize infrastructure to create and register a user within the PingOne Recognize ecosystem. Note this is only produced when working in offline mode.
This streamlined approach ensures secure and efficient user onboarding into the PingOne Recognize platform.
High-level flow
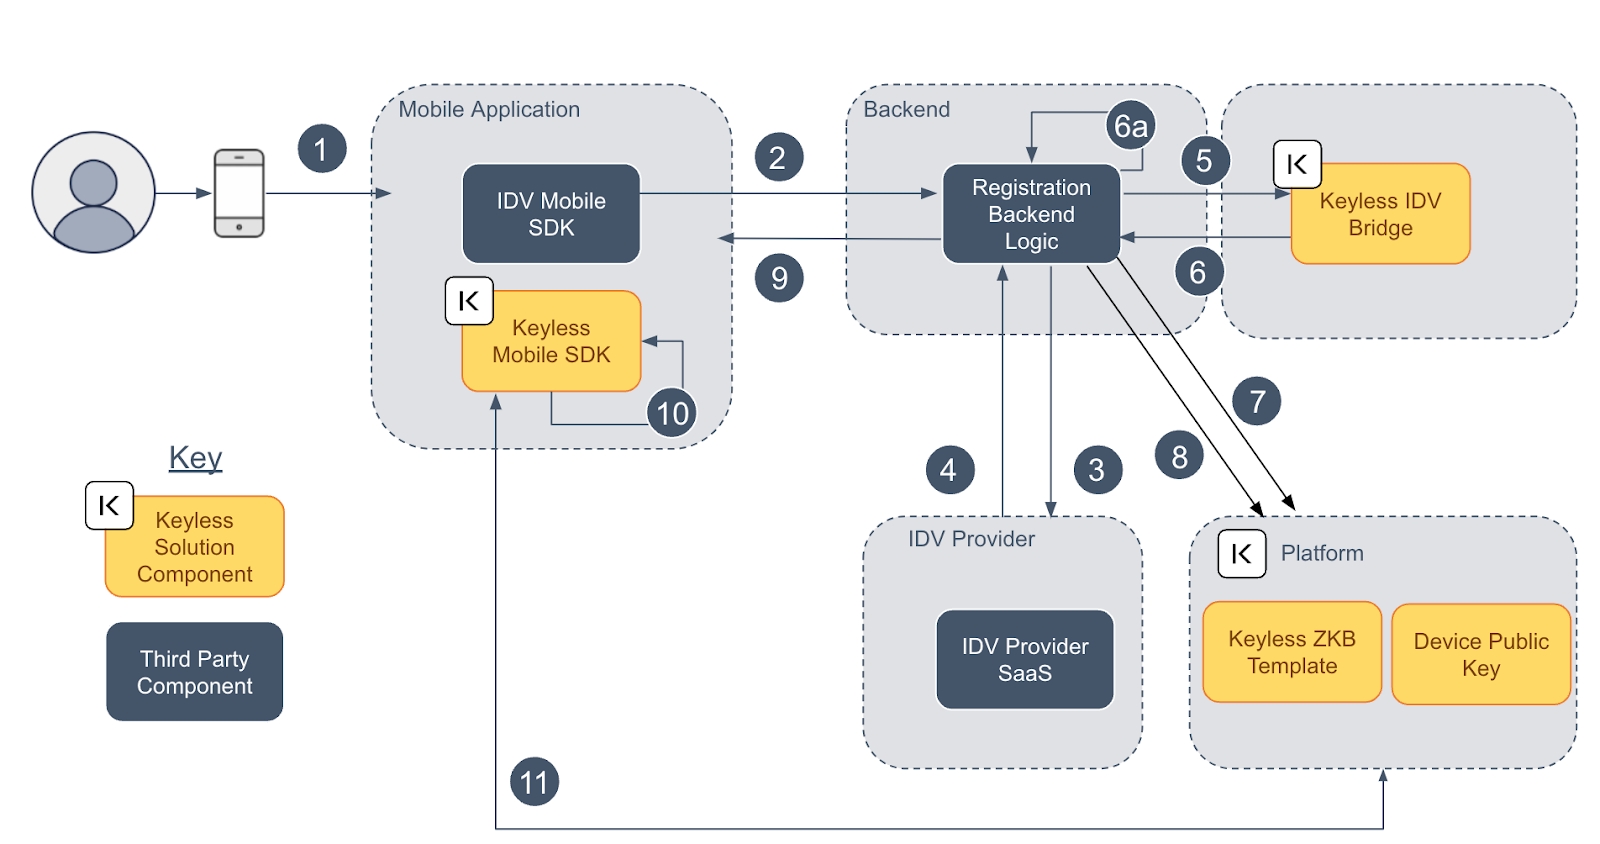
-
User starts the onboarding process through the IDV Vendor Mobile SDK, performing liveness detection, capturing selfie and document data.
-
Captured data are sent to the customer backend.
-
Onboarding data are sent to the IDV Bridge for KYC analysis.
-
The IDV vendor returns a response.
-
User selfie is sent to the PingOne Recognize Agent to create a PingOne Recognize user template.
-
PingOne Recognize Agent sends back a
clientState(for SDK initialization) and aserverState(for PingOne Recognize backend initialization).-
Client state is stored on the customer backend for later use (device binding and account recovery).
-
-
POST /uncommitted-userspassing the server state to initialize the PingOne Recognize user on PingOne Recognize backend. -
POST /uncommitted-users/{userId}/committo activate the PingOne Recognize user. -
The
clientStateis sent to the mobile app to initialize a new PingOne Recognize device for the specific user. -
Call
Enrollment.withTemporaryState(client-state). -
PingOne Recognize prompts the user to authenticate biometrics and confirm the device binding operation.
Installation through Docker image
The Docker image is available on the PingOne Recognize Quay repository. First, execute a docker login:
docker login -u="keyless_technologies+<PROVIDED_TENANT_NAME>" -p="<PROVIDED_PASSWORD>" quay.ioThen pull the container:
docker pull quay.io/keyless_technologies/keyless-agent:v3.0.0Installation through Helm chart
IDV Bridge On-Premise can also be installed through a Helm chart. This installation method provides the advantage of using a Kubernetes orchestrator for both scaling and easier maintenance.
-
Add the PingOne Recognize Helm repository to your Helm repository list:
$ helm repo add keyless https://example.com (the actual FQDN will be shared upon request) -
List the available charts:
$ helm search repo keyless -
Obtain the list of required values for each chart:
$ helm show values keyless/keyless-agent -
Save the reference
values.yamland configure it to your specific installation needs. After configuration, apply it:$ helm upgrade --install keyless-agent keyless/keyless-agent --atomic --wait -
To allow container images to be pulled from the Quay repository, create a registry secret containing the provided credentials. See the Kubernetes documentation on Docker config secrets for the required format.
Enrolling images through the PingOne Recognize Agent APIs
We automatically generate the PingOne Recognize agent APIs in ReDoc. This resource can also be accessed once PingOne Recognize Agent has been installed in your infrastructure using the endpoint /redoc.
Refer to this guide to understand how to enroll user images into PingOne Recognize for both online and offline enrollment, service health checks, and error details.
Operations APIs (offline enrollment only)
|
When working in offline mode, the only way to subsequently register a user with PingOne Recognize for ongoing authentication is to follow the guidance in this section. |
After a user image is processed by the IDV Bridge there are two key outputs:
-
Client State: Must be securely stored for future use during SDK device enrollment.
-
Server State: Must be transmitted to the PingOne Recognize infrastructure to complete the user registration process.
Base URL: api.keyless.io/v2
Secret key for authentication
The APIs are secured using an API key, which can be generated from the Access Control section of the PingOne Recognize dashboard. To access PingOne Recognize APIs, generate a secret key from that section.
After obtaining the API key, include it in the request header as X-Api-Key.
POST /uncommitted-users
To create an uncommitted user from a server state generated by the PingOne Recognize IDV Bridge, pass the server state returned by the IDV Bridge as the request body. Content-Type is application/json.
The newly created user ID is returned as a JSON response:
{
  "userId": "0123456789ABCDEF"
}Authenticating with PingOne Recognize
After you’ve completed the registration of your users through IDV Bridge On-Premise, authenticate them using PingOne Recognize facial biometric authentication. Recommended next steps:
-
For customers who want to authenticate users inside their own iOS and Android apps: Mobile SDK documentation
-
For customers who want to authenticate users inside their browser-based apps: Web SDK documentation
-
For a general understanding of how the core PingOne Recognize components interact (IDV Bridge, Mobile SDK, Web SDK): IDV Bridge overview