Upgrading engines
This phase of the zero downtime upgrade focuses on upgrading each engine in the cluster. To maintain resource availability, perform this set of steps on one engine at a time until all engines are successfully upgraded.
|
Engines are identified by the engine name. Ensure that the engine that you remove from the load balancer aligns with the engine definition you import. |
This phase requires that the following steps take place for each engine in the cluster, one at a time:
|
Do not begin the upgrade of an additional engine until the active engine upgrade is completed and the engine is reporting to the PingAccess administrative node. |
Removing the engine from the load balancer configuration
Remove the engine from the load balancer configuration. Because this step is dependent on your environment, no specific instruction will be provided.
Before you begin
You must be familiar with the steps required to temporarily remove the engine from your load balancer configuration.
|
To maintain resource availability, you should remove only the engine you are upgrading. After the upgrade is complete, add the engine back to the load balancer configuration. Only after you confirm that the engine has been successfully added to the load balancer and is reporting properly to PingAccess should you begin the upgrade process on additional engines. |
The following flowchart demonstrates engine removal.
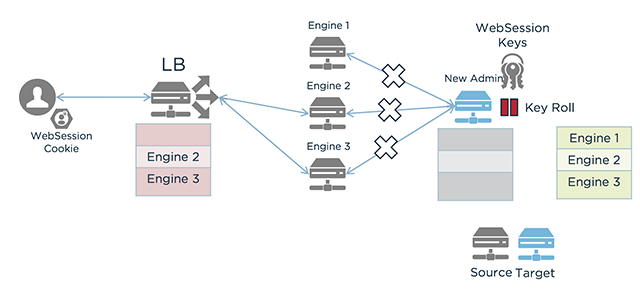
In the previous flowchart:
-
A user with a WebSession Cookie sends a request to the load balancer.
-
The load balancer directs the request to one of the other two engine nodes. All of the engine nodes are still using the source version of PingAccess.
-
The administrative node is using the target version of PingAccess.
Steps
-
Identify and note the engine you want to upgrade. Ensure you have the engine definition for this engine available.
-
Remove the engine from the load balancer.
Keep a record of the changes you make so that you can reverse this operation later in Adding the engine to the load balancer configuration.
-
Restart the load balancer.
Upgrading the engine
Use the PingAccess Upgrade Utility to upgrade the engine.
Before you begin
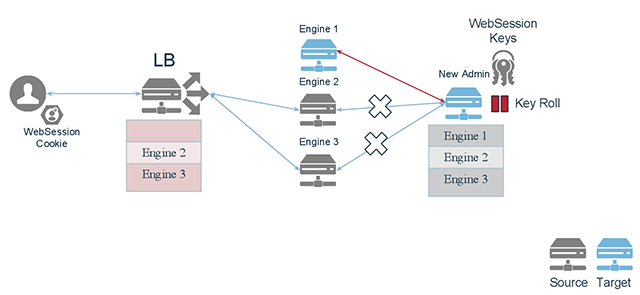
For more information on upgrading PingAccess, see Upgrade PingAccess. The following flowchart displays an example engine upgrade.

In this flowchart:
-
A user with a WebSession Cookie sends a request to the load balancer.
-
The load balancer directs the request to one of the un-upgraded engine nodes. The first engine node is using the target version of PingAccess, while the other engine nodes are still using the source version of PingAccess.
-
The administrative node is using the target version of PingAccess.
Before beginning the upgrade process, make sure you have:
-
Ensured the PingAccess engine is running
-
Downloaded the PingAccess distribution
.zipfile or the incremental update bundle and extracted it. -
The PingAccess license
About this task
Any warnings or errors encountered are recorded in log/upgrade.log, as well as on the screen while the utility is running. The upgrade uses an exit code of 0 to indicate a successful upgrade and an exit code of 1 to indicate failure.
Steps
-
If you are using the upgrade utility, change to the new version’s
/upgrade/bindirectory on the command line.Example:
cd /pingaccess-6.1.0/upgrade/bin
-
Upgrade the system:
Choose from:
-
If you are using the upgrade utility on a Windows system, use this command:
upgrade.bat [-p <admin_port>] [-i <directory>] [-j <jvm_memory_options_file>] [-l <newPingAccessLicense>] [-s | --silent] <sourcePingAccessRootDir>
For example:
upgrade.bat ../pingaccess-5.3.0
-
If you are using the upgrade utility on a Linux system, use this command:
./upgrade.sh [-p <admin_port>] [-i <directory>] [-j <jvm_memory_options_file>] [-l <newPingAccessLicense>] [-s | --silent] <sourcePingAccessRootDir>
For example:
./upgrade.sh ../pingaccess-5.3.0
-
If you are using the incremental update package, open the
ReadMeFirst.txtfile and make the file changes specified in the readme.
The command-line parameters are the same regardless of the platform, and are defined as follows.
Parameter definitions
Parameter Value description -p <admin_port>
Optional port to be used by the temporary PingAccess instance run during the upgrade. The default is
9001.-i <directory>
An optional directory containing additional library JAR files (for example, plugins, JDBC drivers) to be copied into the target installation.
Beginning in version 6.0, JAR files are stored in the
<PA_HOME>/deployfolder.During an upgrade from versions earlier than 6.0, third-party JAR files are migrated from the
libfolder to thedeployfolder if no directory is specified.During an upgrade from version 6.0 or later, the contents of the
deployfolder are migrated to the new<PA_HOME>/deployfolder if no directory is specified.<sourcePingAccessRootDir>
The PA_HOME for the source PingAccess version.
-l <newPingAccessLicense>
An optional path to the PingAccess license file to use for the target version. If not specified, the existing license is reused.
-j <jvm_memory_options_file>
An optional path to a file with Java Virtual Machine (JVM) memory options to use for the new PingAccess instance during the upgrade.
-s | --silent
Run the upgrade with no user input required. To use this option, specify the source version’s credentials using environment variables.
Environment Variables
You can specify the username and password for the source version using these environment variables:
Environment variable Description PA_SOURCE_API_USERNAMEThe username for the source version’s Admin application programming interface (API). This should be set to Administrator.
PA_SOURCE_API_PASSWORDThe basic authorization password for the Administrator in the source version’s Admin API.
JVM Memory options
These options can be included in the JVM memory options file. Memory amounts use
morgto specify the unit.Memory option Description -Xms<amount>Minimum heap size.
-Xmx<amount>Maximum heap size.
-XX:NewSize=<amount>Minimum size for the Young Gen space.
-XX:MaxNewSize=<amount>Maximum size for the Young Gen space.
-XX:+UseParallelGCSpecifies that the parallel garbage collector should be used.
Example:
#Sample JVM Memory options file
-Xms512m
-Xmx1g
-XX:NewSize=256m
-XX:MaxNewSize=512m
-XX:+UseParallelGC
You can copy the existing
PA_HOME/conf/jvm-memory.optionsfile to create a JVM memory options file for the upgrade. -
-
Stop the existing PingAccess instance. Do not start the new instance.
Next steps
|
If PingAccess is running as a service and you upgraded using the upgrade utility:
|
Resuming configuration replication
Resume the configuration replication that was disabled by the Upgrade Utility. Perform this step for all engine nodes in the cluster.
About this task
You will use the PingAccess Admin API to GET and PUT the relevant configuration data for each of these items.
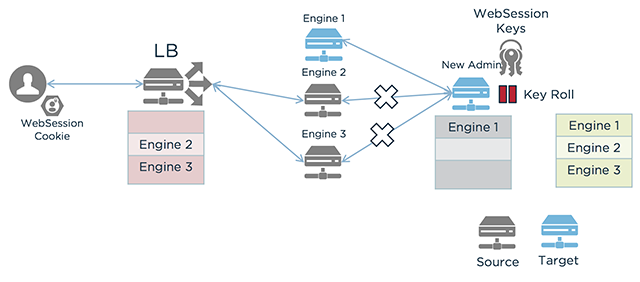
In the previous flowchart:
-
A user with a WebSession Cookie sends a request to the load balancer.
-
The load balancer directs the request to one of the un-upgraded engine nodes. The first engine node is using the target version of PingAccess, and its connection to the administrative node is resuming.
-
The administrative node is using the target version of PingAccess.
|
Perform the following steps for each engine in the cluster. |
To resume configuration replication:
Steps
-
In a browser, go to https://<host>:<admin-port>/pa-admin-api/v3/api-docs/.
Example:
https://localhost:9000/pa-admin-api/v3/api-docs/
-
For engines, expand the /engines endpoint.
-
Click the GET /engines operation.
-
Click Try it out! and note the engine id for each engine.
-
Click the GET /engines/{id} operation.
-
In the ID field, enter the id of the engine you want to update and click Try it out!
-
Copy the entire Response Body.
-
Click the PUT /engines/{id} operation and enter the id of the engine you want to update.
-
In the Engine field, paste the response body you copied and change
"configReplicationEnabled"totrue. -
Click Try it out!
Result:
If the operation is successful, you will receive a response code of
200. -
Start the node.
-
Repeat the previous steps for each node.
Click Settings and then go to Clustering > Engines.
-
Ensure the engines are displayed and reporting. A healthy engine shows a green status indicator.
There might be a delay in bringing the engine to a running status. If the engine does not immediately show as reporting, refresh the page until the engine status indicator is green (running).
In the previous flowchart:
-
A user with a WebSession Cookie sends a request to the load balancer.
-
The load balancer directs the request to one of the un-upgraded engine nodes. The first engine node is using the target version of PingAccess, and its connection to the administrative node has resumed.
-
The administrative node is using the target version of PingAccess.
-
Adding the engine to the load balancer configuration
Add the engine back to the load balancer configuration. Since this step is dependent on your environment, no specific instruction will be provided.
Before you begin
You must be familiar with the steps required to add the engine back to the load balancer configuration.
After you confirm that the engine has been successfully added to the load balancer and is reporting properly to PingAccess, you can begin the upgrade process on additional engines.
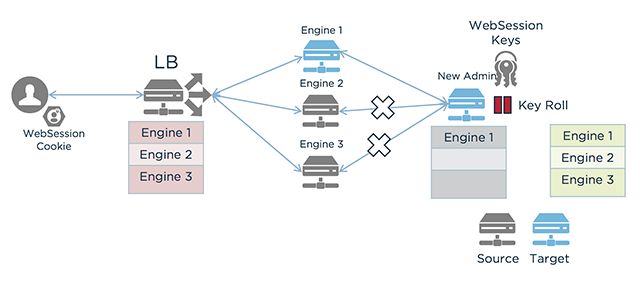
In the previous flowchart:
-
A user with a WebSession Cookie sends a request to the load balancer.
-
The load balancer directs the request to one of the three engine nodes. The first engine node is using the target version of PingAccess, and it has been added to the load balancer configuration.
-
The administrative node is using the target version of PingAccess.
Steps
-
To add the engine to the load balancer configuration, reverse the steps you took in Removing the engine from the load balancer configuration to remove the engine.
-
Restart the load balancer.
Next steps
Repeat the Upgrading engines process until each engine has been upgraded. When all engines have been upgraded, added to the load balancer configuration, and are reporting to PingAccess, you can move on to the final step, Enable key rolling, to complete the zero downtime upgrade process.