Apigee API Gateway integration
Ping Identity’s shared flow for Apigee extends Apigee’s authorization capabilities through an external authorization policy runtime service.
Integration with Apigee allows identity and access management (IAM) administrators to centrally manage access control and application protection in PingAccess, while enforcement is delegated to Apigee.
Use this guide to install and configure the shared flow in Apigee. After installation and configuration, you can manage access control rules, identity mappings, and other application protection features in PingAccess.
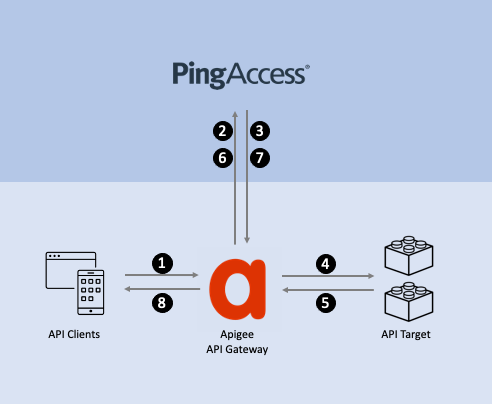
The following diagram shows how traffic flows through Apigee and PingAccess.
-
The API client makes a request to the application programming interface (API) gateway.
-
The shared flow extracts fields from the API client’s request and sends them to PingAccess for authorization.
-
PingAccess evaluates the request, validates the authorization, then responds to Apigee. The response could be an authentication or authorization error that should be immediately sent back to the client, or it could be a modified request that Apigee will send to the API target.
-
If authorized to proceed, Apigee passes the original or modified API request to the API target.
-
The API service responds with the requested resource or with the result of the operation.
-
The shared flow extracts fields from the API target’s response and sends them to PingAccess for processing.
-
PingAccess responds to the processing request. The API response can be modified by the web session configuration and processing rules in PingAccess.
-
Apigee responds to the API client with the original API response received from the API target or the modified response received from PingAccess.
Before you begin
The Ping Identity shared flow for Apigee supports Apigee Edge, Apigee Private Cloud, and Apigee X. Before you begin, ensure that you have the following:
-
A supported Apigee environment
-
PingAccess installed and started
-
The PingAuth shared flow bundle
.zipfile (sharedflowbundle.zip), which is available to download from either the Add-ons tab of the PingAccess downloads page or the Ping Identity Marketplace
Configuring PingAccess for Apigee integration
Before Apigee can use PingAccess as an external authorization policy runtime service, you must prepare PingAccess to receive authorization requests from Apigee.
Steps
-
Enable the Sideband service:
-
Edit the
<PA Home>/conf/run.propertiesfile and setsideband.http.enabled=true. -
(Optional) By default, PingAccess listens for sideband clients on port 3020. You can choose a different port by editing the value of the
sideband.http.portproperty.Learn more in Port requirements and Configuration file reference.
-
Restart PingAccess.
-
-
Add a sideband client for Apigee:
-
Go to Applications > Sideband Clients and click Add Sideband Client.
-
Give the client a name that helps you identify the Apigee environment, such as
Apigee-dev. -
Click Add Secret.
-
Keep the header name of
CLIENT-TOKENunchanged, and copy the shared secret value.You’ll need the shared secret value during the Apigee configuration.
-
Click Save.
-
-
(Optional) Download the sideband listener HTTPS certificate.
By default, the PingAuth shared flow is configured to trust the PingAccess Sideband Listener HTTPS certificates only if they’re issued from a well-known certificate authority (CA). To trust specific HTTPS certificates for PingAccess servers:
-
Go to Security > Key Pairs.
-
Click the Pencil icon next to the key pair labeled SIDEBAND.
-
Click Download Certificate and save the public key certificate.
You’ll need the public key certificate during the Apigee configuration.
-
Configuring Apigee for PingAccess integration
Install the PingAuth shared flow bundle in Apigee and configure it to integrate with PingAccess.
Steps
-
Upload the shared flow bundle.
Choose from:
-
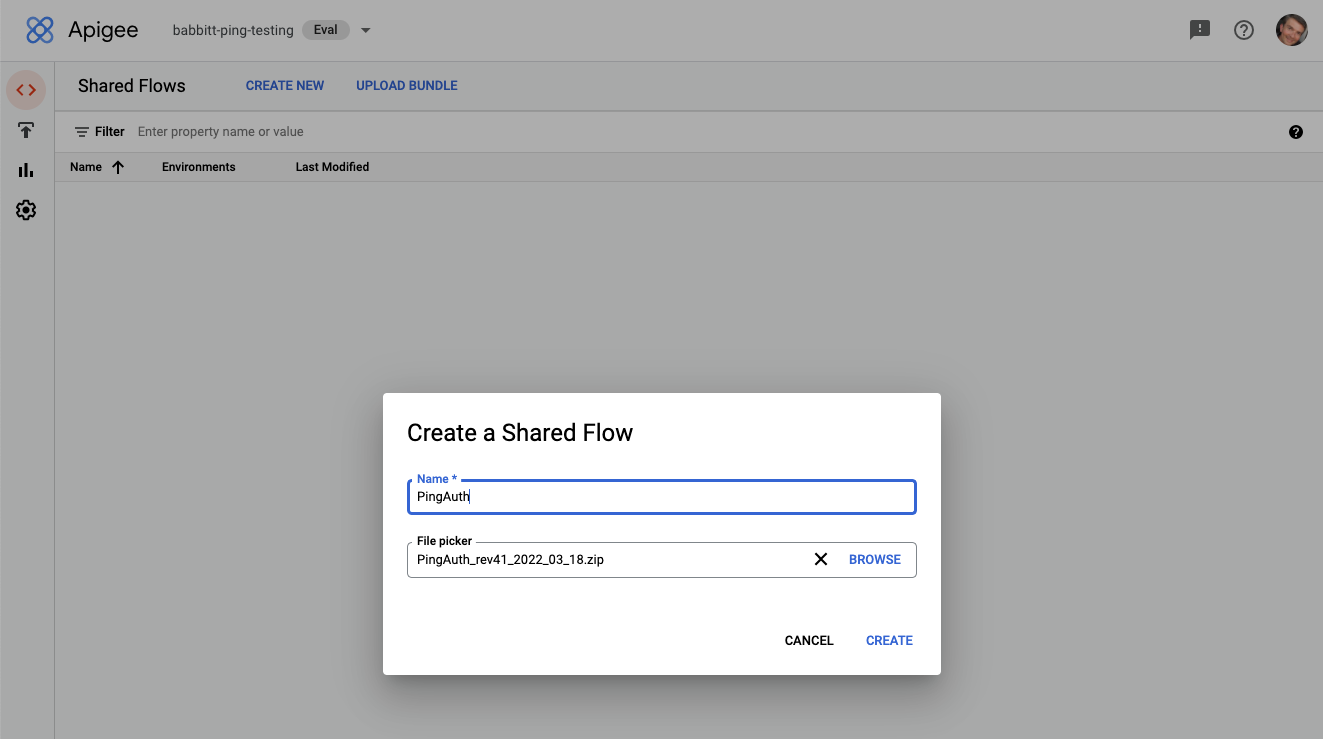
If you’re using Apigee X, go to Develop > Shared Flows and click Upload Bundle. Upload the PingAuth shared flow
.zipfile, and name the shared flowPingAuth. -
If you’re using Apigee Edge or Apigee Private Cloud, click Shared Flow, then click Upload Bundle. Upload the PingAuth shared flow bundle
.zipfile, and name the shared flowPingAuth.
-
-
If you’re using Apigee X, configure the connection to PingAccess.
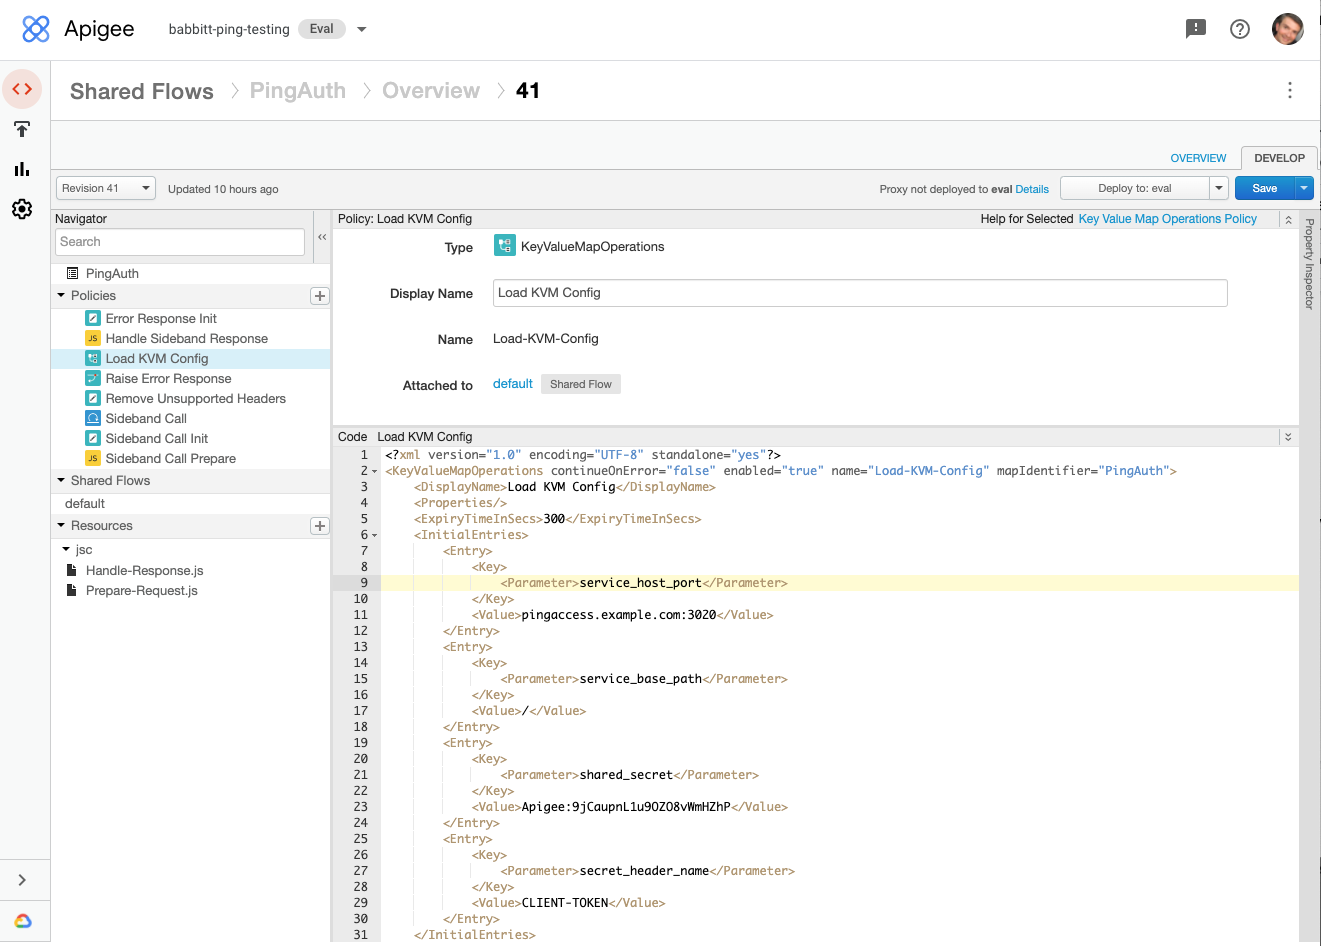
Unlike Apigee Edge, Apigee X doesn’t currently support managing the configuration values stored in key value maps in the Apigee interface. You must add these configuration values to the key value map policy. The key value map is created and the configuration values are added the first time the PingAuth shared flow is executed at runtime.
-
Go to the PingAuth shared flow at Develop > Shared Flows > PingAuth.
-
Click the Develop tab and examine Revisions to make sure you are on the latest revision.
-
In the Policies panel on the left, click the Load KVM Config policy.
-
In the policy editor panel, remove the comment lines above and below the
InitialEntrieselement. -
Edit the values for
service_host_portandshared_secretto match the values that you obtained in the previous procedure, Configuring PingAccess for Apigee integration. -
Click Save.
-
-
If you’re using Apigee Edge or Apigee Private Cloud, configure the connection to PingAccess.
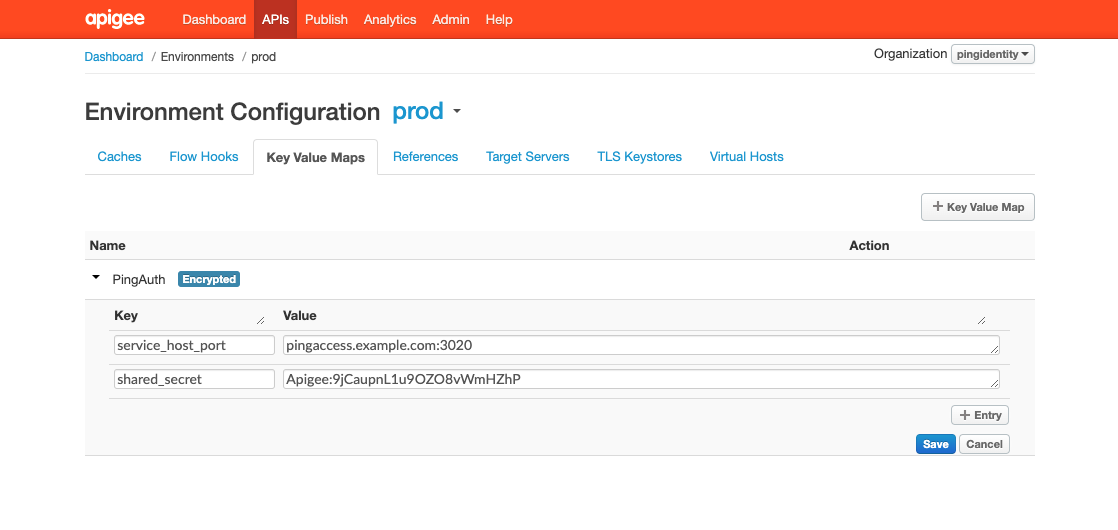
Apigee Edge stores environment-specific configuration values in key value maps so that the same policies can be used across multiple deployment environments without any changes to the policies.
-
Go to Environment > Key Value Maps and click Key Value Map.
-
Edit the key value map and click Add Entry. Use the key names
service_host_portandshared_secret, and set the values to match the ones that you obtained in the previous procedure, Configuring PingAccess for Apigee integration. -
Click Save.
-
-
(Optional) Configure HTTPS trust for PingAccess.
By default, the PingAuth shared flow is configured to trust the PingAccess Sideband Listener HTTPS certificates only if they’re issued from a well-known CA. To trust specific HTTPS certificates for PingAccess servers:
-
Go to the PingAuth shared flow at Develop > Shared Flows > PingAuth.
-
Click the Develop tab and examine Revisions to make sure you are on the latest revision.
-
In the Policies section of the Navigator, click the Sideband Call policy.
-
In the policy editor panel, remove the comment characters surrounding the
TrustStoreelement.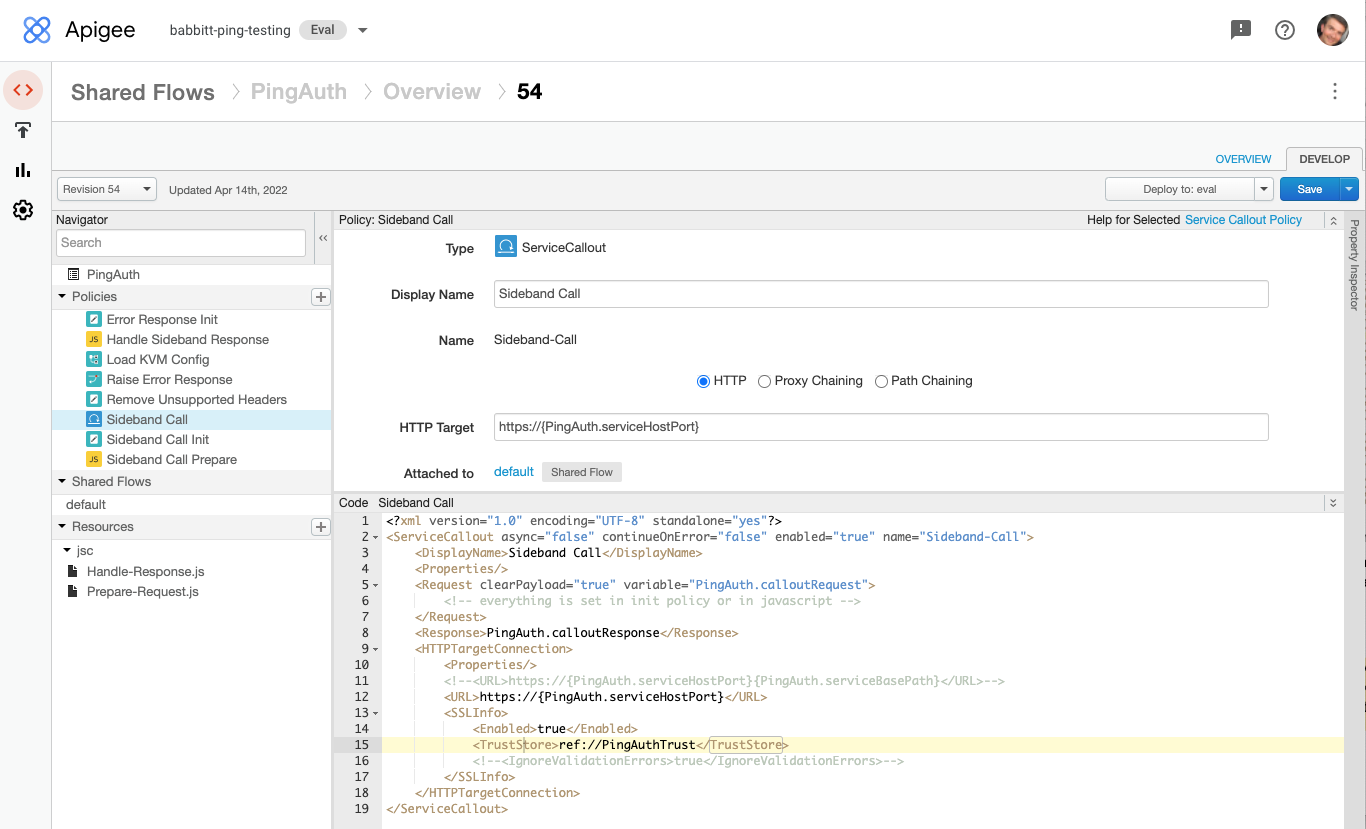
-
Click Save.
-
Go to Environment > TLS Keystores and click Keystore.
-
Give the key store a name that helps you identify your PingAccess environment, such as
PingAccess-dev-truststore. -
Click to add a certificate, give the certificate an alias, and upload the certificate that you obtained earlier. Click Save.

-
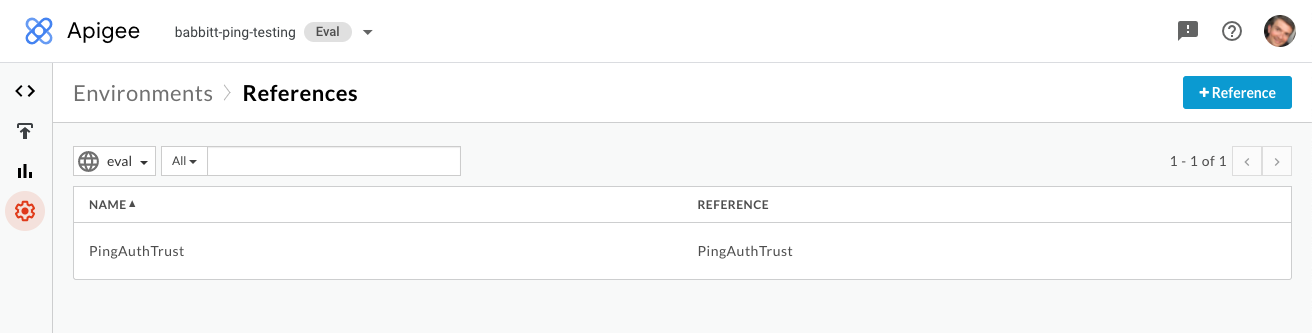
Go to Environment > References and click +Reference.
-
In the Name field, enter
PingAuthTrust. -
Select the key store you created earlier, then click Save.
-
-
Deploy the shared flow:
-
Go to Develop > Shared Flows > PingAuth.
-
Deploy the most recent revision of the shared flow to your environment.
-
Adding an API Proxy in Apigee
Configure the API Proxy where you want to reach a target endpoint.
Steps
-
Go to API Proxies > Create Proxy and click the Reverse Proxy tab.
-
In the Name field, enter a name for the API proxy.
-
In the Base Path field, enter the base path of the API.
-
In the Target (existing API) field, enter the Uniform Resource Locator (URL) of the service invoked by the proxy.
-
Click Next.
-
In the Common Policies section, select Pass through (no authorization).
-
Click Next.
-
In the Optional Deployment section, select the deployment environment.
-
Click Create and Deploy.
Attaching the PingAuth shared flow to API proxies in Apigee
Configure the PingAuth shared flow on the API proxies where you want to use PingAccess as the external authorization policy runtime service.
Steps
-
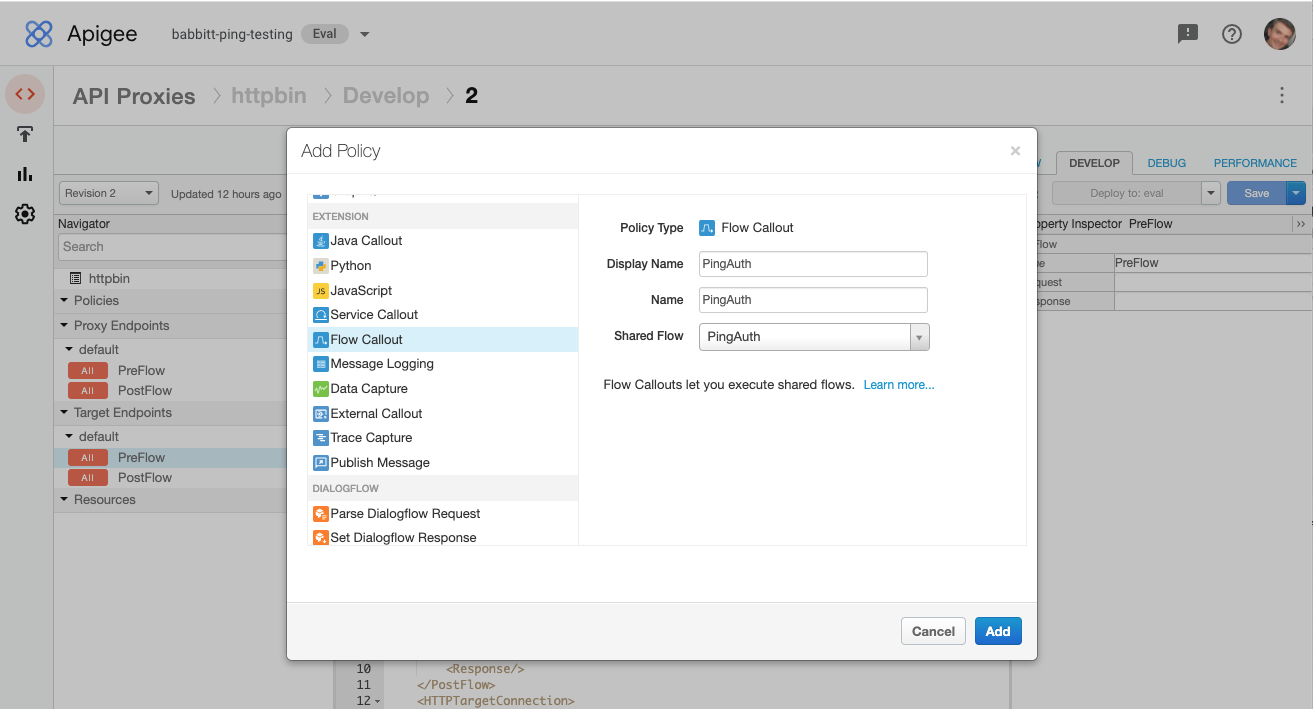
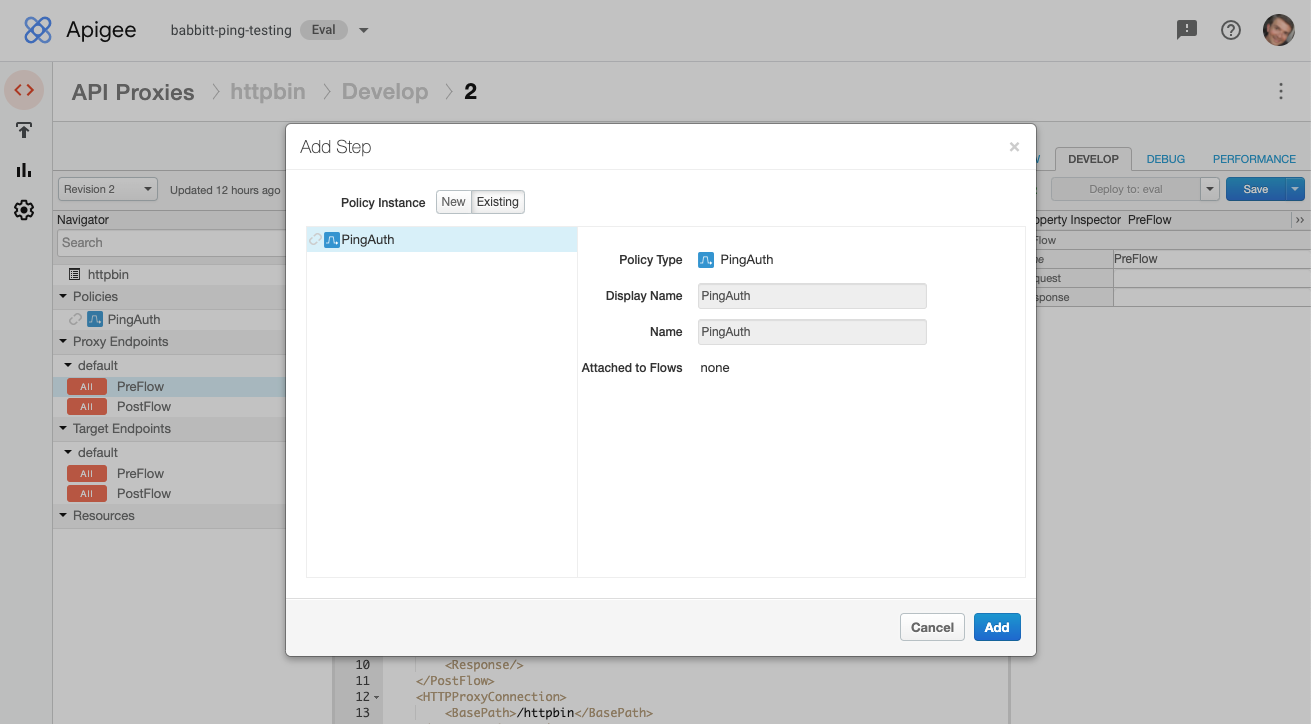
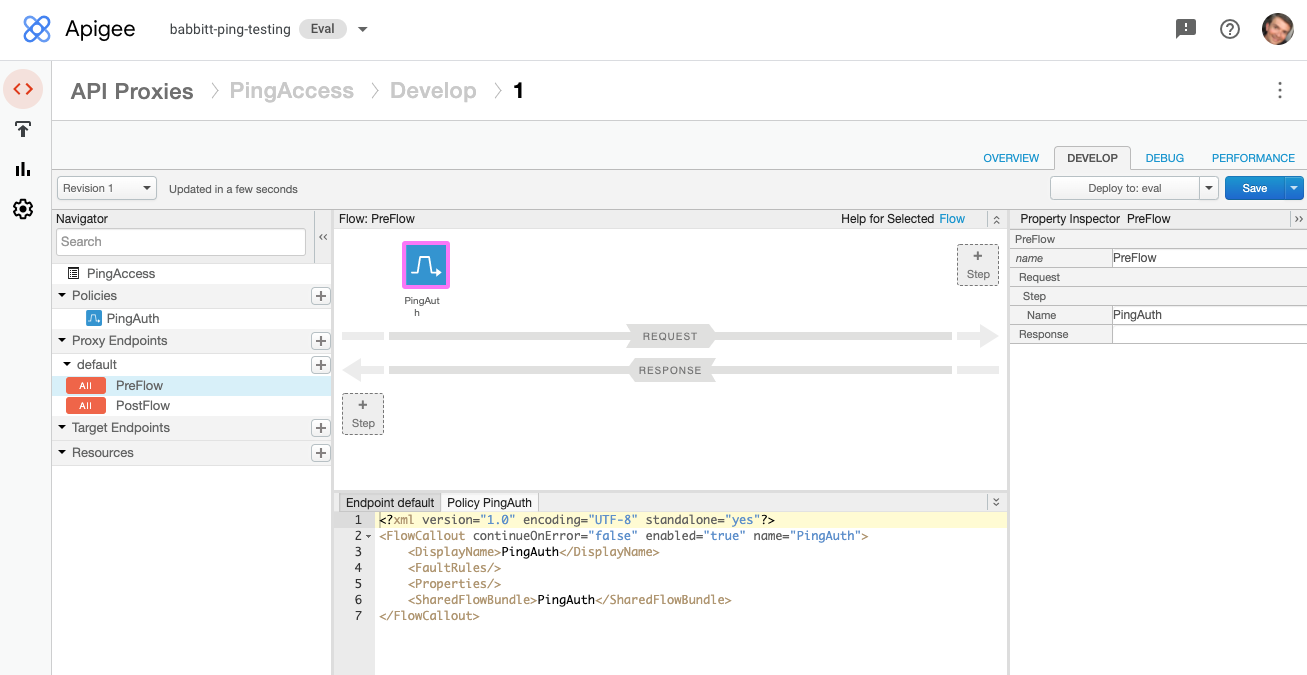
Add a Flow Callout Policy:
-
In Develop > API Proxies, go to one of your APIs and click the Develop tab. Make sure you’re on the latest revision of the proxy.
-
In the Policies section of the Navigator, click to add a policy.
-
Add a Flow Callout Policy, and in the Shared Flow list, select PingAuth.
-
Click Save.
-
-
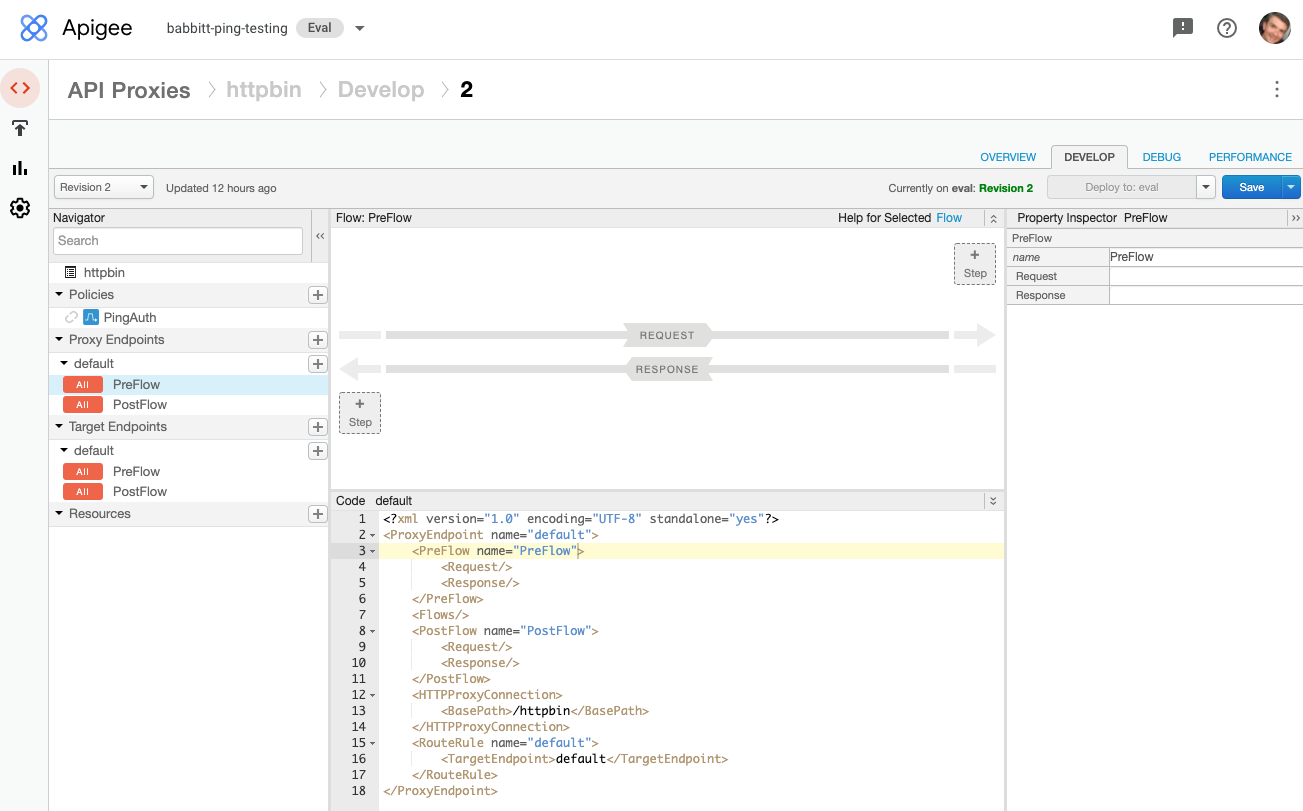
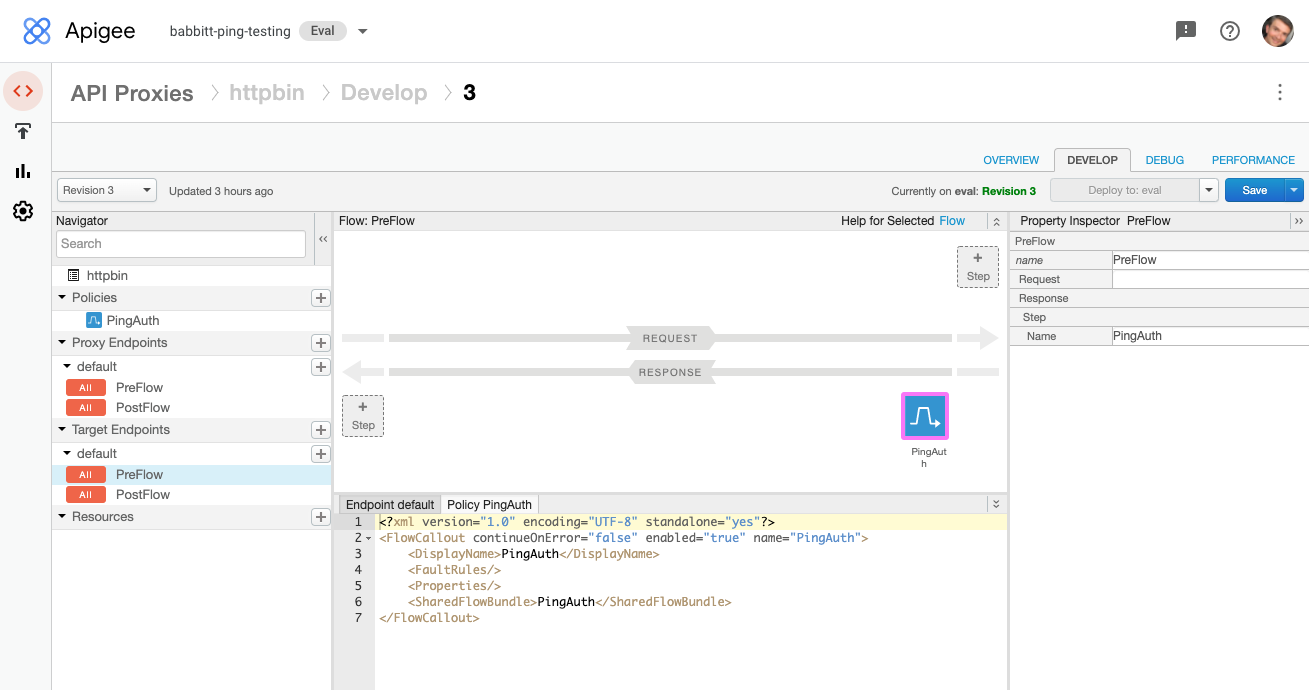
Attach the Flow Callout Policy to Flows.
When PingAccess is integrated as the external authorization policy runtime service for Apigee, it should be integrated in the preflow of the request to the proxy endpoint, because the authentication and authorization function provided by PingAccess should occur before most other policies execute.
You can consider other ways to integrate PingAccess by reading about flows at Controlling API proxies with flows.
-
In the Proxy Endpoint section of the Navigator, click PreFlow, then click Step to add a flow step to the request.
-
On the Existing tab, select the flow callout policy that you created, then click Add.
-
In the Target Endpoint section of the Navigator, select PreFlow, then add the flow callout policy as a Step to the Response flow.
This gives PingAccess an early opportunity to process the API response from the target API before it’s processed by Apigee.
-
-
Save and deploy the updated proxy.
Creating an error handling policy in Apigee
About this task
When the target server returns an error, having an Apigee policy to handle that error prevents the API proxy from going into an error state in the target endpoint response. If the API proxy enters an error state, the normal API proxy flow can’t continue to the proxy endpoint.
Steps
-
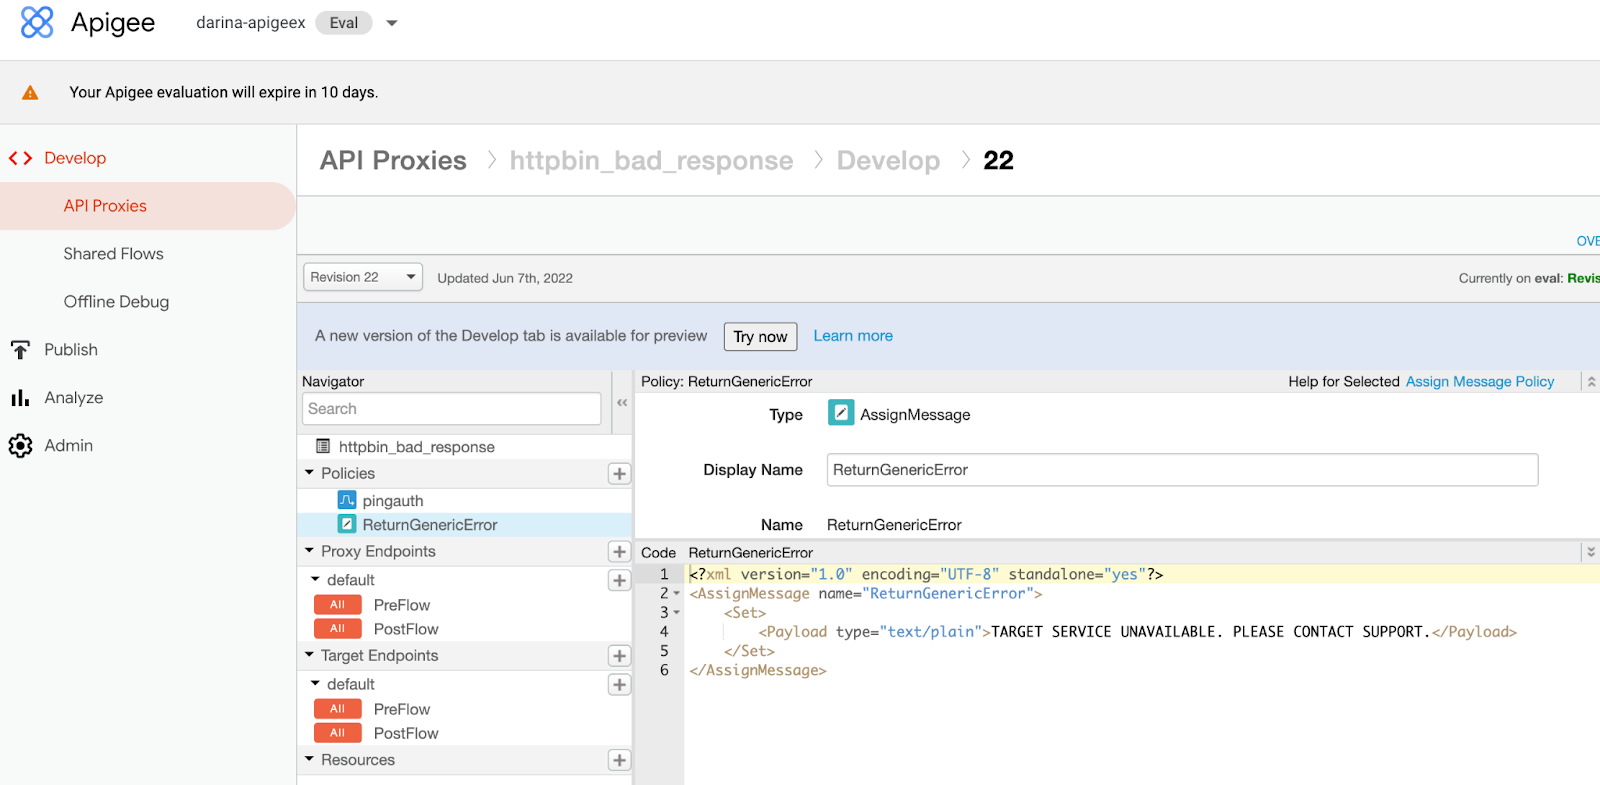
Add a policy with the AssignMessage type.
-
Edit the target endpoint and add the new policy as a step in the default fault rule.
For example:
<DefaultFaultRule name="fault-rule">
     <Step>
          <Name>ReturnGenericError</Name>
     </Step>
</DefaultFaultRule>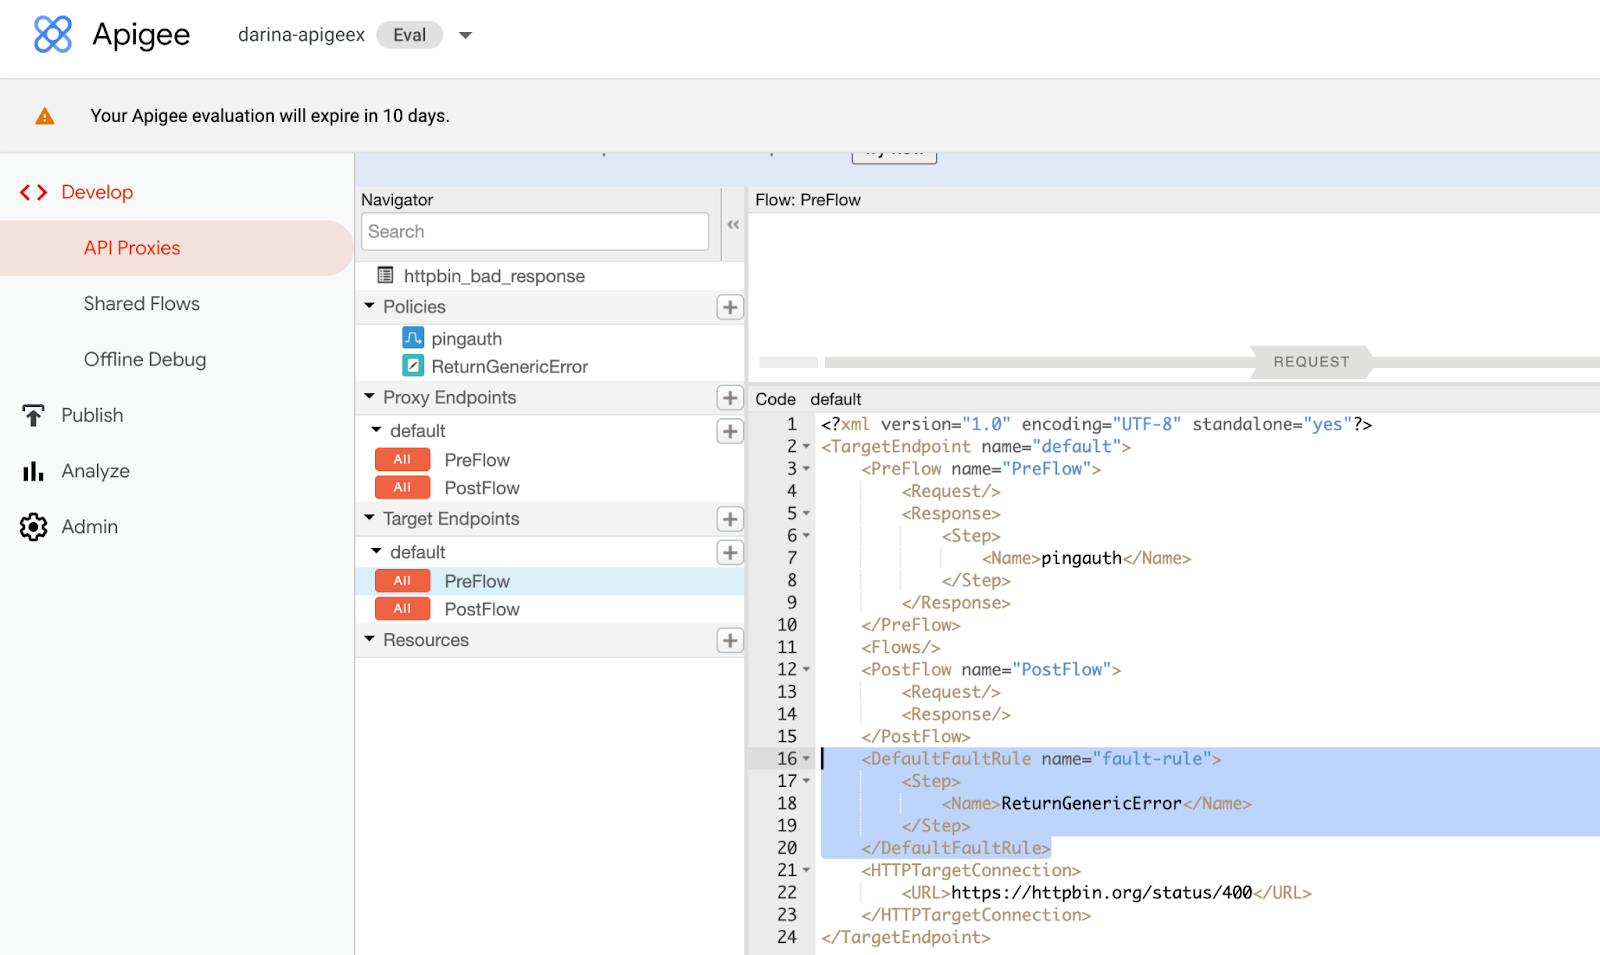
Configuring API applications in PingAccess
Configure a corresponding application in PingAccess for each of the API proxies that you attached the shared flow to.
The application is where you manage access control rules, identity mappings, and other application protection features. To add an API application, configure access validation, and configure Apigee as the application destination:
Steps
-
Go to Applications > Applications and click Application.
-
Enter a Name, then enter the Context Root and select or create the Virtual Host(s) values to match how the application’s APIs are exposed from your Apigee environment.
-
(Optional) Click Create to create a new Virtual Host.
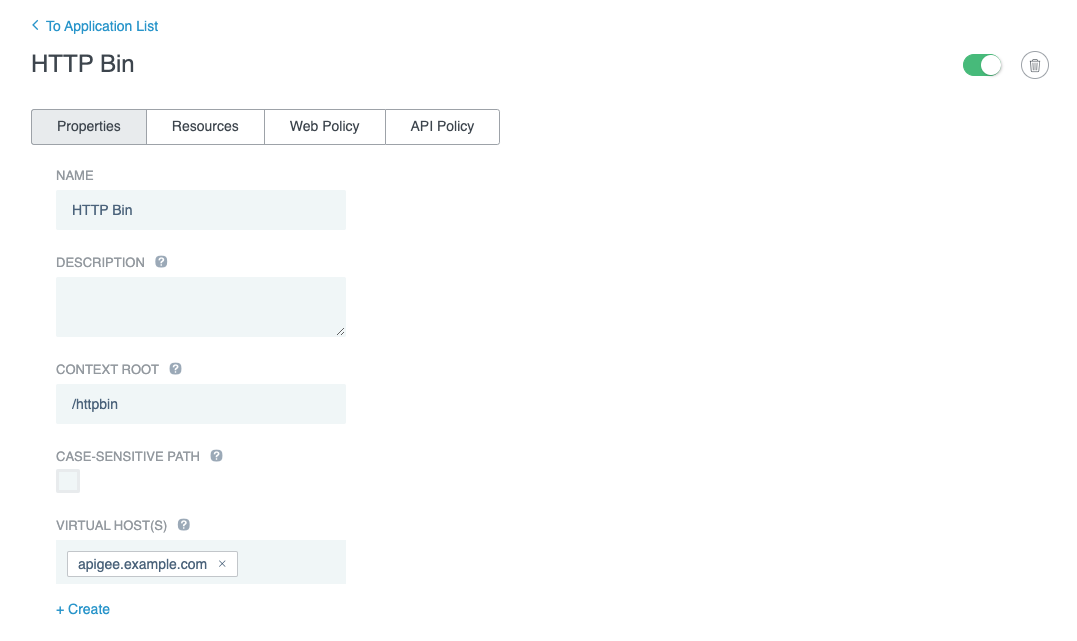
-
-
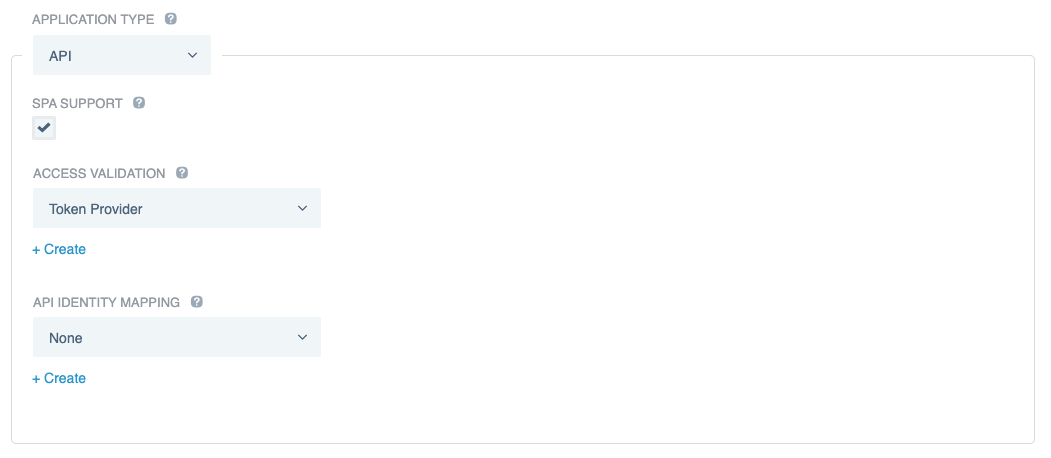
In the Application Type list, select API.
-
In the Access Validation list, select a form of access validation.
-
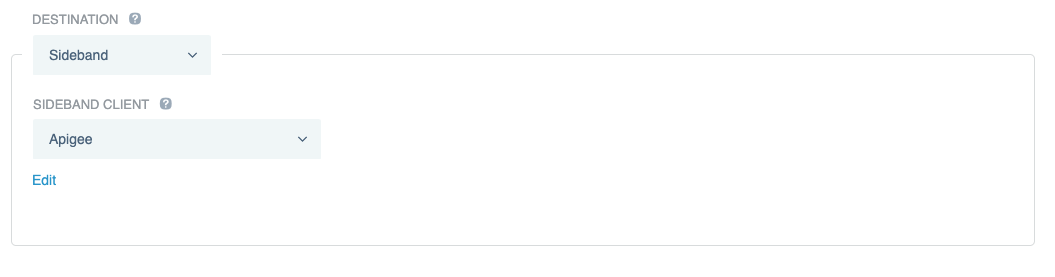
To configure Apigee as the application destination, in the Destination section, select Sideband, then select the Sideband Client that you created previously in Configuring PingAccess for Apigee integration.
-
Click Save.
Supporting Web+API Applications
PingAccess simplifies adding OpenID Connect (OIDC) and OAuth to API-based web applications, such as single-page applications (SPAs).
About this task
In this configuration, PingAccess completely manages the OIDC authentication for the SPA, maintains a cookie-based web session with the browser, and replaces the cookie for an OAuth access token (or other identity mappings) before invoking the target API. You must perform additional steps to support this configuration.
Steps
-
Configure Apigee to intercept calls for PingAccess.
If you selected the Use context root as reserved resource base path checkbox on the PingAccess application you plan to use in conjunction with Apigee, skip ahead to step 2. When enabled, this feature provides reserved PingAccess resources from that application’s context root, which makes step 1 unnecessary.
-
In Apigee, go to Develop > API Proxies and click Create New.
-
On the Create Proxy page, click No Target.
-
In the Name field, enter
PingAccess. -
In the Base Path field, enter
/pa.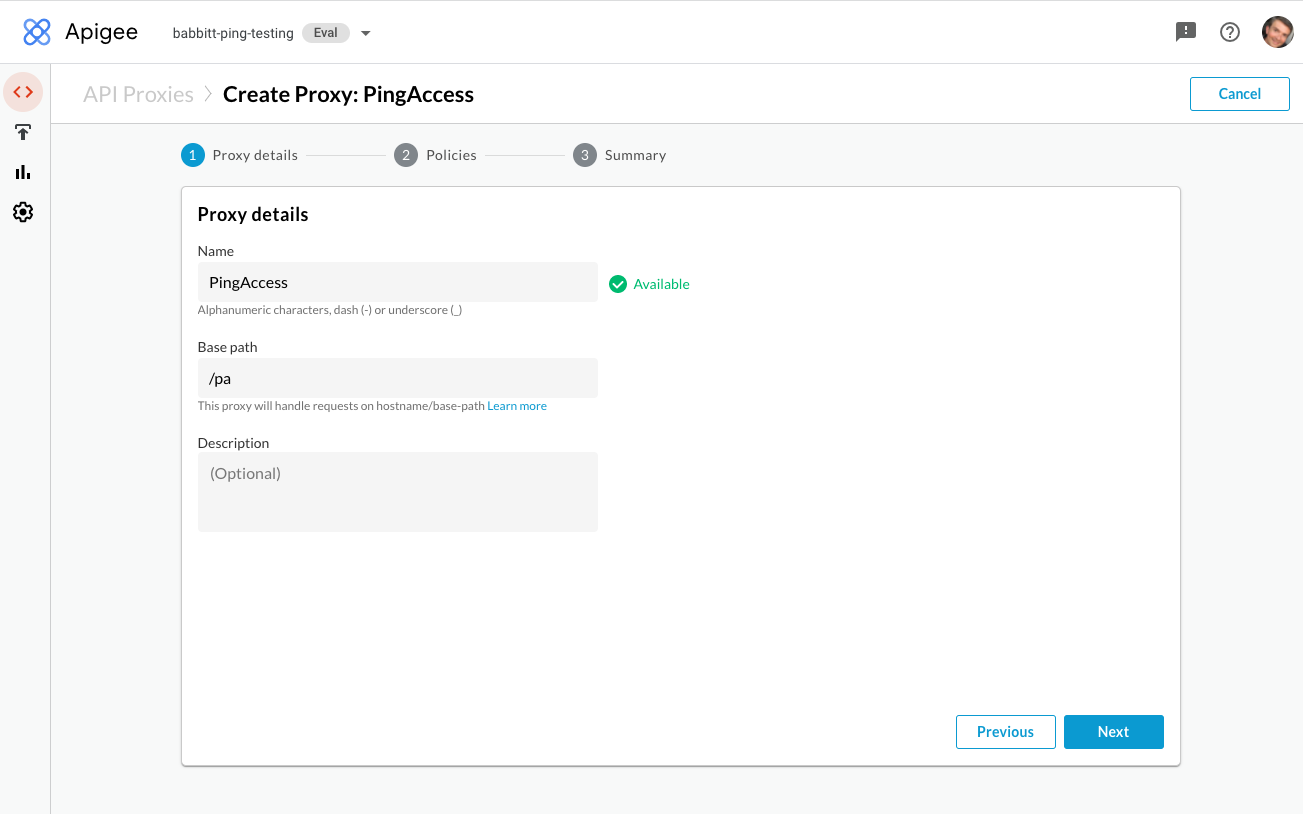
-
In the Policies section of the Navigator, click to add a policy.
-
Add a Flow Callout Policy, and in the Shared Flow list, select PingAuth.
-
Click Save.
-
In the Proxy Endpoints section of the navigator, select PreFlow, then add the flow callout policy as a Request Step.
-
Save and deploy the new proxy.
-
-
Add a Web+API application in PingAccess:
-
Go to Applications > Applications and click Application.
-
Enter a Name, and then enter the Context Root and select or create Virtual Host(s) values to match how the application’s APIs are exposed from your Apigee environment.
To create a Virtual Host, click Create below the field name.

-
-
Configure the web session:
-
In the Application Type list, select Web+API.
-
To create a Web Session, click Create below the field name.
-
Enter the web session details, including the OIDC sign-on details configured in your OpenID Provider (OP).
PingAccess can only manage the OIDC authentication on behalf of the browser if PingAccess, through Apigee, is configured as the redirect URL in your OIDC provider.
For example,
https://apigee.example.com/pa/oidc/cb. -
Click Save to save the web session.
-
To create a Web Identity Mapping, click Create below the field name.
-
Name the identity mapping
Access Tokenand select Web Session Access Token as the Type.This configures PingAccess to forward the OAuth Access Token it obtains from the OIDC provider Authorization Server as the bearer token to the API behind Apigee.
-
Click Save.
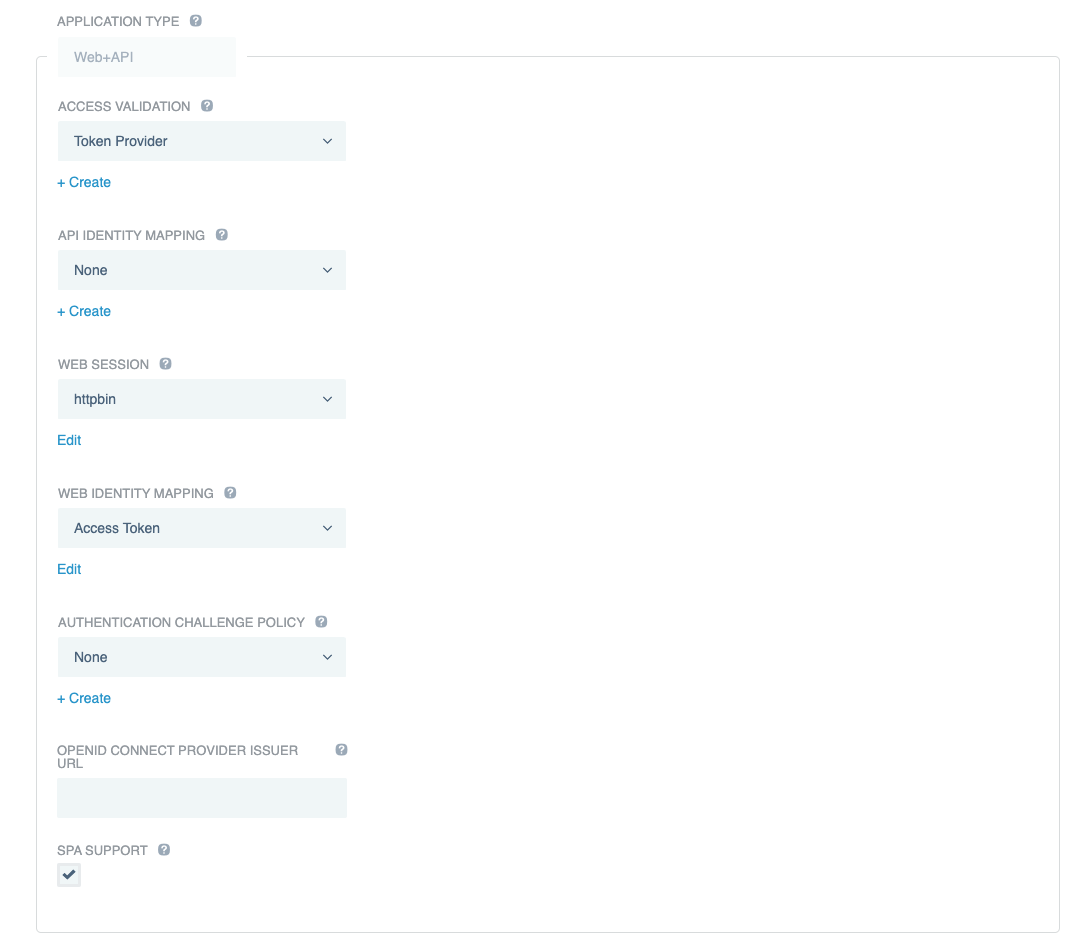
-
-
In the Access Validation list, select the form of access validation to apply for non-web API clients, such as mobile applications.
-
Configure Apigee as the application destination:
-
In the Destination list, select Sideband.
-
In the Sideband Client list, select the sideband client that you created previously.
-
Click Save.

-