Monitoring using SNMP
The PingDirectory server supports real-time monitoring using SNMP. The server provides an embedded SNMPv3 subagent plugin that, when enabled, sets up the server as a managed device and exchanges monitoring information with a primary agent based on the AgentX protocol.
SNMP implementation
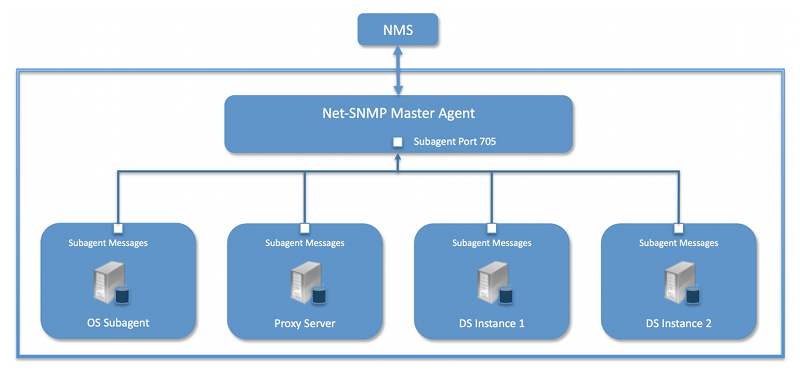
In a typical SNMP deployment, many production environments use a network management system (NMS) for a unified monitoring and administrative view of all SNMP-enabled devices.
The NMS communicates with a primary agent, whose main responsibility is to translate the SNMP protocol messages and multiplex any request messages to the subagent on each managed device, such as a PingDirectory server instance, a PingDirectoryProxy server, a PingDataSync server, or an OS Subagent. The primary agent also processes responses or traps from the agents. Many vendors provide commercial NMS systems. Consult with your NMS system for specific information.
The server contains an SNMP subagent plugin that connects to a Net-SNMP primary agent over TCP. The main configuration properties of the plugin are the address and port of the primary agent, which default to localhost and port 705, respectively. When the plugin is initialized, it creates an AgentX subagent and a managed object server and then registers as a management information base (MIB) server with the server instance. After the plugin’s startup method is called, it starts a session thread with the primary agent. Whenever the connection is lost, the subagent automatically attempts to reconnect with the primary agent. The server’s SNMP subagent plugin transmits only read-only values for polling or trap purposes. Set and inform operations are not supported. SNMP management applications cannot perform actions on the server on their own or through an NMS system.
|
The PingDirectory server was designed to interface with a Net-SNMP (5.3.2.2 or later) primary agent implementation with AgentX over TCP. Many operating systems provide their own Net-SNMP module. However, Service Management Automation (SMA) disables some features present in the Net-SNMP package and only enables AgentX over UNIX Domain Sockets, which cannot be supported by Java. If your operating system has a native Net-SNMP primary agent that only enables UNIX Domain Sockets, you should download and install a separate Net-SNMP binary from its website. |
Configuring SNMP
Because all server instances provide information for a common set of management information bases (MIBs), each server instance provides its information under a unique SNMPv3 context name equal to the server instance name.
About this task
The server instance name is defined in the Global Configuration and is constructed from the host name and the server LDAP port by default. Information must be requested using SNMPv3, specifying the context name that pertains to the desired server instance.
|
The server supports SNMPv3, and only SNMPv3 can access the MIBs. For systems that implement SNMP v1 and v2c, Net-SNMP provides a proxy function to route requests in one version of SNMP to an agent using a different SNMP version. |
Steps
-
To enable the server’s SNMP plugin, use the
dsconfigtool.The SNMPv3 context name is limited to 30 bytes maximum. Any context name longer than 30 characters returns an error message when you attempt to enable the plugin.
The default context server name is the server instance name and the LDAP port number, so take note of the length of the fully-qualified DNS host name.
-
Specify the address and port of the SNMP primary agent.
-
On each server instance, enable the SNMP subagent.
-
Enable the SNMP Subagent Alert Handler so that the sub-agent sends traps for administrative alerts generated by the server.
Example:
$ bin/dsconfig set-alert-handler-prop \
  --handler-name "SNMP Subagent Alert Handler" --set enabled:true
shell
-
-
View the error log.
Result:
A message displays that the primary agent is not connected because it is not yet online.
The SNMP sub-agent was unable to connect to the master
agent at localhost/705: Timeout
-
Edit the SNMP agent
snmpd.confconfiguration file and add the directive to run the agent as an AgentX primary agent.The file is often located in
/etc/snmp/snmpd.conf.Example:
master agentx agentXSocket tcp:localhost:705
Using
localhostmeans that only sub-agents running on the same host can connect to the primary agent. This is necessary because there are no security mechanisms in the AgentX protocol. -
Add the trap directive to send SNMPv2 traps to
localhostwith the community name, public (or whatever SNMP community has been configured for your environment) and the port.Example:
trap2sink localhost public 162
-
To create a SNMPv3 user, add the following lines to the
/etc/snmp/snmpd.conffile.Example:
rwuser initial
createUser initial MD5 setup_passphrase DES
-
To create the SNMPv3 user, run
snmpusm.Example:
snmpusm -v3 -u initial -n "" -l authNoPriv -a MD5 -A setup_passphrase \
localhost create snmpuser initial
-
Start the
snmpddaemon.Result:
A message displays in the server’s error log.
The SNMP subagent connected successfully to the master agent
at localhost:705. The SNMP context name is host.example.com:389
-
To see the alerts that are generated by the server, set up a trap client.
-
Create a config file in
/tmp/snmptrapd.conf. -
Add the
authcommunity log, execute publicdirective to the file.The directive specifies that the trap client can process traps using the public community string and can log and trigger executable actions.
-
-
Install the MIB definitions for the Net-SNMP client tools in the
/usr/share/snmp/mibsdirectory.Example:
$ cp resource/mib/* /usr/share/snmp/mibsshell -
To run the trap client, run the
snmptrapdcommand.Example:
This example specifies that the command should not create a new process using
fork()from the calling shell (-f), should not read any configuration files (-C) except the one specified with the-coption, should print to standard output (-Lo), and then specifies that debugging output should be turned on for the User-based Security Module (-Dusm). The path after the-Moption is a directory that contains the MIBs shipped with our product (server-root/resource/mib).$ snmptrapd -f -C -c /tmp/snmptrapd.conf -Lf /root/trap.log -Dusm \ -m all -M +/usr/share/snmp/mibsshell -
To test the feature, run the Net-SNMP client tools.
You must use the following options:
-
-v<SNMP version> -
-u<user name> -
-l<security level> -
-n<context name (instance name)> -
-A<user password>Example:
In this example, the
-m alloption loads all MIBs in the default MIB directory in/usr/share/snmp/mibsso that MIB names can be used in place of numeric OIDs.+
$ snmpget -v 3 -u snmpuser -A password -l authNoPriv -n host.example.com:389 \
-m all localhost localDBBackendCount.0

$ snmpwalk -v 3 -u snmpuser -A password -l authNoPriv -n host.example.com:389 \
-m all localhost systemStatus
shell -
MIBS
The server provides SMIv2-compliant management information base (MIB) definitions (RFC 2578, 2579, 2580) for distinct monitoring statistics. These MIB definition text files are in the server’s /resource/mib directory.
Each MIB provides managed object tables for each specific SNMP management information as follows:
- LDAP Remote Server MIB
-
Provides information related to the health and status of the LDAP servers that the server connects to and statistics about the operations invoked by the server on those LDAP servers.
- LDAP Statistics MIB
-
Provides a collection of connection-oriented performance data that is based on a connection handler in the server.
A server typically contain only one connection handler and therefore supplies only one table entry.
- Local DB Backend MIB
-
Provides key metrics related to the state of the local database backends contained in the server.
- Processing Time MIB
-
Provides a collection of key performance data related to the processing time of operations broken down by several criteria but reported as a single aggregated data set.
- Replication MIB
-
Provides key metrics related to the current state of replication that can help diagnose how much outstanding work replication might have to do.
- System Status MIB
-
Provides a set of critical metrics for determining the status and health of the system in relation to its work load.
For information on the available monitoring statistics for each MIB available on the PingDirectory server and the PingDirectoryProxy server, see the text files located in the server’s /resource/mib directory.
The server generates an extensive set of SNMP traps for event monitoring. The traps display the severity, description, name, OID, and summary. For information about the available alert types for event monitoring, see the resource/mib/UNBOUNDID-ALERT-MIB.txt file.