Visualizing a policy decision response
Visualize a decision by selecting a recent decision or by copying and pasting a decision from a log.
Steps
-
Sign on to the PingAuthorize Policy Editor.
-
Choose a method for visualizing a decision.
Choose from:
-
Select a recent decision
-
In the Policy Editor, go to Policies.
-
Click the Decision Visualiser tab.
-
Click Recent Decisions and select a decision.
You can control the number of decisions that appear in the Recent Decisions list as explained in Setting the request list length for Decision Visualizer.
To visualize self-governance decisions, you can sign on as a self-governance administrator and click Self Governance instead of Recent Decisions.
-
-
Copy and paste a decision from a log
Before attempting to troubleshoot or trace a policy-decision response, ensure that the Policy Decision Logger is enabled. For more information, see Configuring PingAuthorize logging.
Each policy decision response is presented in JSON format. If the same comparison condition is attached to more than one rule in the policy subtree, the decision response only includes the evaluation for the first instance of this comparison. This behavior is the same regardless of the rule’s outcome (
Permit,Deny,Not Applicable).To view the details of a policy decision response:
-
From within the policy decision file, copy the policy-decision response JSON.
-
In the Policy Editor, go to Policies.
-
Click the Decision Visualiser tab.
-
Click Paste Logs.
-
In the field beneath Paste Logs, paste the policy-decision response JSON.
-
Click
Visualise.
-
-
Result
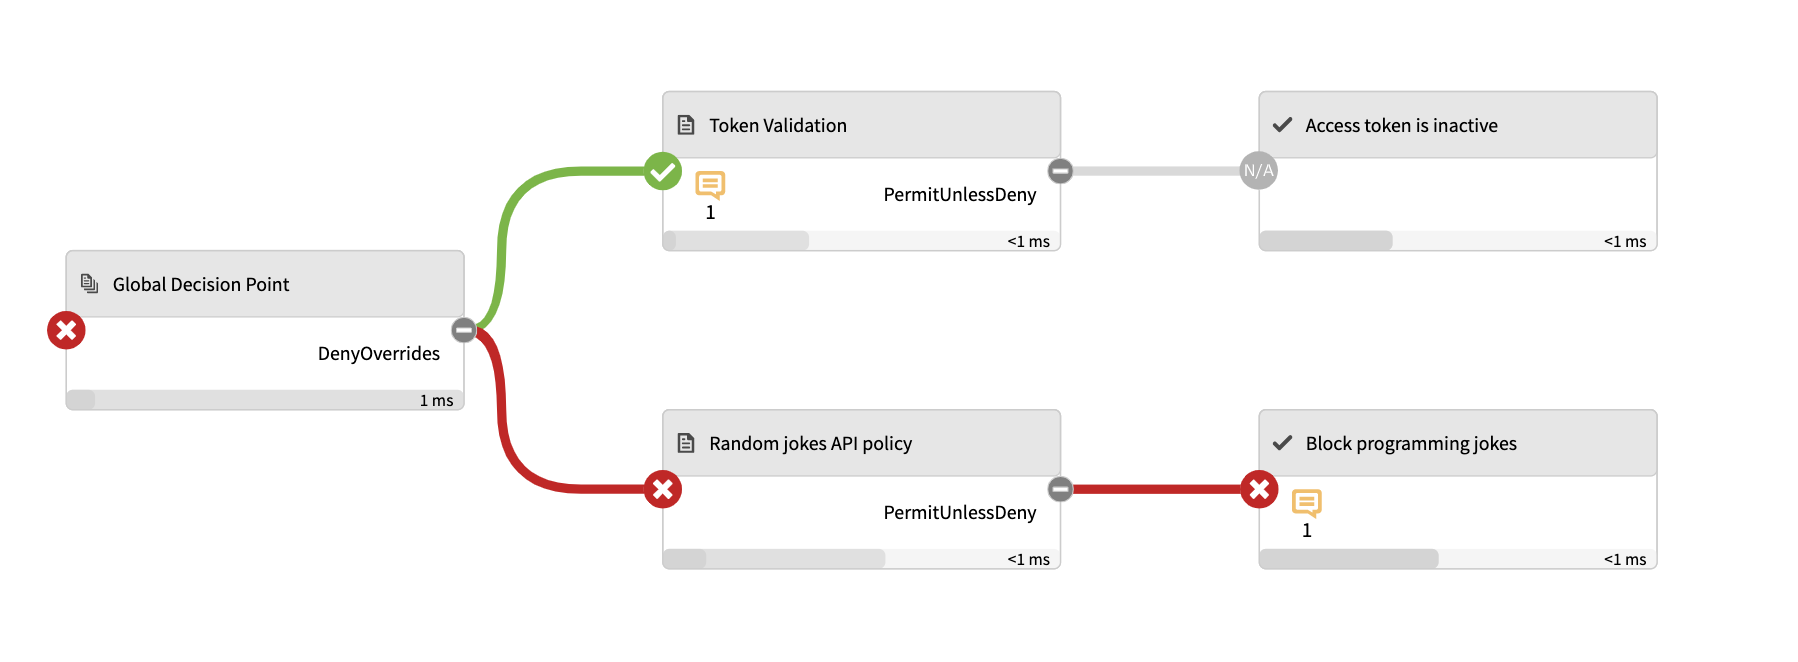
An interactive decision tree of your policies is displayed.

This image depicts the final decision sent to the client. The node to the far left, Global Decision Point, represents the root node, and the child nodes contain the subset of policies and rules.
The following color-coded icons convey important information:
-
A green check mark indicates that the request
permiton the policy or rule. -
A red X indicates that the request
denyon the policy or rule. -
A gray N/A indicates that the request is not applicable to the policy or rule.
In the previous example, the client received a final decision of deny. The Token Validation policy permitted the request initially but was overridden after the Random Jokes API policy was applied.