Configuring Konnect for PingAuthorize integration
For Kong Konnect to use PingAuthorize as an external authorization policy runtime service, you must download, install, and configure the ping-auth plugin.
To configure the ping-auth plugin in Kong Konnect, you must:
Adding the ping-auth plugin to your control plane
Use the ping-auth plugin’s schema.lua file to create the configurable entity required by Konnect. Konnect uses this file to create a plugin entry in the plugin catalog for your control plane. If the plugin schema should be available in multiple control planes, add the schema individually to each one.
You can manage schemas for custom plugins through the Konnect UI or the Konnect Control Planes Config API.
-
Using the Konnect UI
-
Using the Konnect API
Adding the plugin using the Konnect UI
About this task
|
The UI is not available when using KIC in Konnect. Use the Konnect API instead. |
Steps
-
Download version 1.0.8-1 or later of the
kong-plugin-ping-authsrc from https://luarocks.org/modules/pingidentity/kong-plugin-ping-auth.Support for Kong Konnect is available in version 1.0.8 and later of the plugin.
-
Extract the
src.rockfile and store it on your local computer.Verify that you have the following files in the extracted
/kong-plugin/ping-authfolder:-
access.lua -
handler.lua -
Network_handle.lua -
response.lua -
schema.lua
-
-
In Gateway Manager, open a control plane.
-
In the sidebar, open Plugins, then click New Plugin.
-
Click the Custom Plugins tab, then click Create on the Custom Plugin tile.
-
Click Select File, then select the
schema.luafile for theping-authplugin that you extracted in step 1. -
Make sure your file displays correctly in the preview, then click Save.
Adding the plugin using the Konnect API
About this task
When using the /plugin-schemas API, authenticate your requests with either a personal access token or a system account token by including it in the authorization header:
--header 'Authorization: Bearer kpat_xgfT'
Steps
-
Upload the
schema.luafile for your plugin using the/plugin-schemasendpoint:curl -i -X POST \ https://{region}.api.konghq.com/konnect-api/api/runtime_groups/{controlPlaneId}/v2/plugin-schemas \ --header 'Content-Type: application/json' \ --data "{\"lua_schema\": <your escaped Lua schema>}"Result:
You should get an
HTTP 201response. -
To check that your schema was uploaded, use the following request:
curl -i -X GET \
https://{region}.api.konghq.com/konnect-api/api/runtime_groups/{controlPlaneId}/v1/available-plugins
Result:
This request returns an
HTTP 200response with the schema for your plugin as a JSON object.
Uploading files to data plane nodes
About this task
After you upload the ping-auth plugin’s schema to Konnect, upload the following files for the plugin to each Kong Konnect data plane node:
-
access.lua -
handler.lua -
Network_handle.lua -
response.lua -
schema.lua
|
If a data plane node doesn’t have these files, the |
Follow the Kong Gateway plugin deployment instructions to set up the plugin on each node. Instructions can vary depending on the platform. If you’re running Kong Gateway on Docker, the following instructions are provided as an example.
Install the ping-auth plugin inside the Kong Konnect Docker container for each node. Copy or mount the plugin’s source code into the container.
Steps
-
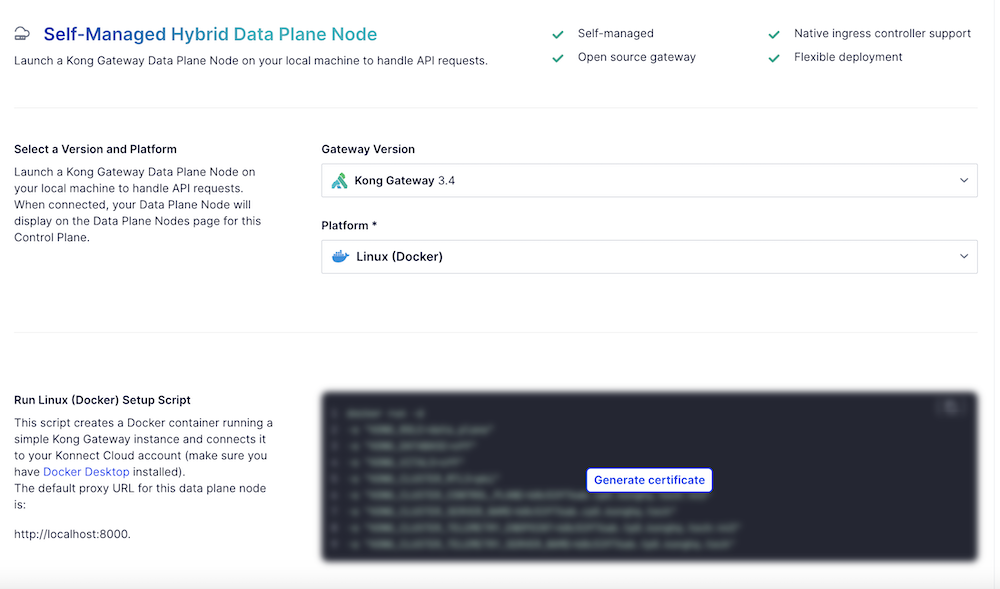
In your control plane, go to Data Plane Nodes, then click New Data Plane Node.
-
Select a Platform, for example Linux (Docker), and Generate a certificate.
-
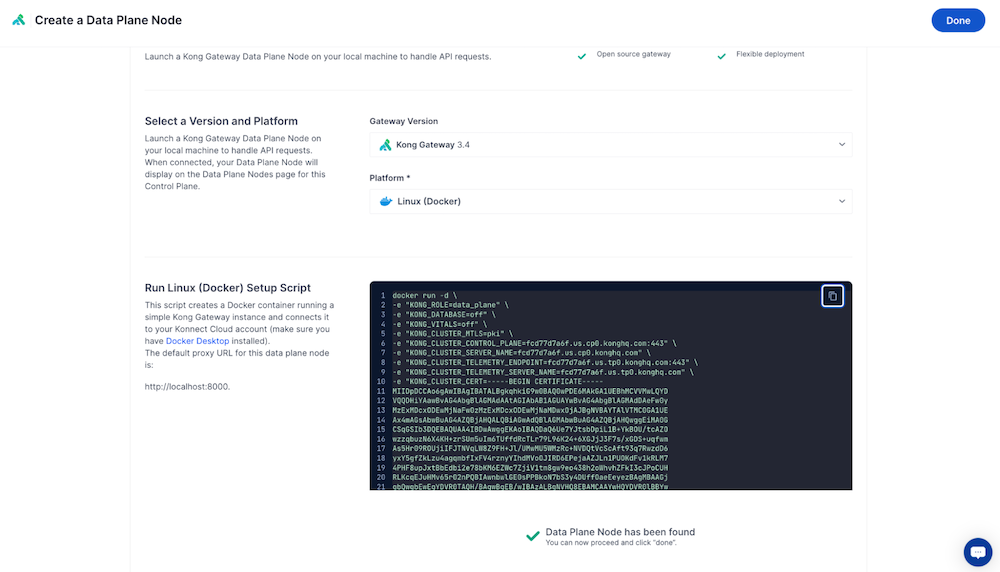
Copy the generated Docker run command and add the following snippet to it.
Substitute your own source and target paths.
-
The <source_path> is the location where you extracted the
ping-authplugin files. This is the parent folder that contains theping-authfolder. -
The <target_path> is where you keep custom Kong plugins. This is the path to the
ping-authplugin.-v "/<source_path>:/ping-auth:/<target_path>/ping-auth" \ -e "KONG_PLUGINS=bundled,ping-auth" \ -e "KONG_LUA_PACKAGE_PATH=/<target_path>/?.lua;;" \
-
-
To start a data plane node with the
ping-authplugin loaded, run the command.Example:
For example, the command will look something like this, including the three snippet lines from the previous step. In this example,
plugins/kongrepresents the <source_path> and/usr/local/share/lua/5.1/kong/pluginsrepresents the <target_path>.docker run -d \ -v "/plugins/kong/ping-auth:/usr/local/share/lua/5.1/kong/plugins/ping-auth" \ -e "KONG_PLUGINS=bundled,ping-auth" \ -e "KONG_LUA_PACKAGE_PATH=/usr/local/share/lua/5.1/kong/plugins/?.lua;;" \ -e "KONG_ROLE=data_plane" \ -e "KONG_DATABASE=off" \ -e "KONG_VITALS=off" \ -e "KONG_NGINX_WORKER_PROCESSES=1" \ -e "KONG_CLUSTER_MTLS=pki" \ -e "KONG_CLUSTER_CONTROL_PLANE=<example>.cp0.konghq.com:443" \ -e "KONG_CLUSTER_SERVER_NAME=<example>.cp0.konghq.com" \ -e "KONG_CLUSTER_TELEMETRY_ENDPOINT=<example>.tp0.konghq.com:443" \ -e "KONG_CLUSTER_TELEMETRY_SERVER_NAME=<example>.tp0.konghq.com" \ -e "KONG_CLUSTER_CERT=<cert>" \ -e "KONG_CLUSTER_CERT_KEY=<key>" \ -e "KONG_LUA_SSL_TRUSTED_CERTIFICATE=system" \ -e "KONG_KONNECT_MODE=on" \ -p 8000:8000 \ -p 8443:8443 \ kong/kong-gateway:<version> -
To confirm the Docker deployment, run the following command:
"docker logs [container id]"
Configuring the ping-auth plugin in Konnect
After you’ve uploaded the ping-auth plugin’s schema to Konnect, configure the plugin in Gateway Manager or use the Kong API.
|
Test the operation of the |
-
Using the Gateway Manager UI
-
Using the Kong API
Configuring the plugin using the Gateway Manager UI
Steps
-
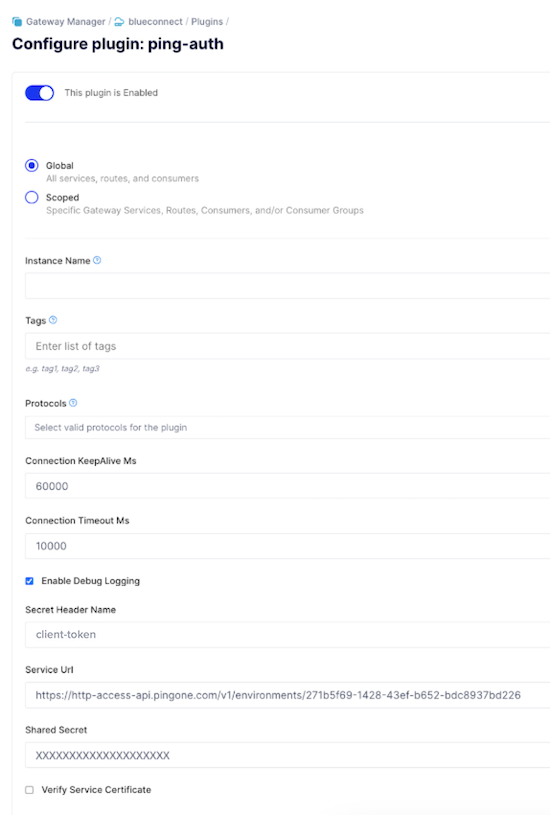
In Gateway Manager, open Plugins from the sidebar, then click New Plugin.
-
On the Custom Plugins tab, click the ping-auth plugin.
-
Optional: To enable the plugin for specific consumers, services, or routes, click Scoped, and then enter the Service, Route, and Consumer information.
-
In the Service Url field, enter the host name of your PingAuthorize server and the port of the HTTPS Connection Handler.
To find this port number in the PingAuthorize administrative console, go to Configuration → System → Connection Handlers. For example,
https://pingauthorize:8443. -
In the Shared Secret field, enter the PingAuthorize sideband client’s shared secret.
-
Verify that the Secret Header Name matches the secret header name configured for the Sideband API Servlet Extension in PingAuthorize.
-
Configure the following additional fields:
Option API Field Name Description Connection KeepAlive Ms
connection_keepAlive_msThe duration to keep the connection alive for reuse. The default is
60000.Connection Timeout Ms
connection_timeout_msThe duration to wait before the connection times out. The default is
10000.Enable Debug Logging
enable_debug_loggingControls if the requests and responses are logged at the debug level. The default is
false. For log messages to show inerror.log, you must setlog_level = debuginkong.conf.Verify Service Certificate
verify_service_certificateControls whether the service certificate is verified. This is intended for testing purposes and the default is
true. -
Click Save.
Result
Kong Konnect is now configured to work with PingAuthorize.
Configuring the plugin using the Kong API
Steps
-
Send the following in a
POSTrequest tohttps://{region}.api.konghq.com/konnect-api/api/runtime_groups/{controlPlaneId}/plugins:{ "name": "ping-auth", "enabled": true, "config": { "enable_debug_logging": true, "verify_service_certificate": false, "secret_header_name": "<shared secret header name>", "service_url": "https://<PingAuthorize Server hostname>:<HTTPS Connection Handler port>", "shared_secret": "<shared secret>" } }The following list describes the required fields for this API request:
-
Service_url: The full URL of the Ping policy provider. This should not contain/sidebandin the path. -
Shared_secret: The shared secret value to authenticate this plugin to the policy provider. -
Secret_header_name: The header name in which the shared secret is provided. You can provide additional configuration in accordance with the Kong API specification.
-
-
Configure the optional fields:
Option API Field Name Description Connection KeepAlive Ms
connection_keepAlive_msThe duration to keep the connection alive for reuse. The default is
60000.Connection Timeout Ms
connection_timeout_msThe duration to wait before the connection times out. The default is
10000.Enable Debug Logging
enable_debug_loggingControls if the requests and responses are logged at the debug level. The default is
false. For log messages to show inerror.log, you must setlog_level = debuginkong.conf.Verify Service Certificate
verify_service_certificateControls whether the service certificate is verified. This is intended for testing purposes and the default is
true.Result:
Kong Konnect is configured to work with PingAuthorize.