Configuring an OIDC provider for single sign-on requests from PingAuthorize
When you install the PingAuthorize software with OpenID Connect (OIDC) authentication, configure an OIDC provider to accept single sign-on (SSO) requests from PingAuthorize.
If you chose OIDC mode when you set up the Policy Editor, you must configure an OIDC provider, such as PingFederate or PingOne, to accept sign-on requests from the Policy Editor. Refer to the following tabs for the configuration steps for PingOne and PingFederate.
If you’re using another OIDC provider, refer to the provider’s documentation for specific client configuration steps. The following steps show the general procedure:
Steps
-
Use the following configuration values to create an OAuth 2 client that represents the Policy Editor:
OAuth 2 client configuration Configuration value Client ID
pingauthorizepolicyeditorRedirect URI
https://<host>:<port>/idp-callbackGrant type
Authorization Code with PKCEResponse type
codeScopes
Refresh tokens
EnableClient authentication on the token endpoint
DisableThe Policy Editor doesn’t have access to the client secret and doesn’t send the credential to the token endpoint.
Return ID token on refresh grant
trueAlways re-roll refresh tokens
trueWhen an authentication token expires, the Policy Editor performs a silent renewal, triggering a background process to retrieve a new token from the OIDC provider. For this process to work, you must configure your OIDC provider to issue the refresh token in the following manner:
-
Issue an
id_tokenas part of the refresh grant. -
Re-roll the refresh token after each use. The Policy Editor will not use refresh tokens more than once.
Because these constraints apply to silent renewal, a misconfiguration of the previous items will still allow you to sign on. After your token expires, though, the application will eject you from your session and redirect you to the sign-on screen. This could cause you to lose unsaved changes in the Policy Editor.
-
-
Configure the access tokens and ID tokens issued for the OAuth 2 client with the following claims:
-
sub -
name -
email
-
-
Configure the OIDC provider to accept a cross-origin resource sharing (CORS) origin that matches the Policy Editor’s scheme, public host, and port, such as
https://<host>:<port>. -
Configure the OIDC provider to issue tokens to the Policy Editor only when the authenticated user is authorized to administer policies according to your organization’s access rules.
Sign the tokens with one of the following supported algorithms:
-
RS256
-
RS384
-
RS512
-
ES256
-
ES384
-
ES512
-
PS256
-
PS384
-
PS512
For PingFederate, this level of authorization is controlled with issuance criteria. Learn more in Defining issuance criteria for IdP Browser SSO in the PingFederate documentation.
-
-
Configuring PingOne
-
Configuring PingFederate
Configuring PingOne as an OIDC provider for PingAuthorize
To improve security and ensure a consistent authentication experience across all enterprise applications, enable single sign-on (SSO) for the PingAuthorize Policy Editor using PingOne as an OIDC provider.
Components
-
PingOne
-
PingAuthorize 9.0 or later
Instructions and screenshots might differ slightly from other product versions. For the latest documentation, refer to the PingOne documentation.
Before you begin
-
Confirm that PingOne is accessible from the subnet on which the Policy Editor is running.
-
Extract the Policy Editor distribution to your specified install location, with appropriate permissions set for write access, for example
/opt/PingAuthorize-PAP.
Configuring PingOne for PingAuthorize policy administration
About this task
Configure PingOne to authorize external access to the Policy Editor.
Steps
-
Sign on to PingOne and click your environment.
Choose from:
-
If you have an account, go to the URL for your environment. Each environment has a unique URL for signing on that follows the https://console.pingone.com/?env=<environmentID> format.
-
If you don’t already have a PingOne account, create one at Try Ping.
-
-
To create an application in PingOne to represent the Policy Editor, go to Connections > Applications and click the icon.
-
Enter a name for the application, such as
PingAuthorize Policy Editor. -
(Optional) Enter a description and add an icon.
-
Click OIDC Web App, and then click Save.
-
On the Configuration tab, click the Pencil icon to edit the settings.
-
In the PKCE Enforcement list in the Grant Type section, select S256_REQUIRED.
-
In the Redirect URIs field, enter a redirect URL that follows the format
https://<pap.hostname:port>/idp-callback. -
In the Token Endpoint Authentication Method section, click None.
-
Click Save.
-
On the Resources tab, click the pencil icon to edit the settings.
-
In the Scopes list, click the icon to add the email and profile scopes to the Allowed Scopes list.
-
Click Save.
-
Click the toggle to enable the application.

-
Copy the following IDs:
-
Client ID: To find the client ID, go to the application’s Profile tab.
-
Environment ID: To find the environment ID, click Environment in the left navigation pane.
You’ll need the client ID and the environment ID to configure the Policy Editor to use PingOne.
-
Configuring PingAuthorize policy administration to use PingOne
About this task
The following configuration enables the Policy Editor to use PingOne for authentication.
Steps
-
Run the <PingAuthorize-PAP>
/bin/stop-servercommand to stop the Policy Editor. -
Using the client ID and environment ID from Configuring PingOne for PingAuthorize policy administration, run the following command to configure the Policy Editor:
bin/setup oidc \
  --licenseKeyFile <path to PingAuthorize.lic> \
  --generateSelfSignedCertificate \
  --hostname <pap-hostname> --port <pap-port> \
  --adminPort <admin-port> \
  --oidcBaseUrl https://auth.pingone.<regional domain>/<environment id>/as \
  --clientId <client-id>
-
Run the
bin/start-servercommand to start the Policy Editor. -
Verify that you can sign on to the Policy Editor using the application you created in PingOne:
-
Go to the Policy Editor.
-
Click Click to Sign in.
Result:
Your browser redirects to the URL you set in Configuring PingOne for PingAuthorize policy administration.
By default, the signed-on username uses the
subJSON Web Token (JWT) claim for the OIDC user ID. You can find details on using a non-default claim in Changing the default JWT claim for the OIDC user ID.
-
Configuring PingFederate as an OIDC provider for PingAuthorize
To improve security and ensure a consistent authentication experience across all enterprise applications, enable single sign-on (SSO) for the PingAuthorize Policy Editor using PingFederate as an OIDC provider.
This document describes one way to configure PingFederate as an OpenID Connect provider for the PingAuthorize Policy Editor. In this example, PingFederate also acts as the identity provider and uses a PingDirectory LDAP server with sample data as the backing store.
Components
-
PingFederate 10.3 or later
-
PingDirectory 9.0 or later
-
PingAuthorize 9.0 or later
Instructions and screenshots might differ slightly from other product versions. For the latest documentation, refer to the PingFederate documentation and PingDirectory documentation.
Before you begin
Make sure of the following:
-
PingFederate is running and accessible from the subnet on which the Policy Editor is running.
-
PingDirectory is running and accessible from the subnet on which PingFederate is running.
-
PingDirectory is loaded with the identities to be used. This document uses the sample data provided when running the PingDirectory setup command line tool with option
--sampleData 1000. -
You have extracted the Policy Editor distribution to your specified install location, with appropriate permissions set for write access. This document uses an installation directory of
/opt/PingAuthorize-PAP. -
If using SSL, the certificate chain is available as a PKCS12 keystore to upload as the server certificate chain for PingFederate.
-
The signing certificate for JWT tokens is available for upload to PingFederate.
If the PingFederate certificate chain contains certificates that are not trusted by the default Java truststore on the system that the Policy Editor is running on, you will need to add them. An example of how to do this is provided in the “Add Certificate to Java Trust Store” subsection below.
Configuring PingFederate for PingAuthorize
Configure PingFederate to authorize external access through tokens to the PingAuthorize Policy Editor.
About this task
You can also use PingAccess to authorize external access through rules. You can find more information in Rule Creation in PingAccess.
The following example configuration assumes that any authenticated user can access the PingAuthorize Policy Editor. You can find more informarion about limiting access to members of a specific group in Configuring PingFederate group access for PingAuthorize.
Steps
-
In the PingFederate administration console, go to System > Data & Credential Stores > Data Stores.
-
Click Add New Data Store.
-
On the Data Store Type tab, in the Name field, enter a name for the data store.
-
From the Type list, select Directory (LDAP), and then click Next.
-
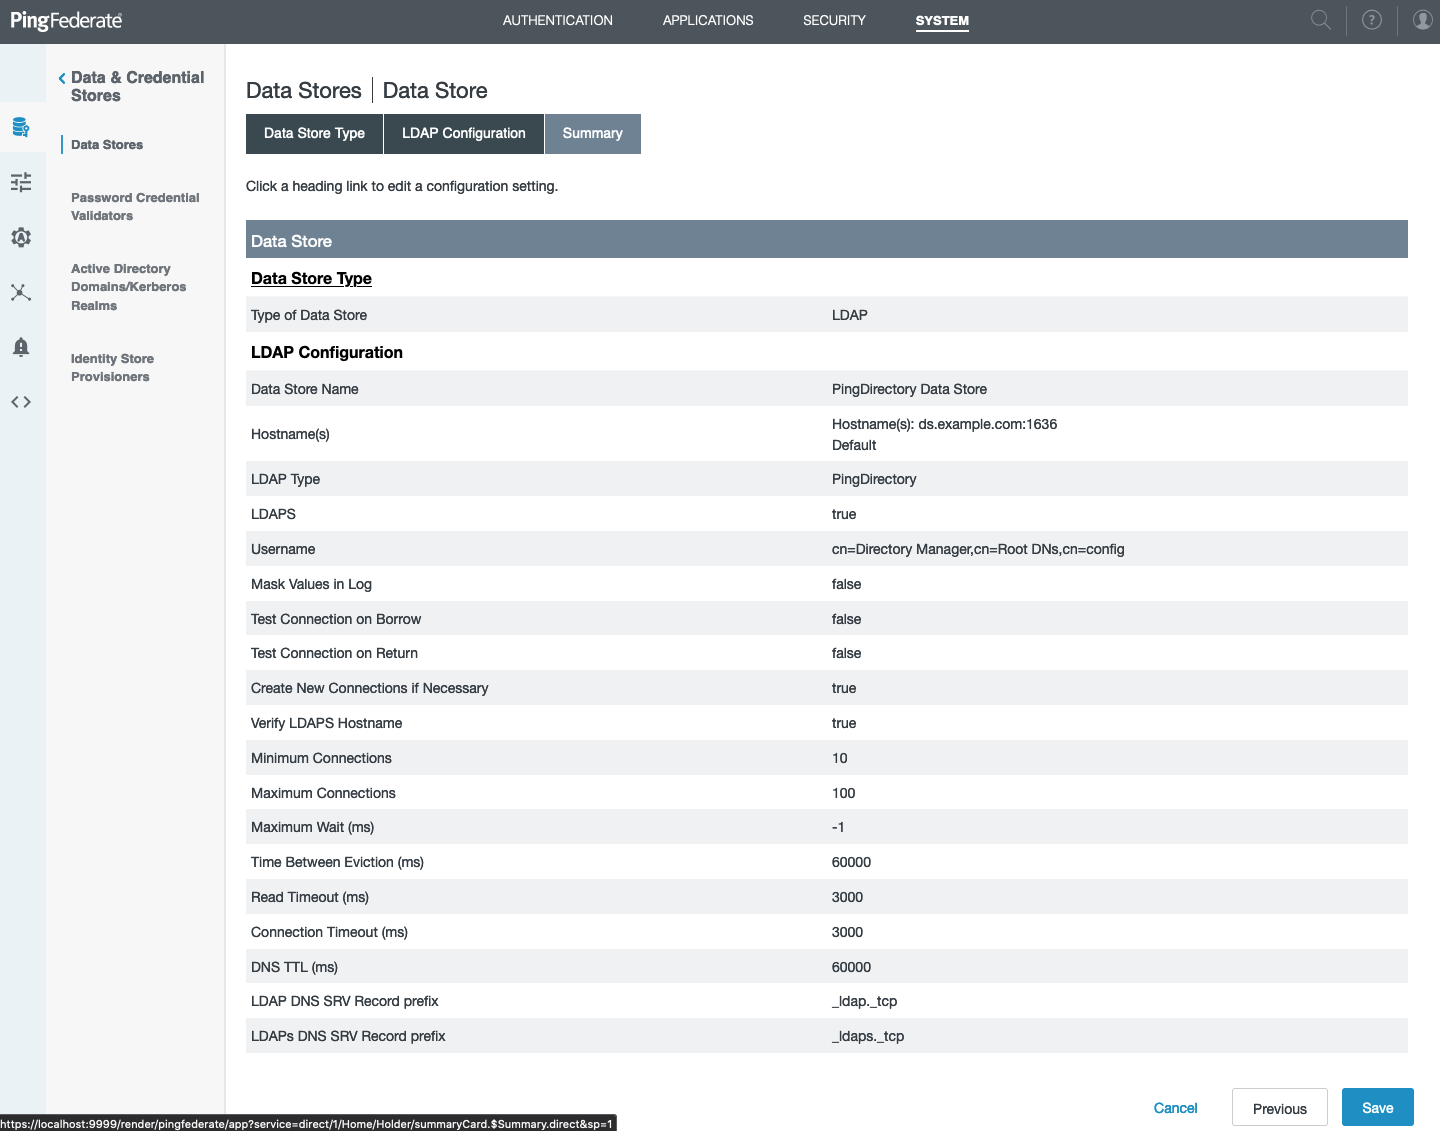
On the LDAP Configuration tab, enter the address and authentication information for PingFederate to use when accessing PingDirectory, and then click Next.
-
On the Summary tab, review your configuration and click Save.
-
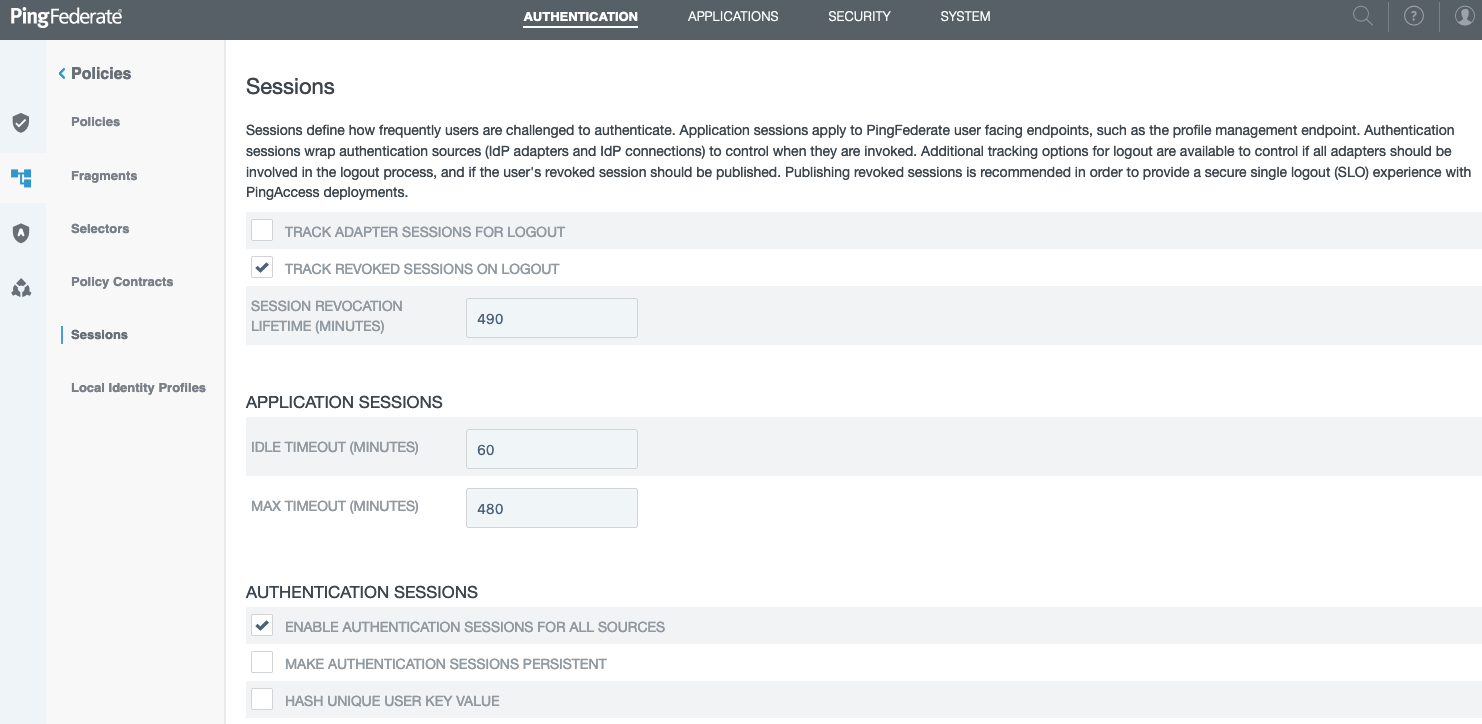
Go to Authentication > Policies > Sessions and enable authentication sessions. The following example enables authentication sessions for all sources. Make the appropriate change for your environment, and then click Save.
-
Go to Security > Certificate & Key Management > SSL Client Keys & Certificates and import your JWT signing certificate. Click Save.
PingFederate expects the certificate chain and keys to be encoded in PKCS12 format.
-
Configure your OAuth server using the OpenID Connect protocol.
-
Go to System > OAuth Settings > Scope Management and create scopes.
-
In the Scope Value field, enter the
email,openid, andprofilescopes, clicking Add after each entry. Click Save.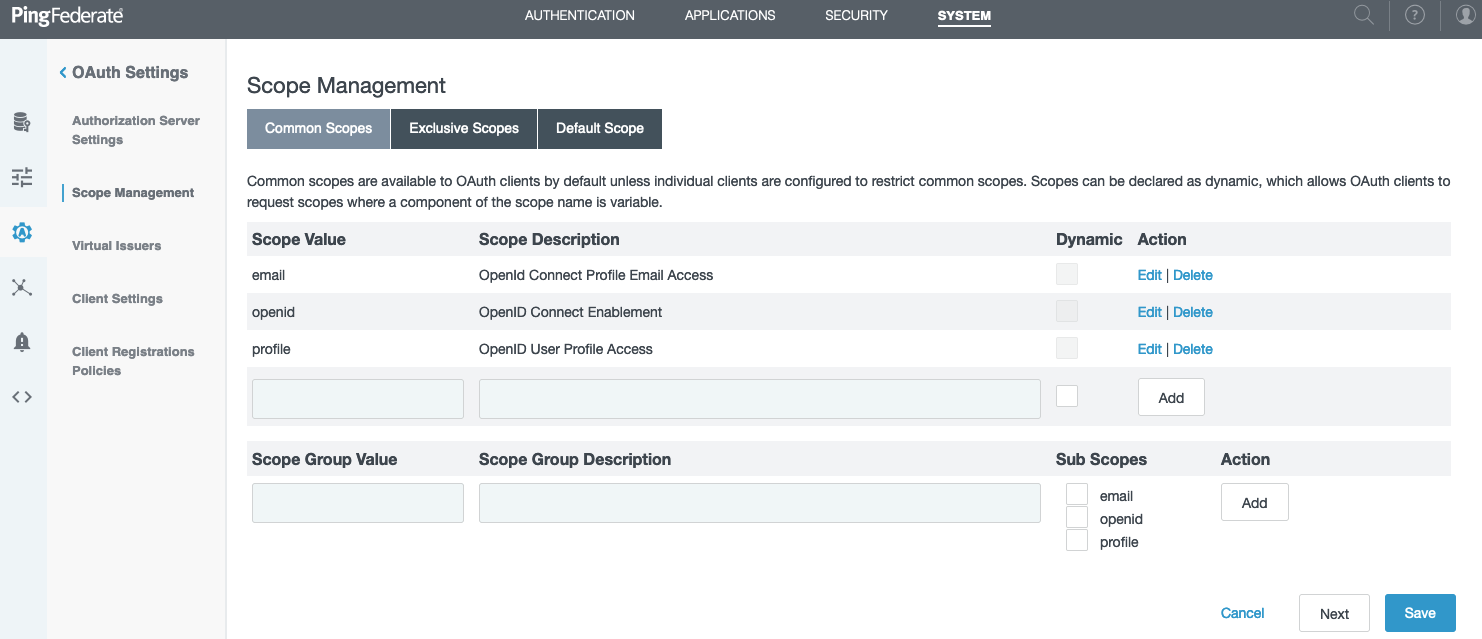
-
Go to Applications > OAuth > Access Token Management and click Create New Instance.
-
On the Type tab, from the Type list, select JSON Web Tokens. From the Parent Instance list, select None. Click Next.
-
On the Instance Configuration tab, click Add a new row to 'Certificates' and add the previously imported signing certificate. Select the desired signing algorithm and token timeout, and then click Next.
-
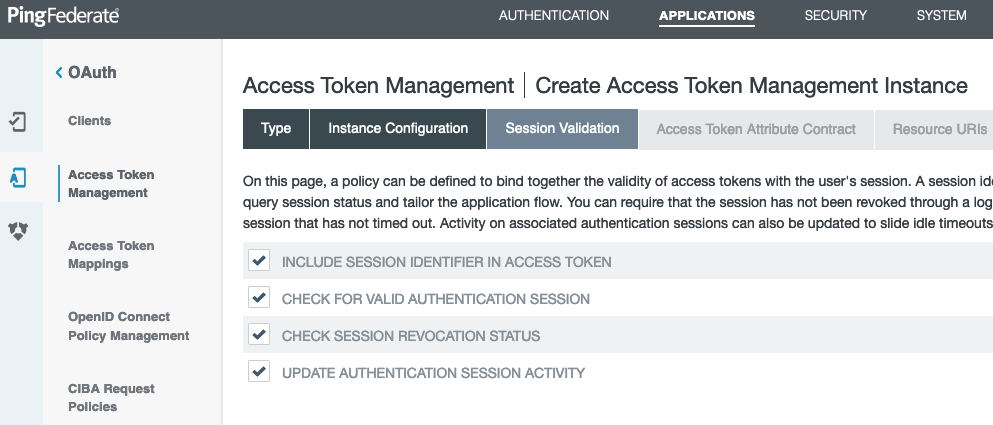
On the Session Validation tab, enable the session validation options.
-
On the Access Token Attribute Contract tab, add the attributes to be included in the OAuth access token. This example extends the contract with
cn,email,scope,sub, anduidattributes.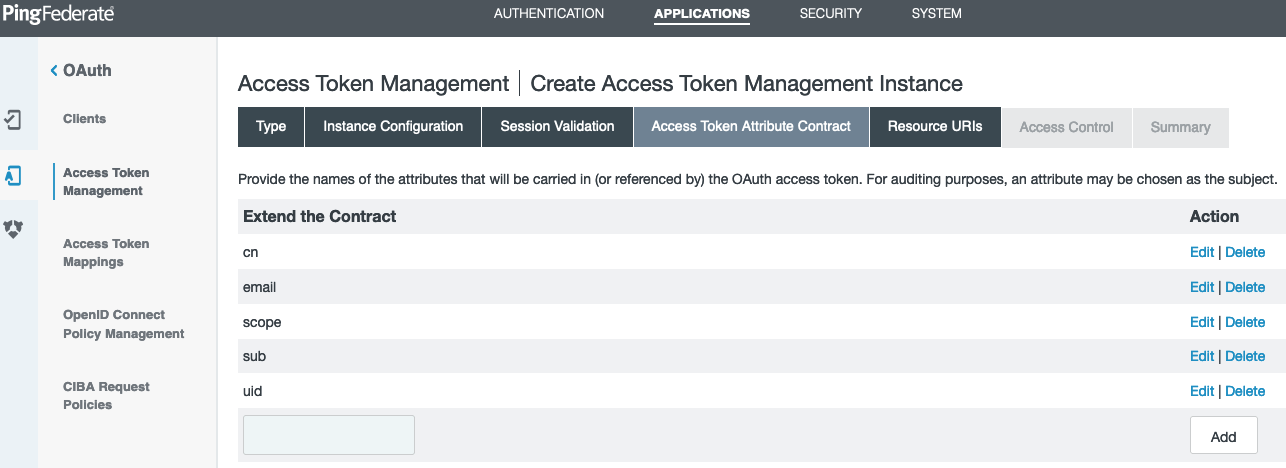
-
Click Next until you reach the Summary tab, and then click Save. Accept the default values for the Resources URIs and Access Control settings.
-
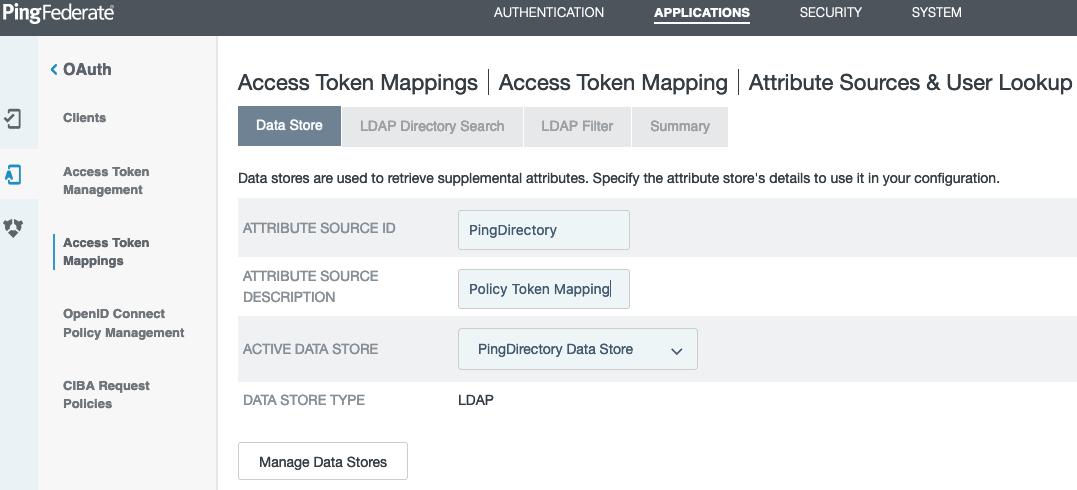
Go to Applications > OAuth > Access Token Mappings to create an Access Token Mapping in the Default context for the Access Token Manager you just created. Click Add Mapping, and then click Add Attribute Source.
-
From the Active Data Store list, select the PingDirectory data store that you created in step 2. Click Next.
-
On the LDAP Directory Search tab, in the Base DN field, enter the base DN for the PingDirectory data that provides your identities.
-
In the Attributes to return from search section, click Add Attribute and enter the attributes to be retrieved.
The sample data uses
ou=People,dc=example,dc=comand the configuration shown in the following image retrieves thecn,mail, anduidattributes.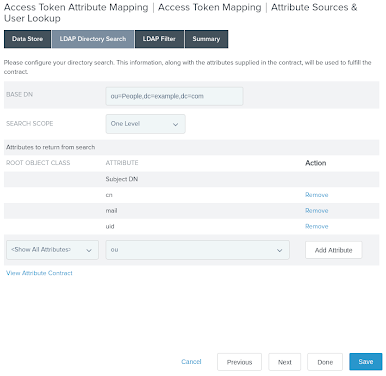
-
On the LDAP Filter tab, in the Filter field, enter
uid=${USER_KEY}to match the PingDirectory sample data with the authenticating user information.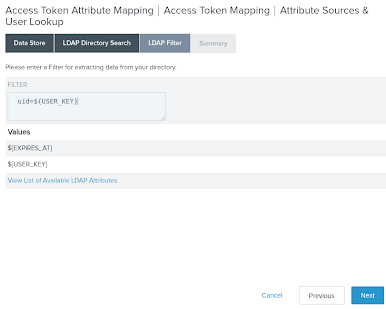
-
Click Next and Save on the Summary tab.
-
On the Contract Fulfillment tab, fulfill the contract with the LDAP attributes from the PingDirectory data store. Leave the remaining settings as their defaults and click Save.
The scope attribute is fulfilled from the OAuth context.
-
Go to Applications > OAuth > OpenID Connect Policy Management and click Add Policy.
-
In the Manage Policy tab, from the Access Token Manager list, select the access token manager you previously created.
-
Ensure that the Include User Info in ID Token checkbox is selected. Click Next.
-
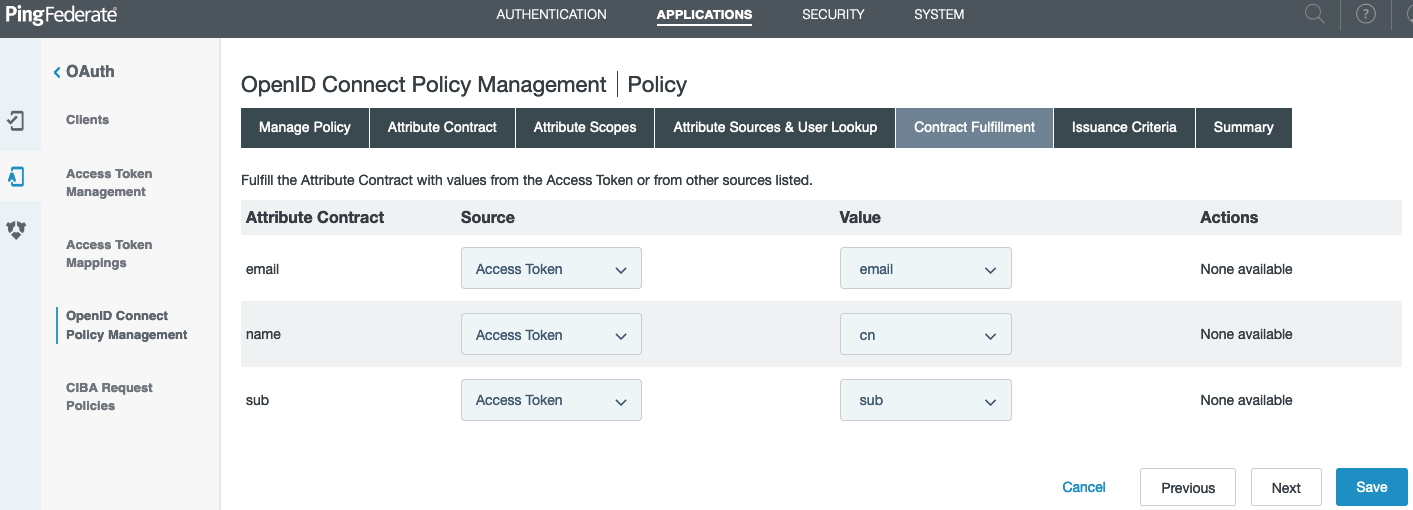
On the Attribute Contract tab, extend the policy contract with the
emailandnameattributes. Click Next. -
On the Attribute Scopes tab, map the previously defined
emailandprofilescopes to theemailandnameID token attributes. Click Next.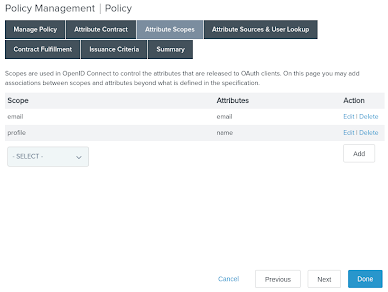
-
On the Contract Fulfillment tab, fulfill the contract with the values in the access token. Click Next until you reach the Summary tab, and then click Save.
-
Click Set as Default to set the newly created policy as the default policy.
-
Go to Applications > OAuth > Clients and click Add Client.
To provide the Policy Editor with appropriate defaults, configure PingFederate with a Client ID of
pingauthorize-papand select the Authorization Code checkbox in the Allowed Grant Types section. From the Default Access Token Manager list, select the JWT Manager created earlier, and in the Redirection URIs field, add the correct callback URL for the Policy Editor, such as https://pap.example.com:9443/idp-callback.Click Save.
-
Go to Authentication > OAuth > IdP Adapter Grant Mapping and create a new Form Adapter Mapping, fulfilling the contracts for
USER_NAMEandUSER_KEYwith the username form field. Click Next and Save on the Summary tab.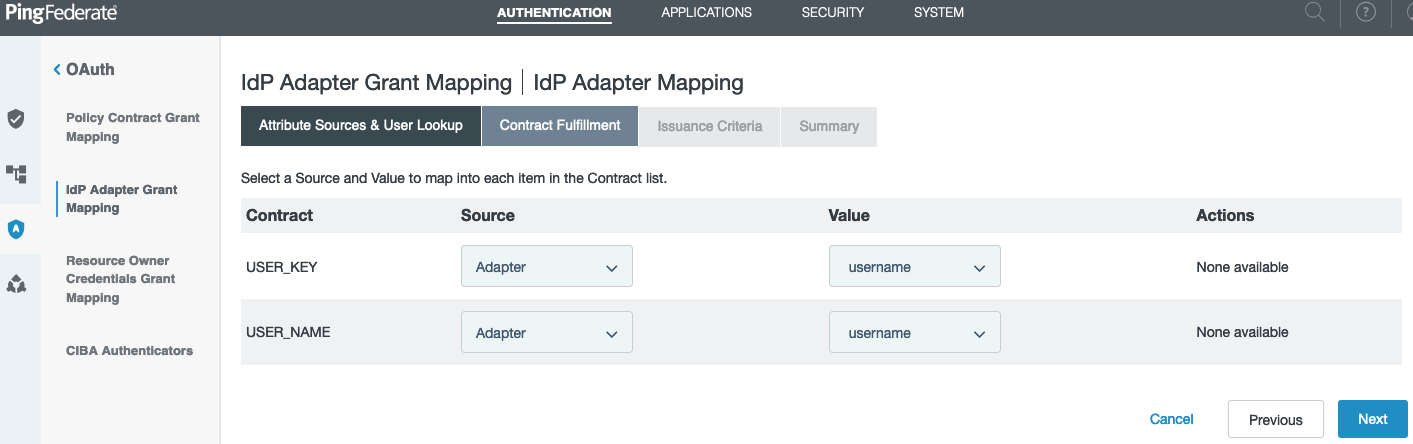
-
Because this PingFederate instance uses a different domain from the Policy Editor, you must modify the PingFederate CORS settings. Go to System → OAuth Settings → Authorization Server Settings. In the Cross-Origin Resource Sharing Settings section, enter the domain for the Policy Editor in the Allowed Origin field. Click Add and then Save.

Result:
PingFederate is configured to handle OpenID Connect requests.
-
Configuring the PingAuthorize Policy Editor to use PingFederate
Configure the Policy Editor to use PingFederate for authentication.
Before you begin
Configure PingFederate to handle OpenID Connect requests as described in Configuring PingFederate for PingAuthorize.
Steps
-
Add the certificate to the Java Trust Store.
If the certificate chain added to PingFederate uses an intermediate certificate authority that is not trusted by the default Java trust store, you must add the certificate. Use the following command (root permissions are usually required).
$JAVA_HOMEmust be defined as the installation location of the JVM on which the Policy Editor will run.keytool -import \ -file /path/to/IntermediateCA.cer \ -keystore $JAVA_HOME/jre/lib/security/cacerts \ -storepass changeit
-
Reconfigure PingAuthorize to point unauthenticated users to PingFederate.
-
Stop the application.
$
bin/stop-serverThe server was successfully stopped. -
Re-run
bin/setupto reconfigure the application. -
Select OpenID Connect to configure the Policy Editor.
[/opt/{pingauthorize}-PAP]$ bin/setup There is an existing configuration file at /config/configuration.yml. Overwrite? (yes / no) [no]: yes Detected valid license file in server root {pingauthorize}.lic {pingauthorize} Policy Editor ============================================ How would you like to configure the Policy Editor? 1) Quickstart (DEMO PURPOSES ONLY): This option configures the server with a form based authentication and generates a self-signed server certificate 2) OpenID Connect: This option configures the server to use an OpenID Connect provider such as PingFederate 3) Cancel the setup Enter option [1]:2On which port should the Policy Editor listen for HTTPS communications? [9443]: Enter the fully qualified host name or IP address that users' browsers will use to connect to this GUI [pap.example.com]: pap.example.com -
Ensure that the PingFederate discovery endpoint uses the public DNS name of the PingFederate server. In this example, the Policy Editor uses a self-signed SSL certificate.
Enter the port of the OpenID Connect provider [9031]: Enter the fully qualified host name or IP address of the OpenID Connect provider [pap.example.com]:
pf.example.comCertificate server options: 1) Generate self-signed certificate (recommended for testing purposes only) 2) Use an existing certificate located on a Java Keystore (JKS) 3) Use an existing certificate located on a PKCS12 keystore Enter option [1]: There already exists a keystore at /config/keystore.p12. Do you want to delete it? (yes / no) [no]:yes -
Follow the remaining prompts.
Setup Summary ======================================= Host Name: pap.example.com Server Port: 9443 Secure Access: Self-signed certificate Admin Port: 9444 Periodic Backups: Enabled Backup Schedule: 0 0 0 * * ? Command-line arguments that would set up this server non-interactively: setup oidc --pkcs12KeyStorePath config/keystore.p12 --licenseKeyFile {pingauthorize}.lic \ --oidcHostname pf.example.com --oidcPort 9031 --certNickname server-cert --backupSchedule '0 0 0 * * ?' \ --hostname pap.example.com --port 9443 --generateSelfSignedCertificate --adminPort 9444 What would you like to do? 1) Set up the server with the parameters above 2) Provide the setup parameters again 3) Cancel the setup Enter option [1]: Setup completed successfully Please configure the following values ============================================================================================= {pingauthorize} Server - Policy External Server Base URL: https://pap.example.com:9443 Shared Secret: 2222142a754f4838ad1e3dccb6e93940 Trust Manager Provider: Blind Trust PingFederate - OAuth Client Config Client ID: pingauthorizepolicyeditor CORS Allowed Origin: https://pap.example.com:9443 Redirect URL: https://pap.example.com:9443/idp-callback Please start the server by running bin/start-server -
Restart the application by running
bin/start-server.
-
-
Verify that you can log into the Policy Editor using OpenID Connect provided by PingFederate.
-
Go to the Policy Editor, for example, https://pap.example.com:9443. Your browser should be redirected into the OAuth flow.
-
Click Click to Sign In.
-
Sign on with your user name and password.
The sample configuration in this document creates an identity with the user name
user.20and passwordpassword. -
Once authenticated, PingFederate will prompt the user with the scopes associated with the OAuth client. Check all of them to continue.
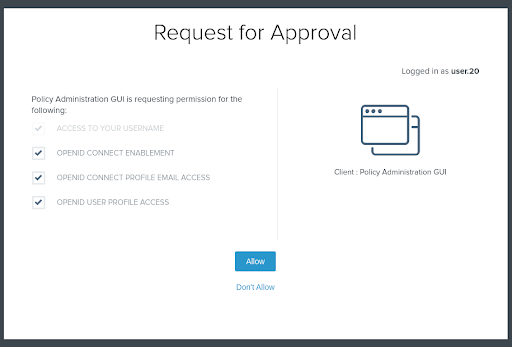
Result:
You are now authenticated and authorized to view the Policy Editor.
-
Configuring PingFederate group access for PingAuthorize
Configure PingFederate so that only members of a specific LDAP group are authorized to access the application.
Configuring PingFederate for PingAuthorize and Configuring the PingAuthorize Policy Editor to use PingFederate explain how to configure the PingAuthorize Policy Editor and PingFederate so that any authenticated user can access the Policy Editor. This task describes how to configure PingFederate to limit access to a specific LDAP group.
Steps
-
Create an LDAP group in PingDirectory and add the desired user (
user.20) to the group.-
Create a file named
create-policy-writer-group.ldifand add the following.dn: ou=groups,dc=example,dc=com objectclass: top objectclass: organizationalunit ou: groups dn: cn=PolicyWriter,ou=groups,dc=example,dc=com objectclass: top objectclass: groupOfUniqueNames cn: PolicyWriter ou: groups uniquemember: uid=user.20,ou=People,dc=example,dc=com
-
Use the PingDirectory
ldapmodifytool to load the newly createdldiffile./opt/PingDirectory/bin/ldapmodify -a -f create-policy-writer-group.ldif
-
-
Add the group membership claim requirement in PingFederate.
-
In the PingFederate console, go to Applications > OAuth > Access Token Mappings.
-
Select the PingDirectory mapping from the list, and then on the Attribute Sources & User Lookup tab, select the PingDirectory source.
-
Click the LDAP Directory Search tab, and in the Root Object Class list, select Show All Attributes.
-
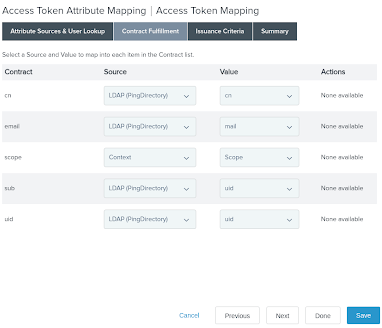
Add the isMemberOf attribute, and then click Done to return to Access Token Attribute Mapping.

-
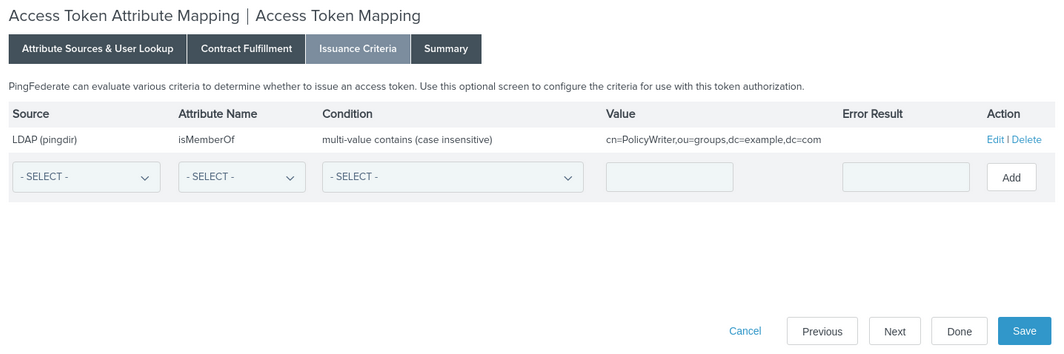
Go to the Issuance Criteria tab and add a new row with the following values:
Column Value Source
LDAP (pingdir)
Attribute Name
isMemberOf
Condition
multi-value contains (case sensitive)
Value
cn=PolicyWriter,ou=groups,dc=example,dc=com
-
Click Save.
Result:
Only
user.20can access the PingAuthorize Policy Editor.
-
-
Verify that only specified users can access the PingAuthorize Policy Editor.
Clear any active SSO sessions before you sign on as each user.
-
Sign on as
user.0.Result:
Access is denied.
-
Sign on as
user.20.Result:
Access is granted.
-