Tutorial (optional): Creating SCIM policies
This tutorial demonstrates how to develop fine-grained access control (FGAC) policies for the System for Cross-domain Identity Management (SCIM) REST application programming interface (API) built into PingAuthorize Server.
In the previous section, you used PingAuthorize Server to filter data that an external REST API returned.
While PingAuthorize Server’s API security gateway protects existing REST APIs, PingAuthorize Server’s built-in SCIM service provides a REST API for accessing and protecting identity data that might be contained in datastore like Lightweight Directory Access Protocol (LDAP) and relational databases.
PingAuthorize Server uses SCIM in the following ways:
-
Internally, user identities are represented as SCIM identities by way of one or more SCIM resource types and schemas. This approach includes access token subject (SAML), which are always mapped to a SCIM identity.
-
A SCIM REST API service provides access to user identities through HTTP.
You will now design a set of policies to control access to the SCIM REST API by using OAuth 2 access token rules.
Before proceeding, make a test request to generate a SCIM REST API response using only the default policies. As in the previous section, send a mock access token in the request.
curl --insecure -X GET https://localhost:7443/scim/v2/Me -H 'Authorization: Bearer {"active": true, "sub": "user.1", "scope": "nonexistent.scope", "client_id": "nonexistent.client"}'Although the precise attributes values might vary, the response returns the SCIM resource that corresponds to user.1.
{"mail":["user.1@example.com"],"initials":["RJV"],"homePhone":["+1 091 438 1890"],
"pager":["+1 472 824 8704"],"givenName":["Romina"],"employeeNumber":"1","telephoneNumber":["+1 319 624 9982"],
"mobile":["+1 650 622 7719"],"sn":["Valerio"],"cn":["Romina Valerio"],
"description":["This is the description for Romina Valerio."],"street":["84095 Maple Street"],
"st":["NE"],"postalAddress":["Romina Valerio$84095 Maple Street$Alexandria, NE 39160"],
"uid":["user.1"],"l":["Alexandria"],"postalCode":["39160"],"entryUUID":"355a133d-58ea-3827-8e8d-b39cf74ddb3e",
"objectClass":["top","person","organizationalPerson","inetOrgPerson"],"entryDN":"uid=user.1,ou=people,o=yeah",
"meta":{"resourceType":"Users",
"location":"https://localhost:7443/scim/v2/Users/355a133d-58ea-3827-8e8d-b39cf74ddb3e"},
"id":"355a133d-58ea-3827-8e8d-b39cf74ddb3e","schemas":["urn:pingidentity:schemas:store:2.0:UserStoreAdapter"]}This response is a success response, although it is preferred that it not be one, because it shows that any active access token referencing a valid user can be used to access any data.
Scenario
In this tutorial, you limit the requester’s access to profile data, returning only specific attributes of the profile that granted the access token. This is achieved using the OIDC-like scope email and profile.
Also, you create a scope scimAdmin that has full access to SCIM-based User resources.
Tasks
This tutorial walks you through these tasks.
-
Create a basic policy structure for scope-based access to SCIM resources.
-
Create a policy for the
emailscope that only allows access to the subject’smailattributes. -
Create a policy for the
profilescope that only allows access to a few other profile attributes. -
Create a policy for the
scimAdminscope that allows access to all attributes.
The following sections provide the details for completing these tasks.
Tutorial: Creating the policy tree
This tutorial describes how to create a tree structure and ensure that your policies apply only to SCIM requests.
About this task
The default policies include the policy named Token Validation. In the PingAuthorize Policy Editor, you can find this policy under Global Decision Point. This policy denies any request using an access token if the token’s active flag is set to false. This policy is augmented with a set of scope-based access control policies.
Steps
-
To create the tree structure, perform the following steps:
-
Sign on to the PingAuthorize Policy Editor using the URL and credentials from Accessing the GUIs.
-
Click Policies.
-
Select Global Decision Point.
-
From the menu, select Add Policy Set.
-
For the name, replace Untitled with
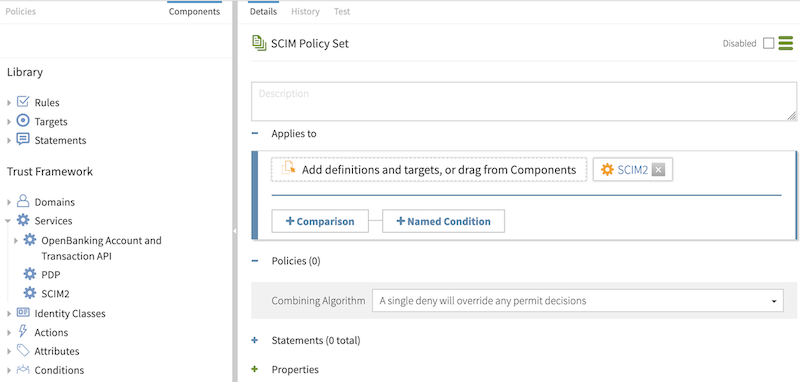
SCIM Policy Set. -
In the Policies section, set the Combining algorithm to A single deny will override any permit decisions.
A combining algorithm determines the manner in which the policy set resolves potentially contending decisions from child policies.
-
Click Applies to.
-
Click Components.
-
From the Services list, drag SCIM2 to the Add definitions and targets, or drag from Components box.
This step ensures that policies in the SCIM policy set apply only to SCIM requests.
-
Click Save changes.
Result:
You should have a screen like the following.
-
-
To add a branch under the SCIM policy set to hold SCIM-specific access token policies, go from Components to Policies and perform the following steps:
-
Select SCIM Policy Set.
-
From the menu, select Add Policy Set.
-
For the name, replace Untitled with
Token Policies. -
In the Policies section, set the Combining algorithm to A single deny will override any permit decisions.
-
Click Save changes.
-
-
To add another branch that holds a policy specific to access token scopes, perform the following steps:
-
Select Token Policies.
-
From the menu, select Add Policy Set.
-
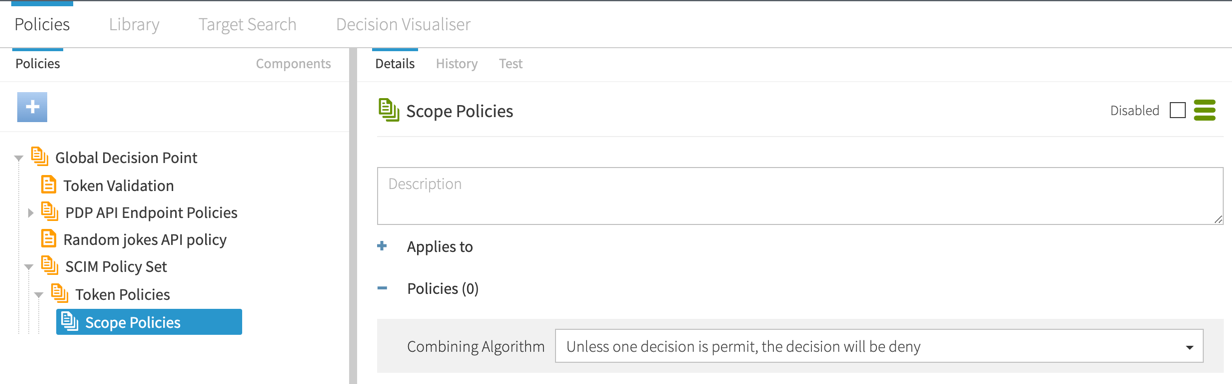
For the name, replace Untitled with
Scope Policies. -
In the Policies section, set the Combining algorithm to Unless one decision is permit, the decision will be deny.
-
Click Save changes.
Result:
After creating the new branches, they should look like the following.
-
Tutorial: Creating SCIM access token policies
This tutorial describes how to define access token policies after you define a structure.
In this section, you will define three policies that use a requester’s access token to limit data access.
Creating a policy for permitted access token scopes
The first policy defines the access token scopes that PingAuthorize Server accepts for SCIM requests.
About this task
The following table defines these scopes.
| Scope | Allowed actions | Applies to |
|---|---|---|
scimAdmin |
search, retrieve, create/modify, delete |
Any data |
retrieve |
Requester’s email attributes |
|
profile |
retrieve |
Requester’s profile attributes |
To create the policy and add rules to define the scopes, perform the following steps:
Steps
-
Sign on to the PingAuthorize Policy Editor using the URL and credentials from Accessing the GUIs.
-
Click Policies.
-
Expand Global Decision Point, SCIM Policy Set, and Token Policies.
-
Select Scope Policies.
-
Next to Statements, click .
-
Click Components.
-
From the Statements list, drag Insufficient Scope to the area immediately following the Statements section. A box appears for you to drop the item into.
-
Click Save changes.
-
Click Policies to the left of Components.
-
Select Scope Policies.
-
From the menu, select Add Policy.
-
For the name, replace Untitled with
Permitted Scopes. -
Change the combining algorithm to A single deny will override any permit decisions.
-
Click Save changes.
Testing the policy with cURL
Test the newly created policy with cURL.
About this task
If you attempt the same HTTP request that you issued previously, it is now denied.
Steps
-
Run the HTTP request to perform the test.
Example:
curl --insecure -X GET https://localhost:7443/scim/v2/Me -H 'Authorization: Bearer {"active": true, "sub": "user.1", "scope": "nonexistent.scope", "client_id": "nonexistent.client"}'

{"schemas":["urn:ietf:params:scim:api:messages:2.0:Error"],"status":"403",
"scimType":"insufficient_scope","detail":"Requested operation not allowed by the granted OAuth scopes."}
shell
Defining the email scope
Define a permitted access token scope to retrieve email attributes.
Steps
-
Sign on to the PingAuthorize Policy Editor using the URL and credentials from Accessing the GUIs.
-
Click Policies.
-
Expand Global Decision Point, SCIM Policy Set, Token Policies, and Scope Policies.
-
Select Permitted Scopes.
-
Click Components.
-
-
From the Rules list, drag Permitted SCIM scope for user to the Rules section.
-
To the right of the copied rule, click the hamburger menu.
-
Click Replace with clone.
-
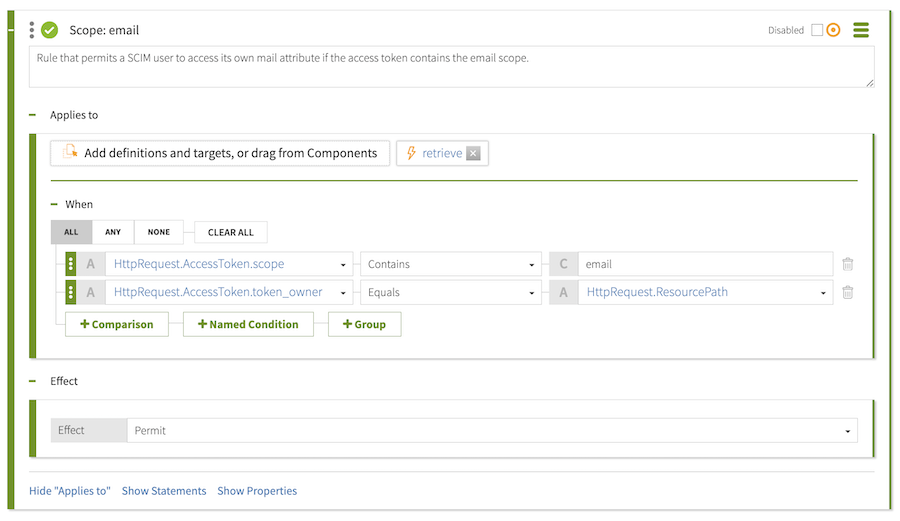
Change the name to
Scope: email. -
To expand the rule, click .
-
Change the description to
Rule that permits a SCIM user to access its own mail attribute if the access token contains the email scope. -
In the HttpRequest.AccessToken.scope row of the Condition section, type
emailin the CHANGEME field. -
Within the rule, click Show "Applies to".
-
From the Actions section, drag retrieve to the Add definitions and targets, or drag from Components box.
This task uses different actions from the previous gateway example.
-
Within the rule, click Show Statements.
-
Click next to Statements.
-
From the Statements list, drag Include email attributes to the Statements section of the rule.
This predefined statement includes a payload. If the condition for this rule is satisfied, the response includes the
mailattribute. -
Click Save changes.
Result
You now have a new email scope, which should look like the following.
Testing the email scope with cURL
You can test a newly created email scope with cURL.
About this task
If you make the same request as earlier, a 403 is returned because the provided scope is not allowed.
curl --insecure -X GET https://localhost:7443/scim/v2/Me -H 'Authorization: Bearer {"active": true, "sub": "user.1", "scope": "nonexistent.scope", "client_id": "nonexistent.client"}'Steps
-
Adjust the request to use the email scope.
Example:
curl --insecure -X GET https://localhost:7443/scim/v2/Me -H 'Authorization: Bearer {"active": true, "sub": "user.1", "scope": "email", "client_id": "nonexistent.client"}'shell{"id":"355a133d-58ea-3827-8e8d-b39cf74ddb3e","meta":{"resourceType":"Users","location":"https://localhost:7443/scim/v2/Users/355a133d-58ea-3827-8e8d-b39cf74ddb3e"},"schemas":["urn:pingidentity:schemas:store:2.0:UserStoreAdapter"],"mail":["user.1@example.com"]}jsonResult:
The request succeeds, and only the
mailattribute is returned.
Defining the profile scope
Define a permitted access token scope to retrieve profile attributes.
Steps
-
Sign on to the PingAuthorize Policy Editor using the URL and credentials from Accessing the GUIs.
-
Click Policies.
-
Expand Global Decision Point, SCIM Policy Set, Token Policies, and Scope Policies.
-
Select Permitted Scopes.
-
Click Components.
-
From the Rules list, drag Permitted SCIM scope for user to the Rules section.
-
To the right of the copied rule, click the hamburger menu.
-
Click Replace with clone.
-
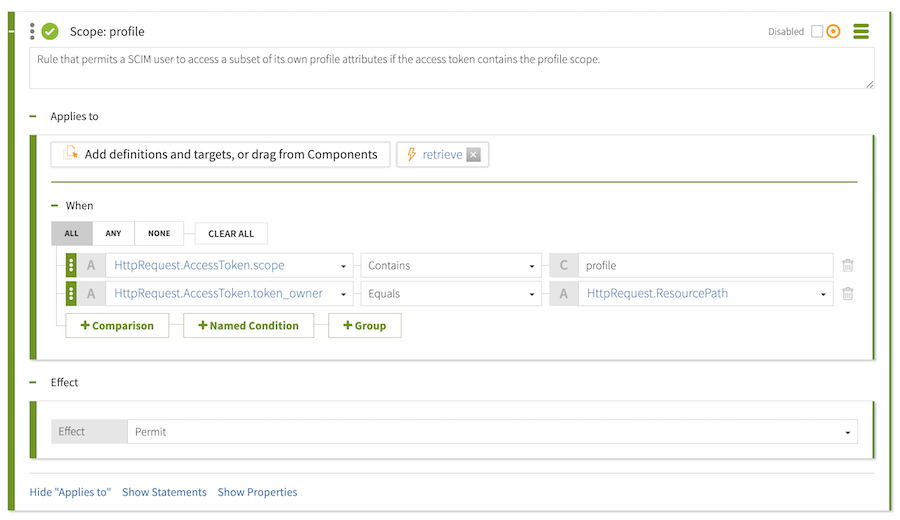
Change the name to
Scope: profile. -
To expand the rule, click .
-
Change the description to
Rule that permits a SCIM user to access a subset of its own profile attributes if the access token contains the profile scope. -
In the HttpRequest.AccessToken.scope row of the Condition section, type
profilein the CHANGEME field. -
Within the rule, click Show "Applies to".
-
From the Actions section, drag retrieve to the Add definitions and targets, or drag from Components box.
-
Within the rule, click Show Statements.
-
Next to Statements, click .
-
From the Statements list, drag Include profile attributes to the Statements section of the rule.
This predefined statement includes a payload. If the condition for this rule is satisfied, the response includes the
uid,sn,givenName, anddescriptionattributes. -
Click Save changes.
Result
You now have a new profile scope, which should look like the following.
Testing the profile scope with cURL
Test your new profile scope with cURL.
Steps
-
Make the same request as earlier, but change the
emailscope that the access token uses toprofile.Example:
curl --insecure -X GET https://localhost:7443/scim/v2/Me -H 'Authorization: Bearer {"active": true, "sub": "user.1", "scope": "profile", "client_id": "nonexistent.client"}'shell{"id":"355a133d-58ea-3827-8e8d-b39cf74ddb3e","meta":{"resourceType":"Users","location":"https://localhost:7443/scim/v2/Users/355a133d-58ea-3827-8e8d-b39cf74ddb3e"},"schemas":["urn:pingidentity:schemas:store:2.0:UserStoreAdapter"],"uid":["user.1"],"givenName":["Romina"],"description":["This is the description for Romina Valerio."],"sn":["Valerio"]}jsonResult:
The attributes defined by the new rule’s statement are returned.
-
Because an access token might contain multiple scopes, confirm that an access token with the
emailandprofilescopes returns the union of the attributes that both scopes grant.Result:
curl --insecure -X GET https://localhost:7443/scim/v2/Me -H 'Authorization: Bearer {"active": true, "sub": "user.1", "scope": "email profile", "client_id": "nonexistent.client"}'shell{"id":"355a133d-58ea-3827-8e8d-b39cf74ddb3e","meta":{"resourceType":"Users","location":"https://localhost:7443/scim/v2/Users/355a133d-58ea-3827-8e8d-b39cf74ddb3e"},"schemas":["urn:pingidentity:schemas:store:2.0:UserStoreAdapter"],"uid":["user.1"],"mail":["user.1@example.com"],"givenName":["Romina"],"description":["This is the description for Romina Valerio."],"sn":["Valerio"]}json
Defining the scimAdmin scope
For the scimAdmin scope, you will define different behaviors that depend on the action of the request.
As a result, the scope definition will be split into multiple rules.
Adding the scimAdmin retrieve rule
Add the scimAdmin retrieve rule to the Permitted Scopes policy.
Steps
-
Sign on to the PingAuthorize Policy Editor using the URL and credentials from Accessing the GUIs.
-
Click Policies.
-
Select Permitted Scopes.
-
Click Add Rule.
-
For the name, replace Untitled with
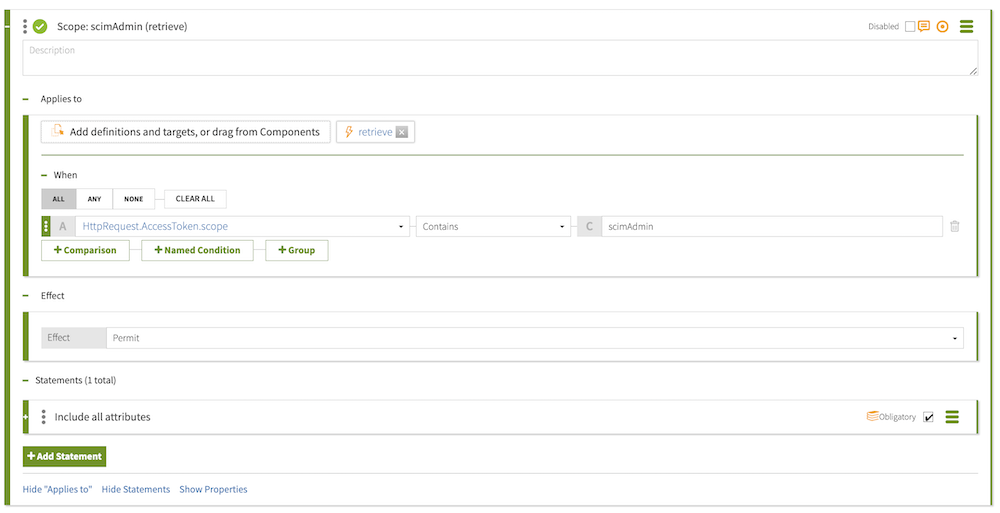
Scope: scimAdmin (retrieve). -
From the Effect list, select Permit.
-
In the Condition section, perform the following steps:
-
Click Comparison.
-
In the first field, select HttpRequest.AccessToken.scope.
-
From the comparator list, select Contains.
-
In the final field, type
scimAdmin.
-
-
Within the rule, click Show "Applies to".
-
Click Components.
-
From the Actions section, drag retrieve to the Add definitions and targets, or drag from Components box.
-
Within the rule, click Show Statements.
-
Click next to Statements.
-
From the Statements list, drag Include all attributes to the Statements section of the rule.
-
Click Save changes.
Result
You now have a new scope for the scimAdmin retrieve rule, which should look like the following.
Adding the scimAdmin create/modify rule
Add the scimAdmin create/modify rule to the Permitted Scopes policy.
Steps
-
Sign on to the PingAuthorize Policy Editor using the URL and credentials from Accessing the GUIs.
-
Click Policies.
-
Select Permitted Scopes.
-
Click Add Rule.
-
For the name, replace Untitled with
Scope: scimAdmin (create/modify). -
From the Effect list, select Permit.
-
In the Condition section, perform the following steps:
-
Click Comparison.
-
In the first field, select HttpRequest.AccessToken.scope.
-
From the comparator list, select Contains.
-
In the final field, type
scimAdmin.
-
-
Within the rule, click Show "Applies to".
-
Click Components.
-
From the Actions section, drag create to the Add definitions and targets, or drag from Components box.
-
From the Actions sections, drag modify to the Add definitions and targets, or drag from Components box.
-
Click Save changes.
Adding the scimAdmin search rule
Add the scimAdmin search rule to the Permitted Scopes policy.
Steps
-
Sign on to the PingAuthorize Policy Editor using the URL and credentials from Accessing the GUIs.
-
Click Policies.
-
Select Permitted Scopes.
-
Click Add Rule.
-
For the name, replace Untitled with
Scope: scimAdmin (search). -
From the Effect list, select Permit.
-
In the Condition section, perform the following steps:
-
Click Comparison.
-
In the first field, select HttpRequest.AccessToken.scope.
-
From the comparator list, select Contains.
-
In the final field, type
scimAdmin.
-
-
Within the rule, click Show "Applies to".
-
Click Components.
-
From the Actions section, drag search to the Add definitions and targets, or drag from Components box.
-
Click Save changes.
Adding the scimAdmin delete rule
Add the scimAdmin delete rule to the Permitted Scopes policy.
Steps
-
Sign on to the PingAuthorize Policy Editor using the URL and credentials from Accessing the GUIs.
-
Click Policies.
-
Select Permitted Scopes.
-
Click Add Rule.
-
For the name, replace Untitled with
Scope: scimAdmin (delete). -
From the Effect list, select Permit.
-
In the Condition section, perform the following steps:
-
Click Comparison.
-
In the first field, type
HttpRequest.AccessToken.scope. -
From the comparator list, select Contains.
-
In the final field, type
scimAdmin.
-
-
Within the rule, click Show "Applies to".
-
Click Components.
-
From the Actions section, drag delete to the Add definitions and targets, or drag from Components box.
-
Click Save changes.
Creating a policy for permitted OAuth2 clients
This tutorial describes how to configure a policy to allow specific OAuth2 clients for a REST service. A REST service typically allows only requests from an allow list of OAuth2 clients.
About this task
In the PingAuthorize Policy Editor, define a policy in which each rule specifies an allowed client.
Steps
-
Go to Policies → Policies.
-
Expand Global Decision Point and SCIM Policy Set.
-
Highlight Token Policies and click and then Add Policy.
-
For the name, replace Untitled with
Permitted Clients. -
From the Combining Algorithm list, select Unless one decision is permit, the decision will be deny.
-
Click Add Rule.
-
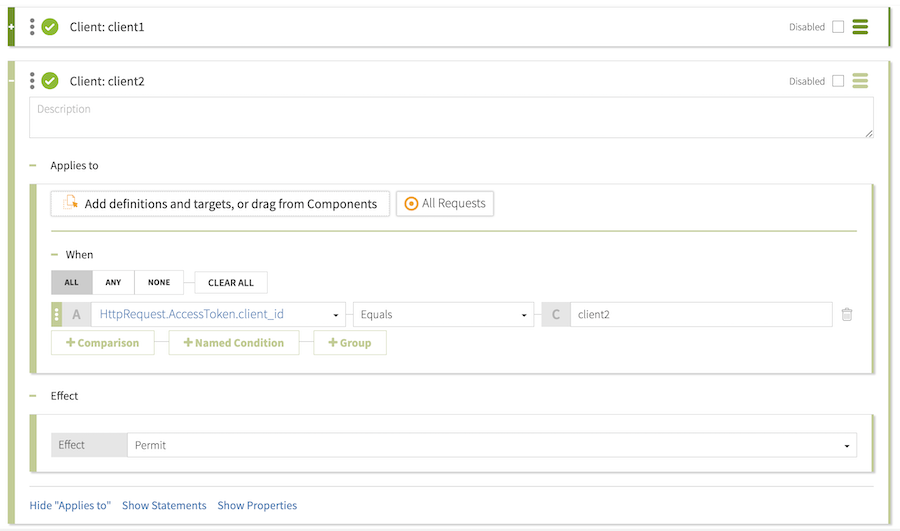
For the name, replace Untitled with
Client: client1. -
From the Effect list, select Permit.
-
In the Condition section:
-
Click Comparison.
-
From the Select an Attribute list, select
HttpRequest.AccessToken.client_id. -
From the middle, comparison-type list, select
Equals. -
In the final field, enter
client1.
-
-
Click Add Rule.
-
For the name, replace Untitled with
Client: client2. -
From the Effect list, select Permit.
-
In the Condition section:
-
Click Comparison.
-
From the Select an Attribute list, select
HttpRequest.AccessToken.client_id. -
From the middle, comparison-type list, select
Equals. -
In the final field, enter
client2.
-
-
Expand Statements.
Do not click Show Statements within the client1 or client2 rules.
-
Click Components.
-
From the Statements list, drag Unauthorized Client to the Statements box.
-
Click Save changes.
Result
The completed configuration should resemble the following image.
Testing the client policy with cURL
To confirm that you successfully completed the tasks from the previous section, test the client policy with cURL.
About this task
After completing the tasks in the previous sections, test the responses you receive for access tokens for any client other than client1 or client2.
Steps
-
To test that an access token for any client other than client1 or client2 is rejected, run the following.
curl --insecure -X GET https://localhost:7443/scim/v2/Me -H 'Authorization: Bearer {"active": true, "sub": "user.1", "scope": "email", "client_id": "nonexistent.client"}'shellResult:
Successful completion of the tasks in the previous sections will result in the following response.
{"schemas":["urn:ietf:params:scim:api:messages:2.0:Error"],"status":"401","scimType":"The client is not authorized to request this resource.","detail":"unauthorized_client"}json -
To test that an access token for client1 is accepted, run the following.
curl --insecure -X GET https://localhost:7443/scim/v2/Me -H 'Authorization: Bearer {"active": true, "sub": "user.1", "scope": "email", "client_id": "client1"}'shellResult:
Successful completion of the tasks in the previous sections will result in the following response.
{"id":"355a133d-58ea-3827-8e8d-b39cf74ddb3e","meta":{"resourceType":"Users","location":"https://localhost:7443/scim/v2/Users/355a133d-58ea-3827-8e8d-b39cf74ddb3e"},"schemas":["urn:pingidentity:schemas:store:2.0:UserStoreAdapter"],"mail":["user.1@example.com"]}json
Creating a policy for permitted audiences
This tutorial describes how to create a policy for a REST service to control access based on an acceptable audience value.
About this task
An authorization server like PingFederate might set an audience field on the access tokens that it issues, naming one or more services that are allowed to accept the access token. A REST service can use the audience field to ensure that it does not accept access tokens that are intended for use with a different service.
As with the Permitted Clients policy, each rule in the Permitted Audiences policy defines an acceptable audience value.
Steps
-
Go to Policies → Policies.
-
Expand Global Decision Point and SCIM Policy Set.
-
Highlight Token Policies and click and then Add Policy.
-
For the name, replace Untitled with
Permitted Audiences. -
From the Combining Algorithm list, select Unless one decision is permit, the decision will be deny.
-
Click Add Rule.
-
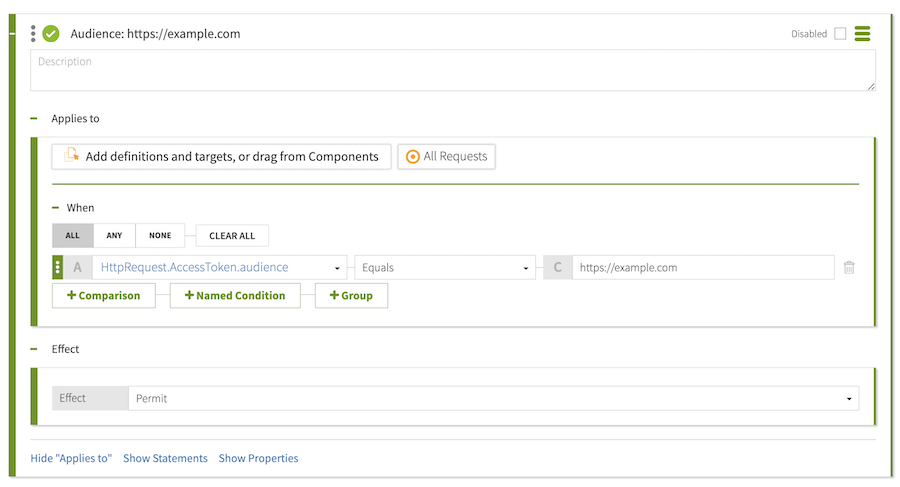
For the name, replace Untitled with
Audience: https://example.com. -
From the Effect list, select
Permit. -
In the Condition section:
-
Click Comparison.
-
From the Select an Attribute list, select
HttpRequest.AccessToken.audience. -
From the middle, comparison-type list, select
Equals. -
In the final field, enter
https://example.com.
-
-
Expand Statements.
-
Click the Components tab, expand Statements, and drag
Unauthorized Audienceto the Statements box.Do not click Show Statements within the "Audience: https://example.com" rule.
-
Click Save changes.
Result
The final configuration should resemble the following image.
Testing the audience policy with cURL
To confirm that you successfully completed the previous task, test the audience policy with cURL.
Steps
-
To test that an access token without a specific audience value is rejected, run the following.
curl --insecure -X GET https://localhost:7443/scim/v2/Me -H 'Authorization: Bearer {"active": true, "sub": "user.1", "scope": "email", "client_id": "client1"}'shellResult:
Successful creation of the audience policy will result in the following.
{"schemas":["urn:ietf:params:scim:api:messages:2.0:Error"],"status":"403","scimType":
"invalid_token","detail":"The access token was issued for a different audience."}
json -
To test that an access token with an audience value of
https://example.comis accepted, run the following.curl --insecure -X GET https://localhost:7443/scim/v2/Me -H 'Authorization: Bearer {"active": true, "sub": "user.1", "scope": "email", "client_id": "client1", "aud": "https://example.com"}'shellResult:
Successful creation of the audience policy will result in the following.
{"id":"355a133d-58ea-3827-8e8d-b39cf74ddb3e","meta":{"resourceType":"Users",
"location":"https://localhost:7443/scim/v2/Users/355a133d-58ea-3827-8e8d-b39cf74ddb3e"},
"schemas":["urn:pingidentity:schemas:store:2.0:UserStoreAdapter"],"mail":["user.1@example.com"]}
json
Tutorial: Creating a policy for role-based access control
This tutorial describes how to create the final policy, which is an access-control rule that can base its authorization decision on an attribute of the requesting identity, rather than on an access token claim.
About this task
When PingAuthorize Server authorizes a request, an access token validator resolves the subject of the access token to a SCIM user and populates a policy request attribute called TokenOwner with the SCIM user’s attributes. In this scenario, build a policy around the employeeType attribute, which must be defined in the Trust Framework.
Steps
-
Go to Trust Framework and click the Attributes tab. Click TokenOwner.
-
Click and then Add new Attribute.
-
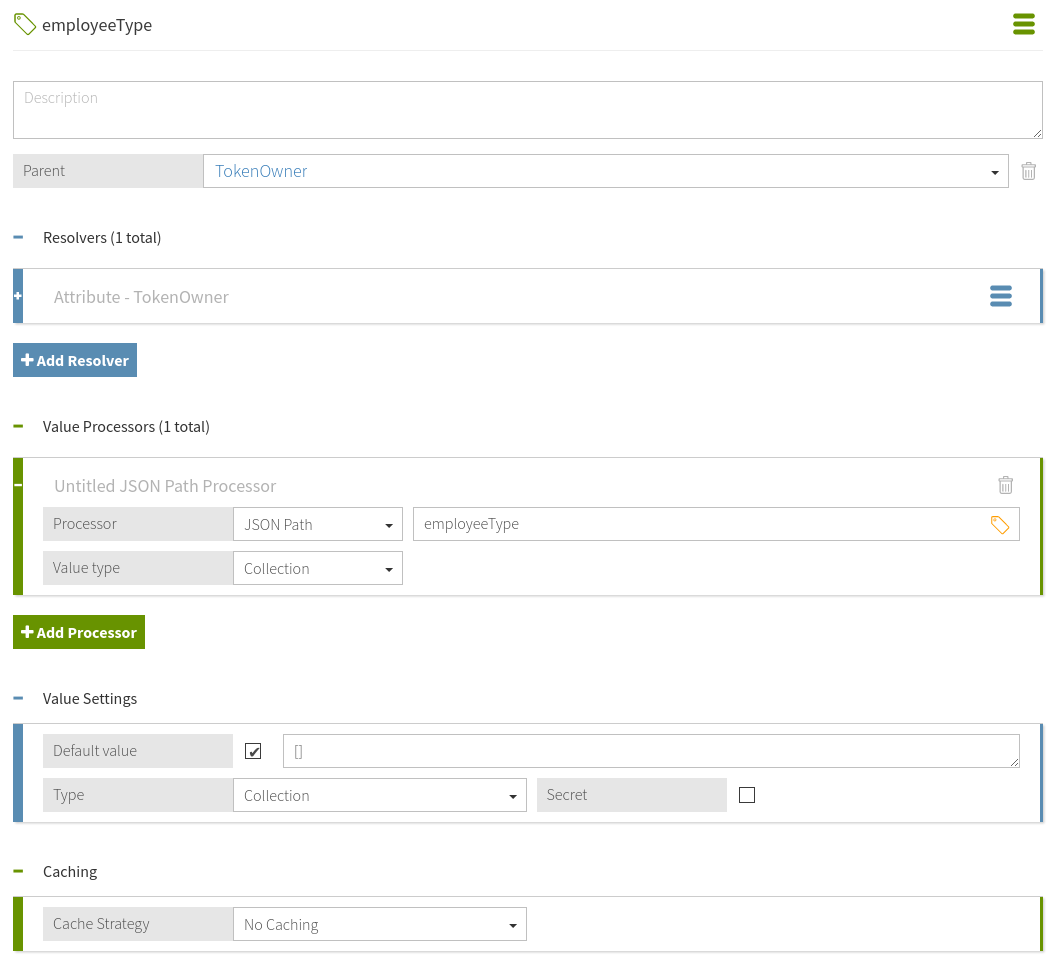
For the name, replace Untitled with
employeeType. -
From the Parent list, select
TokenOwner. -
In the Resolvers section:
-
Click Add Resolver.
-
From the Resolver type list, select
Attributeand in the Select an Attribute list, specify a value ofTokenOwner.
-
-
Click next to Value Processors and then Add Processor.
-
From the Processor list, select
JSON Pathand enter the valueemployeeType. -
Set the Value type to
Collection. -
In the Value Settings section:
-
Select the Default Value check box and in the Enter a default value field, enter the value
[].An empty array is specified as the default value because not all users have an
employeeTypeattribute. A default value of[]ensures that policies can safely use this attribute to define conditions. -
From the Type list, select
Collection.
-
-
Click Save changes.
Result
The final attribute configuration should resemble the following image.
Next steps
Add a policy that uses the employeeType attribute.
-
Go to Policies → Policies.
-
Select SCIM Policy Set and click and then Add Policy.
-
For the name, replace Untitled with
Restrict Intern Access. -
From the Combining Algorithm list, select Unless one decision is deny, the decision will be permit.
-
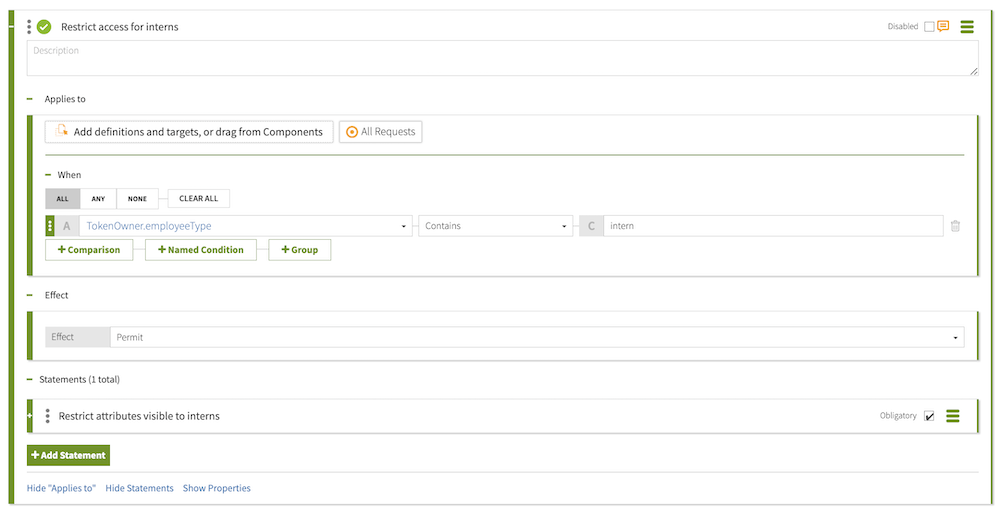
Click Add Rule.
-
For the name, replace Untitled with
Restrict access for interns. -
From the Effect list, select
Permit. -
In the Condition section:
-
Click Comparison.
-
In the Select an Attribute list, select
TokenOwner.employeeType. -
From the middle, comparison-type list, select
Contains. -
In the Type in constant value field, enter
intern.
-
-
Within the rule, click Show Statements, and then click the next to Statements.
-
Click Add Statement → Custom Advice.
-
For the name, replace Untitled with
Restrict attributes visible to interns. -
Select the Obligatory check box.
-
In the Code field, enter
exclude-attributes. -
From the Applies To list, select
Permit. -
In the Payload field, enter
["description"]. -
Click Save changes.
Testing the policy with cURL
Test the policy for role-based access control using cURL.
About this task
The PingAuthorize sample user data allows an employeeType attribute but does not populate it with values for any users.
Confirm that user.2 cannot read the description attribute, even though the profile scope allows it, by running the following command.
curl --insecure -X GET https://localhost:7443/scim/v2/Me -H 'Authorization: Bearer {"active": true, "sub": "user.2", "scope": "profile", "client_id": "client1", "aud": "https://example.com"}'The response should be similar to the following response.
{"id":"c9cbfb8c-d915-3de3-8a2c-a01c0ccc6d09","meta":{"resourceType":"Users","location":"https://localhost:7443/scim/v2/Users/c9cbfb8c-d915-3de3-8a2c-a01c0ccc6d09"},"schemas":["urn:pingidentity:schemas:store:2.0:UserStoreAdapter"],"uid":["user.2"],"givenName":["Billy"],"sn":["Zaleski"]}Example files
The compressed PingAuthorize Server file at PingAuthorize/resource/policies includes a policy snapshot and deployment package that both contain an example Trust Framework and example policies.
Conclusion
In this tutorial, you set scope-based access to SCIM resources.
You also learned:
-
Like
exclude-attributesused in this tutorial,include-attributesfilters which attributes can be returned to the caller.include-attributesworks more like opt-in, whileexclude-attributesworks more like opt-out. -
Multiple attributes can apply from multiple rules or even policies. They are combined by PingAuthorize to
includebeforeexclude.