Configuring the HTTP Request Parameter Authentication Selector
The HTTP Request Parameter Authentication Selector enables PingFederate to choose configured authentication sources or other selectors based on query parameter values.
About this task
Use this selector in one or more authentication policies to choose from authentication sources that share a similar level of assurance, such as among multiple instances of the HTML Form Adapter or between a Kerberos Adapter instance and an X.509 Adapter instance. For example, use an instance of this selector to choose an authentication experience based on the reward program information indicated by a query parameter in the single sign-on (SSO) request.
|
Do not use this selector to determine whether an authentication source with a higher level of assurance should be bypassed because query parameters could potentially be forged. |
Steps
-
Go to Authentication > Policies > Selectors to open the Selectors window.
-
On the Selectors window, click Create New Instance to start the Create Authentication Selector Instance workflow.
-
On the Type tab, configure the basics of this authentication selector instance.
-
On the Authentication Selector tab, configure the applicable selector instance settings.
-
Enter the exact, case-sensitive name of the request parameter in the HTTP Request Parameter Name field.
The policy engine is capable of tracking HTTP request parameters that it receives from the initial request and making them available to selector instances throughout the policy. If you plan on using this selector instance as the second, or subsequent, checkpoint in at least one authentication policy, add the HTTP Request Parameter Name value on the Tracked HTTP Parameters window. For more information, see Defining authentication policies.
-
(Optional) To disable case-sensitive matching between the HTTP request parameter values from the requests and the Match Expression values specified on the Selector Result Values window, clear the Case-Sensitive Matching checkbox.
The Case-Sensitive Matching checkbox is selected by default.
-
(Optional) Enable policy paths to handle additional scenarios.
For more information, see the following table.
Field Description Enable 'Any' Result Value
Each configured selector result value forms a separate authentication policy path.
Select this checkbox if you want to enable a single policy path for the scenario where the HTTP request parameter value matches any one of the configured selector result values.
This checkbox is not selected by default.
Enable 'No Match' Result Value
Selector evaluation fails and the next applicable authentication policy is executed when the HTTP request parameter value does not match any of the configured selector result values.
Select this checkbox if you want to enable a policy path to handle this scenario.
This checkbox is not selected by default.
Enable 'Not in Request' Result Value
Selector evaluation fails and the next applicable authentication policy is executed if the HTTP request parameter is not found.
Select this checkbox if you want to enable a policy path to handle this scenario.
This checkbox is not selected by default.
-
-
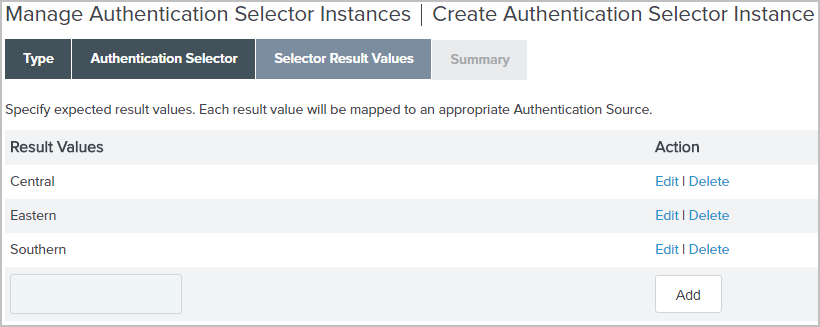
On the Selector Result Values window, enter a request parameter value under Result value, and then click Add.
Wildcard entries are allowed, such as
*value*.A more specific match is a better match, and an exact match is the best match.
-
(Optional) Repeat the previous step to add more request parameter values. Display order does not matter.
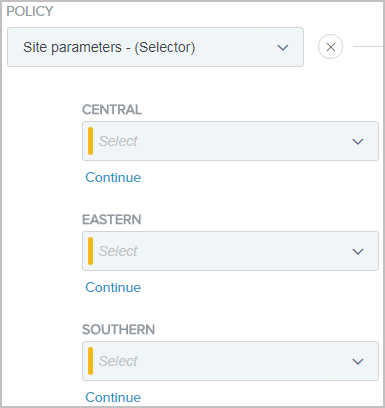
If you have not enabled the Any policy path in step 4c, each selector result value forms a policy path when you place this selector instance as a checkpoint in an authentication policy.
If you have enabled the Any policy path, only one policy path is formed.
Use the Edit, Update, and Cancel workflow to make or undo a change to an existing entry. Click Delete to remove an entry.
-
Complete the configuration.
-
On the Summary tab, click Done.
-
On the Selectors window, click Save.
-
Example
Example
Suppose you enter three selector result values, Central, Eastern, and Southern, on the Selector Result Values window, as illustrated in the following screen capture.

If you have not enabled any additional policy paths in step 4c, as you place this selector instance as a checkpoint in an authentication policy, three policy paths are extended from the selector instance, one for each of the configured selector result values.
