Configuring OIDC SSO to PingFederate from an external IdP
You can configure OpenID Connect (OIDC) single sign-on (SSO) for signing on to the PingFederate administrative console.
Before you begin
Make sure you have the following in place:
-
A valid signing certificate. See Manage digital signing certificates and decryption keys.
-
An openID and a profile scope. See Defining scopes.
-
A policy contract with at least the following attributes:
sub,admin_role,iss,memberOf. See Managing policy contracts. -
An identity provider (IdP) connection in your PingFederate instance with the following attributes:
SAML_SUBJECT,memberOf– fulfilled by the policy contract authentication source. See Managing IdP connections. -
An service provider (SP) connection in your external IdP with the following attributes:
SAML_SUBJECT,memberOf– fulfilled by whichever authentication source is appropriate and using whatever authentication flows you require (for example, username/password and multi-factor authentication (MFA)). See Accessing SP connections.
About this task
Configuring OIDC SSO for the PingFederate administrative console allows you to use an external IdP to authenticate administrative users. You can also use OIDC SSO to enable MFA because the administrative users are taken through an authentication policy flow that invokes an MFA adapter. Other console authentication types don’t use authentication policies.
Mapping the policy contract for grant fulfillment
Complete the contract fulfillment.
Steps
-
Go to Authentication > OAuth > Policy Contract Grant Mapping.
-
In the Policy Contract menu, select your policy contract, and click Add Mapping.
-
On the Attribute Sources & User Lookup tab, click Next.
-
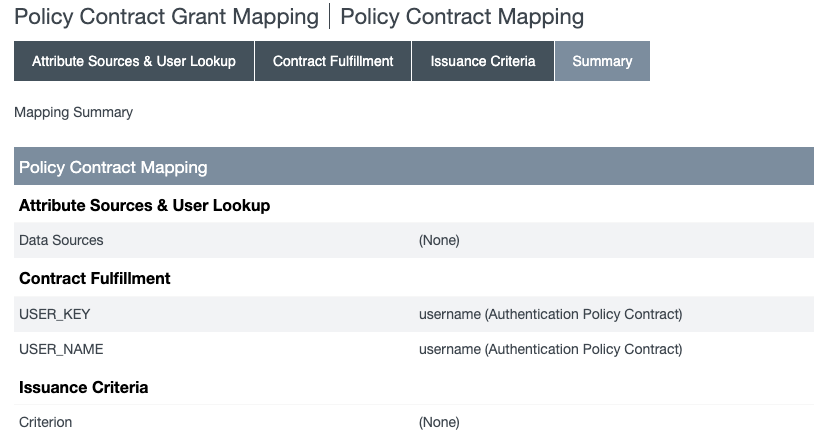
On the Contract Fulfillment tab, map the User_Key to the username from the policy contract.
-
Beside User_Key, select Authentication Policy Contract in the Source menu and the policy contract’s username in the Value menu.
-
Beside User_Name, select Authentication Policy Contract in the Source menu and the policy contract’s username in the Value menu.
-
Click Next.
-
-
On the Issuance Criteria tab, click Next.
-
On the Summary tab, verify your configuration, and click Save.
Configuring an access token manager
Create a JSON Web Token (JWT) access token management instance.
Steps
-
Go to Applications > OAuth > Access Token Management.
-
To create a new access token management instance, click Create New Instance.
-
On the Type tab:
-
Enter a name for the instance in the Instance Name field and an ID in the Instance ID field.
-
In the Type menu, select JSON Web Tokens.
-
Click Next.
-
-
On the Instance Configuration tab:
-
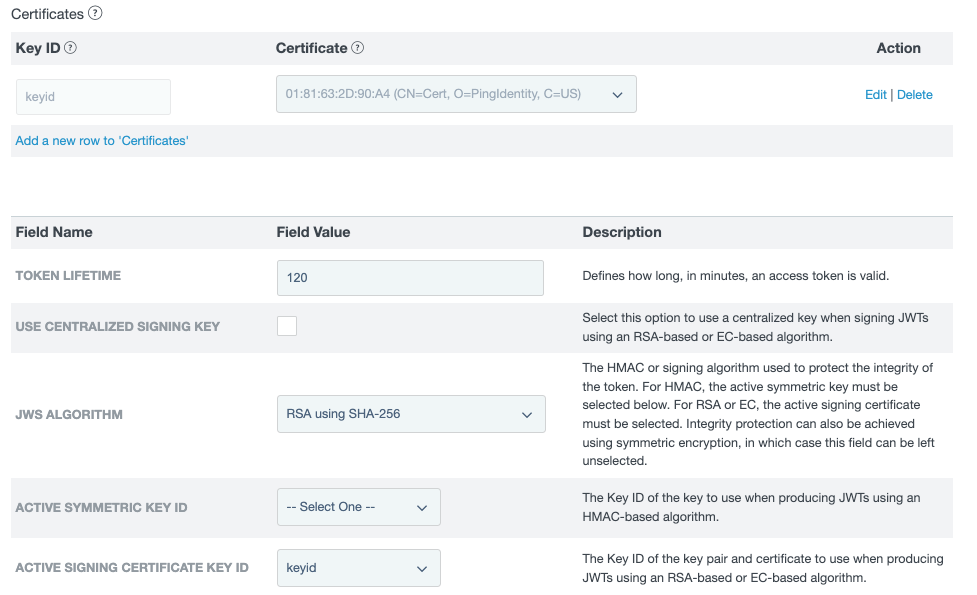
In the Certificates section, click Add a new row to 'certificates'.
-
In the Key ID field, enter an ID for the key.
-
In the Certificate menu, select your signing certificate, and click Update.
-
In the JWS Algorithm menu, select RSA using SHA-256.
-
In the Active Signing Certificate Key ID menu, select the key ID you entered in step b.
-
Click Next.
-
-
On the Session Validation tab, click Next.
-
On the Access Token Attribute Contract tab:
-
Make sure User_Key is selected in the Subject Attribute Name menu.
-
In the Extend the Contract field, enter
admin_role, and click Add. -
Repeat step b to add the
iss,memberOf, andsubattributes. -
Click Next.
-
-
On the Resource URIs and Access Control tabs, click Next.
-
On the Summary tab, review your configuration. Click Save.
Configuring access token mapping
Map your policy contract context to the JWT access token manager.
Steps
-
Go go Applications > OAuth > Access Token Mappings.
-
On the Access Token Mappings page in the Context menu, select your policy contract.
-
In the Access Token Manager menu, select your JWT ATM.
-
Click Add Mapping.
-
On the Attribute Sources & User Lookup tab, click Next.
-
On the Contract Fulfillment tab, select a Source and a Value to map into the
admin_role,iss,memberOf, andsubattributes in the Contract list.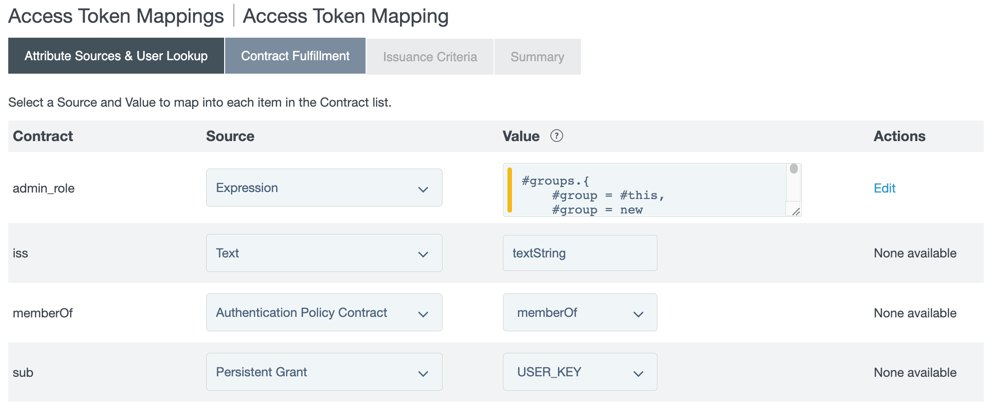
-
For the
admin_roleattribute, select Expression in the Source menu and, in the Value field, enter the following expression:#filter1 = "^pf_admins.*", #filter2 = "^pf_cryptoadmins.*", #filter3 = "^pf_useradmins.*", #filter4 = "^pf_datacollectionadmins.*", #role1 = "admin", #role2 = "cryptoadmin", #role3 = "useradmin", #role4 = "expressionadmin", #role5 = "datacollectionadmin", #outboundattribute = new java.util.ArrayList(), #groups = #this.get("apc.memberOf")!=null?#this.get("apc.memberOf").getValues():{}, #i = 0, #groups.{ #group = #this, #group = new javax.naming.ldap.LdapName(#groups[#i]), #cn = #group.getRdn(#group.size() - 1).getValue().toString(), #cn.matches(#filter1)?#outboundattribute.add(#role1):null, #cn.matches(#filter1)?#outboundattribute.add(#role4):null, #cn.matches(#filter2)?#outboundattribute.add(#role2):null, #cn.matches(#filter3)?#outboundattribute.add(#role3):null, #cn.matches(#filter4)?#outboundattribute.add(#role5):null, #i = #i + 1}, #outboundattribute.size() > 0 ? new org.sourceid.saml20.adapter.attribute.AttributeValue(#outboundattribute):nullThis example OGNL expression gets the
memberOfvalue from the policy contract, looks for group distinguished name (DN) that match the filters, and assigns a role when a filter is matched. In the expression, anyone that is in the Admins group is assigned both the Admin and Expression Admin role, because the Expression Admin role requires the Admin role assignment. Using this expression to map roles allows you to control access with groups from your identity provider’s data source. Match your filter values in the expression to the group names created in your LDAP directory to assign those roles. -
For the
issattribute, select Text in the Source menu, and enter a text string in the Value field.Make a note of the text string. The value entered here is the issuer claim value and should identify the organization as the issuer.
-
For the
memberOfattribute, select Authentication Policy Contract in the Source menu, and memberOf in the Value menu. -
For the
subattribute, select Persistent Grant in the Source menu, and USER_KEY in the Value menu. -
Click Next.
-
-
On the Issuance Criteria tab, click Next.
-
On the Summary tab, review your mappings. Click Save.
Creating the OIDC policy
Steps
-
Go to Applications > OAuth > OpenID Connect Policy Management.
-
Click Add Policy.
-
On the Manage Policy tab:
-
In the Policy ID field, enter the policy identifier.
-
In the Name field, enter the policy name.
-
In the Access Token Manager menu, select your JWT access token manager.
-
Click Next.
-
-
On the Attribute Contract tab, add the
admin_role,iss, andmemberOfattribute contracts.-
In the Extend the Contract field, enter
admin_role, and click Add. -
Repeat step a. to add the
issandmemberOfattributes. -
Click the Edit action for
admin_role. Select the Override Default Delivery and ID Token checkboxes, then click the Update action. -
Repeat step c for
iss, selecting the ID Token checkbox, and formemberOf, selecting the UserInfo checkbox.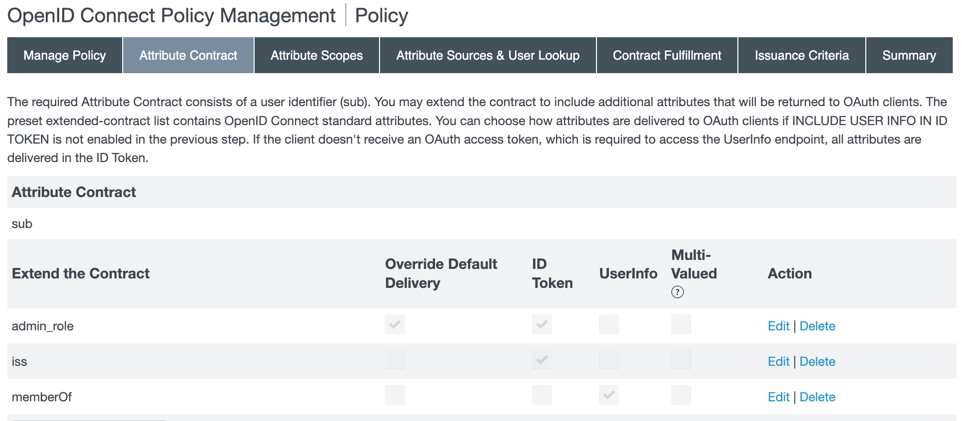
-
Click Next.
-
-
On the Attribute Scopes tab, add the
admin_roleandissattributes to the openid scope and thememberOfattribute to the profile scope.
-
In the Scope menu, select openid. Select the
admin_roleattribute’s checkbox, and click Add. Theissattribute should already be selected. -
In the Scope menu, select profile. Select the
memberOfattribute’s checkbox, and click Add. -
Click Next.
-
-
On the Attribute Sources & User Lookup tab, click Next.
-
On the Contract Fulfillment tab, select a Source and a Value to map into the
admin_role,iss,memberOf, andsubitems in the Attribute Contract list.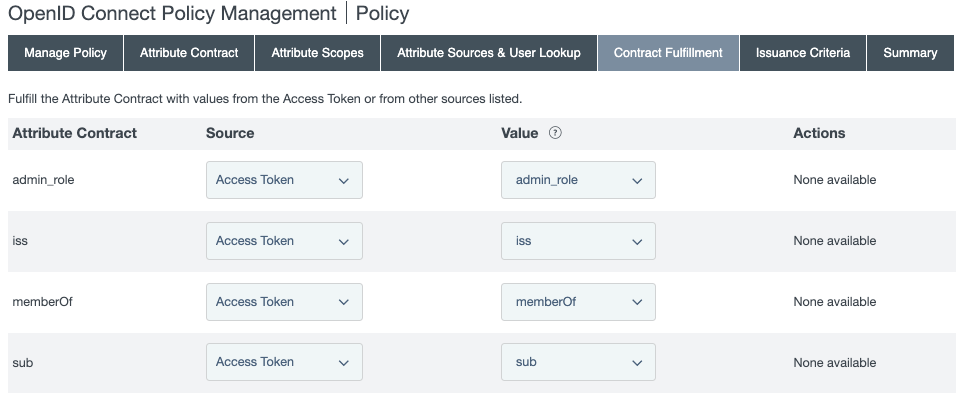
-
For the
admin_roleattribute contract, select Access Token in the Source menu and admin_role in the Value menu. -
For the
issattribute contract, select Access Token in the Source menu and iss in the Value menu. -
For the
memberOfattribute contract, select Access Token in the Source menu and memberOf in the Value menu. -
For the
subattribute contract, select Access Token in the Source menu and sub in the Value menu. -
Click Next.
-
-
On the Issuance Criteria tab, click Next.
-
On the Summary tab, review your configuration. Click Save.
Creating the client
Steps
-
Go to Applications > OAuth > Clients, and click Add Client.
-
In the Client ID field, enter an ID for the client.
-
In the Name field, enter a name for the client.
-
In the Client Authentication section, select Client Secret.
-
In the Client Secret section, select the Change Secret checkbox and enter a password in the field. If preferred, you can click Generate Secret.
-
In the Redirect URIS field, enter the following URI, and click Add.
https://<your PingFederate admin server hostname>/pingfederate/app?service=finishsso -
For Bypass Authorization Approval, select the Bypass checkbox.
-
For Allowed Grant Types, select the Authorization Code checkbox.
-
In the Default Access Token Manager menu, select your JSON access token manager.
-
For Restrict to Default Access Token Manager, select the Restrict checkbox.
-
In the OpenID Connect section, in the Policy menu, select your OIDC policy.
-
Click Save.
Creating an OAuth Set Authentication selector
Create an OAuth Set Authentication selector and add your client to it.
Steps
-
Go to Authentication > Policies > Selectors.
-
On the Selectors page, click Create New Instance.
-
On the Type tab, do the following.
-
In the Instance Name field, enter a name for the instance.
-
In the Instance ID field, enter an ID for the instance.
-
In the Type menu, select OAuth Client Set Authentication Selector.
-
Click Next.
-
-
On the Authentication Selector tab:
-
Click Add a new row to Clients.
-
In the Client ID menu, select your client, and click the Update action.
-
Click Next.
-
-
On the Summary tab, review your configuration. Click Save.
Creating an authentication policy
Create an authentication policy that is triggered by the selector, sends the user to the external IdP, and fulfills the policy contract.
Steps
-
Go to Authentication > Policies > Policies.
-
Click Create New Instance.
-
Click Add Policy.
-
On the Policy page In the Name field, enter a name for the policy.
-
Optional: In the Description field, enter a description for the policy.
-
Click in the Policy field, and select Selectors in the menu.
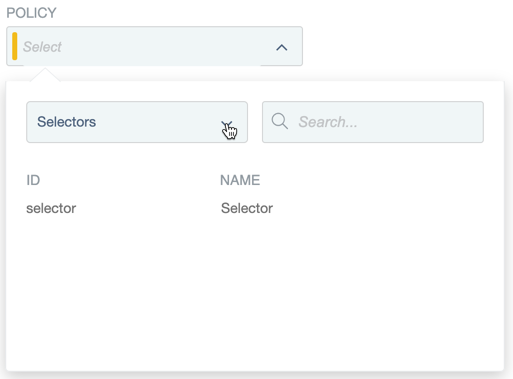
-
Select your selector.
-
For the No option, click Continue.
-
For the Yes option, select IdP Connections in the menu, and select your IdP connection.
-
For the Fail option, click Done.
-
For the Success option, select Policy Contracts in the menu, and select your policy contract.
-
Click Contract Mapping.
-
On the Attribute Sources & User Lookup tab, click Next.
-
On the Contract Fulfillment tab, map the
memberOf,subject, andusernameattributes. If your policy contract has additional attributes, select No Mapping in the Source menu for those attributes.-
For the
memberOfattribute, select IdP Connection in the Source menu andmemberOfin the Value menu. -
For the
subjectattribute, select IdP Connection in the Source menu and SAML_SUBJECT in the Value menu. -
For the
usernameattribute, select IdP Connection in the Source menu and SAML_SUBJECT in the Value menu.
-
-
On the Issuance Criteria tab, click Next.
-
On the Summary tab, review your configuration. Click Done.
-
On the Policy page, click Done.
-
On the Policies tab, click Save.
Exporting the signing certificate
When your PingFederate server is redirected to its own token endpoint, it must trust the certificate used to sign its tokens.
Steps
-
Go go Security > Certificate & Key Management > Signing & Decryption Keys & Certificates.
-
In the Action menu for the certificate that PingFederate will use to sign its tokens, select Export.
-
On the Export Certificate tab, select Certificate Only, and click Next.
-
On the Export & Summary tab, click Export.
-
Click Done.
Importing the certificate to trusted CAs
After you have exported the signing certificate, you must import it to trusted certificate authorities.
Steps
-
Go to Security > Certificate & Key Management > Trusted CAs.
-
Click Import.
-
On the Import Certificate tab, click Choose File.
-
Navigate to the location of the certificate that you exported, select it, and click Open.
-
On the Import Certificate page, click Next.
-
On the Summary tab, review your certificate information, and click Save.
Configuring properties files
Configure required parameters in PingFederate’s oidc.properties and run.properties files.
Steps
-
Configure the required parameters in the
<pf_install>/pingfederate/bin/oidc.propertiesfile.You’ll need the client ID and secret from the client you created, and you should obfuscate the secret. You’ll also need the
issattribute value you used in the access token manager mappings.Use the authorization and token endpoints with your PingFederate base URL.
Example:
An example configuration is shown here:
client.id=pfadminconsole
client.authn.method=client_secret_basic
client.secret=*********
authorization.endpoint=https\://pingfed-idp.ad.jibboo.org\:9031/as/authorization.oauth2
token.endpoint=https\://pingfed-idp.ad.jibboo.org\:9031/as/token.oauth2
issuer=jibbooidp
scopes=openid
username.attribute.name=sub
role.attribute.name=admin_role
role.admin=admin
role.cryptoManager=cryptoadmin
role.userAdmin=useradmin
role.expressionAdmin=expressionadmin
role.dataCollectionAdmin=datacollectionadmin
-
Configure the
pf.console.authenticationparameter in the<pf_install>/pingfederate/bin/run.propertiesfile as follows:pf.console.authentication=oidc -
Restart your PingFederate server.