Configuring a JWT Token Processor 2.0 instance
The PingFederate Security Token Service (STS) provides validation for any JSON Web Token (JWT).
Before you begin
Use the Type tab on the Create Token Processor Instance page to begin configuring a JWT Token Processor 2.0 instance. Learn more in Selecting a token processor type.
About this task
The following procedure describes how to use the Instance Configuration tab on the Create Token Processor Instance window to continue configuring a JWT token processor 2.0 instance.
This feature supports the OAuth 2.0 Token Exchange and WS Trust specifications. JWT token processor 2.0 offers more functions than does JWT token processor 1.2.
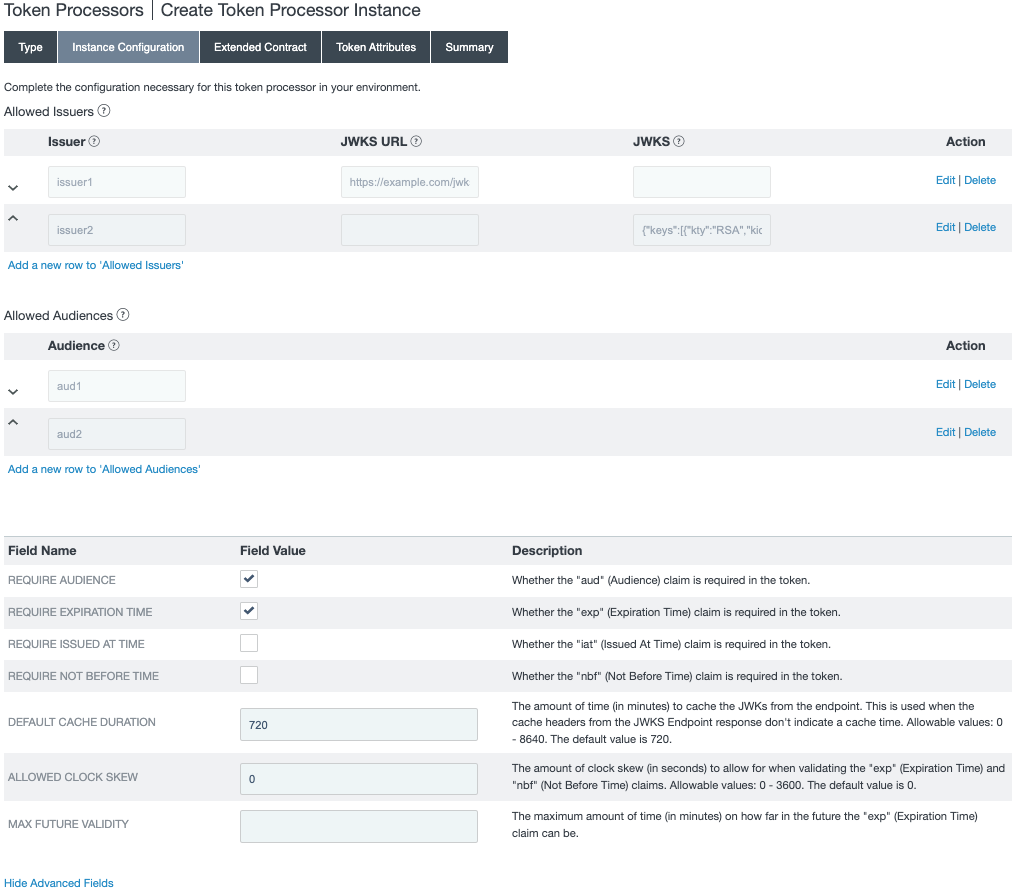
Screenshot of the Instance Configuration tab for a JWT token processor 2.0
Steps
-
On the Create Token Processor Instance page, go to the Instance Configuration tab.
-
In the Issuer field, enter the name of an allowed issuer.
-
Choose one of the following:
Choose from:
-
In the JWKS URL field, enter a JWKS URL.
-
In the JWKS field, paste a JWKS JSON object. The object should have the following format:
    {
      "keys": [
         {
            "kty": "RSA",
            "kid": "1",
            "use": "sig",
            "n": "t7jW8PvJRA7qo4N4dY7JZt1vNtLX9SdRyV1ytW8Fv2jKgGJfRdKjSNWZIvA2fO3efrjzb35LTUpatb0x6OcTjID0J6YwO6UZQL0xfDeX9jK78B2JGpxShsC-VzHf2ggn_rBBFBRHvLcZlGSlpjOyh7X9dNIx-rKjyZH8OYdY7db4nxHzvZt7S9jkG5Qh7Kol8F1JwYjGIVf03QmUR-yWZnGGFJbP9oEJMW_kRWVCn_-Ic6wgK1NIDJFjjUZP6oZgQzAjbAULNV1sHsMYyrDTyOAc_26fTJp6MLDeUZ_iO8jKkrrgXsDxUnsztOeHOrGnvMw",
            "e": "AQAB"
          }
      ]
    }
PingFederate uses the JWKS or JWKS URL to get the validation keys for the issuer.
-
-
Specify one or more Allowed Audiences.
This setting is optional unless you select the Require Audience checkbox.
-
Specify which of the following token claims are required:
-
Audience (
aud) -
Expiration time (
exp) -
Issued at time (
iat) -
Not before time (
nbf)By default, the
audandexpclaims are required, and theiatandnbfclaims are not required.
-
-
(Optional) Click Show Advanced Fields and change the default value for any of the following settings:
-
Default Cache Configuration, which sets the number of minutes to cache the JWKS
This feature affects JWKS caching only when you specify a JWKS URL for an Allowed Issuer and the JWKS URL response doesn’t indicate a cache time. This feature doesn’t apply when you specify a JWKS for an allowed issuer.
-
Allowed Clock Skew for
expandnbfclaims -
Max Future Validity, which limits the lifetime of the token
-
-
Click Save.
Next steps
After selecting the token processor type, go to the Extended Contract tab to continue configuring the token processor instance. Learn more in Extending a token processor contract.