Maintenance guide
ForgeRock® Identity Platform serves as the basis for our simple and comprehensive Identity and Access Management solution. We help our customers deepen their relationships with their customers, and improve the productivity and connectivity of their employees and partners. For more information about ForgeRock and about the platform, see https://www.forgerock.com.
This guide describes tasks and configurations you might repeat throughout the life cycle of a deployment in your organization. It is for people who maintain IG services for their organization.
Switching from development mode to production mode
IG operates in development mode and production mode, as defined inDevelopment Mode and Production Mode.
After installation, IG is by default in production mode. While you evaluate IG or develop routes, it can be helpful to switch to development mode as described in Switching from production mode to development mode. However, after deployment it is essential to switch back to production mode to prevent unwanted changes to the configuration.
-
In
$HOME/.openig/config/admin.json(on Windows,%appdata%\OpenIG\config), change the value ofmodefromDEVELOPMENTtoPRODUCTION:{ "mode": "PRODUCTION" }jsonThe file changes the operating mode from development mode to production mode. For more information about the
admin.jsonfile, see AdminHttpApplication (admin.json).The value set in
admin.jsonoverrides any value set by theig.run.modeconfiguration token when it is used in an environment variable or system property. For information aboutig.run.mode, see Configuration Tokens. -
(Optional) Prevent routes from being reloaded after startup:
-
To prevent all routes in the configuration from being reloaded, add a
config.jsonas described in the Getting started, and configure thescanIntervalproperty of the main Router. -
To prevent individual routes from being reloaded, configure the
scanIntervalof the routers in those routes.{ "type": "Router", "config": { "scanInterval": "disabled" } }json
For more information, see Router.
-
-
Restart IG.
When IG starts up, the route endpoints are not displayed in the logs, and are not available. You can’t access Studio on http://ig.example.com:8080/openig/studio.
Auditing your deployment
The following sections describe how to set up auditing for your deployment. For information about how to include user ID in audit logs, see Recording User ID in Audit Events.
For information about the audit framework and each event handler, see Audit framework.
Record access audit events in CSV
This section describes how to record access audit events in a CSV file, using tamper-evident logging. For information about the CSV audit event handler, see CsvAuditEventHandler.
|
The CSV handler does not sanitize messages when writing to CSV log files. Do not open CSV logs in spreadsheets or other applications that treat data as code. |
Before you start, prepare IG and the sample application as described in the Getting started.
-
Set up secrets for tamper-evident logging:
-
Locate a directory for secrets, and go to it:
$ cd /path/to/secretsbash -
Generate a key pair in the keystore.
The CSV event handler expects a JCEKS-type keystore with a key alias of
signaturefor the signing key, where the key is generated with theRSAkey algorithm and theSHA256withRSAsignature algorithm:$ keytool \ -genkeypair \ -keyalg RSA \ -sigalg SHA256withRSA \ -alias "signature" \ -dname "CN=ig.example.com,O=Example Corp,C=FR" \ -keystore audit-keystore \ -storetype JCEKS \ -storepass password \ -keypass passwordbashBecause keytool converts all characters in its key aliases to lowercase, use only lowercase in alias definitions of a KeyStore. -
Generate a secret key in the keystore.
The CSV event handler expects a JCEKS-type keystore with a key alias of
csv-key-2for the symmetric key, where the key is generated with theHmacSHA256key algorithm and 256-bit key size:$ keytool \ -genseckey \ -keyalg HmacSHA256 \ -keysize 256 \ -alias "password" \ -keystore audit-keystore \ -storetype JCEKS \ -storepass password \ -keypass passwordbash -
Verify the content of the keystore:
$ keytool \
 -list \
 -keystore audit-keystore \
 -storetype JCEKS \
 -storepass password

Keystore type: JCEKS
Keystore provider: SunJCE

Your keystore contains 2 entries

signature, ... PrivateKeyEntry,
Certificate fingerprint (SHA1): 4D:...:D1
password, ... SecretKeyEntry,
bash
-
-
Add the following route to IG, replacing
/path/to/secrets/audit-keystorewith your path:-
Linux
-
Windows
$HOME/.openig/config/routes/30-csv.json
%appdata%\OpenIG\config\routes\30-csv.json
{ "name": "30-csv", "baseURI": "http://app.example.com:8081", "condition": "${find(request.uri.path, '^/home/csv-audit')}", "heap": [ { "name": "AuditService", "type": "AuditService", "config": { "eventHandlers": [ { "class": "org.forgerock.audit.handlers.csv.CsvAuditEventHandler", "config": { "name": "csv", "logDirectory": "/tmp/logs", "security": { "enabled": "true", "filename": "/path/to/secrets/audit-keystore", "password": "password", "signatureInterval": "1 day" }, "topics": [ "access" ] } } ], "config": { } } } ], "auditService": "AuditService", "handler": "ForgeRockClientHandler" }jsonThe route calls an audit service configuration for publishing log messages to the CSV file,
/tmp/logs/access.csv.When a request matches
audit, audit events are logged to the CSV file.The route uses the
ForgeRockClientHandleras its handler, to send theX-ForgeRock-TransactionIdheader with its requests to external services. -
-
Go to http://ig.example.com:8080/home/csv-audit.
The home page of the sample application is displayed, and the file
/tmp/logs/tamper-evident-access.csvis updated.
Recording access audit events with a JMS audit event handler
|
This procedure is an example of how to record access audit events with a JMS audit event handler configured to use the ActiveMQ message broker. This example is not tested on all configurations, and can be more or less relevant to your configuration. |
For information about configuring the JMS event handler, see JmsAuditEventHandler.
Before you start, prepare IG as described in the Getting started.
-
Download the following files:
-
ActiveMQ binary. IG is tested with ActiveMQ Classic 5.15.11.
-
ActiveMQ Client. Use a version that corresponds to your ActiveMQ version.
-
-
Add the files to the configuration:
-
For IG in standalone mode, create the directory
$HOME/.openig/extra, where$HOME/.openigis the instance directory, and add .jar files to the directory. -
For IG in web container mode, add .jar files to the web container classpath. For example, in Jetty use
/path/to/jetty/webapps/ROOT/WEB-INF/lib.
-
-
Create a consumer that subscribes to the
audittopic.From the ActiveMQ installation directory, run the following command:
$ ./bin/activemq consumer --destination topic://auditbash -
Add the following route to IG:
-
Linux
-
Windows
$HOME/.openig/config/routes/30-jms.json
%appdata%\OpenIG\config\routes\30-jms.json
{ "name": "30-jms", "MyCapture" : "all", "baseURI": "http://app.example.com:8081", "condition" : "${request.uri.path == '/activemq_event_handler'}", "heap": [ { "name": "AuditService", "type": "AuditService", "config": { "eventHandlers" : [ { "class" : "org.forgerock.audit.handlers.jms.JmsAuditEventHandler", "config" : { "name" : "jms", "topics": [ "access" ], "deliveryMode" : "NON_PERSISTENT", "sessionMode" : "AUTO", "jndi" : { "contextProperties" : { "java.naming.factory.initial" : "org.apache.activemq.jndi.ActiveMQInitialContextFactory", "java.naming.provider.url" : "tcp://am.example.com:61616", "topic.audit" : "audit" }, "topicName" : "audit", "connectionFactoryName" : "ConnectionFactory" } } } ], "config" : { } } } ], "auditService": "AuditService", "handler" : { "type" : "StaticResponseHandler", "config" : { "status" : 200, "headers" : { "Content-Type" : [ "text/plain; charset=UTF-8" ] }, "entity" : "Message from audited route" } } }jsonWhen a request matches the
/activemq_event_handlerroute, this configuration publishes JMS messages containing audit event data to an ActiveMQ managed JMS topic, and the StaticResponseHandler displays a message. -
-
Access the route on http://ig.example.com:8080/activemq_event_handler.
Depending on how ActiveMQ is configured, audit events are displayed on the ActiveMQ console or written to file.
Recording access audit events with a JSON audit event handler
This section describes how to record access audit events with a JSON audit event handler. For information about configuring the JSON event handler, see JsonAuditEventHandler.
-
Add the following route to IG:
-
Linux
-
Windows
$HOME/.openig/config/routes/30-json.json
%appdata%\OpenIG\config\routes\30-json.json
{ "name": "30-json", "baseURI": "http://app.example.com:8081", "condition": "${find(request.uri.path, '^/home/json-audit')}", "heap": [ { "name": "AuditService", "type": "AuditService", "config": { "eventHandlers": [ { "class": "org.forgerock.audit.handlers.json.JsonAuditEventHandler", "config": { "name": "json", "logDirectory": "/tmp/logs", "topics": [ "access" ], "rotationRetentionCheckInterval": "1 minute", "buffering": { "maxSize": 100000, "writeInterval": "100 ms" } } } ] } } ], "auditService": "AuditService", "handler": "ReverseProxyHandler" }jsonNotice the following features of the route:
-
The route calls an audit service configuration for publishing log messages to the JSON file,
/tmp/audit/access.audit.json. When a request matches/home/json-audit, a single line per audit event is logged to the JSON file. -
The route uses the
ForgeRockClientHandleras its handler, to send theX-ForgeRock-TransactionIdheader with its requests to external services.
-
-
Go to http://ig.example.com:8080/home/json-audit.
The home page of the sample application is displayed and the file
/tmp/logs/access.audit.jsonis created or updated with a message. The following example message is formatted for easy reading, but it is produced as a single line for each event:{ "_id": "830...-41", "timestamp": "2019-...540Z", "eventName": "OPENIG-HTTP-ACCESS", "transactionId": "830...-40", "client": { "ip": "0:0:0:0:0:0:0:1", "port": 51666 }, "server": { "ip": "0:0:0:0:0:0:0:1", "port": 8080 }, "http": { "request": { "secure": false, "method": "GET", "path": "http://ig.example.com:8080/home/json-audit", "headers": { "accept": ["text/html,application/xhtml+xml,application/xml;q=0.9,/;q=0.8"], "host": ["ig.example.com:8080"], "user-agent": ["Mozilla/5.0 ... Firefox/66.0"] } } }, "response": { "status": "SUCCESSFUL", "statusCode": "200", "elapsedTime": 212, "elapsedTimeUnits": "MILLISECONDS" } }json
Recording access audit events to standard output
This section describes how to record access audit events to standard output. For more information about the event handler, see JsonStdoutAuditEventHandler.
Before you start, prepare IG and the sample application as described in the Getting started.
-
Add the following route to IG:
-
Linux
-
Windows
$HOME/.openig/config/routes/30-jsonstdout.json
%appdata%\OpenIG\config\routes\30-jsonstdout.json
{ "name": "30-jsonstdout", "baseURI": "http://app.example.com:8081", "condition": "${find(request.uri.path, '^/home/jsonstdout-audit')}", "heap": [ { "name": "AuditService", "type": "AuditService", "config": { "eventHandlers": [ { "class": "org.forgerock.audit.handlers.json.stdout.JsonStdoutAuditEventHandler", "config": { "name": "jsonstdout", "elasticsearchCompatible": false, "topics": [ "access" ] } } ], "config": {} } } ], "auditService": "AuditService", "handler": "ReverseProxyHandler" }jsonNotice the following features of the route:
-
The route matches requests to
/home/jsonstdout-audit. -
The route calls the audit service configuration for publishing access log messages to standard output. When a request matches
/home/jsonstdout-audit, a single line per audit event is logged.
-
-
Go to http://ig.example.com:8080/home/jsonstdout-audit.
The home page of the sample application is displayed, and a message like this is published to standard output:
{
  "_id": "830...-61",
  "timestamp": "2019-...89Z",
  "eventName": "OPENIG-HTTP-ACCESS",
  "transactionId": "830...-60",
  "client": {
    "ip": "0:0:0:0:0:0:0:1",
    "port": 51876
  },
  "server": {
    "ip": "0:0:0:0:0:0:0:1",
    "port": 8080
  },
  "http": {
    "request": {
      "secure": false,
      "method": "GET",
      "path": "http://ig.example.com:8080/home/jsonstdout-audit",
      "headers": {
        "accept": ["text/html,application/xhtml+xml,application/xml;q=0.9,/;q=0.8"],
        "host": ["ig.example.com:8080"],
        "user-agent": ["Mozilla/5.0 ... Firefox/66.0"]
      }
    }
  },
  "response": {
    "status": "SUCCESSFUL",
    "statusCode": "200",
    "elapsedTime": 10,
    "elapsedTimeUnits": "MILLISECONDS"
  },
  "source": "audit",
  "topic": "access",
  "level": "INFO"
}
json
Trusting transaction IDs from other products
Each audit event is identified by a unique transaction ID that can be communicated across products and recorded for each local event. By using the transaction ID, requests can be tracked as they traverse the platform, making it easier to monitor activity and to enrich reports.
The X-ForgeRock-TransactionId header is automatically set in all outgoing HTTP
calls from one ForgeRock product to another. Customers can also set this header
themselves from their own applications or scripts that call into the
ForgeRock Identity Platform.
To reduce the risk of malicious attacks, by default IG does not trust transaction ID headers from client applications.
If you trust the transaction IDs sent by your client applications, consider
setting Java system property org.forgerock.http.TrustTransactionHeader to
true. All incoming X-ForgeRock-TransactionId headers are trusted, and
monitoring or reporting systems that consume the logs can allow requests to be
correlated as they traverse multiple servers:
-
When IG is running in standalone mode, add the following system property in
env.sh:# Specify a JVM option TX_HEADER_OPT="-Dorg.forgerock.http.TrustTransactionHeader=true" # Include it into the JAVA_OPTS environment variable export JAVA_OPTS="${TX_HEADER_OPT}"bash -
When IG is running in web container mode, set a Java system property. For information, see the container documentation.
Safelisting audit event fields for the logs
To prevent logging of sensitive data for an audit event, the Common Audit Framework uses a safelist to specify which audit event fields appear in the logs.
By default, only safelisted audit event fields are included in the logs. For information about how to include non-safelisted audit event fields, or exclude safelisted audit event fields, see Including or Excluding Audit Event Fields In Logs.
Audit event fields use JSON pointer notation, and are taken from the JSON schema for the audit event content. The following event fields are safelisted:
-
/_id -
/timestamp -
/eventName -
/transactionId -
/trackingIds -
/userId -
/client -
/server -
/http/request/secure -
/http/request/method -
/http/request/path -
/http/request/headers/accept -
/http/request/headers/accept-api-version -
/http/request/headers/content-type -
/http/request/headers/host -
/http/request/headers/user-agent -
/http/request/headers/x-forwarded-for -
/http/request/headers/x-forwarded-host -
/http/request/headers/x-forwarded-port -
/http/request/headers/x-forwarded-proto -
/http/request/headers/x-original-uri -
/http/request/headers/x-real-ip -
/http/request/headers/x-request-id -
/http/request/headers/x-requested-with -
/http/request/headers/x-scheme -
/request -
/response
Including or excluding audit event fields in logs
The safelist is designed to prevent logging of sensitive data for audit events by specifying which audit event fields appear in the logs. You can add or remove messages from the logs as follows:
-
To include audit event fields in logs that are not safelisted, configure the
includeIfproperty of AuditService.Before you include non-safelisted audit event fields in the logs, consider the impact on security. Including some headers, query parameters, or cookies in the logs could cause credentials or tokens to be logged, and allow anyone with access to the logs to impersonate the holder of these credentials or tokens. -
To exclude safelisted audit event fields from the logs, configure the
excludeIfproperty of AuditService. For an example, see Exclude Safelisted Audit Event Fields From Logs.
-
Set up recording for audit events, as described in Recording Access Audit Events in JSON, and note the audit event fields in the log file
access.audit.json. -
Replace the route
30-json.jsonwith the following route:{ "name": "30-json-excludeif", "baseURI": "http://app.example.com:8081", "condition": "${find(request.uri.path, '^/home/json-audit-excludeif$')}", "heap": [ { "name": "AuditService", "type": "AuditService", "config": { "config": { "filterPolicies": { "field": { "excludeIf": [ "/access/http/request/headers/host", "/access/http/request/path", "/access/server", "/access/response" ] } } }, "eventHandlers": [ { "class": "org.forgerock.audit.handlers.json.JsonAuditEventHandler", "config": { "name": "json", "logDirectory": "/tmp/logs", "topics": [ "access" ], "rotationRetentionCheckInterval": "1 minute", "buffering": { "maxSize": 100000, "writeInterval": "100 ms" } } } ] } } ], "auditService": "AuditService", "handler": "ReverseProxyHandler" }jsonNotice that the AuditService is configured with an
excludeIfproperty to exclude audit event fields from the logs. -
Go to http://ig.example.com:8080/home/json-audit-excludeif.
The home page of the sample application is displayed and the file
/tmp/logs/access.audit.jsonis updated:{ "_id": "830...-41", "timestamp": "2019-...540Z", "eventName": "OPENIG-HTTP-ACCESS", "transactionId": "830...-40", "client": { "ip": "0:0:0:0:0:0:0:1", "port": 51666 }, "http": { "request": { "secure": false, "method": "GET", "headers": { "accept": ["text/html,application/xhtml+xml,application/xml;q=0.9,*/*;q=0.8"], "user-agent": ["Mozilla/5.0 ... Firefox/66.0"] } } } }json -
Compare the audit event fields in
access.audit.jsonwith those produced in Recording Access Audit Events in JSON, and note that the audit event fields specified by theexcludeIfproperty no longer appear in the logs.
Recording user ID in audit events
The following sections provide examples of how to capture the AM user ID in audit logs.
Sample scripts are available in the openig-samples.jar file, to capture the
user ID after SSO, CDSSO, OpenID, or SAML authentication. The scripts inject the
user ID into the RequestAuditContext so that it is available when the audit event
is written.
Using the notes in the sample scripts, adapt the script for your deployment.
For example, configure which user_info field to capture in the audit event.
The audit service in these examples use a JsonStdoutAuditEventHandler, which writes audit events to standard output, but can be any other audit service.
Recording user ID in audit logs after SSO authentication
-
Set up SSO, as described in Authenticating with SSO.
-
Add the following script to IG:
-
Linux
-
Windows
$HOME/.openig/scripts/groovy/InjectUserIdSso.groovy
%appdata%\OpenIG\scripts\groovy\InjectUserIdSso.groovy
package scripts.groovy import org.forgerock.openig.openam.SsoTokenContext import org.forgerock.services.context.RequestAuditContext /** * Sample ScriptableFilter implementation to capture the user id from the session * and inject it into the RequestAuditContext for later use when the audit event * is written. * * This ScriptableFilter should be added in the filter chain at whatever point the * desired user id is available - e.g. on the session after SSO. * * "handler": { * "type": "Chain", * "config": { * "filters": [ { * "name": "SingleSignOnFilter-1", * "type": "SingleSignOnFilter", * "config": { * "amService": "AmService-1" * } * }, { * "type" : "ScriptableFilter", * "config" : { * "file" : "InjectUserIdSso.groovy", * "type": "application/x-groovy" * } * } * ], * "handler" : "ReverseProxyHandler", * } * * When using the SSO/ CDSSO flow then the SsoTokenContext is guaranteed to exist and * be populated if there was no error. The RequestAuditContext is also guaranteed to * be available. Note also that if the SessionInfoFilter is present in the route then * a SessionInfoContext would be available in the context chain and could be queried * for user info. * * Implementors may decide which user id field to capture in the audit event: * - The sessionInfo universalId - 'universalId' - is always available as * provided by AM and resembles - * e.g. "id=bonnie,ou=user,o=myrealm,ou=services,dc=openam,dc=forgerock,dc=org". * - The sessionInfo username - mapped to 'username') resembles - e.g. "bonnie". * Field 'username' should be preferred to 'uid', which also points to 'username'. * * Additional error handling may be required. * * @see RequestAuditContext * @see SsoTokenContext * @see org.forgerock.openig.openam.SessionInfoContext */ def requestAuditContext = context.asContext(RequestAuditContext.class) def ssoTokenContext = context.asContext(SsoTokenContext.class) // The sessionInfo 'universalId' is always available, though 'username' may be unknown requestAuditContext.setUserId(ssoTokenContext.universalId) // Propagate the request to the next filter/ handler in the chain next.handle(context, request)javaThe script captures the user ID after SSO or CDSSO authentication, and injects it into the RequestAuditContext so that it is available when the audit event is written.
-
-
Replace
sso.jsonwith the following route:-
Linux
-
Windows
$HOME/.openig/config/routes/audit-sso.json
%appdata%\OpenIG\config\routes\audit-sso.json
{ "name": "audit-sso", "baseURI": "http://app.example.com:8081", "condition": "${find(request.uri.path, '^/home/audit-sso$')}", "heap": [ { "name": "AuditService", "type": "AuditService", "config": { "eventHandlers": [ { "class": "org.forgerock.audit.handlers.json.stdout.JsonStdoutAuditEventHandler", "config": { "name": "jsonstdout", "elasticsearchCompatible": false, "topics": [ "access" ] } } ], "config": {} } }, { "name": "SystemAndEnvSecretStore-1", "type": "SystemAndEnvSecretStore" }, { "name": "AmService-1", "type": "AmService", "config": { "agent": { "username": "ig_agent", "passwordSecretId": "agent.secret.id" }, "secretsProvider": "SystemAndEnvSecretStore-1", "url": "http://am.example.com:8088/openam/", "version": "7.2" } } ], "auditService": "AuditService", "handler": { "type": "Chain", "config": { "filters": [ { "name": "SingleSignOnFilter-1", "type": "SingleSignOnFilter", "config": { "amService": "AmService-1" } }, { "type" : "ScriptableFilter", "config" : { "file" : "InjectUserIdSso.groovy", "type": "application/x-groovy" } } ], "handler": "ReverseProxyHandler" } } }jsonNotice the following features of the route compared to
sso.json:-
The route matches requests to
/home/audit-sso. -
An audit service is included to publish access log messages to standard output.
-
The chain includes a scriptable filter that refers to
InjectUserIdSso.groovy.
-
-
Test the setup
-
Log out of AM, and go to http://ig.example.com:8080/home/audit-sso. The SingleSignOnFilter redirects the request to AM for authentication.
-
Log in to AM as user
demo, passwordCh4ng31t, and then allow the application to access user information.The profile page of the sample application is displayed. The script captures the user ID from the session, and the audit service includes it with the audit event.
-
Search the standard output for a message like this, containing the user ID:
{
  "_id": "23a...-23",
  "timestamp": "...",
  "eventName": "OPENIG-HTTP-ACCESS",
  "transactionId": "23a...-22",
  "userId": "id=demo,ou=user,dc=openam,dc=forgerock,dc=org",
  "client": {
    "ip": "0:0:0:0:0:0:0:1",
    "port": 57843
  },
  "server": {
    "ip": "0:0:0:0:0:0:0:1",
    "port": 8080
  },
  "http": {
    "request": {
      "secure": false,
      "method": "GET",
      "path": "http://ig.example.com/home/audit-sso",
      "headers": {
        "accept": ["text/html,application/xhtml+xml,application/xml;q=0.9,image/webp,/;q=0.8"],
        "host": ["ig.example.com:8080"],
        "user-agent": [...]
      }
    }
  },
  "response": {
    "status": "SUCCESSFUL",
    "statusCode": "200",
    "elapsedTime": 276,
    "elapsedTimeUnits": "MILLISECONDS"
  },
  "source": "audit",
  "topic": "access",
  "level": "INFO"
}
json
-
Recording user ID in audit logs after OpenID connect authentication
-
Set up authentication, as described in Use AM as a single OpenID Connect provider.
-
Set up the script:
-
Add the following example script to IG:
-
Linux
-
Windows
$HOME/.openig/scripts/groovy/InjectUserIdOpenId.groovy
%appdata%\OpenIG\scripts\groovy\InjectUserIdOpenId.groovy
package scripts.groovy import org.forgerock.services.context.AttributesContext import org.forgerock.services.context.RequestAuditContext /** * Sample script implementation supporting user id injection in an OpenId scenario. * This sample captures the user id and injects it into the RequestAuditContext for * later use when the audit event is written. * * This ScriptableFilter should be added in the filter chain at whatever point the * desired user id is available - e.g. after OpenId client authentication (in the * OAuth2 authentication filter chain) - as follows: * * "handler" : { * "type" : "Chain", * "config" : { * "filters" : [ { * "type" : "OAuth2ClientFilter", * "config" : { * ... * "target" : "${attributes.target}", * "registrations" : [ "ClientRegistrationWithOpenIdScope" ], * } * }, { * "type" : "ScriptableFilter", * "config" : { * "file" : "InjectUserIdOpenId.groovy", * "type": "application/x-groovy" * } * } ], * "handler" : "display-user-info-groovy-handler" * } * } * * The ClientRegistration associated with the above OAuth2ClientFilter config will * require the 'openid' scope. The OAuth2SessionContext is guaranteed to exist and * be populated on successful authentication. The userinfo will then be populated * according to the OAuth2ClientFilter OpenId 'target' configuration (e.g. in this * sample, on the AttributesContext). The 'target' referenced will be populated * with a 'user_info' JSON value containing the userinfo. It should be noted that * the OAuth2ClientFilter 'target' config is a config-time expression, and cannot * be used in a ScriptableFilter to read runtime data. The RequestAuditContext is * also guaranteed to be available. * * Implementors may decide which 'user_info' field to capture in the audit event: * - The userinfo 'sub' field is the user's "complex" ID marked with a type - e.g. * "(usr!bonnie)". * - The userinfo 'subName' field is the user's username (or resource name) - e.g. * "bonnie". * - To capture the universalId (consistent with the session info universalId), * it is necessary to configure AM to provide it as a claim in the id-token. To * do this, edit the OIDC Claims Script to include the following line just prior * to the UserInfoClaims creation: * computedClaims["universalId"] = identity.universalId * - This will include 'universalId' in the userinfo which we can use with audit * e.g. "id=bonnie,ou=user,o=myrealm,ou=services,dc=openam,dc=forgerock,dc=org" * * Additional error handling may be required. * * @see RequestAuditContext * @see AttributesContext */ def requestAuditContext = context.asContext(RequestAuditContext.class) def attributesContext = context.asContext(AttributesContext.class) // The OAuth2ClientFilter captures userinfo based on its 'target' configuration. // In this sample 'target' is configured as the AttributesContext with key "target". // We can query this for 'user_info' values: 'sub', 'subName' or anything else // made available via the OIDC Claims Script (see above). def oauth2UserInfo = attributesContext.getAttributes().get("target") requestAuditContext.setUserId(oauth2UserInfo.get("user_info").get("sub")) // Propagate the request to the next filter/ handler in the chain next.handle(context, request)javaThe script captures the user ID from the AuthorizationCodeOAuth2ClientFilter
targetobject, by default at${attributes.openid}, and injects it into the RequestAuditContext so that it is available when the audit event is written. -
-
Edit the script to get the attributes from the
openidtarget:Replace
attributesContext.getAttributes().get("target")with
attributesContext.getAttributes().get("openid").
-
-
Replace
07-openid.jsonwith the following route:-
Linux
-
Windows
$HOME/.openig/config/routes/audit-oidc.json
%appdata%\OpenIG\config\routes\audit-oidc.json
{ "name": "audit-openid", "baseURI": "http://app.example.com:8081", "condition": "${find(request.uri.path, '^/home/id_token')}", "heap": [ { "name": "AuditService", "type": "AuditService", "config": { "eventHandlers": [ { "class": "org.forgerock.audit.handlers.json.stdout.JsonStdoutAuditEventHandler", "config": { "name": "jsonstdout", "elasticsearchCompatible": false, "topics": [ "access" ] } } ], "config": {} } }, { "name": "SystemAndEnvSecretStore-1", "type": "SystemAndEnvSecretStore" } ], "auditService": "AuditService", "handler": { "type": "Chain", "config": { "filters": [ { "name": "AuthorizationCodeOAuth2ClientFilter-1", "type": "AuthorizationCodeOAuth2ClientFilter", "config": { "clientEndpoint": "/home/id_token", "failureHandler": { "type": "StaticResponseHandler", "config": { "status": 500, "headers": { "Content-Type": [ "text/plain" ] }, "entity": "Error in OAuth 2.0 setup." } }, "registrations": [ { "name": "oidc-user-info-client", "type": "ClientRegistration", "config": { "clientId": "oidc_client", "clientSecretId": "oidc.secret.id", "issuer": { "name": "Issuer", "type": "Issuer", "config": { "wellKnownEndpoint": "http://am.example.com:8088/openam/oauth2/.well-known/openid-configuration" } }, "scopes": [ "openid", "profile", "email" ], "secretsProvider": "SystemAndEnvSecretStore-1", "tokenEndpointAuthMethod": "client_secret_basic" } } ], "requireHttps": false, "cacheExpiration": "disabled" } }, { "type" : "ScriptableFilter", "config" : { "file" : "InjectUserIdOpenId.groovy", "type": "application/x-groovy" } } ], "handler": "ReverseProxyHandler" } } }jsonNotice the following features of the route compared to
07-openid.json:-
An audit service is included to publish access log messages to standard output.
-
The chain includes a scriptable filter that refers to
InjectUserIdOpenId.groovy.
-
-
Test the setup
-
Log out of AM, and go to http://ig.example.com:8080/home/id_token. The AM login page is displayed.
-
Log in to AM as user
demo, passwordCh4ng31t, and then allow the application to access user information.The home page of the sample application is displayed. The script captures the user ID from the
openidtarget, and the audit service includes it with the audit event. -
Search the standard output for a message like this, containing the user ID:
{
  "_id": "b64...-25",
  "timestamp": "2021...",
  "eventName": "OPENIG-HTTP-ACCESS",
  "transactionId": "b64...-24",
  "userId": "(usr!demo)",
  "client": {
    "ip": "0:0:0:0:0:0:0:1",
    "port": 64443
  },
  "server": {
    "ip": "0:0:0:0:0:0:0:1",
    "port": 8080
  },
  "http": {
    "request": {
      "secure": false,
      "method": "GET",
      "path": "http://ig.example.com:8080/home/id_token",
      "headers": {
        "accept": ["text/html,application/xhtml+xml,application/xml;q=0.9,image/webp,/;q=0.8"],
        "host": ["ig.example.com:8080"],
        "user-agent": [...]
      }
    }
  },
  "response": {
    "status": "SUCCESSFUL",
    "statusCode": "200",
    "elapsedTime": 199,
    "elapsedTimeUnits": "MILLISECONDS"
  },
  "source": "audit",
  "topic": "access",
  "level": "INFO"
}
json
-
Recording user ID in audit logs after SAML authentication
-
Set up federation, as described in Set up federation with unsigned/unencrypted assertions.
-
Set up the script:
-
Add the following example script to IG:
-
Linux
-
Windows
$HOME/.openig/scripts/groovy/InjectUserIdSaml.groovy
%appdata%\OpenIG\scripts\groovy\InjectUserIdSaml.groovy
package scripts.groovy import org.forgerock.http.session.SessionContext import org.forgerock.services.context.RequestAuditContext /** * Sample ScriptableFilter implementation to capture the user id obtained from a * SAML assertion. The IG SamlFederationHandler captures this and locates it on * the SessionContext with the key as the configured SAML 2 user id key. We then * take this and inject it into the RequestAuditContext for later use when the * audit event is written. * * This ScriptableFilter should be added in the filter chain together with the * SamlFederationHandler, as follows. Note that the InjectUserIdSaml.groovy script * operates on the response, injecting the userId as captured by the handler. * * { * "condition" : "${matches(request.uri.path,'^/api/saml')}", * "handler" : { * "type" : "Chain", * "config" : { * "filters" : [ { * "type" : "ScriptableFilter", * "config" : { * "file" : "InjectUserIdSaml.groovy", * "type": "application/x-groovy" * } * } ], * "handler" : { * "name" : "saml_handler_SPOne", * "type" : "SamlFederationHandler", * "config" : { * "assertionMapping" : { * "SPOne_userName" : "uid", * "SPOne_password" : "mail" * }, * "redirectURI" : "/api/home", * "logoutURI" : "http://openig.example.com:8082/api/after_logout", * "subjectMapping" : "SubjectName_SPOne", * "authnContext" : "AuthnContext_SPOne", * "sessionIndexMapping" : "SessionIndex_SPOne" * } * } * } * } * } * * The SessionContext and RequestAuditContext are guaranteed to be available and the * SessionContext will have been populated with userinfo on successful authentication. * * Implementors may decide which user id field to capture in the audit event: * - This should be based on SAML attribute mappings and/ or the subject mapping (if * transient names are not used). * - Other attributes are available, such as 'uid' and 'userName', though it must be * noted that there is an expectation that the IDP makes available the user id. * - In this sample, 'SPOne_userName' maps to the 'uid'. * * Additional error handling may be required. * * @see RequestAuditContext * @see SessionContext */ // Propagate the request to the next filter/ handler in the chain next.handle(context, request) .then({ response -> def requestAuditContext = context.asContext(RequestAuditContext.class) def sessionContext = context.asContext(SessionContext.class) // Inject the user id as captured by the SamlFederationHandler requestAuditContext.setUserId(sessionContext.getSession().get("SPOne_userName")) return response })javaThe script captures the user ID from the SessionContext subject or attribute mappings, provided by the SamlFederationHandler from the inbound assertions. It injects the user ID into the RequestAuditContext so that it is available when the audit event is written.
-
-
Replace
get("SPOne_userName"))withget("username")).The script captures the user ID from the assertionMapping
username, which is mapped in the route tocn.
-
-
Replace
saml.jsonwith the following route:-
Linux
-
Windows
$HOME/.openig/config/routes/audit-saml.json
%appdata%\OpenIG\config\routes\audit-saml.json
{ "name": "audit-saml", "condition": "${find(request.uri.path, '^/saml')}", "session": "JwtSession", "heap": [ { "name": "AuditService", "type": "AuditService", "config": { "eventHandlers": [ { "class": "org.forgerock.audit.handlers.json.stdout.JsonStdoutAuditEventHandler", "config": { "name": "jsonstdout", "elasticsearchCompatible": false, "topics": [ "access" ] } } ], "config": {} } } ], "auditService": "AuditService", "handler": { "type": "Chain", "config": { "filters": [ { "type" : "ScriptableFilter", "config" : { "file" : "InjectUserIdSaml.groovy", "type": "application/x-groovy" } } ], "handler": { "type": "SamlFederationHandler", "config": { "useOriginalUri": true, "assertionMapping": { "username": "cn", "password": "sn" }, "subjectMapping": "sp-subject-name", "redirectURI": "/home/federate" } } } } }jsonNotice the following features of the route compared to
saml.json:-
An audit service is included to publish access log messages to standard output.
-
The main Handler is a Chain, that includes a scriptable filter to refer to
InjectUserIdSaml.groovy. -
The script uses the assertionMapping
usernameto capture the user ID.
-
-
Test the setup
-
Log out of AM, and go to IDP-initiated SSO.
-
Log in to AM with username
demoand passwordCh4ng31t.IG returns the response page showing that the the demo user has logged in. The script captures the user ID from the session, and the audit service includes it with the audit event.
-
Search the standard output for a message like this, containing the user ID:
{
  "_id": "82f...-14",
  "timestamp": "2021-...",
  "eventName": "OPENIG-HTTP-ACCESS",
  "transactionId": "82f...-13",
  "userId": "demo",
  "client": {
    "ip": "0:0:0:0:0:0:0:1",
    "port": 60655
  },
  "server": {
    "ip": "0:0:0:0:0:0:0:1",
    "port": 8080
  },
  "http": {
    "request": {
      "secure": false,
      "method": "POST",
      "path": "http://sp.example.com:8080/saml/fedletapplication/metaAlias/sp",
      "headers": {
        "accept": ["text/html,application/xhtml+xml,application/xml;q=0.9,image/webp,/;q=0.8"],
        "content-type": ["application/x-www-form-urlencoded"],
        "host": ["sp.example.com:8080"],
        "user-agent": [...]
      }
    }
  },
  "response": {
    "status": "SUCCESSFUL",
    "statusCode": "302",
    "elapsedTime": 2112,
    "elapsedTimeUnits": "MILLISECONDS"
  },
  "source": "audit",
  "topic": "access",
  "level": "INFO"
}
json
-
Monitoring services
The following sections describe how to set up and maintain monitoring in your deployment, to ensure appropriate performance and service availability:
Access the monitoring endpoints
All ForgeRock products automatically expose a monitoring endpoint to expose metrics in a standard Prometheus format, and as a JSON format monitoring resource.
In IG, metrics are available for each router, subrouter, and route in the configuration. When a TimerDecorator is configured, timer metrics are also available.
For information about IG monitoring endpoints and available metrics, see Monitoring.
Monitor at the Prometheus Scrape Endpoint
All ForgeRock products automatically expose a monitoring endpoint where Prometheus can scrape metrics, in a standard Prometheus format.
When IG is set up as described in the Getting started, the Prometheus Scrape Endpoint is available at http://ig.example.com:8080/openig/metrics/prometheus.
By default, no special setup or configuration is required to access metrics at this endpoint. The following example queries the Prometheus Scrape Endpoint for a route.
Tools such as Grafana are available to create customized charts and graphs based on the information collected by Prometheus. For more information on installing and running Grafana, see the Grafana website.
-
Add the following route to IG:
-
Linux
-
Windows
$HOME/.openig/config/routes/myroute1.json
%appdata%\OpenIG\config\routes\myroute1.json
{ "name": "myroute1", "handler": { "type": "StaticResponseHandler", "config": { "status": 200, "headers": { "Content-Type": [ "text/plain; charset=UTF-8" ] }, "entity": "Hello world, from myroute1!" } }, "condition": "${find(request.uri.path, '^/myroute1')}" }jsonThe route contains a StaticResponseHandler to display a simple message.
-
-
Access the route a few times, on http://ig.example.com:8080/myroute1.
-
Query the Prometheus Scrape Endpoint:
$ curl "http://ig.example.com:8080/openig/metrics/prometheus"bashMetrics for
myroute1and_routerare displayed:# HELP ig_router_deployed_routes Generated from Dropwizard metric import (metric=gateway._router.deployed-routes, type=gauge) # TYPE ig_router_deployed_routes gauge ig_router_deployed_routes{fully_qualified_name="gateway._router",heap="gateway",name="_router",} 1.0 # HELP ig_route_request_active Generated from Dropwizard metric import (metric=gateway._router.route.default.request.active, type=gauge) # TYPE ig_route_request_active gauge ig_route_request_active{name="default",route="default",router="gateway._router",} 0.0 # HELP ig_route_request_active Generated from Dropwizard metric import (metric=gateway._router.route.myroute1.request.active, type=gauge) # TYPE ig_route_request_active gauge ig_route_request_active{name="myroute1",route="myroute1",router="gateway._router",} 0.0 # HELP ig_route_request_total Generated from Dropwizard metric import (metric=gateway._router.route.default.request, type=counter) # TYPE ig_route_request_total counter ig_route_request_total{name="default",route="default",router="gateway._router",} 0.0 # HELP ig_route_response_error Generated from Dropwizard metric import (metric=gateway._router.route.default.response.error, type=counter) # TYPE ig_route_response_error counter ig_route_response_error{name="default",route="default",router="gateway._router",} 0.0 # HELP ig_route_response_null Generated from Dropwizard metric import (metric=gateway._router.route.default.response.null, type=counter) # TYPE ig_route_response_null counter ig_route_response_null{name="default",route="default",router="gateway._router",} 0.0 # HELP ig_route_response_status_total Generated from Dropwizard metric import (metric=gateway._router.route.default.response.status.client_error, type=counter) # TYPE ig_route_response_status_total counter ig_route_response_status_total{family="client_error",name="default",route="default",router="gateway._router",} 0.0 ...In standalone mode, Vert.x monitoring is enabled by default to provide additional metrics for HTTP, TCP, and the internal component pool. The metrics provide low-level information about requests and responses, such as the number of bytes, duration, the number of concurrent requests, and so on.
Monitor the Common REST Monitoring Endpoint
All ForgeRock products expose a monitoring endpoint where metrics are exposed as a JSON format monitoring resource.
When IG is set up as described in Getting started, the Common REST Monitoring Endpoint is available at http://ig.example.com:8080/openig/metrics/api?_prettyPrint=true&_sortKeys=_id&_queryFilter=true
By default, no special setup or configuration is required to access metrics at this endpoint. The following example queries the Common REST Monitoring Endpoint for a route, and restricts the query to specific metrics only.
Before you start, prepare IG as described in the Getting started.
-
Set up IG and some example routes, as described in the first few steps of Monitor the Prometheus Scrape Endpoint.
-
Query the Common REST Monitoring Endpoint:
$ curl "http://ig.example.com:8080/openig/metrics/api?_prettyPrint=true&_sortKeys=_id&_queryFilter=true"bashMetrics for
myroute1and_routerare displayed:{ "result" : [ { "_id" : "gateway._router.deployed-routes", "value" : 1.0, "_type" : "gauge" }, { "_id" : "gateway._router.route.default.request", "count" : 204, "_type" : "counter" }, { "_id" : "gateway._router.route.default.request.active", "value" : 0.0, "_type" : "gauge" }, { . . . _id" : "gateway._router.route.myroute1.response.status.unknown", "count" : 0, "_type" : "counter" }, { "_id" : "gateway._router.route.myroute1.response.time", "count" : 204, "max" : 0.420135, "mean" : 0.08624678327176545, "min" : 0.045079999999999995, "p50" : 0.070241, "p75" : 0.096049, "p95" : 0.178534, "p98" : 0.227217, "p99" : 0.242554, "p999" : 0.420135, "stddev" : 0.046611762381930474, "m15_rate" : 0.2004491450567003, "m1_rate" : 2.8726563452698075, "m5_rate" : 0.5974045160056258, "mean_rate" : 0.010877725092634833, "duration_units" : "milliseconds", "rate_units" : "calls/second", "total" : 17.721825, "_type" : "timer" } ], "resultCount" : 11, "pagedResultsCookie" : null, "totalPagedResultsPolicy" : "EXACT", "totalPagedResults" : 11, "remainingPagedResults" : -1 }jsonIn standalone mode, Vert.x monitoring is enabled by default to provide additional metrics for HTTP, TCP, and the internal component pool. The metrics provide low-level information about requests and responses, such as the number of bytes, duration, the number of concurrent requests, and so on.
-
Change the query to access metrics only for
myroute1: http://ig.example.com:8080/openig/metrics/api?_prettyPrint=true&_sortKeys=_id&_queryFilter=_id+sw+"gateway._router.route.myroute1";.Note that metric for the router,
"_id" : "gateway._router.deployed-routes", is no longer displayed.
Monitor Vert.x metrics
Supported only for IG in standalone mode.
In standalone mode, Vert.x monitoring is enabled by default to provide metrics for HTTP, TCP, and the internal component pool. The metrics provide low-level information about requests and responses, such as the number of bytes, duration, the number of concurrent requests, and so on.
To disable Vert.x monitoring, add the following lines to admin.json, and
restart IG:
{
  "vertx": {
    "metricsEnabled": false
  }
}For more information, see AdminHttpApplication (admin.json).
Protect monitoring endpoints
By default, no special credentials or privileges are required for read-access to the Prometheus Scrape Endpoint and Common REST Monitoring Endpoint.
To protect the monitoring endpoints, add an admin.json file to your
configuration, with a filter declared in the heap and named
MetricsProtectionFilter. The following procedure gives an example of how to
manage access to the monitoring endpoints.
-
Add the following script to the IG configuration as
$HOME/.openig/scripts/groovy/BasicAuthResourceServerFilter.groovy(on Windows,%appdata%\OpenIG\scripts\groovy\BasicAuthResourceServerFilter.groovy):/* * This script is a simple implementation of HTTP basic access authentication on * server side. * It expects the following arguments: * - realm: the realm to display when the user-agent prompts for * username and password if none were provided. * - username: the expected username * - password: the expected password */ import static org.forgerock.util.promise.Promises.newResultPromise; import java.nio.charset.Charset; import org.forgerock.util.encode.Base64; String authorizationHeader = request.getHeaders().getFirst("Authorization"); if (authorizationHeader == null) { // No credentials provided, reply that they are needed. Response response = new Response(Status.UNAUTHORIZED); response.getHeaders().put("WWW-Authenticate", "Basic realm=\"" + realm + "\""); return newResultPromise(response); } String expectedAuthorization = "Basic " + Base64.encode((username + ":" + password).getBytes(Charset.defaultCharset())) if (!expectedAuthorization.equals(authorizationHeader)) { return newResultPromise(new Response(Status.FORBIDDEN)); } // Credentials are as expected, let's continue return next.handle(context, request);groovyThe script is a simple implementation of the HTTP basic access authentication scheme.
For information about scripting filters and handlers, see Extend IG.
-
Add the following route to IG:
-
Linux
-
Windows
$HOME/.openig/config/admin.json
%appdata%\OpenIG\config\admin.json
-
Standalone mode
-
Web container mode
{ "prefix": "openig", "connectors": [ { "port": 8080 } ], "heap": [ { "name": "ClientHandler", "type": "ClientHandler" }, { "name": "MetricsProtectionFilter", "type": "ScriptableFilter", "config": { "type": "application/x-groovy", "file": "BasicAuthResourceServerFilter.groovy", "args": { "realm": "/", "username": "metric", "password": "password" } } } ] }json{ "heap": [{ "name": "ClientHandler", "type": "ClientHandler" }, { "name": "MetricsProtectionFilter", "type": "ScriptableFilter", "config": { "type": "application/x-groovy", "file": "BasicAuthResourceServerFilter.groovy", "args": { "realm": "/", "username": "metric", "password": "password" } } }], "prefix": "openig" }json -
-
Restart IG to reload the configuration.
Managing sessions
For information about IG sessions, see Sessions. Change IG session properties in the following ways:
| Mode | To change the session properties |
|---|---|
Stateless sessions in standalone mode and web container mode |
Configure the JwtSession object in the route that processes a request, or in its ascending configuration. For example, define the json |
Stateful sessions in standalone mode |
Change the For example, add the following lines to json |
Stateful session in web container mode |
Change the configuration for the session cookie in the container, and restart IG. For example, add the following lines in Tomcat’s
xml |
Managing logs
Log messages in IG and third-party dependencies are recorded using
the Logback implementation of the Simple Logging Facade for Java (SLF4J) API.
The following log levels are supported: TRACE, DEBUG, INFO, WARN,
ERROR, ALL, and OFF. For a full description of the options for logging, see
the Logback website.
Default logging behavior
By default, log messages are recorded with the following configuration:
-
When IG starts, log messages for IG and third-party dependencies, such as the ForgeRock Common Audit framework, are displayed on the console and written to
$HOME/.openig/logs/route-system.log, where$HOME/.openigis the instance directory. -
When a route is accessed, log messages for requests and responses passing through the route are written to a log file in
$HOME/.openig/logs, and named by the route name or filename, where$HOME/.openigis the instance directory.For more information, see Capturing Log Messages for Routes and CaptureDecorator.
-
By default, log messages with the level
INFOor higher are recorded, with the titles and the top line of the stack trace. Messages on the console are highlighted with a color related to their log level.
The content and format of logs in IG is defined by the reference
logback.xml delivered with IG. This file defines the
following configuration items for logs:
-
A root logger to set the overall log level, and to write all log messages to the
SIFTandSTDOUTappenders. -
A
STDOUTappender to define the format of log messages on the console. -
A
SIFTappender to separate log messages according to the keyrouteId, to define when log files are rolled, and to define the format of log messages in the file. -
An exception logger, called
LogAttachedExceptionFilter, to write log messages for exceptions attached to responses.
<?xml version="1.0" encoding="UTF-8"?>
<configuration>

  <!--
    Prevent log flow attacks, by limiting repeated log messages.

    Configuration properties:
     * AllowedRepetitions (int): Threshold above which repeated messages are no longer logged.
     * CacheSize (int): When CacheSize is reached, remove the oldest entry.
  -->
  <!--<turboFilter class="ch.qos.logback.classic.turbo.DuplicateMessageFilter" />-->

  <!-- Allow configuration of JUL loggers within this file, without performance impact -->
  <contextListener class="ch.qos.logback.classic.jul.LevelChangePropagator" />

  <appender name="STDOUT" class="ch.qos.logback.core.ConsoleAppender">
    <encoder>
      <pattern>%nopex[%thread] %highlight(%-5level) %boldWhite(%logger{35}) @%mdc{routeId:-system} - %replace(%message){'([\r\n])(.)', '$1[CONTINUED]$2'}%n%highlight(%replace(%rootException{short}){'(^|[\r\n])(.)', '$1[CONTINUED]$2'})</pattern>
    </encoder>
  </appender>

  <appender name="SIFT" class="ch.qos.logback.classic.sift.SiftingAppender">
    <discriminator>
      <key>routeId</key>
      <defaultValue>system</defaultValue>
    </discriminator>
    <sift>
      <!-- Create a separate log file for each <key> -->
      <appender name="FILE-${routeId}" class="ch.qos.logback.core.rolling.RollingFileAppender">
        <file>${instance.dir}/logs/route-${routeId}.log</file>

        <rollingPolicy class="ch.qos.logback.core.rolling.SizeAndTimeBasedRollingPolicy">
          <!-- Rotate files daily -->
          <fileNamePattern>${instance.dir}/logs/route-${routeId}-%d{yyyy-MM-dd}.%i.log</fileNamePattern>

          <!-- each file should be at most 100MB, keep 30 days worth of history, but at most 3GB -->
          <maxFileSize>100MB</maxFileSize>
          <maxHistory>30</maxHistory>
          <totalSizeCap>3GB</totalSizeCap>
        </rollingPolicy>

        <encoder>
          <pattern>%nopex%date{"yyyy-MM-dd'T'HH:mm:ss,SSSXXX", UTC} | %-5level | %thread | %logger{20} | @%mdc{routeId:-system} | %replace(%message%n%xException){'([\r\n])(.)', '$1[CONTINUED]$2'}</pattern>
        </encoder>
      </appender>
    </sift>
  </appender>

  <!-- Disable logs of exceptions attached to responses by defining 'level' to OFF -->
  <logger name="org.forgerock.openig.filter.LogAttachedExceptionFilter" level="INHERITED" />

  <root level="${ROOT_LOG_LEVEL:-INFO}">
    <appender-ref ref="SIFT" />
    <appender-ref ref="STDOUT" />
  </root>
</configuration>Using a custom Logback file
To change the logging behavior, create a new logback file at
$HOME/.openig/config/logback.xml, and restart IG. The
custom Logback file overrides the default configuration.
To take into account edits to logback.xml, stop and restart
IG, or edit the configuration parameter to add a scan and an
interval:
<configuration scan="true" scanPeriod="5 seconds">The logback.xml file is scanned after both of the following criteria
are met:
-
The specified number of logging operations have occurred, where the default is 16.
-
The
scanPeriodhas elapsed.
If the custom logback.xml contains errors, messages like these are
displayed on the console but log messages are not recorded:
14:38:59,667 |-ERROR in ch.qos.logback.core.joran.spi.Interpreter@20:72 … 14:38:59,690 |-ERROR in ch.qos.logback.core.joran.action.AppenderRefAction …
Changing the global log level
The global log level is set by default to INFO by the following line of the
default logback.xml:
<root level="${ROOT_LOG_LEVEL:-INFO}">The log level set in logback.xml supercedes the log level set by
environment variables. When the global log level is not set in logback.xml,
and IG is running in standalone mode, set the global log level as
follows:
-
To persist the log level for all future IG instances:
-
Add an environment variable in
$HOME/.openig/bin/env.sh, where$HOME/.openigis the instance directory:export ROOT_LOG_LEVEL=DEBUGbash -
Alternatively, add a system property in
$HOME/.openig/bin/env.sh, where$HOME/.openigis the instance directory:export JAVA_OPTS="-DROOT_LOG_LEVEL=DEBUG"bashIf both an environment variable and system property is set, the system property takes precedence.
-
-
To persist the log level for IG instances launched from the same shell, add an environment variable in the shell before you start IG:
-
Linux
-
Windows
$ export ROOT_LOG_LEVEL=DEBUG $ /path/to/identity-gateway/bin/start.sh $HOME/.openigbashC:\set ROOT_LOG_LEVEL=DEBUG C:\path\to\identity-gateway\bin\start.bat %appdata%\OpenIG
-
-
To persist the log level for a single IG instance:
-
Linux
-
Windows
$ export ROOT_LOG_LEVEL=DEBUG /path/to/identity-gateway/bin/start.sh $HOME/.openigbashC:\set ROOT_LOG_LEVEL=DEBUG C:\path\to\identity-gateway\bin\start.bat %appdata%\OpenIGwindows -
When IG is running in web container mode, add an environment variable on the command line when you start the web container:
-
Linux
-
Windows
$ export ROOT_LOG_LEVEL=DEBUGC:\set ROOT_LOG_LEVEL=DEBUG
Changing the log level for different object types
To change the log level for a single object type without changing it for the
rest of the configuration, edit logback.xml to add a logger defined by
the fully qualified class name or package name of the object, and set its log
level.
The following line in logback.xml sets the ClientHandler log level to
ERROR, but does not change the log level of other classes or packages:
<logger name="org.forgerock.openig.handler.ClientHandler" level="ERROR" />To facilitate debugging, in logback.xml add loggers defined by the
fully qualified package name or class name of the object. For example, add
loggers for the following areas:
Expression resolution |
|
WebSocket notifications |
|
Session management with JwtSession |
|
OAuth 2.0 and OpenID Connect and token resolution and validation |
|
AM policies, SSO, CDSSO, and user profiles |
|
SAML |
|
UMA |
|
WebSocket tunnelling |
|
Secret resolution |
|
AllowOnlyFilter |
|
Condition of a route |
|
Header field size |
|
Change the character set and format of log messages
By default, logs use the system default character set where IG is
running. To use a different character set, or change the pattern of the log
messages, edit logback.xml to change the encoder part of the SIFT
appender.
The following lines add the date to log messages, and change the character set:
<encoder>
   <pattern>%d{yyyyMMdd-HH:mm:ss} | %-5level | %thread | %logger{20} | %message%n%xException</pattern>
   <charset>UTF-8</charset>
</encoder>For more information about what information you can include in the logs, and its format, see PatternLayoutEncoder and Layouts in the Logback documentation.
Logging in scripts
The logger object provides
access to a unique SLF4J logger instance for scripts. Events are logged as
defined in by a dedicated logger in logback.xml, and are included in
the logs with the name of with the scriptable object.
To log events for scripts:
-
Add logger objects to the script to enable logging at different levels. For example, add some of the following logger objects:
logger.error("ERROR")
logger.warn("WARN")
logger.info("INFO")
logger.debug("DEBUG")
logger.trace("TRACE")
groovy -
Add a logger to
logback.xmlto reference the scriptable object and set the log level. The logger is defined by the type and name of the scriptable object that references the script, as follows:-
ScriptableFilter:
org.forgerock.openig.filter.ScriptableFilter.filter_name -
ScriptableHandler:
org.forgerock.openig.handler.ScriptableHandler.handler_name -
ScriptableThrottlingPolicy:
org.forgerock.openig.filter.throttling.ScriptableThrottlingPolicy.throttling_policy_name -
ScriptableAccessTokenResolver:
org.forgerock.openig.filter.oauth2.ScriptableAccessTokenResolver.access_token_resolver_name
-
For example, the following logger logs trace-level messages for a
ScriptableFilter named cors_filter:
<logger name="org.forgerock.openig.filter.ScriptableFilter.cors_filter" level="TRACE" />The resulting messages in the logs contain the name of the scriptable object:
14:54:38:307 | TRACE | http-nio-8080-exec-6 | o.f.o.f.S.cors_filter | TRACELogging the BaseUriDecorator
During setup and configuration, it can be helpful to display log messages from
the BaseUriDecorator. To record a log message each time a request URI is rebased
, edit logback.xml to add a logger defined by the fully qualified
class name of the BaseUriDecorator appended by the name of the baseURI
decorator:
<logger name="org.forgerock.openig.decoration.baseuri.BaseUriDecorator.baseURI" level="TRACE" />Each time a request URI is rebased, a log message similar to this is created:
12:27:40| TRACE | http-nio-8080-exec-3 | o.f.o.d.b.B.b.{Router}/handler| Rebasing request to http://app.example.com:8081Switching off exception logging
To stop recording log messages for exceptions, edit logback.xml to
set the level to OFF:
<logger name="org.forgerock.openig.filter.LogAttachedExceptionFilter" level="OFF" />Capturing the context or entity of messages for routes
To capture the context or entity of inbound and outbound messages for a route, or for an individual handler or filter in the route, configure a CaptureDecorator. Captured information is written to SLF4J logs.
|
During debugging, consider using a CaptureDecorator to capture the entity and context of requests and responses. However, increased logging consumes resources, such as disk space, and can cause performance issues. In production, reduce logging by disabling the CaptureDecorator properties |
For more information about the decorator configuration, see CaptureDecorator.
Studio provides an easy way to capture messages while developing your configuration. The following image illustrates the capture points where you can log messages on a route:

-
In Studio, select ROUTES, and then select a route with the icon.
-
On the left side of the screen, select Capture, and then select capture options. You can capture the body and context of messages passing to and from the user agent, the protected application, and the ForgeRock Identity Platform.
-
Select Deploy to push the route to the IG configuration.
You can check the
$HOME/.openig/config/routesfolder to see that the route is there. -
Access the route, and then check
$HOME/.openig/logsfor a log file named by the route, where$HOME/.openigis the instance directory. The log file should contain the messages defined by your capture configuration.
Limit repetitive log messages
To keep log files clean and readable, and to prevent log flow attacks, limit
the number of repeat log messages. Add a custom logback.xml with a
DuplicateMessageFilter. This filter detects duplicate messages,
and after the specified number of repetitions, drops repeated messages.
The following example allows 5 repetitions of a log message, and holds the last 10 repeated messages in the cache:
<turboFilter class="ch.qos.logback.classic.turbo.DuplicateMessageFilter" allowedRepetitions="5" CacheSize="10" />The DuplicateMessageFilter has the following limitations:
-
Filters out all duplicate messages. It does not filter per logger, or logger instance, or logger name.
-
Detects repetition of raw messages, meaning that the following example messages are considered as repetition:
logger.debug("Hello {}.", name0);
logger.debug("Hello {}.", name1);
groovy -
Does not limit the lifespan of the cache. After the specified number of repetitions is reached, the repeated log messages never appear again, even if they are frequently hit.
Tuning performance
Tune deployments in the following steps:
-
Consider the issues that impact the performance of a deployment. See Defining Performance Requirements and Constraints.
-
Tune and test the downstream servers and applications:
-
Tune the downstream web container and JVM to achieve performance targets.
-
Test downstream servers and applications in a pre-production environment, under the expected load, and with common use cases.
-
Make sure that the configuration of the downstream web container can form the basis for IG and its container.
-
-
Tune IG and its web container:
-
Optimize IG performance, throughput, and response times. See Tuning IG.
-
Configure IG connections to downstream services and protected applications. See Tuning the ClientHandler/ReverseProxyHandler.
-
Configure connections in the IG web container. See Tuning IG’s Tomcat Container.
-
Configure the IG JVM to support the required throughput. See Tuning IG’s JVM.
-
-
Increase hardware resources as required, and then re-tune the deployment.
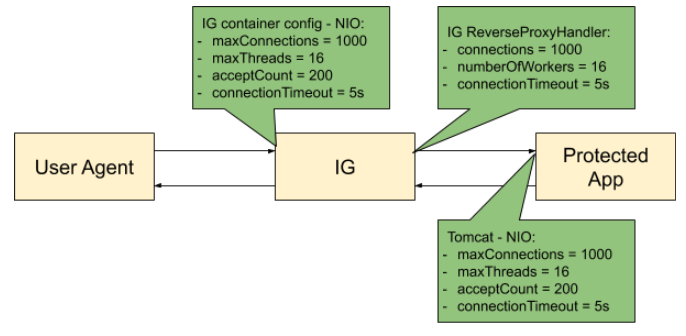
The following figure shows an example configuration for IG, its container, and the container for the protected app:
Defining performance requirements and constraints
When you consider performance requirements, bear in mind the following points:
-
The capabilities and limitations of downstream services or applications on your performance goals.
-
The increase in response time due to the extra network hop and processing, when IG is inserted as a proxy in front of a service or application.
-
The constraint that downstream limitations and response times places on IG and its container.
Service level objectives
A service level objective (SLO) is a target that you can measure quantitatively. Where possible, define SLOs to set out what performance your users expect. Even if your first version of an SLO consists of guesses, it is a first step towards creating a clear set of measurable goals for your performance tuning.
When you define SLOs, bear in mind that IG can depend on external resources that can impact performance, such as AM’s response time for token validation, policy evaluation, and so on. Consider measuring remote interactions to take dependencies into account.
Consider defining SLOs for the following metrics of a route:
-
Average response time for a route.
The response time is the time to process and forward a request, and then receive, process, and forward the response from the protected application.
The average response time can range from less than a millisecond, for a low latency connection on the same network, to however long it takes your network to deliver the response.
-
Distribution of response times for a route.
Because applications set timeouts based on worst case scenarios, the distribution of response times can be more important than the average response time.
-
Peak throughput.
The maximum rate at which requests can be processed at peak times. Because applications are limited by their peak throughput, this SLO is arguably more important than an SLO for average throughput.
-
Average throughput.
The average rate at which requests are processed.
Metrics are returned at the monitoring endpoints. For information about monitoring endpoints, see Monitoring. For examples of how to set up monitoring in IG, see Monitoring services.
Available resources
With your defined SLOs, inventory the server, networks, storage, people, and other resources. Estimate whether it is possible to meet the requirements, with the resources at hand.
Benchmarks
Before you can improve the performance of your deployment, establish an accurate benchmark of its current performance. Consider creating a deployment scenario that you can control, measure, and reproduce.
For information about running ForgeRock Identity Platform benchmark tests, refer to the ForgeOps documentation on benchmarks. Adapt the scenarios as necessary for your IG deployment.
Tuning IG
Consider the following recommendations for improving performance, throughput, and response times. Adjust the tuning to your system workload and available resources, and then test suggestions before rolling them out into production.
Logs
Log messages in IG and third-party dependencies are recorded using the Logback implementation of the Simple Logging Facade for Java (SLF4J) API. By default, logging level is INFO.
To reduce the number of log messages, consider setting the logging level to
error. For information, see Managing logs.
Buffering message content
IG creates a TemporaryStorage object to buffer content during processing. For information about this object and its default values, see TemporaryStorage.
Messages bigger than the buffer size are written to disk, consuming I/O resources and reducing throughput.
The default size of the buffer is 64 KB. If the number of concurrent messages in your application is generally bigger than the default, consider allocating more heap memory or changing the initial or maximum size of the buffer.
To change the values, add a TemporaryStorage object named TemporaryStorage,
and use non-default values.
Cache
When caches are enabled, IG can reuse cached information without making additional or repeated queries for the information. This gives the advantage of higher system performance, but the disadvantage of lower trust in results.
During service downtime, the cache is not updated, and important notifications can be missed, such as for the revocation of tokens or the update of policies, and IG can continue to use outdated tokens or policies.
When caches are disabled, IG must query a data store each time it needs data. This gives the disadvantage of lower system performance, and the advantage of higher trust in results.
When you configure caches in IG, make choices to balance your required performance with your security needs.
IG provides the following caches:
- Session cache
-
After a user authenticates with AM, this cache stores information about the session. IG can reuse the information without asking AM to verify the session token (SSO token or CDSSO token) for each request.
If WebSocket notifications are enabled, the cache evicts entries based on session notifications from AM, making the cache content more accurate (trustable).
By default, the session information is not cached. To increase performance, consider enabling and configuring the cache. For more information, see
sessionCachein AmService. - Policy cache
-
After an AM policy decision, this cache stores the decision. IG can reuse the policy decision without repeatedly asking AM for a new policy decision.
If WebSocket notifications are enabled, the cache evicts entries based on policy notifications from AM, making the cache content more accurate (trustable).
By default, policy decisions are not cached. To increase performance, consider enabling and configuring the cache. For more information, see PolicyEnforcementFilter.
- User profile cache
-
When the UserProfileFilter retrieves user information, it caches it. IG can reuse the cached data without repeatedly querying AM to retrieve it.
By default, profile attributes are not cached. To increase performance, consider enabling and configuring the cache. For more information, see UserProfileFilter.
- Access token cache
-
After a user presents an access token to the OAuth2ResourceServerFilter, this cache stores the token. IG can reuse the token information without repeatedly asking the authorization server to verify the access token for each request.
By default, access tokens are not cached. To increase performance by caching access tokens, consider configuring a cache in one of the following ways:
-
Configure a CacheAccessTokenResolver for a cache based on Caffeine. For more information, see CacheAccessTokenResolver.
-
Configure the
cacheproperty of OAuth2ResourceServerFilter. For more information, see OAuth2ResourceServerFilter
-
- Open ID Connect user information cache
-
When a downstream filter or handler needs user information from an OpenID Connect provider, IG fetches it lazily. By default, IG caches the information for 10 minutes to prevent repeated calls over a short time.
For more information, see
cacheExpirationin AuthorizationCodeOAuth2ClientFilter.
All caches provide similar configuration properties for timeout, defining the duration to cache entries. When the timeout is lower, the cache is evicted more frequently, and consequently, the performance is lower but the trust in results is higher. Consider your requirements for performance and security when you configure the timeout properties for each cache.
WebSocket notifications
By default, IG receives WebSocket notifications from AM for the following events:
-
When a user logs out of AM, or when the AM session is modified, closed, or times out. IG can use WebSocket notifications to evict entries from the session cache. For an example of setting up session cache eviction, see Use WebSocket Notifications to Evict the Session Info Cache.
-
When AM creates, deletes, or changes a policy decision. IG can use WebSocket notifications to evict entries from the policy cache. For an example of setting up policy cache eviction, see Using WebSocket Notifications to Evict the Policy Cache.
If the WebSocket connection is lost, during that time the WebSocket is not connected, IG behaves as follows:
-
Responds to session service calls with an empty SessionInfo result.
When the SingleSignOn filter recieves an empty SessionInfo call, it concludes that the user is not logged in, and triggers a login redirect.
-
Responds to policy evaluations with a deny policy result.
By default, IG waits for five seconds before trying to re-establish the WebSocket connection. If it can’t re-establish the connection, it keeps trying every five seconds.
To disable WebSocket notifications, or change any of the parameters, configure
the notifications property in AmService. For information, see
AmService.
Tuning the ClientHandler/ReverseProxyHandler
The ClientHandler/ReverseProxyHandler communicates as a client to a downstream third-party service or protected application. The performance of the communication is determined by the following parameters:
-
The number of available connections to the downstream service or application.
-
Number of IG worker threads allocated to service inbound requests, and manage propagation to the downstream service or application.
-
The connection timeout, or maximum time to connect to a server-side socket, before timing out and abandoning the connection attempt.
-
The socket timeout, or the maximum time a request is expected to take before a response is received, after which the request is deemed to have failed.
ClientHandler/ReverseProxyHandler tuning in web container mode
Configure IG in conjunction with the Tomcat container, as follows:
-
For BIO Connector (Tomcat 3.x to 8.x), configure
maxThreadsin Tomcat to be close to the number of configured Tomcat connections.Because IG uses an asynchronous threading model, the
numberOfWorkersin ClientHandler/ReverseProxyHandler can be much lower. The asynchronous threads are freed up immediately after the request is propagated, and can service another blocking Tomcat request thread.To take advantage of IG’s asynchronous thread model, configure Tomcat to use a non-blocking, NIO or NIO2 connector, instead of a BIO connector.
-
For NIO connectors, align
numberOfWorkersin IG withmaxThreadsin Tomcat.Because NIO connectors use an asynchronous threading model, the
maxThreadsin Tomcat can be much lower than for a BIO connector.
To identify the throughput plateau, test in a pre-production performance
environment, with realistic use cases. Increment numberOfWorkers from its
default value of one thread per JVM core, up to a large maximum value based on
the number of concurrent connections.
ClientHandler/ReverseProxyHandler tuning in Standalone mode
Configure IG in conjunction with IG’s first-class Vert.x
configuration, and the vertx property of admin.json. For more
information, see
AdminHttpApplication (admin.json).
| Object | Vert.x Option | Description |
|---|---|---|
IG (first-class) |
|
The number of Vert.x Verticle instances to deploy. Each instance operates on the same port on its own event-loop thread. This setting effectively determines the number of cores that IG operates across, and therefore, the number of available threads. Default: The number of cores. |
root.vertx |
|
The size of the pool available to service Verticles for event-loop threads. To guarantee that a single thread handles all I/O events for a single request or response, IG deploys a Verticle onto each event loop. Configure Default: 2 * number of available cores. For more information, refer to Reactor and Multi-Reactor. |
root.connectors.<connector>.vertx |
|
The maximum number of connections to queue before refusing requests. |
|
TCP connection send buffer size. Set this property according to the available RAM and required number of concurrent connections. |
|
|
TCP receive buffer size. Set this property according to the available RAM and required number of concurrent connections. |
|
|
Set this property if HTTP headers manage large values (such as JWT). Default: 8 KB (8,192 bytes) |
| Object | Vert.x Option | Description |
|---|---|---|
root.vertx |
|
Interval at which Vert.x checks for blocked threads and logs a warning. Default: One second. |
|
Maximum time executing before Vert.x logs a warning. Default: Two seconds. |
|
|
Threshold at which warning logs are accompanied by a stack trace to identify causes. Default: Five seconds. |
|
|
Log network activity. |
Tuning IG’s Tomcat container
Configure the Tomcat container in conjunction with IG, as described in Tuning the ClientHandler/ReverseProxyHandler.
To take advantage of IG’s asynchronous thread model, configure Tomcat to use a non-blocking, NIO or NIO2 connector. Consider configuring the following connector attributes:
-
maxConnections -
connectionTimeout -
soTimeout -
acceptCount -
executor -
maxThreads -
minSpareThreads
For more information, see Apache Tomcat 9 Configuration Reference and Apache Tomcat 8 Configuration Reference.
Set the maximum number of file descriptors and processes per user
Each IG instance in your environment should have access to at least 65,536 file descriptors to handle multiple client connections.
Ensure that every IG instance is allocated enough file descriptors.
For example, use the ulimit -n command to check the limits for a
particular user:
$ su - iguser
$ ulimit -nIt may also be necessary to increase the number of processes available to the user running the IG processes.
For example, use the ulimit -u command to check the process limits
for a user:
$ su - iguser
$ ulimit -u|
Before increasing the file descriptors for the IG instance, ensure that the total amount of file descriptors configured for the operating system is higher than 65,536. If the IG instance uses all of the file descriptors, the operating system will run out of file descriptors. This may prevent other services from working, including those required for logging in the system. |
Refer to your operating system’s documentation for instructions on how to display and increase the file descriptors or process limits for the operating system and for a given user.
Tuning IG’s JVM
Start tuning the JVM with default values, and monitor the execution, paying particular attention to memory consumption, and GC collection time and frequency. Incrementally adjust the configuration, and retest to find the best settings for memory and garbage collection.
Make sure that there is enough memory to accommodate the peak number of required connections, and make sure that timeouts in IG and its container support latency in downstream servers and applications.
IG makes low memory demands, and consumes mostly YoungGen memory. However, using caches, or proxying large resources, increases the consumption of OldGen memory. For information about how to optimize JVM memory, see the Oracle documentation.
Consider these points when choosing a JVM:
-
Find out which version of the JVM is available. More recent JVMs usually contain performance improvements, especially for garbage collection.
-
Choose a 64-bit JVM if you need to maximize available memory.
Consider these points when choosing a GC:
-
Test GCs in realistic scenarios, and load them into a pre-production environment.
-
Choose a GC that is adapted to your requirements and limitations. Consider comparing the Garbage-First Collector (G1) and Parallel GC in typical business use cases.
The G1 is targeted for multi-processor environments with large memories. It provides good overall performance without the need for additional options. The G1 is designed to reduce garbage collection, through low-GC latency. It is largely self-tuning, with an adaptive optimization algorithm.
The Parallel GC aims to improve garbage collection by following a high-throughput strategy, but it requires more full garbage collections.
Learn more in Best practice for JVM Tuning with G1 GC.
Rotating keys
The following sections give an overview of how to manage rotation of encryption keys and signing keys, and include examples for key rotation based on use cases from the Gateway guide.
About key rotation
Key rotation is the process of generating a new version of a key, assigning that version as the active key to encrypt or sign new messages, or as a valid key to decrypt or validate messages, and then deprovisioning the old key.
Why and when to rotate keys
Regular key rotation is a security consideration that is sometimes required for internal business compliance. Regularly rotate keys to:
-
Limit the amount of data protected by a single key.
-
Reduce dependence on specific keys, making it easier to migrate to stronger algorithms.
-
Prepare for when a key is compromised. The first time you try key rotation shouldn’t be during a real-time recovery.
Key revocation is a type of key rotation, done exceptionally if you suspect that a key has been compromised. To decide when to revoke a key, consider the following points:
-
If limited use of the old keys can be tolerated, provision the new keys and then deprovision the old keys. Messages produced before the new keys are provisioned are impacted.
-
If use of the old keys cannot be tolerated, deprovision the old keys before you provision the new keys. The system is unusable until new keys are provisioned.
Steps for rotating symmetric keys
The following steps outline key rotation and revocation for symmetric keys managed by a KeyStoreSecretStore. For an example, see Rotating keys in a shared JWT session.
-
Using OpenSSL, Keytool, or another key creation mechanism, create the new symmetric key. The keystore should contain the old key and the new key.
-
Provision the new key.
-
In the
mappingsproperty of KeyStoreSecretStore, add the alias for the new key after the alias for the old key. The new key is now valid. Because the old key is the first key in the list, it is the active key. -
Move the new key to be the first key in the list. The new key is now the active key.
-
-
Deprovision the old key.
To ensure that no messages or users are impacted, wait until messages encrypted or signed with the old key are out of the system before you deprovision the old key.
-
In the
mappingsproperty of KeyStoreSecretStore, delete the alias for the old key. The old key can no longer be used. -
Using OpenSSL, Keytool, or another key creation mechanism, delete the old symmetric key.
-
Steps for rotating asymmetric keys
The following steps outline the process for key rotation and revocation for asymmetric keys managed by a KeyStoreSecretStore or HsmSecretStore. For an example, see Rotating keys for stateless access tokens signed with a KeyStoreSecretStore.
-
Create new asymmetric keys for signing and encryption, using OpenSSL, Keytool, or another key creation mechanism.
-
Provision the message consumer with the private portion of the new encryption key, and the public portion of the new signing key.
The message consumer can now decrypt and verify messages with the old key and the new key.
-
Provision the message producer, with the public portion of the new encryption key, and the private portion of the signing key. The message producer starts encrypting and signing messages with the new key, and stops using the old key.
-
Deprovision the message consumer with the private portion of the old encryption key, and the public portion of the old signing key. The message consumer can no longer decrypt and verify messages with the old key.
To ensure that no messages or users are impacted, wait until messages encrypted or signed with the corresponding old key are out of the system before you deprovision the old key.
-
Deprovision the message producer, with the public portion of the old encryption key, and the private portion of old signing key.
Key rotation for keys in a JWK set
When keys are provided by a JWK Set from AM, the key rotation is
transparent to IG. AM generates a key ID (kid) for each
key it exposes at the jwk_uri. For more information, see
Mapping and rotating secrets in AM’s Security guide.
When IG processes a request with a JWT containing a kid,
IG uses the kid to identify the key in the JWK Set. If the kid
is available at the jwk_uri on AM, IG processes the request.
Otherwise, IG tries all compatible secrets from the JWK Set. If
none of the secrets work, the JWT is rejected.
Rotating keys for stateless access tokens signed with a KeyStoreSecretStore
This example extends the example in Validate signed access tokens with the StatelessAccessTokenResolver and KeyStoreSecretStore to rotate the keys that sign an access token and verify the signature.
Before you start, set up and test the example in Validate signed access tokens with the StatelessAccessTokenResolver and KeyStoreSecretStore.
-
Set up the new keys:
-
Generate a new private key called
signature-key-new, and a corresponding public certificate calledx509certificate-new.pem:$ openssl req -x509 \ -newkey rsa:2048 \ -nodes \ -subj "/CN=ig.example.com/OU=example/O=com/L=fr/ST=fr/C=fr" \ -keyout keystore_directory/signature-key-new.key \ -out keystore_directory/x509certificate-new.pem \ -days 365 ... writing new private key to 'keystore_directory/signature-key-new.key'bash -
Convert the private key and certificate files into a new PKCS12 keystore file:
$ openssl pkcs12 \
-export \
-in keystore_directory/x509certificate-new.pem \
-inkey keystore_directory/signature-key-new.key \
-out keystore_directory/keystore-new.p12 \
-passout pass:password \
-name signature-key-new
bash -
List the keys in the new keystore:
$ keytool -list \
-keystore "keystore_directory/keystore-new.p12" \
-storepass "password" \
-storetype PKCS12

...
Your keystore contains 1 entry
Alias name: signature-key-new
bash -
Import the new keystore into
keystore.p12, so thatkeystore.p12contains both keys:$ keytool -importkeystore -srckeystore keystore_directory/keystore-new.p12 -srcstoretype pkcs12 -srcstorepass password -destkeystore keystore_directory/keystore.p12 -deststoretype pkcs12 -deststorepass password Entry for alias signature-key-new successfully imported ...bash -
List the keys in
keystore.p12, to make sure that it contains the new and old keys:$ keytool -list \ -keystore "keystore_directory/keystore.p12" \ -storepass "password" \ -storetype PKCS12 ... Your keystore contains 2 entries Alias name: signature-key Alias name: signature-key-newbash
-
-
Set up AM:
-
Copy the updated keystore to AM:
-
Copy
keystore.p12to AM:$ cp keystore_directory/keystore.p12 am_keystore_directory/AM_keystore.p12bash -
List the keys in the updated AM keystore:
$ keytool -list \
-keystore "am_keystore_directory/AM_keystore.p12" \
-storepass "password" \
-storetype PKCS12

...
Your keystore contains 2 entries
Alias name: signature-key
Alias name: signature-key-new
bash -
Restart AM to update the keystore cache.
-
-
Update the KeyStoreSecretStore on AM:
-
In AM, select Secret Stores > keystoresecretstore.
-
Select the Mappings tab, and in
am.services.oauth2.stateless
.signing.RSA
add the aliassignature-key-new.The mapping now contains two aliases, but the alias
signature-keyis still the active alias. AM still usessignature-keyto sign tokens. -
Drag
signature-key-newabovesignature-key.AM now uses
signature-key-newto sign tokens.
-
-
-
Set up IG:
-
Import the public certificate to the IG keystore, with the alias
verification-key-new:$ keytool -import \ -trustcacerts \ -rfc \ -alias verification-key-new \ -file "keystore_directory/x509certificate-new.pem" \ -keystore "ig_keystore_directory/IG_keystore.p12" \ -storetype PKCS12 \ -storepass "password" ... Trust this certificate? [no]: yes Certificate was added to keystorebash -
List the keys in the IG keystore:
$ keytool -list \
-keystore "ig_keystore_directory/IG_keystore.p12" \
-storepass "password" \
-storetype PKCS12

...
Your keystore contains 2 entries
Alias name: verification-key
Alias name: verification-key-new
bash -
In
rs-stateless-signed-ksss.json, edit the KeyStoreSecretStore mapping with the new verification key:"mappings": [ { "secretId": "stateless.access.token.verification.key", "aliases": [ "verification-key", "verification-key-new" ] } ]jsonIf the Router
scanIntervalis disabled, restart IG to reload the route.IG can now check the authenticity of access tokens signed with
verification-key, the old key, andverification-key-new, the new key. However, AM signs with the old key.
-
-
Test the setup:
-
Get an access token for the demo user, using the scope
myscope:$ mytoken=$(curl -s \ --user "client-application:password" \ --data "grant_type=password&username=demo&password=Ch4ng31t&scope=myscope" \ http://am.example.com:8088/openam/oauth2/access_token | jq -r ".access_token")bash -
Display the token:
$ echo ${mytoken}bash -
Access the route by providing the token returned in the previous step:
$ curl -v http://ig.example.com:8080/rs-stateless-signed-ksss --header "Authorization: Bearer ${mytoken}"

...
Decoded access_token: {
sub=demo,
cts=OAUTH2_STATELESS_GRANT,
...
bash
-
-
Remove
signature-keyfrom the AM keystore:-
Delete the key from the keystore:
$ keytool -delete \
-keystore "am_keystore_directory/AM_keystore.p12" \
-storepass "password" \
-alias signature-key
bash -
List the keys in the AM keystore to make sure that
signature-keyis removed:$ keytool -list \ -keystore "am_keystore_directory/AM_keystore-new.p12" \ -storepass "password" \ -storetype PKCS12bash -
Restart AM.
-
-
Remove
verification-keyfrom the IG keystore:-
Delete the key from the keystore:
$ keytool -delete \
-keystore "ig_keystore_directory/IG_keystore.p12" \
-storepass "password" \
-alias verification-key
bash -
List the keys in the IG keystore to make sure that
verification-keyis removed:$ keytool -list \ -keystore "ig_keystore_directory/IG_keystore.p12" \ -storepass "password" \ -storetype PKCS12bash
-
-
In AM, delete the mapping for
signature-keyfromkeystoresecretstore. -
In IG, delete the mapping for
verification-keyfrom the routers-stateless-signed-ksss.json. If the RouterscanIntervalis disabled, restart IG to reload the route.
Rotating keys in a shared JWT session
This section builds on the example in Share JWT Session Between Multiple Instances of IG to rotate a key used in a shared JWT session.
When a JWT session is shared between multiple instances of IG, the instances are able to share the session information for load balancing and failover.
Before you start, set up the example in Set Up Shared Secrets for Multiple Instances of IG, where three instances of IG share a JwtSession and use the same authenticated encryption key. Instance 1 acts as a load balancer, and generates a session. instances 2 and 3 access the session information.
-
Test the setup with the existing key,
symmetric-key:-
Access instance 1 to generate a session:
$ curl -v http://ig.example.com:8001/log-in-and-generate-session

GET /log-in-and-generate-session HTTP/1.1
...

HTTP/1.1 200 OK
Content-Length: 84
Set-Cookie: IG=eyJ...HyI; Path=/; Domain=.example.com; HttpOnly
...
Sam Carter logged IN. (JWT session generated)
bash -
Using the JWT cookie returned in the previous step, access instance 2:
$ curl -v http://ig.example.com:8001/webapp/browsing?one --header "cookie:IG=<JWT cookie>" GET /webapp/browsing?one HTTP/1.1 ... cookie: IG=eyJ...QHyI ... HTTP/1.1 200 OK ... Hello, Sam Carter !! (instance2)bashNote that instance 2 can access the session info.
-
Using the JWT cookie again, access instance 3:
$ curl -v http://ig.example.com:8001/webapp/browsing?two --header "Cookie:IG=<JWT cookie>" GET /webapp/browsing?two HTTP/1.1 ... cookie: IG=eyJ...QHyI ... HTTP/1.1 200 OK ... Hello, Sam Carter !! (instance3)bashNote that instance 3 can access the session info.
-
-
Commission a new key:
-
Generate a new encryption key, called
symmetric-key-new, in the existing keystore:$ keytool \ -genseckey \ -alias symmetric-key-new -keystore /path/to/secrets/jwtsessionkeystore.pkcs12 \ -storepass password \ -storetype PKCS12 \ -keyalg HmacSHA512 \ -keysize 512bash -
Make sure that the keystore contains the old key and the new key:
$ keytool \
-list \
-keystore /path/to/secrets/jwtsessionkeystore.pkcs12 \
-storepass password \
-storetype PKCS12

...
Your keystore contains 2 entries
symmetric-key, ...
symmetric-key-new ...
bash -
Add the key alias to
instance1-loadbalancer.json,instance2-retrieve-session-username.json, andinstance3-retrieve-session-username.json, for each IG instance, as follows:"mappings": [{ "secretId": "jwtsession.encryption.secret.id", "aliases": ["symmetric-key", "symmetric-key-new"] }]jsonIf the Router
scanIntervalis disabled, restart IG to reload the route.The active key is
symmetric-key, and the valid key issymmetric-key-new. -
Test the setup again, as described in step 1, and make sure that instances 2 and 3 can still access the session information.
-
-
Make the new key the active key for generating sessions:
-
In
instance1-loadbalancer.json, change the order of the keys to makesymmetric-key-newthe active key, andsymmetric-keythe valid key:"mappings": [{ "secretId": "jwtsession.encryption.secret.id", "aliases": ["symmetric-key-new", "symmetric-key"] }]jsonDon’t change
instance2-retrieve-session-username.jsonorinstance3-retrieve-session-username.json. -
Test the setup again, as described in step 1, and make sure that instances 2 and 3 can still access the session information.
Instance 1 creates the session using the new active key,
symmetric-key-new.Because
symmetric-key-newis declared as a valid key in instances 2 and 3, the instances can still access the session. It isn’t necessary to makesymmetric-key-newthe active key.
-
-
Decommission the old key:
-
Remove the old key from all of the routes, as follows:
"mappings": [{ "secretId": "jwtsession.encryption.secret.id", "aliases": ["symmetric-key-new"] }]jsonKey
symmetric-key-newis the only key in the routes. -
Remove the old key,
symmetric-key, from the keystore:-
Delete
symmetric-key:$ keytool \ -delete \ -alias symmetric-key \ -keystore /path/to/secrets/jwtsessionkeystore.pkcs12 \ -storepass password \ -storetype PKCS12 \ -keypass passwordbash -
Make sure that the keystore contains only
symmetric-key-new:$ keytool \ -list \ -keystore /path/to/secrets/jwtsessionkeystore.pkcs12 \ -storepass password \ -storetype PKCS12 ... Your keystore contains 1 entry symmetric-key-new ...bash
-
-
Test the setup again, as described in step 1, and make sure that instances 2 and 3 can still access the session information.
-
Troubleshooting
ForgeRock provides support services, professional services, training through ForgeRock University, and partner services to help you set up and maintain your deployments.
Getting support
ForgeRock provides support services, professional services, training through ForgeRock University, and partner services to assist you in setting up and maintaining your deployments. For a general overview of these services, see https://www.forgerock.com.
ForgeRock has staff members around the globe who support our international customers and partners. For details on ForgeRock’s support offering, including support plans and service level agreements (SLAs), visit https://www.forgerock.com/support.
ForgeRock publishes comprehensive documentation online:
-
The ForgeRock Knowledge Base offers a large and increasing number of up-to-date, practical articles that help you deploy and manage ForgeRock software.
While many articles are visible to everyone, ForgeRock customers have access to much more, including advanced information for customers using ForgeRock software in a mission-critical capacity.
-
ForgeRock product documentation, such as this document, aims to be technically accurate and complete with respect to the software documented. It is visible to everyone and covers all product features and examples of how to use them.
Getting info about the problem
When you are trying to solve a problem, save time by asking the following questions:
-
How do you reproduce the problem?
-
What behavior do you expect, and what behavior do you see?
-
When did the problem start occurring?
-
Are their circumstances in which the problem does not occur?
-
Is the problem permanent, intermittent, getting better, getting worse, or staying the same?
If you contact ForgeRock for help, include the following information with your request:
-
The product version and build information. This information is included in the logs when IG starts up. If IG is running in development mode, and set up as described in the Getting started, access the information at http://ig.example.com:8080/openig/api/info.
-
Description of the problem, including when the problem occurs and its impact on your operation.
-
Steps you took to reproduce the problem.
-
Relevant access and error logs, stack traces, and core dumps.
-
Description of the environment, including the following information:
-
Machine type
-
Operating system and version
-
Web server or container and version
-
Java version
-
Patches or other software that might affect the problem
-
Troubleshooting
- Displaying resources
-
Requests redirected to AM instead of to the resource
By default, ForgeRock Access Management 5 and later writes cookies to the fully qualified domain name of the server; for example,
am.example.com. Therefore, a host-based cookie, rather than a domain-based cookie, is set.Consequently, after authentication through Access Management, requests can be redirected to Access Management instead of to the resource.
To resolve this issue, add a cookie domain to the Access Management configuration. For example, in the Access Management console, go to Configure > Global Services > Platform, and add the domain
example.com.Sample application not displayed correctly
When the sample application is used with IG in the documentation examples, the sample application must serve static resources, such as the .css. Add the following route to the IG configuration, as:
-
Linux
-
Windows
$HOME/.openig/config/routes/static-resources.json
%appdata%\OpenIG\config\routes\static-resources.json
{ "name" : "sampleapp-resources", "baseURI" : "http://app.example.com:8081", "condition": "${find(request.uri.path,'^/css')}", "handler": "ReverseProxyHandler" }jsonStaticResponseHandler results in a blank page
Define an entity for the response, as in the following example:
{
  "name": "AccessDeniedHandler",
  "type": "StaticResponseHandler",
  "config": {
    "status": 403,
    "headers": {
      "Content-Type": [ "text/html; charset=UTF-8" ]
    },
    "entity": "<html><body><p>User does not have permission</p></body></html>"
  }
}
json -
- Using routes
-
No handler to dispatch to
If you get the message
no handler to dispatch to, consider the following points:-
Make sure that your routes include a
conditionconfiguration to match the request. For more information, see Set Route Conditions. -
If requests might not match any condition, consider adding a default route to provide a default handler when no condition is met. For more information, see Adding a Default Route.
Object not found in heap
If you see the following error, you have specified
"handler": "Router2"inconfig.jsonor in the route, but no handler configuration object named Router2 exists:org.forgerock.json.fluent.JsonValueException: /handler: object Router2 not found in heap at org.forgerock.openig.heap.HeapImpl.resolve(HeapImpl.java:351) at org.forgerock.openig.heap.HeapImpl.resolve(HeapImpl.java:334) at org.forgerock.openig.heap.HeapImpl.getHandler(HeapImpl.java:538)Make sure you have added an entry for the handler, and that you have correctly spelled its name.
Extra or missing character / invalid JSON
When the JSON for a route is not valid, IG does not load the route. Instead, a description of the error appears in the log.
Use a JSON editor or JSON validation tool such as JSONLint to make sure that your JSON is valid.
Route not used
IG loads all configurations at startup, and, by default, periodically reloads changed route configurations.
If you make changes to a route that result in an invalid configuration, IG logs errors, but it keeps the previous, correct configuration, and continues to use the old route.
IG only uses the new configuration after you save a valid version or when you restart IG.
Of course, if you restart IG with an invalid route configuration, then IG tries to load the invalid route at startup and logs an error. In that case, if there is no default handler to accept any incoming request for the invalid route, then you see an error,
No handler to dispatch to.Skip routes
IG returns an exception if it loads a route for which it can’t resolve a requirement. For example, when you load a route that uses an AmService object, the object must be available in the AM configuration.
If you add routes to a configuration when the environment is not ready, rename the route to prevent IG from loading it. For example, rename a route as follows:
$ mv $HOME/.openig/config/routes/03-sql.json $HOME/.openig/config/routes/03-sql.inactivebashIf necessary, restart IG to reload the configuration. When you have configured the environment, change the file extension back to
.json. -
- Using Studio
-
Can’t deploy routes in Studio
Studio deploys and undeploys routes through a main router named
_router, which is the name of the main router in the default configuration. If you use a customconfig.json, make sure that it contains a main router named_router.For information about creating routes in Studio, see the Studio guide.
- Understanding timeout errors
-
Timeout downloading large files
(Not supported for IG in standalone mode.) If
SocketTimeoutExceptionerrors occur in the logs when you try to download large files, in your ReverseProxyHandler or ClientHandler, increasesoTimeoutand setasyncBehaviortostreaming.Log is flushed with timeout exception warnings on sending a request
Problem: After a request is sent to IG, IG seems to hang. An HTTP 502 Bad Gateway error is produced, and the IG log is flushed with SocketTimeoutException warnings.
Possible cause: The
baseURIconfiguration is missing or causes the request to return to IG, so IG can’t produce a response to the request.Possible solution: Configure the
baseURIto use a different host and port to IG.
- Other problems
-
Incorrect values in the flat files
Make sure that the user running IG can read the flat file. Remember that values include spaces and tabs between the separator, so make sure the values are not padded with spaces.
Problem accessing URLs
The following error can be encountered when using an
AssignmentFilteras described in AssignmentFilter and setting a string value for one of the headers.HTTP ERROR 500 Problem accessing /myURL . Reason: java.lang.String cannot be cast to java.util.List Caused by: java.lang.ClassCastException: java.lang.String cannot be cast to java.util.ListAll headers are stored in lists so the header must be addressed with a subscript. For example, rather than trying to set
request.headers['Location']for a redirect in the response object, you should instead setrequest.headers['Location'][0]. A header without a subscript leads to the error above.