Managing environments
All environments managed within PingCentral, as well as connected PingFederate and PingAccess environments, display on the Environments page, where you can view and update information about each environment and delete them from PingCentral when they are no longer needed.
Items worth mentioning:
-
If you add PingAccess environments to PingCentral, ensure that PingFederate is configured as the PingAccess token provider. See Configuring PingFederate as a PingAccess token provider for details.
-
To enforce random secret generation and restrict non-administrators from creating their own, select the Generate Client Secret on Promotion check box when managing your environments. PingCentral will generate random client secrets.
-
If your application owners promote Security Assertion Markup Language (SAML) applications to PingFederate or PingAccess environments, ensure that the appropriate trusted certificate authority (CA) certificates are available in PingCentral. See Adding trusted CA certificates to PingCentral for details.
Starting with PingCentral 1.8, trusted CA certificates are stored in the PingCentral database instead of an external trust store. Certificates that exist in this trust store in previous versions are imported to the PingCentral database during the upgrade process.
-
Adding environments
-
Updating environments
-
Deleting environments
Adding environments
Use the wizard to add PingFederate and PingAccess environments to PingCentral.
Before you begin
Ensure that PingFederate is configured as a token provider for PingAccess.
For more information, see Configuring PingFederate as a PingAccess token provider.
Steps
-
On the Environments page, click Add Environment.
-
On the Connect to Instances page, connect to a PingFederate or PingAccess environment:
Choose from:
-
To connect to a PingFederate environment, complete the PingFederate Admin, PingFederate Admin Username, and PingFederate Admin Password fields with your authentication information.
-
To connect to a PingAccess environment, complete the PingAccess Admin, PingAccess Admin Username, and PingAccess Admin Password fields with your authentication information.
If this is the first time that you have set up this environment, and the initial validation fails, you see a Skip Verification option. If you select this option, it allows you to skip the validation process. However, if you set it up correctly, you won’t see this option.
-
-
Click Next.
-
On the Name Environment page, complete the Name, Short Code, and Description fields.
-
Optional: To configure whether non-administrators need approval for promoting an application to an environment, select an option from the Approval Type list:
Choose from:
-
Select No Approval to allow non-administrators to promote applications to the environment freely.
-
Select Approval Required to indicate that application promotion requires approval.
-
Select Require Approval If Any Expression Fails and proceed to the next step to configure an Approval Expression.
-
Select Require Approval If Any Expression Succeeds and proceed to the next step to configure an Approval Expression.
-
-
Optional: If you selected Require Approval If Any Expression Fails or Require Approval If Any Expression Succeeds, you must configure a Spring Expression Language (SpEL) expression in the Approval Expression field.
You can use SpEL expressions to determine whether an application requires approval or not. For more information, go to Creating and testing approval expressions on this page.
For more information on SpEL, see Spring Expression Language (SpEL) in the Spring Framework documentation.
-
Optional: To enforce random secret generation and restrict non-administrators from creating their own, select the Generate Client Secret on Promotion check box.
PingCentral will generate random client secrets.
-
Optional: To add an identity provider (IdP) certificate, select the appropriate certificate in the Signing Certificate list or to upload your own certificate, click Choose and enter the certificate password in the appropriate field. Click Save and Close.
Result:
The environment is displayed on the Environments page. If you chose to protect the environment, you see a shield icon next to its name. Depending on the type of environment, you also see a PF or PA icon. The color of this icon represents the status of the environment. A green icon indicates that the environment is verified while a red icon indicates that the environment isn’t verified.
-
Click Save and Continue.
-
Click the expandable icon associated with the environment to view environment details.
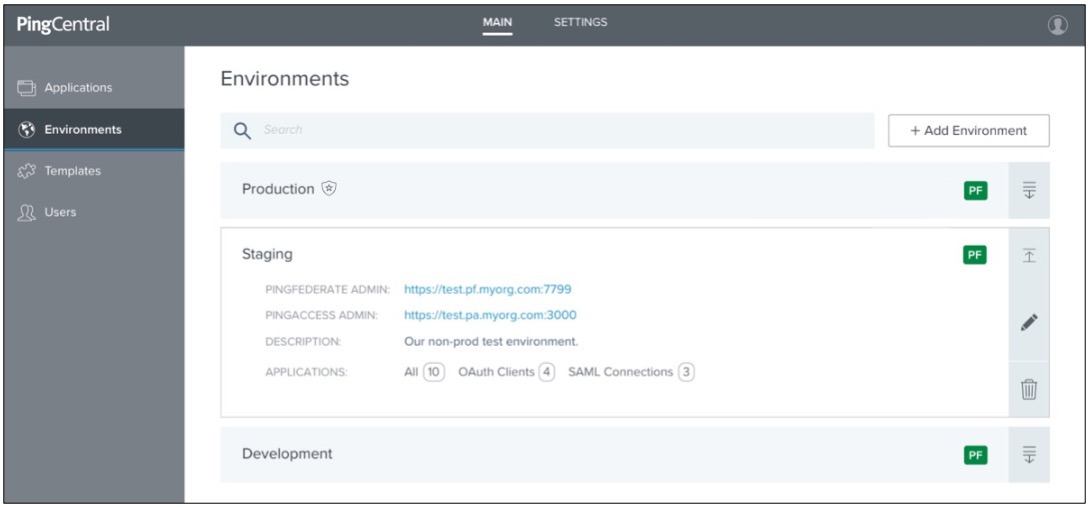
Environment details include:
-
A link to PingFederate.
-
A link to PingAccess.
-
A description of the environment.
-
The total number of applications hosted on this environment and a breakdown of OAuth or OpenID Connect (OIDC) clients, SAML service provider (SP) connections, and PingAccess applications. Click these links to access filtered lists of these applications on the Applications page.
If an environment is unavailable, applications in that environment don’t display on the Applications page.
-
Updating environments
Update PingFederate and PingAccess environment information at any time.
Steps
-
To edit environment information, click the expandable icon associated with it, and then click the Pencil icon.
All of the editable information displays on one page.
Option Description Update the name and description
To update the name and description, change the information in the Name, Short Code, and Description fields.
Update the assertion encryption certificate
To update the assertion encryption certificate, click Choose to upload a new certificate and enter the certificate password in the appropriate field.
Update connection information
To update the connection information for either a PingFederate or PingAccess environment, change the information in the Username and Password fields.
+
If a PingAccess environment is added to PingCentral and removed through the edit page, the connection information is saved and restored if the PingAccess environment is selected again.
Configure promotion approval requirements
To configure if non-administrators need approval for promoting an application to an environment, select an option from the Approval Type.
Choose from:
-
Select No Approval to allow non-administrators to promote applications to the environment freely.
-
Select Approval Required to indicate that application promotion requires approval.
-
Select Require Approval If Any Expression Fails and go to Creating and testing approval expressions on this page.
-
Select Require Approval If Any Expression Succeeds and go to Creating and testing approval expressions on this page.
Add or remove the enforcement of random client secret generation
To enforce random secret generation and restrict non-administrators from creating their own, select the Generate Client Secret on Promotion check box. PingCentral will generate random client secrets. To allow non-administrators to generate their own secret, clear the check box.
Update the signing certificate
To update the signing certificate used to promote SAML applications, select the appropriate certificate in the Signing Certificate list or upload your own.
Update the SP certificate
To update the SP certificate, click Choose to upload a new certificate and enter the certificate password in the appropriate field.
Update the assertion encryption certificate
To update the assertion encryption certificate, click Choose to upload a new certificate and enter the certificate password in the appropriate field.
-
-
Click Save.
Deleting environments
Delete environments from PingCentral when they are no longer needed.
Steps
-
Click the expandable icon associated with the environment to view environment details.
-
To delete the environment from PingCentral, click its associated Delete icon.
Result:
A message displays asking you if you want to delete the environment.
-
Click Delete.
Result:
A message displays saying that the environment was deleted.
When an environment is deleted, applications that were promoted to that environment retain the promotion details from the deleted environment.
Creating and testing approval expressions
Configure a Spring Expression Language (SpEL) expression to manage promotion approval requirements for your environment.
Before you begin
When you configure an environment, on the Connection page, select Require Approval If Any Expression Fails or Require Approval If Any Expression Succeeds from the Approval Expression list. For more information, see Adding environments.
About this task
You can use SpEL expressions to determine whether an application requires approval or not. For more information on SpEL, see Spring Expression Language (SpEL) in the Spring Framework documentation. TIP: The approval expression should handle different application types and the promotional configurations associated with each application type.
Steps
-
On the Connection page, in the Approval Expression field, click Test to expand the Test Spring Expression window.
Result:
The Test Spring Expression window displays.
-
In the Application Configuration field, enter the available application configuration.
-
Optional: In the Promotion Configuration field, enter the promotion configuration corresponding to the provided application configuration.
-
Under the Spring Expression field, click Test Expression to test your SpEL expression.
The PingCentral API expects the application and promotion configuration to be a JSON payload.
Result:
The Spring Expression result displays.
For information about approval expression handling, see the following:
-
If you selected Require Approval If Any Expression Fails from the Approval Type list: If any expression results in
falsethen approval is required. If all expressions aretruethen approval is not required. -
If you selected Require Approval If Any Expression Succeeds from the Approval Type list: If any expression results in
truethen approval is required. If all expressions arefalsethen approval is not required. -
If any of the expressions do not return a Boolean value or if there are any errors in the expressions, the promotions will require approval.
-
Multiple expressions can be added, and are evaluated sequentially from top to bottom in an IF/ELSE chain. You can change the order in which these expressions display in the list by dragging and dropping them into different locations within the list.
-
-
Click the Update button to save your configuration or click the Cancel button to discard it.