Users are managed in an environment that does not contain the OIDC application
In this configuration, users are managed in a PingOne environment that does not contain the OIDC application that connects to PingOne Advanced Services, as shown in the diagram.
Network diagram
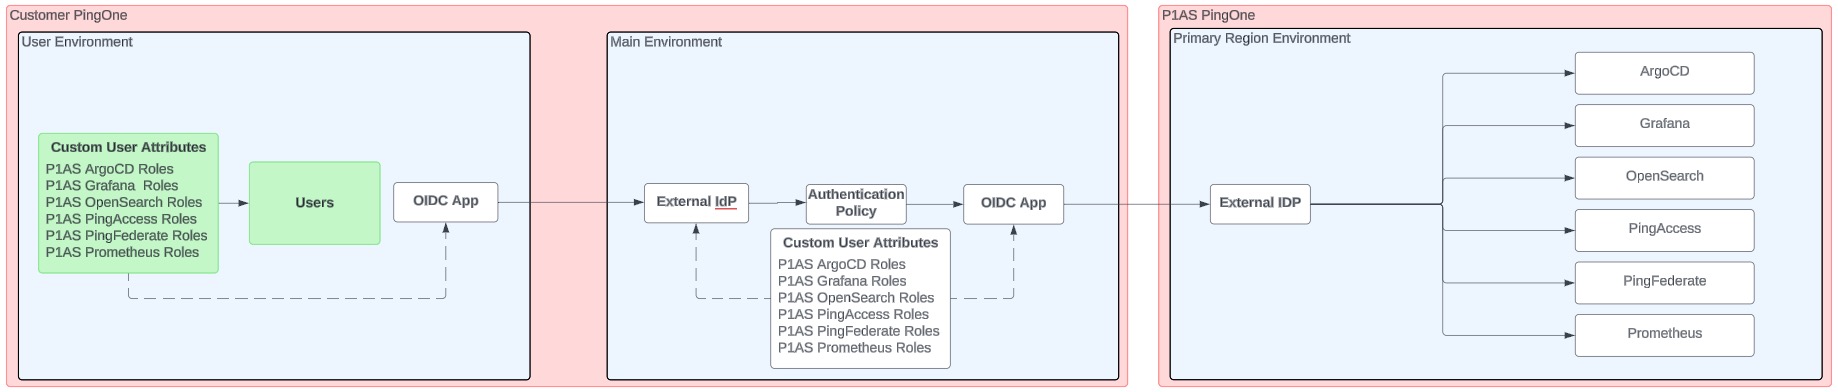
If you have this type of configuration, you need to configure a connection from the environment containing your users to the environment containing the OIDC application that connects to PingOne Advanced Services.
In the PingOne environment that contains your users
Steps
-
Ensure that the custom user attributes are defined as described in Creating custom user attributes.
-
Create a new OIDC application to connect these environments. See Creating an OIDC application for instructions.
-
Copy and save the application client ID, client secret, and OIDC Discovery Endpoint URL, which you’ll need to provide in the next task.
In the PingOne environment that contains the OIDC application that connects to PingOne Advanced Services
Steps
-
Access the appropriate PingOne environment.
-
Create an external IdP to configure a connection to the user environment:
-
Go to Integrations → External IdPs.
-
Click Add Provider.
-
Click OpenID Connect.
-
On the Create Profile page, enter the following:
-
Name: A unique identifier for the IdP.
-
Description (optional): A brief description of the IdP.
-
Icon (optional): An image to represent the identity provider. Use a file up to 1 MB in JPG, JPEG, GIF, or PNG format. Use a 90 X 90 pixel image.
-
Login button (optional): An image to use for the login button displayed to the end user. Use a 300 X 42 pixel image.
-
-
Click Continue.
-
Enter the connection and discovery details you copied and saved in step 3 of the previous task:
-
Client ID: Enter the client ID for the OIDC application you just created.
-
Client secret: Enter the client secret generated for the OIDC application.
-
Discovery document URI: Enter the OIDC Discovery Endpoint URL from the OIDC application, and then click Use Discovery document to populate the remaining settings. Learn more in Discovery document URI in the PingOne documentation.
-
-
Click Save and Continue.
-
On the Map Attributes page enter the following mappings:
“Username” = “providerAttributes.username”
“External ID” = “providerAttributes.sub”
“Email” = “providerAttributes.email”
“Family Name” = “providerAttributes.familyName”
“Given Name” = “providerAttributes.givenName”
“P1AS ArgoCD Roles” = “providerAttributes.p1asArgoCDRoles
“P1AS Grafana Roles” = “providerAttributes.p1asGrafanaRoles”
“P1AS Opensearch Roles” = “providerAttributes.p1asOpensearchRoles”
“P1AS PingAccess Roles” = “providerAttributes.p1asPingAccessRoles”
“P1AS PingFederate Roles” = “providerAttributes.p1asPingFederateRoles”
“P1AS Prometheus Roles” = “providerAttributes.p1asPrometheusRoles”
"P1AS Self-Service Roles" = "providerAttributes.p1asSelfServiceRoles"
-
Click Save and Finish.
-
Locate the new external IdP in the list, expand it, and click the Connections tab.
-
Copy and save the Callback URL to use in a later step.
-
Click the toggle switch to enable the application.
-
-
Create an authentication policy for the external IdP:
-
Go to Authentication → Authentication.
-
Click Add Policy.
-
Enter a policy name.
-
From theStep Type list, select External identity provider.
-
From the External identity provider list, select the external provider you just configured and click Save.
-
-
Add the authentication policy to the OIDC application:
-
Go to Applications → Applications, and select the OIDC application you created in the previous step.
-
Select the Policies tab and click Add Policies.
-
Select the authentication policy you created in the previous step and click Save.
-
In the PingOne environment that contains your users
Steps
-
Go to Applications → Applications, and select the new OIDC application.
-
Click the Configuration tab and then click the Pencil icon.
-
In the Redirect URIs field, enter the Callback URL you copied and saved in the previous task and click Save.
-
Submit a service request to the Support and Professional Services teams to provide them with details regarding the OIDC application and the name that should display when users sign on.
-
Now, you can begin adding users to this environment and assigning roles. You can find a complete list of PingOne Advanced Services attribute mappings for each administrator role and the permissions each role is assigned in Administrative role mappings.