Getting started with DaVinci
Let’s explore how to create your first flow.
Choosing a use case
You’re here for a reason. There’s a customer experience that you want to create or improve without having to write a mountain of code. DaVinci is a tool to help you do that.
Start your process by identifying the problem that you want to solve. Usually identity experiences start by focusing on sign on and registration. But there’s a lot more you’ll want to eventually consider, such as what happens when a user forgets their username or password or needs to set up multi-factor authentication (MFA).
If you already have the basics in place, you might be looking for ways to streamline the end user experience without increasing the risk of inappropriate access, such as incorporating data from device management, risk scoring, or behavior analytics services. If you’re looking for inspiration, check out the flow templates in the Ping Identity Marketplace.
Another key area you might be focusing on is giving your end users new capabilities, such as applying for a credit card, adding information to their profile, or setting up a new authorized user. These self-service activities can be quickly prototyped and integrated into existing web applications.
Don’t forget about support flows either, which often start from a chat box or phone call but greatly benefit from authentication to verify a user’s identity and link it to their official account information.
No matter what use case you are focusing on, before you even open up DaVinci, grab a pen or whiteboard marker and sketch out the logic of the experience you want to create. Now let’s start building!
Creating the flow
After you have a good understanding of what you want your flow to do, you can begin putting it together.
There are a few ways you can create a flow. Ping Identity has created a variety of flow templates that cover many common use cases. If the flow you’re imagining is similar to one of these use cases or incorporates parts of one, you can use the template as a starting point.
You can download these templates as JavaScript Object Notation (JSON) files and import them into your environment. For help, see Using DaVinci flow templates.
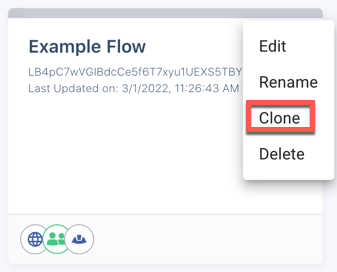
If you have an existing flow that you want to use as a foundation, you can import the JSON for that flow or clone it to create your new flow. To import the JSON, click Add Flow, select Import From JSON, name the flow, and click Import. To clone a flow, select the existing flow and click ... > Clone.
If your flow concept is different from existing templates or flows, you might need to start from an empty flow canvas. To create a blank flow, click Add Flow, select Blank Flow, name the flow, and click Create. You can then build out the flow to fit your specific use case.
Starting with a key part of the experience
After you have started your DaVinci flow, there are a couple of ways that you can progress.
If you started with a template or an existing flow, you can begin by testing how the flow currently works. You can then make changes to the structure to bring it in line with what you’re imagining.
If you’re starting from a blank slate, the process is more open. A good way to begin is to prototype the front-end experience first. You can use the HTML Form capability of an HTTP connector to represent user-facing pages and the Custom HTML Message capability of another HTTP connector to represent messages displayed to the user. Use these capabilities to build a prototype and figure out how you want users to progress. Test the user experience to make sure it matches what you imagine.
Using the HTML Form capability of the HTTP connector is a great way to prototype user inputs without having to write any HTML code. For messages displayed to the user, the Custom HTML Message capability provides a quick way to print out data. As you get closer to making your flow pixel perfect, you can substitute in the Custom HTML Template to give you full control over the HTML, CSS, and JavaScript.
After you have the user-facing piece assembled, you can add nodes to perform backend actions and replace the test HTML forms with pages that match your style and branding.
To map out the logical execution of your flow, start by using the Functions connector. This allows the logical evaluation of outputs from previous nodes to determine forks in the flow. To make your flow more functional, you can add REST API calls or connectors that can interact with external systems.
Dropping our first node
Your flow is built out of multiple nodes, with each node using a single capability from one of your connectors.
You can add a node to the flow canvas in multiple ways. You can click the icon to add a node without any logical links to existing nodes. You can also click and drag a line from an existing node, and a new node is automatically added.
When you create a new node, you specify which connector it uses. If the connector you want isn’t on the list, you can add it on the Connectors tab by clicking Add Connector.
Many connectors have multiple capabilities. For example, a PingOne connector lets you look up users or create new users. When you create a node, you select one capability. The node will show you what information is required for that capability.
You can do a lot of additional configuration to the nodes in your flows. You can name them to make their purpose clear, change their background colors to indicate their role in the flow, and provide additional information, such as logging details.
When you’re done updating a node, click Apply to apply your changes to the node.
|
Changes to the node aren’t preserved if you don’t apply them. |
You can copy and paste individual nodes or groups of nodes into the current flow or into a different flow. Select the nodes, right-click, and select Copy. You can use this to reuse components of existing flows.
Testing early and often
Testing your flows frequently is key to making them work correctly.
At the top of the flow canvas are three buttons: Save, Deploy, and Try Flow.

Save saves all changes to the flow and creates a new version in the version list. Deploy deploys the current version of the flow. Try Flow launches a test run of the flow.
When you’re developing a flow, use these options regularly. Save the current version of the flow, deploy it, and then try it to make sure it’s behaving the way you expect.
If you encounter a new issue with your flow, you can revert to a previous version to prevent the issue and try to diagnose it. Click > Flow Versions, select the earlier version in the list, and click Revert.
You can also disable one or more nodes as part of your troubleshooting. Select and right-click the nodes, then click Disable. This prevents the disabled nodes from being activated during an execution of the flow.
If you want to make a modified version of a flow or use one flow as a basis for a new flow, you can clone or export an existing flow. Cloning a flow creates an identical but distinct copy of the flow with a timestamp of when it was cloned. To clone a flow, locate the flow and click ... > Clone.
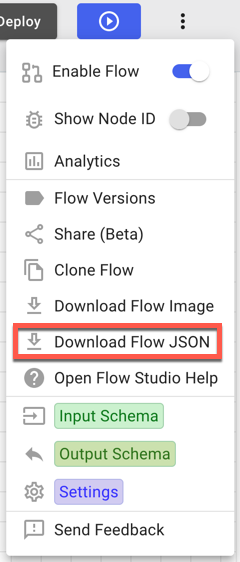
To export a flow, open the flow, then click > Download Flow JSON. When you create a new flow, you can choose to import the saved JSON file as a starting point, even in a different environment.
Troubleshooting your flow
A vital part of building a successful flow is troubleshooting errors when things don’t go as expected. The following are suggestions and techniques to assist in getting your flow back on track.
Clicking Try Flow doesn’t launch flow
If Try Flow is grayed out, verify that your flow has been deployed. After you save your changes, click Deploy to publish them. Additionally, verify that the flow contains UI components.
Flow will not deploy
If a flow does not deploy, verify that it does not include nodes that are missing connector configuration information. Verify that all of the nodes in the flow are connected to the preceding and subsequent nodes.
Flow fails to continue
If a flow progression halts, most likely it’s waiting on user interaction. Adding a Continue button to the form will allow the flow to progress to the next event.
Another possibility is that your flow encountered an error when processing. In the flow, click Analytics to display a list of flow executions. Select the most recent flow run to view the path and details of each node.
Enable Flow debug logging
To view additional details of API requests and responses within flow analytics, enable Debug Logging in More options ( ) > Flow Settings > Logging.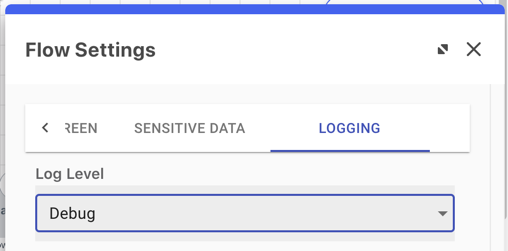
Temporary UI screens
To view the current state of variables, API responses, and other flow data, place temporary UI components within the flow to display their details.
Node IDs
As your flow grows, you might find it helpful to display the node IDs. This allows you to verify that values are being pulled from the correct node. To see where a value such as {{email}} is pulled from, mouse-over the name to display its details (for example, {{local.m3qhb63tfb.payload.output.email}}). In this example, m3qhb63tfb is the node id that contains the email attribute.
Invoking your flow
After you’ve created a flow and performed early testing, you can launch the flow.
Flows can be launched in multiple ways, depending on the content of the flow and the way you want it to appear. See the developer documentation for more information about launching flows using these methods.
Invoking a flow using a redirect
You can launch a flow using a whole-page redirect. The user is sent to a new page with your DaVinci domain in the URL. This method works well for flows involving user interaction in situations where you don’t mind redirecting the user to a new page.