Integrate an application
Connect your existing application to PingOne SSO for SaaS Apps.
OIDC applications
The PingOne SSO for SaaS Apps OAuth endpoints for OpenID Connect (OIDC) applications are available at https://sso.connect.pingidentity.com/client_id/.well-known/openid-configuration, where client_id is the Client ID entry in the Details section of the summary page for the application.
For more information, see Integrating an OIDC application.
PingOne SSO for SaaS Apps REST Authentication
The PingOne SSO for SaaS Apps REST service uses HTTP Basic authentication. When calling the REST API you need to authenticate to PingOne SSO for SaaS Apps using these credentials (Base64-encoded) in the Basic authentication header:
-
username: Your REST username is the REST API Client ID value automatically assigned in the PingOne SSO for SaaS Apps admin portal on the Account > Integration page. -
password: Your password is also specified on this page as the REST API Client Secret value. You need to assign a REST API Client Secret value before using your credentials. For more information, see Using the global REST API client credentials.
IdP-initiated SSO
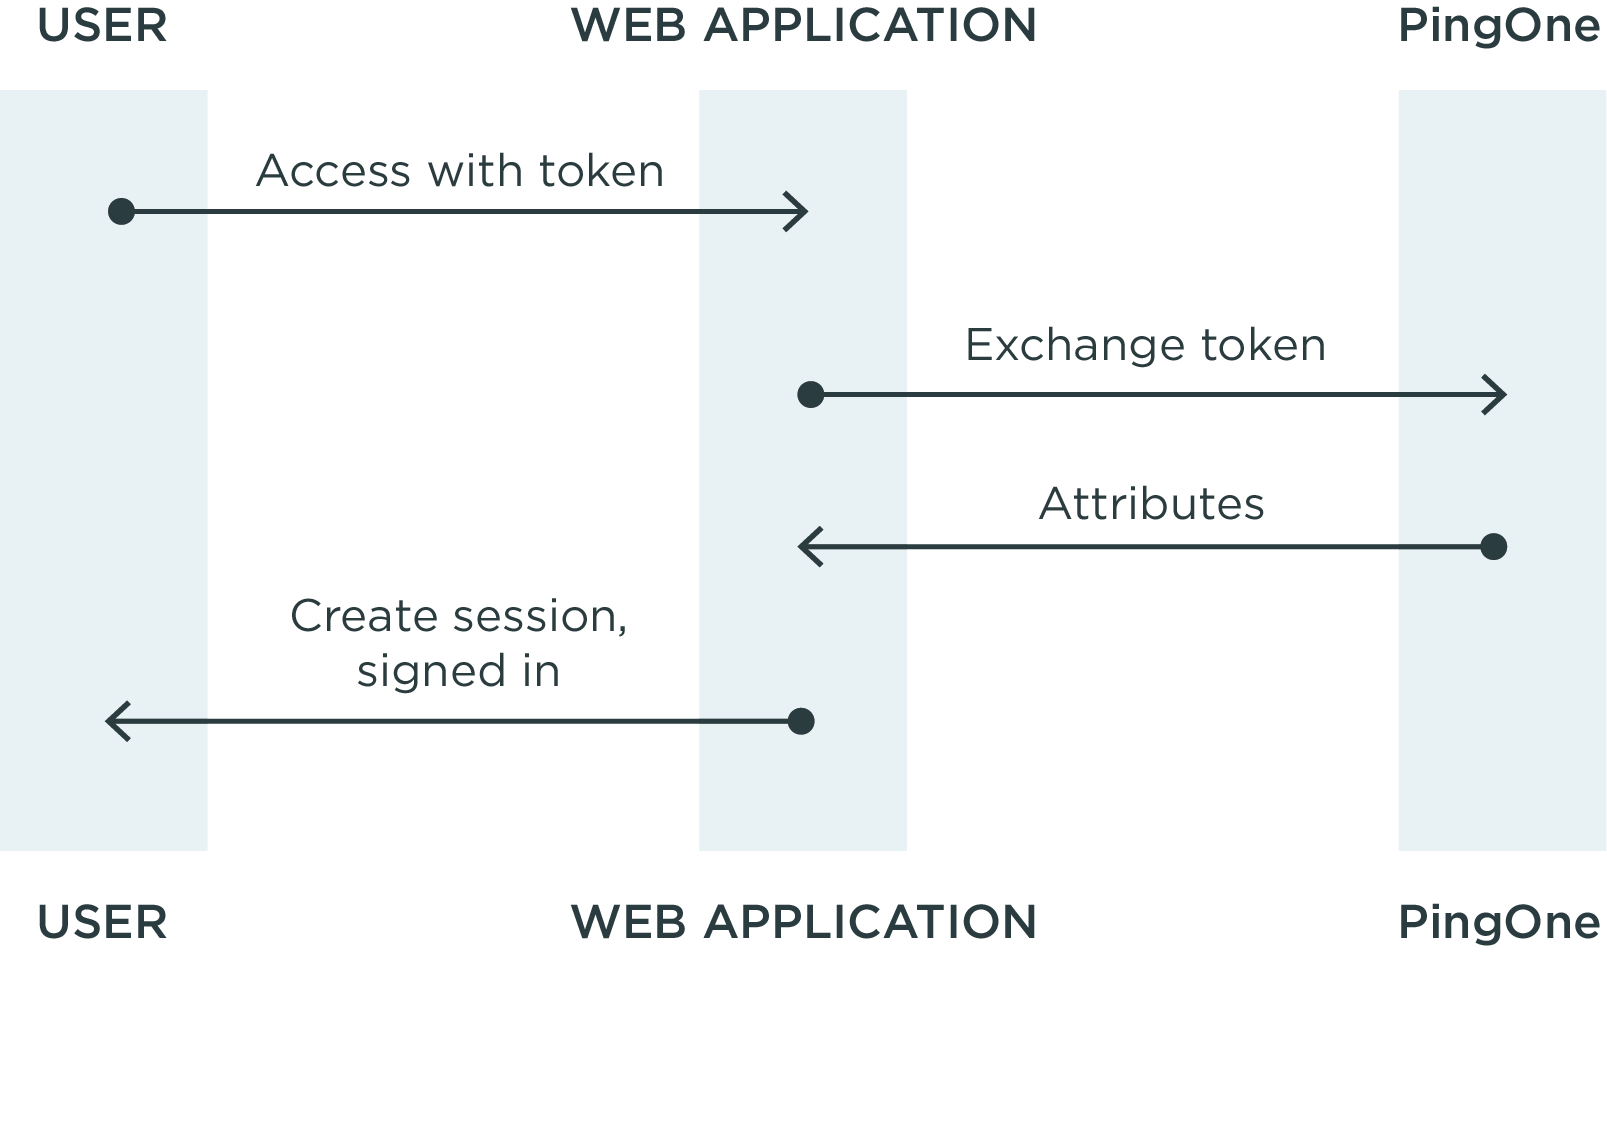
When the single sign-on (SSO) process begins from the identity bridge side, the user authentication to the identity bridge is already done. You just need to create a session for the user when they return to your application with a secure token from PingOne SSO for SaaS Apps. Your application makes a REST call to the PingOne SSO for SaaS Apps REST service using this token. This completes the PingOne SSO for SaaS Apps token exchange that authenticates the user and returns the user attributes. The SSO session for the user is then initiated.
Here’s a sequence diagram illustrating these steps:

For IdP-initiated SSO, start with Process the PingOne SSO for SaaS Apps token exchange.
SP-initiated SSO
When you begin the SSO process from your side, as a Service Provider (SP), you need to:
-
Redirect a user’s browser to PingOne SSO for SaaS Apps to start SSO. PingOne SSO for SaaS Apps will then authenticate the user at the IdP.
-
Create a session for the user when they return to your application with a secure token from PingOne SSO for SaaS Apps.
So, what you need to know about are HTTP redirects and how to create user sessions within your application.
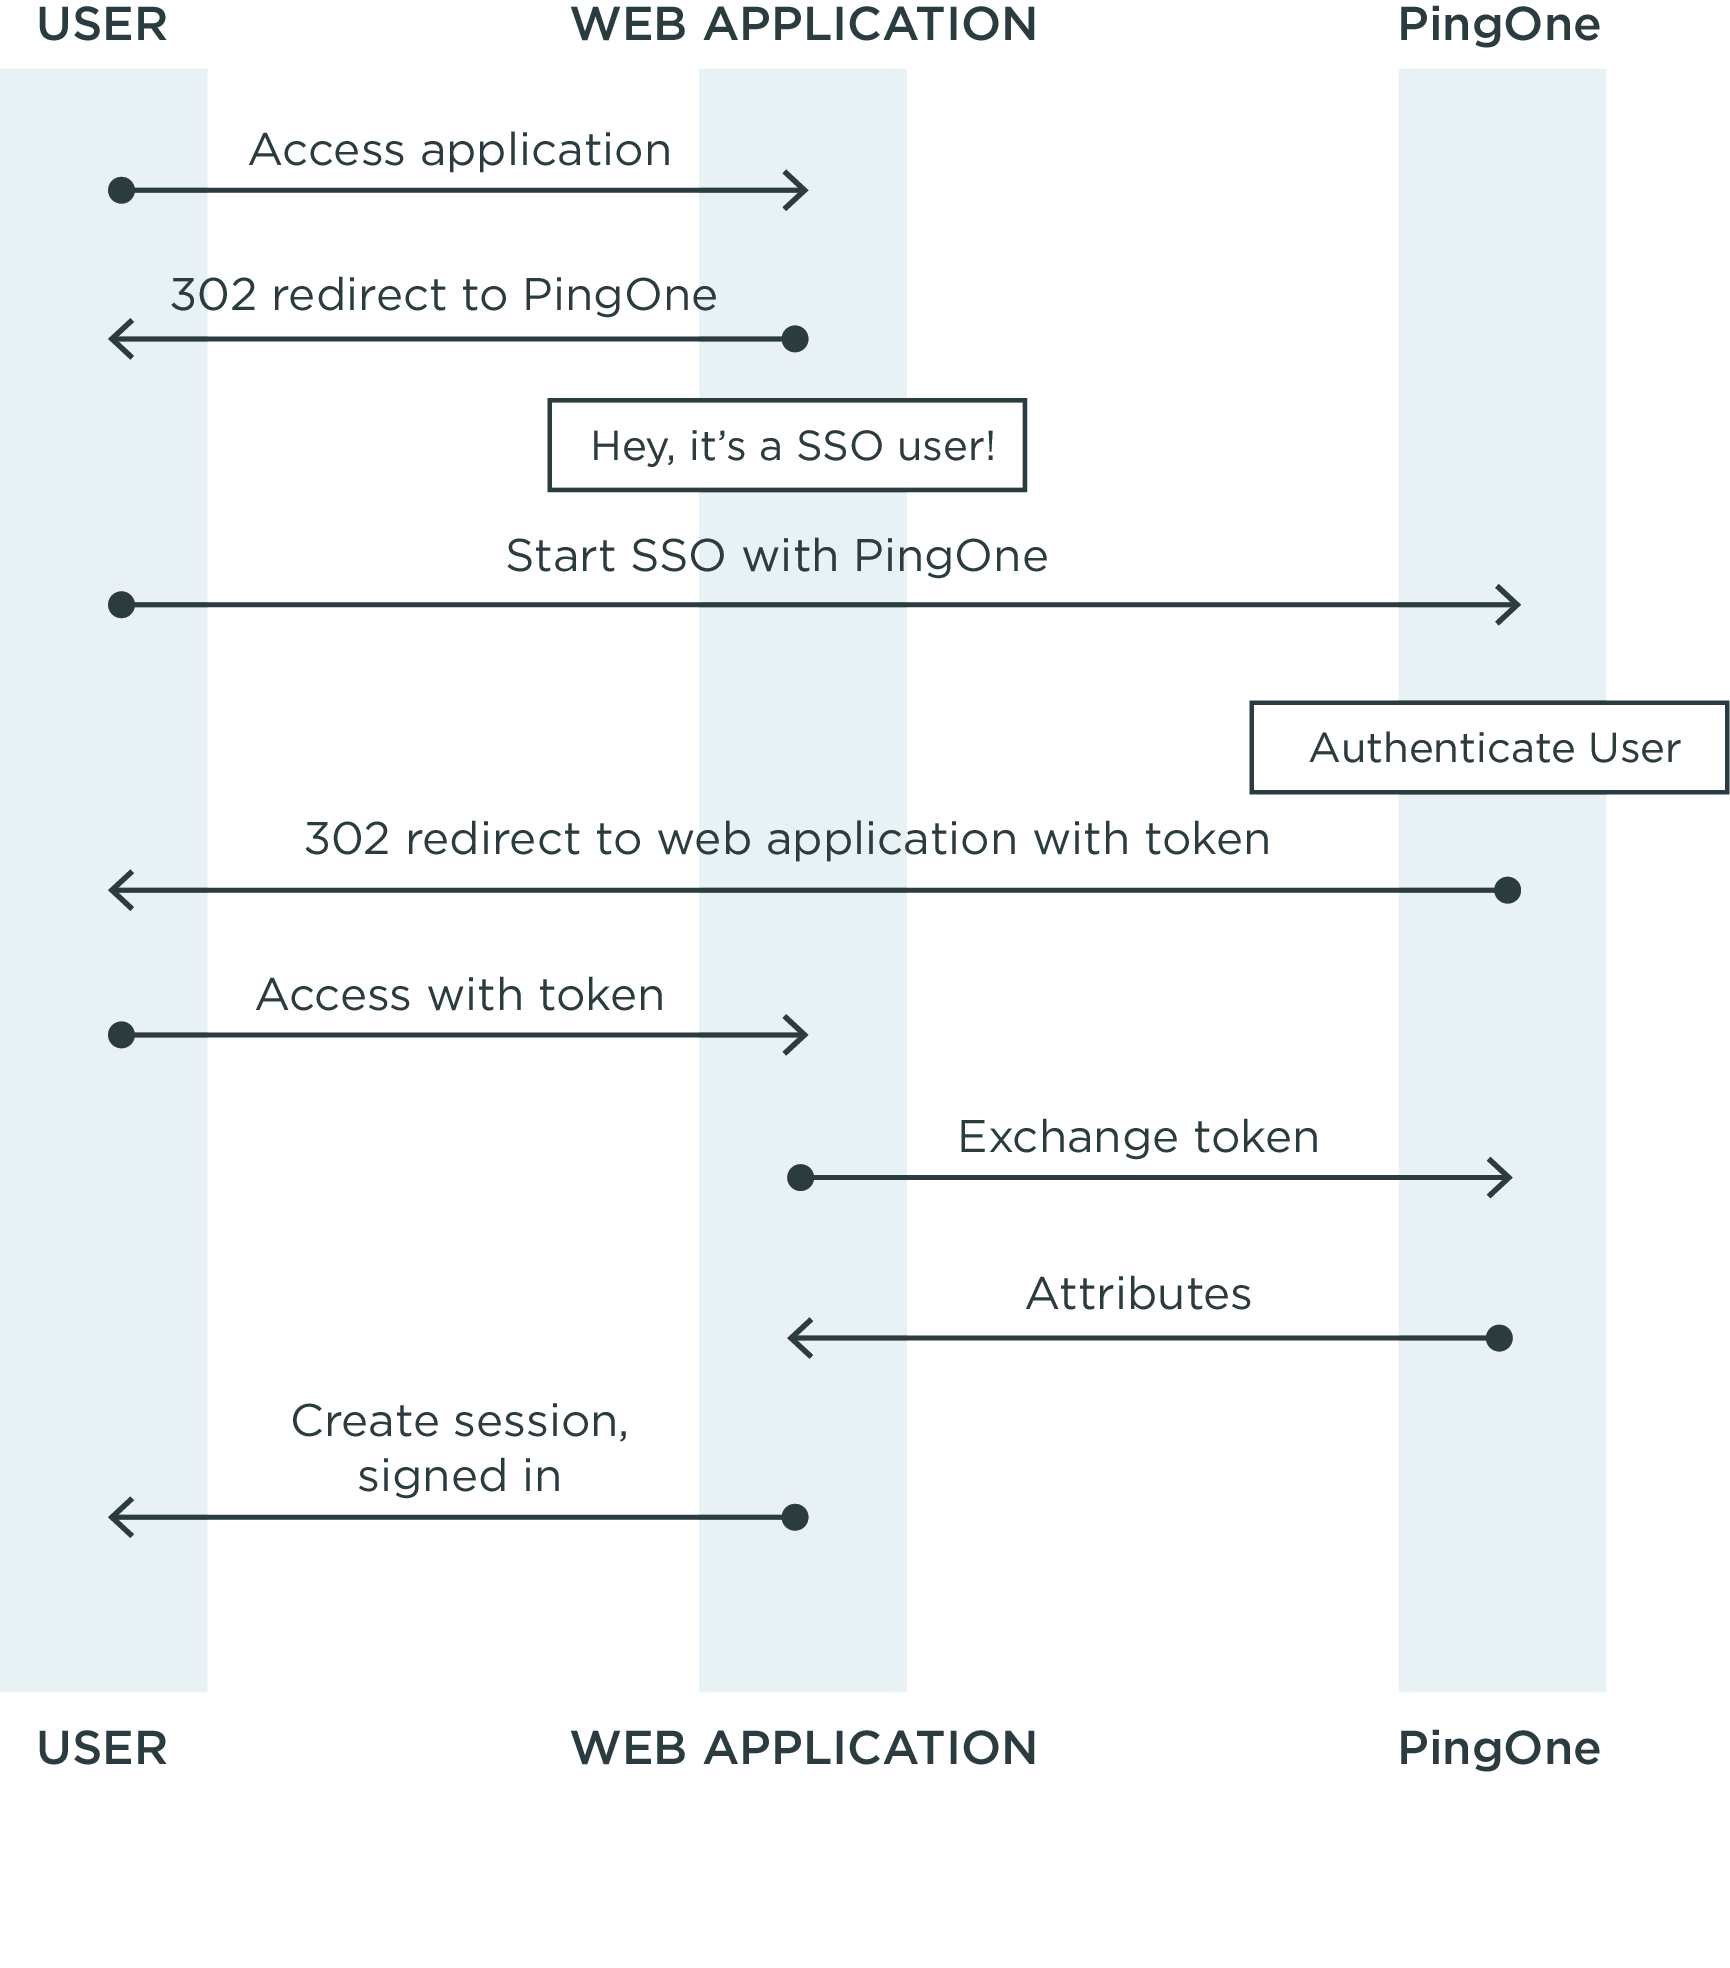
After a user is authenticated through PingOne SSO for SaaS Apps, the user arrives at your application via an HTTP redirect with a security token. Your application makes a REST call to the PingOne SSO for SaaS Apps REST service using this token. This completes the PingOne SSO for SaaS Apps token exchange that authenticates the user and returns the user attributes.
Here’s a sequence diagram illustrating these steps:

After you’ve determined that a user accessing your application is trying to perform SSO, you redirect that user’s browser to PingOne SSO for SaaS Apps using an HTTP 302 redirect. PingOne SSO for SaaS Apps needs to know a few things to successfully process an SSO request:
-
Who is the user?
-
Where should I send this user to authenticate?
-
(Optional) Where should I send this user after they’ve authenticated?
-
(Optional) Where should I send this user if something goes wrong?
For SP-initiated SSO, start with Redirect users to PingOne SSO for SaaS Apps (SP-initiated SSO).
PingOne SSO for SaaS Apps token exchange
After authenticating, the user returns to your application with a token. We create this token as a one-time secret between you, the user, and PingOne SSO for SaaS Apps.
The token exchange is a one-time only REST call. After the first call, the token expires. Subsequent calls using this token will return HTTP 404.
You use the PingOne SSO for SaaS Apps REST API to make a REST call and initiate the token exchange. Our Token Resolution Service will process the exchange and we will return the set of attributes for the user.
The PingOne SSO for SaaS Apps token exchange process is secured at each stage:
-
The REST call uses TLS.
-
The REST call is authenticated.
-
The token can only be exchanged by you.
-
The token can only be exchanged once, then it expires.
Your REST call needs to:
-
Identify the token you’re exchanging.
-
Specify the return format for the user attributes.
For more information, see Process the PingOne SSO for SaaS Apps token exchange.
HTTP status codes
HTTP status codes are likely familiar to you. Status codes that can be returned to you include:
| Code | Description |
|---|---|
|
Success. The requested token is returned. |
|
The request format isn’t supported. |
|
The HTTP Basic authentication failed. |
|
The requested resource or token doesn’t exist. For tokens, this can mean the |