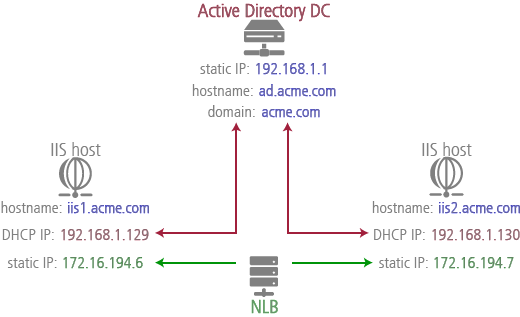
High availability for AD Connect
About this task
Use these instructions when expect to have large numbers of single sign-on (SSO) users for AD Connect, and you want to use Microsoft Network Load Balancing (NLB) as the load-balancing and clustering solution. NLB is an optional Windows Server feature.
| If you’re using a load-balancing and clustering solution other than NLB, you can also apply these settings to your configuration by replacing the NLB-specific steps for those that match your solution. |
You will configure NLB clustering for AD Connect, using the example configuration shown in the illustration as a guideline.
Although you can use this process for other configurations, these instructions are for a minimal configuration, one Active Directory domain controller (DC) and two Windows Server IIS hosts.

| The IIS hosts need two NICs, one for the static IP used by NLB (NLB requires static IPs), the other for the dynamic IP used by the DC. The NLB-dedicated NICs for all IIS hosts should be in the same subnet. |
Steps
-
Install AD Connect on the IIS hosts (iis1.acme.com and ii2.acme.com).
One of the IIS hosts will supply the signing certificate to be used on all other IIS hosts. We will call this the master IIS host.
-
On one of the IIS hosts (here we will use iis1.acme.com), use the Services MMC to disable ADConnect Provisioner Service. This will be the master IIS host.
-
On the master IIS host (iis1.acme.com), export the signing certificate.
-
Open MMC, and from the File menu, select Add/Remove Snap-in. The Add or Remove Snap-ins dialog box is displayed.
-
Select Certificates and click Add. The Certificates Snap-in dialog box is displayed.
-
Select Computer Account and click Next. The Select Computer dialog box is displayed.
-
Select Local computer and click Finish, and OK. The Certificates snap-in is displayed in MMC.
-
Expand Certificates (Local Computer) > Personal and select Certificates. The certificates for the Local Computer account are displayed.
-
Right-click the signing certificate (the certificate name includes the full domain name of the host) and select All tasks > Export. The Certificate Export Wizard is displayed.
-
Follow the Certificate Export Wizard to export the private key.
Result:
The master IIS host signing certificate has been exported to the current user directory.
-
-
On the other IIS hosts (iis2.acme.com), import this signing certificate.
-
Follow the steps above to add the Certificates snap-in to MMC.
-
Expand Certificates (Local Computer) > Trusted People. Right-click Certificates and select All tasks > Import. The Certificate Import Wizard is displayed.
-
Follow the Certificate Import Wizard and select the signing certificate you exported from the master IIS host.
Result:
The master IIS host signing certificate is now imported to the other IIS host.
-
-
On the other IIS hosts (iis2.acme.com), grant the IIS process access to the signing keys.
-
Open MMC and go to Certificates (Local Computer) > Personal > Certificates. Right-click the master IIS host certificate that you imported and select All tasks > Manage private private keys. The permissions dialog box is displayed.
-
Click Add, and in the entry box, enter the object name "IIS_IUSRS". Click OK.
-
Grant Full Control and Read permissions to IIS_IUSRS.
Result:
The IIS host now has the necessary permissions to use the imported signing certificate.
-
-
On the other IIS hosts (iis2.acme.com), update the AD Connect
Web.configfile to use the imported signing certificate.-
Edit the AD Connect file
<installPath>\Ping Identity\ADConnect\SSO\Web.config. -
Change the
saml.signing.certvalue to the name of the imported signing certificate, and save the file.Result:
AD Connect will now use the imported signing certificate.
-
-
On each IIS host (iis1.acme.com and iis2.acme.com), install the Network Load Balancing feature. This is an optional feature for Windows Server.
-
On each IIS host, configure network load balancing.
-
Open Network Load Balancing Manager (in Administrative Tools) and choose to create a new cluster.
-
Enter the static IP address (the NLB-dedicated NIC) of one of the IIS hosts.
-
Select this interface, click Next, and assign a unique host ID.
-
Click Add to create a virtual cluster IP address for this interface. Specify an address in the same subnet as the NLB-dedicated NICs of your IIS hosts.
The virtual cluster IP is the address you will use to access AD Connect. Do not use the IP addresses (static or dynamic) assigned to the IIS hosts. -
If you’re deploying the IIS hosts in a VM (virtual machine), set the cluster operation mode to Multicast. Otherwise, set this mode to Unicast.
Microsoft recommends using Unicast as the cluster operation mode. Unicast is compatible with all routers, switches and network devices. include::partial$p14e_p1refs_vm.adoc[tags=VM]recommends using Multicast if you’re configuring NLB clusters on VMs.
-
Optional: Set any port rules you consider necessary.
-
When the information for the new cluster node (the IIS host) indicates the node is in a Converged state, right-click the node and select Add Host to Cluster.
Result:
The IIS host is now configured for NLB.
-
-
Repeat the above steps for each remaining IIS host (iis2.acme.com).
Result
You should now be able to power cycle a clustered IIS host, with automatic failover to another IIS host in the cluster. You also can add additional IIS hosts to the cluster as needed.