Gateway guide
This guide shows you how to set up examples that use IG. It is for access management designers and administrators who develop, build, deploy, and maintain IG for their organizations.
This guide assumes familiarity with the following topics:
-
Hypertext Transfer Protocol (HTTP), including how clients and servers exchange messages, and the role that a reverse proxy (gateway) plays
-
JavaScript Object Notation (JSON), which is the format for IG configuration files
-
Managing services on operating systems and application servers
-
Configuring network connections on operating systems
-
Managing Public Key Infrastructure (PKI) used to establish HTTPS connections
-
Access management for web applications
Depending on the features you use, you should also have basic familiarity with the following topics:
-
Lightweight Directory Access Protocol (LDAP) if you use IG with LDAP directory services
-
Structured Query Language (SQL) if you use IG with relational databases
-
Configuring AM if you use password capture and replay, or if you plan to follow the OAuth 2.0 or SAML 2.0 tutorials
-
The Groovy programming language if you plan to extend IG with scripts
-
The Java programming language if you plan to extend IG with plugins, and Apache Maven for building plugins
Example installation for this guide
Unless otherwise stated, the examples in this guide assume the following installation:
-
IG accessible on
http://ig.example.com:8080andhttps://ig.example.com:8443, as described in Quick install. -
Sample application installed on http://app.example.com:8081, as described in Use the sample application.
-
AM installed on http://am.example.com:8088/openam, with the default configuration.
If you use a different configuration, substitute in the procedures accordingly.
Set up AM
This documentation contains procedures for setting up items in AM that you can use with IG. For more information about setting up AM, refer to the Access Management docs.
Authenticate an IG agent to AM
|
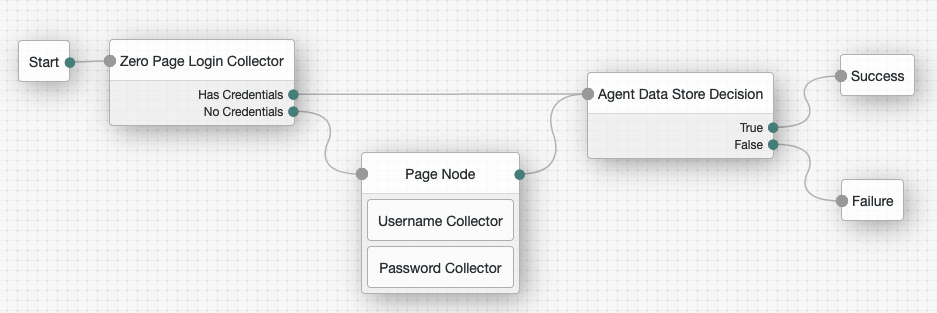
This section describes how to create an authentication tree to authenticate an IG agent to AM. The tree has the following requirements:
-
It must be called
Agent -
Its nodes must pass the agent credentials to the Agent Data Store Decision node.
When you define a tree in AM, that same tree is used for all instances of IG, Java agent, and Web agent. Consider this point if you change the tree configuration.
-
On the Realms page of the AM admin UI, choose the realm in which to create the authentication tree.
-
On the Realm Overview page, click Authentication > Trees > Create tree.
-
Create a tree named
Agent.The authentication tree designer is displayed, with the
Startentry point connected to theFailureexit point, and aSuccessnode.The authentication tree designer provides the following features on the toolbar:
Button Usage 
Lay out and align nodes according to the order they are connected.

Toggle the designer window between normal and full-screen layout.

Remove the selected node. Note that the
Startentry point cannot be deleted. -
Using the Filter bar, find and then drag the following nodes from the Components panel into the designer area:
-
Zero Page Login Collector node to check whether the agent credentials are provided in the incoming authentication request, and use their values in the following nodes.
This node is required for compatibility with Java agent and Web agent.
-
Page node to collect the agent credentials if they are not provided in the incoming authentication request, and use their values in the following nodes.
-
Agent Data Store Decision node to verify the agent credentials match the registered IG agent profile.
Many nodes can be configured in the panel on the right side of the page. Unless otherwise stated, do not configure the nodes and use only the default values. -
-
Drag the following nodes from the Components panel into the Page node:
-
Username Collector node to prompt the user to enter their username.
-
Password Collector node to prompt the user to enter their password.
-
-
Connect the nodes as follows and save the tree:
Register an IG agent in AM 7 and later
In AM 7 and later versions, follow these steps to register an agent that acts on behalf of IG.
-
In the AM admin UI, select the top-level realm, and then select Applications > Agents > Identity Gateway.
-
Add an agent with the following configuration, leaving other options blank or with the default value:
-
For SSO
-
For CDSSO
-
Agent ID :
ig_agent -
Password :
password
-
Agent ID :
ig_agent -
Password :
password -
Redirect URL for CDSSO :
https://ig.ext.com:8443/home/cdsso/redirect -
Login URL Template for CDSSO: Configure this property to direct login to a custom URL instead of the default AM login page.
-
Register an IG agent in AM 6.5 and earlier
In AM 6.5 and earlier versions, follow these steps to register an agent that acts on behalf of IG.
-
In the AM admin UI, select the top-level realm, and then select Applications > Agents > Java (or J2EE ).
-
Add an agent with the following configuration, leaving other options blank or with the default value:
-
For SSO
-
For CDSSO
-
Agent ID :
ig_agent -
Agent URL :
http://ig.example.com:8080/agentapp -
Server URL :
http://am.example.com:8088/openam -
Password :
password
-
Agent ID :
ig_agent_cdsso -
Agent URL :
http://ig.ext.com:8080/agentapp -
Server URL :
http://am.example.com:8088/openam -
Password :
password -
Login URL Template for CDSSO: Configure this property to direct login to a custom URL instead of the default AM login page.
-
-
On the Global tab, deselect Agent Configuration Change Notification.
This option stops IG from being notified about agent configuration changes in AM. IG doesn’t need these notifications.
-
(For CDSSO) On the SSO tab, select the following values:
-
Cross Domain SSO : Deselect this option
-
CDSSO Redirect URI :
/home/cdsso/redirect
-
-
(For CDSSO and policy enforcement) On the SSO tab, select the following values:
-
Cross Domain SSO : Deselect this option
-
CDSSO Redirect URI :
/home/pep-cdsso/redirect
-
Set up a demo user in AM
AM is provided with a demo user in the top-level realm, with the following credentials:
-
ID/username:
demo -
Last name:
user -
Password:
Ch4ng31t -
Email address:
demo@example.com -
Employee number:
123
For information about how to manage identities in AM, refer to AM’s Identity stores.
Find the AM session cookie name
In routes that use AmService, IG retrieves AM’s SSO
cookie name from the ssoTokenHeader property or from AM’s
/serverinfo/* endpoint.
In other circumstances where you need to find the SSO cookie name, access
http://am-base-url/serverinfo/*. For example, access the
AM endpoint with curl:
$ curl http://am.example.com:8088/openam/json/serverinfo/*Authentication
Single sign-on (SSO)
The following sections describe how to set up SSO for requests in the same domain:
|
To require users to authenticate in the correct realm for security reasons, configure SSO or CDSSO with a PolicyEnforcementFilter, that refers to an AM policy where the realm is enforced. For an example, refer to Require users to authenticate to a specific realm. |
In SSO using the SingleSignOnFilter, IG processes a request using authentication provided by AM. IG and the authentication provider must run on the same domain.
The following sequence diagram shows the flow of information during SSO between IG and AM as the authentication provider.

-
The browser sends an unauthenticated request to access the sample app.
-
IG intercepts the request, and redirects the browser to AM for authentication.
-
AM authenticates the user, creates an SSO token.
-
AM redirects the request back to the original URI with the token in a cookie, and the browser follows the redirect to IG.
-
IG validates the token it gets from the cookie. It then adds the AM session info to the request, and stores the SSO token in the context for use by downstream filters and handlers.
-
IG forwards the request to the sample app, and the sample app returns the requested resource to the browser.
SSO through the default AM authentication tree
This section gives an example of how to authenticate by using SSO and the default authentication service provided in AM.
Before you start, prepare AM, IG, and the sample application as described in Example installation for this guide.
-
Set up AM:
-
(From AM 6.5.3) Select Services > Add a Service, and add a Validation Service with the following Valid goto URL Resources:
-
http://ig.example.com:8080/* -
http://ig.example.com:8080/*?*
-
-
Select Applications > Agents > Identity Gateway and register an IG agent with the following values:
-
Agent ID:
ig_agent -
Password:
passwordFor AM 6.5.x and earlier versions, register an agent as described in Register an IG agent in AM 6.5 and earlier.
Use secure passwords in a production environment. Consider using a password manager to generate secure passwords.
-
-
(Optional) Authenticate the agent to AM as described in Authenticate an IG agent to AM.
IG agents are automatically authenticated to AM by a deprecated authentication module in AM. This step is currently optional, but will be required when authentication chains and modules are removed in a future release of AM. -
Select Configure > Global Services > Platform, and add
example.comas an AM cookie domain.By default, AM sets host-based cookies. After authentication with AM, requests can be redirected to AM instead of to the resource.
-
-
Set up IG:
-
Set an environment variable for the IG agent password, and then restart IG:
$ export AGENT_SECRET_ID='cGFzc3dvcmQ='bashThe password is retrieved by a SystemAndEnvSecretStore, and must be base64-encoded.
-
Add the following route to IG to serve the sample application .css and other static resources:
-
Linux
-
Windows
$HOME/.openig/config/routes/00-static-resources.json
%appdata%\OpenIG\config\routes\00-static-resources.json
{
  "name" : "00-static-resources",
  "baseURI" : "http://app.example.com:8081",
  "condition": "${find(request.uri.path,'^/css') or matchesWithRegex(request.uri.path, '^/.*\\\\.ico$') or matchesWithRegex(request.uri.path, '^/.*\\\\.gif$')}",
  "handler": "ReverseProxyHandler"
}
json -
-
Add the following route to IG:
-
Linux
-
Windows
$HOME/.openig/config/routes/sso.json
%appdata%\OpenIG\config\routes\sso.json
{ "name": "sso", "baseURI": "http://app.example.com:8081", "condition": "${find(request.uri.path, '^/home/sso$')}", "heap": [ { "name": "SystemAndEnvSecretStore-1", "type": "SystemAndEnvSecretStore" }, { "name": "AmService-1", "type": "AmService", "config": { "agent": { "username": "ig_agent", "passwordSecretId": "agent.secret.id" }, "secretsProvider": "SystemAndEnvSecretStore-1", "url": "http://am.example.com:8088/openam/" } } ], "handler": { "type": "Chain", "config": { "filters": [ { "name": "SingleSignOnFilter-1", "type": "SingleSignOnFilter", "config": { "amService": "AmService-1" } } ], "handler": "ReverseProxyHandler" } } }jsonFor information about how to set up the IG route in Studio, refer to Policy enforcement in Structured Editor or Protecting a web app with Freeform Designer.
-
-
-
Test the setup:
-
If you are logged in to AM, log out and clear any cookies.
-
Go to http://ig.example.com:8080/home/sso, and log in to AM as user
demo, passwordCh4ng31t.The SingleSignOnFilter passes the request to sample application, which returns the sample application home page.
-
SSO through a specified AM authentication tree
This section gives an example of how to authenticate by using SSO and the example authentication tree provided in AM, instead of the default authentication tree.
-
Set up the example in Authenticate with SSO through the default authentication service.
-
Add the following route to IG:
-
Linux
-
Windows
$HOME/.openig/config/routes/sso-authservice.json
%appdata%\OpenIG\config\routes\sso-authservice.json
{ "name": "sso-authservice", "baseURI": "http://app.example.com:8081", "condition": "${find(request.uri.path, '^/home/sso-authservice')}", "heap": [ { "name": "SystemAndEnvSecretStore-1", "type": "SystemAndEnvSecretStore" }, { "name": "AmService-1", "type": "AmService", "config": { "agent": { "username": "ig_agent", "passwordSecretId": "agent.secret.id" }, "secretsProvider": "SystemAndEnvSecretStore-1", "url": "http://am.example.com:8088/openam/" } } ], "handler": { "type": "Chain", "config": { "filters": [ { "name": "SingleSignOnFilter-1", "type": "SingleSignOnFilter", "config": { "amService": "AmService-1", "authenticationService": "Example" } } ], "handler": "ReverseProxyHandler" } } }jsonNotice the features of the route compared to
sso.json:-
The route matches requests to
/home/sso-authservice. -
The
authenticationServiceproperty of SingleSignOnFilter refers toExample, the name of the example authentication tree in AM. This authentication tree is used for authentication instead of the AM admin UI.
-
-
Test the setup:
-
If you are logged in to AM, log out and clear any cookies.
-
Go to http://ig.example.com:8080/home/sso-authservice, and note that the login page is different to that returned in Authenticate with SSO through the default authentication service.
-
Cross-domain single sign-on (CDSSO)
The following sections describe how to set up CDSSO for requests in a different domain:
|
To require users to authenticate in the correct realm for security reasons, configure SSO or CDSSO with a PolicyEnforcementFilter, that refers to an AM policy where the realm is enforced. For an example, refer to Require users to authenticate to a specific realm. |
The SSO mechanism described in Authenticating with SSO can be used when IG and AM are running in the same domain. When IG and AM are running in different domains, AM cookies are not visible to IG because of the same-origin policy.
CDSSO using the CrossDomainSingleSignOnFilter provides a mechanism to push tokens issued by AM to IG running in a different domain.
The following sequence diagram shows the flow of information between
IG, AM, and the sample application during CDSSO. In this
example, AM is running on am.example.com, and IG is
running on ig.ext.com.

1. The browser sends an unauthenticated request to access the sample app.
2-3. IG intercepts the request, and redirects the browser to AM for authentication.
4. AM authenticates the user and creates a CDSSO token.
5. AM responds to a successful authentication with an HTML autosubmit form containing the issued token.
6. The browser loads the HTML and autosubmit form parameters to the IG callback URL for the redirect endpoint.
7.
When verificationSecretId in CrossDomainSingleSignOnFilter is configured,
IG verifies the AM session token signature.
When verificationSecretId is not configured, IG discovers
and uses the AM JWK set to verify the signature of AM session
tokens. If the JWK set isn’t available, IG does not verify the tokens.
|
8. IG checks the nonce found inside the CDSSO token to confirm that the callback comes from an authentication initiated by IG.
9.
IG constructs a cookie, and fulfills it with a cookie name, path, and
domain, using the CrossDomainSingleSignOnFilter property authCookie. The
domain must match that set in the AM IG agent.
10-11. IG redirects the request back to the original URI, with the cookie, and the browser follows the redirect back to IG.
12. IG validates the SSO token inside of the CDSSO token
13-15. IG adds the AM session info to the request, and stores the SSO token and CDSSO token in the contexts for use by downstream filters and handlers.
16-18. IG forwards the request to the sample application, and the sample application returns the requested resource to the browser.
Before you start, prepare AM, IG, and the sample application, as described in Quick install.
-
Set up AM:
-
Select Applications > Agents > Identity Gateway and register an IG agent with the following values:
-
Agent ID:
ig_agent_cdsso -
Password:
password -
Redirect URL for CDSSO:
https://ig.ext.com:8443/home/cdsso/redirectUse secure passwords in a production environment. Consider using a password manager to generate secure passwords. For AM 6.5.x and earlier versions, register an agent as described in Register an IG agent in AM 6.5 and earlier.
-
-
(Optional) Authenticate the agent to AM as described in Authenticate an IG agent to AM.
IG agents are automatically authenticated to AM by a deprecated authentication module in AM. This step is currently optional, but will be required when authentication chains and modules are removed in a future release of AM. -
(From AM 6.5.3) Select Services > Add a Service, and add a Validation Service with the following Valid goto URL Resources:
-
https://ig.ext.com:8443/* -
https://ig.ext.com:8443/*?*
-
-
Select Configure > Global Services > Platform, and add
example.comas an AM cookie domain.By default, AM sets host-based cookies. After authentication with AM, requests can be redirected to AM instead of to the resource.
-
-
Set up IG:
-
Set up IG for HTTPS, as described in Configure IG for HTTPS (server-side).
-
Add the following
sessionconfiguration toadmin.json, to ensure that the browser passes the session cookie in the form-POST to the redirect endpoint (step 6 of Information flow during CDSSO):{ "connectors": […], "session": { "cookie": { "sameSite": "none", "secure": true } }, "heap": […] }This step is required for the following reasons:
-
When
sameSiteisstrictorlax, the browser does not send the session cookie, which contains the nonce used in validation. If IG doesn’t find the nonce, it assumes that the authentication failed. -
When
secureisfalse, the browser is likely to reject the session cookie.For more information, refer to admin.json.
-
-
Set an environment variable for the IG agent password, and then restart IG:
$ export AGENT_SECRET_ID='cGFzc3dvcmQ='bashThe password is retrieved by a SystemAndEnvSecretStore, and must be base64-encoded.
-
Add the following route to IG to serve the sample application .css and other static resources:
-
Linux
-
Windows
$HOME/.openig/config/routes/00-static-resources.json
%appdata%\OpenIG\config\routes\00-static-resources.json
{
  "name" : "00-static-resources",
  "baseURI" : "http://app.example.com:8081",
  "condition": "${find(request.uri.path,'^/css') or matchesWithRegex(request.uri.path, '^/.*\\\\.ico$') or matchesWithRegex(request.uri.path, '^/.*\\\\.gif$')}",
  "handler": "ReverseProxyHandler"
}
json -
-
Add the following route to IG:
-
Linux
-
Windows
$HOME/.openig/config/routes/cdsso.json
%appdata%\OpenIG\config\routes\cdsso.json
{ "name": "cdsso", "baseURI": "http://app.example.com:8081", "condition": "${find(request.uri.path, '^/home/cdsso')}", "heap": [ { "name": "SystemAndEnvSecretStore-1", "type": "SystemAndEnvSecretStore" }, { "name": "AmService-1", "type": "AmService", "config": { "url": "http://am.example.com:8088/openam", "realm": "/", "agent": { "username": "ig_agent_cdsso", "passwordSecretId": "agent.secret.id" }, "secretsProvider": "SystemAndEnvSecretStore-1", "sessionCache": { "enabled": false } } } ], "handler": { "type": "Chain", "config": { "filters": [ { "name": "CrossDomainSingleSignOnFilter-1", "type": "CrossDomainSingleSignOnFilter", "config": { "redirectEndpoint": "/home/cdsso/redirect", "authCookie": { "path": "/home", "name": "ig-token-cookie" }, "amService": "AmService-1" } } ], "handler": "ReverseProxyHandler" } } }jsonNotice the following features of the route:
-
The route matches requests to
/home/cdsso. -
The agent password for AmService is provided by a SystemAndEnvSecretStore in the heap.
-
IG discovers and uses the AM JWK set to verify the signature of AM session tokens. If the JWK set isn’t available, IG does not verify the tokens.
-
-
-
Test the setup:
-
If you are logged in to AM, log out and clear any cookies.
-
Go to https://ig.ext.com:8443/home/cdsso.
If you see warnings that the site is not secure, respond to the warnings to access the site.
The CrossDomainSingleSignOnFilter redirects the request to AM for authentication.
-
Log in to AM as user
demo, passwordCh4ng31t.When you have authenticated, AM calls
/home/cdsso/redirect, and includes the CDSSO token. The CrossDomainSingleSignOnFilter passes the request to sample app, which returns the home page.
-
Password replay from AM
Use IG with AM’s password capture and replay to bring SSO to legacy web applications, without the need to edit, upgrade, or recode. This feature helps you to integrate legacy web applications with other applications using the same user identity.
For an alternative configuration using an AM policy agent instead of IG’s CapturedUserPasswordFilter, refer to the documentation for earlier versions of IG.
The following figure illustrates the flow of requests when an unauthenticated user accesses a protected application. After authenticating with AM, the user is logged into the application with the username and password from the AM login session.
![Data flow to log in to a protect appl[[figure-password-capture-replay-agentless]]](_images/password-capture-replay-agentless-c361cc5f3f3421dfd089d60f1f7c4d2158a29813.svg)
-
IG intercepts the browser’s HTTP GET request.
-
Because the user is not authenticated, the SingleSignOnFilter redirects the user to AM for authentication.
-
AM authenticates the user, capturing the login credentials, and storing the encrypted password in the user’s AM session.
-
AM redirects the browser back to the protected application.
-
IG intercepts the browser’s HTTP GET request again:
-
The user is now authenticated, so IG’s SingleSignOnFilter passes the request to the CapturedUserPasswordFilter.
-
The CapturedUserPasswordFilter checks that the SessionInfoContext
${contexts.amSession.properties.sunIdentityUserPassword}is available and notnull. It then decrypts the password and stores it in the CapturedUserPasswordContext, at${contexts.capturedPassword}.
-
-
The PasswordReplayFilter uses the username and decrypted password in the context to replace the request with an HTTP POST of the login form.
-
The sample application validates the credentials.
-
The sample application responds with the user’s profile page.
-
IG then passes the response from the sample application to the browser.
Before you start, prepare AM, IG, and the sample application as described in Example installation for this guide.
-
Generate an AES 256-bit key:
$ openssl rand -base64 32
loH...UFQ=
bash -
Set up AM:
-
(From AM 6.5.3) Select Services > Add a Service, and add a Validation Service with the following Valid goto URL Resources:
-
http://ig.example.com:8080/* -
http://ig.example.com:8080/*?*
-
-
Select Applications > Agents > Identity Gateway and register an IG agent with the following values:
-
Agent ID:
ig_agent -
Password:
passwordFor AM 6.5.x and earlier versions, register an agent as described in Register an IG agent in AM 6.5 and earlier.
Use secure passwords in a production environment. Consider using a password manager to generate secure passwords.
-
-
(Optional) Authenticate the agent to AM as described in Authenticate an IG agent to AM.
IG agents are automatically authenticated to AM by a deprecated authentication module in AM. This step is currently optional, but will be required when authentication chains and modules are removed in a future release of AM. -
Update the Authentication Post Processing Classes for password replay:
-
Select Authentication > Settings > Post Authentication Processing.
-
In Authentication Post Processing Classes, add
com.sun.identity.authentication.spi.JwtReplayPassword.
-
-
Add the AES 256-bit key to AM:
-
Select DEPLOYMENT > Servers, and then select the AM server name,
http://am.example.com:8088/openam.In earlier version of AM, select Configuration > Servers and Sites.
-
Select Advanced, and add the following property:
-
PROPERTY NAME :
com.sun.am.replaypasswd.key -
PROPERTY VALUE : The value of the AES 256-bit key from step 1.
-
-
-
Select Configure > Global Services > Platform, and add
example.comas an AM cookie domain.By default, AM sets host-based cookies. After authentication with AM, requests can be redirected to AM instead of to the resource.
-
-
Set up IG:
-
Set environment variables for the value of the AES 256-bit key in step 1, and the IG agent password, and then restart IG:
$ export AES_KEY='AES 256-bit key'
$ export AGENT_SECRET_ID='cGFzc3dvcmQ='
bash -
Add the following route to IG to serve the sample application .css and other static resources:
-
Linux
-
Windows
$HOME/.openig/config/routes/00-static-resources.json
%appdata%\OpenIG\config\routes\00-static-resources.json
{
  "name" : "00-static-resources",
  "baseURI" : "http://app.example.com:8081",
  "condition": "${find(request.uri.path,'^/css') or matchesWithRegex(request.uri.path, '^/.*\\\\.ico$') or matchesWithRegex(request.uri.path, '^/.*\\\\.gif$')}",
  "handler": "ReverseProxyHandler"
}
json -
-
Add the following route to IG:
-
Linux
-
Windows
$HOME/.openig/config/routes/04-replay.json
%appdata%\OpenIG\config\routes\04-replay.json
{ "name": "04-replay", "condition": "${find(request.uri.path, '^/replay')}", "heap": [ { "name": "SystemAndEnvSecretStore-1", "type": "SystemAndEnvSecretStore", "config": { "mappings": [ { "secretId": "aes.key", "format": { "type": "SecretKeyPropertyFormat", "config": { "format": "BASE64", "algorithm": "AES" } } } ] } }, { "name": "AmService-1", "type": "AmService", "config": { "agent": { "username": "ig_agent", "passwordSecretId": "agent.secret.id" }, "secretsProvider": "SystemAndEnvSecretStore-1", "url": "http://am.example.com:8088/openam/" } }, { "name": "CapturedUserPasswordFilter", "type": "CapturedUserPasswordFilter", "config": { "ssoToken": "${contexts.ssoToken.value}", "keySecretId": "aes.key", "keyType": "AES", "secretsProvider": "SystemAndEnvSecretStore-1", "amService": "AmService-1" } } ], "handler": { "type": "Chain", "config": { "filters": [ { "type": "SingleSignOnFilter", "config": { "amService": "AmService-1" } }, { "type": "PasswordReplayFilter", "config": { "loginPage": "${true}", "credentials": "CapturedUserPasswordFilter", "request": { "method": "POST", "uri": "http://app.example.com:8081/login", "form": { "username": [ "${contexts.ssoToken.info.uid}" ], "password": [ "${contexts.capturedPassword.value}" ] } } } } ], "handler": "ReverseProxyHandler" } } }jsonNotice the following features of the route:
-
The route matches requests to
/replay. -
The agent password for AmService is provided by a SystemAndEnvSecretStore in the heap.
-
If the request does not have a valid AM session cookie, the SingleSignOnFilter redirects the request to AM for authentication.
After authentication, the SingleSignOnFilter passes the request to the next filter, storing the cookie value in an
SsoTokenContext. -
The PasswordReplayFilter uses the CapturedUserPasswordFilter declared in the heap to retrieve the AM password from AM session properties. The CapturedUserPasswordFilter uses the AES 256-bit key to decrypt the password, and then makes it available in a CapturedUserPasswordContext.
The value of the AES 256-bit key is provided by the SystemAndEnvSecretStore.
The PasswordReplayFilter retrieves the username and password from the context. It replaces the browser’s original HTTP GET request with an HTTP POST login request containing the credentials to authenticate to the sample application.
-
-
-
Test the setup:
-
If you are logged in to AM, log out and clear any cookies.
-
Go to http://ig.example.com:8080/replay. The SingleSignOnFilter redirects the request to AM for authentication.
-
Log in to AM as user
demo, passwordCh4ng31t. The request is redirected to the sample application.
-
Password replay from a database
This section describes how to configure IG to get credentials from a database. This example is tested with H2 1.4.197.
The following figure illustrates the flow of requests when IG uses credentials from a database to log a user in to the sample application:

-
IG intercepts the browser’s HTTP GET request.
-
The PasswordReplayFilter confirms that a login page is required, and passes the request to the SqlAttributesFilter.
-
The SqlAttributesFilter uses the email address to look up credentials in H2, and stores them in the request context attributes map.
-
The PasswordReplayFilter retrieves the credentials from the attributes map, builds the login form, and performs the HTTP POST request to the sample app.
-
The sample application validates the credentials, and responds with a profile page.
Before you start, prepare IG and the sample application as described in the Quick install.
-
Set up the database:
-
On your system, add the following data in a comma-separated value file:
-
Linux
-
Windows
/tmp/userfile.txt
C:\Temp\userfile.txt
username,password,fullname,email
george,C0stanza,George Costanza,george@example.com
kramer,N3wman12,Kramer,kramer@example.com
bjensen,H1falutin,Babs Jensen,bjensen@example.com
demo,Ch4ng31t,Demo User,demo@example.com
kvaughan,B5ibery12,Kirsten Vaughan,kvaughan@example.com
scarter,S9rain12,Sam Carter,scarter@example.com
csv -
-
Download and unpack the H2 database, and then start H2:
$ sh /path/to/h2/bin/h2.shbashH2 starts, listening on port 8082, and opens the H2 Console in a browser.
-
In the H2 Console, select the following options, and then select Connect to access the console:
-
Saved Settings :
Generic H2 (Server) -
Setting Name :
Generic H2 (Server) -
Driver Class:
org.h2.Driver -
JDBC URL:
jdbc:h2:~/ig-credentials -
User Name:
sa -
Password :
passwordIf you have run this example before but can’t access the console now, try deleting your local ~/ig-credentialsfiles and starting H2 again.
-
-
In the console, add the following text, and then run it to create the user table:
DROP TABLE IF EXISTS USERS;
CREATE TABLE USERS AS SELECT * FROM CSVREAD('/tmp/userfile.txt');
sql -
In the console, add the following text, and then run it to verify that the table contains the same users as the file:
SELECT * FROM users;sql -
Add the .jar file
/path/to/h2/bin/h2-*.jarto the IG configuration:-
Create the directory
$HOME/.openig/extra, where$HOME/.openigis the instance directory, and add .jar files to the directory.
-
-
-
Set up IG:
-
Set an environment variable for the database password, and then restart IG:
$ export DATABASE_PASSWORD='cGFzc3dvcmQ='bashThe password is retrieved by a SystemAndEnvSecretStore, and must be base64-encoded.
-
Add the following route to IG to serve the sample application .css and other static resources:
-
Linux
-
Windows
$HOME/.openig/config/routes/00-static-resources.json
%appdata%\OpenIG\config\routes\00-static-resources.json
{
  "name" : "00-static-resources",
  "baseURI" : "http://app.example.com:8081",
  "condition": "${find(request.uri.path,'^/css') or matchesWithRegex(request.uri.path, '^/.*\\\\.ico$') or matchesWithRegex(request.uri.path, '^/.*\\\\.gif$')}",
  "handler": "ReverseProxyHandler"
}
json -
-
Add the following route to IG:
-
Linux
-
Windows
$HOME/.openig/config/routes/03-sql.json
%appdata%\OpenIG\config\routes\03-sql.json
{ "heap": [ { "name": "SystemAndEnvSecretStore-1", "type": "SystemAndEnvSecretStore" }, { "name": "JdbcDataSource-1", "type": "JdbcDataSource", "config": { "driverClassName": "org.h2.Driver", "jdbcUrl": "jdbc:h2:tcp://localhost/~/ig-credentials", "username": "sa", "passwordSecretId": "database.password", "secretsProvider": "SystemAndEnvSecretStore-1" } } ], "name": "sql", "condition": "${find(request.uri.path, '^/profile')}", "handler": { "type": "Chain", "baseURI": "http://app.example.com:8081", "config": { "filters": [ { "type": "PasswordReplayFilter", "config": { "loginPage": "${find(request.uri.path, '^/profile/george') and (request.method == 'GET')}", "credentials": { "type": "SqlAttributesFilter", "config": { "dataSource": "JdbcDataSource-1", "preparedStatement": "SELECT username, password FROM users WHERE email = ?;", "parameters": [ "george@example.com" ], "target": "${attributes.sql}" } }, "request": { "method": "POST", "uri": "http://app.example.com:8081/login", "form": { "username": [ "${attributes.sql.USERNAME}" ], "password": [ "${attributes.sql.PASSWORD}" ] } } } } ], "handler": "ReverseProxyHandler" } } }jsonNotice the following features of the route:
-
The route matches requests to
/profile. -
The PasswordReplayFilter specifies a loginPage page property:
-
When a request is an HTTP GET, and the request URI path is
/profile/george, the expression resolves totrue. The request is directed to a login page.The
SqlAttributesFilterspecifies the data source to access, a prepared statement to look up the user’s record, a parameter to pass into the statement, and where to store the search results in the request context attributes map.The
requestobject retrieves the username and password from the context, and replaces the browser’s original HTTP GET request with an HTTP POST login request, containing the credentials to authenticate.The request is for
username, password, but H2 returns the fields asUSERNAMEandPASSWORD. The configuration reflects this difference. -
For other requests, the expression resolves to
false. The request passes to the ReverseProxyHandler, which directs it to the profile page of the sample app.
-
-
-
Test the setup:
-
Go to http://ig.example.com:8080/profile.
Because the property
loginPageresolves tofalse, the PasswordReplayFilter passes the request directly to the ReverseProxyHandler. The sample app returns the login page. -
Go to http://ig.example.com:8080/profile/george.
Because the property
loginPageresolves totrue, the PasswordReplayFilter processes the request to obtain the login credentials. The sample app returns the profile page for George.
-
Password replay from a file
The following figure illustrates the flow of requests when IG uses credentials in a file to log a user in to the sample application:

-
IG intercepts the browser’s HTTP GET request, which matches the route condition.
-
The PasswordReplayFilter confirms that a login page is required, and
-
The FileAttributesFilter uses the email address to look up the user credentials in a file, and stores the credentials in the request context attributes map.
-
The PasswordReplayFilter retrieves the credentials from the attributes map, builds the login form, and performs the HTTP POST request to the sample app.
-
The sample application validates the credentials, and responds with a profile page.
-
The ReverseProxyHandler passes the response to the browser.
Before you start, prepare IG and the sample application as described in the Quick install.
-
On your system, add the following data in a comma-separated value file:
-
Linux
-
Windows
/tmp/userfile.txt
C:\Temp\userfile.txt
username,password,fullname,email
george,C0stanza,George Costanza,george@example.com
kramer,N3wman12,Kramer,kramer@example.com
bjensen,H1falutin,Babs Jensen,bjensen@example.com
demo,Ch4ng31t,Demo User,demo@example.com
kvaughan,B5ibery12,Kirsten Vaughan,kvaughan@example.com
scarter,S9rain12,Sam Carter,scarter@example.com
csv -
-
Set up IG:
-
Add the following route to IG to serve the sample application .css and other static resources:
-
Linux
-
Windows
$HOME/.openig/config/routes/00-static-resources.json
%appdata%\OpenIG\config\routes\00-static-resources.json
{
  "name" : "00-static-resources",
  "baseURI" : "http://app.example.com:8081",
  "condition": "${find(request.uri.path,'^/css') or matchesWithRegex(request.uri.path, '^/.*\\\\.ico$') or matchesWithRegex(request.uri.path, '^/.*\\\\.gif$')}",
  "handler": "ReverseProxyHandler"
}
json -
-
Add the following route to IG:
-
Linux
-
Windows
$HOME/.openig/config/routes/02-file.json
%appdata%\OpenIG\config\routes\02-file.json
{ "name": "02-file", "condition": "${find(request.uri.path, '^/profile')}", "capture": "all", "handler": { "type": "Chain", "baseURI": "http://app.example.com:8081", "config": { "filters": [ { "type": "PasswordReplayFilter", "config": { "loginPage": "${find(request.uri.path, '^/profile/george') and (request.method == 'GET')}", "credentials": { "type": "FileAttributesFilter", "config": { "file": "/tmp/userfile.txt", "key": "email", "value": "george@example.com", "target": "${attributes.credentials}" } }, "request": { "method": "POST", "uri": "http://app.example.com:8081/login", "form": { "username": [ "${attributes.credentials.username}" ], "password": [ "${attributes.credentials.password}" ] } } } } ], "handler": "ReverseProxyHandler" } } }jsonNotice the following features of the route:
-
The route matches requests to
/profile. -
The
PasswordReplayFilterspecifies aloginPagepage property:-
When a request is an HTTP GET, and the request URI path is
/profile/george, the expression resolves totrue. The request is directed to a login page.The
FileAttributesFilterlooks up the key and value in/tmp/userfile.txt, and stores them in the context.The
requestobject retrieves the username and password from the context, and replaces the browser’s original HTTP GET request with an HTTP POST login request, containing the credentials to authenticate. -
For other requests, the expression resolves to
false. The request passes to the ReverseProxyHandler, which directs it to the profile page of the sample app.
-
-
-
-
Test the setup:
-
Go to http://ig.example.com:8080/profile/george.
Because the property
loginPageresolves totrue, the PasswordReplayFilter processes the request to obtain the login credentials. The sample app returns the profile page for George. -
Go to http://ig.example.com:8080/profile/bob, or to any other URI starting with
http://ig.example.com:8080/profile.Because the property
loginPageresolves tofalse, the PasswordReplayFilter passes the request directly to the ReverseProxyHandler. The sample app returns the login page.
-
Session cache eviction
When WebSocket notifications are enabled in IG, IG receives notifications when the following events occur:
-
A user logs out of AM
-
An AM session is modified, closed, or times out
-
An AM admin forces logout of user sessions (from AM 7.3)
The following procedure gives an example of how to change the configurations in Single sign-on and Cross-domain single sign-on to receive WebSocket notifications for session logout, and to evict entries related to the session from the cache. For information about WebSocket notifications, refer to WebSocket notifications.
Before you start, set up and test the example in Authenticating with SSO.
-
Websocket notifications are enabled by default. If they are disabled, enable them by adding the following configuration to the AmService in your route:
"notifications": {
  "enabled": true
}
json -
Enable the session cache by adding the following configuration to the AmService in your route:
"sessionCache": {
  "enabled": true
}
json -
In
logback.xmladd the following logger for WebSocket notifications, and then restart IG:<logger name="org.forgerock.openig.tools.notifications.ws" level="TRACE" />xmlFor information, refer to Changing the log level for different object types.
-
Go to http://ig.example.com:8080/home/sso, and log in to AM as user
demo, passwordCh4ng31t. -
On the AM console, log the demo user out of AM to end the AM session.
-
Note that the IG system logs are updated with Websocket notifications about the logout. The following example uses AM 7.3:
... | TRACE | vert.x-eventloop-thread-2 | o.f.o.t.n.w.SubscriptionService | @system | Received a message: { "topic": "/agent/session.v2", "timestamp": "...", "body": { "sessionuid": "58c...573", "eventType": "LOGOUT" } }
... | TRACE | vert.x-eventloop-thread-2 | o.f.o.t.n.w.SubscriptionService | @system | Received a notification: { "topic": "/agent/session.v2", "timestamp": "...", "body": { "sessionuid": "58c...573", "eventType": "LOGOUT" } }
none
Policy enforcement
About policy enforcement
IG as a policy enforcement point (PEP) uses the PolicyEnforcementFilter to intercept requests for a resource and provide information about the request to AM.
AM as a policy decision point (PDP) evaluates requests based on their context and the configured policies. AM then returns decisions that indicate what actions are allowed or denied, as well as any advices, subject attributes, or static attributes for the specified resources.
For more information, refer to the PolicyEnforcementFilter and AM’s Authentication and SSO guide.
Deny requests without advices
The following image shows a simplified flow of information when AM denies a request without advices.

Deny requests with advices as parameters in a redirect response
The following image shows a simplified flow of information when AM denies a request with advices and IG returns the advices as parameters in a redirect response.
This is the default flow, most used for web applications.

Deny requests with advices in a header
The following image shows a simplified flow of information when the
request to IG includes an x-authenticate-response header with the
value header. If the header has any other value, the flow in
Deny requests with advices as parameters in a redirect response takes place.
To change the name of the x-authenticate-response header, refer to the
authenticateResponseRequestHeader property of the
PolicyEnforcementFilter.
In this flow, AM denies the request with advices, and IG sends
the response with the advices in the WWW-authenticate header.
Use this method for SDKs and single page applications. Placing advices in a header gives these applications more options for handling the advices.

Consider the following example GET with an x-authenticate-response header
with the value HEADER:
[CONTINUED]GET https://ig.example.com:8443/home HTTP/1.1
[CONTINUED]accept-encoding: gzip, deflate
[CONTINUED]Connection: close
[CONTINUED]cookie: iPlanetDirectoryPro=0Dx...e3A.*....; amlbcookie=01
[CONTINUED]Host: ig.example.com:8443
[CONTINUED]x-authenticate-response: HEADERIG returns a WWW-Authenticate header containing advices, as follows:
HTTP/1.1 401 Unauthorized
WWW-Authenticate: SSOADVICE realm="/",advices="eyJ...XX0=",am_uri="http://openam.example.com:8080/am/"
transfer-encoding: chunked
connection: closeThe advice decodes to a transaction condition advice:
{"TransactionConditionAdvice":["493...3c4"]}Enforce policy decisions from AM
The following sections describe how to set up single sign on for requests in the same domain and in a different domain.
Enforce AM policy decisions in the same domain
The following procedure gives an example of how to create a policy in AM and configure an agent that can request policy decisions, when IG and AM are in the same domain.
Before you start, set up and test the example in Authenticate with SSO through the default authentication service.
-
Set up AM:
-
In the AM admin UI, select Authorization > Policy Sets > New Policy Set, and add a policy set with the following values:
-
Id :
PEP-SSO -
Resource Types :
URL
-
-
In the policy set, add a policy with the following values:
-
Name :
PEP-SSO -
Resource Type :
URL -
Resource pattern :
*://*:*/* -
Resource value :
http://app.example.com:8081/home/pep-sso*This policy protects the home page of the sample application.
-
-
On the Actions tab, add an action to allow HTTP
GET. -
On the Subjects tab, remove any default subject conditions, add a subject condition for all
Authenticated Users.
-
-
Set up IG:
-
Set an environment variable for the IG agent password, and then restart IG:
$ export AGENT_SECRET_ID='cGFzc3dvcmQ='bashThe password is retrieved by a SystemAndEnvSecretStore, and must be base64-encoded.
-
Add the following route to IG to serve the sample application .css and other static resources:
-
Linux
-
Windows
$HOME/.openig/config/routes/00-static-resources.json
%appdata%\OpenIG\config\routes\00-static-resources.json
{
  "name" : "00-static-resources",
  "baseURI" : "http://app.example.com:8081",
  "condition": "${find(request.uri.path,'^/css') or matchesWithRegex(request.uri.path, '^/.*\\\\.ico$') or matchesWithRegex(request.uri.path, '^/.*\\\\.gif$')}",
  "handler": "ReverseProxyHandler"
}
json -
-
Add the following route to IG:
-
Linux
-
Windows
$HOME/.openig/config/routes/04-pep.json
%appdata%\OpenIG\config\routes\04-pep.json
{ "name": "pep-sso", "baseURI": "http://app.example.com:8081", "condition": "${find(request.uri.path, '^/home/pep-sso')}", "heap": [ { "name": "SystemAndEnvSecretStore-1", "type": "SystemAndEnvSecretStore" }, { "name": "AmService-1", "type": "AmService", "config": { "agent": { "username": "ig_agent", "passwordSecretId": "agent.secret.id" }, "secretsProvider": "SystemAndEnvSecretStore-1", "url": "http://am.example.com:8088/openam/" } } ], "handler": { "type": "Chain", "config": { "filters": [ { "name": "SingleSignOnFilter-1", "type": "SingleSignOnFilter", "config": { "amService": "AmService-1" } }, { "name": "PolicyEnforcementFilter-1", "type": "PolicyEnforcementFilter", "config": { "application": "PEP-SSO", "ssoTokenSubject": "${contexts.ssoToken.value}", "amService": "AmService-1" } } ], "handler": "ReverseProxyHandler" } } }jsonFor information about how to set up the IG route in Studio, refer to Policy enforcement in Structured Editor or Protecting a web app with Freeform Designer.
For an example route that uses
claimsSubjectinstead ofssoTokenSubjectto identify the subject, refer to Example policy enforcement using claimsSubject. -
-
-
Test the setup:
-
If you are logged in to AM, log out and clear any cookies.
-
Go to http://ig.example.com:8080/home/pep-sso.
Because you have not previously authenticated to AM, the request does not contain a cookie with an SSO token. The SingleSignOnFilter redirects you to AM for authentication.
-
Log in to AM as user
demo, passwordCh4ng31t.When you have authenticated, AM redirects you back to the request URL, and IG requests a policy decision using the AM session cookie.
AM returns a policy decision that grants access to the sample application.
-
Require users to authenticate to a specific realm
This example creates a policy that requires users to authenticate in a specific realm.
To reduce the attack surface on the top level realm, ForgeRock advises you to create federation entities, agent profiles, authorizations, OAuth2/OIDC, and STS services in a subrealm. For this reason, the AM policy, AM agent, and services are in a subrealm.
-
Set up AM:
-
In the AM admin UI, click Realms, and add a realm named
alpha. Leave all other values as default.For the rest of the steps in this procedure, make sure you are managing the alpha realm by checking that the alpha icon is displayed on the top left.
-
(From AM 6.5.3) Select Services > Add a Service, and add a Validation Service with the following Valid goto URL Resources:
-
http://ig.example.com:8080/* -
http://ig.example.com:8080/*?*
-
-
Select Applications > Agents > Identity Gateway and register an IG agent with the following values:
-
Agent ID:
ig_agent -
Password:
passwordFor AM 6.5.x and earlier versions, register an agent as described in Register an IG agent in AM 6.5 and earlier.
Use secure passwords in a production environment. Consider using a password manager to generate secure passwords.
-
-
(Optional) Authenticate the agent to AM as described in Authenticate an IG agent to AM.
IG agents are automatically authenticated to AM by a deprecated authentication module in AM. This step is currently optional, but will be required when authentication chains and modules are removed in a future release of AM. -
Add a policy:
-
Select Authorization > Policy Sets > New Policy Set, and add a policy set with the following values:
-
Id :
PEP-SSO-REALM -
Resource Types :
URL
-
-
In the policy set, add a policy with the following values:
-
Name :
PEP-SSO-REALM -
Resource Type :
URL -
Resource pattern :
*://*:*/* -
Resource value :
http://app.example.com:8081/home/pep-sso-realmThis policy protects the home page of the sample application.
-
-
On the Actions tab, add an action to allow HTTP
GET. -
On the Subjects tab, remove any default subject conditions, add a subject condition for all
Authenticated Users. -
On the Environments tab, add an environment condition that requires the user to authenticate to the alpha realm:
-
Type :
Authentication to a Realm -
Authenticate to a Realm :
/alpha
-
-
-
-
Set up IG:
-
Add the following route to IG:
-
Linux
-
Windows
$HOME/.openig/config/routes/04-pep-sso-realm.json
%appdata%\OpenIG\config\routes\04-pep-sso-realm.json
{ "name": "pep-sso-realm", "baseURI": "http://app.example.com:8081", "condition": "${find(request.uri.path, '^/home/pep-sso-realm')}", "heap": [ { "name": "SystemAndEnvSecretStore-1", "type": "SystemAndEnvSecretStore" }, { "name": "AmService-1", "type": "AmService", "config": { "agent": { "username": "ig_agent", "passwordSecretId": "agent.secret.id" }, "secretsProvider": "SystemAndEnvSecretStore-1", "url": "http://am.example.com:8088/openam/", "realm": "/alpha" } } ], "handler": { "type": "Chain", "config": { "filters": [ { "name": "SingleSignOnFilter-1", "type": "SingleSignOnFilter", "config": { "amService": "AmService-1" } }, { "name": "PolicyEnforcementFilter-1", "type": "PolicyEnforcementFilter", "config": { "application": "PEP-SSO-REALM", "ssoTokenSubject": "${contexts.ssoToken.value}", "amService": "AmService-1" } } ], "handler": "ReverseProxyHandler" } } }jsonNotice the following differences compared to
04-pep-sso.json:-
The AmService is in the
alpharealm. That means that the user authenticates to AM in that realm. -
The PolicyEnforcementFilter realm is not specified, so it takes the same value as the AmService realm. If refers to a policy in the AM
alpharealm.
-
-
-
Test the setup:
-
In a private browser, go to http://ig.example.com:8080/home/pep-sso-realm, and log in to AM as user
demo, passwordCh4ng31t.Because you are authenticating in the
alpharealm, AM returns a policy decision that grants access to the sample application.If you were to send the request from a different realm, AM would redirect the request with an
AuthenticateToRealmConditionAdvice.
-
Enforce AM policy decisions in different domains
The following procedure gives an example of how to create a policy in AM and configure an agent that can request policy decisions, when IG and AM are in different domains.
Before you start, set up and test the example in Cross-domain single sign-on.
-
Set up AM:
-
In the AM admin UI, select Applications > Agents > Identity Gateway, and change the redirect URL for
ig_agent_cdsso:-
Redirect URL for CDSSO :
https://ig.ext.com:8443/home/pep-cdsso/redirect
-
-
Select Authorization > Policy Sets > New Policy Set, and add a policy set with the following values:
-
Id :
PEP-CDSSO -
Resource Types :
URL-
In the new policy set, add a policy with the following values:
-
-
Name :
CDSSO -
Resource Type :
URL -
Resource pattern :
*://*:*/* -
Resource value :
http://app.example.com:8081/home/pep-cdsso*This policy protects the home page of the sample application.
-
On the Actions tab, add an action to allow HTTP
GET. -
On the Subjects tab, remove any default subject conditions, add a subject condition for all
Authenticated Users.
-
-
-
Set up IG:
-
Set an environment variable for the IG agent password, and then restart IG:
$ export AGENT_SECRET_ID='cGFzc3dvcmQ='bashThe password is retrieved by a SystemAndEnvSecretStore, and must be base64-encoded.
-
Add the following route to IG to serve the sample application .css and other static resources:
-
Linux
-
Windows
$HOME/.openig/config/routes/00-static-resources.json
%appdata%\OpenIG\config\routes\00-static-resources.json
{
  "name" : "00-static-resources",
  "baseURI" : "http://app.example.com:8081",
  "condition": "${find(request.uri.path,'^/css') or matchesWithRegex(request.uri.path, '^/.*\\\\.ico$') or matchesWithRegex(request.uri.path, '^/.*\\\\.gif$')}",
  "handler": "ReverseProxyHandler"
}
json -
-
Add the following route to IG:
-
Linux
-
Windows
$HOME/.openig/config/routes/04-pep-cdsso.json
%appdata%\OpenIG\config\routes\04-pep-cdsso.json
{
  "name": "pep-cdsso",
  "baseURI": "http://app.example.com:8081",
  "condition": "${find(request.uri.path, '^/home/pep-cdsso')}",
  "heap": [
    {
      "name": "SystemAndEnvSecretStore-1",
      "type": "SystemAndEnvSecretStore"
    },
    {
      "name": "AmService-1",
      "type": "AmService",
      "config": {
        "agent": {
          "username": "ig_agent_cdsso",
          "passwordSecretId": "agent.secret.id"
        },
        "secretsProvider": "SystemAndEnvSecretStore-1",
        "url": "http://am.example.com:8088/openam/"
      }
    }
  ],
  "handler": {
    "type": "Chain",
    "config": {
      "filters": [
        {
          "name": "CrossDomainSingleSignOnFilter-1",
          "type": "CrossDomainSingleSignOnFilter",
          "config": {
            "redirectEndpoint": "/home/pep-cdsso/redirect",
            "authCookie": {
              "path": "/home",
              "name": "ig-token-cookie"
            },
            "amService": "AmService-1"
          }
        },
        {
          "name": "PolicyEnforcementFilter-1",
          "type": "PolicyEnforcementFilter",
          "config": {
            "application": "PEP-CDSSO",
            "ssoTokenSubject": "${contexts.cdsso.token}",
            "amService": "AmService-1"
          }
        }
      ],
      "handler": "ReverseProxyHandler"
    }
  }
}
json -
-
When verificationSecretId is not configured, IG discovers
and uses the AM JWK set to verify the signature of AM session
tokens. If the JWK set isn’t available, IG does not verify the tokens.
|
-
Test the setup:
-
If you are logged in to AM, log out and clear any cookies.
-
Go to https://ig.ext.com:8443/home/pep-cdsso.
If you have warnings that the site is not secure respond to the warnings to access the site.
IG redirects you to AM for authentication.
-
Log in to AM as user
demo, passwordCh4ng31t.When you have authenticated, AM redirects you back to the request URL, and IG requests a policy decision. AM returns a policy decision that grants access to the sample application.
-
Enforce policy decisions using claimsSubject
This example is a variant of
Enforce AM policy decisions in the same domain.
It enforces a policy decision from AM, using
claimsSubject instead of ssoTokenSubject to identify the subject.
-
Set up AM as described in Enforce AM policy decisions in the same domain.
-
In AM, select the policy you created in the previous step, and add a new resource:
-
Resource Type:
URL -
Resource pattern:
*://*:*/* -
Resource value:
http://app.example.com:8081/home/pep-claims
-
-
In the same policy, add the following subject condition:
-
Any of -
Type :
OpenID Connect/JwtClaim -
claimName :
iss -
claimValue :
am.example.com
-
-
Set an environment variable for the IG agent password, and then restart IG:
$ export AGENT_SECRET_ID='cGFzc3dvcmQ='bashThe password is retrieved by a SystemAndEnvSecretStore, and must be base64-encoded.
-
Add the following route to IG to serve the sample application .css and other static resources:
-
Linux
-
Windows
$HOME/.openig/config/routes/00-static-resources.json
%appdata%\OpenIG\config\routes\00-static-resources.json
{
  "name" : "00-static-resources",
  "baseURI" : "http://app.example.com:8081",
  "condition": "${find(request.uri.path,'^/css') or matchesWithRegex(request.uri.path, '^/.*\\\\.ico$') or matchesWithRegex(request.uri.path, '^/.*\\\\.gif$')}",
  "handler": "ReverseProxyHandler"
}
json -
-
Add the following route to IG:
-
Linux
-
Windows
$HOME/.openig/config/routes/04-pep-claims.json
%appdata%\OpenIG\config\routes\04-pep-claims.json
{
  "name": "pep-claims",
  "baseURI": "http://app.example.com:8081",
  "condition": "${find(request.uri.path, '^/home/pep-claims')}",
  "heap": [
    {
      "name": "SystemAndEnvSecretStore-1",
      "type": "SystemAndEnvSecretStore"
    },
    {
      "name": "AmService-1",
      "type": "AmService",
      "config": {
        "url": "http://am.example.com:8088/openam",
        "agent": {
          "username": "ig_agent",
          "passwordSecretId": "agent.secret.id"
        },
        "secretsProvider": "SystemAndEnvSecretStore-1"
      }
    }
  ],
  "handler": {
    "type": "Chain",
    "config": {
      "filters": [
        {
          "name": "SingleSignOnFilter-1",
          "type": "SingleSignOnFilter",
          "config": {
            "amService": "AmService-1"
          }
        },
        {
          "name": "PolicyEnforcementFilter-1",
          "type": "PolicyEnforcementFilter",
          "config": {
            "application": "PEP-SSO",
            "claimsSubject": {
              "sub": "${contexts.ssoToken.info.uid}",
              "iss": "am.example.com"
            },
            "amService": "AmService-1"
          }
        }
      ],
      "handler": "ReverseProxyHandler"
    }
  }
}
json -
-
Log in to AM as user
demo, passwordCh4ng31t.AM returns a policy decision that grants access to the sample application.
Using WebSocket notifications to evict the policy cache
When WebSocket notifications are enabled, IG receives notifications whenever AM creates, deletes, or changes a policy.
The following procedure gives an example of how to change the configuration in Enforce AM policy decisions in the same domain and Enforce AM policy decisions in different domains to evict outdated entries from the policy cache. For information about WebSocket notifications, refer to WebSocket notifications.
-
Set up and test the example in Enforce AM policy decisions in the same domain.
-
Websocket notifications are enabled by default. If they are disabled, enable them by adding the following configuration to the AmService in your route:
"notifications": {
  "enabled": true
}
json -
Enable policy cache in the PolicyEnforcementFilter in your route:
"cache": {
  "enabled": true
}
json -
In
logback.xmladd the following logger for WebSocket notifications, and then restart IG:<logger name="org.forgerock.openig.tools.notifications.ws" level="TRACE" />xmlFor information, refer to Changing the log level for different object types.
-
Go to http://ig.example.com:8080/home/pep-sso, and log in to AM as user
demo, passwordCh4ng31t. -
In a separate terminal, log on to AM as admin, and change the PEP-SSO policy. For example, in the Actions tab, add an action to allow HTTP
DELETE. -
Note that the IG system logs are updated with Websocket notifications about the change:
... | TRACE | vert.x-eventloop-thread-2 | o.f.o.t.n.w.SubscriptionService | @system | Received a message: { "topic": "/agent/policy", "timestamp": ..., "body": { "realm": "/", "policy": "PEP-SSO", "policySet": "PEP-SSO", "eventType": "UPDATE" } }
... | TRACE | vert.x-eventloop-thread-2 | o.f.o.t.n.w.SubscriptionService | @system | Received a notification: { "topic": "/agent/policy", "timestamp": ..., "body": { "realm": "/", "policy": "PEP-SSO", "policySet": "PEP-SSO", "eventType": "UPDATE" } }
none
Harden authorization with advice from AM
To protect sensitive resources, AM policies can be configured with additional conditions to harden the authorization. When AM communicates these policy decisions to IG, the decision includes advices to indicate what extra conditions the user must meet.
Conditions can include requirements to access the resource over a secure channel, access during working hours, or to authenticate again at a higher authentication level. For more information, refer to AM’s Authorization guide.
The following sections build on the policies in Enforce policy decisions from AM to step up the authentication level:
Step up the authentication level for an AM session
When you step up the authentication level for an AM session, the authorization is verified and then captured as part of the AM session, and the user agent is authorized to that authentication level for the duration of the AM session.
This section uses the policies you created in Enforce AM policy decisions in the same domain and Enforce AM policy decisions in different domains, adding an authorization policy with a Authentication by Service environment condition. Except for the paths where noted, procedures for single domain and cross-domain are the same.
After the user agent redirects the user to AM, if the user is not
already authenticated they are presented with a login page. If the user is
already authenticated, or after they authenticate, they are presented with a
second page asking for a verification code to meet the
AuthenticateToService environment condition.
Before you start, set up one of the following examples in Enforce AM policy decisions in the same domain or Enforce AM policy decisions in different domains.
-
In the AM admin UI, add an environment condition to the policy:
-
Select a policy set:
-
For SSO, select Authorization > Policy Sets > PEP-SSO.
-
For CDSSO, select Authorization > Policy Sets > PEP-CDSSO.
-
-
In the policy, select Environments, and add the following environment condition:
-
All of -
Type :
Authentication by Service -
Authenticate to Service :
VerificationCodeLevel1
-
-
-
Set up client-side and server-side scripts:
-
Select Scripts > Scripted Module - Client Side, and replace the default script with the following script:
autoSubmitDelay = 60000; function callback() { var parent = document.createElement("div"); parent.className = "form-group"; var label = document.createElement("label"); label.className = "sr-only separator"; label.setAttribute("for", "answer"); label.innerText = "Verification Code"; parent.appendChild(label); var input = document.createElement("input"); input.className = "form-control input-lg"; input.type = "text"; input.placeholder = "Enter your verification code"; input.name = "answer"; input.id = "answer"; input.value = ""; input.oninput = function(event) { var element = document.getElementById("clientScriptOutputData"); if (!element.value || element.value == "clientScriptOutputData") element.value = "{}"; var json = JSON.parse(element.value); json["answer"] = event.target.value; element.value = JSON.stringify(json); }; parent.appendChild(input); var fieldset = document.forms[0].getElementsByTagName("fieldset")[0]; fieldset.prepend(parent); } if (document.readyState !== 'loading') { callback(); } else { document.addEventListener("DOMContentLoaded", callback); }javascriptLeave all other values as default.
This client-side script adds a field to the AM form, in which the user is required to enter a verification code. The script formats the entered code as a JSON object, as required by the server-side script.
-
Select Scripts > Scripted Module - Server Side, and replace the default script with the following script:
username = 'demo' logger.error('username: ' + username) // Test whether the user 'demo' enters the correct validation code data = JSON.parse(clientScriptOutputData); answer = data.answer; if (answer !== '123456') { logger.error('Authentication Failed !!') authState = FAILED; } else { logger.error('Authenticated !!') authState = SUCCESS; }javascriptLeave all other values as default.
This server-side script tests that the user
demohas entered123456as the verification code.
-
-
Add an authentication module:
-
Select Authentication > Modules, and add a module with the following settings:
-
Name :
VerificationCodeLevel1 -
Type :
Scripted Module
-
-
In the authentication module, enable the option for client-side script, and select the following options:
-
Client-side Script :
Scripted Module - Client Side -
Server-side Script :
Scripted Module - Server Side -
Authentication Level :
1
-
-
Add the authentication module to an authentication chain:
-
Select Authentication > Chains, and add a chain called
VerificationCodeLevel1. -
Add a module with the following settings:
-
Select Module :
VerificationCodeLevel1 -
Select Criteria :
Required
-
-
-
-
Test the setup:
-
Log out of AM.
-
Access the route:
-
For SSO, go to https://ig.example.com:8080/home/pep-sso.
-
For CDSSO, go to https://ig.ext.com:8443/home/pep-cdsso.
If you have not previously authenticated to AM, the SingleSignOnFilter redirects the request to AM for authentication.
-
-
Log in to AM as user
demo, passwordCh4ng31t.AM creates a session with the default authentication level
0, and IG requests a policy decision.The updated policy requires authentication level
1, which is higher than the AM session’s current authentication level. AM issues a redirect with aAuthenticateToServiceConditionAdviceto authenticate at level1. -
In the session upgrade window, enter the verification code
123456.AM upgrades the authentication level for the session to 1, and grants access to the sample application. If you try to access the sample application again in the same session, you don’t need to provide the verification code.
-
Increase authorization for a single transaction
Transactional authorization improves security by requiring a user to perform additional actions when trying to access a resource protected by an AM policy. For example, they must reauthenticate to an authentication module or respond to a push notification on their mobile device.
Performing the additional action successfully grants access to the protected resource, but only once. Additional attempts to access the resource require the user to perform the configured actions again.
This section builds on the example in
Step up the authentication level for an AM session, adding a simple authorization policy with
a Transaction environment condition. Each time the user agent tries to
access the protected resource, the user must reauthenticate to an
authentication module by providing a verification code.
Before you start, configure AM as described in Step up the authentication level for an AM session. The IG configuration is not changed.
-
In the AM admin UI, add a new environment condition:
-
Select the policy set:
-
For SSO, select Authorization > Policy Sets > PEP-SSO.
-
For CDSSO, select Authorization > Policy Sets > PEP-CDSSO.
-
-
In the IG policy, select Environments and add another environment condition:
-
All of -
Type :
Transaction -
Authentication strategy :
Authenticate To Module -
Strategy specifier :
TxVerificationCodeLevel5
-
-
-
Set up client-side and server-side scripts:
-
Select Scripts > New Script, and add the following client-side script:
-
Name :
Tx Scripted Module - Client Side -
Script Type :
Client-side AuthenticationautoSubmitDelay = 60000; function callback() { var parent = document.createElement("div"); parent.className = "form-group"; var label = document.createElement("label"); label.className = "sr-only separator"; label.setAttribute("for", "answer"); label.innerText = "Verification Code"; parent.appendChild(label); var input = document.createElement("input"); input.className = "form-control input-lg"; input.type = "text"; input.placeholder = "Enter your TX code"; input.name = "answer"; input.id = "answer"; input.value = ""; input.oninput = function(event) { var element = document.getElementById("clientScriptOutputData"); if (!element.value || element.value == "clientScriptOutputData") element.value = "{}"; var json = JSON.parse(element.value); json["answer"] = event.target.value; element.value = JSON.stringify(json); }; parent.appendChild(input); var fieldset = document.forms[0].getElementsByTagName("fieldset")[0]; fieldset.prepend(parent); } if (document.readyState !== 'loading') { callback(); } else { document.addEventListener("DOMContentLoaded", callback); }javascriptThis client-side script adds a field to the AM form, in which the user is required to enter a TX code. The script formats the entered code as a JSON object, as required by the server-side script.
-
-
Select Scripts > New Script, and add the following server-side script:
-
Name :
Tx Scripted Module - Server Side -
Script Type :
Server-side Authenticationusername = 'demo' logger.error('username: ' + username) // Test whether the user 'demo' enters the correct validation code data = JSON.parse(clientScriptOutputData); answer = data.answer; if (answer !== '789') { logger.error('Authentication Failed !!') authState = FAILED; } else { logger.error('Authenticated !!') authState = SUCCESS; }javascriptThis server-side script tests that the user
demohas entered789as the verification code.
-
-
-
Add an authentication module:
-
Select Authentication > Modules, and add a module with the following settings:
-
Name :
TxVerificationCodeLevel5 -
Type :
Scripted Module
-
-
In the authentication module, enable the option for client-side script, and select the following options:
-
Client-side Script :
Tx Scripted Module - Client Side -
Server-side Script :
Tx Scripted Module - Server Side -
Authentication Level :
5
-
-
-
Test the setup:
-
Log out of AM.
-
Access your route:
-
For SSO, go to http://ig.example.com:8080/home/pep-sso.
-
For CDSSO, go to https://ig.ext.com:8443/home/pep-cdsso.
If you have not previously authenticated to AM, the SingleSignOnFilter redirects the request to AM for authentication.
-
-
Log in to AM as user
demo, passwordCh4ng31t.AM creates a session with the default authentication level
0, and IG requests a policy decision. -
Enter the verification code
123456to upgrade the authorization level for the session to1.The authentication module you configured for transactional authorization requires authentication level
5, so AM issues aTransactionConditionAdvice. -
In the transaction upgrade window, enter the verification code
789.AM upgrades the authentication level for this policy evaluation to
5, and then returns a policy decision that grants a one-time access to the sample application. If you try to access the sample application again, you must enter the code again.
-
OAuth 2.0
OAuth 2.0 includes the following entities:
-
Resource owner : A user who owns protected resources on a resource server. For example, a resource owner can store photos in a web service.
-
Resource server : A service that gives authorized client applications access to the resource owner’s protected resources. In OAuth 2.0, an Authorization Server grants authorization to a client application, based on the resource owner’s consent. For example, a resource server can be a web service that holds a user’s photos.
-
Client : An application that requests access to the resource owner’s protected resources, on behalf of the resource owner. For example, a client can be a photo printing service requesting access to a resource owner’s photos stored on a web service, after the resource owner gives the client consent to download the photos.
-
Authorization server : A service responsible for authenticating resource owners, and obtaining their consent to allow client applications to access their resources. For example, AM can act as the OAuth 2.0 Authorization Server to authenticate resource owners and obtain their consent. Other services, such as Google and Facebook can provide OAuth 2.0 authorization services.
IG as an OAuth 2.0 client
IG as an OAuth 2.0 client supports the OAuth 2.0 filters and flows in the following table:
| Filter | OAuth 2.0 flow | Description |
|---|---|---|
(previously named OAuth2ClientFilter) |
This filter requires the user agent to authorize the request interactively to obtain an access token and optional ID token. The access token is maintained only for the OAuth 2.0 session, and is valid only for the configured scopes. This filter can act as an OpenID Connect relying party or as an OAuth 2.0 client. Use for Web applications running on a server. |
|
According to information in the The OAuth 2.0 Authorization Framework, minimize use of this grant type and use other grant types when possible. This filter supports the transformation of client credentials and user credentials to obtain an access token from the Authorization Server. It injects the access token into the inbound request as a Bearer Authorization header. The access token is valid only for the configured scopes. Use for clients trusted with the resource owner credentials. |
||
This filter is similar to the Resource Owner Password Credentials grant type, but the resource owner is not part of the flow and the client accesses only information relevant to itself. Use when the client is the resource owner, or the client does not act on behalf of the resource owner. |
IG as an OAuth 2.0 resource server
The following image illustrates the steps for a client application to access a user’s protected resources, with AM as the Authorization Server and IG as the resource server:

-
The application obtains an authorization grant, representing the resource owner’s consent. For information about the different OAuth 2.0 grant mechanisms supported by AM, refer to OAuth 2.0 grant flows in AM’s OAuth 2.0 guide.
-
The application authenticates to the Authorization Server and requests an access token. The Authorization Server returns an access token to the application.
An OAuth 2.0 access token is an opaque string issued by the authorization server. When the client interacts with the resource server, the client presents the access token in the
Authorizationheader. For example:Authorization: Bearer 7af...da9httpAccess tokens are the credentials to access protected resources. The advantage of access tokens over passwords or other credentials is that access tokens can be granted and revoked without exposing the user’s credentials.
The access token represents the authorization to access protected resources. Because an access token is a bearer token, anyone who has the access token can use it to get the resources. Access tokens must therefore be protected, so that requests involving them go over HTTPS.
In OAuth 2.0, the token scopes are strings that identify the scope of access authorized to the client, but can also be used for other purposes.
-
The application supplies the access token to the resource server, which then resolves and validates the access token by using an access token resolver, as described in Access token resolvers.
If the access token is valid, the resource server permits the client access to the requested resource.
The OAuth2ResourceServerFilter grants access to a resource by using an OAuth 2.0 access token from the HTTP Authorization header of a request.
When auditing is enabled, OAuth 2.0 token tracking IDs can be logged in access audit events for routes that contain an OAuth2ResourceServerFilter. For information, refer to Audit the deployment and Audit framework.
Validate stateful or stateless access tokens through the introspection endpoint
This section sets up IG as an OAuth 2.0 resource server, using the introspection endpoint.
For more information about configuring AM as an OAuth 2.0 authorization service, refer to AM’s OAuth 2.0 guide.
| This procedure uses the Resource Owner Password Credentials grant type. According to information in the The OAuth 2.0 Authorization Framework, minimize use of this grant type and utilize other grant types whenever possible. |
Before you start, prepare AM, IG, and the sample application as described in Example installation for this guide.
-
Set up AM:
-
Select Applications > Agents > Identity Gateway, and register an IG agent with the following values:
-
Agent ID:
ig_agent -
Password:
password -
Token Introspection:
Realm OnlyUse secure passwords in a production environment. Consider using a password manager to generate secure passwords.
-
-
(Optional) Authenticate the agent to AM as described in Authenticate an IG agent to AM.
IG agents are automatically authenticated to AM by a deprecated authentication module in AM. This step is currently optional, but will be required when authentication chains and modules are removed in a future release of AM. -
Create an OAuth 2.0 Authorization Server:
-
Select Services > Add a Service > OAuth2 Provider.
-
Add a service with the default values.
-
-
Create an OAuth 2.0 Client to request OAuth 2.0 access tokens:
-
Select Applications > OAuth 2.0 > Clients, and add a client with the following values:
-
Client ID:
client-application -
Client secret:
password -
Scope(s):
mail,employeenumber
-
-
(From AM 6.5) On the Advanced tab, select the following value:
-
Grant Types:
Resource Owner Password Credentials
-
-
-
-
Set up IG
-
Set an environment variable for the IG agent password, and then restart IG:
$ export AGENT_SECRET_ID='cGFzc3dvcmQ='bashThe password is retrieved by a SystemAndEnvSecretStore, and must be base64-encoded.
-
Add the following route to IG:
-
Linux
-
Windows
$HOME/.openig/config/routes/rs-introspect.json
%appdata%\OpenIG\config\routes\rs-introspect.json
{ "name": "rs-introspect", "baseURI": "http://app.example.com:8081", "condition": "${find(request.uri.path, '^/rs-introspect$')}", "heap": [ { "name": "SystemAndEnvSecretStore-1", "type": "SystemAndEnvSecretStore" }, { "name": "AmService-1", "type": "AmService", "config": { "agent": { "username": "ig_agent", "passwordSecretId": "agent.secret.id" }, "secretsProvider": "SystemAndEnvSecretStore-1", "url": "http://am.example.com:8088/openam/" } } ], "handler": { "type": "Chain", "config": { "filters": [ { "name": "OAuth2ResourceServerFilter-1", "type": "OAuth2ResourceServerFilter", "config": { "scopes": [ "mail", "employeenumber" ], "requireHttps": false, "realm": "OpenIG", "accessTokenResolver": { "name": "TokenIntrospectionAccessTokenResolver-1", "type": "TokenIntrospectionAccessTokenResolver", "config": { "amService": "AmService-1", "providerHandler": { "type": "Chain", "config": { "filters": [ { "type": "HttpBasicAuthenticationClientFilter", "config": { "username": "ig_agent", "passwordSecretId": "agent.secret.id", "secretsProvider": "SystemAndEnvSecretStore-1" } } ], "handler": "ForgeRockClientHandler" } } } } } } ], "handler": { "type": "StaticResponseHandler", "config": { "status": 200, "headers": { "Content-Type": [ "text/html; charset=UTF-8" ] }, "entity": "<html><body><h2>Decoded access_token: ${contexts.oauth2.accessToken.info}</h2></body></html>" } } } } }jsonFor information about how to set up the IG route in Studio, see Token validation using the introspection endpoint in Structured Editor.
Notice the following features of the route:
-
The route matches requests to
/rs-introspect. -
The
OAuth2ResourceServerFilterexpects an OAuth 2.0 access token in the header of the incoming authorization request, with the scopesmailandemployeenumber.The
accessTokenResolveruses the AM server declared in the heap. The introspection endpoint to validate the access token is extrapolated from the URL of the AM server.For convenience in this test,
requireHttpsis false. In production environments, set it to true. -
After the filter validates the access token, it creates a new context from the Authorization Server response. The context is named
oauth2, and can be reached atcontexts.oauth2orcontexts['oauth2'].The context contains information about the access token, which can be reached at
contexts.oauth2.accessToken.info. Filters and handlers further down the chain can access the token info through the context.If there is no access token in the request, or token validation does not complete successfully, the filter returns an HTTP error status to the user agent, and IG does not continue processing the request. This is done as specified in the RFC, The OAuth 2.0 Authorization Framework: Bearer Token Usage.
-
The HttpBasicAuthenticationClientFilter adds the credentials to the outgoing token introspection request.
-
The StaticResponseHandler returns the content of the access token from the context
${contexts.oauth2.accessToken.info}.
-
-
-
Test the setup:
-
In a terminal window, use a
curlcommand similar to the following to retrieve an access token:$ mytoken=$(curl -s \ --user "client-application:password" \ --data "grant_type=password&username=demo&password=Ch4ng31t&scope=mail%20employeenumber" \ http://am.example.com:8088/openam/oauth2/access_token | jq -r ".access_token")bash -
Validate the access token returned in the previous step:
$ curl -v http://ig.example.com:8080/rs-introspect --header "Authorization: Bearer ${mytoken}"

{
  active = true,
  scope = employeenumber mail,
  realm=/,
  client_id = client - application,
  user_id = demo,
  token_type = Bearer,
  exp = 158...907,
  ...
}
bash
-
Define required scopes with a script
This example builds on the example in Validate access tokens through the introspection endpoint to use a script to define the scopes that a request requires in an access token.
-
If the request path is
/rs-tokeninfo, the request requires only the scopemail. -
If the request path is
/rs-tokeninfo/employee, the request requires the scopesmailandemployeenumber.
-
Set up and test the example in Validate access tokens through the introspection endpoint.
-
Add the following route to IG:
-
Linux
-
Windows
$HOME/.openig/config/routes/rs-dynamicscope.json
%appdata%\OpenIG\rs-dynamicscope.json
{
  "name": "rs-dynamicscope",
  "baseURI": "http://app.example.com:8081",
  "condition": "${find(request.uri.path, '^/rs-dynamicscope')}",
  "heap": [
    {
      "name": "SystemAndEnvSecretStore-1",
      "type": "SystemAndEnvSecretStore"
    },
    {
      "name": "AmService-1",
      "type": "AmService",
      "config": {
        "agent": {
          "username": "ig_agent",
          "passwordSecretId": "agent.secret.id"
        },
        "secretsProvider": "SystemAndEnvSecretStore-1",
        "url": "http://am.example.com:8088/openam/"
      }
    }
  ],
  "handler": {
    "type": "Chain",
    "config": {
      "filters": [
        {
          "name": "OAuth2ResourceServerFilter-1",
          "type": "OAuth2ResourceServerFilter",
          "config": {
            "scopes": {
              "name": "myscript",
              "type": "ScriptableResourceAccess",
              "config": {
                "type": "application/x-groovy",
                "source": [
                  "// Minimal set of required scopes",
                  "def scopes = [ 'mail' ] as Set",
                  "if (request.uri.path =~ /employee$/) {",
                  "  // Require another scope to access this resource",
                  "  scopes += 'employeenumber'",
                  "}",
                  "return scopes"
                ]
              }
            },
            "requireHttps": false,
            "realm": "OpenIG",
            "accessTokenResolver": {
              "name": "token-resolver-1",
              "type": "TokenIntrospectionAccessTokenResolver",
              "config": {
                "amService": "AmService-1",
                "providerHandler": {
                  "type": "Chain",
                  "config": {
                    "filters": [
                      {
                        "type": "HttpBasicAuthenticationClientFilter",
                        "config": {
                          "username": "ig_agent",
                          "passwordSecretId": "agent.secret.id",
                          "secretsProvider": "SystemAndEnvSecretStore-1"
                        }
                      }
                    ],
                    "handler": "ForgeRockClientHandler"
                  }
                }
              }
            }
          }
        }
      ],
      "handler": {
        "type": "StaticResponseHandler",
        "config": {
          "status": 200,
          "headers": {
            "Content-Type": [ "text/html; charset=UTF-8" ]
          },
          "entity": "<html><body><h2>Decoded access_token: ${contexts.oauth2.accessToken.info}</h2></body></html>"
        }
      }
    }
  }
}
json -
-
Test the setup with the
mailscope only:-
In a terminal, use a
curlcommand to retrieve an access token with the scopemail:$ mytoken=$(curl -s \ --user "client-application:password" \ --data "grant_type=password&username=demo&password=Ch4ng31t&scope=mail" \ http://am.example.com:8088/openam/oauth2/access_token | jq -r ".access_token")bash -
Confirm that the access token is returned for the
/rs-dynamicscopepath:$ curl -v http://ig.example.com:8080/rs-dynamicscope --header "Authorization: Bearer ${mytoken}" { active = true, scope = mail, client_id = client-application, user_id = demo, token_type = Bearer, exp = 158...907, sub = demo, iss = http://am.example.com:8088/openam/oauth2, ... ... }bash -
Confirm that the access token is not returned for the
/rs-dynamicscope/employeepath:$ curl -v http://ig.example.com:8080/rs-dynamicscope/employee --header "Authorization: Bearer ${mytoken}"bash
-
-
Test the setup with the scopes
mailandemployeenumber:-
In a terminal window, use a
curlcommand similar to the following to retrieve an access token with the scopesmailandemployeenumber:$ mytoken=$(curl -s \ --user "client-application:password" \ --data "grant_type=password&username=demo&password=Ch4ng31t&scope=mail%20employeenumber" \ http://am.example.com:8088/openam/oauth2/access_token | jq -r ".access_token")bash -
Confirm that the access token is returned for the
/rs-dynamicscope/employeepath:$ curl -v http://ig.example.com:8080/rs-dynamicscope/employee --header "Authorization: Bearer ${mytoken}"bash
-
Validate stateless access tokens with the StatelessAccessTokenResolver
The StatelessAccessTokenResolver confirms that stateless access tokens provided by AM are well-formed, have a valid issuer, have the expected access token name, and have a valid signature.
After the StatelessAccessTokenResolver resolves an access token, the OAuth2ResourceServerFilter checks that the token is within the expiry time, and that it provides the required scopes. For more information, refer to StatelessAccessTokenResolver.
The following sections provide examples of how to validate signed and encrypted access tokens:
Validate signed access tokens with the StatelessAccessTokenResolver and JwkSetSecretStore
This section provides examples of how to validate signed access tokens with the StatelessAccessTokenResolver, using a JwkSetSecretStore. For more information about JwkSetSecretStore, refer to JwkSetSecretStore.
| This procedure uses the Resource Owner Password Credentials grant type. According to information in the The OAuth 2.0 Authorization Framework, minimize use of this grant type and utilize other grant types whenever possible. |
-
Set up AM:
-
Configure an OAuth 2.0 Authorization Provider:
-
Select Services, and add an OAuth 2.0 Provider.
-
Accept all of the default values, and select Create. The service is added to the Services list.
-
On the Core tab, select the following option:
-
Use Client-Based Access & Refresh Tokens :
on
-
-
On the Advanced tab, select the following options:
-
Client Registration Scope Allowlist :
myscope -
OAuth2 Token Signing Algorithm :
RS256 -
Encrypt Client-Based Tokens : Deselected
-
-
-
Create an OAuth2 Client to request OAuth 2.0 access tokens:
-
Select Applications > OAuth 2.0 > Clients, and add a client with the following values:
-
Client ID :
client-application -
Client secret :
password -
Scope(s) :
myscope
-
-
(From AM 6.5) On the Advanced tab, select the following values:
-
Grant Types :
Resource Owner Password Credentials -
Response Types :
code token
-
-
On the Signing and Encryption tab, include the following setting:
-
ID Token Signing Algorithm :
RS256
-
-
-
-
Set up IG:
-
Add the following route to IG:
-
Linux
-
Windows
$HOME/.openig/config/routes/rs-stateless-signed.json
%appdata%\OpenIG\config\routes\rs-stateless-signed.json
{ "name": "rs-stateless-signed", "condition": "${find(request.uri.path, '/rs-stateless-signed')}", "heap": [ { "name": "SecretsProvider-1", "type": "SecretsProvider", "config": { "stores": [ { "type": "JwkSetSecretStore", "config": { "jwkUrl": "http://am.example.com:8088/openam/oauth2/connect/jwk_uri" } } ] } } ], "handler": { "type": "Chain", "capture": "all", "config": { "filters": [ { "name": "OAuth2ResourceServerFilter-1", "type": "OAuth2ResourceServerFilter", "config": { "scopes": ["myscope"], "requireHttps": false, "accessTokenResolver": { "type": "StatelessAccessTokenResolver", "config": { "secretsProvider": "SecretsProvider-1", "issuer": "http://am.example.com:8088/openam/oauth2", "verificationSecretId": "any.value.in.regex.format" } } } } ], "handler": { "type": "StaticResponseHandler", "config": { "status": 200, "headers": { "Content-Type": [ "text/html; charset=UTF-8" ] }, "entity": "<html><body><h2>Decoded access_token: ${contexts.oauth2.accessToken.info}</h2></body></html>" } } } } }jsonNotice the following features of the route:
-
The route matches requests to
/rs-stateless-signed. -
A SecretsProvider in the heap declares a JwkSetSecretStore to manage secrets for signed access tokens.
-
The JwkSetSecretStore specifies the URL to a JWK set on AM, that contains the signing keys.
-
The OAuth2ResourceServerFilter expects an OAuth 2.0 access token in the header of the incoming authorization request, with the scope
myscope. -
The
StatelessAccessTokenResolveruses the SecretsProvider to verify the signature of the provided access token. -
After the OAuth2ResourceServerFilter validates the access token, it creates the
OAuth2Contextcontext. For more information, refer to OAuth2Context. -
If there is no access token in a request, or token validation does not complete successfully, the filter returns an HTTP error status to the user agent, and IG does not continue processing the request. This is done as specified in the RFC The OAuth 2.0 Authorization Framework: Bearer Token Usage.
-
The StaticResponseHandler returns the content of the access token from the context.
-
-
-
Test the setup for a signed access token:
-
Get an access token for the demo user, using the scope
myscope:$ mytoken=$(curl -s \ --user "client-application:password" \ --data "grant_type=password&username=demo&password=Ch4ng31t&scope=myscope" \ http://am.example.com:8088/openam/oauth2/access_token | jq -r ".access_token")bash -
Display the token:
$ echo ${mytoken}bashNote that the token is structured as a signed token.
-
Access the route by providing the token returned in the previous step:
$ curl -v http://ig.example.com:8080/rs-stateless-signed --header "Authorization: Bearer ${mytoken}"

...
    Decoded access_token: {
    sub=(usr!demo),
    cts=OAUTH2_STATELESS_GRANT,
    ...
bash
-
Validate signed access tokens with the StatelessAccessTokenResolver and KeyStoreSecretStore
This section provides examples of how to validate signed access tokens with the StatelessAccessTokenResolver, using a KeyStoreSecretStore. For more information about KeyStoreSecretStore, refer to KeyStoreSecretStore.
-
Locate the following directories for keys, keystores, and certificates, and in a terminal create variables for them:
-
Directory where the keystore is created:
keystore_directory -
AM keystore directory:
am_keystore_directory -
IG keystore directory:
ig_keystore_directory
-
-
Set up the keystore for signing keys:
-
Generate a private key called
signature-key, and a corresponding public certificate calledx509certificate.pem:$ openssl req -x509 \ -newkey rsa:2048 \ -nodes \ -subj "/CN=ig.example.com/OU=example/O=com/L=fr/ST=fr/C=fr" \ -keyout $keystore_directory/signature-key.key \ -out $keystore_directory/x509certificate.pem \ -days 365 ... writing new private key to '$keystore_directory/signature-key.key'bash -
Convert the private key and certificate files into a PKCS#12 file, called
signature-key, and store them in a keystore namedkeystore.p12:$ openssl pkcs12 \ -export \ -in $keystore_directory/x509certificate.pem \ -inkey $keystore_directory/signature-key.key \ -out $keystore_directory/keystore.p12 \ -passout pass:password \ -name signature-keybash -
List the keys in
keystore.p12:$ keytool -list \ -v \ -keystore "$keystore_directory/keystore.p12" \ -storepass "password" \ -storetype PKCS12 ... Your keystore contains 1 entry Alias name: signature-keybash
-
-
Set up keys for AM:
-
Copy the signing key
keystore.p12to AM:$ cp $keystore_directory/keystore.p12 $am_keystore_directory/AM_keystore.p12bash -
List the keys in the AM keystore:
$ keytool -list \
-v \
-keystore "$am_keystore_directory/AM_keystore.p12" \
-storepass "password" \
-storetype PKCS12

...
Your keystore contains 1 entry
Alias name: signature-key
bash -
Add a file called
keystore.pass, containing the store passwordpassword:$ cd $am_keystore_directory $ echo -n 'password' > keystore.passbashMake sure the password file contains only the password, with no trailing spaces or carriage returns. The filename corresponds to the secret ID of the store password and entry password for the KeyStoreSecretStore.
-
Restart AM.
-
-
Set up keys for IG:
-
Import the public certificate to the IG keystore, with the alias
verification-key:$ keytool -import \ -trustcacerts \ -rfc \ -alias verification-key \ -file "$keystore_directory/x509certificate.pem" \ -keystore "$ig_keystore_directory/IG_keystore.p12" \ -storetype PKCS12 \ -storepass "password" ... Trust this certificate? [no]: yes Certificate was added to keystorebash -
List the keys in the IG keystore:
$ keytool -list \
-v \
-keystore "$ig_keystore_directory/IG_keystore.p12" \
-storepass "password" \
-storetype PKCS12

...
Your keystore contains 1 entry
Alias name: verification-key
bash -
In the IG configuration, set an environment variable for the keystore password:
$ export KEYSTORE_SECRET_ID='cGFzc3dvcmQ='bash -
Restart IG.
-
| This procedure uses the Resource Owner Password Credentials grant type. According to information in the The OAuth 2.0 Authorization Framework, minimize use of this grant type and utilize other grant types whenever possible. |
-
Set up AM:
-
Create a KeyStoreSecretStore to manage the new AM keystore:
-
In AM, select Secret Stores, and then add a secret store with the following values:
-
Secret Store ID :
keystoresecretstore -
Store Type :
Keystore -
File :
am_keystore_directory/AM_keystore.p12 -
Keystore type :
PKCS12 -
Store password secret ID :
keystore.pass -
Entry password secret ID :
keystore.pass
-
-
Select the Mappings tab, and add a mapping with the following values:
-
Secret ID :
am.services.oauth2.stateless.signing.RSA -
Aliases :
signature-keyThe mapping sets
signature-keyas the active alias to use for signature generation.
-
-
-
Create a FileSystemSecretStore to manage secrets for the KeyStoreSecretStore:
-
Select Secret Stores, and then create a secret store with the following configuration:
-
Secret Store ID :
filesystemsecretstore -
Store Type :
File System Secret Volumes -
Directory :
am_keystore_directory -
File format :
Plain text
-
-
-
Configure an OAuth 2.0 Authorization Provider:
-
Select Services, and add an OAuth 2.0 Provider.
-
Accept all of the default values, and select Create. The service is added to the Services list.
-
On the Core tab, select the following option:
-
Use Client-Based Access & Refresh Tokens :
on
-
-
On the Advanced tab, select the following options:
-
Client Registration Scope Allowlist :
myscope -
OAuth2 Token Signing Algorithm :
RS256 -
Encrypt Client-Based Tokens : Deselected
-
-
-
Create an OAuth2 Client to request OAuth 2.0 access tokens:
-
Select Applications > OAuth 2.0 > Clients, and add a client with the following values:
-
Client ID :
client-application -
Client secret :
password -
Scope(s) :
myscope
-
-
(From AM 6.5) On the Advanced tab, select the following values:
-
Grant Types :
Resource Owner Password Credentials -
Response Types :
code token
-
-
On the Signing and Encryption tab, include the following setting:
-
ID Token Signing Algorithm :
RS256
-
-
-
-
Set up IG:
-
Add the following route to IG, and replace the path to IG_keystore.p12:
-
Linux
-
Windows
$HOME/.openig/config/routes/rs-stateless-signed-ksss.json
%appdata%\OpenIG\config\routes\rs-stateless-signed-ksss.json
{ "name": "rs-stateless-signed-ksss", "condition" : "${find(request.uri.path, '/rs-stateless-signed-ksss')}", "heap": [ { "name": "SystemAndEnvSecretStore-1", "type": "SystemAndEnvSecretStore" }, { "name": "KeyStoreSecretStore-1", "type": "KeyStoreSecretStore", "config": { "file": "<ig_keystore_directory>/IG_keystore.p12", "storeType": "PKCS12", "storePasswordSecretId": "keystore.secret.id", "entryPasswordSecretId": "keystore.secret.id", "secretsProvider": "SystemAndEnvSecretStore-1", "mappings": [ { "secretId": "stateless.access.token.verification.key", "aliases": [ "verification-key" ] } ] } } ], "handler" : { "type" : "Chain", "capture" : "all", "config" : { "filters" : [ { "name" : "OAuth2ResourceServerFilter-1", "type" : "OAuth2ResourceServerFilter", "config" : { "scopes" : [ "myscope" ], "requireHttps" : false, "accessTokenResolver": { "type": "StatelessAccessTokenResolver", "config": { "secretsProvider": "KeyStoreSecretStore-1", "issuer": "http://am.example.com:8088/openam/oauth2", "verificationSecretId": "stateless.access.token.verification.key" } } } } ], "handler": { "type": "StaticResponseHandler", "config": { "status": 200, "headers": { "Content-Type": [ "text/html; charset=UTF-8" ] }, "entity": "<html><body><h2>Decoded access_token: ${contexts.oauth2.accessToken.info}</h2></body></html>" } } } } }jsonNotice the following features of the route:
-
The route matches requests to
/rs-stateless-signed-ksss. -
The keystore password is provided by the SystemAndEnvSecretStore in the heap.
-
The OAuth2ResourceServerFilter expects an OAuth 2.0 access token in the header of the incoming authorization request, with the scope
myscope. -
The
accessTokenResolveruses aStatelessAccessTokenResolverto resolve and verify the authenticity of the access token. The secret is provided by the KeyStoreSecretStore in the heap. -
After the OAuth2ResourceServerFilter validates the access token, it creates the
OAuth2Contextcontext. For more information, refer to OAuth2Context. -
If there is no access token in a request, or if the token validation does not complete successfully, the filter returns an HTTP error status to the user agent, and IG stops processing the request, as specified in the RFC, The OAuth 2.0 Authorization Framework: Bearer Token Usage.
-
The StaticResponseHandler returns the content of the access token from the context.
-
-
-
Test the setup for a signed access token:
-
Get an access token for the demo user, using the scope
myscope:$ mytoken=$(curl -s \ --user "client-application:password" \ --data "grant_type=password&username=demo&password=Ch4ng31t&scope=myscope" \ http://am.example.com:8088/openam/oauth2/access_token | jq -r ".access_token")bash -
Display the token:
$ echo ${mytoken}bash -
Access the route by providing the token returned in the previous step:
$ curl -v http://ig.example.com:8080/rs-stateless-signed-ksss --header "Authorization: Bearer ${mytoken}"

...
Decoded access_token: {
sub=(usr!demo),
cts=OAUTH2_STATELESS_GRANT,
...
bash
-
Validating encrypted access tokens with the StatelessAccessTokenResolver and KeyStoreSecretStore
-
Locate the following directories for keys, keystores, and certificates, and in a terminal create variables for them:
-
Directory where the keystore is created:
keystore_directory -
AM keystore directory:
am_keystore_directory -
IG keystore directory:
ig_keystore_directory
-
-
Set up keys for AM:
-
Generate the encryption key:
$ keytool -genseckey \
-alias encryption-key \
-dname "CN=ig.example.com, OU=example, O=com, L=fr, ST=fr, C=fr" \
-keystore "$am_keystore_directory/AM_keystore.p12" \
-storetype PKCS12 \
-storepass "password" \
-keyalg AES \
-keysize 256
bash -
List the keys in the AM keystore:
$ keytool -list \
-v \
-keystore "$am_keystore_directory/AM_keystore.p12" \
-storepass "password" \
-storetype PKCS12

...
Your keystore contains 1 entry
Alias name: encryption-key
bash -
Add a file called
keystore.pass, with the contentpassword:$ cd $am_keystore_directory $ echo -n 'password' > keystore.passbashMake sure the password file contains only the password, with no trailing spaces or carriage returns. The filename corresponds to the secret ID of the store password and entry password for the KeyStoreSecretStore.
-
Restart AM.
-
-
Set up keys for IG:
-
Import
encryption-keyinto the IG keystore, with the aliasdecryption-key:$ keytool -importkeystore \ -srcalias encryption-key \ -srckeystore "$am_keystore_directory/AM_keystore.p12" \ -srcstoretype PKCS12 \ -srcstorepass "password" \ -destkeystore "$ig_keystore_directory/IG_keystore.p12" \ -deststoretype PKCS12 \ -destalias decryption-key \ -deststorepass "password" \ -destkeypass "password"bash -
List the keys in the IG keystore:
$ keytool -list \
-v \
-keystore "$ig_keystore_directory/IG_keystore.p12" \
-storepass "password" \
-storetype PKCS12

...
Your keystore contains 1 entry
Alias name: decryption-key
bash -
In the IG configuration, set an environment variable for the keystore password:
$ export KEYSTORE_SECRET_ID='cGFzc3dvcmQ='bash -
Restart IG.
-
-
Set up AM:
-
Set up AM as described in Validate signed access tokens with the StatelessAccessTokenResolver and KeyStoreSecretStore.
-
Add a mapping for the encryption keystore:
-
Select Secret Stores >
keystoresecretstore. -
Select the Mappings tab, and add a mapping with the following values:
-
Secret ID :
am.services.oauth2.stateless.token.encryption -
Alias :
encryption-key
-
-
-
Enable token encryption on the OAuth 2.0 Authorization Provider:
-
Select Services > OAuth2 Provider.
-
On the Advanced tab, select Encrypt Client-Based Tokens.
-
-
-
Set up IG:
-
Add the following route to IG, and replace ig_keystore_directory:
-
Linux
-
Windows
$HOME/.openig/config/routes/rs-stateless-encrypted.json
%appdata%\OpenIG\config\routes\rs-stateless-encrypted.json
{ "name": "rs-stateless-encrypted", "condition": "${find(request.uri.path, '/rs-stateless-encrypted')}", "heap": [ { "name": "SystemAndEnvSecretStore-1", "type": "SystemAndEnvSecretStore" }, { "name": "KeyStoreSecretStore-1", "type": "KeyStoreSecretStore", "config": { "file": "<ig_keystore_directory>/IG_keystore.p12", "storeType": "PKCS12", "storePasswordSecretId": "keystore.secret.id", "entryPasswordSecretId": "keystore.secret.id", "secretsProvider": "SystemAndEnvSecretStore-1", "mappings": [ { "secretId": "stateless.access.token.decryption.key", "aliases": [ "decryption-key" ] } ] } } ], "handler": { "type": "Chain", "capture": "all", "config": { "filters": [ { "name": "OAuth2ResourceServerFilter-1", "type": "OAuth2ResourceServerFilter", "config": { "scopes": [ "myscope" ], "requireHttps": false, "accessTokenResolver": { "type": "StatelessAccessTokenResolver", "config": { "secretsProvider": "KeyStoreSecretStore-1", "issuer": "http://am.example.com:8088/openam/oauth2", "decryptionSecretId": "stateless.access.token.decryption.key" } } } } ], "handler": { "type": "StaticResponseHandler", "config": { "status": 200, "headers": { "Content-Type": [ "text/html; charset=UTF-8" ] }, "entity": "<html><body><h2>Decoded access_token: ${contexts.oauth2.accessToken.info}</h2></body></html>" } } } } }jsonNotice the following features of the route compared to
rs-stateless-signed.json, used in: Validate signed access tokens with the StatelessAccessTokenResolver and KeyStoreSecretStore:-
The route matches requests to
/rs-stateless-encrypted. -
The OAuth2ResourceServerFilter and KeyStoreSecretStore refer to the configuration for a decryption key instead of a verification key.
-
-
-
Get an access token for the demo user, using the scope
myscope:$ mytoken=$(curl -s \ --user "client-application:password" \ --data "grant_type=password&username=demo&password=Ch4ng31t&scope=myscope" \ http://am.example.com:8088/openam/oauth2/access_token | jq -r ".access_token")bash -
Display the token:
$ echo ${mytoken}bashNote that the token is structured as an encrypted token.
-
Access the route by providing the token returned in the previous step:
$ curl -v http://ig.example.com:8080/rs-stateless-encrypted --header "Authorization: Bearer ${mytoken}"

...
Decoded access_token: {
sub=demo,
cts=OAUTH2_STATELESS_GRANT,
...
bash
Validate certificate-bound access tokens
Clients can authenticate to AM through mutual TLS (mTLS) and X.509 certificates. Certificates must be self-signed or use public key infrastructure (PKI), as described in version 12 of the draft OAuth 2.0 Mutual TLS Client Authentication and Certificate Bound Access Tokens.
When a client requests an access token from AM through mTLS,
AM can use a confirmation key to bind the access token to the
presented client certificate. The confirmation key is the certificate
thumbprint, computed as
base64url-encode(sha256(der(certificate))). The access token is then
certificate-bound. For more information, refer to
Mutual TLS in AM’s OAuth 2.0 guide.
When the client connects to IG by using that certificate, IG can verify that the confirmation key corresponds to the presented certificate. This proof-of-possession interaction ensures that only the client in possession of the key corresponding to the certificate can use the access token to access protected resources.
mTLS using standard TLS client certificate authentication
IG can validate the thumbprint of certificate-bound access tokens by reading the client certificate from the TLS connection.
For this example, the client must be connected directly to IG through a TLS connection, for which IG is the TLS termination point. If TLS is terminated at a reverse proxy or load balancer before IG, use the example in mTLS Using Trusted Headers.


Perform the procedures in this section to set up and test mTLS using standard TLS client certificate authentication:
Set up keystores and truststores
-
Locate the following keystore directories, and in a terminal create variables for them:
-
oauth2_client_keystore_directory -
am_keystore_directory -
ig_keystore_directory
-
-
Create self-signed RSA key pairs for AM, IG, and the client:
$ keytool -genkeypair \ -alias openam-server \ -keyalg RSA \ -keysize 2048 \ -keystore $am_keystore_directory/keystore.p12 \ -storepass changeit \ -storetype PKCS12 \ -keypass changeit \ -validity 360 \ -dname CN=am.example.com,O=Example,C=FRbash$ keytool -genkeypair \ -alias openig-server \ -keyalg RSA \ -keysize 2048 \ -keystore $ig_keystore_directory/keystore.p12 \ -storepass changeit \ -storetype PKCS12 \ -keypass changeit \ -validity 360 \ -dname CN=ig.example.com,O=Example,C=FRbash$ keytool -genkeypair \ -alias oauth2-client \ -keyalg RSA \ -keysize 2048 \ -keystore $oauth2_client_keystore_directory/keystore.p12 \ -storepass changeit \ -storetype PKCS12 \ -keypass changeit \ -validity 360 \ -dname CN=testbash -
Export the certificates to .pem so that the
curlclient can verify the identity of the AM and IG servers:$ keytool -export \ -rfc \ -alias openam-server \ -keystore $am_keystore_directory/keystore.p12 \ -storepass changeit \ -storetype PKCS12 \ -file $am_keystore_directory/openam-server.cert.pem Certificate stored in file .../openam-server.cert.pembash$ keytool -export \ -rfc \ -alias openig-server \ -keystore $ig_keystore_directory/keystore.p12 \ -storepass changeit \ -storetype PKCS12 \ -file $ig_keystore_directory/openig-server.cert.pem Certificate stored in file openig-server.cert.pembash -
Extract the certificate and client private key to .pem so that the
curlcommand can identity itself as the client for the HTTPS connection:$ keytool -export \ -rfc \ -alias oauth2-client \ -keystore $oauth2_client_keystore_directory/keystore.p12 \ -storepass changeit \ -storetype PKCS12 \ -file $oauth2_client_keystore_directory/client.cert.pem Certificate stored in file .../client.cert.pembash$ openssl pkcs12 \ -in $oauth2_client_keystore_directory/keystore.p12 \ -nocerts \ -nodes \ -passin pass:changeit \ -out $oauth2_client_keystore_directory/client.key.pem ...verified OKbashYou can now delete the client keystore.
-
Create the CACerts truststore so that AM can validate the client identity:
$ keytool -import \
-noprompt \
-trustcacerts \
-file $oauth2_client_keystore_directory/client.cert.pem \
-keystore $oauth2_client_keystore_directory/cacerts.p12 \
-storepass changeit \
-storetype PKCS12 \
-alias client-cert

Certificate was added to keystore
bash
Set up AM for HTTPS (server-side) in Tomcat
This procedure sets up AM for HTTPS in Tomcat. For more information, see Secure connections to the AM container in AM’s Installation guide.
-
Add a connector configuration for port
8445to AM’s Tomcatserver.xml, replacing the values for the keystore directories with your path. If the file already contains a connector for the port, edit that connector or replace it:<Connector port="8445" protocol="HTTP/1.1" SSLEnabled="true" scheme="https" secure="true"> <SSLHostConfig protocols="+TLSv1.2,-TLSv1.1,-TLSv1,-SSLv2Hello,-SSLv3" certificateVerification="optionalNoCA" truststoreFile="oauth2_client_keystore_directory/cacerts.p12" truststorePassword="changeit" truststoreType="PKCS12"> <Certificate certificateKeystoreFile="am_keystore_directory/keystore.p12" certificateKeystorePassword="changeit" certificateKeystoreType="PKCS12"/> </SSLHostConfig> </Connector>xmlThe
optionalNoCAproperty allows the presentation of client certificates to be optional. Tomcat does not check them against the list of trusted CAs. -
In AM, export an environment variable for the base64-encoded value of the password (
changeit) for thecacerts.p12truststore:$ export PASSWORDSECRETID='Y2hhbmdlaXQ='bash -
Restart AM, and make sure you can access it on the secure port
https://am.example.com:8445/openam.
Set up IG for HTTPS (server-side)
This procedure sets up IG for HTTPS. Before you start, install IG as described in the Install.
-
In ig_keystore_directory, add a file called
keystore.passcontaining the keystore password:$ cd $ig_keystore_directory $ echo -n 'changeit' > keystore.passbashMake sure the password file contains only the password, with no trailing spaces or carriage returns. -
Add the following configuration to IG, replacing instances of ig_keystore_directory and oauth2_client_keystore_directory with your path:
-
Linux
-
Windows
$HOME/.openig/config/admin.json
%appdata%\OpenIG\config\admin.json
{ "mode": "DEVELOPMENT", "connectors": [ { "port": 8080 }, { "port": 8443, "tls": { "type": "ServerTlsOptions", "config": { "alpn": { "enabled": true }, "clientAuth": "REQUEST", "keyManager": { "type": "SecretsKeyManager", "config": { "signingSecretId": "key.manager.secret.id", "secretsProvider": { "type": "KeyStoreSecretStore", "config": { "file": "<ig_keystore_directory>/keystore.p12", "storePasswordSecretId": "keystore.pass", "secretsProvider": "SecretsPasswords", "mappings": [ { "secretId": "key.manager.secret.id", "aliases": [ "openig-server" ] } ] } } } }, "trustManager": { "name": "SecretsTrustManager-1", "type": "SecretsTrustManager", "config": { "verificationSecretId": "trust.manager.secret.id", "secretsProvider": { "type": "KeyStoreSecretStore", "config": { "file": "<oauth2_client_keystore_directory>/cacerts.p12", "storePasswordSecretId": "keystore.pass", "secretsProvider": "SecretsPasswords", "mappings": [ { "secretId": "trust.manager.secret.id", "aliases": [ "client-cert" ] } ] } } } } } } } ], "heap": [ { "name": "SecretsPasswords", "type": "FileSystemSecretStore", "config": { "directory": "<ig_keystore_directory>", "format": "PLAIN" } } ] }jsonNotice the following features of the configuration:
-
IG starts on port
8080, and on8443over TLS. -
IG’s private keys for TLS are managed by the SecretsKeyManager, which references the KeyStoreSecretStore that holds the keys.
-
The password of the KeyStoreSecretStore is provided by the FileSystemSecretStore.
-
The KeyStoreSecretStore maps the keystore alias to the secret ID for retrieving the private signing keys.
-
-
Start IG:
-
Linux
-
Windows
$ /path/to/identity-gateway-2023.11.0/bin/start.sh ... ... started in 1234ms on ports : [8080 8443]bashC:\path\to\identity-gateway-2023.11.0\bin\start.batwindowsBy default, IG configuration files are located under
$HOME/.openig(on Windows%appdata%\OpenIG). For information about how to use a different location, refer to Configuration location. -
Set up AM as an Authorization Server with mTLS
-
In a the AM admin UI, select Applications > Agents > Identity Gateway, and register an IG agent with the following values:
-
Agent ID:
ig_agent -
Password:
password -
Token Introspection:
Realm OnlyUse secure passwords in a production environment. Consider using a password manager to generate secure passwords.
-
-
(Optional) Authenticate the agent to AM as described in Authenticate an IG agent to AM.
IG agents are automatically authenticated to AM by a deprecated authentication module in AM. This step is currently optional, but will be required when authentication chains and modules are removed in a future release of AM. -
Configure an OAuth 2.0 Authorization Server:
-
Select Services > Add a Service > OAuth2 Provider, and add a service with the default values.
-
On the Advanced tab, select the following value:
-
Support TLS Certificate-Bound Access Tokens: enabled
-
-
-
Configure an OAuth 2.0 client to request access tokens:
-
Select Applications > OAuth 2.0 > Clients, and add a client with the following values:
-
Client ID:
client-application -
Client secret:
password -
Scope(s):
test
-
-
On the Advanced tab, select the following values:
-
Grant Types:
Client CredentialsThe
passwordis the only grant type used by the client in the example. -
Token Endpoint Authentication Method:
tls_client_auth
-
-
On the signing and Encryption tab, select the following values:
-
mTLS Subject DN:
CN=testWhen this option is set, AM requires the subject DN in the client certificate to have the same value. This ensures that the certificate is from the client, and not just any valid certificate trusted by the trust manager.
-
Use Certificate-Bound Access Tokens: Enabled
-
-
-
Set up AM secret stores to trust the client certificate:
-
Select Secret Stores, and add a store with the following values:
-
Secret Store ID:
trusted-ca-certs -
Store Type:
Keystore -
File:
$oauth2_client_keystore_directory/cacerts.p12 -
Keystore type:
PKCS12 -
Store password secret ID:
passwordSecretId
-
-
Select Mappings and add the following mapping:
-
Secret ID:
am.services.oauth2.tls.client.cert.authentication -
Aliases:
client-cert
-
When the token endpoint authentication method is
tls_client_auth, this secret is used to validate the client certificate. Add an alias in this list for each client that usestls_client_auth. For certificates signed by a CA, add the CA certificate to the list. -
Set up IG as a resource server with mTLS
-
Set an environment variable for the IG agent password, and then restart IG:
$ export AGENT_SECRET_ID='cGFzc3dvcmQ='bashThe password is retrieved by a SystemAndEnvSecretStore, and must be base64-encoded.
-
Add the following route to IG:
-
Linux
-
Windows
$HOME/.openig/config/routes/mtls-certificate.json
%appdata%\OpenIG\config\routes\mtls-certificate.json
{ "name": "mtls-certificate", "condition": "${find(request.uri.path, '/mtls-certificate')}", "heap": [ { "name": "SystemAndEnvSecretStore-1", "type": "SystemAndEnvSecretStore" }, { "name": "AmService-1", "type": "AmService", "config": { "agent": { "username": "ig_agent", "passwordSecretId": "agent.secret.id" }, "secretsProvider": "SystemAndEnvSecretStore-1", "url": "http://am.example.com:8088/openam/" } } ], "handler": { "type": "Chain", "capture": "all", "config": { "filters": [ { "name": "OAuth2ResourceServerFilter-1", "type": "OAuth2ResourceServerFilter", "config": { "scopes": [ "test" ], "requireHttps": false, "accessTokenResolver": { "type": "ConfirmationKeyVerifierAccessTokenResolver", "config": { "delegate": { "name": "token-resolver-1", "type": "TokenIntrospectionAccessTokenResolver", "config": { "amService": "AmService-1", "providerHandler": { "type": "Chain", "config": { "filters": [ { "type": "HttpBasicAuthenticationClientFilter", "config": { "username": "ig_agent", "passwordSecretId": "agent.secret.id", "secretsProvider": "SystemAndEnvSecretStore-1" } } ], "handler": "ForgeRockClientHandler" } } } } } } } } ], "handler": { "name": "StaticResponseHandler-1", "type": "StaticResponseHandler", "config": { "status": 200, "headers": { "Content-Type": [ "text/plain; charset=UTF-8" ] }, "entity": "mTLS\n Valid token: ${contexts.oauth2.accessToken.token}\n Confirmation keys: ${contexts.oauth2}" } } } } }jsonNotice the following features of the route:
-
The route matches requests to
/mtls-certificate. -
The OAuth2ResourceServerFilter uses the ConfirmationKeyVerifierAccessTokenResolver to validate the certificate thumbprint against the thumbprint from the resolved access token, provided by AM.
The ConfirmationKeyVerifierAccessTokenResolver then delegates token resolution to the TokenIntrospectionAccessTokenResolver.
-
The
providerHandleradds an authorization header to the request, containing the username and password of the OAuth 2.0 client with the scope to examine (introspect) access tokens. -
The OAuth2ResourceServerFilter checks that the resolved token has the required scopes, and injects the token info into the context.
-
The StaticResponseHandler returns the content of the access token from the context.
-
Test the setup
-
Get an access token from AM, over TLS:
$ mytoken=$(curl --request POST \
--cacert $am_keystore_directory/openam-server.cert.pem \
--cert $oauth2_client_keystore_directory/client.cert.pem \
--key $oauth2_client_keystore_directory/client.key.pem \
--header 'cache-control: no-cache' \
--header 'content-type: application/x-www-form-urlencoded' \
--data 'client_id=client-application&grant_type=client_credentials&scope=test' \
https://am.example.com:8445/openam/oauth2/access_token | jq -r .access_token)
bash -
Introspect the access token on AM:
$ curl --request POST \ -u ig_agent:password \ --header 'content-type: application/x-www-form-urlencoded' \ --data token=${mytoken} \ http://am.example.com:8088/openam/oauth2/realms/root/introspect | jq { "active": true, "scope": "test", "realm": "/", "client_id": "client-application", "user_id": "client-application", "token_type": "Bearer", "exp": 155...833, "sub": "(age!client-application)", "subname": "client-application", "iss": "http://am.example.com:8088/openam/oauth2", "cnf": { "x51...156": "T4u...R9Q" }, "authGrantId": "dfE...2vk", "auditTrackingId": "e36...524" }bashThe
cnfproperty indicates the value of the confirmation code, as follows:-
x5: X509 certificate -
t: thumbprint -
#: separator -
S256: algorithm used to hash the raw certificate bytes
-
-
Access the IG route to validate the token’s confirmation thumbprint with the ConfirmationKeyVerifierAccessTokenResolver:
$ curl --request POST \ --cacert $ig_keystore_directory/openig-server.cert.pem \ --cert $oauth2_client_keystore_directory/client.cert.pem \ --key $oauth2_client_keystore_directory/client.key.pem \ --header "authorization: Bearer ${mytoken}" \ https://ig.example.com:8443/mtls-certificate mTLS Valid token: 2Bp...s_k Confirmation keys: { ... }bashThe validated token and confirmation keys are displayed.
mTLS using trusted headers
IG can validate the thumbprint of certificate-bound access tokens by reading the client certificate from a configured, trusted HTTP header.
Use this method when TLS is terminated at a reverse proxy or load balancer before IG. IG cannot authenticate the client through the TLS connection’s client certificate because:
-
If the connection is over TLS, the connection presents the certificate of the TLS termination point before IG.
-
If the connection is not over TLS, the connection presents no client certificate.
If the client is connected directly to IG through a TLS connection, for which IG is the TLS termination point, use the example in mTLS Using Standard TLS Client Certificate Authentication.
Configure the proxy or load balancer to:
-
Forward the encoded certificate to IG in the trusted header. Encode the certificate in an HTTP-header compatible format that can convey a full certificate, so that IG can rebuild the certificate.
-
Strip the trusted header from incoming requests, and change the default header name to something an attacker can’t guess.
Because there is a trust relationship between IG and the TLS termination point, IG doesn’t authenticate the contents of the trusted header. IG accepts any value in a header from a trusted TLS termination point.
Use this example when the IG instance is running behind a load balancer or other ingress point. If the IG instance is running behind the TLS termination point, consider the example in mTLS Using Standard TLS Client Certificate Authentication.
The following image illustrates the connections and certificates required by the example:


-
Set up the keystores, truststores, AM, and IG as described in mTLS Using Standard TLS Client Certificate Authentication.
-
Base64-encode the value of
$oauth2_client_keystore_directory/client.cert.pem. The value is used in the final POST. -
Add the following route to IG:
-
Linux
-
Windows
$HOME/.openig/config/routes/mtls-header.json
%appdata%\OpenIG\config\routes\mtls-header.json
{ "name": "mtls-header", "condition": "${find(request.uri.path, '/mtls-header')}", "heap": [ { "name": "SystemAndEnvSecretStore-1", "type": "SystemAndEnvSecretStore" }, { "name": "AmService-1", "type": "AmService", "config": { "agent": { "username": "ig_agent", "passwordSecretId": "agent.secret.id" }, "secretsProvider": "SystemAndEnvSecretStore-1", "url": "http://am.example.com:8088/openam/" } } ], "handler": { "type": "Chain", "capture": "all", "config": { "filters": [ { "name": "CertificateThumbprintFilter-1", "type": "CertificateThumbprintFilter", "config": { "certificate": "${pemCertificate(decodeBase64(request.headers['ssl_client_cert'][0]))}", "failureHandler": { "type": "ScriptableHandler", "config": { "type": "application/x-groovy", "source": [ "def response = new Response(Status.TEAPOT);", "response.entity = 'Failure in CertificateThumbprintFilter'", "return response" ] } } } }, { "name": "OAuth2ResourceServerFilter-1", "type": "OAuth2ResourceServerFilter", "config": { "scopes": [ "test" ], "requireHttps": false, "accessTokenResolver": { "type": "ConfirmationKeyVerifierAccessTokenResolver", "config": { "delegate": { "name": "token-resolver-1", "type": "TokenIntrospectionAccessTokenResolver", "config": { "amService": "AmService-1", "providerHandler": { "type": "Chain", "config": { "filters": [ { "type": "HttpBasicAuthenticationClientFilter", "config": { "username": "ig_agent", "passwordSecretId": "agent.secret.id", "secretsProvider": "SystemAndEnvSecretStore-1" } } ], "handler": "ForgeRockClientHandler" } } } } } } } } ], "handler": { "name": "StaticResponseHandler-1", "type": "StaticResponseHandler", "config": { "status": 200, "headers": { "Content-Type": [ "text/plain; charset=UTF-8" ] }, "entity": "mTLS\n Valid token: ${contexts.oauth2.accessToken.token}\n Confirmation keys: ${contexts.oauth2}" } } } } }jsonNotice the following features of the route compared to
mtls-certificate.json:-
The route matches requests to
/mtls-header. -
The CertificateThumbprintFilter extracts a Java certificate from the trusted header, computes the SHA-256 thumbprint of that certificate, and makes the thumbprint available for the ConfirmationKeyVerifierAccessTokenResolver.
-
-
Test the setup:
-
Get an access token from AM, over TLS:
$ mytoken=$(curl --request POST \
--cacert $am_keystore_directory/openam-server.cert.pem \
--cert $oauth2_client_keystore_directory/client.cert.pem \
--key $oauth2_client_keystore_directory/client.key.pem \
--header 'cache-control: no-cache' \
--header 'content-type: application/x-www-form-urlencoded' \
--data 'client_id=client-application&grant_type=client_credentials&scope=test' \
https://am.example.com:8445/openam/oauth2/access_token | jq -r .access_token)
bash -
Introspect the access_token on AM:
$ curl --request POST \ -u ig_agent:password \ --header 'content-type: application/x-www-form-urlencoded' \ --data token=${mytoken} \ http://am.example.com:8088/openam/oauth2/realms/root/introspect | jq { "active": true, "scope": "test", "realm": "/", "client_id": "client-application", "user_id": "client-application", "token_type": "Bearer", "exp": 157...994, "sub": "(age!client-application)", "subname": "client-application", "iss": "http://am.example.com:8088/openam/oauth2", "cnf": { "x51...156": "1QG...Wgc" }, "authGrantId": "lto...8vw", "auditTrackingId": "119...480" }bashThe
cnfproperty indicates the value of the confirmation code, as follows:-
x5: X509 certificate -
t: thumbprint -
#: separator -
S256: algorithm used to hash the raw certificate bytes
-
-
Access the IG route to validate the confirmation key, using the base64-encoded value of
$oauth2_client_keystore_directory/client.cert.pem:$ curl --request POST \ --header "authorization:Bearer $mytoken" \ --header 'ssl_client_cert:base64-encoded-cert' http://ig.example.com:8080/mtls-header Valid token: zw5...Sj1 Confirmation keys: { ... }bashThe validated token and confirmation keys are displayed.
-
Use the OAuth 2.0 context to log in to the sample application
The introspection returns scopes in the context. This section contains an example route that retrieves the scopes, assigns them as the IG session username and password, and uses them to log the user directly in to the sample application.
For information about the context, refer to OAuth2Context.
-
Set up AM:
-
Set up AM as described in Validate access tokens through the introspection endpoint.
-
Select Identities, and change the email address of the demo user to
demo. -
Select Scripts > OAuth2 Access Token Modification Script, and replace the default script as follows:
import org.forgerock.http.protocol.Request import org.forgerock.http.protocol.Response import com.iplanet.sso.SSOException import groovy.json.JsonSlurper def attributes = identity.getAttributes(["mail"].toSet()) accessToken.setField("mail", attributes["mail"][0]) accessToken.setField("password", "{amDemoPw}")groovyThe AM script adds user profile information to the access token, and adds a
passwordfield with the valueCh4ng31t.Do not use this example in production! If the token is stateless and unencrypted, the password value is easily accessible when you have the token.
-
-
Set up IG:
-
Set an environment variable for the IG agent password, and then restart IG:
$ export AGENT_SECRET_ID='cGFzc3dvcmQ='bashThe password is retrieved by a SystemAndEnvSecretStore, and must be base64-encoded.
-
Add the following route to IG:
-
Linux
-
Windows
$HOME/.openig/config/routes/rs-pwreplay.json
%appdata%\OpenIG\config\routes\rs-pwreplay.json
{ "name" : "rs-pwreplay", "baseURI" : "http://app.example.com:8081", "condition" : "${find(request.uri.path, '^/rs-pwreplay')}", "heap": [ { "name": "SystemAndEnvSecretStore-1", "type": "SystemAndEnvSecretStore" }, { "name": "AmService-1", "type": "AmService", "config": { "agent": { "username": "ig_agent", "passwordSecretId": "agent.secret.id" }, "secretsProvider": "SystemAndEnvSecretStore-1", "url": "http://am.example.com:8088/openam/" } } ], "handler" : { "type" : "Chain", "config" : { "filters" : [ { "name" : "OAuth2ResourceServerFilter-1", "type" : "OAuth2ResourceServerFilter", "config" : { "scopes" : [ "mail", "employeenumber" ], "requireHttps" : false, "realm" : "OpenIG", "accessTokenResolver": { "name": "TokenIntrospectionAccessTokenResolver-1", "type": "TokenIntrospectionAccessTokenResolver", "config": { "amService": "AmService-1", "providerHandler": { "type": "Chain", "config": { "filters": [ { "type": "HttpBasicAuthenticationClientFilter", "config": { "username": "ig_agent", "passwordSecretId": "agent.secret.id", "secretsProvider": "SystemAndEnvSecretStore-1" } } ], "handler": "ForgeRockClientHandler" } } } } } }, { "type": "AssignmentFilter", "config": { "onRequest": [{ "target": "${session.username}", "value": "${contexts.oauth2.accessToken.info.mail}" }, { "target": "${session.password}", "value": "${contexts.oauth2.accessToken.info.password}" } ] } }, { "type": "StaticRequestFilter", "config": { "method": "POST", "uri": "http://app.example.com:8081/login", "form": { "username": [ "${session.username}" ], "password": [ "${session.password}" ] } } } ], "handler": "ReverseProxyHandler" } } }jsonNotice the following features of the route compared to
rs-introspect.json:-
The route matches requests to
/rs-pwreplay. -
The AssignmentFilter accesses the context, and injects the username and password into the SessionContext,
${Session}. -
The StaticRequestFilter retrieves the username and password from
session, and replaces the original HTTP GET request with an HTTP POST login request that contains the credentials to authenticate.
-
-
-
Test the setup:
-
In a terminal window, use a
curlcommand similar to the following to retrieve an access token:$ mytoken=$(curl -s \ --user "client-application:password" \ --data "grant_type=password&username=demo&password=Ch4ng31t&scope=mail%20employeenumber" \ http://am.example.com:8088/openam/oauth2/access_token | jq -r ".access_token")bash -
Validate the access token returned in the previous step:
$ curl -v http://ig.example.com:8080/rs-pwreplay --header "Authorization: Bearer ${mytoken}"bashHTML for the sample application is displayed.
-
Cache access tokens
This section builds on the example in Validate access tokens through the introspection endpoint to cache and then revoke access tokens.
When the access token is not cached, IG calls AM to validate the access token. When the access token is cached, IG doesn’t validate the access token with AM.
(From AM 6.5.3.) When an access token is revoked on AM, the CacheAccessTokenResolver can delete the token from the cache when both of the following conditions are true:
-
The
notificationproperty of AmService is enabled. -
The delegate AccessTokenResolver provides the token metadata required to update the cache.
When a refresh_token is revoked on AM, all associated access tokens are automatically and immediately revoked.
-
Set up AM as described in Validate access tokens through the introspection endpoint.
-
Set up IG:
-
Set an environment variable for the IG agent password, and then restart IG:
$ export AGENT_SECRET_ID='cGFzc3dvcmQ='bashThe password is retrieved by a SystemAndEnvSecretStore, and must be base64-encoded.
-
Add the following route to IG:
-
Linux
-
Windows
$HOME/.openig/config/routes/rs-introspect-cache.json
%appdata%\OpenIG\config\routes\rs-introspect-cache.json
{ "name": "rs-introspect-cache", "baseURI": "http://app.example.com:8081", "condition": "${find(request.uri.path, '^/rs-introspect-cache$')}", "heap": [ { "name": "SystemAndEnvSecretStore-1", "type": "SystemAndEnvSecretStore" }, { "name": "AmService-1", "type": "AmService", "config": { "url": "http://am.example.com:8088/openam", "realm": "/", "agent" : { "username" : "ig_agent", "passwordSecretId" : "agent.secret.id" }, "secretsProvider": "SystemAndEnvSecretStore-1" } } ], "handler": { "type": "Chain", "config": { "filters": [ { "name": "OAuth2ResourceServerFilter-1", "type": "OAuth2ResourceServerFilter", "config": { "scopes": [ "mail", "employeenumber" ], "requireHttps": false, "realm": "OpenIG", "accessTokenResolver": { "name": "CacheAccessTokenResolver-1", "type": "CacheAccessTokenResolver", "config": { "enabled": true, "defaultTimeout ": "1 hour", "maximumTimeToCache": "1 day", "amService":"AmService-1", "delegate": { "name": "TokenIntrospectionAccessTokenResolver-1", "type": "TokenIntrospectionAccessTokenResolver", "config": { "amService": "AmService-1", "providerHandler": { "type": "Chain", "config": { "filters": [ { "type": "HttpBasicAuthenticationClientFilter", "config": { "username": "ig_agent", "passwordSecretId": "agent.secret.id", "secretsProvider": "SystemAndEnvSecretStore-1" } } ], "handler": { "type": "Delegate", "capture": "all", "config": { "delegate": "ForgeRockClientHandler" } } } } } } } } } } ], "handler": { "type": "StaticResponseHandler", "config": { "status": 200, "headers": { "Content-Type": [ "text/html; charset=UTF-8" ] }, "entity": "<html><body><h2>Decoded access_token: ${contexts.oauth2.accessToken.info}</h2></body></html>" } } } } }jsonNotice the following features of the route compared to
rs-introspect.json, in Validate access tokens through the introspection endpoint:-
The OAuth2ResourceServerFilter uses a CacheAccessTokenResolver to cache the access token, and then delegate token resolution to the TokenIntrospectionAccessTokenResolver.
-
The
amServiceproperty in CacheAccessTokenResolver enables WebSocket notifications from AM, for events such as token revocation. -
The TokenIntrospectionAccessTokenResolver uses a ForgeRockClientHandler and a capture decorator to capture IG’s interactions with AM.
-
-
-
Test token caching:
-
In a terminal window, use a
curlcommand similar to the following to retrieve an access token:$ mytoken=$(curl -s \ --user "client-application:password" \ --data "grant_type=password&username=demo&password=Ch4ng31t&scope=mail%20employeenumber" \ http://am.example.com:8088/openam/oauth2/access_token | jq -r ".access_token")bash -
Access the route, using the access token returned in the previous step:
$ curl http://ig.example.com:8080/rs-introspect-cache --header "Authorization: Bearer ${mytoken}"

{
 active = true,
 scope = employeenumber mail,
 client_id = client - application,
 user_id = demo,
 token_type = Bearer,
 exp = 158...907,
 ...
}
bash -
In the route log, note that IG calls AM to introspect the access token:
-
Access the route again, and in the route log note that this time IG doesn’t call AM, because the token is cached.
-
Disable the cache and repeat the previous steps to cause IG to call AM to validate the access token for each request.
-
-
Test token revocation:
-
In a terminal window, use a
curlcommand similar to the following to revoke the access token obtained in the previous step:$ curl --request POST \ --data "token=${mytoken}" \ --data "client_id=client-application" \ --data "client_secret=password" \ "http://am.example.com:8088/openam/oauth2/realms/root/token/revoke"bash -
Access the route, using the access token returned in the previous step, and and note that the request is not authorized because the token is revoked:
$ curl -v http://ig.example.com:8080/rs-introspect-cache --header "Authorization: Bearer ${mytoken}"

...
HTTP/1.1 401 Unauthorized
bash
-
Use OAuth 2.0 client credentials
This example shows how a client service accesses an OAuth 2.0-protected resource by using its OAuth 2.0 client credentials.

-
Set up the AM as an Authorization Server:
-
Select Applications > Agents > Identity Gateway, and register an IG agent with the following values:
-
Agent ID:
ig_agent -
Password:
password -
Token Introspection:
Realm OnlyUse secure passwords in a production environment. Consider using a password manager to generate secure passwords.
-
-
(Optional) Authenticate the agent to AM as described in Authenticate an IG agent to AM.
IG agents are automatically authenticated to AM by a deprecated authentication module in AM. This step is currently optional, but will be required when authentication chains and modules are removed in a future release of AM. -
Create an OAuth 2.0 Authorization Server:
-
Select Services > Add a Service > OAuth2 Provider.
-
Add a service with the default values.
-
-
Create an OAuth 2.0 client to request access tokens, using client credentials for authentication:
-
Select Applications > OAuth 2.0 > Clients, and add a client with the following values:
-
Client ID :
client-service -
Client secret :
password -
Scope(s) :
client-scope
-
-
(From AM 6.5) On the Advanced tab, select the following value:
-
Grant Types :
Client Credentials
-
-
-
-
Set up IG:
-
Set an environment variable for the IG agent password, and then restart IG:
$ export AGENT_SECRET_ID='cGFzc3dvcmQ='bashThe password is retrieved by a SystemAndEnvSecretStore, and must be base64-encoded.
-
Add the following route to IG:
-
Linux
-
Windows
$HOME/.openig/config/routes/oauth2-protected-resource.json
%appdata%\OpenIG\config\routes\oauth2-protected-resource.json
{ "name": "oauth2-protected-resource", "condition": "${find(request.uri.path, '^/oauth2-protected-resource')}", "heap": [ { "name": "SystemAndEnvSecretStore-1", "type": "SystemAndEnvSecretStore" }, { "name": "AmService-1", "type": "AmService", "config": { "agent": { "username": "ig_agent", "passwordSecretId": "agent.secret.id" }, "secretsProvider": "SystemAndEnvSecretStore-1", "url": "http://am.example.com:8088/openam/" } } ], "handler": { "type": "Chain", "config": { "filters": [ { "name": "OAuth2ResourceServerFilter-1", "type": "OAuth2ResourceServerFilter", "config": { "scopes": [ "client-scope" ], "requireHttps": false, "realm": "OpenIG", "accessTokenResolver": { "name": "TokenIntrospectionAccessTokenResolver-1", "type": "TokenIntrospectionAccessTokenResolver", "config": { "amService": "AmService-1", "providerHandler": { "type": "Chain", "config": { "filters": [ { "type": "HttpBasicAuthenticationClientFilter", "config": { "username": "ig_agent", "passwordSecretId": "agent.secret.id", "secretsProvider": "SystemAndEnvSecretStore-1" } } ], "handler": "ForgeRockClientHandler" } } } } } } ], "handler": { "type": "StaticResponseHandler", "config": { "status": 200, "headers": { "Content-Type": [ "text/html; charset=UTF-8" ] }, "entity": "<html><body><h2>Access Granted</h2></body></html>" } } } } }jsonNotice the following features of the route:
-
The route matches requests to
/oauth2-protected-resource. -
The
OAuth2ResourceServerFilterexpects an OAuth 2.0 access token in the header of the incoming request, with the scopeclient-scope. -
The filter uses a TokenIntrospectionAccessTokenResolver to resolve the access token. The introspect endpoint is protected with HTTP Basic Authentication, and the
providerHandleruses an HttpBasicAuthenticationClientFilter to provide the resource server credentials. -
For convenience in this test,
"requireHttps"is false. In production environments, set it to true. -
After the filter successfully validates the access token, it creates a new context from the Authorization Server response, containing information about the access token.
-
The StaticResponseHandler returns a message that access is granted.
-
-
Add the following route to IG:
-
Linux
-
Windows
$HOME/.openig/config/routes/client-credentials.json
%appdata%\OpenIG\config\routes\client-credentials.json
{ "name": "client-credentials", "baseURI": "http://ig.example.com:8080", "condition" : "${find(request.uri.path, '^/client-credentials')}", "heap" : [ { "name" : "clientSecretAccessTokenExchangeHandler", "type" : "Chain", "capture" : "all", "config" : { "filters" : [ { "type" : "ClientSecretBasicAuthenticationFilter", "config" : { "clientId" : "client-service", "clientSecretId" : "client.secret.id", "secretsProvider" : { "type" : "Base64EncodedSecretStore", "config" : { "secrets" : { "client.secret.id" : "cGFzc3dvcmQ=" } } } } } ], "handler" : "ForgeRockClientHandler" } }, { "name" : "oauth2EnabledClientHandler", "type" : "Chain", "capture" : "all", "config" : { "filters" : [ { "type" : "ClientCredentialsOAuth2ClientFilter", "config" : { "tokenEndpoint" : "http://am.example.com:8088/openam/oauth2/access_token", "endpointHandler": "clientSecretAccessTokenExchangeHandler", "scopes" : [ "client-scope" ] } } ], "handler" : "ForgeRockClientHandler" } } ], "handler" : { "type" : "ScriptableHandler", "config" : { "type" : "application/x-groovy", "clientHandler" : "oauth2EnabledClientHandler", "source" : [ "request.uri.path = '/oauth2-protected-resource'", "return http.send(context, request);" ] } } }jsonNote the following features of the route:
-
The route matches requests to
/client-credentials. -
The ScriptableHandler rewrites the request to target it to
/oauth2-protected-resource, and then calls the HTTP client, that has been redefined to use the oauth2EnabledClientHandler. -
The oauth2EnabledClientHandler calls the ClientCredentialsOAuth2ClientFilter to obtain an access token from AM.
-
The ClientCredentialsOAuth2ClientFilter calls the clientSecretAccessTokenExchangeHandler to exchange tokens on the authorization endpoint.
-
The clientSecretAccessTokenExchangeHandler calls a ClientSecretBasicAuthenticationFilter to authenticate the client through the HTTP basic access authentication scheme, and a ForgeRockClientHandler to propagate the request.
-
The route
oauth2-protected-resource.jsonuses the AM introspection endpoint to resolve the access token and display its contents.
-
-
-
Test the setup by accessing the route on http://ig.example.com:8080/client-credentials. A message shows that access is granted.
Use OAuth 2.0 resource owner password credentials
This example shows how a client service accesses an OAuth 2.0-protected resource by using resource owner password credentials.

| This procedure uses the Resource Owner Password Credentials grant type. According to information in the The OAuth 2.0 Authorization Framework, minimize use of this grant type and utilize other grant types whenever possible. |
-
Set up the AM as an Authorization Server:
-
Select Applications > Agents > Identity Gateway, and register an IG agent with the following values:
-
Agent ID:
ig_agent -
Password:
password -
Token Introspection:
Realm OnlyUse secure passwords in a production environment. Consider using a password manager to generate secure passwords.
-
-
(Optional) Authenticate the agent to AM as described in Authenticate an IG agent to AM.
IG agents are automatically authenticated to AM by a deprecated authentication module in AM. This step is currently optional, but will be required when authentication chains and modules are removed in a future release of AM. -
Create an OAuth 2.0 Authorization Server:
-
Select Services > Add a Service > OAuth2 Provider.
-
Add a service with the default values.
-
-
Create an OAuth 2.0 client to request access tokens, using the resource owner’s password for authentication:
-
Select Applications > OAuth 2.0 > Clients, and add a client with the following values:
-
Client ID :
resource-owner-client -
Client secret :
password -
Scope(s) :
client-scope
-
-
(From AM 6.5) On the Advanced tab, select the following value:
-
Grant Types :
Resource Owner Password Credentials
-
-
-
-
Set up IG:
-
Set an environment variable for the IG agent password, and then restart IG:
$ export AGENT_SECRET_ID='cGFzc3dvcmQ='bashThe password is retrieved by a SystemAndEnvSecretStore, and must be base64-encoded.
-
Add the following route to IG:
-
Linux
-
Windows
$HOME/.openig/config/routes/oauth2-protected-resource.json
%appdata%\OpenIG\config\routes\oauth2-protected-resource.json
{ "name": "oauth2-protected-resource", "condition": "${find(request.uri.path, '^/oauth2-protected-resource')}", "heap": [ { "name": "SystemAndEnvSecretStore-1", "type": "SystemAndEnvSecretStore" }, { "name": "AmService-1", "type": "AmService", "config": { "agent": { "username": "ig_agent", "passwordSecretId": "agent.secret.id" }, "secretsProvider": "SystemAndEnvSecretStore-1", "url": "http://am.example.com:8088/openam/" } } ], "handler": { "type": "Chain", "config": { "filters": [ { "name": "OAuth2ResourceServerFilter-1", "type": "OAuth2ResourceServerFilter", "config": { "scopes": [ "client-scope" ], "requireHttps": false, "realm": "OpenIG", "accessTokenResolver": { "name": "TokenIntrospectionAccessTokenResolver-1", "type": "TokenIntrospectionAccessTokenResolver", "config": { "amService": "AmService-1", "providerHandler": { "type": "Chain", "config": { "filters": [ { "type": "HttpBasicAuthenticationClientFilter", "config": { "username": "ig_agent", "passwordSecretId": "agent.secret.id", "secretsProvider": "SystemAndEnvSecretStore-1" } } ], "handler": "ForgeRockClientHandler" } } } } } } ], "handler": { "type": "StaticResponseHandler", "config": { "status": 200, "headers": { "Content-Type": [ "text/html; charset=UTF-8" ] }, "entity": "<html><body><h2>Access Granted</h2></body></html>" } } } } }jsonNotice the following features of the route:
-
The route matches requests to
/oauth2-protected-resource. -
The
OAuth2ResourceServerFilterexpects an OAuth 2.0 access token in the header of the incoming request, with the scopeclient-scope. -
The filter uses a TokenIntrospectionAccessTokenResolver to resolve the access token. The introspect endpoint is protected with HTTP Basic Authentication, and the
providerHandleruses an HttpBasicAuthenticationClientFilter to provide the resource server credentials. -
For convenience in this test,
"requireHttps"is false. In production environments, set it to true. -
After the filter successfully validates the access token, it creates a new context from the Authorization Server response, containing information about the access token.
-
The StaticResponseHandler returns a message that access is granted.
-
-
Add the following route to IG:
-
Linux
-
Windows
$HOME/.openig/config/routes/resource-owner.json
%appdata%\OpenIG\config\routes\resource-owner.json
{ "name": "resource-owner", "baseURI": "http://ig.example.com:8080", "condition" : "${find(request.uri.path, '^/resource-owner')}", "heap" : [ { "name" : "clientSecretAccessTokenExchangeHandler", "type" : "Chain", "capture" : "all", "config" : { "filters" : [ { "type" : "ClientSecretBasicAuthenticationFilter", "config" : { "clientId" : "resource-owner-client", "clientSecretId" : "client.secret.id", "secretsProvider" : { "type" : "Base64EncodedSecretStore", "config" : { "secrets" : { "client.secret.id" : "cGFzc3dvcmQ=" } } } } } ], "handler" : "ForgeRockClientHandler" } }, { "name" : "oauth2EnabledClientHandler", "type" : "Chain", "capture" : "all", "config" : { "filters" : [ { "type" : "ResourceOwnerOAuth2ClientFilter", "config" : { "tokenEndpoint" : "http://am.example.com:8088/openam/oauth2/access_token", "endpointHandler": "clientSecretAccessTokenExchangeHandler", "scopes" : [ "client-scope" ], "username" : "demo", "passwordSecretId" : "user.password.secret.id", "secretsProvider" : { "type" : "Base64EncodedSecretStore", "config" : { "secrets" : { "user.password.secret.id" : "Q2g0bmczMXQ=" } } } } } ], "handler" : "ForgeRockClientHandler" } } ], "handler" : { "type" : "ScriptableHandler", "config" : { "type" : "application/x-groovy", "clientHandler" : "oauth2EnabledClientHandler", "source" : [ "request.uri.path = '/oauth2-protected-resource'", "return http.send(context, request);" ] } } }jsonNote the following features of the route:
-
The route matches requests to
/resource-owner. -
The ScriptableHandler rewrites the request to target it to
/oauth2-protected-resource, and then calls the HTTP client, that has been redefined to use the oauth2EnabledClientHandler. -
The oauth2EnabledClientHandler calls the ResourceOwnerOAuth2ClientFilter to obtain an access token from AM.
-
The ResourceOwnerOAuth2ClientFilter calls the clientSecretAccessTokenExchangeHandler to exchange tokens on the authorization endpoint. The demo user authenticates with their username and password.
-
The clientSecretAccessTokenExchangeHandler calls a ClientSecretBasicAuthenticationFilter to authenticate the client through the HTTP basic access authentication scheme, and a ForgeRockClientHandler to propagate the request.
-
The route
oauth2-protected-resource.jsonuses the AM introspection endpoint to resolve the access token and display its contents.
-
-
-
Test the setup by accessing the route on http://ig.example.com:8080/resource-owner. A message shows that access is granted.
OpenID Connect
The following sections provide an overview of how IG supports OpenID Connect 1.0, and examples of to set up IG as an OpenID Connect relying party in different deployment scenarios:
About IG with OpenID Connect
IG supports OpenID Connect 1.0, an authentication layer built on OAuth 2.0. OpenID Connect 1.0 is a specific implementation of OAuth 2.0, where the identity provider holds the protected resource that the third-party application wants to access. For more information, refer to OpenID Connect.
OpenID Connect refers to the following entities:
-
End user : An OAuth 2.0 resource owner whose user information the application needs to access.
The end user wants to use an application through an existing identity provider account without signing up and creating credentials for another web service.
-
Relying Party (RP): An OAuth 2.0 client that needs access to the end user’s protected user information.
For example, an online mail application needs to know which end user is accessing the application in order to present the correct inbox.
As another example, an online shopping site needs to know which end user is accessing the site in order to present the right offerings, account, and shopping cart.
-
OpenID Provider (OP): An OAuth 2.0 Authorization Server and also resource server that holds the user information and grants access.
The OP requires the end user to give the RP permission to access to some of its user information. Because OpenID Connect 1.0 defines unique identification for an account (subject identifier + issuer identifier), the RP can use that identification to bind its own user profile to a remote identity.
For the online mail application, this key could be used to access the mailboxes and related account information. For the online shopping site, this key could be used to access the offerings, account, shopping cart and others. The key makes it possible to serve users as if they had local accounts.
-
UserInfo : The protected resource that the third-party application wants to access. The information about the authenticated end user is expressed in a standard format. The user-info endpoint is hosted on the Authorization Server and is protected with OAuth 2.0.
When IG acts as an OpenID Connect relying party, its role is to retrieve user information from the OpenID provider, and then to inject that information into the context for use by subsequent filters and handlers.
Use AM as a single OpenID Connect provider
This section gives an example of how to set up AM as an OpenID Connect identity provider, and IG as a relying party for browser requests to the home page of the sample application.
The following sequence diagram shows the flow of information for a request to access the home page of the sample application, using AM as a single, preregistered OpenID Connect identity provider, and IG as a relying party:

Before you start, prepare AM, IG, and the sample application as described in Example installation for this guide.
-
Set Up AM as an OpenID Connect provider:
-
(From AM 6.5.3) Select Services > Add a Service, and add a Validation Service with the following Valid goto URL Resources:
-
http://ig.example.com:8080/* -
http://ig.example.com:8080/*?*
-
-
Create an OAuth 2.0 Authorization Server:
-
Select Services > Add a Service > OAuth2 Provider.
-
Add a service with the default values.
-
-
Create an OAuth 2.0 Client to request OAuth 2.0 access tokens:
-
Select Applications > OAuth 2.0 > Clients.
-
Add a client with the following values:
-
Client ID:
oidc_client -
Client secret:
password -
Redirection URIs:
http://ig.example.com:8080/home/id_token/callback -
Scope(s):
openid,profile, andemail
-
-
(From AM 6.5) On the Advanced tab, select the following values:
-
Grant Types:
Authorization Code
-
-
On the Signing and Encryption tab, change ID Token Signing Algorithm to
HS256,HS384, orHS512. The algorithm must be HMAC.
-
-
-
Set up IG:
-
Set an environment variable for
oidc_client, and then restart IG:$ export OIDC_SECRET_ID='cGFzc3dvcmQ='bash -
Add the following route to IG to serve the sample application .css and other static resources:
-
Linux
-
Windows
$HOME/.openig/config/routes/00-static-resources.json
%appdata%\OpenIG\config\routes\00-static-resources.json
{
  "name" : "00-static-resources",
  "baseURI" : "http://app.example.com:8081",
  "condition": "${find(request.uri.path,'^/css') or matchesWithRegex(request.uri.path, '^/.*\\\\.ico$') or matchesWithRegex(request.uri.path, '^/.*\\\\.gif$')}",
  "handler": "ReverseProxyHandler"
}
json -
-
Add the following route to IG:
-
Linux
-
Windows
$HOME/.openig/config/routes/07-openid.json
%appdata%\OpenIG\config\routes\07-openid.json
{ "name": "07-openid", "baseURI": "http://app.example.com:8081", "condition": "${find(request.uri.path, '^/home/id_token')}", "heap": [ { "name": "SystemAndEnvSecretStore-1", "type": "SystemAndEnvSecretStore" }, { "name": "AuthenticatedRegistrationHandler-1", "type": "Chain", "config": { "filters": [ { "name": "ClientSecretBasicAuthenticationFilter-1", "type": "ClientSecretBasicAuthenticationFilter", "config": { "clientId": "oidc_client", "clientSecretId": "oidc.secret.id", "secretsProvider": "SystemAndEnvSecretStore-1" } } ], "handler": "ForgeRockClientHandler" } } ], "handler": { "type": "Chain", "config": { "filters": [ { "name": "AuthorizationCodeOAuth2ClientFilter-1", "type": "AuthorizationCodeOAuth2ClientFilter", "config": { "clientEndpoint": "/home/id_token", "failureHandler": { "type": "StaticResponseHandler", "config": { "status": 500, "headers": { "Content-Type": [ "text/plain" ] }, "entity": "Error in OAuth 2.0 setup." } }, "registrations": [ { "name": "oidc-user-info-client", "type": "ClientRegistration", "config": { "clientId": "oidc_client", "issuer": { "name": "Issuer", "type": "Issuer", "config": { "wellKnownEndpoint": "http://am.example.com:8088/openam/oauth2/.well-known/openid-configuration" } }, "scopes": [ "openid", "profile", "email" ], "authenticatedRegistrationHandler": "AuthenticatedRegistrationHandler-1" } } ], "requireHttps": false, "cacheExpiration": "disabled" } } ], "handler": "ReverseProxyHandler" } } }jsonFor information about how to set up the IG route in Studio, see OpenID Connect in Structured Editor.
Notice the following features about the route:
-
The route matches requests to
/home/id_token. -
The
AuthorizationCodeOAuth2ClientFilterenables IG to act as a relying party. It uses a single client registration that is defined inline and refers to the AM server configured in Use AM as a single OpenID Connect provider. -
The filter has a base client endpoint of
/home/id_token, which creates the following service URIs:-
Requests to
/home/id_token/loginstart the delegated authorization process. -
Requests to
/home/id_token/callbackare expected as redirects from the OAuth 2.0 Authorization Server (OpenID Connect provider). This is why the redirect URI in the client profile in AM is set tohttp://ig.example.com:8080/home/id_token/callback. -
Requests to
/home/id_token/logoutremove the authorization state for the end user, and redirect to the specified URL if agotoparameter is provided.These endpoints are implicitly reserved. Attempts to access them directly can cause undefined errors.
-
-
For convenience in this test,
"requireHttps"is false. In production environments, set it to true. So that you see the delegated authorization process when you make a request,"requireLogin"has the default valuetrue. -
The target for storing authorization state information is
${attributes.openid}. This is where subsequent filters and handlers can find access tokens and user information.
-
-
-
Test the setup:
-
If you are logged in to AM, log out and clear any cookies.
-
Go to http://ig.example.com:8080/home/id_token.
The AM login page is displayed.
-
Log in to AM as user
demo, passwordCh4ng31t, and then allow the application to access user information.The home page of the sample application is displayed.
-
Authenticate automatically to the sample application
To authenticate automatically to the sample application, change the last
name of the user demo to match the password Ch4ng31t, and
add a StaticRequestFilter like the following to the end of the chain in
07-openid.json:
{
  "type": "StaticRequestFilter",
  "config": {
    "method": "POST",
    "uri": "http://app.example.com:8081/login",
    "form": {
      "username": [
        "${attributes.openid.user_info.sub}"
      ],
      "password": [
        "${attributes.openid.user_info.family_name}"
      ]
    }
  }
}The StaticRequestFilter retrieves the username and password from the context, and replaces the original HTTP GET request with an HTTP POST login request containing credentials.
Use multiple OpenID Connect providers
This section gives an example of using OpenID Connect with two identity providers.
Client registrations for an AM provider and Identity Cloud provider are declared in the heap. The Nascar page helps the user to choose an identity provider.
-
Set up AM as the first identity provider, as described in Use AM as a single OpenID Connect provider.
-
Set up Identity Cloud as a second identity provider, as described in Single sign-on with OpenID Connect.
-
Set up IG:
-
Add the following route to IG to serve the sample application .css and other static resources:
-
Linux
-
Windows
$HOME/.openig/config/routes/00-static-resources.json
%appdata%\OpenIG\config\routes\00-static-resources.json
{
  "name" : "00-static-resources",
  "baseURI" : "http://app.example.com:8081",
  "condition": "${find(request.uri.path,'^/css') or matchesWithRegex(request.uri.path, '^/.*\\\\.ico$') or matchesWithRegex(request.uri.path, '^/.*\\\\.gif$')}",
  "handler": "ReverseProxyHandler"
}
json -
-
Add the following route to IG, replacing the value for the property
amInstanceUrl:-
Linux
-
Windows
$HOME/.openig/config/routes/07-openid-nascar.json
%appdata%\OpenIG\config\routes\07-openid-nascar.json
{ "heap": [ { "name": "SystemAndEnvSecretStore-1", "type": "SystemAndEnvSecretStore" }, { "name": "AuthenticatedRegistrationHandler-1", "type": "Chain", "config": { "filters": [ { "name": "ClientSecretBasicAuthenticationFilter-1", "type": "ClientSecretBasicAuthenticationFilter", "config": { "clientId": "oidc_client", "clientSecretId": "oidc.secret.id", "secretsProvider": "SystemAndEnvSecretStore-1" } } ], "handler": "ForgeRockClientHandler" } }, { "name": "openam", "type": "ClientRegistration", "config": { "clientId": "oidc_client", "issuer": { "name": "am_issuer", "type": "Issuer", "config": { "wellKnownEndpoint": "http://am.example.com:8088/openam/oauth2/.well-known/openid-configuration" } }, "scopes": [ "openid", "profile", "email" ], "authenticatedRegistrationHandler": "AuthenticatedRegistrationHandler-1" } }, { "name": "idcloud", "type": "ClientRegistration", "config": { "clientId": "oidc_client", "issuer": { "name": "idc_issuer", "type": "Issuer", "config": { "wellKnownEndpoint": "&{amInstanceUrl}/oauth2/realms/alpha/.well-known/openid-configuration" } }, "scopes": [ "openid", "profile", "email" ], "authenticatedRegistrationHandler": "AuthenticatedRegistrationHandler-1" } }, { "name": "NascarPage", "type": "StaticResponseHandler", "config": { "status": 200, "headers": { "Content-Type": [ "text/html; charset=UTF-8" ] }, "entity": [ "<html>", " <body>", " <p><a href='/home/id_token/login?registration=oidc_client&issuer=am_issuer&goto=${urlEncodeQueryParameterNameOrValue('http://ig.example.com:8080/home/id_token')}'>Access Management login</a></p>", " <p><a href='/home/id_token/login?registration=oidc_client&issuer=idc_issuer&goto=${urlEncodeQueryParameterNameOrValue('http://ig.example.com:8080/home/id_token')}'>ID Cloud login</a></p>", " </body>", "</html>" ] } } ], "name": "07-openid-nascar", "baseURI": "http://app.example.com:8081", "condition": "${find(request.uri.path, '^/home/id_token')}", "properties": { "amInstanceUrl": "https://openam-docs.forgeblocks.com/am" }, "handler": { "type": "Chain", "config": { "filters": [ { "type": "AuthorizationCodeOAuth2ClientFilter", "config": { "clientEndpoint": "/home/id_token", "failureHandler": { "type": "StaticResponseHandler", "config": { "comment": "Trivial failure handler for debugging only", "status": 500, "headers": { "Content-Type": [ "text/plain; charset=UTF-8" ] }, "entity": "${contexts.oauth2failure.error}: ${contexts.oauth2failure.description}" } }, "loginHandler": "NascarPage", "registrations": [ "openam", "idcloud" ], "requireHttps": false, "cacheExpiration": "disabled" } } ], "handler": "ReverseProxyHandler" } } }jsonConsider the differences with
07-openid.json:-
The heap objects
openamandidclouddefine client registrations. -
The StaticResponseHandler provides links to the client registrations.
-
The AuthorizationCodeOAuth2ClientFilter uses a
loginHandlerto allow users to choose a client registration and therefore an identity provider.
-
-
-
Test the setup:
-
Log out of AM.
-
Go to http://ig.example.com:8080/home/id_token.
The Nascar page offers the choice of identity provider.
-
Select a provider, log in with your credentials, and then allow the application to access user information.
-
AM: user
demo, passwordCh4ng31t. -
Identity Cloud: user
demo, passwordCh4ng3!t
-
The home page of the sample application is displayed.
-
Discover and dynamically register with OpenID Connect providers
OpenID Connect defines mechanisms for discovering and dynamically registering with an identity provider that isn’t known in advance, as specified in the following publications: OpenID Connect Discovery, OpenID Connect Dynamic Client Registration, and OAuth 2.0 Dynamic Client Registration Protocol.
In dynamic registration, issuer and client registrations are generated dynamically. They are held in memory and can be reused, but don’t persist when IG is restarted.
This section builds on the example in Use AM as a single OpenID Connect provider to give an example of discovering and dynamically registering with an identity provider that isn’t known in advance. In this example, the client sends a signed JWT to the Authorization Server.
To facilitate the example, a WebFinger service is embedded in the sample application. In a normal deployment, the WebFinger server is likely to be a service on the issuer’s domain.
-
Set up a key
-
Locate a directory for secrets, and go to it:
$ cd /path/to/secretsbash -
Create a key:
$ keytool -genkey \
  -alias myprivatekeyalias \
  -keyalg RSA \
  -keysize 2048 \
  -keystore keystore.p12 \
  -storepass keystore \
  -storetype PKCS12 \
  -keypass keystore \
  -validity 360 \
  -dname "CN=ig.example.com, OU=example, O=com, L=fr, ST=fr, C=fr"
bash
-
-
Set up AM:
-
Set up AM as described in Use AM as a single OpenID Connect provider.
-
Select the user
demo, and change the last name toCh4ng31t. For this example, the last name must be the same as the password. -
Configure the OAuth 2.0 Authorization Server for dynamic registration:
-
Select Services > OAuth2 Provider.
-
On the Advanced tab, add the following scopes to Client Registration Scope Allowlist:
openid,profile,email. -
On the Client Dynamic Registration tab, select these settings:
-
Allow Open Dynamic Client Registration: Enabled
-
Generate Registration Access Tokens: Disabled
-
-
-
Configure the authentication method for the OAuth 2.0 Client:
-
Select Applications > OAuth 2.0 > Clients.
-
Select
oidc_client, and on the Advanced tab, select Token Endpoint Authentication Method:private_key_jwt.
-
-
-
Set up IG:
-
In the IG configuration, set an environment variable for the keystore password, and then restart IG:
$ export KEYSTORE_SECRET_ID='a2V5c3RvcmU='bashThe password is retrieved by a SystemAndEnvSecretStore, and must be base64-encoded.
-
Add the following route to IG to serve the sample application .css and other static resources:
-
Linux
-
Windows
$HOME/.openig/config/routes/00-static-resources.json
%appdata%\OpenIG\config\routes\00-static-resources.json
{
  "name" : "00-static-resources",
  "baseURI" : "http://app.example.com:8081",
  "condition": "${find(request.uri.path,'^/css') or matchesWithRegex(request.uri.path, '^/.*\\\\.ico$') or matchesWithRegex(request.uri.path, '^/.*\\\\.gif$')}",
  "handler": "ReverseProxyHandler"
}
json -
-
Add the following script to IG:
-
Linux
-
Windows
$HOME/.openig/scripts/groovy/discovery.groovy
%appdata%\OpenIG\scripts\groovy\discovery.groovy
/* * OIDC discovery with the sample application */ response = new Response(Status.OK) response.getHeaders().put(ContentTypeHeader.NAME, "text/html"); response.entity = """ <!doctype html> <html> <head> <title>OpenID Connect Discovery</title> <meta charset='UTF-8'> </head> <body> <form id='form' action='/discovery/login?'> Enter your user ID or email address: <input type='text' id='discovery' name='discovery' placeholder='demo or demo@example.com' /> <input type='hidden' name='goto' value='${contexts.idpSelectionLogin.originalUri}' /> </form> <script> // Make sure sampleAppUrl is correct for your sample app. window.onload = function() { document.getElementById('form').onsubmit = function() { // Fix the URL if not using the default settings. var sampleAppUrl = 'http://app.example.com:8081/'; var discovery = document.getElementById('discovery'); discovery.value = sampleAppUrl + discovery.value.split('@', 1)[0]; }; }; </script> </body> </html>""" as String return responsejavaThe script transforms the input into a
discoveryvalue for IG. This is not a requirement for deployment, only a convenience for the purposes of this example. Alternatives are described in the discovery protocol specification. -
-
Add the following route to IG, replacing
/path/to/secrets/keystore.p12with your path:-
Linux
-
Windows
$HOME/.openig/config/routes/07-discovery.json
%appdata%\OpenIG\config\routes\07-discovery.json
{ "heap": [ { "name": "SystemAndEnvSecretStore-1", "type": "SystemAndEnvSecretStore" }, { "name": "SecretsProvider-1", "type": "SecretsProvider", "config": { "stores": [ { "type": "KeyStoreSecretStore", "config": { "file": "/path/to/secrets/keystore.p12", "mappings": [ { "aliases": [ "myprivatekeyalias" ], "secretId": "private.key.jwt.signing.key" } ], "storePasswordSecretId": "keystore.secret.id", "storeType": "PKCS12", "secretsProvider": "SystemAndEnvSecretStore-1" } } ] } }, { "name": "DiscoveryPage", "type": "ScriptableHandler", "config": { "type": "application/x-groovy", "file": "discovery.groovy" } } ], "name": "07-discovery", "baseURI": "http://app.example.com:8081", "condition": "${find(request.uri.path, '^/discovery')}", "handler": { "type": "Chain", "config": { "filters": [ { "name": "DynamicallyRegisteredClient", "type": "AuthorizationCodeOAuth2ClientFilter", "config": { "clientEndpoint": "/discovery", "requireHttps": false, "requireLogin": true, "target": "${attributes.openid}", "failureHandler": { "type": "StaticResponseHandler", "config": { "comment": "Trivial failure handler for debugging only", "status": 500, "headers": { "Content-Type": [ "text/plain; charset=UTF-8" ] }, "entity": "${contexts.oauth2failure.error}: ${contexts.oauth2failure.description}" } }, "loginHandler": "DiscoveryPage", "discoverySecretId": "private.key.jwt.signing.key", "tokenEndpointAuthMethod": "private_key_jwt", "secretsProvider": "SecretsProvider-1", "metadata": { "client_name": "My Dynamically Registered Client", "redirect_uris": [ "http://ig.example.com:8080/discovery/callback" ], "scopes": [ "openid", "profile", "email" ] } } }, { "type": "StaticRequestFilter", "config": { "method": "POST", "uri": "http://app.example.com:8081/login", "form": { "username": [ "${attributes.openid.user_info.name}" ], "password": [ "${attributes.openid.user_info.family_name}" ] } } } ], "handler": "ReverseProxyHandler" } } }jsonConsider the differences with
07-openid.json:-
The route matches requests to
/discovery. -
The AuthorizationCodeOAuth2ClientFilter uses
DiscoveryPageas the login handler, and specifies metadata to prepare the dynamic registration request. -
DiscoveryPageuses a ScriptableHandler and script to provide thediscoveryparameter andgotoparameter.If there is a match, then it can use the issuer’s registration endpoint and avoid an additional request to look up the user’s issuer using the WebFinger protocol.
If there is no match, IG uses the
discoveryvalue as theresourcefor a WebFinger request using OpenID Connect Discovery protocol. -
IG uses the
discoveryparameter to find an identity provider. IG extracts the domain host and port from the value, and attempts to find a match in thesupportedDomainslists for issuers configured for the route. -
When
discoverySecretIdis set, thetokenEndpointAuthMethodis alwaysprivate_key_jwt. Clients send a signed JWT to the Authorization Server.Redirects IG to the end user’s browser, using the
gotoparameter, after the process is complete and IG has injected the OpenID Connect user information into the context.
-
-
-
Test the setup:
-
Log out of AM, and clear any cookies.
-
Enter the following email address:
demo@example.com. The AM login page is displayed. -
Log in as user
demo, passwordCh4ng31t, and then allow the application to access user information. The sample application returns the user’s page.
-
Passing data along the chain
Pass profile data downstream
Retrieve user profile attributes of an AM user, and provide them in the
UserProfileContext to downstream filters and handlers. Profile attributes that are
enabled in AM can be retrieved, except the roles attribute.
The userProfile property of AmService is configured to retrieve employeeNumber
and mail. When the property is not configured, all available attributes in
rawInfo or asJsonValue() are displayed.
Retrieve profile attributes for a user authenticated with an SSO token
In this example, the user is authenticated with AM through the
SingleSignOnFilter, which stores the SSO token and its validation information
in the SsoTokenContext. The UserProfileFilter retrieves the user’s mail
and employee number, as well as the username, _id, and _rev,
from that context.
-
Set up AM:
-
Select Applications > Agents > Identity Gateway and register an IG agent with the following values:
-
Agent ID:
ig_agent -
Password:
passwordFor AM 6.5.x and earlier versions, register an agent as described in Register an IG agent in AM 6.5 and earlier.
Use secure passwords in a production environment. Consider using a password manager to generate secure passwords.
-
-
(Optional) Authenticate the agent to AM as described in Authenticate an IG agent to AM.
IG agents are automatically authenticated to AM by a deprecated authentication module in AM. This step is currently optional, but will be required when authentication chains and modules are removed in a future release of AM. -
(From AM 6.5.3) Select Services > Add a Service, and add a Validation Service with the following Valid goto URL Resources:
-
http://ig.example.com:8080/* -
http://ig.example.com:8080/?
-
-
-
Set up IG:
-
Set an environment variable for the IG agent password, and then restart IG:
$ export AGENT_SECRET_ID='cGFzc3dvcmQ='bashThe password is retrieved by a SystemAndEnvSecretStore, and must be base64-encoded.
-
Add the following route to IG:
-
Linux
-
Windows
$HOME/.openig/config/routes/user-profile-sso.json
%appdata%\OpenIG\config\routes\user-profile-sso.json
{
  "name": "user-profile-sso",
  "condition": "${find(request.uri.path, '^/user-profile-sso')}",
  "heap": [
    {
      "name": "SystemAndEnvSecretStore-1",
      "type": "SystemAndEnvSecretStore"
    },
    {
      "name": "AmService-1",
      "type": "AmService",
      "config": {
        "url": "http://am.example.com:8088/openam",
        "realm": "/",
        "agent": {
          "username": "ig_agent",
          "passwordSecretId": "agent.secret.id"
        },
        "secretsProvider": "SystemAndEnvSecretStore-1",
        "amHandler": "ForgeRockClientHandler"
      }
    }
  ],
  "handler": {
    "type": "Chain",
    "config": {
      "filters": [
        {
          "name": "SingleSignOnFilter",
          "type": "SingleSignOnFilter",
          "config": {
            "amService": "AmService-1"
          }
        },
        {
          "name": "UserProfileFilter-1",
          "type": "UserProfileFilter",
          "config": {
            "username": "${contexts.ssoToken.info.uid}",
            "userProfileService": {
              "type": "UserProfileService",
              "config": {
                "amService": "AmService-1",
                "profileAttributes": [ "employeeNumber", "mail" ]
              }
            }
          }
        }
      ],
      "handler": {
        "type": "StaticResponseHandler",
        "config": {
          "status": 200,
          "headers": {
            "Content-Type": [ "text/html; charset=UTF-8" ]
          },
          "entity": "<html><body>username: ${contexts.userProfile.username}<br><br>rawInfo: <pre>${contexts.userProfile.rawInfo}</pre></body></html>"
        }
      }
    }
  }
}
json -
-
-
Test the setup:
-
Log in to AM with username
demoand passwordCh4ng31t.The UserProfileFilter retrieves the user’s profile data and stores it in the UserProfileContext. The StaticResponseHandler displays the username and the profile data that is available in
rawInfo:username: demo rawInfo: {_id=demo, _rev=273001616, employeeNumber=[123], mail=[demo@example.com], username=demo}
Retrieve a username from the sessionInfo context
In this example, the UserProfileFilter retrieves AM profile
information for the user identified by the SessionInfoContext, at
${contexts.amSession.username}. The SessionInfoFilter validates
an SSO token without redirecting the request to an authentication page.
-
Set up AM:
-
Select Applications > Agents > Identity Gateway and register an IG agent with the following values:
-
Agent ID:
ig_agent -
Password:
passwordFor AM 6.5.x and earlier versions, register an agent as described in Register an IG agent in AM 6.5 and earlier.
Use secure passwords in a production environment. Consider using a password manager to generate secure passwords.
-
-
(Optional) Authenticate the agent to AM as described in Authenticate an IG agent to AM.
IG agents are automatically authenticated to AM by a deprecated authentication module in AM. This step is currently optional, but will be required when authentication chains and modules are removed in a future release of AM.
-
-
Set up IG:
-
Set an environment variable for the IG agent password, and then restart IG:
$ export AGENT_SECRET_ID='cGFzc3dvcmQ='bashThe password is retrieved by a SystemAndEnvSecretStore, and must be base64-encoded.
-
Add the following route to IG:
-
Linux
-
Windows
$HOME/.openig/config/routes/user-profile-ses-info.json
%appdata%\OpenIG\config\routes\user-profile-ses-info.json
{
  "name": "user-profile-ses-info",
  "condition": "${find(request.uri.path, '^/user-profile-ses-info')}",
  "heap": [
    {
      "name": "SystemAndEnvSecretStore-1",
      "type": "SystemAndEnvSecretStore"
    },
    {
      "name": "AmService-1",
      "type": "AmService",
      "config": {
        "url": "http://am.example.com:8088/openam",
        "realm": "/",
        "agent": {
          "username": "ig_agent",
          "passwordSecretId": "agent.secret.id"
        },
        "secretsProvider": "SystemAndEnvSecretStore-1",
        "amHandler": "ForgeRockClientHandler"
      }
    }
  ],
  "handler": {
    "type": "Chain",
    "capture": "all",
    "config": {
      "filters": [
        {
          "name": "SessionInfoFilter-1",
          "type": "SessionInfoFilter",
          "config": {
            "amService": "AmService-1"
          }
        },
        {
          "name": "UserProfileFilter-1",
          "type": "UserProfileFilter",
          "config": {
            "username": "${contexts.amSession.username}",
            "userProfileService": {
              "type": "UserProfileService",
              "config": {
                "amService": "AmService-1",
                "profileAttributes": [ "employeeNumber", "mail" ]
              }
            }
          }
        }
      ],
      "handler": {
        "type": "StaticResponseHandler",
        "config": {
          "status": 200,
          "headers": {
            "Content-Type": [ "application/json" ]
          },
          "entity": "{ \"username\": \"${contexts.userProfile.username}\", \"user_profile\":  ${contexts.userProfile.asJsonValue()} }"
        }
      }
    }
  }
}
json -
-
-
Test the setup:
-
In a terminal window, retrieve an SSO token:
$ curl --request POST \
--url http://am.example.com:8088/openam/json/realms/root/authenticate \
--header 'accept-api-version: resource=2.0' \
--header 'content-type: application/json' \
--header 'x-openam-username: demo' \
--header 'x-openam-password: Ch4ng31t' \
--data '{}'

{"tokenId":"AQIC5wM2LY . . . Dg5AAJTMQAA*","successUrl":"/openam/console"}
bash -
Access the route, providing the token ID retrieved in the previous step, where iPlanetDirectoryPro is the name of the AM session cookie:
$ curl --cookie 'iPlanetDirectoryPro=tokenID' http://ig.example.com:8080/user-profile-ses-info | jq . { "username": "demo", "user_profile": { "_id": "demo", "_rev": "123...456", "employeeNumber": ["123"], "mail": ["demo@example.com"], "username": "demo" } }bashFor more information, refer to Find the AM session cookie name.
The UserProfileFilter retrieves the user’s profile data and stores it in the UserProfileContext. The StaticResponseHandler displays the username and the profile data that is available in
asJsonValue().
-
Retrieving a username from the OAuth2Context
In this example, the OAuth2ResourceServerFilter validates a request containing an OAuth 2.0 access token, using the introspection endpoint, and injects the token into the OAuth2Context context. The UserProfileFilter retrieves AM profile information for the user identified by this context.
-
Set up AM as described in Validate access tokens through the introspection endpoint.
-
Set up IG:
-
Set an environment variable for the IG agent password, and then restart IG:
$ export AGENT_SECRET_ID='cGFzc3dvcmQ='bashThe password is retrieved by a SystemAndEnvSecretStore, and must be base64-encoded.
-
Add the following route to IG:
-
Linux
-
Windows
$HOME/.openig/config/routes/user-profile-oauth.json
%appdata%\OpenIG\config\routes\user-profile-oauth.json
{
  "name": "user-profile-oauth",
  "baseURI": "http://app.example.com:8081",
  "condition": "${find(request.uri.path, '^/user-profile-oauth')}",
  "heap": [
    {
      "name": "SystemAndEnvSecretStore-1",
      "type": "SystemAndEnvSecretStore"
    },
    {
      "name": "AmService-1",
      "type": "AmService",
      "config": {
        "url": "http://am.example.com:8088/openam",
        "realm": "/",
        "agent": {
          "username": "ig_agent",
          "passwordSecretId": "agent.secret.id"
        },
        "secretsProvider": "SystemAndEnvSecretStore-1",
        "amHandler": "ForgeRockClientHandler"
      }
    }
  ],
  "handler": {
    "type": "Chain",
    "config": {
      "filters": [
        {
          "name": "OAuth2ResourceServerFilter-1",
          "type": "OAuth2ResourceServerFilter",
          "config": {
            "scopes": [
              "mail",
              "employeenumber"
            ],
            "requireHttps": false,
            "realm": "OpenIG",
            "accessTokenResolver": {
              "name": "token-resolver-1",
              "type": "TokenIntrospectionAccessTokenResolver",
              "config": {
                "amService": "AmService-1",
                "providerHandler": {
                  "type": "Chain",
                  "config": {
                    "filters": [
                      {
                        "type": "HttpBasicAuthenticationClientFilter",
                        "config": {
                          "username": "ig_agent",
                          "passwordSecretId": "agent.secret.id",
                          "secretsProvider": "SystemAndEnvSecretStore-1"
                        }
                      }
                    ],
                    "handler": "ForgeRockClientHandler"
                  }
                }
              }
            }
          }
        },
        {
          "name": "UserProfileFilter-1",
          "type": "UserProfileFilter",
          "config": {
            "username": "${contexts.oauth2.accessToken.info.sub}",
            "userProfileService": {
              "type": "UserProfileService",
              "config": {
                "amService": "AmService-1",
                "profileAttributes": [ "employeeNumber", "mail" ]
              }
            }
          }
        }
      ],
      "handler": {
        "type": "StaticResponseHandler",
        "config": {
          "status": 200,
          "headers": {
            "Content-Type": [ "application/json" ]
          },
          "entity": "{ \"username\": \"${contexts.userProfile.username}\", \"user_profile\":  ${contexts.userProfile.asJsonValue()} }"
        }
      }
    }
  }
}
json -
-
-
Test the setup:
-
In a terminal window, use a
curlcommand similar to the following to retrieve an access token:$ mytoken=$(curl -s \ --user "client-application:password" \ --data "grant_type=password&username=demo&password=Ch4ng31t&scope=mail%20employeenumber" \ http://am.example.com:8088/openam/oauth2/access_token | jq -r ".access_token")
-
Validate the access token returned in the previous step:
$ curl -v http://ig.example.com:8080/user-profile-oauth --header "Authorization: Bearer ${mytoken}" | jq .** { "username": "demo", "user_profile": { "_id": "demo", "_rev": "123…456", "employeeNumber": ["123"], "mail": ["demo@example.com"], "username": "demo" } }
The UserProfileFilter retrieves the user’s profile data and stores it in the UserProfileContext. The StaticResponseHandler displays the username and the profile data that is available in
asJsonValue().
-
Passing runtime data downstream
The following sections describe how to pass identity or other runtime information in a JWT, downstream to a protected application:
The examples in this section use the following objects:
-
JwtBuilderFilter to collect runtime information and pack it into a JWT
-
HeaderFilter to add the information to the forwarded request
To help with development, the sample application includes a /jwt endpoint to
display the JWT, verify its signature, and decrypt the JWT.
Pass runtime data in a JWT signed with a PEM
-
Set up secrets
-
Locate a directory for secrets, and go to it:
$ cd /path/to/secretsbash -
Generate PEM files to sign and verify the JWT:
$ openssl req \
-newkey rsa:2048 \
-new \
-nodes \
-x509 \
-days 3650 \
-subj "/CN=ig.example.com/OU=example/O=com/L=fr/ST=fr/C=fr" \
-keyout id.key.for.signing.jwt.pem \
-out id.key.for.verifying.jwt.pem
bash
-
-
Set up AM:
-
(From AM 6.5.3) Select Services > Add a Service, and add a Validation Service with the following Valid goto URL Resources:
-
http://ig.example.com:8080/* -
http://ig.example.com:8080/*?*
-
-
Select Applications > Agents > Identity Gateway and register an IG agent with the following values:
-
Agent ID:
ig_agent -
Password:
passwordFor AM 6.5.x and earlier versions, register an agent as described in Register an IG agent in AM 6.5 and earlier.
Use secure passwords in a production environment. Consider using a password manager to generate secure passwords.
-
-
(Optional) Authenticate the agent to AM as described in Authenticate an IG agent to AM.
IG agents are automatically authenticated to AM by a deprecated authentication module in AM. This step is currently optional, but will be required when authentication chains and modules are removed in a future release of AM.
-
-
Set up IG:
-
Set an environment variable for the IG agent password, and then restart IG:
$ export AGENT_SECRET_ID='cGFzc3dvcmQ='bashThe password is retrieved by a SystemAndEnvSecretStore, and must be base64-encoded.
-
Add the following route to IG to serve the sample application .css and other static resources:
-
Linux
-
Windows
$HOME/.openig/config/routes/00-static-resources.json
%appdata%\OpenIG\config\routes\00-static-resources.json
{
  "name" : "00-static-resources",
  "baseURI" : "http://app.example.com:8081",
  "condition": "${find(request.uri.path,'^/css') or matchesWithRegex(request.uri.path, '^/.*\\\\.ico$') or matchesWithRegex(request.uri.path, '^/.*\\\\.gif$')}",
  "handler": "ReverseProxyHandler"
}
json -
-
Add the following route to IG, replacing value of the property
secretsDirwith the directory for the PEM file:-
Linux
-
Windows
$HOME/.openig/config/routes/jwt-builder-sign-pem.json
%appdata%\OpenIG\config\routes\jwt-builder-sign-pem.json
{ "name": "jwt-builder-sign-pem", "condition": "${find(request.uri.path, '/jwt-builder-sign-pem')}", "baseURI": "http://app.example.com:8081", "properties": { "secretsDir": "/path/to/secrets" }, "capture": "all", "heap": [ { "name": "pemPropertyFormat", "type": "PemPropertyFormat" }, { "name": "FileSystemSecretStore-1", "type": "FileSystemSecretStore", "config": { "format": "PLAIN", "directory": "&{secretsDir}", "suffix": ".pem", "mappings": [{ "secretId": "id.key.for.signing.jwt", "format": "pemPropertyFormat" }] } }, { "name": "SystemAndEnvSecretStore-1", "type": "SystemAndEnvSecretStore" }, { "name": "AmService-1", "type": "AmService", "config": { "agent": { "username": "ig_agent", "passwordSecretId": "agent.secret.id" }, "secretsProvider": "SystemAndEnvSecretStore-1", "url": "http://am.example.com:8088/openam" } } ], "handler": { "type": "Chain", "config": { "filters": [{ "name": "SingleSignOnFilter", "type": "SingleSignOnFilter", "config": { "amService": "AmService-1" } }, { "name": "UserProfileFilter", "type": "UserProfileFilter", "config": { "username": "${contexts.ssoToken.info.uid}", "userProfileService": { "type": "UserProfileService", "config": { "amService": "AmService-1" } } } }, { "name": "JwtBuilderFilter-1", "type": "JwtBuilderFilter", "config": { "template": { "name": "${contexts.userProfile.commonName}", "email": "${contexts.userProfile.rawInfo.mail[0]}" }, "secretsProvider": "FileSystemSecretStore-1", "signature": { "secretId": "id.key.for.signing.jwt", "algorithm": "RS512" } } }, { "name": "HeaderFilter-1", "type": "HeaderFilter", "config": { "messageType": "REQUEST", "add": { "x-openig-user": ["${contexts.jwtBuilder.value}"] } } }], "handler": "ReverseProxyHandler" } } }jsonNotice the following features of the route:
-
The route matches requests to
/jwt-builder-sign-pem. -
The agent password for AmService is provided by a SystemAndEnvSecretStore.
-
If the request does not have a valid AM session cookie, the SingleSignOnFilter redirects the request to authenticate with AM. If the request already has a valid AM session cookie, the SingleSignOnFilter passes the request to the next filter, and stores the cookie value in an SsoTokenContext.
-
The UserProfileFilter reads the username from the SsoTokenContext, uses it to retrieve the user’s profile info from AM, and places the data into the UserProfileContext.
-
The JwtBuilderFilter refers to the secret ID of the PEM, and uses the FileSystemSecretStore to manage the secret.
-
The FileSystemSecretStore mapping refers to the secret ID of the PEM, and uses the PemPropertyFormat to define the format.
-
The HeaderFilter retrieves the JWT from the JwtBuilderContext, and adds it to the header field
x-openig-userin the request, so that the sample app can display the JWT. -
The ClientHandler passes the request to the sample app, which displays the JWT.
-
-
-
Test the setup
-
If you are logged in to AM, log out and clear any cookies.
-
Log in to AM as user
demo, passwordCh4ng31t, or as another user. The sample app displays the signed JWT along with its header and payload. -
In
USE PEM FILEin the sample app, enter the path toid.key.for.verifying.jwt.pemto verify the JWT signature.
-
Pass runtime data in a JWT signed with PEM then encrypted with a symmetric key
This example passes runtime data in a JWT that is signed with a PEM, and then encrypted with a symmetric key.
-
Set up secrets
-
Locate a directory for secrets, and go to it:
$ cd /path/to/secretsbash -
From the secrets directory, generate PEM files to sign and verify the JWT:
$ openssl req \
-newkey rsa:2048 \
-new \
-nodes \
-x509 \
-days 3650 \
-subj "/CN=ig.example.com/OU=example/O=com/L=fr/ST=fr/C=fr" \
-keyout id.key.for.signing.jwt.pem \
-out id.key.for.verifying.jwt.pem
bash -
Encrypt the PEM file used to sign the JWT:
$ openssl pkcs8 \ -topk8 \ -inform PEM \ -outform PEM \ -in id.key.for.signing.jwt.pem \ -out id.encrypted.key.for.signing.jwt.pem \ -passout pass:encryptedpassword \ -v1 PBE-SHA1-3DESbashThe encrypted PEM file used for signatures is
id.encrypted.key.for.signing.jwt.pem. The password to decode the file isencryptedpassword.If encryption fails, make sure your encryption methods and ciphers are supported by the Java Cryptography Extension. -
Generate a symmetric key to encrypt the JWT:
$ openssl rand -base64 32 > symmetric.key.for.encrypting.jwtbash -
Make sure you have the following keys in your secrets directory:
-
id.encrypted.key.for.signing.jwt.pem -
id.key.for.signing.jwt.pem -
id.key.for.verifying.jwt.pem -
symmetric.key.for.encrypting.jwt
-
-
-
Set up AM:
-
(From AM 6.5.3) Select Services > Add a Service, and add a Validation Service with the following Valid goto URL Resources:
-
http://ig.example.com:8080/* -
http://ig.example.com:8080/*?*
-
-
Select Applications > Agents > Identity Gateway and register an IG agent with the following values:
-
Agent ID:
ig_agent -
Password:
passwordFor AM 6.5.x and earlier versions, register an agent as described in Register an IG agent in AM 6.5 and earlier.
Use secure passwords in a production environment. Consider using a password manager to generate secure passwords.
-
-
(Optional) Authenticate the agent to AM as described in Authenticate an IG agent to AM.
IG agents are automatically authenticated to AM by a deprecated authentication module in AM. This step is currently optional, but will be required when authentication chains and modules are removed in a future release of AM.
-
-
Set up IG:
-
In IG, create an environment variable for the base64-encoded password to decrypt the PEM file used to sign the JWT:
$ export ID_DECRYPTED_KEY_FOR_SIGNING_JWT='ZW5jcnlwdGVkcGFzc3dvcmQ='bash -
Set an environment variable for the IG agent password, and then restart IG:
$ export AGENT_SECRET_ID='cGFzc3dvcmQ='bashThe password is retrieved by a SystemAndEnvSecretStore, and must be base64-encoded.
-
Add the following route to IG to serve the sample application .css and other static resources:
-
Linux
-
Windows
$HOME/.openig/config/routes/00-static-resources.json
%appdata%\OpenIG\config\routes\00-static-resources.json
{
  "name" : "00-static-resources",
  "baseURI" : "http://app.example.com:8081",
  "condition": "${find(request.uri.path,'^/css') or matchesWithRegex(request.uri.path, '^/.*\\\\.ico$') or matchesWithRegex(request.uri.path, '^/.*\\\\.gif$')}",
  "handler": "ReverseProxyHandler"
}
json -
-
Add the following route to IG, replacing the value of
secretsDirwith your secrets directory:-
Linux
-
Windows
$HOME/.openig/config/routes/jwtbuilder-sign-then-encrypt.json
%appdata%\OpenIG\config\routes\jwtbuilder-sign-then-encrypt.json
{ "name": "jwtbuilder-sign-then-encrypt", "condition": "${find(request.uri.path, '/jwtbuilder-sign-then-encrypt')}", "baseURI": "http://app.example.com:8081", "properties": { "secretsDir": "/path/to/secrets" }, "capture": "all", "heap": [ { "name": "SystemAndEnvSecretStore", "type": "SystemAndEnvSecretStore", "config": { "mappings": [{ "secretId": "id.decrypted.key.for.signing.jwt", "format": "BASE64" }] } }, { "name": "AmService-1", "type": "AmService", "config": { "agent": { "username": "ig_agent", "passwordSecretId": "agent.secret.id" }, "secretsProvider": "SystemAndEnvSecretStore", "url": "http://am.example.com:8088/openam" } }, { "name": "pemPropertyFormat", "type": "PemPropertyFormat", "config": { "decryptionSecretId": "id.decrypted.key.for.signing.jwt", "secretsProvider": "SystemAndEnvSecretStore" } }, { "name": "FileSystemSecretStore-1", "type": "FileSystemSecretStore", "config": { "format": "PLAIN", "directory": "&{secretsDir}", "mappings": [{ "secretId": "id.encrypted.key.for.signing.jwt.pem", "format": "pemPropertyFormat" }, { "secretId": "symmetric.key.for.encrypting.jwt", "format": { "type": "SecretKeyPropertyFormat", "config": { "format": "BASE64", "algorithm": "AES" } } }] } } ], "handler": { "type": "Chain", "config": { "filters": [{ "name": "SingleSignOnFilter", "type": "SingleSignOnFilter", "config": { "amService": "AmService-1" } }, { "name": "UserProfileFilter", "type": "UserProfileFilter", "config": { "username": "${contexts.ssoToken.info.uid}", "userProfileService": { "type": "UserProfileService", "config": { "amService": "AmService-1" } } } }, { "name": "JwtBuilderFilter-1", "type": "JwtBuilderFilter", "config": { "template": { "name": "${contexts.userProfile.commonName}", "email": "${contexts.userProfile.rawInfo.mail[0]}" }, "secretsProvider": "FileSystemSecretStore-1", "signature": { "secretId": "id.encrypted.key.for.signing.jwt.pem", "algorithm": "RS512", "encryption": { "secretId": "symmetric.key.for.encrypting.jwt", "algorithm": "dir", "method": "A128CBC-HS256" } } } }, { "name": "AddBuiltJwtToHeader", "type": "HeaderFilter", "config": { "messageType": "REQUEST", "add": { "x-openig-user": ["${contexts.jwtBuilder.value}"] } } }, { "name": "AddBuiltJwtAsCookie", "type": "HeaderFilter", "config": { "messageType": "RESPONSE", "add": { "set-cookie": ["my-jwt=${contexts.jwtBuilder.value};PATH=/"] } } }], "handler": "ReverseProxyHandler" } } }jsonNotice the following features of the route:
-
The route matches requests to
/jwtbuilder-sign-then-encrypt. -
The SystemAndEnvSecretStore provides the IG agent password and the password to decode the PEM file for the signing keys.
-
The FileSystemSecretStore maps the secret IDs of the encrypted PEM file used to sign the JWT, and the symmetric key used to encrypt the JWT.
-
After authentication, the UserProfileFilter reads the username from the SsoTokenContext, uses it to retrieve the user’s profile info from AM, and places the data into the UserProfileContext.
-
The JwtBuilderFilter takes the username and email from the UserProfileContext, and stores them in a JWT in the JwtBuilderContext. It uses the secrets mapped in the FileSystemSecretStore to sign then encrypt the JWT.
-
The
AddBuiltJwtToHeaderHeaderFilter retrieves the JWT from the JwtBuilderContext, and adds it to the header fieldx-openig-userin the request so that the sample app can display the JWT. -
The
AddBuiltJwtAsCookieHeaderFilter adds the JWT to a cookie calledmy-jwtso that it can be retrieved by the JwtValidationFilter in JWT validation. The cookie is ignored in this example. -
The ClientHandler passes the request to the sample app.
-
-
-
Test the setup
-
If you are logged in to AM, log out and clear any cookies.
-
Go to http://ig.example.com:8080/jwtbuilder-sign-then-encrypt.
-
Log in to AM as user
demo, passwordCh4ng31t. The sample app displays the encrypted JWT. The payload is concealed because the JWT is encrypted. -
In the
ENTER SECRETbox, enter the value ofsymmetric.key.for.encrypting.jwtto decrypt the JWT. The signed JWT and its payload are now displayed. -
In the
USE PEM FILEbox, enter the path toid.key.for.verifying.jwt.pemto verify the JWT signature.
-
Pass runtime data in JWT encrypted with a symmetric key
-
Set up secrets:
-
Locate a directory for secrets, and go to it:
$ cd /path/to/secretsbash -
In the secrets folder, generate an AES 256-bit key:
$ openssl rand -base64 32
loH...UFQ=
bash -
In the secrets folder, create a file called
symmetric.key.for.encrypting.jwtcontaining the AES key:$ echo -n 'loH...UFQ=' > symmetric.key.for.encrypting.jwtbashMake sure the password file contains only the password, with no trailing spaces or carriage returns.
-
-
Set up AM:
-
(From AM 6.5.3) Select Services > Add a Service, and add a Validation Service with the following Valid goto URL Resources:
-
http://ig.example.com:8080/* -
http://ig.example.com:8080/*?*
-
-
Select Applications > Agents > Identity Gateway and register an IG agent with the following values:
-
Agent ID:
ig_agent -
Password:
passwordFor AM 6.5.x and earlier versions, register an agent as described in Register an IG agent in AM 6.5 and earlier.
Use secure passwords in a production environment. Consider using a password manager to generate secure passwords.
-
-
(Optional) Authenticate the agent to AM as described in Authenticate an IG agent to AM.
IG agents are automatically authenticated to AM by a deprecated authentication module in AM. This step is currently optional, but will be required when authentication chains and modules are removed in a future release of AM.
-
-
Set up IG:
-
Set an environment variable for the IG agent password, and then restart IG:
$ export AGENT_SECRET_ID='cGFzc3dvcmQ='bashThe password is retrieved by a SystemAndEnvSecretStore, and must be base64-encoded.
-
Add the following route to IG to serve the sample application .css and other static resources:
-
Linux
-
Windows
$HOME/.openig/config/routes/00-static-resources.json
%appdata%\OpenIG\config\routes\00-static-resources.json
{
  "name" : "00-static-resources",
  "baseURI" : "http://app.example.com:8081",
  "condition": "${find(request.uri.path,'^/css') or matchesWithRegex(request.uri.path, '^/.*\\\\.ico$') or matchesWithRegex(request.uri.path, '^/.*\\\\.gif$')}",
  "handler": "ReverseProxyHandler"
}
json -
-
Add the following route to IG, replacing the value of the property
secretsDirwith your value:-
Linux
-
Windows
$HOME/.openig/config/routes/jwtbuilder-encrypt-symmetric.json
%appdata%\OpenIG\config\routes\jwtbuilder-encrypt-symmetric.json
{ "name": "jwtbuilder-encrypt-symmetric", "condition": "${find(request.uri.path, '/jwtbuilder-encrypt-symmetric')}", "baseURI": "http://app.example.com:8081", "properties": { "secretsDir": "/path/to/secrets" }, "heap": [ { "name": "SystemAndEnvSecretStore-1", "type": "SystemAndEnvSecretStore" }, { "name": "AmService-1", "type": "AmService", "config": { "agent": { "username": "ig_agent", "passwordSecretId": "agent.secret.id" }, "secretsProvider": "SystemAndEnvSecretStore-1", "url": "http://am.example.com:8088/openam" } }, { "name": "FileSystemSecretStore-1", "type": "FileSystemSecretStore", "config": { "format": "PLAIN", "directory": "&{secretsDir}", "mappings": [{ "secretId": "symmetric.key.for.encrypting.jwt", "format": { "type": "SecretKeyPropertyFormat", "config": { "format": "BASE64", "algorithm": "AES" } } }] } } ], "handler": { "type": "Chain", "config": { "filters": [{ "name": "SingleSignOnFilter-1", "type": "SingleSignOnFilter", "config": { "amService": "AmService-1" } }, { "name": "UserProfileFilter-1", "type": "UserProfileFilter", "config": { "username": "${contexts.ssoToken.info.uid}", "userProfileService": { "type": "UserProfileService", "config": { "amService": "AmService-1" } } } }, { "name": "JwtBuilderFilter-1", "type": "JwtBuilderFilter", "config": { "template": { "name": "${contexts.userProfile.commonName}", "email": "${contexts.userProfile.rawInfo.mail[0]}" }, "secretsProvider": "FileSystemSecretStore-1", "encryption": { "secretId": "symmetric.key.for.encrypting.jwt", "algorithm": "dir", "method": "A128CBC-HS256" } } }, { "name": "HeaderFilter-1", "type": "HeaderFilter", "config": { "messageType": "REQUEST", "add": { "x-openig-user": ["${contexts.jwtBuilder.value}"] } } }], "handler": "ReverseProxyHandler" } } }jsonNotice the following features of the route:
-
The route matches requests to
/jwtbuilder-encrypt-symmetric. -
The JWT encryption key is managed by the FileSystemSecretStore in the heap, which defines the SecretKeyPropertyFormat.
-
The JwtBuilderFilter
encryptionproperty refers to key in the FileSystemSecretStore. -
The HeaderFilter retrieves the JWT from the JwtBuilderContext, and adds it to the header field
x-openig-userin the request, so that the sample app can display the JWT.
-
-
-
Test the setup:
-
If you are logged in to AM, log out and clear any cookies.
-
Go to http://ig.example.com:8080/jwtbuilder-encrypt-symmetric.
-
Log in to AM as user
demo, passwordCh4ng31t, or as another user. The JWT is displayed in the sample app. -
In the
ENTER SECRETfield, enter the value of the AES 256-bit key to decrypt the JWT and display its payload.
-
Pass runtime data in JWT encrypted with an asymmetric key
The asymmetric key in this example is a PEM, but you can equally use a keystore.
-
Set up secrets:
-
Locate a directory for secrets, and go to it:
$ cd /path/to/secretsbash -
Generate an encrypted PEM file:
$ openssl req \
-newkey rsa:2048 \
-new \
-nodes \
-x509 \
-days 3650 \
-subj "/CN=ig.example.com/OU=example/O=com/L=fr/ST=fr/C=fr" \
-keyout id.key.for.encrypting.jwt.pem \
-out id.key.for.decrypting.jwt.pem
bash
-
-
Set up AM:
-
(From AM 6.5.3) Select Services > Add a Service, and add a Validation Service with the following Valid goto URL Resources:
-
http://ig.example.com:8080/* -
http://ig.example.com:8080/*?*
-
-
Select Applications > Agents > Identity Gateway and register an IG agent with the following values:
-
Agent ID:
ig_agent -
Password:
passwordFor AM 6.5.x and earlier versions, register an agent as described in Register an IG agent in AM 6.5 and earlier.
Use secure passwords in a production environment. Consider using a password manager to generate secure passwords.
-
-
(Optional) Authenticate the agent to AM as described in Authenticate an IG agent to AM.
IG agents are automatically authenticated to AM by a deprecated authentication module in AM. This step is currently optional, but will be required when authentication chains and modules are removed in a future release of AM.
-
-
Set up IG:
-
Set an environment variable for the IG agent password, and then restart IG:
$ export AGENT_SECRET_ID='cGFzc3dvcmQ='bashThe password is retrieved by a SystemAndEnvSecretStore, and must be base64-encoded.
-
Add the following route to IG to serve the sample application .css and other static resources:
-
Linux
-
Windows
$HOME/.openig/config/routes/00-static-resources.json
%appdata%\OpenIG\config\routes\00-static-resources.json
{
  "name" : "00-static-resources",
  "baseURI" : "http://app.example.com:8081",
  "condition": "${find(request.uri.path,'^/css') or matchesWithRegex(request.uri.path, '^/.*\\\\.ico$') or matchesWithRegex(request.uri.path, '^/.*\\\\.gif$')}",
  "handler": "ReverseProxyHandler"
}
json -
-
Add the following route to IG, replacing value of the property
secretsDirwith the directory for the PEM file:-
Linux
-
Windows
$HOME/.openig/config/routes/jwtbuilder-encrypt-asymmetric.json
%appdata%\OpenIG\config\routes\jwtbuilder-encrypt-asymmetric.json
{ "name": "jwtbuilder-encrypt-asymmetric", "condition": "${find(request.uri.path, '/jwtbuilder-encrypt-asymmetric')}", "baseURI": "http://app.example.com:8081", "properties": { "secretsDir": "/path/to/secrets" }, "capture": "all", "heap": [ { "name": "pemPropertyFormat", "type": "PemPropertyFormat" }, { "name": "FileSystemSecretStore-1", "type": "FileSystemSecretStore", "config": { "format": "PLAIN", "directory": "&{secretsDir}", "suffix": ".pem", "mappings": [{ "secretId": "id.key.for.decrypting.jwt", "format": "pemPropertyFormat" }] } }, { "name": "SystemAndEnvSecretStore-1", "type": "SystemAndEnvSecretStore" }, { "name": "AmService-1", "type": "AmService", "config": { "agent": { "username": "ig_agent", "passwordSecretId": "agent.secret.id" }, "secretsProvider": "SystemAndEnvSecretStore-1", "url": "http://am.example.com:8088/openam" } } ], "handler": { "type": "Chain", "config": { "filters": [{ "name": "SingleSignOnFilter", "type": "SingleSignOnFilter", "config": { "amService": "AmService-1" } }, { "name": "UserProfileFilter", "type": "UserProfileFilter", "config": { "username": "${contexts.ssoToken.info.uid}", "userProfileService": { "type": "UserProfileService", "config": { "amService": "AmService-1" } } } }, { "name": "JwtBuilderFilter-1", "type": "JwtBuilderFilter", "config": { "template": { "name": "${contexts.userProfile.commonName}", "email": "${contexts.userProfile.rawInfo.mail[0]}" }, "secretsProvider": "FileSystemSecretStore-1", "encryption": { "secretId": "id.key.for.decrypting.jwt", "algorithm": "RSA-OAEP-256", "method": "A128CBC-HS256" } } }, { "name": "HeaderFilter-1", "type": "HeaderFilter", "config": { "messageType": "REQUEST", "add": { "x-openig-user": ["${contexts.jwtBuilder.value}"] } } }], "handler": "ReverseProxyHandler" } } }jsonNotice the following features of the route:
-
The route matches requests to
/jwtbuilder-encrypt-asymmetric. -
The JwtBuilderFilter refers to the secret ID of the PEM, and uses the FileSystemSecretStore to manage the secret.
-
The FileSystemSecretStore mapping refers to the secret ID of the PEM, and uses the default PemPropertyFormat.
-
The HeaderFilter retrieves the JWT from the JwtBuilderContext, and adds it to the header field
x-openig-userin the request, so that the sample app can display the JWT.
-
-
-
Test the setup:
-
If you are logged in to AM, log out and clear any cookies.
-
Go to http://ig.example.com:8080/jwtbuilder-encrypt-asymmetric.
-
Log in to AM as user
demo, passwordCh4ng31t, or as another user. The JWT is displayed in the sample app. -
In the
USE PEM FILEfield, enter the path toid.key.for.encrypting.jwt.pemto decrypt the JWT and display its payload.
-
SAML
The IG implements SAML 2.0, to validate users and log them in to protected applications.
For more information about the SAML 2.0 standard, refer to RFC 7522. The following terms are used:
-
Identity Provider (IDP): The service that manages the user identity, for example Identity Cloud or AM.
-
Service Provider (SP): The service that a user wants to access. IG acts as a SAML 2.0 SP for SSO, providing an interface to applications that don’t support SAML 2.0.
-
Circle of trust (CoT): An IDP and SP that participate in federation.
SAML assertions can be signed and encrypted. ForgeRock recommends using *SHA-256 variants (rsa-sha256 or ecdsa-sha256).
SAML assertions can contain configurable attribute values, such as user meta-information or anything else provided by the IDP. The attributes of a SAML assertion can contain one or more values, made available as a list of strings. Even if an attribute contains a single value, it is made available as a list of strings.
SAML in deployments with multiple instances of IG
IG uses the federation libraries from AM (also referred to as the Fedlet) to implement SAML. When IG acts as a SAML service provider, the session information is stored in the fedlet, not the session cookie. In deployments that use multiple instances of IG as a SAML service provider, it is therefore necessary to set up sticky sessions so that requests always hit the instance where the SAML interaction was started.
For information, refer to Session state considerations in AM’s SAML v2.0 guide.
Federation using the SamlFederationFilter
About SP-initiated SSO with the SamlFederationFilter
SP-initiated SSO occurs when a user attempts to access a protected application directly through the SP. Because the user’s federated identity is managed by the IDP, the SP sends a SAML authentication request to the IDP. After the IDP authenticates the user, it provides the SP with a SAML assertion for the user.
For the SamlFederationFilter, SP-initiated SSO is the preferred to IDP-initiated SSO:
-
A dedicated SAML URI is not required to start SP-initiated authentication.
-
The HTTP session tracks the state of the user session.
The following sequence diagram shows the flow of information in SP-initiated SSO, when IG acts as a SAML 2.0 SP:

Set up federation with unsigned/unencrypted assertions with the SamlFederationFilter
-
Set up the network:
Add
sp.example.comto your/etc/hostsfile:127.0.0.1 localhost am.example.com ig.example.com app.example.com sp.example.comTraffic to the application is proxied through IG, using the host name
sp.example.com. -
Configure a Java Fedlet:
The SAML library component validates the SP’s AssertionConsumerService Location against the incoming IDP SAML Assertion, based on the request information, including the port. In
sp.xml, always specify the port in the Location value ofAssertionConsumerService, even when using defaults of 443 or 80, as follows:<AssertionConsumerService isDefault="true" index="0" Binding="urn:oasis:names:tc:SAML:2.0:bindings:HTTP-POST" Location="https://sp.example.com:443/fedletapplication" />xmlFor more information about Java Fedlets, refer to Creating and configuring the Fedlet in AM’s SAML v2.0 guide.
-
Copy and unzip the fedlet zip file,
Fedlet-7.4.0.zip, delivered with the AM installation, into a local directory.$ unzip $HOME/openam/Fedlet-7.4.0.zip Archive: Fedlet-7.4.0.zip creating: conf/ inflating: README inflating: conf/FederationConfig.properties inflating: conf/fedlet.cot-template inflating: conf/idp-extended.xml-template inflating: conf/sp-extended.xml-template inflating: conf/sp.xml-template inflating: fedlet.warbash -
In each file, search and replace the following properties:
Replace this With this IDP_ENTITY_IDopenamFEDLET_ENTITY_IDspFEDLET_PROTOCOL://FEDLET_HOST:FEDLET_PORT/FEDLET_DEPLOY_URIhttp://sp.example.com:8080/home/samlfedletcotandFEDLET_COTCircle of Trustsp.example.com:8080/home/saml/fedletapplicationsp.example.com:8080/home/saml/fedletapplication/metaAlias/sp -
Save the files as .xml, without the
-templateextension, so that the directory looks like this:conf ├── FederationConfig.properties ├── fedlet.cot ├── idp-extended.xml ├── sp-extended.xml └── sp.xml
By default, AM as an IDP uses the NameID format
urn:oasis:names:tc:SAML:2.0:nameid-format:transientto communicate about a user. For information about using a different NameID format, refer to Use a non-transient NameID format.
-
-
Set up AM:
-
In the AM admin UI, select Identities, select the user
demo, and change the last name toCh4ng31t. Note that, for this example, the last name must be the same as the password. -
Select Applications > Federation > Circles of Trust, and add a circle of trust called
Circle of Trust, with the default settings. -
Set up a remote service provider:
-
Select Applications > Federation > Entity Providers, and add a remote entity provider.
-
Drag in or import
sp.xmlcreated in the previous step. -
Select Circles of Trust:
Circle of Trust.
-
-
Set up a hosted identity provider:
-
Select Applications > Federation > Entity Providers, and add a hosted entity provider with the following values:
-
Entity ID:
openam -
Entity Provider Base URL:
http://am.example.com:8088/openam -
Identity Provider Meta Alias:
idp -
Circles of Trust:
Circle of Trust
-
-
Select Assertion Processing > Attribute Mapper, map the following SAML attribute keys and values, and then save your changes:
-
SAML Attribute:
cn, Local Attribute:cn -
SAML Attribute:
sn, Local Attribute:sn
-
-
In a terminal, export the XML-based metadata for the IDP:
$ curl -v \ --output idp.xml \ "http://am.example.com:8088/openam/saml2/jsp/exportmetadata.jsp?entityid=openam"bashThe
idp.xmlfile is created locally.
-
-
-
Set up IG:
-
Copy the edited fedlet files, and the exported
idp.xmlfile into the IG configuration, at$HOME/.openig/SAML.$ ls -l $HOME/.openig/SAML FederationConfig.properties fedlet.cot idp-extended.xml idp.xml sp-extended.xml sp.xmlbash -
Add the following route to IG to serve the sample application .css and other static resources:
-
Linux
-
Windows
$HOME/.openig/config/routes/00-static-resources.json
%appdata%\OpenIG\config\routes\00-static-resources.json
{
  "name" : "00-static-resources",
  "baseURI" : "http://app.example.com:8081",
  "condition": "${find(request.uri.path,'^/css') or matchesWithRegex(request.uri.path, '^/.*\\\\.ico$') or matchesWithRegex(request.uri.path, '^/.*\\\\.gif$')}",
  "handler": "ReverseProxyHandler"
}
json -
-
Add the following route to IG:
-
Linux
-
Windows
$HOME/.openig/config/routes/saml-filter.json
%appdata%\OpenIG\config\routes\saml-filter.json
{ "name": "saml-filter", "baseURI": "http://app.example.com:8081", "condition": "${find(request.uri.path, '^/home')}", "handler": { "type": "Chain", "config": { "filters": [ { "name": "SamlFilter", "type": "SamlFederationFilter", "config": { "assertionMapping": { "name": "cn", "surname": "sn" }, "subjectMapping": "sp-subject-name", "redirectURI": "/home/saml-filter" } }, { "name": "SetSamlHeaders", "type": "HeaderFilter", "config": { "messageType": "REQUEST", "add": { "x-saml-cn": [ "${toString(session.name)}" ], "x-saml-sn": [ "${toString(session.surname)}" ] } } } ], "handler": "ReverseProxyHandler" } } }jsonNotice the following features of the route:
-
The route matches requests to
/home. -
The SamlFederationFilter extracts
cnandsnfrom the SAML assertion, and maps them to the SessionContext, atsession.name[0]andsession.surname[0]. -
The HeaderFilter adds the session name and surname as headers to the request so that they are displayed by the sample application.
-
-
Restart IG.
-
-
Test the setup:
-
If you are logged in to AM, log out and clear any cookies.
-
Log in to AM as user
demo, passwordCh4ng31t. The request is redirected to the sample application.
-
Set up federation with signed/encrypted assertions with the SamlFederationFilter
-
Set up the example in saml.adoc#federation-setup-filter.
-
Set up the SAML keystore:
-
Find the values of AM’s default SAML keypass and storepass:
$ more /path/to/am/security/secrets/default/.keypass
$ more /path/to/am/security/secrets/default/.storepass
bash -
Copy the SAML keystore from the AM configuration to IG:
$ cp /path/to/am/security/keystores/keystore.jceks /path/to/ig/keystore.jceksbashLegacy keystore types such as JKS and JCEKS are supported but are not secure. Consider using the PKCS#12 keystore type.
-
-
Configure the Fedlet in IG:
-
In
FederationConfig.properties, make the following changes:-
Delete the following lines:
-
com.sun.identity.saml.xmlsig.keystore=%BASE_DIR%/security/keystores/keystore.jks -
com.sun.identity.saml.xmlsig.storepass=%BASE_DIR%/.storepass -
com.sun.identity.saml.xmlsig.keypass=%BASE_DIR%/.keypass -
com.sun.identity.saml.xmlsig.certalias=test -
com.sun.identity.saml.xmlsig.storetype=JKS -
am.encryption.pwd=@AM_ENC_PWD@
-
-
Add the following line:
org.forgerock.openam.saml2.credential.resolver.class=org.forgerock.openig.handler.saml.SecretsSaml2CredentialResolverThis class is responsible for resolving secrets and supplying credentials.
Be sure to leave no space at the end of the line.
-
-
In
sp.xml, make the following changes:-
Change
AuthnRequestsSigned="false"toAuthnRequestsSigned="true". -
Add the following KeyDescriptor just before
</SPSSODescriptor><KeyDescriptor use="signing"> <ds:KeyInfo xmlns:ds="http://www.w3.org/2000/09/xmldsig#" > <ds:X509Data> <ds:X509Certificate> </ds:X509Certificate> </ds:X509Data> </ds:KeyInfo> </KeyDescriptor> </SPSSODescriptor>xml -
Copy the value of the signing certificate from
idp.xmlto this file:<KeyDescriptor use="signing"> <ds:KeyInfo> <ds:X509Data> <ds:X509Certificate> MII...zA6 </ds:X509Certificate>xmlThis is the public key used for signing so that the IDP can verify request signatures.
-
-
-
Replace the remote service provider in AM:
-
Select Applications > Federation > Entity Providers, and remove the
spentity provider. -
Drag in or import the new
sp.xmlupdated in the previous step. -
Select Circles of Trust:
Circle of Trust.
-
-
Set up IG
-
In the IG configuration, set environment variables for the following secrets, and then restart IG:
$ export KEYSTORE_SECRET_ID='a2V5c3RvcmU=' $ export SAML_KEYSTORE_STOREPASS_SECRET_ID='<base64-encoded value of the SAML storepass>' $ export SAML_KEYSTORE_KEYPASS_SECRET_ID='<base64-encoded value of the SAML keypass>'bashThe passwords are retrieved by a SystemAndEnvSecretStore, and must be base64-encoded.
-
Remove
saml-filter.jsonfrom the configuration, and add the following route, replacing the path tokeystore.jcekswith your path:-
Linux
-
Windows
$HOME/.openig/config/routes/saml-filter-secure.json
%appdata%\OpenIG\config\routes\saml-filter-secure.json
{ "name": "saml-filter-secure", "baseURI": "http://app.example.com:8081", "condition": "${find(request.uri.path, '^/home')}", "heap": [ { "name": "SystemAndEnvSecretStore-1", "type": "SystemAndEnvSecretStore" }, { "name": "KeyStoreSecretStore-1", "type" : "KeyStoreSecretStore", "config" : { "file" : "/path/to/ig/keystore.jceks", "storeType" : "jceks", "storePasswordSecretId" : "saml.keystore.storepass.secret.id", "entryPasswordSecretId" : "saml.keystore.keypass.secret.id", "secretsProvider" : "SystemAndEnvSecretStore-1", "mappings" : [ { "secretId" : "sp.signing.sp", "aliases" : [ "rsajwtsigningkey" ] }, { "secretId" : "sp.decryption.sp", "aliases" : [ "test" ] } ] } } ], "handler": { "type": "Chain", "config": { "filters": [ { "name": "SamlFilter", "type": "SamlFederationFilter", "config": { "assertionMapping": { "name": "cn", "surname": "sn" }, "subjectMapping": "sp-subject-name", "redirectURI": "/home/saml-filter", "secretsProvider" : "KeyStoreSecretStore-1" } }, { "name": "SetSamlHeaders", "type": "HeaderFilter", "config": { "messageType": "REQUEST", "add": { "x-saml-cn": [ "${toString(session.name)}" ], "x-saml-sn": [ "${toString(session.surname)}" ] } } } ], "handler": "ReverseProxyHandler" } } }jsonNotice the following features of the route compared to
saml-filter.json:-
The SamlFederationHandler refers to the KeyStoreSecretStore to provide the keys for the signed and encrypted SAML assertions.
-
The secret IDs,
sp.signing.spandsp.decryption.sp, follow a naming convention based on the name of the service provider,sp. -
The alias for the signing key corresponds to the PEM in
keystore.jceks.
-
-
Restart IG.
-
-
Test the setup:
-
If you are logged in to AM, log out and clear any cookies.
-
Log in to AM as user
demo, passwordCh4ng31t. The request is redirected to the sample application.
-
Federation using the SamlFederationHandler (deprecated)
| The SamlFederationHandler is deprecated; use the SamlFederationFilter instead. For more information, refer to the Deprecated section of the Release Notes. |
About SP-initiated SSO with the SamlFederationHandler
SP-initiated SSO occurs when a user attempts to access a protected application directly through the SP. Because the user’s federated identity is managed by the IDP, the SP sends a SAML authentication request to the IDP. After the IDP authenticates the user, it provides the SP with a SAML assertion for the user.
The following sequence diagram shows the flow of information in SP-initiated SSO, when IG acts as a SAML 2.0 SP:

About IDP-initiated SSO the the SamlFederationHandler
IDP-initiated SSO occurs when a user attempts to access a protected application, using the IDP for authentication. The IDP sends an unsolicited authentication statement to the SP.
Before IDP-initiated SSO can occur:
-
The user must access a link on the IDP that refers to the remote SP.
-
The user must authenticate to the IDP.
-
The IDP must be configured with links that refer to the SP.
The following sequence diagram shows the flow of information in IDP-initiated SSO when IG acts as a SAML 2.0 SP:

Set up federation with unsigned/unencrypted assertions with the SamlFederationHandler
For examples of the federation configuration files, refer to Example fedlet files. To set up multiple SPs, work through this section, and then SAML 2.0 and multiple applications.
-
Set up the network:
Add
sp.example.comto your/etc/hostsfile:127.0.0.1 localhost am.example.com ig.example.com app.example.com sp.example.comTraffic to the application is proxied through IG, using the host name
sp.example.com. -
Configure a Java Fedlet:
The SAML library component validates the SP’s AssertionConsumerService Location against the incoming IDP SAML Assertion, based on the request information, including the port. In
sp.xml, always specify the port in the Location value ofAssertionConsumerService, even when using defaults of 443 or 80, as follows:<AssertionConsumerService isDefault="true" index="0" Binding="urn:oasis:names:tc:SAML:2.0:bindings:HTTP-POST" Location="https://sp.example.com:443/fedletapplication" />xmlFor more information about Java Fedlets, refer to Creating and configuring the Fedlet in AM’s SAML v2.0 guide.
-
Copy and unzip the fedlet zip file,
Fedlet-7.4.0.zip, delivered with the AM installation, into a local directory.$ unzip $HOME/openam/Fedlet-7.4.0.zip Archive: Fedlet-7.4.0.zip creating: conf/ inflating: README inflating: conf/FederationConfig.properties inflating: conf/fedlet.cot-template inflating: conf/idp-extended.xml-template inflating: conf/sp-extended.xml-template inflating: conf/sp.xml-template inflating: fedlet.warbash -
In each file, search and replace the following properties:
Replace this With this IDP_ENTITY_IDopenamFEDLET_ENTITY_IDspFEDLET_PROTOCOL://FEDLET_HOST:FEDLET_PORT/FEDLET_DEPLOY_URIhttp://sp.example.com:8080/samlfedletcotandFEDLET_COTCircle of Trustsp.example.com:8080/saml/fedletapplicationsp.example.com:8080/saml/fedletapplication/metaAlias/sp -
Save the files as .xml, without the
-templateextension, so that the directory looks like this:conf ├── FederationConfig.properties ├── fedlet.cot ├── idp-extended.xml ├── sp-extended.xml └── sp.xml
By default, AM as an IDP uses the NameID format
urn:oasis:names:tc:SAML:2.0:nameid-format:transientto communicate about a user. For information about using a different NameID format, refer to Use a non-transient NameID format.
-
-
Set up AM:
-
In the AM admin UI, select Identities, select the user
demo, and change the last name toCh4ng31t. Note that, for this example, the last name must be the same as the password. -
Select Applications > Federation > Circles of Trust, and add a circle of trust called
Circle of Trust, with the default settings. -
Set up a remote service provider:
-
Select Applications > Federation > Entity Providers, and add a remote entity provider.
-
Drag in or import
sp.xmlcreated in the previous step. -
Select Circles of Trust:
Circle of Trust.
-
-
Set up a hosted identity provider:
-
Select Applications > Federation > Entity Providers, and add a hosted entity provider with the following values:
-
Entity ID:
openam -
Entity Provider Base URL:
http://am.example.com:8088/openam -
Identity Provider Meta Alias:
idp -
Circles of Trust:
Circle of Trust
-
-
Select Assertion Processing > Attribute Mapper, map the following SAML attribute keys and values, and then save your changes:
-
SAML Attribute:
cn, Local Attribute:cn -
SAML Attribute:
sn, Local Attribute:sn
-
-
In a terminal, export the XML-based metadata for the IDP:
$ curl -v \ --output idp.xml \ "http://am.example.com:8088/openam/saml2/jsp/exportmetadata.jsp?entityid=openam"bashThe
idp.xmlfile is created locally.
-
-
-
Set up IG:
-
Copy the edited fedlet files, and the exported
idp.xmlfile into the IG configuration, at$HOME/.openig/SAML.$ ls -l $HOME/.openig/SAML FederationConfig.properties fedlet.cot idp-extended.xml idp.xml sp-extended.xml sp.xmlbash -
In
config.json, comment out or remove thebaseURI:{ "handler": { "_baseURI": "http://app.example.com:8081", ... } }jsonRequests to the SamlFederationHandler must not be rebased, because the request URI must match the endpoint in the SAML metadata.
-
Add the following route to IG to serve the sample application .css and other static resources:
-
Linux
-
Windows
$HOME/.openig/config/routes/00-static-resources.json
%appdata%\OpenIG\config\routes\00-static-resources.json
{
  "name" : "00-static-resources",
  "baseURI" : "http://app.example.com:8081",
  "condition": "${find(request.uri.path,'^/css') or matchesWithRegex(request.uri.path, '^/.*\\\\.ico$') or matchesWithRegex(request.uri.path, '^/.*\\\\.gif$')}",
  "handler": "ReverseProxyHandler"
}
json -
-
Add the following route to IG:
-
Linux
-
Windows
$HOME/.openig/config/routes/saml-handler.json
%appdata%\OpenIG\config\routes\saml-handler.json
{ "name": "saml-handler", "condition": "${find(request.uri.path, '^/saml')}", "session": "JwtSession", "handler": { "type": "SamlFederationHandler", "config": { "useOriginalUri": true, "assertionMapping": { "username": "cn", "password": "sn" }, "subjectMapping": "sp-subject-name", "redirectURI": "/home/federate" } } }jsonNotice the following features of the route:
-
The route matches requests to
/saml. -
After authentication, the SamlFederationHandler extracts
cnandsnfrom the SAML assertion, and maps them to the SessionContext, atsession.usernameandsession.password. -
The handler stores the subject name as a string in the session field
session.sp-subject-name, which is named by thesubjectMappingproperty. By default, the subject name is stored in the session fieldsession.subjectName. -
The handler redirects the request to the
/federateroute. -
The route uses the
JwtSessionimplementation, meaning it stores encrypted session information in a browser cookie. The name is a reference to theJwtSessionobject defined inconfig.json. For information, see JwtSession.
-
-
Add the following route to IG:
-
Linux
-
Windows
$HOME/.openig/config/routes/federate-handler.json
%appdata%\OpenIG\config\routes\federate-handler.json
{ "name": "federate-handler", "condition": "${find(request.uri.path, '^/home/federate')}", "session": "JwtSession", "baseURI": "http://app.example.com:8081", "handler": { "type": "DispatchHandler", "config": { "bindings": [ { "condition": "${empty session.username}", "handler": { "type": "StaticResponseHandler", "config": { "status": 302, "headers": { "Location": [ "http://sp.example.com:8080/saml/SPInitiatedSSO?metaAlias=/sp" ] } } } }, { "handler": { "type": "Chain", "config": { "filters": [ { "type": "HeaderFilter", "config": { "messageType": "REQUEST", "add": { "x-username": ["${session.username[0]}"], "x-password": ["${session.password[0]}"] } } } ], "handler": "ReverseProxyHandler" } } } ] } } }jsonNotice the following features of the route:
-
The route matches requests to
/home/federate. -
If the user is not authenticated with AM, the username is not populated in the context. The DispatchHandler then dispatches the request to the StaticResponseHandler, which redirects it to the SP-initiated SSO endpoint.
If the credentials are in the context, or after successful authentication, the DispatchHandler dispatches the request to the Chain.
-
The HeaderFilter adds headers for the first value for the
usernameandpasswordattributes of the SAML assertion. -
The route uses the
JwtSessionimplementation, meaning it stores encrypted session information in a browser cookie. The name is a reference to theJwtSessionobject defined inconfig.json. For information, see JwtSession.
-
-
Restart IG.
-
-
Test the setup:
-
Log out of AM, and test the setup with the following links:
-
Log in to AM with username
demoand passwordCh4ng31t.IG returns the response page showing that the the demo user has logged in.
-
|
For more control over the URL where the user agent is redirected, use the
The In the following example, the user is finally redirected to the original URI from the request: json |
Set up federation with signed/encrypted assertions with the SamlFederationHandler
-
Set up the example in saml.adoc#federation-setup-handler.
-
Set up the SAML keystore:
-
Find the values of AM’s default SAML keypass and storepass:
$ more /path/to/am/security/secrets/default/.keypass
$ more /path/to/am/security/secrets/default/.storepass
bash -
Copy the SAML keystore from the AM configuration to IG:
$ cp /path/to/am/security/keystores/keystore.jceks /path/to/ig/keystore.jceksbashLegacy keystore types such as JKS and JCEKS are supported but are not secure. Consider using the PKCS#12 keystore type.
-
-
Configure the Fedlet in IG:
-
In
FederationConfig.properties, make the following changes:-
Delete the following lines:
-
com.sun.identity.saml.xmlsig.keystore=%BASE_DIR%/security/keystores/keystore.jks -
com.sun.identity.saml.xmlsig.storepass=%BASE_DIR%/.storepass -
com.sun.identity.saml.xmlsig.keypass=%BASE_DIR%/.keypass -
com.sun.identity.saml.xmlsig.certalias=test -
com.sun.identity.saml.xmlsig.storetype=JKS -
am.encryption.pwd=@AM_ENC_PWD@
-
-
Add the following line:
org.forgerock.openam.saml2.credential.resolver.class=org.forgerock.openig.handler.saml.SecretsSaml2CredentialResolverThis class is responsible for resolving secrets and supplying credentials.
Be sure to leave no space at the end of the line.
-
-
In
sp.xml, make the following changes:-
Change
AuthnRequestsSigned="false"toAuthnRequestsSigned="true". -
Add the following KeyDescriptor just before
</SPSSODescriptor><KeyDescriptor use="signing"> <ds:KeyInfo xmlns:ds="http://www.w3.org/2000/09/xmldsig#" > <ds:X509Data> <ds:X509Certificate> </ds:X509Certificate> </ds:X509Data> </ds:KeyInfo> </KeyDescriptor> </SPSSODescriptor>xml -
Copy the value of the signing certificate from
idp.xmlto this file:<KeyDescriptor use="signing"> <ds:KeyInfo> <ds:X509Data> <ds:X509Certificate> MII...zA6 </ds:X509Certificate>xmlThis is the public key used for signing so that the IDP can verify request signatures.
-
-
-
Replace the remote service provider in AM:
-
Select Applications > Federation > Entity Providers, and remove the
spentity provider. -
Drag in or import the new
sp.xmlupdated in the previous step. -
Select Circles of Trust:
Circle of Trust.
-
-
Set up IG:
-
In the IG configuration, set environment variables for the following secrets, and then restart IG:
$ export KEYSTORE_SECRET_ID='a2V5c3RvcmU=' $ export SAML_KEYSTORE_STOREPASS_SECRET_ID='<base64-encoded value of the SAML storepass>' $ export SAML_KEYSTORE_KEYPASS_SECRET_ID='<base64-encoded value of the SAML keypass>'bashThe passwords are retrieved by a SystemAndEnvSecretStore, and must be base64-encoded.
-
Remove
saml-handler.jsonfrom the configuration, and add the following route, replacing the path tokeystore.jcekswith your path:-
Linux
-
Windows
$HOME/.openig/config/routes/saml-handler-secure.json
%appdata%\OpenIG\config\routes\saml-handler-secure.json
{ "name": "saml-handler-secure", "condition": "${find(request.uri.path, '^/saml')}", "session": "JwtSession", "heap": [ { "name": "SystemAndEnvSecretStore-1", "type": "SystemAndEnvSecretStore" }, { "name": "KeyStoreSecretStore-1", "type" : "KeyStoreSecretStore", "config" : { "file" : "/path/to/ig/keystore.jceks", "storeType" : "jceks", "storePasswordSecretId" : "saml.keystore.storepass.secret.id", "entryPasswordSecretId" : "saml.keystore.keypass.secret.id", "secretsProvider" : "SystemAndEnvSecretStore-1", "mappings" : [ { "secretId" : "sp.signing.sp", "aliases" : [ "rsajwtsigningkey" ] }, { "secretId" : "sp.decryption.sp", "aliases" : [ "test" ] } ] } } ], "handler": { "type": "SamlFederationHandler", "config": { "useOriginalUri": true, "assertionMapping": { "username": "cn", "password": "sn" }, "subjectMapping": "sp-subject-name", "redirectURI": "/home/federate", "secretsProvider" : "KeyStoreSecretStore-1" } } }jsonNotice the following features of the route compared to
saml-handler.json:-
The SamlFederationHandler refers to the KeyStoreSecretStore to provide the keys for the signed and encrypted SAML assertions.
-
The secret IDs,
sp.signing.spandsp.decryption.sp, follow a naming convention based on the name of the service provider,sp. -
The alias for the signing key corresponds to the PEM in
keystore.jceks.
-
-
Restart IG.
-
-
Test the setup:
-
Log out of AM, and test the setup with the following links:
-
Log in to AM with username
demoand passwordCh4ng31t.IG returns the response page showing that the the demo user has logged in.
-
SAML 2.0 and multiple applications with the SamlFederationHandler
The chapter extends the example in
SAML
with the service provider sp, to add a second service provider.
The new service provider has entity ID sp2 and runs on the host
sp2.example.com. To prevent unwanted behavior, the service providers must
have different values.
-
Add
sp2.example.comto your/etc/hostsfile:127.0.0.1 localhost am.example.com ig.example.com app.example.com sp.example.com sp2.example.com -
In IG, configure the service provider files for
sp2, using the files you created in Configure a Java Fedlet::-
In
fedlet.cot, addsp2to the list of sun-fm-trusted-providers:cot-name=Circle of Trust sun-fm-cot-status=Active sun-fm-trusted-providers=openam, sp, sp2 sun-fm-saml2-readerservice-url= sun-fm-saml2-writerservice-url=properties -
Copy
sp.xmltosp2.xml, and copysp-extended.xmltosp2-extended.xml. -
In both files, search and replace the following strings:
-
entityID=sp: replace withentityID=sp2 -
sp.example.com: replace withsp2.example.com -
metaAlias=/sp: replace withmetaAlias=/sp2 -
/metaAlias/sp: replace with/metaAlias/sp2
-
-
Restart IG.
-
-
In AM, set up a remote service provider for
sp2, as described in Set up federation with unsigned/unencrypted assertions:-
Select Applications > Federation > Entity Providers.
-
Drag in or import
sp2.xmlcreated in the previous step. -
Select Circles of Trust:
Circle of Trust.
-
-
Add the following routes to IG:
-
Linux
-
Windows
$HOME/.openig/config/routes/saml-handler-sp2.json
%appdata%\OpenIG\config\routes\saml-handler-sp2.json
{ "name": "saml-handler-sp2", "condition": "${find(request.uri.host, 'sp2.example.com') and find(request.uri.path, '^/saml')}", "handler": { "type": "SamlFederationHandler", "config": { "comment": "Use unique session properties for this SP.", "useOriginalUri": true, "assertionMapping": { "sp2Username": "cn", "sp2Password": "sn" }, "authnContext": "sp2AuthnContext", "sessionIndexMapping": "sp2SessionIndex", "subjectMapping": "sp2SubjectName", "redirectURI": "/sp2" } } }json-
Linux
-
Windows
$HOME/.openig/config/routes/federate-handler-sp2.json
%appdata%\OpenIG\config\routes\federate-handler-sp2.json
{
  "name": "federate-handler-sp2",
  "condition": "${find(request.uri.host, 'sp2.example.com') and not find(request.uri.path, '^/saml')}",
  "baseURI": "http://app.example.com:8081",
  "handler": {
    "type": "DispatchHandler",
    "config": {
      "bindings": [
        {
          "condition": "${empty session.sp2Username}",
          "handler": {
            "type": "StaticResponseHandler",
            "config": {
              "status": 302,
              "headers": {
                "Location": [
                  "http://sp2.example.com:8080/saml/SPInitiatedSSO?metaAlias=/sp2"
                ]
              }
            }
          }
        },
        {
          "handler": {
            "type": "Chain",
            "config": {
              "filters": [
                {
                  "type": "HeaderFilter",
                  "config": {
                    "messageType": "REQUEST",
                    "add": {
                      "x-username": ["${session.sp2Username[0]}"],
                      "x-password": ["${session.sp2Password[0]}"]
                    }
                  }
                }
              ],
              "handler": "ReverseProxyHandler"
            }
          }
        }
      ]
    }
  }
}
json -
-
Test the setup:
-
Log out of AM, and test the setup with the following links:
-
Log in to AM with username
demoand passwordCh4ng31t.IG returns the response page showing that the user has logged in.
-
Use a non-transient NameID format
By default, AM as an IDP uses the NameID format
urn:oasis:names:tc:SAML:2.0:nameid-format:transient.
For more information, refer to
Hosted identity provider configuration properties
in AM’s SAML v2.0 guide.
When the IDP uses another NameID format, configure IG to use
that NameID format by editing the Fedlet configuration file
sp-extended.xml:
-
To use the NameID value provided by the IDP, add the following attribute:
<Attribute name="useNameIDAsSPUserID">
  <Value>true</Value>
</Attribute>
xml -
To use an attribute from the assertion, add the following attribute:
<Attribute name="autofedEnabled"> <Value>true</Value> </Attribute> <Attribute name="autofedAttribute"> <Value>sn</Value> </Attribute>xmlThis example uses the value in
SNto identify the subject.
Although IG supports the persistent NameID format,
IG does not store the mapping. To configure this behavior, edit
the file sp-extended.xml:
-
To disable attempts to persist the user mapping, add the following attribute:
<Attribute name="spDoNotWriteFederationInfo">
  <Value>true</Value>
</Attribute>
xml -
To enable attempts to persist the user mapping, add the following attribute:
<Attribute name="spDoNotWriteFederationInfo">
  <Value>false</Value>
</Attribute>
xml
If a login request doesn’t contain a NameID format query parameter, the
value is defined by the presence and content of the NameID format list for
the SP and IDP. For example, an SP-initiated login can be constructed with
the binding and NameIDFormat as a parameter, as follows:
http://fedlet.example.org:7070/fedlet/SPInitiatedSSO?binding=urn:oasis:names:tc:SAML:2.0:bindings:HTTP-POST&NameIDFormat=urn:oasis:names:tc:SAML:1.1:nameid-format:unspecifiedWhen the NameID format is provided in a list, it is resolved as follows:
-
If both the IDP and SP have a list, the first matching NameID format in the lists.
-
If either the IDP or SP list is empty, the first NameID format in the other list.
-
If neither the IDP nor SP has a list, then AM defaults to
transient, and IG defaults topersistent.
Example fedlet files
| File | Description |
|---|---|
|
Fedlet properties |
|
Circle of trust for IG and the IDP |
|
Standard metadata for the IDP |
|
Metadata extensions for the IDP |
|
Standard metadata for the IG SP |
|
Metadata extensions for the IG SP |
The following example of
$HOME/.openig/SAML/FederationConfig.properties defines the fedlet
properties:
#
# DO NOT ALTER OR REMOVE COPYRIGHT NOTICES OR THIS HEADER.
#
# Copyright (c) 2006 Sun Microsystems Inc. All Rights Reserved
#
# The contents of this file are subject to the terms
# of the Common Development and Distribution License
# (the License). You may not use this file except in
# compliance with the License.
#
# You can obtain a copy of the License at
# https://opensso.dev.java.net/public/CDDLv1.0.html or
# opensso/legal/CDDLv1.0.txt
# See the License for the specific language governing
# permission and limitations under the License.
#
# When distributing Covered Code, include this CDDL
# Header Notice in each file and include the License file
# at opensso/legal/CDDLv1.0.txt.
# If applicable, add the following below the CDDL Header,
# with the fields enclosed by brackets [] replaced by
# your own identifying information:
# "Portions Copyrighted [year] [name of copyright owner]"
#
# $Id: FederationConfig.properties,v 1.21 2010/01/08 22:41:28 exu Exp $
#
# Portions Copyright 2016-2023 ForgeRock AS.

# If a component wants to use a different datastore provider than the
# default one defined above, it can define a property like follows:
# com.sun.identity.plugin.datastore.class.<componentName>=<provider class>

# com.sun.identity.plugin.configuration.class specifies implementation for
# com.sun.identity.plugin.configuration.ConfigurationInstance interface.
com.sun.identity.plugin.configuration.class=com.sun.identity.plugin.configuration.impl.FedletConfigurationImpl

# Specifies implementation for
# com.sun.identity.plugin.datastore.DataStoreProvider interface.
# This property defines the default datastore provider.
com.sun.identity.plugin.datastore.class.default=com.sun.identity.plugin.datastore.impl.FedletDataStoreProvider

# Specifies implementation for
# org.forgerock.openam.federation.plugin.rooturl.RootUrlProvider interface.
# This property defines the default base url provider.
com.sun.identity.plugin.root.url.class.default=org.forgerock.openam.federation.plugin.rooturl.impl.FedletRootUrlProvider

# com.sun.identity.plugin.log.class specifies implementation for
# com.sun.identity.plugin.log.Logger interface.
com.sun.identity.plugin.log.class=com.sun.identity.plugin.log.impl.FedletLogger

# com.sun.identity.plugin.session.class specifies implementation for
# com.sun.identity.plugin.session.SessionProvider interface.
com.sun.identity.plugin.session.class=com.sun.identity.plugin.session.impl.FedletSessionProvider

# com.sun.identity.plugin.monitoring.agent.class specifies implementation for
# com.sun.identity.plugin.monitoring.FedMonAgent interface.
com.sun.identity.plugin.monitoring.agent.class=com.sun.identity.plugin.monitoring.impl.FedletAgentProvider

# com.sun.identity.plugin.monitoring.saml2.class specifies implementation for
# com.sun.identity.plugin.monitoring.FedMonSAML2Svc interface.
com.sun.identity.plugin.monitoring.saml2.class=com.sun.identity.plugin.monitoring.impl.FedletMonSAML2SvcProvider

# com.sun.identity.saml.xmlsig.keyprovider.class specified the implementation
# class for com.sun.identity.saml.xmlsig.KeyProvider interface
com.sun.identity.saml.xmlsig.keyprovider.class=com.sun.identity.saml.xmlsig.JKSKeyProvider

# com.sun.identity.saml.xmlsig.signatureprovider.class specified the
# implementation class for com.sun.identity.saml.xmlsig.SignatureProvider
# interface
com.sun.identity.saml.xmlsig.signatureprovider.class=com.sun.identity.saml.xmlsig.AMSignatureProvider

com.iplanet.am.server.protocol=http
com.iplanet.am.server.host=am.example.com
com.iplanet.am.server.port=8080
com.iplanet.am.services.deploymentDescriptor=/openam
com.iplanet.am.logstatus=ACTIVE

# Name of the webcontainer.
# Even though the servlet/JSP are web container independent,
# Access/Federation Manager uses servlet 2.3 API request.setCharacterEncoding()
# to decode incoming non English characters. These APIs will not work if
# Access/Federation Manager is deployed on Sun Java System Web Server 6.1.
# We use gx_charset mechanism to correctly decode incoming data in
# Sun Java System Web Server 6.1 and S1AS7.0. Possible values
# are BEA6.1, BEA 8.1, IBM5.1 or IAS7.0.
# If the web container is Sun Java System Webserver, the tag is not replaced.
com.sun.identity.webcontainer=WEB_CONTAINER

# Identify saml xml signature keystore file, keystore password file
# key password file
com.sun.identity.saml.xmlsig.keystore=%BASE_DIR%/security/keystores/keystore.jks
com.sun.identity.saml.xmlsig.storepass=%BASE_DIR%/.storepass
com.sun.identity.saml.xmlsig.keypass=%BASE_DIR%/.keypass
com.sun.identity.saml.xmlsig.certalias=test

# Type of keystore used for saml xml signature. Default is JKS.
#
# com.sun.identity.saml.xmlsig.storetype=JKS

# Specifies the implementation class for
# com.sun.identity.saml.xmlsig.PasswordDecoder interface.
com.sun.identity.saml.xmlsig.passwordDecoder=com.sun.identity.fedlet.FedletEncodeDecode

# The following key is used to specify the maximum content-length
# for an HttpRequest that will be accepted by the OpenSSO
# The default value is 16384 which is 16k
com.iplanet.services.comm.server.pllrequest.maxContentLength=16384

# The following keys are used to configure the Debug service.
# Possible values for the key 'level' are: off | error | warning | message.
# The key 'directory' specifies the output directory where the debug files
# will be created.
# Trailing spaces are significant.
# Windows: Use forward slashes "/" separate directories, not backslash "\".
# Windows: Spaces in the file name are allowed for Windows.
#
com.iplanet.services.debug.level=message
com.iplanet.services.debug.directory=%BASE_DIR%%SERVER_URI%/debug

# The following keys are used to configure the Stats service.
# Possible values for the key 'level' are: off | file | console
# Stats state 'file' will write to a file under the specified directory,
# and 'console' will write into  webserver log files
# The key 'directory' specifies the output directory where the debug files
# will be created.
# Trailing spaces are significant.
# Windows: Use forward slashes "/" separate directories, not backslash "\".
# Windows: Spaces in the file name are allowed for Windows.
# Stats interval should be atleast 5 secs to avoid CPU saturation,
# the product would assume any thing less than 5 secs is 5 secs.
com.iplanet.am.stats.interval=60
com.iplanet.services.stats.state=file
com.iplanet.services.stats.directory=%BASE_DIR%/var/stats

# The key that will be used to encrypt and decrypt passwords.
am.encryption.pwd=@AM_ENC_PWD@

# SecureRandom Properties: The key
# "com.iplanet.security.SecureRandomFactoryImpl"
# specifies the factory class name for SecureRandomFactory
# Available impl classes are:
#   com.iplanet.am.util.JSSSecureRandomFactoryImpl (uses JSS)
#   com.iplanet.am.util.SecureRandomFactoryImpl (pure Java)
com.iplanet.security.SecureRandomFactoryImpl=com.iplanet.am.util.SecureRandomFactoryImpl

# SocketFactory properties: The key "com.iplanet.security.SSLSocketFactoryImpl"
# specifies the factory class name for LDAPSocketFactory
# Available classes are:
#    com.iplanet.services.ldap.JSSSocketFactory (uses JSS)
#    com.sun.identity.shared.ldap.factory.JSSESocketFactory    (pure Java)
com.iplanet.security.SSLSocketFactoryImpl=com.sun.identity.shared.ldap.factory.JSSESocketFactory

# Encryption: The key "com.iplanet.security.encryptor" specifies
# the encrypting class implementation.
# Available classes are:
#    com.iplanet.services.util.JCEEncryption
#    com.iplanet.services.util.JSSEncryption
com.iplanet.security.encryptor=com.iplanet.services.util.JCEEncryption

# Determines if JSS will be added with highest priority to JCE
# Set this to "true" if other JCE providers should be used for
# digial signatures and encryptions.
com.sun.identity.jss.donotInstallAtHighestPriority=true

# Configuration File (serverconfig.xml) Location
com.iplanet.services.configpath=@BASE_DIR@The following example of $HOME/.openig/SAML/fedlet.cot defines a circle
of trust between AM as the IDP, and IG as the SP:
cot-name=Circle of Trust
sun-fm-cot-status=Active
sun-fm-trusted-providers=openam, sp
sun-fm-saml2-readerservice-url=
sun-fm-saml2-writerservice-url=The following example of $HOME/.openig/SAML/idp.xml defines a SAML
configuration file for the AM IDP, idp:
<?xml version="1.0" encoding="UTF-8" standalone="yes"?>
<EntityDescriptor entityID="openam" xmlns="urn:oasis:names:tc:SAML:2.0:metadata" xmlns:query="urn:oasis:names:tc:SAML:metadata:ext:query" xmlns:mdattr="urn:oasis:names:tc:SAML:metadata:attribute" xmlns:saml="urn:oasis:names:tc:SAML:2.0:assertion" xmlns:xenc="http://www.w3.org/2001/04/xmlenc#" xmlns:xenc11="http://www.w3.org/2009/xmlenc11#" xmlns:alg="urn:oasis:names:tc:SAML:metadata:algsupport" xmlns:x509qry="urn:oasis:names:tc:SAML:metadata:X509:query" xmlns:ds="http://www.w3.org/2000/09/xmldsig#">
    <IDPSSODescriptor protocolSupportEnumeration="urn:oasis:names:tc:SAML:2.0:protocol">
        <KeyDescriptor use="signing">
            <ds:KeyInfo>
                <ds:X509Data>
                    <ds:X509Certificate>
...
                    </ds:X509Certificate>
                </ds:X509Data>
            </ds:KeyInfo>
        </KeyDescriptor>
        <KeyDescriptor use="encryption">
            <ds:KeyInfo>
                <ds:X509Data>
                    <ds:X509Certificate>
...
                    </ds:X509Certificate>
                </ds:X509Data>
            </ds:KeyInfo>
            <EncryptionMethod Algorithm="http://www.w3.org/2009/xmlenc11#rsa-oaep">
                <ds:DigestMethod Algorithm="http://www.w3.org/2001/04/xmlenc#sha256"/>
                <xenc11:MGF Algorithm="http://www.w3.org/2009/xmlenc11#mgf1sha256"/>
            </EncryptionMethod>
            <EncryptionMethod Algorithm="http://www.w3.org/2001/04/xmlenc#aes128-cbc">
                <xenc:KeySize>128</xenc:KeySize>
            </EncryptionMethod>
        </KeyDescriptor>
        <ArtifactResolutionService index="0" Binding="urn:oasis:names:tc:SAML:2.0:bindings:SOAP" Location="http://am.example.com:8088/openam/ArtifactResolver/metaAlias/idp"/>
        <SingleLogoutService Binding="urn:oasis:names:tc:SAML:2.0:bindings:HTTP-Redirect" Location="http://am.example.com:8088/openam/IDPSloRedirect/metaAlias/idp" ResponseLocation="http://am.example.com:8088/openam/IDPSloRedirect/metaAlias/idp"/>
        <SingleLogoutService Binding="urn:oasis:names:tc:SAML:2.0:bindings:HTTP-POST" Location="http://am.example.com:8088/openam/IDPSloPOST/metaAlias/idp" ResponseLocation="http://am.example.com:8088/openam/IDPSloPOST/metaAlias/idp"/>
        <SingleLogoutService Binding="urn:oasis:names:tc:SAML:2.0:bindings:SOAP" Location="http://am.example.com:8088/openam/IDPSloSoap/metaAlias/idp"/>
        <ManageNameIDService Binding="urn:oasis:names:tc:SAML:2.0:bindings:HTTP-Redirect" Location="http://am.example.com:8088/openam/IDPMniRedirect/metaAlias/idp" ResponseLocation="http://am.example.com:8088/openam/IDPMniRedirect/metaAlias/idp"/>
        <ManageNameIDService Binding="urn:oasis:names:tc:SAML:2.0:bindings:HTTP-POST" Location="http://am.example.com:8088/openam/IDPMniPOST/metaAlias/idp" ResponseLocation="http://am.example.com:8088/openam/IDPMniPOST/metaAlias/idp"/>
        <ManageNameIDService Binding="urn:oasis:names:tc:SAML:2.0:bindings:SOAP" Location="http://am.example.com:8088/openam/IDPMniSoap/metaAlias/idp"/>
        <NameIDFormat>urn:oasis:names:tc:SAML:2.0:nameid-format:persistent</NameIDFormat>
        <NameIDFormat>urn:oasis:names:tc:SAML:2.0:nameid-format:transient</NameIDFormat>
        <NameIDFormat>urn:oasis:names:tc:SAML:1.1:nameid-format:emailAddress</NameIDFormat>
        <NameIDFormat>urn:oasis:names:tc:SAML:1.1:nameid-format:unspecified</NameIDFormat>
        <NameIDFormat>urn:oasis:names:tc:SAML:1.1:nameid-format:WindowsDomainQualifiedName</NameIDFormat>
        <NameIDFormat>urn:oasis:names:tc:SAML:2.0:nameid-format:kerberos</NameIDFormat>
        <NameIDFormat>urn:oasis:names:tc:SAML:1.1:nameid-format:X509SubjectName</NameIDFormat>
        <SingleSignOnService Binding="urn:oasis:names:tc:SAML:2.0:bindings:HTTP-Redirect" Location="http://am.example.com:8088/openam/SSORedirect/metaAlias/idp"/>
        <SingleSignOnService Binding="urn:oasis:names:tc:SAML:2.0:bindings:HTTP-POST" Location="http://am.example.com:8088/openam/SSOPOST/metaAlias/idp"/>
        <SingleSignOnService Binding="urn:oasis:names:tc:SAML:2.0:bindings:SOAP" Location="http://am.example.com:8088/openam/SSOSoap/metaAlias/idp"/>
        <NameIDMappingService Binding="urn:oasis:names:tc:SAML:2.0:bindings:SOAP" Location="http://am.example.com:8088/openam/NIMSoap/metaAlias/idp"/>
        <AssertionIDRequestService Binding="urn:oasis:names:tc:SAML:2.0:bindings:SOAP" Location="http://am.example.com:8088/openam/AIDReqSoap/IDPRole/metaAlias/idp"/>
        <AssertionIDRequestService Binding="urn:oasis:names:tc:SAML:2.0:bindings:URI" Location="http://am.example.com:8088/openam/AIDReqUri/IDPRole/metaAlias/idp"/>
    </IDPSSODescriptor>
</EntityDescriptor>The following example of $HOME/.openig/SAML/idp-extended.xml defines an
AM-specific SAML descriptor file for the IDP:
<?xml version="1.0" encoding="UTF-8" standalone="yes"?>
<!--
   DO NOT ALTER OR REMOVE COPYRIGHT NOTICES OR THIS HEADER.

   Copyright (c) 2002-2010 Sun Microsystems Inc. All Rights Reserved

   The contents of this file are subject to the terms
   of the Common Development and Distribution License
   (the License). You may not use this file except in
   compliance with the License.

   You can obtain a copy of the License at
   https://opensso.dev.java.net/public/CDDLv1.0.html or
   opensso/legal/CDDLv1.0.txt
   See the License for the specific language governing
   permission and limitations under the License.

   When distributing Covered Code, include this CDDL
   Header Notice in each file and include the License file
   at opensso/legal/CDDLv1.0.txt.
   If applicable, add the following below the CDDL Header,
   with the fields enclosed by brackets [] replaced by
   your own identifying information:
   "Portions Copyrighted [year] [name of copyright owner]"

   Portions Copyrighted 2010-2017 ForgeRock AS.
-->
<EntityConfig entityID="openam" hosted="0" xmlns="urn:sun:fm:SAML:2.0:entityconfig">
    <IDPSSOConfig>
        <Attribute name="description">
            <Value/>
        </Attribute>
        <Attribute name="cotlist">
            <Value>Circle of Trust</Value>
        </Attribute>
    </IDPSSOConfig>
    <AttributeAuthorityConfig>
        <Attribute name="cotlist">
            <Value>Circle of Trust</Value>
        </Attribute>
    </AttributeAuthorityConfig>
    <XACMLPDPConfig>
        <Attribute name="wantXACMLAuthzDecisionQuerySigned">
            <Value></Value>
        </Attribute>
        <Attribute name="cotlist">
            <Value>Circle of Trust</Value>
        </Attribute>
    </XACMLPDPConfig>
</EntityConfig>|
The SAML library component validates the SP’s AssertionConsumerService
Location against the incoming IDP SAML Assertion, based on the request
information, including the port. Always specify the port in the Location
value of xml |
The following example of $HOME/.openig/SAML/sp.xml defines a SAML
configuration file for the IG SP, sp.
<!--
   DO NOT ALTER OR REMOVE COPYRIGHT NOTICES OR THIS HEADER.

   Copyright (c) 2002-2010 Sun Microsystems Inc. All Rights Reserved

   The contents of this file are subject to the terms
   of the Common Development and Distribution License
   (the License). You may not use this file except in
   compliance with the License.

   You can obtain a copy of the License at
   https://opensso.dev.java.net/public/CDDLv1.0.html or
   opensso/legal/CDDLv1.0.txt
   See the License for the specific language governing
   permission and limitations under the License.

   When distributing Covered Code, include this CDDL
   Header Notice in each file and include the License file
   at opensso/legal/CDDLv1.0.txt.
   If applicable, add the following below the CDDL Header,
   with the fields enclosed by brackets [] replaced by
   your own identifying information:
   "Portions Copyrighted [year] [name of copyright owner]"

   Portions Copyrighted 2010-2017 ForgeRock AS.
-->
<EntityDescriptor entityID="sp" xmlns="urn:oasis:names:tc:SAML:2.0:metadata">
    <SPSSODescriptor AuthnRequestsSigned="false" WantAssertionsSigned="false" protocolSupportEnumeration="urn:oasis:names:tc:SAML:2.0:protocol">
        <SingleLogoutService Binding="urn:oasis:names:tc:SAML:2.0:bindings:HTTP-Redirect" Location="http://sp.example.com:8080/saml/fedletSloRedirect" ResponseLocation="http://sp.example.com:8080/saml/fedletSloRedirect"/>
        <SingleLogoutService Binding="urn:oasis:names:tc:SAML:2.0:bindings:HTTP-POST" Location="http://sp.example.com:8080/saml/fedletSloPOST" ResponseLocation="http://sp.example.com:8080/saml/fedletSloPOST"/>
        <SingleLogoutService Binding="urn:oasis:names:tc:SAML:2.0:bindings:SOAP" Location="http://sp.example.com:8080/saml/fedletSloSoap"/>
        <NameIDFormat>urn:oasis:names:tc:SAML:2.0:nameid-format:transient</NameIDFormat>
        <AssertionConsumerService isDefault="true" index="0" Binding="urn:oasis:names:tc:SAML:2.0:bindings:HTTP-POST" Location="http://sp.example.com:8080/saml/fedletapplication/metaAlias/sp"/>
        <AssertionConsumerService index="1" Binding="urn:oasis:names:tc:SAML:2.0:bindings:HTTP-Artifact" Location="http://sp.example.com:8080/saml/fedletapplication/metaAlias/sp"/>
    </SPSSODescriptor>
    <RoleDescriptor xmlns:xsi="http://www.w3.org/2001/XMLSchema-instance" xmlns:query="urn:oasis:names:tc:SAML:metadata:ext:query" xsi:type="query:AttributeQueryDescriptorType" protocolSupportEnumeration= "urn:oasis:names:tc:SAML:2.0:protocol">
    </RoleDescriptor>
    <XACMLAuthzDecisionQueryDescriptor WantAssertionsSigned="false" protocolSupportEnumeration="urn:oasis:names:tc:SAML:2.0:protocol">
    </XACMLAuthzDecisionQueryDescriptor>
</EntityDescriptor>The following example of $HOME/.openig/SAML/sp-extended.xml defines an
AM-specific SAML descriptor file for the SP:
<!--
   DO NOT ALTER OR REMOVE COPYRIGHT NOTICES OR THIS HEADER.

   Copyright (c) 2002-2010 Sun Microsystems Inc. All Rights Reserved

   The contents of this file are subject to the terms
   of the Common Development and Distribution License
   (the License). You may not use this file except in
   compliance with the License.

   You can obtain a copy of the License at
   https://opensso.dev.java.net/public/CDDLv1.0.html or
   opensso/legal/CDDLv1.0.txt
   See the License for the specific language governing
   permission and limitations under the License.

   When distributing Covered Code, include this CDDL
   Header Notice in each file and include the License file
   at opensso/legal/CDDLv1.0.txt.
   If applicable, add the following below the CDDL Header,
   with the fields enclosed by brackets [] replaced by
   your own identifying information:
   "Portions Copyrighted [year] [name of copyright owner]"

   Portions Copyrighted 2010-2017 ForgeRock AS.
-->
<EntityConfig xmlns="urn:sun:fm:SAML:2.0:entityconfig" xmlns:fm="urn:sun:fm:SAML:2.0:entityconfig" hosted="1" entityID="sp">
    <SPSSOConfig metaAlias="/sp">
        <Attribute name="description">
            <Value></Value>
        </Attribute>
        <Attribute name="signingCertAlias">
            <Value></Value>
        </Attribute>
        <Attribute name="encryptionCertAlias">
            <Value></Value>
        </Attribute>
        <Attribute name="basicAuthOn">
            <Value>false</Value>
        </Attribute>
        <Attribute name="basicAuthUser">
            <Value></Value>
        </Attribute>
        <Attribute name="basicAuthPassword">
            <Value></Value>
        </Attribute>
        <Attribute name="autofedEnabled">
            <Value>false</Value>
        </Attribute>
        <Attribute name="autofedAttribute">
            <Value></Value>
        </Attribute>
        <Attribute name="transientUser">
            <Value>anonymous</Value>
        </Attribute>
        <Attribute name="spAdapter">
            <Value></Value>
        </Attribute>
        <Attribute name="spAdapterEnv">
            <Value></Value>
        </Attribute>
        <Attribute name="fedletAdapter">
            <Value></Value>
        </Attribute>
        <Attribute name="fedletAdapterEnv">
            <Value></Value>
        </Attribute>
        <Attribute name="spAccountMapper">
            <Value>com.sun.identity.saml2.plugins.DefaultLibrarySPAccountMapper</Value>
        </Attribute>
        <Attribute name="spAttributeMapper">
            <Value>com.sun.identity.saml2.plugins.DefaultSPAttributeMapper</Value>
        </Attribute>
        <Attribute name="spAuthncontextMapper">
            <Value>com.sun.identity.saml2.plugins.DefaultSPAuthnContextMapper</Value>
        </Attribute>
        <Attribute name="spAuthncontextClassrefMapping">
            <Value>urn:oasis:names:tc:SAML:2.0:ac:classes:PasswordProtectedTransport|0|default</Value>
        </Attribute>
        <Attribute name="spAuthncontextComparisonType">
           <Value>exact</Value>
        </Attribute>
        <Attribute name="attributeMap">
           <Value>*=*</Value>
        </Attribute>
        <Attribute name="saml2AuthModuleName">
           <Value></Value>
       </Attribute>
       <Attribute name="localAuthURL">
           <Value></Value>
       </Attribute>
       <Attribute name="intermediateUrl">
           <Value></Value>
       </Attribute>
       <Attribute name="defaultRelayState">
           <Value></Value>
       </Attribute>
       <Attribute name="appLogoutUrl">
           <Value>http://sp.example.com:8080/saml/logout</Value>
       </Attribute>
       <Attribute name="assertionTimeSkew">
           <Value>300</Value>
       </Attribute>
       <Attribute name="wantAttributeEncrypted">
           <Value></Value>
       </Attribute>
       <Attribute name="wantAssertionEncrypted">
           <Value></Value>
       </Attribute>
       <Attribute name="wantNameIDEncrypted">
           <Value></Value>
       </Attribute>
       <Attribute name="wantPOSTResponseSigned">
           <Value></Value>
       </Attribute>
       <Attribute name="wantArtifactResponseSigned">
           <Value></Value>
       </Attribute>
       <Attribute name="wantLogoutRequestSigned">
           <Value></Value>
       </Attribute>
       <Attribute name="wantLogoutResponseSigned">
           <Value></Value>
       </Attribute>
       <Attribute name="wantMNIRequestSigned">
           <Value></Value>
       </Attribute>
       <Attribute name="wantMNIResponseSigned">
           <Value></Value>
       </Attribute>
       <Attribute name="cotlist">
           <Value>Circle of Trust</Value></Attribute>
       <Attribute name="saeAppSecretList">
       </Attribute>
       <Attribute name="saeSPUrl">
           <Value></Value>
       </Attribute>
       <Attribute name="saeSPLogoutUrl">
       </Attribute>
       <Attribute name="ECPRequestIDPListFinderImpl">
           <Value>com.sun.identity.saml2.plugins.ECPIDPFinder</Value>
       </Attribute>
       <Attribute name="ECPRequestIDPList">
           <Value></Value>
       </Attribute>
       <Attribute name="enableIDPProxy">
           <Value>false</Value>
       </Attribute>
       <Attribute name="idpProxyList">
           <Value></Value>
       </Attribute>
       <Attribute name="idpProxyCount">
           <Value>0</Value>
       </Attribute>
       <Attribute name="useIntroductionForIDPProxy">
           <Value>false</Value>
       </Attribute>
    </SPSSOConfig>
    <AttributeQueryConfig metaAlias="/attrQuery">
        <Attribute name="signingCertAlias">
            <Value></Value>
        </Attribute>
        <Attribute name="encryptionCertAlias">
            <Value></Value>
        </Attribute>
        <Attribute name="wantNameIDEncrypted">
           <Value></Value>
        </Attribute>
        <Attribute name="cotlist">
           <Value>Circle of Trust</Value>
        </Attribute>
    </AttributeQueryConfig>
    <XACMLAuthzDecisionQueryConfig metaAlias="/pep">
        <Attribute name="signingCertAlias">
            <Value></Value>
        </Attribute>
        <Attribute name="encryptionCertAlias">
            <Value></Value>
        </Attribute>
        <Attribute name="basicAuthOn">
            <Value>false</Value>
        </Attribute>
        <Attribute name="basicAuthUser">
            <Value></Value>
        </Attribute>
        <Attribute name="basicAuthPassword">
            <Value></Value>
        </Attribute>
        <Attribute name="wantXACMLAuthzDecisionResponseSigned">
            <Value></Value>
        </Attribute>
        <Attribute name="wantAssertionEncrypted">
            <Value></Value>
        </Attribute>
        <Attribute name="cotlist">
            <Value>Circle of Trust</Value>
        </Attribute>
   </XACMLAuthzDecisionQueryConfig>
</EntityConfig>Token transformation
Transform OpenID Connect ID tokens into SAML assertions
This chapter builds on the example in OpenID Connect to transform OpenID Connect ID tokens into SAML 2.0 assertions.
Many enterprises use existing or legacy, SAML 2.0-based SSO, but many mobile and social applications are managed by OpenID Connect. Use the IG TokenTransformationFilter to bridge the gap between OpenID Connect and SAML 2.0 frameworks.
The following figure illustrates the data flow:

-
A user tries to access to a protected resource.
-
If the user is not authenticated, the AuthorizationCodeOAuth2ClientFilter redirects the request to AM. After authentication, AM asks for the user’s consent to give IG access to private information.
-
If the user consents, AM returns an id_token to the AuthorizationCodeOAuth2ClientFilter. The filter opens the id_token JWT and makes it available in
attributes.openid .id_tokenandattributes.openid.id_token_claimsfor downstream filters. -
The TokenTransformationFilter calls the AM STS to transform the id_token into a SAML 2.0 assertion.
-
The STS validates the signature, decodes the payload, and verifies that the user issued the transaction. The STS then issues a SAML assertion to IG on behalf of the user.
-
The TokenTransformationFilter makes the result of the token transformation available to downstream handlers in the
issuedTokenproperty of the${contexts.sts}context.
The following sequence diagram shows a more detailed view of the flow:

-
Set up an AM Security Token Service (STS), where the subject confirmation method is Bearer. For more information about setting up a REST STS instance, see AM’s Security Token Service (STS) guide.
-
Set up AM as described in Use AM as a single OpenID Connect provider.
-
Select Applications > Agents > Identity Gateway and register an IG agent with the following values:
-
Agent ID:
ig_agent -
Password:
passwordFor AM 6.5.x and earlier versions, register an agent as described in Register an IG agent in AM 6.5 and earlier.
Use secure passwords in a production environment. Consider using a password manager to generate secure passwords.
-
-
(Optional) Authenticate the agent to AM as described in Authenticate an IG agent to AM.
IG agents are automatically authenticated to AM by a deprecated authentication module in AM. This step is currently optional, but will be required when authentication chains and modules are removed in a future release of AM. -
Create a Bearer Module:
-
In the top level realm, select Authentication > Modules, and add a module with the following values:
-
Module name :
oidc -
Type :
OpenID Connect id_token bearer
-
-
In the configuration page, enter the following values:
-
OpenID Connect validation configuration type :
Client Secret -
OpenID Connect validation configuration value :
passwordThis is the password of the OAuth 2.0/OpenID Connect client.
-
Client secret :
password -
Name of OpenID Connect ID Token Issuer :
http://am.example.com:8088/openam/oauth2 -
Audience name :
oidc_clientThis is the name of the OAuth 2.0/OpenID Connect client.
-
List of accepted authorized parties :
oidc_clientLeave all other values as default, and save your settings.
-
-
-
Create an instance of STS REST.
-
In the top level realm, select STS, and add a Rest STS instance with the following values:
-
Deployment URL Element :
openigThis value identifies the STS instance and is used by the
instanceparameter in the TokenTransformationFilter. -
SAML2 Token
For STS, it isn’t necessary to create a SAML SP configuration in AM. -
SAML2 issuer Id :
OpenAM -
Service Provider Entity Id :
openig_sp -
NameIdFormat : Select
urn:oasis:names:tc:SAML:2.0:nameid-format:transient
-
-
OpenID Connect Token
-
OpenID Connect Token Provider Issuer Id :
oidc -
Token signature algorithm : Enter a value that is consistent with Use AM as a single OpenID Connect provider, for example,
HMAC SHA 256 -
Client Secret :
password -
Issued Tokens Audience :
oidc_client
-
-
-
On the SAML 2 Token tab, add the following Attribute Mappings:
-
Key :
userName, Value :uid -
Key :
password, Value :mail
-
-
-
Log out of AM.
-
-
Set up IG:
-
Set an environment variable for
oidc_clientandig_agent, and then restart IG:$ export OIDC_SECRET_ID='cGFzc3dvcmQ=' $ export AGENT_SECRET_ID='cGFzc3dvcmQ='bash -
Add the following route to IG:
-
Linux
-
Windows
$HOME/.openig/config/routes/50-idtoken.json
%appdata%\OpenIG\config\routes\50-idtoken.json
{ "name": "50-idtoken", "baseURI": "http://app.example.com:8081", "condition": "${find(request.uri.path, '^/home/id_token')}", "heap": [ { "name": "SystemAndEnvSecretStore-1", "type": "SystemAndEnvSecretStore" }, { "name": "AuthenticatedRegistrationHandler-1", "type": "Chain", "config": { "filters": [ { "name": "ClientSecretBasicAuthenticationFilter-1", "type": "ClientSecretBasicAuthenticationFilter", "config": { "clientId": "oidc_client", "clientSecretId": "oidc.secret.id", "secretsProvider": "SystemAndEnvSecretStore-1" } } ], "handler": "ForgeRockClientHandler" } }, { "name": "AmService-1", "type": "AmService", "config": { "agent": { "username": "ig_agent", "passwordSecretId": "agent.secret.id" }, "secretsProvider": "SystemAndEnvSecretStore-1", "url": "http://am.example.com:8088/openam/" } } ], "handler": { "type": "Chain", "config": { "filters": [ { "name": "AuthorizationCodeOAuth2ClientFilter-1", "type": "AuthorizationCodeOAuth2ClientFilter", "config": { "clientEndpoint": "/home/id_token", "failureHandler": { "type": "StaticResponseHandler", "config": { "status": 500, "headers": { "Content-Type": [ "text/plain" ] }, "entity": "An error occurred during the OAuth2 setup." } }, "registrations": [ { "name": "oidc-user-info-client", "type": "ClientRegistration", "config": { "clientId": "oidc_client", "issuer": { "name": "Issuer", "type": "Issuer", "config": { "wellKnownEndpoint": "http://am.example.com:8088/openam/oauth2/.well-known/openid-configuration" } }, "scopes": [ "openid", "profile", "email" ], "authenticatedRegistrationHandler": "AuthenticatedRegistrationHandler-1" } } ], "requireHttps": false, "cacheExpiration": "disabled" } }, { "name": "TokenTransformationFilter-1", "type": "TokenTransformationFilter", "config": { "idToken": "${attributes.openid.id_token}", "instance": "openig", "amService": "AmService-1" } } ], "handler": { "type": "StaticResponseHandler", "config": { "status": 200, "headers": { "Content-Type": [ "text/plain; charset=UTF-8" ] }, "entity": "{\"id_token\":\n\"${attributes.openid.id_token}\"} \n\n\n{\"saml_assertions\":\n\"${contexts.sts.issuedToken}\"}" } } } } }jsonFor information about how to set up the IG route in Studio, refer to Token transformation in Structured Editor.
Notice the following features of the route:
-
The route matches requests to
/home/id_token. -
The AmService in the heap is used for authentication and REST STS requests.
-
The AuthorizationCodeOAuth2ClientFilter enables IG to act as an OpenID Connect relying party:
-
The client endpoint is set to
/home/id_token, so the service URIs for this filter on the IG server are/home/id_token/login,/home/id_token/logout, and/home/id_token/callback. -
For convenience in this test,
requireHttpsis false. In production environments, set it to true. So that you see the delegated authorization process when you make a request,requireLoginis true. -
The target for storing authorization state information is
${attributes.openid}. Subsequent filters and handlers can find access tokens and user information at this target.
-
-
The ClientRegistration holds configuration provided in Use AM as a single OpenID Connect provider, and used by IG to connect with AM.
-
The TokenTransformationFilter transforms an id_token into a SAML assertion:
-
The
id_tokenparameter defines where this filter gets the id_token created by theAuthorizationCodeOAuth2ClientFilter.The TokenTransformationFilter makes the result of the token transformation available to downstream handlers in the
issuedTokenproperty of the${contexts.sts}context. -
The
instanceparameter must match theDeployment URL Elementfor the REST STS instance.Errors that occur during token transformation cause an error response to be returned to the client and an error message to be logged for the IG administrator.
-
-
When the request succeeds, a StaticResponseHandler retrieves and displays the id_token from the target
{attributes.openid.id_token}.
-
-
-
Test the setup:
-
Go to http://ig.example.com:8080/home/id_token.
The AM login screen is displayed.
-
Log in to AM as username
demo, passwordCh4ng31t.An OpenID Connect request to access private information is displayed.
-
Select Allow.
The id_token and SAML assertions are displayed:
{"id_token": "eyA . . ."}

{"saml_assertions": "<\"saml:Assertion xmlns:saml=\"urn:oasis:names:tc:SAML:2.0:assertion\" Version= . . ."}
json
-
OAuth 2.0 token exchange
The following sections describe how to exchange an OAuth 2.0 access token for another access token, with AM as an Authorization Server. Other authorization providers can be used instead of AM.
Token exchange requires a subject token and provides an issued token. The subject token is the original access token, obtained using the OAuth 2.0/OpenID Connect flow. The issued token is provided in exchange for the subject token.
The token exchange can be conducted only by an OAuth 2.0 client that "may act" on the subject token, as configured in the authorization service.
This example is a typical scenario for token impersonation. For more information, refer to Token exchange in AM’s OAuth 2.0 guide.
The following sequence diagram shows the flow of information during token exchange between IG and AM:

| This procedure uses the Resource Owner Password Credentials grant type. According to information in the The OAuth 2.0 Authorization Framework, minimize use of this grant type and utilize other grant types whenever possible. |
Before you start, prepare AM, IG, and the sample application as described in Example installation for this guide.
-
Set up AM:
-
(From AM 6.5.3) Select Services > Add a Service, and add a Validation Service with the following Valid goto URL Resources:
-
http://ig.example.com:8080/* -
http://ig.example.com:8080/*?*
-
-
Select Applications > Agents > Identity Gateway, and register an IG agent with the following values:
-
Agent ID:
ig_agent -
Password:
password -
Token Introspection:
Realm OnlyUse secure passwords in a production environment. Consider using a password manager to generate secure passwords.
-
-
(Optional) Authenticate the agent to AM as described in Authenticate an IG agent to AM.
IG agents are automatically authenticated to AM by a deprecated authentication module in AM. This step is currently optional, but will be required when authentication chains and modules are removed in a future release of AM. -
Select Services > Add a Service, and add an OAuth2 Provider service with the following values:
-
OAuth2 Access Token May Act Script :
OAuth2 May Act Script -
OAuth2 ID Token May Act Script :
OAuth2 May Act Script
-
-
Select Scripts# > OAuth2 May Act Script, and replace the example script with the following script:
import org.forgerock.json.JsonValue
token.setMayAct(
    JsonValue.json(JsonValue.object(
        JsonValue.field("client_id", "serviceConfidentialClient"))))
This script adds a
may_actclaim to the token, indicating that the OAuth 2.0 client,serviceConfidentialClient, may act to exchange the subject token in the impersonation use case. -
Add an OAuth 2.0 Client to request OAuth 2.0 access tokens:
-
Select Applications > OAuth 2.0 > Clients, and add a client with the following values:
-
Client ID :
client-application -
Client secret :
password -
Scope(s) :
mail,employeenumber
-
-
On the Advanced tab, select Grant Types :
Resource Owner Password Credentials.
-
-
Add an OAuth 2.0 client to perform the token exchange:
-
Select Applications > OAuth 2.0 > Clients, and add a client with the following values:
-
Client ID :
serviceConfidentialClient -
Client secret :
password -
Scope(s) :
mail,employeenumber
-
-
On the Advanced tab, select:
-
Grant Types :
Token Exchange -
Token Endpoint Authentication Methods :
client_secret_post
-
-
-
-
Set up IG:
-
Set an environment variable for the serviceConfidentialClient password:
$ export CLIENT_SECRET_ID='cGFzc3dvcmQ='bash -
Set an environment variable for the IG agent password, and then restart IG:
$ export AGENT_SECRET_ID='cGFzc3dvcmQ='bashThe password is retrieved by a SystemAndEnvSecretStore, and must be base64-encoded.
-
Add the following route to IG to exchange the access token:
-
Linux
-
Windows
$HOME/.openig/config/routes/token-exchange.json
%appdata%\OpenIG\config\routes\token-exchange.json
{ "name": "token-exchange", "baseURI": "http://app.example.com:8081", "condition": "${find(request.uri.path, '^/token-exchange')}", "heap": [ { "name": "SystemAndEnvSecretStore-1", "type": "SystemAndEnvSecretStore" }, { "name": "AmService-1", "type": "AmService", "config": { "agent": { "username": "ig_agent", "passwordSecretId": "agent.secret.id" }, "secretsProvider": "SystemAndEnvSecretStore-1", "url": "http://am.example.com:8088/openam/" } }, { "name": "ExchangeHandler", "type": "Chain", "capture": "all", "config": { "handler": "ForgeRockClientHandler", "filters": [ { "type": "ClientSecretBasicAuthenticationFilter", "config": { "clientId": "serviceConfidentialClient", "clientSecretId": "client.secret.id", "secretsProvider" : "SystemAndEnvSecretStore-1" } } ] } }, { "name": "ExchangeFailureHandler", "type": "StaticResponseHandler", "capture": "all", "config": { "status": 400, "entity": "${contexts.oauth2failure.error}: ${contexts.oauth2failure.description}", "headers": { "Content-Type": [ "application/json" ] } } } ], "handler": { "type": "Chain", "config": { "filters": [ { "name": "oauth2TokenExchangeFilter", "type": "OAuth2TokenExchangeFilter", "config": { "amService": "AmService-1", "endpointHandler": "ExchangeHandler", "subjectToken": "#{request.entity.form['subject_token'][0]}", "scopes": ["mail"], "failureHandler": "ExchangeFailureHandler" } } ], "handler": { "type": "StaticResponseHandler", "config": { "status": 200, "headers": { "content-type": [ "application/json" ] }, "entity": "{\"access_token\": \"${contexts.oauth2TokenExchange.issuedToken}\", \"issued_token_type\": \"${contexts.oauth2TokenExchange.issuedTokenType}\"}" } } } } }jsonNotice the following features of the route:
-
The route matches requests to
/token-exchange -
IG reads the
subjectTokenfrom the request entity. -
The StaticResponseHandler returns an issued token.
-
-
-
Test the setup:
-
In a terminal window, use a
curlcommand similar to the following to retrieve an access token, which is the subject token:$ subjecttoken=$(curl -s \ --user "client-application:password" \ --data "grant_type=password&username=demo&password=Ch4ng31t&scope=mail%20employeenumber" \ http://am.example.com:8088/openam/oauth2/access_token | jq -r ".access_token") \ && echo $subjecttoken hc-...c6Abash -
Introspect the subject token at the AM introspection endpoint:
$ curl --location \ --request POST 'http://am.example.com:8088/openam/oauth2/realms/root/introspect' \ --header 'Content-Type: application/x-www-form-urlencoded' \ --data-urlencode "token=${subjecttoken}" \ --data-urlencode 'client_id=client-application' \ --data-urlencode 'client_secret=password' Decoded access_token: { "active": true, "scope": "employeenumber mail", "realm": "/", "client_id": "client-application", "user_id": "demo", "username": "demo", "token_type": "Bearer", "exp": 1626796888, "sub": "(usr!demo)", "subname": "demo", "iss": "http://am.example.com:8088/openam/oauth2", "auth_level": 0, "authGrantId": "W-j...E1E", "may_act": { "client_id": "serviceConfidentialClient" }, "auditTrackingId": "4be...169" }bashNote that in the subject token, the
client_idisclient-application, and the scopes areemployeenumberandmail. Themay_actclaim indicates thatserviceConfidentialClientis authorized to exchange this token. -
Exchange the subject token for an issued token:
$ issuedtoken=$(curl \
--location \
--request POST 'http://ig.example.com:8080/token-exchange' \
--header 'Content-Type: application/x-www-form-urlencoded' \
--data "subject_token=${subjecttoken}" | jq -r ".access_token") \
&& echo $issuedtoken

F8e...Q3E
bash -
Introspect the issued token at the AM introspection endpoint:
$ curl --location \ --request POST 'http://am.example.com:8088/openam/oauth2/realms/root/introspect' \ --header 'Content-Type: application/x-www-form-urlencoded' \ --data-urlencode "token=${issuedtoken}" \ --data-urlencode 'client_id=serviceConfidentialClient' \ --data-urlencode 'client_secret=password' { "active": true, "scope": "mail", "realm": "/", "client_id": "serviceConfidentialClient", "user_id": "demo", "username": "demo", "token_type": "Bearer", "exp": 1629200490, "sub": "(usr!demo)", "subname": "demo", "iss": "http://am.example.com:8088/openam/oauth2", "auth_level": 0, "authGrantId": "aYK...EPA", "may_act": { "client_id": "serviceConfidentialClient" }, "auditTrackingId": "814...367" }bashNote that in the issued token, the
client_idisserviceConfidentialClient, and the only the scope ismail.
-
Not-enforced URIs
By default, IG routes protect resources (such as a websites or applications) from all requests on the route’s condition path. Some parts of the resource, however, do not need to be protected. For example, it can be okay for unauthenticated requests to access the welcome page of a web site, or an image or favicon.
The following sections give examples of routes that do not enforce authentication for a specific request URL or URL pattern, but enforce authentication for other request URLs:
Implement not-enforced URIs with a SwitchFilter
Before you start:
-
Prepare IG and the sample app as described in the Quick install
-
Install and configure AM on http://am.example.com:8088/openam, using the default configuration.
-
On your system, add the following data in a comma-separated value file:
-
Linux
-
Windows
/tmp/userfile.txt
C:\Temp\userfile.txt
username,password,fullname,email
george,C0stanza,George Costanza,george@example.com
kramer,N3wman12,Kramer,kramer@example.com
bjensen,H1falutin,Babs Jensen,bjensen@example.com
demo,Ch4ng31t,Demo User,demo@example.com
kvaughan,B5ibery12,Kirsten Vaughan,kvaughan@example.com
scarter,S9rain12,Sam Carter,scarter@example.com
csv -
-
Set up AM:
-
(From AM 6.5.3) Select Services > Add a Service, and add a Validation Service with the following Valid goto URL Resources:
-
http://ig.example.com:8080/* -
http://ig.example.com:8080/*?*
-
-
Select Applications > Agents > Identity Gateway and register an IG agent with the following values:
-
Agent ID:
ig_agent -
Password:
passwordFor AM 6.5.x and earlier versions, register an agent as described in Register an IG agent in AM 6.5 and earlier.
Use secure passwords in a production environment. Consider using a password manager to generate secure passwords.
-
-
(Optional) Authenticate the agent to AM as described in Authenticate an IG agent to AM.
IG agents are automatically authenticated to AM by a deprecated authentication module in AM. This step is currently optional, but will be required when authentication chains and modules are removed in a future release of AM.
-
-
Set up IG:
-
Set an environment variable for the IG agent password, and then restart IG:
$ export AGENT_SECRET_ID='cGFzc3dvcmQ='bashThe password is retrieved by a SystemAndEnvSecretStore, and must be base64-encoded.
-
Add the following route to IG to serve the sample application .css and other static resources:
-
Linux
-
Windows
$HOME/.openig/config/routes/00-static-resources.json
%appdata%\OpenIG\config\routes\00-static-resources.json
{
  "name" : "00-static-resources",
  "baseURI" : "http://app.example.com:8081",
  "condition": "${find(request.uri.path,'^/css') or matchesWithRegex(request.uri.path, '^/.*\\\\.ico$') or matchesWithRegex(request.uri.path, '^/.*\\\\.gif$')}",
  "handler": "ReverseProxyHandler"
}
json -
-
Add the following route to IG:
-
Linux
-
Windows
$HOME/.openig/config/routes/not-enforced-switch.json
%appdata%\OpenIG\config\routes\not-enforced-switch.json
{ "properties": { "notEnforcedPathPatterns": "^/home|^/favicon.ico|^/css" }, "heap": [ { "name": "SystemAndEnvSecretStore-1", "type": "SystemAndEnvSecretStore" }, { "name": "AmService-1", "type": "AmService", "config": { "agent": { "username": "ig_agent", "passwordSecretId": "agent.secret.id" }, "secretsProvider": "SystemAndEnvSecretStore-1", "url": "http://am.example.com:8088/openam/" } } ], "name": "not-enforced-switch", "condition": "${find(request.uri.path, '^/')}", "baseURI": "http://app.example.com:8081", "handler": { "type": "Chain", "config": { "filters": [ { "name": "SwitchFilter-1", "type": "SwitchFilter", "config": { "onRequest": [{ "condition": "${find(request.uri.path, '&{notEnforcedPathPatterns}')}", "handler": "ReverseProxyHandler" }] } }, { "type": "SingleSignOnFilter", "config": { "amService": "AmService-1" } }, { "type": "PasswordReplayFilter", "config": { "loginPage": "${true}", "credentials": { "type": "FileAttributesFilter", "config": { "file": "/tmp/userfile.txt", "key": "email", "value": "${contexts.ssoToken.info.uid}@example.com", "target": "${attributes.credentials}" } }, "request": { "method": "POST", "uri": "http://app.example.com:8081/login", "form": { "username": [ "${attributes.credentials.username}" ], "password": [ "${attributes.credentials.password}" ] } } } } ], "handler": "ReverseProxyHandler" } } }jsonNotice the following features of the route:
-
The route condition is
/, so the route matches all requests. -
The SwitchFilter passes requests on the path
^/home,^/favicon.ico, and^/cssdirectly to the ReverseProxyHandler. All other requests continue the along the chain to the SingleSignOnFilter. -
If the request does not have a valid AM session cookie, the SingleSignOnFilter redirects the request to AM for authentication. The SingleSignOnFilter stores the cookie value in an
SsoTokenContext. -
Because the PasswordReplayFilter detects that the response is a login page, it uses the FileAttributesFilter to replay the password, and logs the request into the sample application.
-
-
-
Test the setup:
-
If you are logged in to AM, log out and clear any cookies.
-
Access the route on the not-enforced URL http://ig.example.com:8080/home. The home page of the sample app is displayed without authentication.
-
Access the route on the enforced URL http://ig.example.com:8080/profile. The SingleSignOnFilter redirects the request to AM for authentication.
-
Log in to AM as user
demo, passwordCh4ng31t. The PasswordReplayFilter replays the credentials for the demo user. The request is passed to the sample app’s profile page for the demo user.
-
-
Implement not-enforced URIs with a DispatchHandler
To use a DispatchHandler for not-enforced URIs, replace the route in
Implement not-enforced URIs with a SwitchFilter with the following route. If the
request is on the path ^/home, ^/favicon.ico, or ^/css, the
DispatchHandler sends it directly to the ReverseProxyHandler, without
authentication. It passes all other requests into the Chain for authentication.
{
  "properties": {
    "notEnforcedPathPatterns": "^/home|^/favicon.ico|^/css"
  },
  "heap": [
    {
      "name": "SystemAndEnvSecretStore-1",
      "type": "SystemAndEnvSecretStore"
    },
    {
      "name": "AmService-1",
      "type": "AmService",
      "config": {
        "agent": {
          "username": "ig_agent",
          "passwordSecretId": "agent.secret.id"
        },
        "secretsProvider": "SystemAndEnvSecretStore-1",
        "url": "http://am.example.com:8088/openam/"
      }
    }
  ],
  "name": "not-enforced-dispatch",
  "condition": "${find(request.uri.path, '^/')}",
  "baseURI": "http://app.example.com:8081",
  "handler": {
    "type": "DispatchHandler",
    "config": {
      "bindings": [
        {
          "condition": "${find(request.uri.path, '&{notEnforcedPathPatterns}')}",
          "handler": "ReverseProxyHandler"
        },
        {
          "handler": {
            "type": "Chain",
            "config": {
              "filters": [
                {
                  "type": "SingleSignOnFilter",
                  "config": {
                    "amService": "AmService-1"
                  }
                },
                {
                  "type": "PasswordReplayFilter",
                  "config": {
                    "loginPage": "${true}",
                    "credentials": {
                      "type": "FileAttributesFilter",
                      "config": {
                        "file": "/tmp/userfile.txt",
                        "key": "email",
                        "value": "${contexts.ssoToken.info.uid}@example.com",
                        "target": "${attributes.credentials}"
                      }
                    },
                    "request": {
                      "method": "POST",
                      "uri": "http://app.example.com:8081/login",
                      "form": {
                        "username": [
                          "${attributes.credentials.username}"
                        ],
                        "password": [
                          "${attributes.credentials.password}"
                        ]
                      }
                    }
                  }
                }
              ],
              "handler": "ReverseProxyHandler"
            }
          }
        }
      ]
    }
  }
}POST data preservation
The DataPreservationFilter triggers POST data preservation when an unauthenticated client posts HTML form data to a protected resource.
When an authentication redirect is triggered, the filter stores the data in the HTTP session, and redirects the client for authentication. After authentication, the filter generates an empty self-submitting form POST to emulate the original POST. It then replays the stored data into the request before passing it along the chain.
The data can be any POST content, such as HTML form data or a file upload.
Consider the following points for POST data preservation:
-
The size of the POST data is important because the data is stored in the HTTP session.
-
Stateless sessions store form content in encrypted JWT session cookies. To prevent requests from being rejected because the HTTP headers are too long, configure
connectors:maxTotalHeadersSizein admin.json. -
Sticky sessions may be required for deployments with stateful sessions, and multiple IG instances.
The following image shows a simplified data flow for POST data preservation:

1. An unauthenticated client requests a POST to a protected resource.
2. The DataPreservationFilter tags the the request with a unique identifier, and passes it along the chain. The next filter should be an authentication filter such as a SingleSignOnFilter.
3. The next filter triggers the authentication, and includes a goto URL tagged with the unique identifier from the previous step.
4-5. The DataPreservationFilter stores the POST data in the HTTP session, and redirects the request for authentication. The POST data is identified by the unique identifier.
6-7. The client authenticates with AM, and AM provides an authentication response to the goto URL.
8. The authenticated client sends a GET request containing the unique identifier.
9-10. The DataPreservationFilter validates the unique identifier, and generates a self-posting form response for the client.
The presence of the unique identifier in the goto URL ensures that requests at the URL can be individually identified. Additionally, it is more difficult to hijack user data, because there is little chance of guessing the code within the login window.
If the identifier is not validated, IG denies the request.
11. The client resends the POST request, including the identifier.
12-13. The DataPreservationFilter updates the request with the POST data, and sends it along the chain.
Preserve POST data during CDSSO
-
Set up AM and IG as described in Authentication, and test the example. This example extends that example.
-
Replace
cdsso.jsonwith the following route:-
Linux
-
Windows
$HOME/.openig/config/routes/pdp.json
%appdata%\OpenIG\config\routes\pdp.json
{ "name": "pdp", "baseURI": "http://app.example.com:8081", "condition": "${find(request.uri.path, '^/home/cdsso')}", "heap": [ { "name": "SystemAndEnvSecretStore-1", "type": "SystemAndEnvSecretStore" }, { "name": "AmService-1", "type": "AmService", "config": { "url": "http://am.example.com:8088/openam", "realm": "/", "agent": { "username": "ig_agent_cdsso", "passwordSecretId": "agent.secret.id" }, "secretsProvider": "SystemAndEnvSecretStore-1", "sessionCache": { "enabled": false } } } ], "handler": { "type": "Chain", "config": { "filters": [ { "name": "DataPreservationFilter", "type": "DataPreservationFilter" }, { "name": "CrossDomainSingleSignOnFilter-1", "type": "CrossDomainSingleSignOnFilter", "config": { "redirectEndpoint": "/home/cdsso/redirect", "authCookie": { "path": "/home", "name": "ig-token-cookie" }, "amService": "AmService-1", "logoutExpression": "${find(request.uri.query, 'logOff=true')}", "defaultLogoutLandingPage": "/form" } } ], "handler": { "type": "StaticResponseHandler", "config": { "status": 200, "headers": { "Content-Type": [ "text/html; charset=UTF-8" ] }, "entity": [ "<html>", " <body>", " <h1>Request Information</h1>", " <p>Request method: #{request.method}", " <p>Request URI: #{request.uri}", " <p>Query string: #{request.queryParams}", " <p>Form: #{request.entity.form}", " <p>Content length: #{request.headers['Content-Length'][0]}", " <p>Content type: #{request.headers['Content-Type'][0]}", " </body>", "</html>" ] } } } } }jsonNotice the following differences compared to
cdsso.json:-
A DataPreservationFilter is positioned in front of the CrossDomainSingleSignOnFilter to manage POST data preservation before authentication.
-
The ReverseProxyHandler is replaced by a StaticResponseHandler, which displays the POST data provided in the request.
-
When verificationSecretId is not configured, IG discovers
and uses the AM JWK set to verify the signature of AM session
tokens. If the JWK set isn’t available, IG does not verify the tokens.
|
-
Add the following route to IG:
-
Linux
-
Windows
$HOME/.openig/config/routes/form.json
%appdata%\OpenIG\config\routes\pdp.json
{ "condition": "${request.uri.path == '/form'}", "handler": { "type": "StaticResponseHandler", "config": { "status": 200, "headers": { "Content-Type": [ "text/html" ] }, "entity" : [ "<html>", " <body>", " <h1>Test page : POST Data Preservation containing visible and hidden form elements</h1>", " <form id='testingPDP' enctype='application/x-www-form-urlencoded' name='test_form' action='/home/cdsso/pdp.info?foo=bar&baz=pdp' method='post'>", " <input name='email' value='user@example.com' size='60'>", " <input type='hidden' name='phone' value='555-123-456'/>", " <input type='hidden' name='manager' value='Bob'/>", " <input type='hidden' name='dept' value='Engineering'/>", " <input type='submit' value='Press to demo form posting' id='form_post_button'/>", " </form>", " </body>", "</html>" ] } } }jsonNotice the following features of the route:
-
The route matches requests to
/home/form. -
The StaticResponseHandler includes the following entity to present visible and hidden form elements from the original request:
<!DOCTYPE html>
<html>
   <body>
      <h1>Test page : POST Data Preservation containing visible and hidden form elements</h1>
      <form
         id='testingPDP'
         enctype='application/x-www-form-urlencoded'
         name='test_form'
         action='/home/cdsso/pdp.info?foo=bar&baz=pdp'
         method='post'>
         <input
            name='email'
            value='user@example.com'
            size='60'>
         <input
            type='hidden'
            name='phone'
            value='555-123-456'/>
         <input
            type='hidden'
            name='manager'
            value='Bob'/>
         <input
            type='hidden'
            name='dept'
            value='Engineering'/>
         <input
            type='submit'
            value='Press to demo form posting'
            id='form_post_button'/>
      </form>
   </body>
</html>
html
-
-
Test the setup:
-
If you are logged in to AM, log out and clear any cookies.
-
Go to https://ig.ext.com:8443/form.
If you see warnings that the site is not secure, respond to the warnings to access the site.
The script in the StaticResponseHandler entity of
form.jsoncreates a button to demonstrate form posting. -
Press the button, and log in to AM as user
demo, passwordCh4ng31t.When you have authenticated, the script presents the POST data from the original request.
-
CSRF protection
In a Cross Site Request Forgery (CSRF) attack, a user unknowingly executes a malicious request on a website where they are authenticated. A CSRF attack usually includes a link or script in a web page. When a user accesses the link or script, the page executes an HTTP request on the site where the user is authenticated.
CSRF attacks interact with HTTP requests as follows:
-
CSRF attacks can execute POST, PUT, and DELETE requests on the targeted server. For example, a CSRF attack can transfer funds out of a bank account or change a user’s password.
-
Because of same-origin policy, CSRF attacks cannot access any response from the targeted server.
When IG processes POST, PUT, and DELETE requests, it checks a custom HTTP header in the request. If a CSRF token is not present in the header or not valid, IG rejects the request and returns a valid CSRF token in the response.
Rogue websites that attempt CSRF attacks operate in a different website domain to the targeted website. Because of same-origin policy, rogue websites can’t access a response from the targeted website, and cannot, therefore, access the response or CSRF token.
The following example shows the data flow when an authenticated user sends a POST request to an application protected against CSRF:

The following example shows the data flow when an authenticated user sends a POST request from a rogue site to an application protected against CSRF:

-
Set up SSO, so that AM authenticates users to the sample app through IG:
-
Set up AM and IG as described in Authenticate with SSO through the default authentication service.
-
Remove the condition in
sso.json, so that the route matches all requests:"condition": "${find(request.uri.path, '^/home/sso')}"json
-
-
Test the setup without CSRF protection:
-
Go to http://ig.example.com:8080/bank/index, and log in to the Sample App Bank through AM, as user
demo, passwordCh4ng31t. -
Send a bank transfer of $10 to Bob, and note that the transfer is successful.
-
Go to http://localhost:8081/bank/attack-autosubmit to simulate a CSRF attack.
When you access this page, a hidden HTML form is automatically submitted to transfer $1000 to the rogue user, using the IG session cookie to authenticate to the bank.
In the bank transaction history, note that $1000 has been debited.
-
-
Test the setup with CSRF protection:
-
In IG, replace
sso.jsonwith the following route:{ "name": "Csrf", "baseURI": "http://app.example.com:8081", "heap": [ { "name": "SystemAndEnvSecretStore-1", "type": "SystemAndEnvSecretStore" }, { "name": "AmService-1", "type": "AmService", "config": { "agent": { "username": "ig_agent", "passwordSecretId": "agent.secret.id" }, "secretsProvider": "SystemAndEnvSecretStore-1", "url": "http://am.example.com:8088/openam/" } }, { "name": "FailureHandler-1", "type": "StaticResponseHandler", "config": { "status": 403, "headers": { "Content-Type": [ "text/plain; charset=UTF-8" ] }, "entity": "Request forbidden" } } ], "handler": { "type": "Chain", "config": { "filters": [ { "name": "SingleSignOnFilter-1", "type": "SingleSignOnFilter", "config": { "amService": "AmService-1" } }, { "name": "CsrfFilter-1", "type": "CsrfFilter", "config": { "cookieName": "iPlanetDirectoryPro", "failureHandler": "FailureHandler-1" } } ], "handler": "ReverseProxyHandler" } } }jsonNotice the following features of the route compared to
sso.json:-
The CsrfFilter checks the AM session cookie for the
X-CSRF-Tokenheader. If a CSRF token is not present in the header or not valid, the filter rejects the request and provides a valid CSRF token in the header.
-
-
Go to http://ig.example.com:8080/bank/index, and send a bank transfer of $10 to Alice.
Because there is no CSRF token, IG responds with an HTTP 403, and provides the token.
-
Send the transfer again, and note that because the CSRF token is provided the transfer is successful.
-
Go to http://localhost:8081/bank/attack-autosubmit to automatically send a rogue transfer.
Because there is no CSRF token, IG rejects the request and provides the CSRF token. However, because the rogue site is in a different domain to
ig.example.comit can’t access the CSRF token.
-
Throttling
To protect applications from being overused by clients, use a throttling filter to limit how many requests can be made in a defined time. The maximum number of requests that are allowed in a defined time is called the throttling rate. The following sections describe how to set up simple, mapped, and scriptable throttling filters:
About throttling
The throttling filter uses the token bucket algorithm, allowing some unevenness or bursts in the request flow. The following image shows how IG manages requests for a throttling rate of 10 requests/10 seconds:

-
At 7 seconds, 2 requests have previously passed when there is a burst of 9 requests. IG allows 8 requests, but disregards the 9th because the throttling rate for the 10-second throttling period has been reached.
-
At 8 and 9 seconds, although 10 requests have already passed in the 10-second throttling period, IG allows 1 request each second.
-
At 17 seconds, 4 requests have passed in the previous 10-second throttling period, and IG allows another burst of 6 requests.
When the throttling rate is reached, IG issues an HTTP status code 429
Too Many Requests and a Retry-After header like the following, where the
value is the number of seconds to wait before trying the request again:
GET http://ig.example.com:8080/home/throttle-scriptable HTTP/1.1
. . .

HTTP/1.1 429 Too Many Requests
Retry-After: 10
Configure simple throttling
This section describes how to configure a simple throttling filter that applies a throttling rate of 6 requests/10 seconds. When an application is protected by this throttling filter, no more than 6 requests, irrespective of their origin, can access the sample application in a 10 second period.

-
Add the following route to IG:
-
Linux
-
Windows
$HOME/.openig/config/routes/00-throttle-simple.json
%appdata%\OpenIG\config\routes\00-throttle-simple.json
{ "name": "00-throttle-simple", "baseURI": "http://app.example.com:8081", "condition": "${find(request.uri.path, '^/home/throttle-simple')}", "handler": { "type": "Chain", "config": { "filters": [ { "type": "ThrottlingFilter", "name": "ThrottlingFilter-1", "config": { "requestGroupingPolicy": "", "rate": { "numberOfRequests": 6, "duration": "10 s" } } } ], "handler": "ReverseProxyHandler" } } }jsonFor information about how to set up the IG route in Studio, refer to Simple throttling filter in Structured Editor.
Notice the following features of the route:
-
The route matches requests to
/home/throttle-simple. -
The ThrottlingFilter contains a request grouping policy that is blank. This means that all requests are in the same group.
-
The rate defines the number of requests allowed to access the sample application in a given time.
-
-
Test the setup:
-
With IG and the sample application running, use
curl, a bash script, or another tool to access the following route in a loop: http://ig.example.com:8080/home/simple-throttle.Accessing the route in a loop runs the request multiple times in quick succession, allowing you to test the throttling rate.
$ curl -v http://ig.example.com:8080/home/throttle-simple/\[01-10\] \
> /tmp/throttle-simple.txt 2>&1
bash -
Search the output file for the result:
$ grep "< HTTP/1.1" /tmp/throttle-simple.txt | sort | uniq -c 6 < HTTP/1.1 200 OK 4 < HTTP/1.1 429 Too Many RequestsbashNotice that the first six requests returned a success response, and the following four requests returned an HTTP 429
Too Many Requests. This result demonstrates that the throttling filter has allowed only six requests to access the application, and has blocked the other requests.
-
Configure mapped throttling
This section describes how to configure a mapped throttling policy, where the grouping policy defines criteria to group requests, and the rate policy defines the criteria by which rates are mapped.
The following image illustrates how different throttling rates can be applied to users.
The following image illustrates how each user with a gold status has a
throttling rate of 6 requests/10 seconds, and each user with a silver status
has 3 requests/10 seconds. The bronze status is not mapped to a throttling
rate, and so a user with the bronze status has the default rate.

-
Set up AM:
-
Set up AM as described in Validate access tokens through the introspection endpoint.
-
Select Scripts > OAuth2 Access Token Modification Script, and replace the default script as follows:
import org.forgerock.http.protocol.Request import org.forgerock.http.protocol.Response def attributes = identity.getAttributes(["mail", "employeeNumber"].toSet()) accessToken.setField("mail", attributes["mail"][0]) def mail = attributes['mail'][0] if (mail.endsWith('@example.com')) { status = "gold" } else if (mail.endsWith('@other.com')) { status = "silver" } else { status = "bronze" } accessToken.setField("status", status)groovyThe AM script adds user profile information to the access token, and defines the content of the users
statusfield according to the email domain.
-
-
Set up IG:
-
Set an environment variable for the IG agent password, and then restart IG:
$ export AGENT_SECRET_ID='cGFzc3dvcmQ='bashThe password is retrieved by a SystemAndEnvSecretStore, and must be base64-encoded.
-
Add the following route to IG:
-
Linux
-
Windows
$HOME/.openig/config/routes/00-throttle-mapped.json
%appdata%\OpenIG\config\routes\00-throttle-mapped.json
{ "name": "00-throttle-mapped", "baseURI": "http://app.example.com:8081", "condition": "${find(request.uri.path, '^/home/throttle-mapped')}", "heap": [ { "name": "SystemAndEnvSecretStore-1", "type": "SystemAndEnvSecretStore" }, { "name": "AmService-1", "type": "AmService", "config": { "agent": { "username": "ig_agent", "passwordSecretId": "agent.secret.id" }, "secretsProvider": "SystemAndEnvSecretStore-1", "url": "http://am.example.com:8088/openam/" } } ], "handler": { "type": "Chain", "config": { "filters": [ { "name": "OAuth2ResourceServerFilter-1", "type": "OAuth2ResourceServerFilter", "config": { "scopes": [ "mail", "employeenumber" ], "requireHttps": false, "realm": "OpenIG", "accessTokenResolver": { "name": "token-resolver-1", "type": "TokenIntrospectionAccessTokenResolver", "config": { "amService": "AmService-1", "providerHandler": { "type": "Chain", "config": { "filters": [ { "type": "HttpBasicAuthenticationClientFilter", "config": { "username": "ig_agent", "passwordSecretId": "agent.secret.id", "secretsProvider": "SystemAndEnvSecretStore-1" } } ], "handler": "ForgeRockClientHandler" } } } } } }, { "name": "ThrottlingFilter-1", "type": "ThrottlingFilter", "config": { "requestGroupingPolicy": "${contexts.oauth2.accessToken.info.mail}", "throttlingRatePolicy": { "name": "MappedPolicy", "type": "MappedThrottlingPolicy", "config": { "throttlingRateMapper": "${contexts.oauth2.accessToken.info.status}", "throttlingRatesMapping": { "gold": { "numberOfRequests": 6, "duration": "10 s" }, "silver": { "numberOfRequests": 3, "duration": "10 s" }, "bronze": { "numberOfRequests": 1, "duration": "10 s" } }, "defaultRate": { "numberOfRequests": 1, "duration": "10 s" } } } } } ], "handler": "ReverseProxyHandler" } } }jsonFor information about how to set up the IG route in Studio, refer to Mapped throttling filter in Structured Editor.
Notice the following features of the route:
-
The route matches requests to
/home/throttle-mapped. -
The OAuth2ResourceServerFilter validates requests with the AccessTokenResolver, and makes it available for downstream components in the
oauth2context. -
The ThrottlingFilter bases the request grouping policy on the AM user’s email. The throttling rate is applied independently to each email address.
The throttling rate is mapped to the AM user’s
status, which is defined by the email domain, in the AM script.
-
-
-
Test the setup:
-
In a terminal window, use a
curlcommand similar to the following to retrieve an access token:$ mytoken=$(curl -s \ --user "client-application:password" \ --data "grant_type=password&username=demo&password=Ch4ng31t&scope=mail%20employeenumber" \ http://am.example.com:8088/openam/oauth2/access_token | jq -r ".access_token")bash -
Using the access token, access the route multiple times. The following example accesses the route 10 times, and writes the output to a file:
$ curl -v http://ig.example.com:8080/home/throttle-mapped/\[01-10\] \
       --header "Authorization:Bearer ${mytoken}" \
       > /tmp/throttle-mapped.txt 2>&1
bash -
Search the output file for the result:
$ grep "< HTTP/1.1" /tmp/throttle-mapped.txt | sort | uniq -c 6 < HTTP/1.1 200 4 < HTTP/1.1 429bashNotice that with a
goldstatus, the user can access the route 6 times in 10 seconds. -
In AM, change the demo user’s email to
demo@other.com, and then run the last two steps again to find how the access is reduced.
-
Considerations for dynamic throttling
The following image illustrates what can happen when the throttling rate defined
by throttlingRateMapping changes frequently or quickly:

In the image, the user starts out with a gold status. In a two second period,
the users sends five requests, is downgraded to silver, sends four requests, is
upgraded back to gold, and then sends three more requests.
After making five requests with a gold status, the user has almost reached
their throttling rate. When his status is downgraded to silver, those requests
are disregarded and the full throttling rate for silver is applied. The user
can now make three more requests even though they have nearly reached their
throttling rate with a gold status.
After making three requests with a silver status, the user has reached their
throttling rate. When the user makes a fourth request, the request is refused.
The user is now upgraded back to gold and can now make six more requests even
though they had reached his throttling rate with a silver status.
When you configure requestGroupingPolicy and throttlingRateMapper, bear
in mind what happens when the throttling rate defined by the
throttlingRateMapper is changed.
Configure scriptable throttling
This section builds on the example in
Configure mapped throttling.
It creates a scriptable throttling filter, where the script applies a throttling
rate of 6 requests/10 seconds to requests from gold status users. For all other
requests, the script returns null, and applies the default rate of 1
request/10 seconds.
-
Set up AM as described in Configure mapped throttling.
-
Set up IG:
-
Set an environment variable for the IG agent password, and then restart IG:
$ export AGENT_SECRET_ID='cGFzc3dvcmQ='bashThe password is retrieved by a SystemAndEnvSecretStore, and must be base64-encoded.
-
Add the following route to IG:
-
Linux
-
Windows
$HOME/.openig/config/routes/00-throttle-scriptable.json
%appdata%\OpenIG\config\routes\00-throttle-scriptable.json
{ "name": "00-throttle-scriptable", "baseURI": "http://app.example.com:8081", "condition": "${find(request.uri.path, '^/home/throttle-scriptable')}", "heap": [ { "name": "SystemAndEnvSecretStore-1", "type": "SystemAndEnvSecretStore" }, { "name": "AmService-1", "type": "AmService", "config": { "agent": { "username": "ig_agent", "passwordSecretId": "agent.secret.id" }, "secretsProvider": "SystemAndEnvSecretStore-1", "url": "http://am.example.com:8088/openam/" } } ], "handler": { "type": "Chain", "config": { "filters": [ { "name": "OAuth2ResourceServerFilter-1", "type": "OAuth2ResourceServerFilter", "config": { "scopes": [ "mail", "employeenumber" ], "requireHttps": false, "realm": "OpenIG", "accessTokenResolver": { "name": "token-resolver-1", "type": "TokenIntrospectionAccessTokenResolver", "config": { "amService": "AmService-1", "providerHandler": { "type": "Chain", "config": { "filters": [ { "type": "HttpBasicAuthenticationClientFilter", "config": { "username": "ig_agent", "passwordSecretId": "agent.secret.id", "secretsProvider": "SystemAndEnvSecretStore-1" } } ], "handler": "ForgeRockClientHandler" } } } } } }, { "name": "ThrottlingFilter-1", "type": "ThrottlingFilter", "config": { "requestGroupingPolicy": "${contexts.oauth2.accessToken.info.mail}", "throttlingRatePolicy": { "type": "DefaultRateThrottlingPolicy", "config": { "delegateThrottlingRatePolicy": { "name": "ScriptedPolicy", "type": "ScriptableThrottlingPolicy", "config": { "type": "application/x-groovy", "source": [ "if (contexts.oauth2.accessToken.info.status == status) {", " return new ThrottlingRate(rate, duration)", "} else {", " return null", "}" ], "args": { "status": "gold", "rate": 6, "duration": "10 seconds" } } }, "defaultRate": { "numberOfRequests": 1, "duration": "10 s" } } } } } ], "handler": "ReverseProxyHandler" } } }jsonFor information about how to set up the IG route in Studio, refer to Scriptable throttling filter in Structured Editor.
Notice the following features of the route, compared to path]
00-throttle-mapped.json:-
The route matches requests to
/home/throttle-scriptable. -
The DefaultRateThrottlingPolicy delegates the management of throttling to the ScriptableThrottlingPolicy.
-
The script applies a throttling rate to requests from users with gold status. For all other requests, the script returns null and the default rate is applied.
-
-
-
Test the setup:
-
In a terminal window, use a
curlcommand similar to the following to retrieve an access token:
-
$ mytoken=$(curl -s \
--user "client-application:password" \
--data "grant_type=password&username={amDemoUn}&password={amDemoPw}&scope=mail%20employeenumber" \
http://am.example.com:8088/openam/oauth2/access_token | jq -r ".access_token")
-
Using the access token, access the route multiple times. The following example accesses the route 10 times, and writes the output to a file:
$ curl -v http://ig.example.com:8080/home/throttle-scriptable/\[01-10\] --header "Authorization:Bearer ${mytoken}" > /tmp/throttle-script.txt 2>&1bash -
Search the output file for the result:
$ grep "< HTTP/1.1" /tmp/throttle-script.txt | sort | uniq -c 6 < HTTP/1.1 200 4 < HTTP/1.1 429bashNotice that with a
goldstatus, the user can access the route 6 times in 10 seconds. -
In AM, change the user’s email to
demo@other.com, and then run the last two steps again to find how the access is reduced.
URI fragments in redirect
URI fragments are optional last parts of a URL for a document, typically used to
identify or navigate to a particular part of the document. The fragment part
follows the URL after a hash #, for example
https://www.rfc-editor.org/rfc/rfc1234#section5.
When an unauthenticated user requests a resource that includes a URI fragment, the user agent sends the URI but does not send the fragment. The fragment is lost during the authentication flow.
IG provides a FragmentFilter to track the fragment part of a URI when a request triggers a login redirect.
The FragmentFilter doesn’t handle multiple fragment captures in parallel. If a fragment capture is in progress while IG performs another login redirect, a second fragment capture process isn’t triggered and the fragment is lost.
When a browser request loads a favicon, it can cause the fragment part of a URI to be lost. Prevent problems by serving static resources with a separate route. As an example, use the route in Serve static resources.
The following image shows the flow of information when the FragmentFilter is included in the SSO authentication flow:

1-2. An unauthenticated client requests access to a fragment URL.
3. The FragmentFilter adds the AuthRedirectContext, so that downstream filters can mark the response as redirected.
4-5. The SingleSignOnFilter adds to the context to notify upstream filters that a redirect is pending, and redirects the request for authentication.
6-7. The FragmentFilter is notified by the context that a redirect is pending, and returns a new response object containing the response cookies, an autosubmit HTML form, and Javascript.
8. The user agent runs the Javascript or displays the form’s submit button for the user to click on. This operation POSTs a form request back to a fragment endpoint URI, containing the following parts:
-
Request URI path (
/profile) -
Captured fragment (
#fragment) -
Login URI (
http://am.example.com/login?goto=…)
9. The FragmentFilter creates the fragment cookie.
10-12. The client authenticates with AM.
13. The FragmentFilter intercepts the request because it contains a fragment cookie, and its URI matches the original request URI.
The filter redirects the client to the original request URI containing the fragment. The fragment cookie then expires.
14-19. The client follows the final redirect to the original request URI containing the fragment, and the sample app returns the response.
This procedure shows how to persist a URI fragment in an SSO authentication.
-
Set up the example in Authenticate with SSO through the default authentication service.
-
Add the following route to IG:
-
Linux
-
Windows
$HOME/.openig/config/routes/fragment.json
%appdata%\OpenIG\config\routes\fragment.json
{ "name": "fragment", "baseURI": "http://app.example.com:8081", "condition": "${find(request.uri.path, '^/home/sso')}", "heap": [ { "name": "SystemAndEnvSecretStore-1", "type": "SystemAndEnvSecretStore" }, { "name": "AmService-1", "type": "AmService", "config": { "agent": { "username": "ig_agent", "passwordSecretId": "agent.secret.id" }, "secretsProvider": "SystemAndEnvSecretStore-1", "url": "http://am.example.com:8088/openam/" } } ], "handler": { "type": "Chain", "config": { "filters": [ { "name": "FragmentFilter-1", "type": "FragmentFilter", "config": { "fragmentCaptureEndpoint": "/home/sso" } }, { "name": "SingleSignOnFilter-1", "type": "SingleSignOnFilter", "config": { "amService": "AmService-1" } } ], "handler": "ReverseProxyHandler" } } }jsonNotice the following feature of the route compared to
sso.json:-
The
FragmentFiltercaptures the fragment form data from the route condition endpoint.
-
-
Test the setup:
-
If you are logged in to AM, log out and clear any cookies.
-
Go to http://ig.example.com:8080/home/sso#fragment.
The SingleSignOnFilter redirects the request to AM for authentication.
-
Log in to AM as user
demo, passwordCh4ng31t.The SingleSignOnFilter passes the request to sample app, which returns the home page. Note that the URL of the page has preserved the fragment:
http://ig.example.com:8080/home/sso?_ig=true#fragment -
Remove the FragmentFilter from the route and test the route again.
Note that this time the URL of the page has not preserved the fragment.
-
JWT validation
The following examples show how to use the JwtValidationFilter to validate signed and encrypted JWT.
The JwtValidationFilter can access JWTs in the request, provided in a
header, query parameter, form parameter, cookie, or other way. If an upstream
filter makes the JWT available in the request’s attributes context, the
JwtValidationFilter can access the JWT through the context, for example, at
${attributes.jwtToValidate}.
For convenience, the JWT in this example is provided by the JwtBuilderFilter, and passed to the JwtValidationFilter in a cookie.
The following figure shows the flow of information in the example:

-
Create a signed then encrypted JWT as described in Pass runtime data in a JWT signed with PEM then encrypted with a symmetric key.
-
Add the following route to IG, replacing value of the property
secretsDirwith the directory for the PEM files:-
Linux
-
Windows
$HOME/.openig/config/routes/jwt-validate.json
%appdata%\OpenIG\config\routes\jwt-validate.json
{ "name": "jwt-validate", "condition": "${find(request.uri.path, '^/jwt-validate')}", "properties": { "secretsDir": "path/to/secrets" }, "capture": "all", "heap": [ { "name": "SystemAndEnvSecretStore", "type": "SystemAndEnvSecretStore", "config": { "mappings": [{ "secretId": "id.decrypted.key.for.signing.jwt", "format": "BASE64" }] } }, { "name": "pemPropertyFormat", "type": "PemPropertyFormat", "config": { "decryptionSecretId": "id.decrypted.key.for.signing.jwt", "secretsProvider": "SystemAndEnvSecretStore" } }, { "name": "FileSystemSecretStore-1", "type": "FileSystemSecretStore", "config": { "format": "PLAIN", "directory": "&{secretsDir}", "mappings": [{ "secretId": "id.encrypted.key.for.signing.jwt.pem", "format": "pemPropertyFormat" }, { "secretId": "symmetric.key.for.encrypting.jwt", "format": { "type": "SecretKeyPropertyFormat", "config": { "format": "BASE64", "algorithm": "AES" } } }] } } ], "handler": { "type": "Chain", "config": { "filters": [{ "type": "JwtValidationFilter", "config": { "jwt": "${request.cookies['my-jwt'][0].value}", "secretsProvider": "FileSystemSecretStore-1", "decryptionSecretId": "symmetric.key.for.encrypting.jwt", "customizer": { "type": "ScriptableJwtValidatorCustomizer", "config": { "type": "application/x-groovy", "source": [ "builder.claim('name', JsonValue::asString, isEqualTo('demo'))", "builder.claim('email', JsonValue::asString, isEqualTo('demo@example.com'));" ] } }, "failureHandler": { "type": "ScriptableHandler", "config": { "type": "application/x-groovy", "source": [ "def response = new Response(Status.FORBIDDEN)", "response.headers['Content-Type'] = 'text/html; charset=utf-8'", "def errors = contexts.jwtValidationError.violations.collect{it.description}", "def display = \"<html>Can't validate JWT:<br> ${contexts.jwtValidationError.jwt} \"", "display <<=\"<br><br>For the following errors:<br> ${errors.join(\"<br>\")}</html>\"", "response.entity=display as String", "return response" ] } } } }], "handler": { "type": "StaticResponseHandler", "config": { "status": 200, "headers": { "Content-Type": [ "text/html; charset=UTF-8" ] }, "entity": [ "<html>", " <h2>Validated JWT:</h2>", " <p>${contexts.jwtValidation.value}</p>", " <h2>JWT payload:</h2>", " <p>${contexts.jwtValidation.info}</p>", "</html>" ] } } } } }jsonNotice the following features of the route:
-
The route matches requests to
/jwt-validate. -
The JwtValidationFilter takes the value of the JWT from
my-jwt. -
The SystemAndEnvSecretStore, PemPropertyFormat, and FileSystemSecretStore objects in the heap are the same as those in the route to create the JWT. The JwtValidationFilter uses the same objects to validate the JWT.
-
The JwtBuilderFilter
customizerrequires that the JWT claims matchname:demoandemail:demo@example.com. -
If the JWT is validated, the StaticResponseHandler displays the validated value. Otherwise, the FailureHandler displays the reason for the failed validation.
-
-
Test the setup:
-
If you are logged in to AM, log out and clear any cookies.
-
Go to http://ig.example.com:8080/jwtbuilder-sign-then-encrypt to build a JWT, and log in to AM as user
demo, passwordCh4ng31t. The sample app displays the signed JWT along with its header and payload. -
Go to http://ig.example.com:8080/jwt-validate to validate the JWT. The validated JWT and its payload are displayed.
-
Test the setup again, but log in to AM as a different user, or change the email address of the demo user in AM. The JWT is not validated, and an error is displayed.
-
WebSocket traffic
When a user agent requests an upgrade from HTTP or HTTPS to the WebSocket protocol, IG detects the request and performs an HTTP handshake request between the user agent and the protected application.
If the handshake is successful, IG upgrades the connection and provides a dedicated tunnel to route WebSocket traffic between the user agent and the protected application. IG does not intercept messages to or from the WebSocket server.
The tunnel remains open until it is closed by the user agent or protected application. When the user agent closes the tunnel, the connection between IG and the protected application is automatically closed.
The following sequence diagram shows the flow of information when IG proxies WebSocket traffic:

To configure IG to proxy WebSocket traffic, configure the websocket
property of ReverseProxyHandler.
By default, IG does not proxy WebSocket traffic.
-
Set up AM:
-
(From AM 6.5.3) Select Services > Add a Service, and add a Validation Service with the following Valid goto URL Resources:
-
http://ig.example.com:8080/* -
http://ig.example.com:8080/*?*
-
-
Select Applications > Agents > Identity Gateway and register an IG agent with the following values:
-
Agent ID:
ig_agent -
Password:
passwordFor AM 6.5.x and earlier versions, register an agent as described in Register an IG agent in AM 6.5 and earlier.
Use secure passwords in a production environment. Consider using a password manager to generate secure passwords.
-
-
(Optional) Authenticate the agent to AM as described in Authenticate an IG agent to AM.
IG agents are automatically authenticated to AM by a deprecated authentication module in AM. This step is currently optional, but will be required when authentication chains and modules are removed in a future release of AM.
-
-
Set up IG:
-
Add the following route to IG to serve the sample application .css and other static resources:
-
Linux
-
Windows
$HOME/.openig/config/routes/00-static-resources.json
%appdata%\OpenIG\config\routes\00-static-resources.json
{
  "name" : "00-static-resources",
  "baseURI" : "http://app.example.com:8081",
  "condition": "${find(request.uri.path,'^/css') or matchesWithRegex(request.uri.path, '^/.*\\\\.ico$') or matchesWithRegex(request.uri.path, '^/.*\\\\.gif$')}",
  "handler": "ReverseProxyHandler"
}
json -
-
Add the following route to IG:
-
Linux
-
Windows
$HOME/.openig/config/routes/websocket.json
%appdata%\OpenIG\config\routes\websocket.json
{ "name": "websocket", "baseURI": "http://app.example.com:8081", "condition": "${find(request.uri.path, '^/websocket')}", "heap": [ { "name": "SystemAndEnvSecretStore-1", "type": "SystemAndEnvSecretStore" }, { "name": "AmService-1", "type": "AmService", "config": { "agent": { "username": "ig_agent", "passwordSecretId": "agent.secret.id" }, "secretsProvider": "SystemAndEnvSecretStore-1", "url": "http://am.example.com:8088/openam/" } }, { "name": "ReverseProxyHandler", "type": "ReverseProxyHandler", "config": { "websocket": { "enabled": true } } } ], "handler": { "type": "Chain", "config": { "filters": [ { "name": "SingleSignOnFilter-1", "type": "SingleSignOnFilter", "config": { "amService": "AmService-1" } } ], "handler": "ReverseProxyHandler" } } }jsonFor information about how to set up the route in Studio, refer to Proxy for WebSocket traffic in Structured Editor.
Notice the following features of the route:
-
The route matches requests to
/websocket, the endpoint on the sample app that exposes a WebSocket server. -
The SingleSignOnFilter redirects unauthenticated requests to AM for authentication.
-
The ReverserProxyHandler enables IG to proxy WebSocket traffic, and, after IG upgrades the HTTP connection to the WebSocket protocol, passes the messages to the WebSocket server.
-
Test the setup:
-
-
-
If you are logged in to AM, log out and clear any cookies.
-
Go to http://ig.example.com:8080/websocket. The SingleSignOnFilter redirects the request to AM for authentication.
-
Log in to AM as user
demo, passwordCh4ng31t.AM authenticates the user, creates an SSO token, and redirects the request back to the original URI, with the token in a cookie.
The request then passes to the ReverseProxyHandler, which routes the request to the HTML page
/websocket/index.htmlof the sample app. The page initiates the HTTP handshake for connecting to the WebSocket endpoint/websocket/echo. -
Enter text on the WebSocket echo screen, and note that the text is echoed back.
Vert.x-specific configuration for WebSocket connections
Configure Vert.x-specific configuration for WebSocket connections, where IG does not provide its own first-class configuration. Vert.x options are described in HttpClientOptions.
The following example configures Vert.x options for Websocket connections:
{
"type": "ReverseProxyHandler",
"config": {
"websocket": {
"enabled": true,
"vertx": {
"maxWebSocketFrameSize": 200000000,
"maxWebSocketMessageSize": 200000000,
"tryUsePerMessageWebSocketCompression": true
}
}
}
}UMA support
IG includes support for User-Managed Access (UMA) 2.0 Grant for OAuth 2.0 Authorization specifications.
About IG as an UMA resource server
The following figure shows an UMA environment, with IG protecting a resource, and AM acting as an Authorization Server. For information about UMA, refer to AM’s User-Managed Access (UMA) 2.0 guide.

The following figure shows the data flow when the resource owner registers a resource with AM, and sets up a share using a Protection API Token (PAT):

The following figure shows the data flow when the client accesses the resource, using a Requesting Party Token (RPT):

For information about CORS support, refer to Configure CORS support in AM’s Security guide. This procedure describes how to modify the AM configuration to allow cross-site access.
Limitations of IG as an UMA resource server
When using IG as an UMA resource server, note the following points:
-
IG depends on the resource owner for the PAT.
When a PAT expires, no refresh token is available to IG. The resource owner must repeat the entire share process with a new PAT in order to authorize access to protected resources. The resource owner should delete the old resource and create a new one.
-
Data about PATs and shared resources is held in memory.
IG has no mechanism for persisting the data across restarts. When IG stops and starts again, the resource owner must repeat the entire share process.
-
UMA client applications for sharing and accessing protected resources must deal with UMA error conditions and IG error conditions.
-
By default, the REST API to manage share objects exposed by IG is protected only by CORS.
-
When matching protected resource paths with share patterns, IG takes the longest match.
For example, if resource owner Alice shares
/photos/.*with Bob, and/photos/vacation.pngwith Charlie, and then Bob attempts to access/photos/vacation.png, IG applies the sharing permissions for Charlie, not Bob. As a result, Bob can be denied access.
Set up the UMA example
This section describes tasks to set up AM as an Authorization Server:
-
Enabling cross-origin resource sharing (CORS) support in AM
-
Configuring AM as an Authorization Server
-
Registering UMA client profiles with AM
-
Setting up a resource owner (Alice) and requesting party (Bob)
|
The settings in this section are suggestions for this tutorial. They are not intended as instructions for setting up AM CORS support on a server in production. If you need to accept all origins, by allowing the use of
|
| This procedure uses the Resource Owner Password Credentials grant type. According to information in the The OAuth 2.0 Authorization Framework, minimize use of this grant type and utilize other grant types whenever possible. |
Before you start, prepare AM, IG, and the sample application as described in Example installation for this guide.
If you use different settings for the sample application, refer to Edit the example to match custom settings.
-
Set up AM:
-
Find the name of the AM session cookie at the
/json/serverinfo/*endpoint. This procedure assumes that you are using the default AM session cookie,iPlanetDirectoryPro. -
Create an OAuth 2.0 Authorization Server:
-
Select Services > Add a Service > OAuth2 Provider.
-
Add a service with the default values.
-
-
Configure an UMA Authorization Server:
-
Select Services > Add a Service > UMA Provider.
-
Add a service with the default values.
-
-
Add an OAuth 2.0 client for UMA protection:
-
Select Applications > OAuth 2.0 > Clients.
-
Add a client with these values:
-
Client ID :
OpenIG -
Client secret :
password -
Scope :
uma_protection
-
-
(From AM 6.5) On the Advanced tab, select the following option:
-
Grant Types :
Resource Owner Password Credentials
-
-
-
Add an OAuth 2.0 client for accessing protected resources:
-
Select Applications > OAuth 2.0 > Clients.
-
Add a client with these values:
-
Client ID :
UmaClient -
Client secret :
password -
Scope :
openid
-
-
(From AM 6.5) On the Advanced tab, select the following option:
-
Grant Types :
Resource Owner Password CredentialsandUMA
-
-
-
Select Identities, and add an identity for a resource owner, with the following values:
-
ID :
alice -
Password :
UMAexamp1e
-
-
Select Identities, and add an identity for a requesting party, with the following values:
-
ID :
bob -
Password :
UMAexamp1e
-
-
Enable the CORS filter on AM:
-
In a terminal window, retrieve an SSO token from AM:
$ mytoken=$(curl --request POST \ --header "Accept-API-Version: resource=2.1" \ --header "X-OpenAM-Username: amadmin" \ --header "X-OpenAM-Password: password" \ --header "Content-Type: application/json" \ --data "{}" \ http://am.example.com:8088/openam/json/authenticate | jq -r ".tokenId")bash -
Using the token retrieved in the previous step, enable the CORS filter on AM, by using the use the
/global-config/services/CorsServiceREST endpoint:$ curl \ --request PUT \ --header "Content-Type: application/json" \ --header "iPlanetDirectoryPro: $mytoken" http://am.example.com:8088/openam/json/global-config/services/CorsService/configuration/CorsService \ --data '{ "acceptedMethods": [ "POST", "GET", "PUT", "DELETE", "PATCH", "OPTIONS" ], "acceptedOrigins": [ "http://app.example.com:8081", "http://ig.example.com:8080", "http://am.example.com:8088/openam" ], "allowCredentials": true, "acceptedHeaders": [ "Authorization", "Content-Type", "iPlanetDirectoryPro", "X-OpenAM-Username", "X-OpenAM-Password", "Accept", "Accept-Encoding", "Connection", "Content-Length", "Host", "Origin", "User-Agent", "Accept-Language", "Referer", "Dnt", "Accept-Api-Version", "If-None-Match", "Cookie", "X-Requested-With", "Cache-Control", "X-Password", "X-Username", "X-NoSession" ], "exposedHeaders": [ "Access-Control-Allow-Origin", "Access-Control-Allow-Credentials", "Set-Cookie", "WWW-Authenticate" ], "maxAge": 600, "enabled": true, "allowCredentials": true }'bashA CORS configuration is diplayed.
To delete the CORS configuration and create another, first run the following command:
$ curl \ --request DELETE \ --header "X-Requested-With: XMLHttpRequest" \ --header "iPlanetDirectoryPro: $mytoken" \ http://am.example.com:8088/openam/json/global-config/services/CorsService/CorsService/configuration/CorsServicebash
-
-
-
Set up IG as an UMA resource server:
-
Add the following route to IG to serve the sample application .css and other static resources:
-
Linux
-
Windows
$HOME/.openig/config/routes/00-static-resources.json
%appdata%\OpenIG\config\routes\00-static-resources.json
{ "name" : "00-static-resources", "baseURI" : "http://app.example.com:8081", "condition": "${find(request.uri.path,'^/css') or matchesWithRegex(request.uri.path, '^/.*\\\\.ico$') or matchesWithRegex(request.uri.path, '^/.*\\\\.gif$')}", "handler": "ReverseProxyHandler" }json -
-
Add the following
admin.jsonconfiguration to IG:{ "prefix": "openig", "connectors": [ { "port" : 8080 } ], "heap": [ { "name": "ClientHandler", "type": "ClientHandler" }, { "name": "ApiProtectionFilter", "type": "CorsFilter", "config": { "policies": [ { "acceptedOrigins": [ "http://app.example.com:8081" ], "acceptedMethods": [ "GET", "POST", "DELETE" ], "acceptedHeaders": [ "Content-Type" ] } ] } } ] }jsonNotice the following feature:
-
The default ApiProtectionFilter is overridden by the CorsFilter, which allows requests from the origin
http://app.example.com:8081.
-
-
Add the following route to IG:
-
Linux
-
Windows
$HOME/.openig/config/routes/00-uma.json
%appdata%\OpenIG\config\routes\00-uma.json
{ "name": "00-uma", "condition": "${request.uri.host == 'app.example.com'}", "heap": [ { "name": "UmaService", "type": "UmaService", "config": { "protectionApiHandler": "ClientHandler", "wellKnownEndpoint": "http://am.example.com:8088/openam/uma/.well-known/uma2-configuration", "resources": [ { "comment": "Protects all resources matching the following pattern.", "pattern": ".*", "actions": [ { "scopes": [ "#read" ], "condition": "${request.method == 'GET'}" }, { "scopes": [ "#create" ], "condition": "${request.method == 'POST'}" } ] } ] } } ], "handler": { "type": "Chain", "config": { "filters": [ { "type": "CorsFilter", "config": { "policies": [ { "acceptedOrigins": [ "http://app.example.com:8081" ], "acceptedMethods": [ "GET" ], "acceptedHeaders": [ "Authorization" ], "exposedHeaders": [ "WWW-Authenticate" ], "allowCredentials": true } ] } }, { "type": "UmaFilter", "config": { "protectionApiHandler": "ClientHandler", "umaService": "UmaService" } } ], "handler": "ReverseProxyHandler" } } }jsonNotice the following features of the route:
-
The route matches requests from
app.example.com. -
The UmaService describes the resources that a resource owner can share, using AM as the Authorization Server. It provides a REST API to manage sharing of resource sets.
-
The CorsFilter defines the policy for cross-origin requests, listing the methods and headers that the request can use, the headers that are exposed to the frontend JavaScript code, and whether the request can use credentials.
-
The UmaFilter manages requesting party access to protected resources, using the UmaService. Protected resources are on the sample application, which responds to requests on port 8081.
-
-
Restart IG.
-
-
Test the setup:
-
If you are logged in to AM, log out and clear any cookies.
-
Share resources:
-
Select Alice shares resources.
-
On Alice’s page, select Share with Bob. The following items are displayed:
-
The PAT that Alice receives from AM.
-
The metadata for the resource set that Alice registers through IG.
-
The result of Alice authenticating with AM in order to create a policy.
-
The successful result when Alice configures the authorization policy attached to the shared resource.
If the step fails, run the following command to get an access token for Alice:
$ curl -X POST \ -H "Cache-Control: no-cache" \ -H "Content-Type: application/x-www-form-urlencoded" \ -d 'grant_type=password&scope=uma_protection&username=alice&password=UMAexamp1e&client_id=OpenIG&client_secret=password' \ http://am.example.com:8088/openam/oauth2/access_tokenbashIf you fail to get an access token, check that AM is configured as described in this procedure. If you continue to have problems, make sure that your IG configuration matches that shown when you are running the test on http://app.example.com:8081/uma/.
-
-
-
Access resources:
-
Go back to the first page, and select Bob accesses resources.
-
On Bob’s page, select Get Alice’s resources. The following items are displayed:
-
The WWW-Authenticate Header.
-
The OpenID Connect Token that Bob gets to obtain the RPT.
-
The RPT that Bob gets in order to request the resource again.
-
The final response containing the body of the resource.
-
-
-
Edit the example to match custom settings
If you use a configuration that is different to that described in this chapter, consider the following tasks to adjust the sample to your configuration:
-
Unpack the UMA files from the sample application described in Use the sample application to temporary folder:
$ mkdir /tmp/uma $ cd /tmp/uma $ jar -xvf /path/to/IG-sample-application-2023.11.0.jar webroot-uma created: webroot-uma/ inflated: webroot-uma/bob.html inflated: webroot-uma/common.js inflated: webroot-uma/alice.html inflated: webroot-uma/index.html inflated: webroot-uma/style.cssbash -
Edit the configuration in
common.js,alice.html, andbob.htmlto match your settings. -
Repack the UMA sample client files and then restart the sample application:
$ jar -uvf /path/to/IG-sample-application-2023.11.0.jar webroot-uma adding: webroot-uma/(in = 0) (out= 0)(stored 0%) adding: webroot-uma/bob.html(in = 26458) (out= 17273)(deflated 34%) adding: webroot-uma/common.js(in = 3652) (out= 1071)(deflated 70%) adding: webroot-uma/alice.html(in = 27775) (out= 17512)(deflated 36%) adding: webroot-uma/index.html(in = 22046) (out= 16060)(deflated 27%) adding: webroot-uma/style.css(in = 811) (out= 416)(deflated 48%) updated module-info: module-info.classbash -
If necessary, adjust the CORS settings for AM.
Understand the UMA API with an API descriptor
The UMA share endpoint serves API descriptors at runtime. When you retrieve an API descriptor for the endpoint, a JSON that describes the API for the endpoint is returned.
You can use the API descriptor with a tool such as Swagger UI to generate a web page that helps you to view and test the endpoint. For information, refer to API descriptors.
IG as a microgateway
This section describes how to use the ForgeRock Token Validation Microservice to resolve and cache OAuth 2.0 access tokens when protecting API resources. The section is based on the example in Introspecting stateful access tokens, in the Token Validation Microservice’s User guide.
For information about the architecture, refer to IG as a microgateway. The following figure illustrates the flow of information when a client requests access to a protected microservice, providing a stateful access token as credentials:

Before you start, download and run the sample application as described in Use the sample application. The sample application acts as Microservice A.
-
Set up the example in Introspect stateful access tokens, in the Token Validation Microservice’s User guide.
-
In AM, edit the microservice client to add a scope to access the protected microservice:
-
Select Applications > OAuth 2.0 > Clients.
-
Select
microservice-client, and add the scopemicroservice-A.
-
-
Add the following route to IG:
-
Linux
-
Windows
$HOME/.openig/config/routes/mgw.json
%appdata%\OpenIG\config\routes\mgw.json
{ "properties": { "introspectOAuth2Endpoint": "http://mstokval.example.com:9090" }, "capture": "all", "name": "mgw", "baseURI": "http://app.example.com:8081", "condition": "${matches(request.uri.path, '^/home/mgw')}", "handler": { "type": "Chain", "config": { "filters": [ { "name": "OAuth2ResourceServerFilter-1", "type": "OAuth2ResourceServerFilter", "config": { "requireHttps": false, "accessTokenResolver": { "name": "TokenIntrospectionAccessTokenResolver-1", "type": "TokenIntrospectionAccessTokenResolver", "config": { "endpoint": "&{introspectOAuth2Endpoint}/introspect", "providerHandler": "ForgeRockClientHandler" } }, "scopes": ["microservice-A"] } } ], "handler": "ReverseProxyHandler" } } }jsonNotice the following features of the route:
-
The route matches requests to IG on
http://ig.example.com:8080/home/mgw, and rebases them to the sample application, onhttp://app.example.com:8081. -
The OAuth2ResourceServerFilter expects an OAuth 2.0 access token in the header of the incoming authorization request, with the scope
microservice-A. -
If the filter successfully validates the access token, the ReverseProxyHandler passes the request to the sample application.
-
-
Test the setup:
-
With AM, IG, the Token Validation Microservice, and the sample application running, get an access token from AM, using the scope
microservice-A:$ mytoken=$(curl -s \ --request POST \ --url http://am.example.com:8088/openam/oauth2/access_token \ --user microservice-client:password \ --data grant_type=client_credentials \ --data scope=microservice-A --silent | jq -r .access_token)bash -
View the access token:
$ echo $mytokenbash -
Call IG to access microservice A:
$ curl -v --header "Authorization: Bearer ${mytoken}" http://ig.example.com:8080/home/mgwbashThe home page of the sample application is displayed.
-