Entrust Connector
The Entrust connector lets you use Entrust adaptive authentication in your PingOne DaVinci flow.
You can use the Entrust connector to:
-
Profile a user’s device and perform multi-factor authentication (MFA) using:
-
A one-time passcode (OTP) through SMS or email
-
A time-based one-time passcode (TOTP) through a hardware or software token
-
Setup
Adding an application in Entrust
The connector needs an application ID to communicate with Entrust.
To get the application ID, complete the steps in "Integrate Authentication API with Identity as a Service" in the Entrust administrator documentation.
For a direct link to the documentation, modify the following URL: https://<your Entrust domain>/documentation/help/admin/index.htm#t=Resources%2FAdd_Authentication_API.htm
-
For Source of Client IP Address for Risk Conditions, select From the incoming HTTP connection.
-
Copy the Application ID. You’ll use it when you set up the connector configuration.
-
Configure a resource rule as described in the Entrust documentation.
Configuring the Entrust connector
Add the connector in PingOne DaVinci as shown in Adding a connector, then configure it as follows.
Using the connector in a flow
Authentication
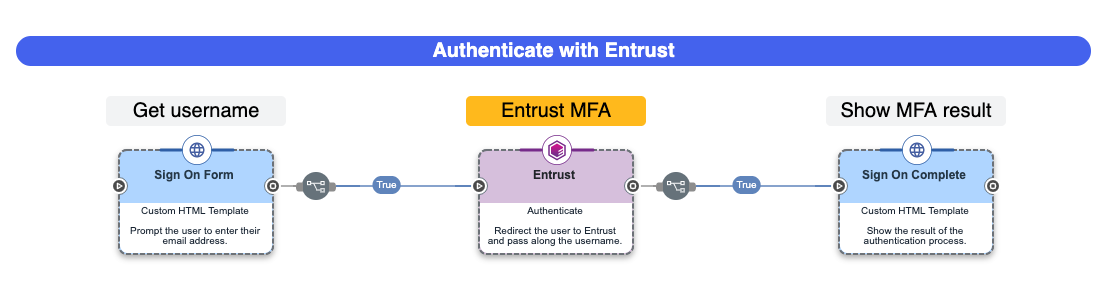
This flow asks a user to authenticate with Entrust. It asks the user to enter their user ID in an HTML form, prompts them to select and complete a Entrust authentication method, then shows the results on an HTML page.
-
Download the Entrust Authentication flow template. Learn more in Using PingOne DaVinci flow templates.
-
(Optional) Add transaction details:
-
On the flow canvas, select the Authenticate (Entrust) node.
-
On the General tab, in the Transaction Details section, add attributes as key-value pairs. These are sent to Entrust as part of the authentication process.
You can dynamically populate values by clicking {} and selecting a variable from elsewhere in your flow.
-
-
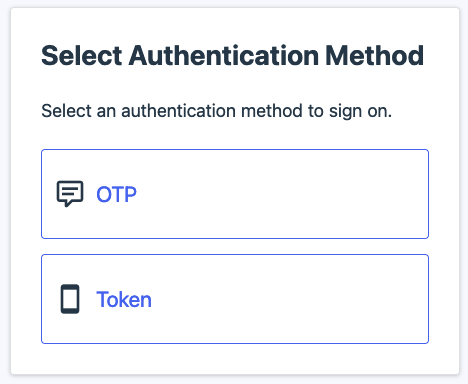
(Optional) Customize the default Authenticator Selection interface.
-
On the flow canvas, select the Authenticate (Entrust) node.
-
On the Custom tab, in the Select Authenticator section, modify the HTML Template, CSS, and Script fields.
-
Click Switch View to display the HTML formatted with syntax highlighting.
-
Click the Maximize(
 ) icon to give yourself more room to work.
 -
To access a variety of useful tools, right-click the field when you’re in syntax highlighting mode (dark background).
-
-
-
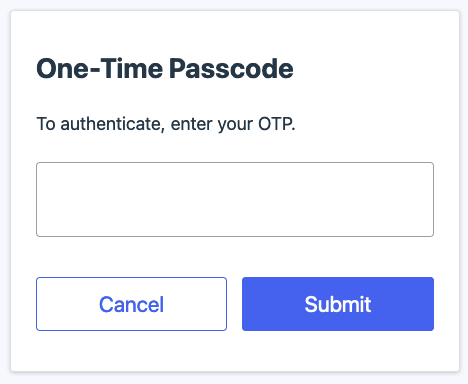
(Optional) Modify the default OTP Input interface on the Custom tab.
-
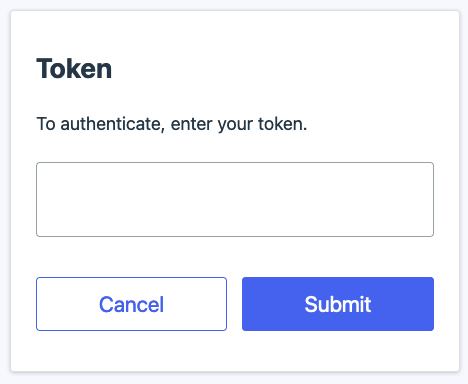
(Optional) Modify the default Token Input interface on the Custom tab.
-
Test the flow.
-
Click Save, Deploy, then Try Flow.
-
On the Sign On page, enter your Entrust user ID, such as
jsmith@example.com. -
Select your authentication method and complete the authentication process.
-
See the result of the authentication process.
-
Capabilities
Authenticate
Authenticate users with Entrust.
Show details
-
Properties
-
Input Schema
-
Output Schema
- User ID textField required
-
The unique ID of the user you want to authenticate.
- Transaction Details keyValueList
-
Additional transaction details to send to Entrust.
-
default object
-
properties object
-
serviceDomain string required
-
applicationId string required
-
userId string required
-
-
-
output object
-
statusCode integer
-
rawResponse object
-