PingOne Advanced Identity Cloud Access Request Connector
The PingOne Advanced Identity Cloud Access Request connector lets you manage users and create access requests in PingOne Advanced Identity Cloud in your PingOne DaVinci flow.
You can use the PingOne Advanced Identity Cloud Access Request connector to:
-
Manage users
-
Create access requests
-
Make custom API calls
Setup
Setting up PingOne Advanced Identity Cloud
- Setting up a service account
-
The service account acts like an administrator account and is required for all user CRUD capabilities as well as for System Requests using the Make a Custom API Call capability.
To set up a service account:
-
Sign on to the Advanced Identity Cloud admin portal.
-
Select Account, then Tenant Settings.
-
Under Service Accounts, select New Service Account.
-
Give the new service account a name and select
fr:idm:* All Identity Management APIs. -
Click Save.
-
Note the ID. You will use it for the Service Account ID in the connector configuration.
-
Click Download Key to save the key as a
.jwkfile. You will use it for the Service Account Key in the connector configuration.
-
- Setting up an end user account
-
The end user account acts on behalf of any single user and is required for user-centric capabilities, such as Get Request, Get Requestable Items, and Create Request, as well as for the End User Requests using the Make a Custom API Call. This setup is not required for using the connector’s user CRUD capabilities or making a custom API call.
The Frodo command-line interface (CLI) is a Ping Identity-developed utility that allows for advanced management of Advanced Identity Cloud. The following steps create credentials that are unique to your PingOne DaVinci environment and you can only have one set of credentials for Advanced Identity Cloud for a given PingOne DaVinci environment. If you have multiple environments, such as for staging and production, repeat these steps so each PingOne DaVinci environment has its own end user credentials in your Advanced Identity Cloud tenant.
To set up an end user account:
-
Install Frodo CLI 2.0.0-36 or later.
-
In your CLI, enter the following command:
% brew tap rockcarver/frodo-cli
-
Install the latest pre-release by entering the following command:
% brew install frodo-cli-next
-
-
Link the Frodo CLI to your Identity Cloud environment. In your CLI, enter the following command, adding your Advanced Identity Cloud
emailandpasswordcredentials:% frodo conn save https://openam-frodo-dev.forgeblocks.com/am
<email>'<password>' -
Use the Frodo CLI to create a client ID for the end user and the OIDC issuer.
-
For regular environments, enter the following command, adding your
client ID,domain,DaVinci environment ID, andIdentity Cloud tenant IDparameters:% frodo admin generate-rfc7523-authz-grant-artefacts --client-id <client ID> --scope "openid fr:am:* fr:idm:* fr:iga:*" --iss https://<domain>/<DaVinci environment ID>/davinci <Identity Cloud tenant ID>
See the following example of the command with the appropriate parameters:
+
% frodo admin generate-rfc7523-authz-grant-artefacts --client-id myclientid --scope "openid fr:am:* fr:idm:* fr:iga:*" --iss https://auth.pingone.eu/b5063c3e-d9c8-42c6-99bf-9e19a96a617b/davinci open-am-mycompany
-
For a custom domain environment, enter the following command, adding your
client ID,domain, andIdentity Cloud tenant IDparameters:% frodo admin generate-rfc7523-authz-grant-artefacts --client-id <client ID> --scope "openid fr:am:* fr:idm:* fr:iga:*" --iss https://<domain>/davinci <Identity Cloud tenant ID>
See the following example of the command with the appropriate parameters:
+
% frodo admin generate-rfc7523-authz-grant-artefacts --client-id myclientid --scope "openid fr:am:* fr:idm:* fr:iga:*" --iss https://mydomain.com/davinci open-am-mydomain
-
-
Copy the End User Client ID and End User Client Private Key from that end user account to your PingOne Advanced Identity Cloud Access Request connector configuration.
-
Configuring the PingOne Advanced Identity Cloud Access Request connector
Add the connector in PingOne DaVinci as shown in Adding a connector, then configure it as follows.
Connector configuration
Service Account ID
The account ID from your PingOne Advanced Identity Cloud service account. Paste the ID that you noted when you set up the service account.
Using the connector in a flow
Manage users in Identity Cloud
The connector has several capabilities that allow you to manage users:
-
Find Users
-
Get User Information
-
Create User
-
Update User
-
Delete User
No special configuration is needed. Add the capability and populate its properties according to the help text.
Creating access requests
You can use the PingOne Advanced Identity Cloud Access Request connector to allow a user to create an access request. If you know the information about the access request you want to create, such as the IDs for the user and entitlements, you can use the Create Request capability directly. If you need to get that information at runtime, you can use the Get User Information or Get List of Requestable Items capabilities first and use the results in the Create Request capability.
To create an access request:
-
Add a node in the flow with the capability to capture a user identifier, such as email or username.
-
Add the PingOne Advanced Identity Cloud Access Request conenctor with Get Request in a subsequent node in the flow. Configure with the Identity Management Attribute and specific Identifier captured earlier in the field.
-
Add another node with the Get Requestable Items capability and configure with the Identity Management Attribute and specific Identifier captured earlier in the field.
-
Add another node with the Create Request capability and configure based on the help text.
You can get User IDs, Application IDs, Entitlement IDs and Role IDs using the Get Requestable Items capability and include them as variables in the Create Request capability configuration fields. The following screenshot shows the valid JSON structure for all of the ID fields as well as the format for a variable:
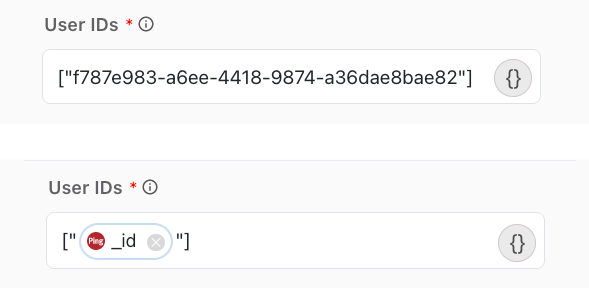
The above examples show a single ID. Separate multiple IDs with a comma, for example: ["1234", "2345", "3456"].
Creating a custom API call
If you want to do something that isn’t supported by one of the provided capabilities, you can use the Make a Custom API Call capability to define your own action.
This capability uses the credentials from your connector to make an API call with the HTTP method, headers, query parameters, and body you specify. You can use the Request Type list to change between System Requests and End User Requests.
|
System Requests are used for general administration of Advanced Identity Cloud, such as user management. End User Requests are used for user-centric tasks with Identity Governance, such as managing access requests and access reviews. |
Capabilities
Find Users
Search for users based on identifier or filter.
Show details
-
Properties
-
Input Schema
-
Output Schema
- Custom Filter toggleSwitch
-
When enabled, you can search for users based on a custom filter instead of an identifier.
- Filter textField
-
The Common REST filter query to use, such as "givenName eq 'John' and sn eq 'Doe'
". Learn more in the IDM documentation > REST API Reference > Common REST > Query."
- Identity Management Attributes textFieldArrayView
-
Select the attribute(s) that contains the user identifier provided in the identifier field. Used to identify the user.
- Identifier textField
-
The unique identifier, such as "jsmith@example.com". This is checked against the selected Identity Management Attribute(s).
-
default object
-
properties object
-
baseURL string required
-
realm string required
-
serviceAccountId string required
-
serviceAccountprivateKey string
-
useCustomFilter boolean required
-
customFilter string
-
matchAttributes array
-
userIdentifier string
-
-
-
output object
-
rawResponse object
-
result array
-
resultCount integer
-
pagedResultsCookie string
-
totalPagedResultsPolicy string
-
totalPagedResults integer
-
remainingPagedResults integer
-
-
statusCode number
-
headers object
-
userIds array
-
Get User Information
Get information about a user.
Show details
-
Properties
-
Input Schema
-
Output Schema
- Identity Management Attribute dropDown
-
Select the attribute that contains the user identifier provided in the identifier field. Used to identify the user.
-
User ID (Default)
-
Username
-
Email
-
- Identifier textField
-
The unique identifier, such as "jsmith@example.com". This is checked against the selected Identity Management Attribute(s).
-
default object
-
properties object
-
baseURL string required
-
realm string required
-
serviceAccountId string required
-
serviceAccountPrivateKey string required
-
matchAttribute string required
-
userIdentifier string required
-
-
-
output object
-
rawResponse object
-
_id string
-
_rev string
-
country string
-
frUnindexedString1 string
-
mail string
-
memberOfOrgIDs array
-
frIndexedDate5 string
-
frUnindexedString2 string
-
frIndexedDat4 string
-
frUnindexedString3 string
-
frIndexedDate3 string
-
frUnindexedString4 string
-
postalCode string
-
frUnindexedString5 string
-
profileImage string
-
frIndexedString5 string
-
frIndexedString4 string
-
frIndexedString3 string
-
frIndexedString2 string
-
frIndexedString1 string
-
frIndexedMultivalued3 array
-
frUnindexedInteger5 number
-
consentedMappings array
-
frIndexedMultivalued4 array
-
frUnindexedInteger4 number
-
frIndexedMultivalued5 array
-
frUnindexedInteger3 number
-
frUnindexedInteger2 number
-
effectiveGroups array
-
frIndexedMultivalued1 array
-
frIndexedMultivalued2 array
-
frUnindexedInteger1 number
-
givenName string
-
stateProvince string
-
postalAddress string
-
telephoneNumber string
-
city string
-
displayName string
-
effectiveAssignments array
-
description string
-
effectiveApplications array
-
accountStatus string
-
frUnindexedDate3 string
-
frUnindexedMultivalued1 array
-
frUnindexedDate2 string
-
frUnindexedDate5 string
-
frUnindexedMultivalued3 array
-
frUnindexedDate4 string
-
frUnindexedMultivalued2 array
-
aliasList array
-
frUnindexedMultivalued5 array
-
frUnindexedMultivalued4 array
-
kbaInfo array
-
frIndexedInteger4 number
-
frIndexedInteger3 number
-
frIndexedInteger2 number
-
frIndexedInteger1 number
-
sn string
-
frUnindexedDate1 string
-
frIndexedInteger5 number
-
preferences object
-
userName string
-
frIndexedDate2 string
-
frIndexedDate1 string
-
effectiveRoles array
-
-
statusCode number
-
headers object
-
Create User
Create a new user account.
Show details
-
Properties
-
Input Schema
-
Output Schema
- Username textField required
-
The username assigned to the new user.
- First Name textField required
-
The first name of the new user.
- Last Name textField required
-
The last name of the new user.
- Email Address textField required
-
The email address of the new user.
- Password textField
-
The password for the new user.
- User Attributes variableInputList
-
Add user attributes and their values.
-
default object
-
properties object
-
baseURL string required
-
realm string required
-
serviceAccountId string required
-
serviceAccountPrivateKey string required
-
userName string required
-
givenName string required
-
sn string required
-
mail string required
-
password string
-
userAttributes array
-
-
-
output object
-
rawResponse object
-
_id string
-
_rev string
-
country string
-
frUnindexedString1 string
-
mail string
-
memberOfOrgIDs array
-
frIndexedDate5 string
-
frUnindexedString2 string
-
frIndexedDat4 string
-
frUnindexedString3 string
-
frIndexedDate3 string
-
frUnindexedString4 string
-
postalCode string
-
frUnindexedString5 string
-
profileImage string
-
frIndexedString5 string
-
frIndexedString4 string
-
frIndexedString3 string
-
frIndexedString2 string
-
frIndexedString1 string
-
frIndexedMultivalued3 array
-
frUnindexedInteger5 number
-
consentedMappings array
-
frIndexedMultivalued4 array
-
frUnindexedInteger4 number
-
frIndexedMultivalued5 array
-
frUnindexedInteger3 number
-
frUnindexedInteger2 number
-
effectiveGroups array
-
frIndexedMultivalued1 array
-
frIndexedMultivalued2 array
-
frUnindexedInteger1 number
-
givenName string
-
stateProvince string
-
postalAddress string
-
telephoneNumber string
-
city string
-
displayName string
-
effectiveAssignments array
-
description string
-
effectiveApplications array
-
accountStatus string
-
frUnindexedDate3 string
-
frUnindexedMultivalued1 array
-
frUnindexedDate2 string
-
frUnindexedDate5 string
-
frUnindexedMultivalued3 array
-
frUnindexedDate4 string
-
frUnindexedMultivalued2 array
-
aliasList array
-
frUnindexedMultivalued5 array
-
frUnindexedMultivalued4 array
-
kbaInfo array
-
frIndexedInteger4 number
-
frIndexedInteger3 number
-
frIndexedInteger2 number
-
frIndexedInteger1 number
-
sn string
-
frUnindexedDate1 string
-
frIndexedInteger5 number
-
preferences object
-
userName string
-
frIndexedDate2 string
-
frIndexedDate1 string
-
effectiveRoles array
-
-
statusCode number
-
headers object
-
Update User
Update information about a user.
Show details
-
Properties
-
Input Schema
-
Output Schema
- Identity Management Attribute dropDown
-
Select the attribute that contains the user identifier provided in the identifier field. Used to identify the user.
-
User ID (Default)
-
Username
-
Email
-
- Identifier textField
-
The unique identifier, such as "jsmith@example.com". This is checked against the selected Identity Management Attribute(s).
- User Attributes variableInputList
-
Add user attributes and their values.
-
default object
-
properties object
-
baseURL string required
-
realm string required
-
serviceAccountId string required
-
serviceAccountPrivateKey string required
-
userAttributes array
-
-
-
output object
-
rawResponse object
-
_id string
-
_rev string
-
country string
-
frUnindexedString1 string
-
mail string
-
memberOfOrgIDs array
-
frIndexedDate5 string
-
frUnindexedString2 string
-
frIndexedDat4 string
-
frUnindexedString3 string
-
frIndexedDate3 string
-
frUnindexedString4 string
-
postalCode string
-
frUnindexedString5 string
-
profileImage string
-
frIndexedString5 string
-
frIndexedString4 string
-
frIndexedString3 string
-
frIndexedString2 string
-
frIndexedString1 string
-
frIndexedMultivalued3 array
-
frUnindexedInteger5 number
-
consentedMappings array
-
frIndexedMultivalued4 array
-
frUnindexedInteger4 number
-
frIndexedMultivalued5 array
-
frUnindexedInteger3 number
-
frUnindexedInteger2 number
-
effectiveGroups array
-
frIndexedMultivalued1 array
-
frIndexedMultivalued2 array
-
frUnindexedInteger1 number
-
givenName string
-
stateProvince string
-
postalAddress string
-
telephoneNumber string
-
city string
-
displayName string
-
effectiveAssignments array
-
description string
-
effectiveApplications array
-
accountStatus string
-
frUnindexedDate3 string
-
frUnindexedMultivalued1 array
-
frUnindexedDate2 string
-
frUnindexedDate5 string
-
frUnindexedMultivalued3 array
-
frUnindexedDate4 string
-
frUnindexedMultivalued2 array
-
aliasList array
-
frUnindexedMultivalued5 array
-
frUnindexedMultivalued4 array
-
kbaInfo array
-
frIndexedInteger4 number
-
frIndexedInteger3 number
-
frIndexedInteger2 number
-
frIndexedInteger1 number
-
sn string
-
frUnindexedDate1 string
-
frIndexedInteger5 number
-
preferences object
-
userName string
-
frIndexedDate2 string
-
frIndexedDate1 string
-
effectiveRoles array
-
-
statusCode number
-
headers object
-
Delete user
Delete a user account.
Show details
-
Properties
-
Input Schema
-
Output Schema
- Identity Management Attribute dropDown
-
Select the attribute that contains the user identifier provided in the identifier field. Used to identify the user.
-
User ID (Default)
-
Username
-
Email
-
- Identifier textField
-
The unique identifier, such as "jsmith@example.com". This is checked against the selected Identity Management Attribute(s).
-
default object
-
properties object
-
baseURL string required
-
realm string required
-
serviceAccountId string required
-
serviceAccountPrivateKey string required
-
matchAttribute array required
-
userIdentifier string required
-
-
-
output object
-
rawResponse object
-
_id string
-
_rev string
-
country string
-
frUnindexedString1 string
-
mail string
-
memberOfOrgIDs array
-
frIndexedDate5 string
-
frUnindexedString2 string
-
frIndexedDat4 string
-
frUnindexedString3 string
-
frIndexedDate3 string
-
frUnindexedString4 string
-
postalCode string
-
frUnindexedString5 string
-
profileImage string
-
frIndexedString5 string
-
frIndexedString4 string
-
frIndexedString3 string
-
frIndexedString2 string
-
frIndexedString1 string
-
frIndexedMultivalued3 array
-
frUnindexedInteger5 number
-
consentedMappings array
-
frIndexedMultivalued4 array
-
frUnindexedInteger4 number
-
frIndexedMultivalued5 array
-
frUnindexedInteger3 number
-
frUnindexedInteger2 number
-
effectiveGroups array
-
frIndexedMultivalued1 array
-
frIndexedMultivalued2 array
-
frUnindexedInteger1 number
-
givenName string
-
stateProvince string
-
postalAddress string
-
telephoneNumber string
-
city string
-
displayName string
-
effectiveAssignments array
-
description string
-
effectiveApplications array
-
accountStatus string
-
frUnindexedDate3 string
-
frUnindexedMultivalued1 array
-
frUnindexedDate2 string
-
frUnindexedDate5 string
-
frUnindexedMultivalued3 array
-
frUnindexedDate4 string
-
frUnindexedMultivalued2 array
-
aliasList array
-
frUnindexedMultivalued5 array
-
frUnindexedMultivalued4 array
-
kbaInfo array
-
frIndexedInteger4 number
-
frIndexedInteger3 number
-
frIndexedInteger2 number
-
frIndexedInteger1 number
-
sn string
-
frUnindexedDate1 string
-
frIndexedInteger5 number
-
preferences object
-
userName string
-
frIndexedDate2 string
-
frIndexedDate1 string
-
effectiveRoles array
-
-
statusCode number
-
headers object
-
Get Requestable Items
Get a list of requestable items.
Show details
-
Properties
-
Input Schema
-
Output Schema
- Identity Management Attribute dropDown
-
Select the attribute that contains the user identifier provided in the identifier field. Used to identify the user.
-
User ID (Default)
-
Username
-
Email
-
- Identifier textField
-
The unique identifier, such as "jsmith@example.com". This is checked against the selected Identity Management Attribute(s).
-
default object
-
properties object
-
baseURL string required
-
realm string required
-
serviceAccountId string required
-
serviceAccountPrivateKey string required
-
endUserClientPrivateKey string required
-
endUserClientId string required
-
matchAttribute string required
-
userIdentifier string required
-
-
-
output object
-
rawResponse object
-
result array
-
searchAfterKey array
-
totalCount integer
-
resultCount integer
-
-
statusCode number
-
headers object
-
applicationIds array
-
entitlementIds array
-
roleIds array
-
Create Request
Start an access request by providing a list of requested items.
Show details
-
Properties
-
Input Schema
-
Output Schema
- Identity Management Attribute dropDown
-
Select the attribute that contains the user identifier provided in the identifier field. Used to identify the user.
-
User ID (Default)
-
Username
-
Email
-
- Identifier textField
-
The unique identifier, such as "jsmith@example.com". This is checked against the selected Identity Management Attribute(s).
- User IDs textField
-
Array of user IDs in JSON array format, such as ["1d0e…ca94b","debd…2bcf","11e4…cd95"].
- Application IDs textField
-
Array of application IDs in JSON array format, such as ["1d0e…ca94b","debd…2bcf","11e4…cd95"].
- Entitlement IDs textField
-
Array of entitlement IDs in JSON array format, such as ["1d0e…ca94b","debd…2bcf","11e4…cd95"].
- Role IDs textField
-
Array of role IDs in JSON array format, such as ["1d0e…ca94b","debd…2bcf","11e4…cd95"].
- Priority dropDown required
-
Select a priority level for the request. Your organization can consider the priority level when reviewing the request.
-
Low (Default)
-
Medium
-
High
-
- Request Action dropDown required
-
Select an action for the request.
-
Add (Default)
-
Remove
-
- Expiry Date dateTimePicker
-
The date that the request should expire. Use this when the resource is required before a certain date and the request won’t be relevant after that date.
- Justification textField
-
Comment on the reason for requesting access to the selected resources.
-
default object
-
properties object
-
baseURL string required
-
realm string required
-
endUserClientId string required
-
endUserClientPrivateKey string required
-
matchAttribute string required
-
userIdentifier string required
-
userIds string required
-
applicationIds string
-
entitlementIds string
-
roleIds array
-
priority string required
-
requestType string required
-
expiryDate string
-
justification string
-
-
-
output object
-
rawResponse object
-
result array
-
-
statusCode number
-
headers object
-
Get Request
Get information about an existing request.
Show details
-
Properties
-
Input Schema
-
Output Schema
- Identity Management Attribute dropDown
-
Select the attribute that contains the user identifier provided in the identifier field. Used to identify the user.
-
User ID (Default)
-
Username
-
Email
-
- Identifier textField
-
The unique identifier, such as "jsmith@example.com". This is checked against the selected Identity Management Attribute(s).
- Request ID textField required
-
The unique ID of the request, such as "bcac0387-e5ea-4c22-981c-df0ea340f1ee".
-
default object
-
properties object
-
baseURL string required
-
realm string required
-
serviceAccountId string required
-
serviceAccountPrivateKey string required
-
endUserClientPrivateKey string required
-
endUserClientId string required
-
matchAttribute string required
-
userIdentifier string required
-
requestId string required
-
-
-
output object
-
rawResponse object
-
id string
-
requester object
-
mail string
-
givenName string
-
id string
-
sn string
-
userName string
-
isAdmin boolean
-
-
requestType string
-
request object
-
common object
-
priority string
-
expiryDate string
-
justification string
-
entitlementId string
-
applicationId string
-
userId string
-
isDraft boolean
-
-
-
user object
-
_rev string
-
accountStatus string
-
aliasList array
-
assignedDashboard array
-
city string
-
cn string
-
consentedMappings array
-
country string
-
description string
-
displayName string
-
effectiveApplications array
-
effectiveAssignments array
-
effectiveGroups array
-
effectiveRoles array
-
fr object
-
realm string
-
-
frIndexedDate1 string
-
frIndexedDate2 string
-
frIndexedDate3 string
-
frIndexedDate4 string
-
frIndexedDate5 string
-
frIndexedInteger1 number
-
frIndexedInteger2 number
-
frIndexedInteger3 number
-
frIndexedInteger4 number
-
frIndexedInteger5 number
-
frIndexedMultivalued1 array
-
frIndexedMultivalued2 array
-
frIndexedMultivalued3 array
-
frIndexedMultivalued4 array
-
frIndexedMultivalued5 array
-
frIndexedString1 string
-
frIndexedString2 string
-
frIndexedString3 string
-
frIndexedString4 string
-
frIndexedString5 string
-
frUnindexedDate1 string
-
frUnindexedDate2 string
-
frUnindexedDate3 string
-
frUnindexedDate4 string
-
frUnindexedDate5 string
-
frUnindexedInteger1 string
-
frUnindexedInteger2 string
-
frUnindexedInteger3 string
-
frUnindexedInteger4 string
-
frUnindexedInteger5 string
-
frUnindexedMultivalued1 array
-
frUnindexedMultivalued2 array
-
frUnindexedMultivalued3 array
-
frUnindexedMultivalued4 array
-
frUnindexedMultivalued5 array
-
frUnindexedString1 string
-
frUnindexedString2 string
-
frUnindexedString3 string
-
frUnindexedString4 string
-
frUnindexedString5 string
-
givenName string
-
id string
-
kbaInfo array
-
lastSync string
-
mail string
-
memberOfOrgIDs array
-
postalAddress string
-
postalCode string
-
preferences object
-
marketing boolean
-
updates boolean
-
-
profileImage string
-
sn string
-
stateProvince string
-
telephoneNumber string
-
userName string
-
-
glossary object
-
idx object
-
/entitlement object
-
entitlementOwner string
-
requestable boolean
-
-
/application object
-
requestable boolean
-
-
-
types array
-
-
entitlement object
-
Label string
-
Name string
-
_id string
-
-
assignment object
-
_rev string
-
attributes array
-
description string
-
fr object
-
realm string
-
-
id string
-
mapping string
-
metadata object
-
entityType string
-
created string
-
-
name string
-
type string
-
-
application object
-
_rev string
-
fr object
-
realm string
-
-
id string
-
metadata object
-
entityType string
-
created string
-
-
name string
-
templateName string
-
templateVersion string
-
url string
-
-
applicationOwner array
-
decision object
-
status string
-
decision string
-
outcome string
-
startDate string
-
completionDate string
-
deadline string
-
comments array
-
actors object
-
active array
-
-
inactive array
-
actorTags array
-
-
events object
-
expiration object
-
date string
-
-
-
phases array
-
workflow object
-
instanceId string
-
id string
-
-
-
statusCode number
-
headers object
-
Make Custom API Call
Define and use your own API call to Identity Cloud.
Show details
-
Properties
-
Input Schema
-
Output Schema
- Request Type dropDown required
-
The type of request.
-
System Request (Default)
-
End User Request
-
- Identity Management Attribute dropDown
-
Select the attribute that contains the user identifier provided in the identifier field. Used to identify the user.
-
User ID (Default)
-
Username
-
Email
-
- Identifier textField
-
The unique identifier, such as "jsmith@example.com". This is checked against the selected Identity Management Attribute(s).
- Endpoint textField required
-
The Identity Cloud API endpoint.
- HTTP Method dropDown required
-
The HTTP method of the API call.
-
GET
-
POST
-
PUT
-
DELETE
-
PATCH
-
- Query Parameters keyValueList
-
Define additional query parameters for the request.
- Additional Headers keyValueList
-
Additional headers for the request.
- Body codeEditor
-
The body of the API call.
-
default object
-
properties object
-
baseURL string required
-
realm string required
-
serviceAccountId string required
-
serviceAccountPrivateKey string required
-
apiRequestType string required
-
endpoint string required
-
method string required
-
queryParameters array
-
headers array
-
bodyData object
-
-
-
output object
-
rawResponse object
-
statusCode number
-
headers object
-