Flow Conductor Connector
The Flow Conductor connector lets your PingOne DaVinci flow initiate asynchronous events in external systems. It also allows you to use another flow as a subflow.
Interacting with external systems
Some authentication workflows require the user to do something in another system, such as clicking a magic link in their email or verifying a document in a mobile app. The Flow Conductor connector simplifies these cases by allowing you to generate the magic link and create a challenge variable that‘s resolved when the link is clicked. Learn more about challenges in the Challenge connector documentation.
The Flow Conductor also allows you to create a secondary path in your flow that’s triggered when the magic link is clicked:
-
In your main flow, a Flow Conductor Out-of-Band Start (Links Only) node generates a magic link or QR code. You can send this link to the user by email, SMS, or another method of your choice. This node also creates the challenge, which gives an HTTP connector the ability to pause the flow until the status of the challenge changes.
-
When the user clicks the magic link, an Out-of-Band Continue node starts a secondary flow. You can use this flow to show a confirmation message, and to trigger the main flow to continue by updating the status of the challenge.
The Start and Continue nodes work as a pair, and they are always attached to the same parent node. DaVinci automatically follows the Start node first and activates the Continue node when the user clicks the magic link that contains the matching challenge ID.
Links to subflows
By linking to subflows, you can simplify visually complex flows by breaking them into smaller components. You can also link to a subflow from as many main flows as you want, so this is a powerful way to centralize your maintenance work.
Subflows are best used for frequently-used groups of nodes that serve a specific purpose. For example, you might create a subflow for registering a multi-factor authentication (MFA) device or letting a user reset their password. Then you could include these in several of your main flows, such as your registration, authentication, and user self-service portal experiences.
Setup
Setting up the Flow Conductor connector configuration
In DaVinci, add a Flow Conductor connection. For help, see Adding a connector.
Connector configuration
Input Schema
When you call on this subflow, it will receive information from your main flow. The input schema defines the structure of that information. For help, see JSON-Schema.org.
Using the connector in a flow
Emailing a magic link to a user, then continuing the flow
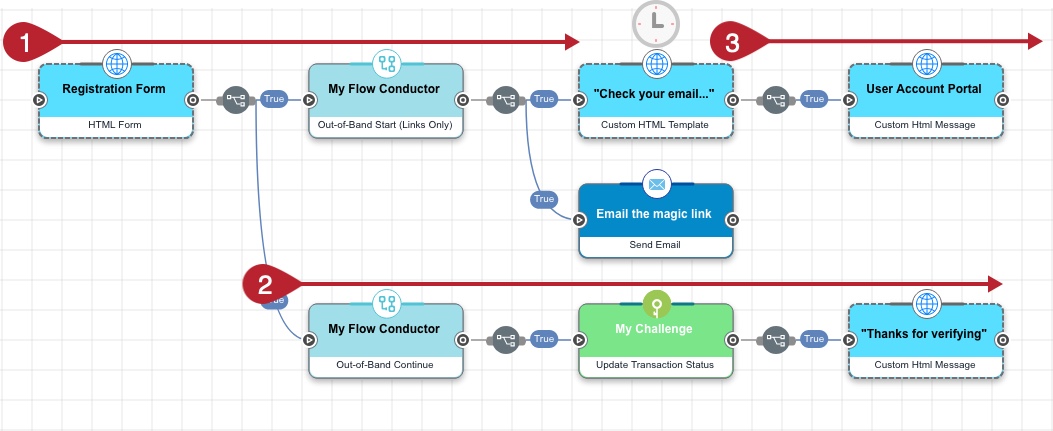
When a guest registers a new user account, you can verify that they own the email address that they entered. We want to pause our main flow until the user clicks the link in their email inbox. We also want to show them a confirmation message in a new browser tab when they click the link. After they click the magic link, our secondary flow will trigger our main flow to bring the user to the User Account Portal.
For this flow, you’ll need:
-
Generate the magic link and the challenge:
-
In your flow, following the registration form, add the Flow Conductor connector, and select the Out-of-Band Start (Links only) capability. Select the node that appears in your flow.
-
In our case, we want to send a text link rather than a QR code, so we’ll leave Generate QR Code turned off.
-
In the Challenge Length field, you can customize the length of the challenge ID. This is a number that DaVinci generates to keep track of this challenge. We’ll refer to this ID elsewhere in our flow, but we don’t need to know the number. Leave it as the default of 32.
-
In the Challenge Expiry field, specify how long you want the flow to wait before timing out.
-
It won’t take the user long to click a magic link, but if your flow has the user taking photos of their drivers license for identity verification, you should give them more time.
-
We’re sending a normal link to the user, so we’ll leave Use Custom Link turned off.
-
You can turn this on in your own flow if you need to customize the URL to point to a mobile app. To customize the URL, point to your equivalent of
com.myApp://skSKD?challenge=.
-
-
Send the magic link to the user:
-
Following your Out-of-Band Start node, add an SMTP connector and select the Send Email capability. Select the node that appears in your flow.
-
In the To Email Address field, select the email address variable from your registration form.
-
In the HTML Message field, include a hyperlink. For the
hrefpart of the link, click {} and select thecontinueLinkvariable from your Flow Conductor node.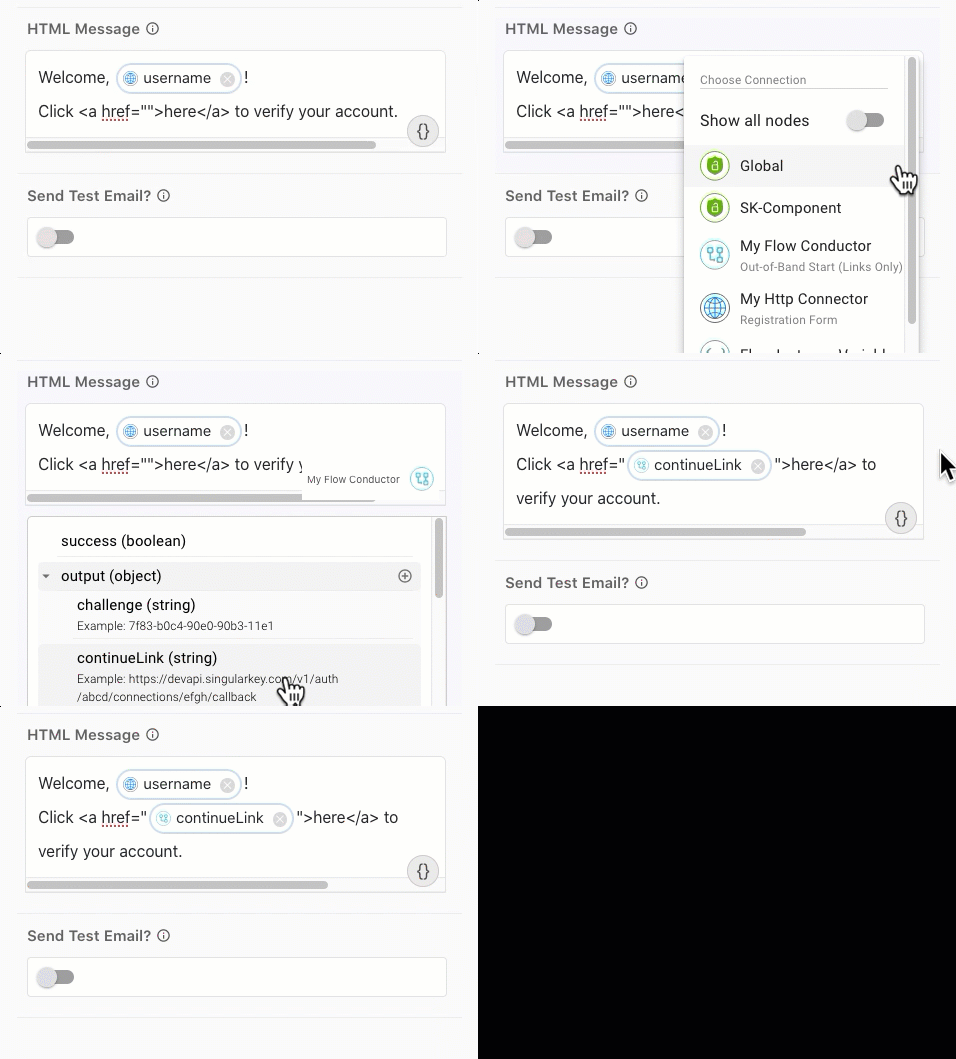
This inserts the magic link with the unique challenge ID associated with our flow.
-
-
Show a page with a “waiting” animation until the user clicks the link:
-
Parallel to your SMTP node, add an HTTP connector and select the Custom HTML Template capability. Select the node that appears in your flow.
-
Build your message in the HTML Template field. To show a “waiting” animation on the page, click {} and select the skpolling variable from SK-Component.
-
In the Challenge field, click {} and select the challenge variable from your Flow Conductor node.
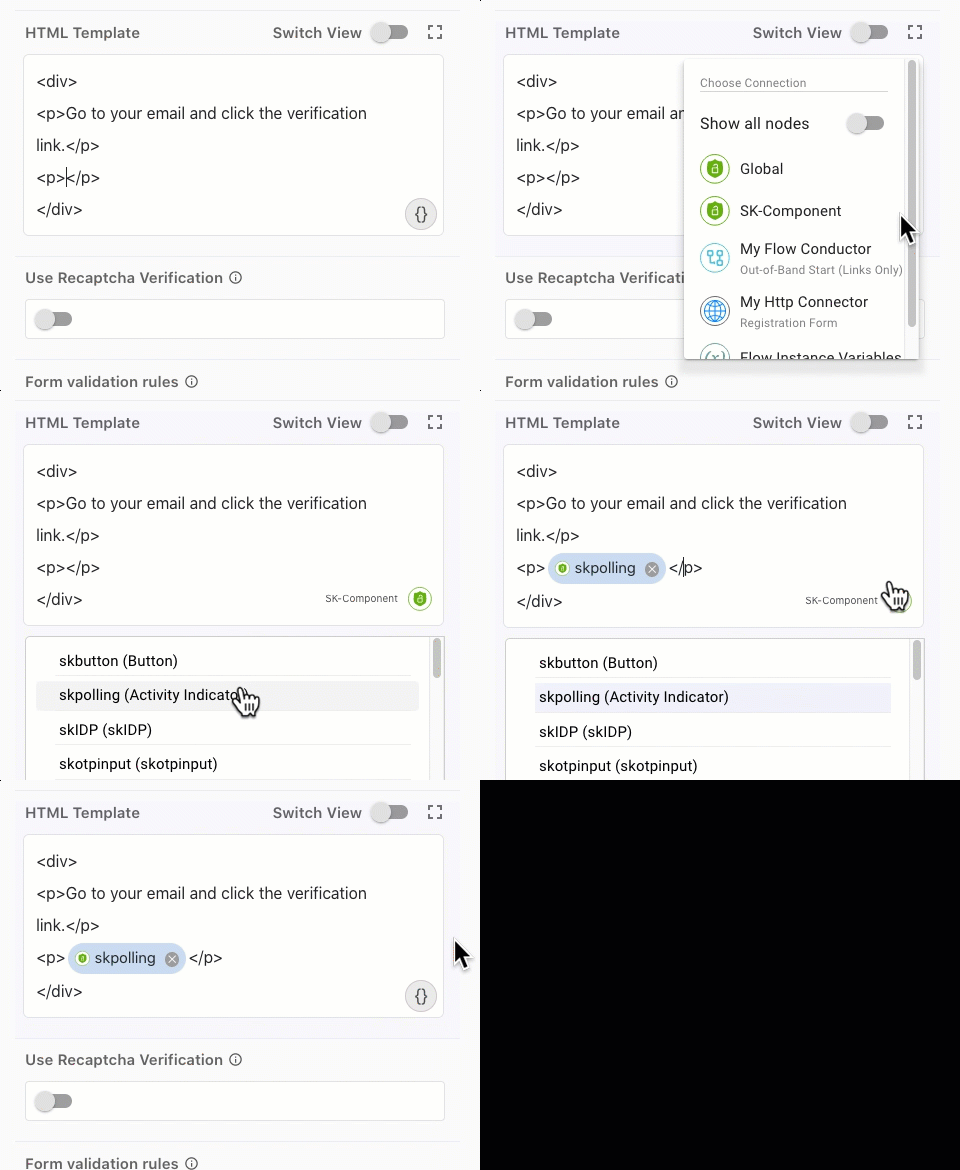
This pauses the main flow on this page until the challenge status changes. We’ll update the challenge status in the secondary flow. Any change in the challenge status, regardless of the value, will cause this flow to continue.
-
-
Build a secondary flow that thanks the user for clicking the link and signals the main flow to continue by resolving the challenge:
-
Following your registration form, add another Flow Conductor connector parallel to the first one. Select the Out-of-Band Continue capability, and click Apply.
You don’t need to configure this node. It starts automatically when the user clicks the magic link.
-
Following your Out-of-Band Continue node, add a Challenge connector and select the Update Transaction Status capability.
-
In the Challenge field, click {} and select the
challengevariable from your Out-of-Band Continue node. -
In the Challenge Status list, select approved. Click Apply.
Because our Custom HTML Template page in the main flow is waiting for this challenge status to change, this update will trigger the flow to continue.
-
Add a “Thanks for verifying” page after your Out-of-Band Continue node. This page will appear when the user clicks the magic link.
-
-
Following your Custom HTML Template “waiting” page in the main flow, continue building the rest of your flow.
For example, you could direct the user to their user account self-service portal.
Linking to a subflow
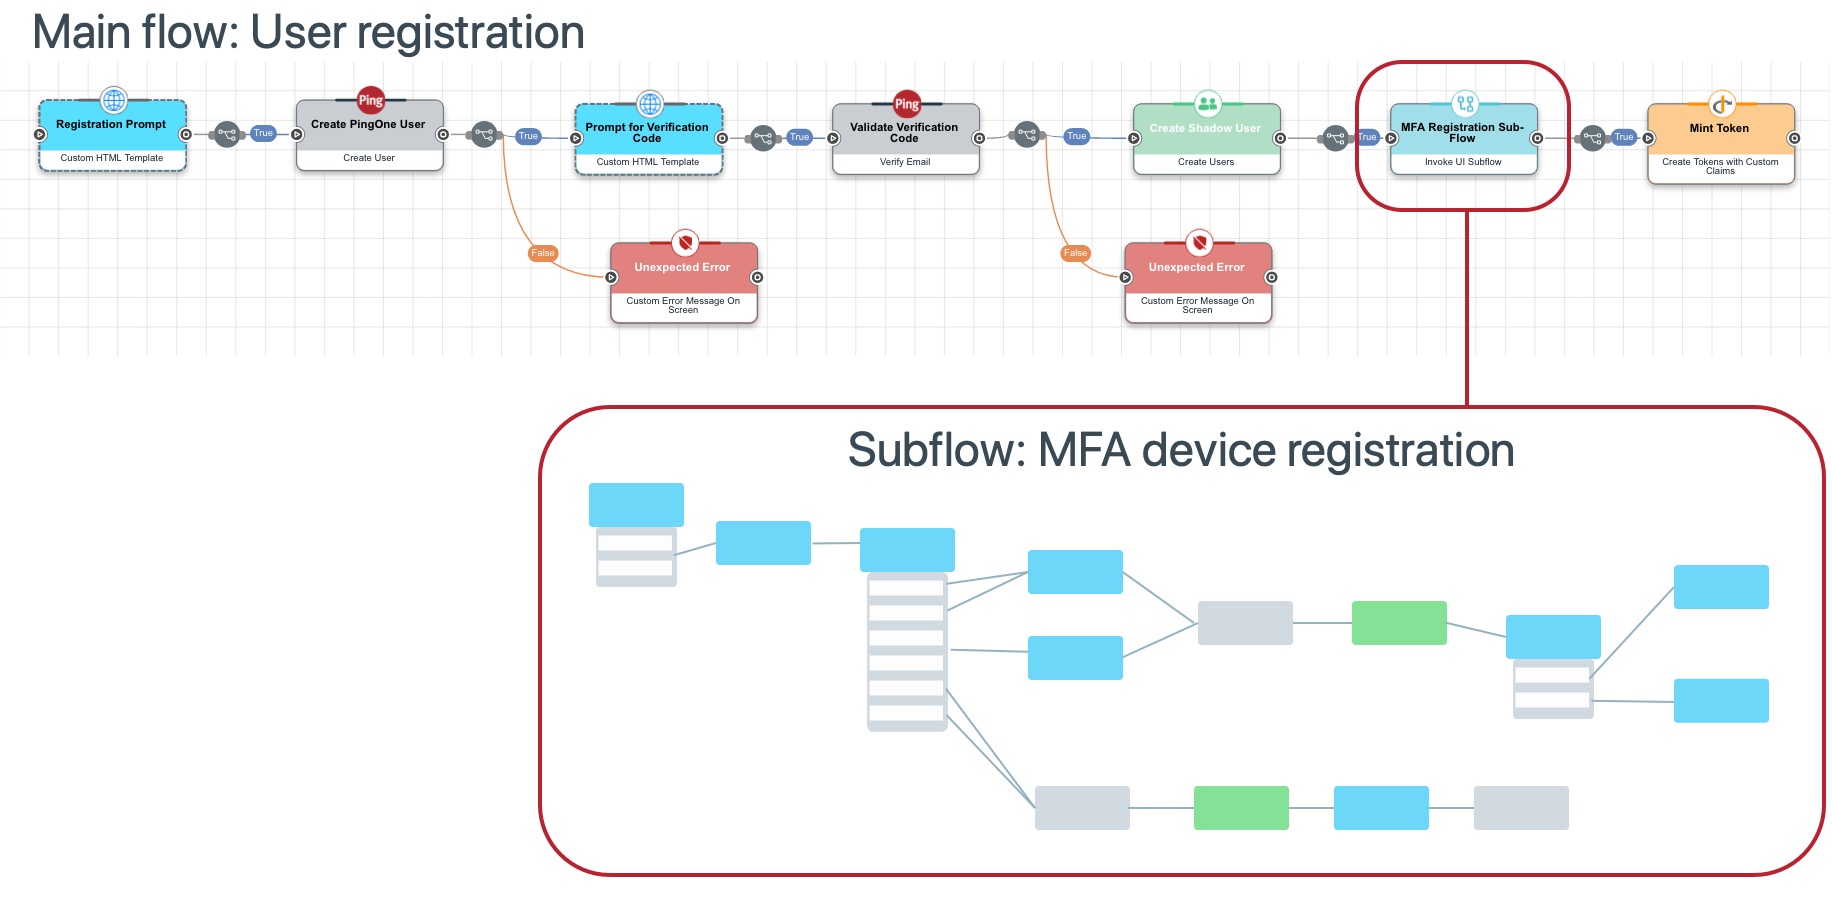
Using subflows lets you organize large flows into smaller pieces that are more manageable and modular. This approach includes a main flow and one or more subflows.
In the example scenario below, the main flow allows guests to register a new user account. As part of the process, the user is prompted to add a multi-factor authentication (MFA) device.
This example organization created a subflow for MFA device management so it can be reused in an authentication flow and a user self-service portal flow.
Before you start, you need a main flow and a subflow. You can create these yourself, or import the PingOne - Register with verify email and MFA enrollment and PingOne - Device registration sub-flow flows in the Ping Identity Marketplace.
-
In your main flow, create a link to your subflow:
-
Add the Flow Conductor connector and select the Invoke UI Subflow capability. Select the node that appears in your flow.
We need this capability because there is a user interface component to our MFA setup experience. If your own flow doesn’t have a UI component, select the Invoke Subflow capability instead.
-
In the Flow list, select the flow that you want to invoke. You can choose any flow in your environment, but you should only choose a flow that would work well in the middle of your main flow.
-
In the Flow Version Id field, enter a version number.
If you want to link to the latest version of the subflow, enter
-1.If you want to use a specific version, click Edit Subflow to open the Flow Studio in a new tab. Open the subflow and click More Options ( ) > Flow Versions to see the list of versions.
-
Click Apply to save your changes.
-
-
Configure the input schema to pass properties from your main flow to your subflow:
-
Click the Edit Subflow link to open the Flow Studio in a new tab.
-
Open your subflow. In the example scenario, this is the MFA device registration flow.
-
Click More Options ( ) > Input Schema
-
Click Add.
-
In the Property Name field, enter the attribute that your subflow needs. In our example case, it’s
pingone_userId. -
In the Data Type list, we’ll select String because it matches the data for the PingOne user ID.
-
(Optional) Click Add to any more properties that your subflow needs.
-
Click Save to save your changes.
-
Click Save to save your flow.
-
-
Configure the output schema to pass properties from your subflow to back to your main flow. To determine the output schema, you can get an example payload and convert it in using an online tool.
-
Copy your raw JSON output:
-
At the end of your subflow, add an HTTP connector and select the Custom HTML Message capability. Click the new node in your flow.
-
In the Message field, click {} and insert the output (object) variable from your the node immediately preceding the HTTP node you’re editing.
-
Click Apply, save, deploy, and run your changes.
-
Copy the JSON payload that appears in your HTML message.
-
Remove the Custom HTML Message node from your flow.
-
-
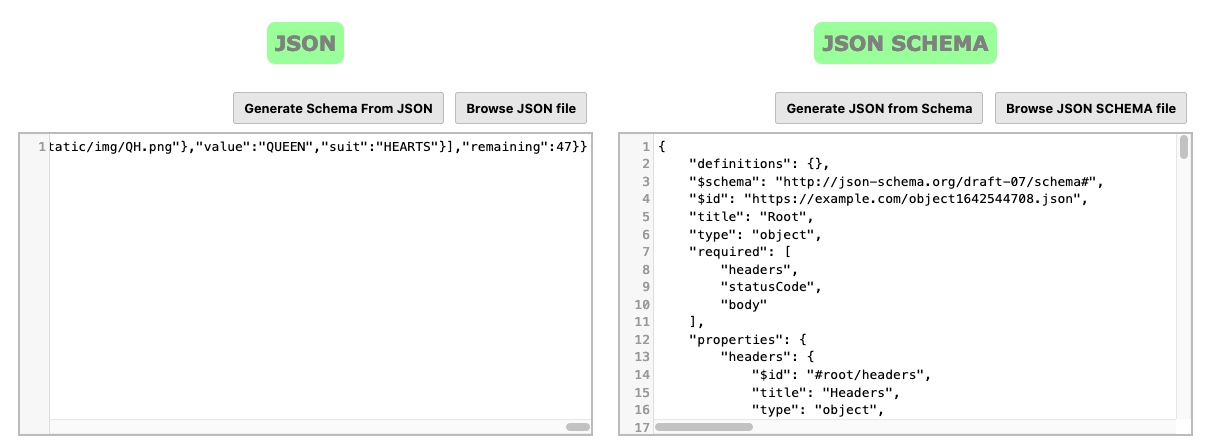
In a browser, open the Online JSON Schema Validator and Generator tool.
-
Paste the JSON response you copied into the JSON field. Click Generate Schema From JSON. Copy the output from the JSON SCHEMA field.
-
In your subflow, click More Options ( ) > Output Schema.
-
In the Output Schema field, paste the output schema that you copied.
-
Click Save to save your changes.
-
Click Save to save your flow.
-
-
Run your main flow to test it.
When your main flow reaches the Flow Conductor node, it jumps over to the MFA setup subflow and passes the necessary properties. When that flow completes, properties from the subflow are carried over and the main flow continues.
Capabilities
Receive Start Flow Redirect
Receive the redirect URI to start the flow.
Show details
- Details
-
- Properties
- authenticatedRequest
dropDown - tokenSigningMethod
dropDown - clientId
textField - clientSecret
textField - issuerUrl
textField - jwksKeys
textArea - tokenHint
textField - connectionId
dropDown - claimsMapping
mapping -
Default:
[
	{
		"value1": "username",
		"value2": "sub",
		"deleteAllowed": false
	},
	{
		"value1": "name",
		"value2": "name",
		"deleteAllowed": false
	},
	{
		"value1": "email",
		"value2": "email",
		"deleteAllowed": false
	}
]
Out-of-Band Start (Links Only)
Receive links through email, SMS, or push notifications to continue the flow outside of the typical path.
Show details
- Details
-
- Properties
- generateQr
toggleSwitch - challengeLength
textField - challengeExpiry
textField - useCustomLink
toggleSwitch - customLink
textField
- Output Schema
- output
object - challenge
string - continueLink
string - continueQr
string
Out-of-Band Continue
Continue the flow in the out-of-band path.
Show details
- Details
-
- Properties
- Node ID when this OOB link expires
textField
Select Node ID when this OOB link expires
- Output Schema
- output
object - status
string - detailStatus
string - rawStatus
string - challenge
string - credId
string
Invoke Subflow
Invoke API-based subflows.
Show details
- Details
-
- Properties
- subFlowId
dropDownAsync - subFlowVersionId
textField - Input Schema
- default
object - cookies
object -
List of cookies associated with the user.
- ip
stringminLength: 1maxLength: 255 -
Ip address of the user in current session.
- userAgent
stringminLength: 1maxLength: 250 -
Information about browser, OS, etc. of user in current session.
- skOpenId
object -
Object containing client id of user.
- origin
stringminLength: 0maxLength: 500 -
Origin
- originCookies
stringminLength: 0maxLength: 5000 -
OriginCookies
Invoke UI Subflow
Invoke UI-based subflows.
Show details
- Details
-
- Properties
- subFlowId
dropDownAsync - subFlowVersionId
textField - Input Schema
- default
object - cookies
object -
List of cookies associated with the user.
- ip
stringminLength: 1maxLength: 255 -
Ip address of the user in current session.
- userAgent
stringminLength: 1maxLength: 250 -
Information about browser, OS, etc. of user in current session.
- skOpenId
object -
Object containing client id of user.
- origin
stringminLength: 0maxLength: 500 -
Origin
- originCookies
stringminLength: 0maxLength: 5000 -
OriginCookies