Azure AD User Management Connector
The Azure AD User Management connector lets you manage users, groups, and software licenses in your PingOne DaVinci flow.
You can use the Azure AD User Management connector to:
-
Query user information
-
Create, update, and delete users
-
List the users in a group
-
Add and remove group members
-
Add and remove software licenses and disable plans
Setup
Resources
For information and setup help, see the following:
-
Microsoft documentation:
-
DaVinci documentation:
Setting up Azure AD
-
Sign on to the Azure portal.
-
Create the application:
-
Search for and select Azure Active Directory.
-
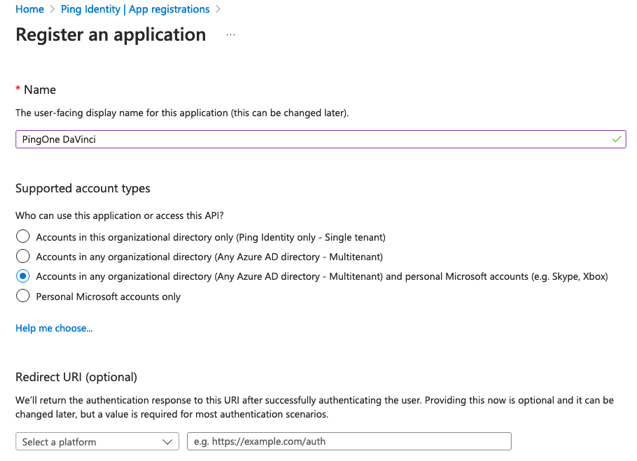
Under Manage, select App registrations → New registration.
-
On the Register an Application page, for Supported account types, select Accounts in any organizational directory and personal Microsoft accounts.
-
Leave the Redirect URI field blank.
-
Click Register.

-
-
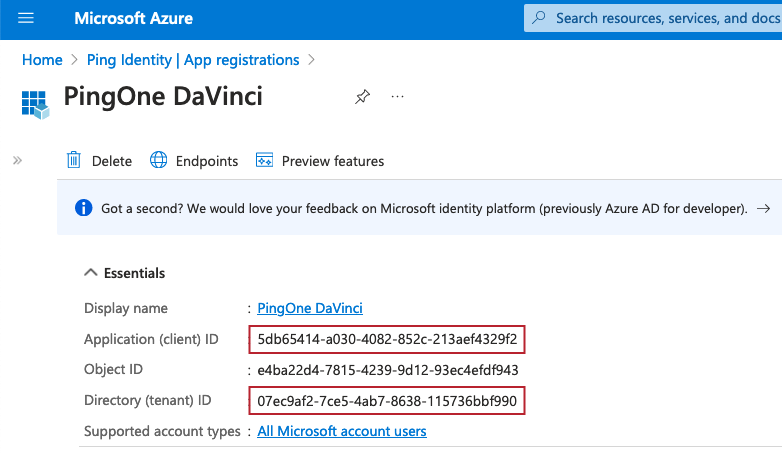
On your app’s Overview page, note the Application (client) ID and Directory (tenant) ID. You’ll use these in the connector configuration.

-
Create a client secret:
-
Under Manage, click Certificates & secrets. On the Client secrets tab, click New client secret.
-
Enter a name and select an expiry time. Click Add.
-
Note the Value of the secret. You’ll use this in the connector configuration.

-
-
Give the connector permission to manage users and send messages:
-
Under Manage, click API permissions.
-
Click Add a permission and add the following Microsoft Graph API permissions:
Application permissions Permission Type Directory.Read.All
Application
Directory.ReadWrite.All
Application
Group.Read.All
Application
Group.ReadWrite.All
Application
GroupMember.Read.All
Application
GroupMember.ReadWrite.All
Application
User.EnableDisableAccount.All
Application
User.ManageIdentities.All
Application
User.Read.All
Application
User.ReadWrite.All
Application
-
Click Grant admin consent for <your organization>.
-
-
Grant your application the User Administrator role:
-
In the Azure portal, search for and select Azure AD roles and administrators.
-
On the All Roles list, search for and select User Administrator.
-
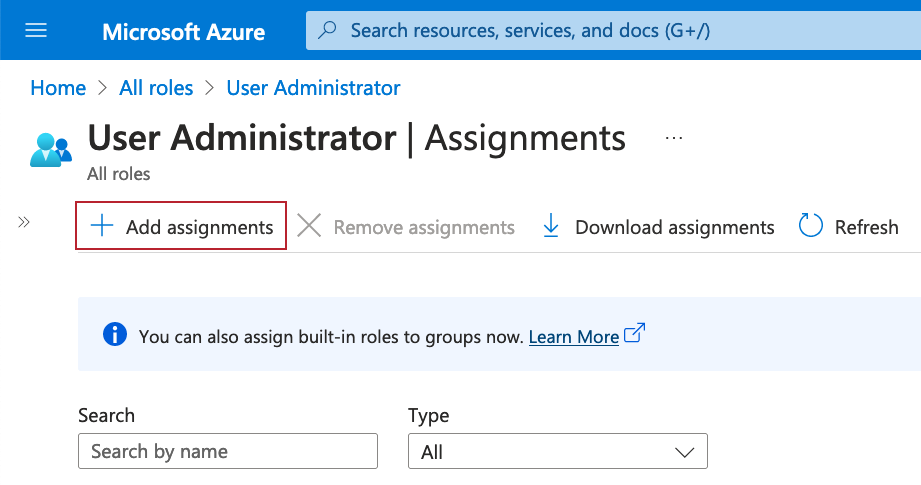
On the User Administrator > Assignments page, click Add assignments.

-
Search for and select your application. Click Add.
-
Configuring the Azure AD User Management connector
Add the connector in DaVinci as shown in Adding a connector, then configure it as follows.
Connector configuration
Client ID
The Application (client) ID that you noted in Setting up Azure AD.
Client Secret
The client secret Value that you noted in Setting up Azure AD.
Tenant ID
The Directory (tenant) ID that you noted in Setting up Azure AD.
Using the connector in a flow
Get user attributes based on a query
The Query Users capability allows you to get information about one or more users based on a query function.
This capability queries the Azure AD users endpoint. You can select certain user attributes, and filter, order, or format the results. For help creating a query, see Use query parameters and Advanced query capabilities in the Microsoft documentation.
Enter queries in the Query Parameters field. See the following table for examples.
| Description | Query Parameters |
|---|---|
List users whose given name starts with J. |
|
Get users' given name and surname only. |
|
Combined query: List users whose given name starts with J and get their given name and surname only. |
|
List changes to users since a previous query
The Query User Changes capability allows you to get information about one or more users based on a query function, then repeat the same query one or more times and only receive the information that has changed since the previous query. This includes data that has been created, modified, or deleted. Because only changes are included, the query runs more quickly and can provide valuable or actionable results. For more information about this function, see Get delta in the Graph API documentation.
In your initial request, you can specify a set of query parameters. You’ll receive the requested information, as well as a deltaLink URL, which includes a delta token. In subsequent requests, you only need to provide the delta token as a parameter. The results include any changed data that matches the original query parameters.
Microsoft provides a limited query options for this function. For details, see the Query parameters section of the Get delta topic in the Graph API documentation.
-
Define and test your query parameters:
-
Create a flow and add an Azure AD User Management with the Query User Changes capability.
-
In the Query Parameters field, enter your initial query parameters to define the user information you want to track. For example:
$select=givenName,surname -
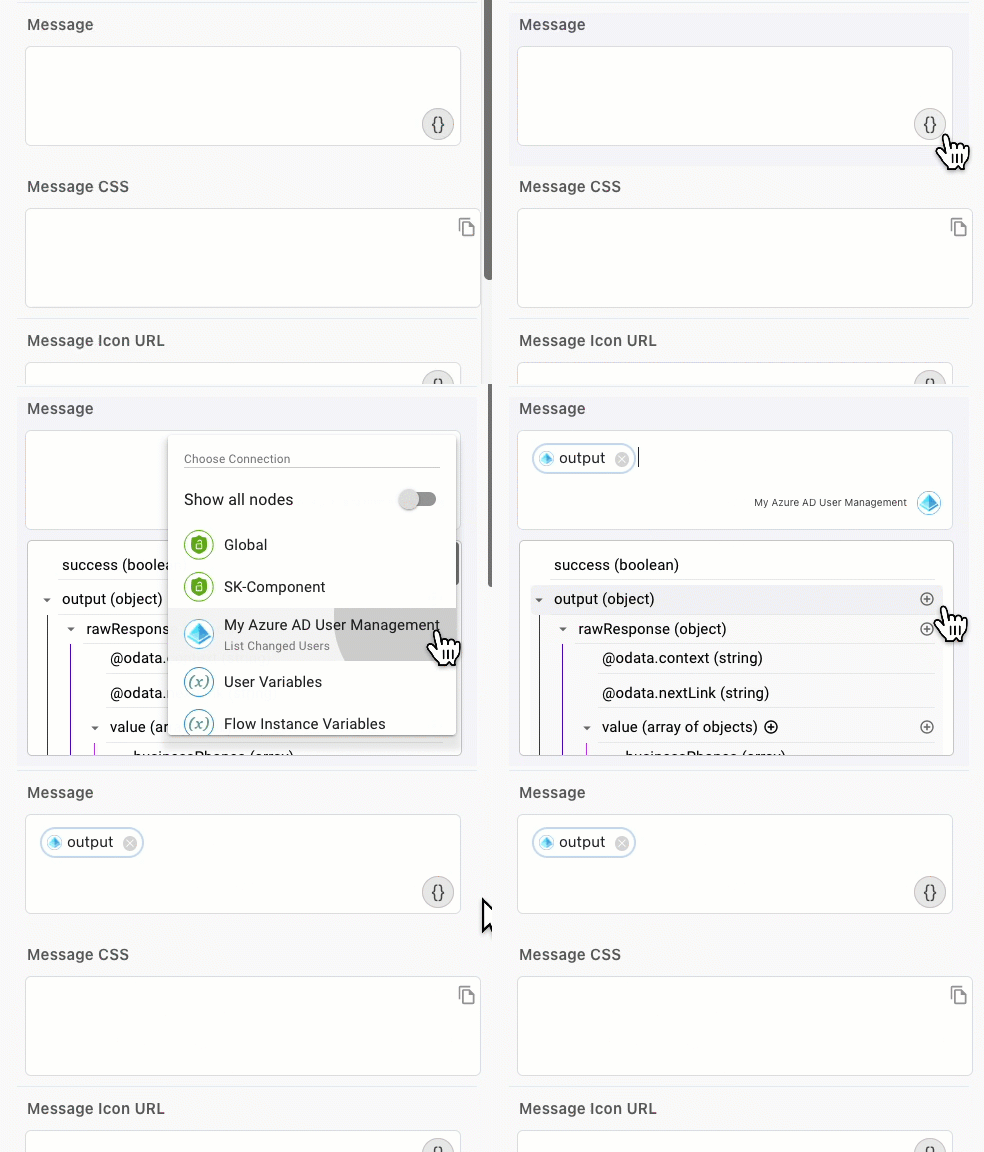
Add an HTTP connector with the Custom HTML Message and use it to display the output variable from the Query User Changes node. Click Apply.

-
Click Save, Deploy, and Try Flow.
-
In the output, check that your queries return the information that you want.
-
-
Get the delta token:
-
Open the Query User Changes node for editing.
-
In the Query Parameters field, add the parameter to get the delta token. For example:
$deltaToken=latest&$select=givenName,surname -
In the Custom HTML Message node, remove the output variable and add the deltaToken variable.
-
Click Save, Deploy, and Try Flow.
-
In the output, copy the delta token parameter. For example:
$deltatoken=slyJnDHUp6df3Y...nTlLFOVXPjexmCk2a
-
-
Use the delta token to make subsequent requests:
-
Create a new flow and add an Azure AD User Management with the Query User Changes capability.
-
In the Query Parameters field, enter your delta token parameter only. For example:
$deltatoken=slyJnDHUp6df3Y...nTlLFOVXPjexmCk2a -
Add an HTTP connector with the Custom HTML Message and use it to display the output variable from the Query User Changes node. Click Apply.
-
Click Save, Deploy, and Try Flow.
-
In the output, see the list of user attributes that have been created, modified, or deleted since you generated the delta token.
-
User management
The connector has several capabilities that allow you to manage users:
-
Read User
-
Create User
-
Update User
-
Delete User
No special configuration is needed. Add the capability and populate its properties according to the help text.
Group membership management
The connector has several capabilities that allow you to manage the groups that a user is part of:
-
List User’s Groups
-
Add User to Group
-
Remove User From Group
No special configuration is needed. Add the capability and populate its properties according to the help text.
Manage user licenses
The Manage User License capability lets you select a user and define one or more licenses to add, remove, or disable for that user.
For more information, see user: assignLicense in the Graph API documentation.
No special configuration is needed. Add the capability and populate its properties according to the help text.
Creating a custom API call
If you want to do something that isn’t supported by one of the provided capabilities, you can use the Make a Custom API Call capability to define your own action.
This capability uses the credentials from your connector to make an API call with the HTTP method, headers, query parameters, and body you specify.
Capabilities
Query Users
Get user attributes based on a custom query.
Show details
- Properties
- Query Parameters
textField -
Customize your request with a user filter or query, such as "$select=displayName,givenName,postalCode". See 'User Query' in the Graph API documentation for help. This field is optional.
- Input Schema
- default
object - clientId
string - clientSecret
string - tenantId
string - userQuery
string - Output Schema
- output
object - rawResponse
object - properties
object - @odata.context
string - @odata.nextLink
string - value
array - items
array -
- type
object - properties
- type
- statusCode
integer
Query User Changes
Get user attributes based on an initial query, then run subsequent queries to get a list of attributes that have been created, modified, or deleted since the initial query. See 'user: Delta' in the Graph API documentation for help.
Show details
- Properties
- Query Parameters
textField -
Customize your request with a user filter or query, such as "$select=displayName,givenName,postalCode". See 'User Query' in the Graph API documentation for help. This field is optional.
- Input Schema
- default
object - clientId
string - clientSecret
string - tenantId
string - userQuery
string - Output Schema
- output
object - rawResponse
object - properties
object - @odata.context
string - @odata.nextLink
string - @odata.deltaLink
string - skiptoken
string - deltatoken
string - value
array - items
array -
- type
object - properties
- type
- statusCode
integer
Read User
Select a single user to get all of their attributes.
Show details
- Properties
- User
dropDownrequired -
The user to target. For a dynamic value, select Use User ID and enter a value in the User ID field.
-
Use User ID
-
- User ID
textField -
The user’s principal name, such as "jsmith@example.com" or "144c6d7e-ef33-46b8-847a-7021943e9900".
- Input Schema
- default
object - clientId
string - clientSecret
string - tenantId
string - userId
string - Output Schema
- output
object - rawResponse
object - properties
object - businessPhones
array - displayName
string - givenName
string - jobTitle
string - mail
string - mobilePhone
string - officeLocation
string - preferredLanguage
string - surname
string - userPrincipalName
string - id
string - statusCode
integer
Create User
Create a new user account
Show details
- Properties
- Account Enabled
toggleSwitchrequired -
When enabled, the new account is enabled and ready to use.
- Display Name
textFieldrequired -
The name to display in the address book for the user.
- Mail Nickname
textFieldrequired -
The mail alias for the user, such as "jsmith".
- Principal Name
textFieldrequired -
The user’s principal name, such as "jsmith@example.com".
- Password
textFieldrequired -
The user’s password
- Force Change Password
toggleSwitch -
When enabled, the user must set a new password the next time they sign on.
- Force Change Password with MFA
toggleSwitch -
When enabled, the user must authenticate with MFA then set a new password the next time they sign on.
- Other Attributes
variableInputList -
Define additional attributes to add to the user account.
- Input Schema
- default
object - clientId
string - clientSecret
string - tenantId
string - createUserAccountEnabled
boolean - createUserDisplayName
string - createUserMailNickname
string - createUserPrincipalName
string - forceChangePasswordNextSignIn
boolean - forceChangePasswordNextSignInWithMfa
boolean - createUserPassword
string - Output Schema
- output
object - rawResponse
object - properties
object - @odata.context
string - id
string - businessPhones
array - displayName
string - givenName
string - jobTitle
string - mail
string - mobilePhone
string - officeLocation
string - preferredLanguage
string - surname
string - userPrincipalName
string - statusCode
integer
Update User
Update information about a user.
Show details
- Properties
- User
dropDownrequired -
The user to target. For a dynamic value, select Use User ID and enter a value in the User ID field.
-
Use User ID
-
- User ID
textField -
The user’s principal name, such as "jsmith@example.com" or "144c6d7e-ef33-46b8-847a-7021943e9900".
- Given Name
textField -
The given name (first name) of the user
- Surname
textField -
The user’s surname (family name or last name).
- Display Name
textField -
The name to display in the address book for the user.
- Password
textField -
The user’s password.
- Force Change Password
toggleSwitch -
When enabled, the user must set a new password the next time they sign on.
- Force Change Password with MFA
toggleSwitch -
When enabled, the user must authenticate with MFA then set a new password the next time they sign on.
- Country
textField -
The user’s country, in ISO 3166-1 alpha-2 format, such as "US".
- State or Province
textField -
The user’s state or province, such as "WA".
- City
textField -
The user’s city, such as "Seattle".
- Department
textField -
The user’s department, such as "Accounting".
- Employee ID
textField -
The user’s employee identifier, such as "A2304884". Maximum length is 16 digits.
- Mail
textField -
The user’s SMTP address, such as "jsmith@example.com". Changes to this property will also update the user’s proxyAddresses collection to include the value as an SMTP address.
- Other Attributes
variableInputList -
Define additional attributes to add to the user account.
- Input Schema
- default
object - clientId
string - clientSecret
string - tenantId
string - userId
string - displayName
string - accountEnabled
boolean - password
string - forceChangePasswordNextSignIn
boolean - forceChangePasswordNextSignInWithMfa
boolean - givenName
string - surname
string - country
string - state
string - city
string - department
string - employeeId
string - mail
string - Output Schema
- output
object - rawResponse
object - properties
object - ok
- statusCode
integer
Delete User
Delete a user account
Show details
- Properties
- User
dropDownrequired -
The user to target. For a dynamic value, select Use User ID and enter a value in the User ID field.
-
Use User ID
-
- User ID
textField -
The user’s principal name, such as "jsmith@example.com" or "144c6d7e-ef33-46b8-847a-7021943e9900".
- Input Schema
- default
object - userId
string - clientId
string - clientSecret
string - tenantId
string - Output Schema
- output
object - rawResponse
object - properties
object - ok
- statusCode
integer
Manage User License
Manage a user’s access to products by adding, removing, or disabling licenses.
Show details
- Properties
- User
dropDownrequired -
The user to target. For a dynamic value, select Use User ID and enter a value in the User ID field.
-
Use User ID
-
- User ID
textField -
The user’s principal name, such as "jsmith@example.com" or "144c6d7e-ef33-46b8-847a-7021943e9900".
- Remove License
textField -
The ID for the license that you want to revoke, such as ["bea13e0c-3828-4daa-a392-28af7ff61a0f"]. Separate multiple IDs with a comma.
Default:
[""]
- Add License
textField -
The SKU ID for the license that you want to grant, such as "45715bb8-13f9-4bf6-927f-ef96c102d394".
- Disable Plan
textField -
The ID of a plan associated with the new license, such as ["11b0131d-43c8-4bbb-b2c8-e80f9a50834a"]. Separate multiple IDs with a comma.
Default:
[""]
- Input Schema
- default
object - clientId
string - clientSecret
string - tenantId
string - userId
string - removeLicenses
array - skuId
string - disabledPlans
array - Output Schema
- output
object - rawResponse
object - properties
object - accountEnabled
boolean - assignedLicenses
array - items
array -
- type
object - properties
- type
- assignedPlans
array - items
array -
- type
object - properties
- type
- businessPhones
array - items
array -
- type
string
- type
- city
string - companyName
string - statusCode
integer - headers
object
List User’s Groups
Get a list of groups that a user belongs to.
Show details
- Properties
- User
dropDownrequired -
The user to target. For a dynamic value, select Use User ID and enter a value in the User ID field.
-
Use User ID
-
- User ID
textField -
The user’s principal name, such as "jsmith@example.com" or "144c6d7e-ef33-46b8-847a-7021943e9900".
- Limit to Security Groups
toggleSwitchrequired -
When enabled, the request only lists the user’s security groups.
- Input Schema
- default
object - clientId
string - clientSecret
string - tenantId
string - userId
string - Output Schema
- output
object - rawResponse
object - properties
object - @odata.context
string - value
array - items
array -
- type
string
- type
- statusCode
integer
Add User to Group
Add a member to a security or Microsoft 365 group.
Show details
- Properties
- User
dropDownrequired -
The user to target. For a dynamic value, select Use User ID and enter a value in the User ID field.
-
Use User ID
-
- User ID
textField -
The user’s ID such as "144c6d7e-ef33-46b8-847a-7021943e9900".
- Group
dropDownrequired -
The group to target. For a dynamic value, select Use Group ID and enter a value in the Use Group ID field.
-
Use Group ID
-
- Group
textField -
The id of the group, such as "0b2b7c5b-4eb2-5c7b-a94b-bea34ac31c30".
- Input Schema
- default
object - clientId
string - clientSecret
string - tenantId
string - userId
string - groupId
string - Output Schema
- output
object - rawResponse
object - properties
object - ok
- statusCode
integer
Remove User From Group
Remove a user from a group.
Show details
- Properties
- Group
dropDownrequired -
The group to target. For a dynamic value, select Use Group ID and enter a value in the Use Group ID field.
-
Use Group ID
-
- Group
textField -
The id of the group, such as "0b2b7c5b-4eb2-5c7b-a94b-bea34ac31c30".
- User
dropDownrequired -
The user to target. For a dynamic value, select Use User ID and enter a value in the User ID field.
-
Use User ID
-
- User ID
textField -
The user’s ID such as "144c6d7e-ef33-46b8-847a-7021943e9900".
- Input Schema
- default
object - clientId
string - clientSecret
string - tenantId
string - userId
string - groupId
string - Output Schema
- output
object - rawResponse
object - properties
object - ok
- statusCode
integer
Make a Custom API Call
Define and use your own call to the Microsoft Graph API
Show details
- Properties
- Endpoint
textFieldrequired -
The Microsoft Graph API endpoint, such as "/user". This endpoint is added to the base API URL selected in the connector configuration.
- HTTP Method
dropDownrequired -
The HTTP method of the API call.
-
GET
-
POST
-
PUT
-
DELETE
-
PATCH
-
- Body
codeEditor -
The body of the API call.
- Input Schema
- default
object - clientId
string - clientSecret
string - tenantId
string - endpoint
string - method
string - customQueryParams
array - headers
array - bodyData
object - Output Schema
- output
object - rawResponse
object - statusCode
integer - headers
object