Adding PingAuthorize policy decision access control rules
Add a policy decision access control rule to use the Policy Decision Endpoint to contact PingAuthorize for access information.
|
This rule allows for more control over fine-grain authorization decisions than the PingAuthorize access control rule, but isn’t compatible with PingOne Authorize. |
Before you begin
-
Create a third-party service with PingAuthorize configured as the target. Learn more in Adding third-party services.
-
Make the JSON PDP API available. Learn more in About the Authorization Policy Decision APIs.
Limitations:
-
Currently, there isn’t an out-of-the-box way to perform token validation for PDP calls. If you want to use token validation instead of shared secrets, learn more in Setting up the token validation workaround.
About this task
Use a policy decision access control rule to:
-
Set the domain, service, and action.
-
Provide additional attributes to be sent with the request. This includes static attributes, the request method and request URI, and attributes from the token provider.
-
Retrieve information that PingAuthorize returns as a statement and set it as a header.
To add a PingAuthorize policy decision access control rule:
Steps
-
Click Access and then go to Rules > Rules.
-
Click Add Rule.
-
In the Name field, enter a unique name of up to 64 characters.
Special characters and spaces are allowed.
-
In the Type list, select PingAuthorize Policy Decision Access Control.
-
In the Third Party Service list, select your PingAuthorize service.
-
In the Authorization Policy Decision Shared Secret field, enter the shared secret from PingAuthorize.
-
In the Domain field, enter the organizational structure in the trust framework to use.
-
In the Service field, enter either the service PingAuthorize protects or the data source for the policy decision.
-
In the Action field, enter the action that the authorization request might ask to perform on a specific resource.
-
To send the access token to the PingAuthorize service, select the Send Web Session Access Token as PingAuthorize Request Attribute checkbox.
-
In the Mapped Payload Attributes section, enter any attributes to send to the PingAuthorize service.
-
Click + Add Row to create a mapping.
-
In the Attribute Name field, enter the name of the attribute.
-
In the Attribute Value list, select the value to which you want to map the attribute.
-
-
In the Static Payload Attributes section, enter any static attributes to send to the PingAuthorize service.
-
Click + Add Row to create a mapping.
-
In the Attribute Name field, enter the name of the attribute.
-
In the Attribute Value field, enter the value to which you want to map the attribute.
-
-
In the Mapped Request Object Payload Attributes section, enter any request object attributes to send to the PingAuthorize service.
-
Click + Add Row to create a mapping.
-
In the Attribute Name field, enter the name of the attribute.
-
In the Attribute Value list, select the value to which you want to map the attribute.
-
-
In the Mapping Statement Response to Headers section, enter a JSON pointer to identify any data in the returned statement from PingAuthorize that can be mapped to a header for the response.
-
Click + Add Row to create a mapping.
-
In the Header Name field, enter the name of the header to which you want to map the data.
-
In the Response JSON Pointer field, enter a JSON pointer that indicates the data in the PingAuthorize statement that you want to map.
-
-
(Optional) To configure advanced settings, click Show Advanced Settings.
-
In the Shared Secret Header Name field, enter the header in which to send the shared secret.
-
In the Rejection Handler list, select a rejection handler.
-
-
Click Save.
Setting up the token validation workaround
Shared secrets are available out of the box with the PingAuthorize policy decision access control rule, but token validation is not. You can perform the following workaround to set up token validation.
|
This procedure is optional. |
About this task
To set up token validation, you’ll build the call to the introspection endpoint manually and create a policy to check if the token is active.
There are three main steps in this workaround:
-
Creating an HTTP service for the PingFederate introspection endpoint
-
Creating attributes for the
client_id,client_secret, and active token -
Creating a policy to validate the access token
To create an HTTP service for the PingFederate introspection endpoint:
Steps
-
In the PingAuthorize administrative console, go to Trust Framework > Services > PDP and create a service named
PingFederate Introspection. -
In the Service Type list, select HTTP.
-
In the HTTP Settings section:
-
In the URL field, enter the PingFederate introspection endpoint.
-
In the HTTP Method list, select
POST. -
In the Body field, enter
token={{HttpRequest.AccessToken.access_token}} -
In the Authentication list, select Basic.
-
In the Username list, select the PingFederate client option.
-
In the Password list, select the PingFederate client option.
-
-
In the Value Processors section, add a new JSON path processor:
-
In the Processor list, select JSON and enter
activein the field. -
In the Value Type list, select Boolean.
-
-
In the Value Settings section:
-
In the Type list, select String, and enter
Secretin the field.
-
-
In the Timeout and Retry section:
-
In the Request Timeout (ms) field, enter
2000.
-
-
Click Save.
Next steps
Creating attributes for the client_id, client_secret, and active token
Create the attributes you’ll reference in the access token validation policy.
Steps
-
In the PingAuthorize administrative console, go to Trust Framework > Attributes.
-
In the PingFed Client section, create a
client_idattribute:-
In the Parent list, select PingFed Client.
-
In the Value Settings section:
-
Select the Default Value checkbox and enter the client ID from the OAuth resource server that you want to use to validate the token in the field.
For example, authroize_rs.
-
In the Type list, select String.
-
-
In the Caching section:
-
In the Cache Strategy list, select No Caching.
-
-
-
In the PingFed Client section, create a
client_secretattribute.-
In the Parent list, select PingFed Client.
-
In the Value Settings section:
-
Select the Default Value checkbox and enter the corresponding client secret from the OAuth resource server that you want to use to validate the token in the field.
-
In the Type list, select String.
-
-
In the Caching section:
-
In the Cache Strategy list, select No Caching.
-
-
-
Go to the SCIM2 section, and create a
TokenActiveattribute to resolve thePingFederate Introspectionservice:-
In the Resolvers section:
-
In the Resolver type list, select Service, then select PingFederate introspection.
-
-
In the Value Settings section:
-
In the Type list, select Boolean.
-
-
In the Caching section:
-
In the Cache Strategy list, select No Caching.
-
-
Next steps
Creating policies to validate and authorize the access token
Create policies to validate the access token and determine authorization requirements.
Steps
-
In the PingAuthorize Policy Editor, go to the Policies tab.
-
Go to the Global Decision Endpoint section and create a new policy called
Token Validation. -
In the Rules section, in the Combining Algorithm list, select Unless one decision is deny, the decision will be permit.
-
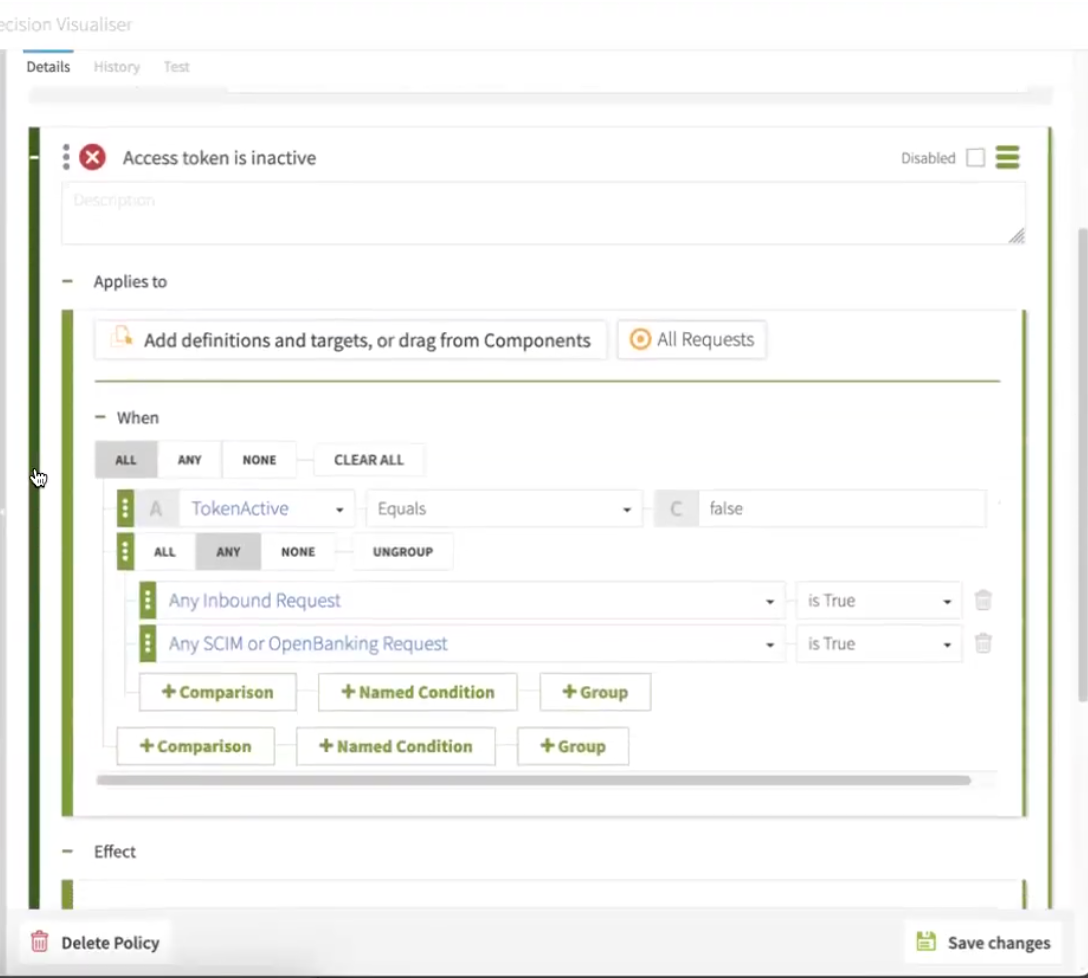
In the Rules section, add an Access token is inactive rule:
-
In the Applies to section, select Add definitions and targets, or drag from components and All requests.
-
In the When section, map the following:
-
Select All, then select TokenActive, Equals, and False.
-
Select Any, then set Any Inbound Request to is True, and Any SCIM or OpenBanking Request to is True.
-
-
-
In the Statements section:
-
Add an Invalid Token statement:
-
In the Code field, enter
denied-reason. -
In the Applies To field, enter
Deny. -
In the Applies If field, enter
All decisions in path match. -
In the Payload field, enter
{"status":401, "message":"invalid_token","detail":"Access token is expired or otherwise invalid"}. -
Make sure the Obligatory checkbox is selected.
-
-
-
Click Save.