Managing the PingID desktop app on a Mac
Updating the desktop app on a Mac
Keep PingID desktop up-to-date to ensure you have access to the latest features, security features, and fixes.
About this task
When you launch the desktop app it checks if there’s a new version available of the software. If you enable the automatic update feature, your app updates automatically. If you do not enable the automatic update feature, you can check for updates manually, be notified when an update is available, and decide when to download and install the update.
|
If your organization’s policy allows it, you can choose for updates to install manually or automatically. If your organization does not allow you to choose, this menu option is disabled and is not visible to you. |
Steps
-
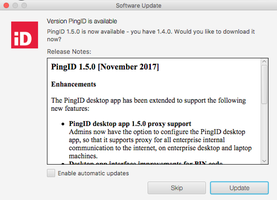
To check for updates in the menu bar, go to PingID → Check for Updates….
Result:
A progress bar displays. If an update is available, the Software Update window shows you the software version number and the release notes detailing any changes and new features.
-
Select an update option:
Choose from:
-
Update: To start downloading and installing the update.
-
Skip: To skip the update.
-
Enable automatic updates (optional): Select the check box to automatically check for updates in the future.
If enabled, when an update is available, it downloads automatically and proceeds to the Install and Relaunch window described in the following step.
-
-
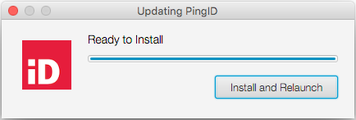
After the update downloads, click Install and Relaunch.
-
Enter the password to your computer if prompted to do so.

Depending on the changes to your company security policy, you might be required to create a PIN code after a desktop app update and then enter it each time you access the app to secure your desktop app.
Result
When the update is complete, the old PingID desktop app version closes and the updated version of the app opens automatically.
Enabling or disabling automatic updates on a Mac
Enable or disable automatic updates that activate whenever you open PingID using a Mac.
About this task
Whenever you launch the PingID desktop application, it checks if there’s a new version of the software available. If automatic updates are enabled, your app is automatically updated as soon as a new version of the software becomes available.
Steps
-
Launch the PingID desktop app.
Choose from:
-
To enable automatic updates, from the Menu bar, go to PingID → Automatic Updates and select the Automatic Updates check box.
For changes to take effect, you must close and restart the desktop application.
-
To disable automatic updates, from the Menu bar, go to PingID → Automatic Updates and clear the Automatic Updates check box.
The check mark next to Automatic Updates is removed, and PingID is no longer updated automatically.
-
Uninstalling the desktop app on a Mac
Uninstall the PingID desktop application using a Mac computer.
Before you begin
You must unpair your account from the desktop app before uninstalling the app from your Mac. For more information, see Unpairing the desktop app.
About this task
Steps
-
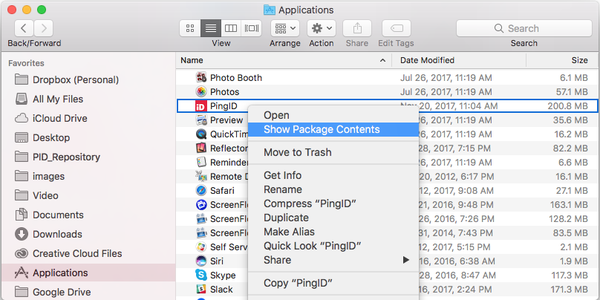
On your Mac, open Finder and in the Applications folder right-click PingID.
-
Click Show Package Contents.
-
-
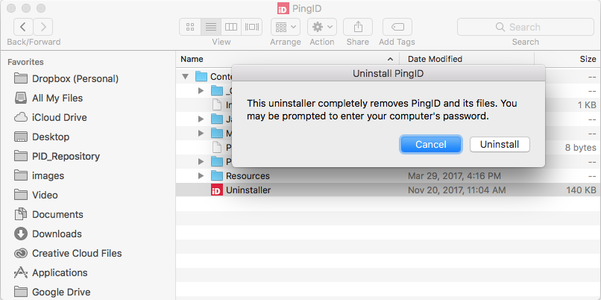
From the Contents folder, select Uninstaller.
Result:
A confirmation message is displayed.
-
Click Uninstall, and enter your computer password if prompted.
Result:
The app is uninstalled, and all PingID desktop files are removed from your Mac.