Authentication and SSO
These topics cover concepts, implementation procedures, and customization techniques for working with the authentication and single sign-on (SSO) features of PingAM.
Configure AM for authentication
Learn about AM’s authentication mechanisms.
Multi-factor authentication
Require that users provide multiple forms of identification when logging in to services.
Single sign-on
Enable single sign-on (SSO) so that users can log in once with a single set of credentials.
Social authentication
Allow users to authenticate to your services by using third-party identity providers.
Name changes for ForgeRock products
Product names changed when ForgeRock became part of Ping Identity.
The following name changes have been in effect since early 2024:
| Old name | New name |
|---|---|
ForgeRock Identity Cloud |
PingOne Advanced Identity Cloud |
ForgeRock Access Management |
PingAM |
ForgeRock Directory Services |
PingDS |
ForgeRock Identity Management |
PingIDM |
ForgeRock Identity Gateway |
PingGateway |
Learn more about the name changes in New names for ForgeRock products in the Knowledge Base.
Introduction to authentication
Authentication is the act of confirming a user’s identity, for example, by providing a set of credentials.
In access management, authentication is tightly coupled with authorization. Usually, it’s important to confirm that a user is who they say they are, and to make sure they can access only a subset of information.
Consider a user who wants to access an online shop. As the owner of the shop, you want to make sure the user’s identity is confirmed as it’s tied to their shipping and email addresses and payment information. You also want to make sure the user can only access their own information.
You can deploy a web agent on the web server hosting the online shop. The agent redirects the user’s request to an AM login page, where the user enters their credentials, such as username and password. AM determines who the user is, and whether the user has the right to access the protected page. AM then redirects the user back to the protected page with authorization credentials that can be verified by the agent. The agent allows the user authorized by AM to access the page.
In the same way, you can also use AM to protect physical devices connected on the Internet of Things (IoT). For example, a delivery van tracking system could have its proxying gateway authenticate to a brokering system using an X.509 certificate to allow it to enable an HTTPS protocol and then connect to sensors in its delivery trucks. If the X.509 certificate is valid, the brokering system can monitor a van’s fuel consumption, speed, mileage, and overall engine condition to maximize each van’s operating efficiency.
Nodes and trees
AM implements authentication with authentication nodes and trees.
AM provides a large variety of authentication nodes. You can also develop your own nodes based on your authentication requirements.
You connect nodes to create a tree that guides users through the authentication process.
Learn more in Nodes and trees.
Default trees
AM provides the following trees (unless you upgraded from an earlier version using the file-based configuration):
- ldapService
-
The
ldapServicetree is the default authentication tree used when administrators and non-administrative users log into AM. The tree validates the user credentials with a Data Store Decision node.Before going to production, make sure you change the default authentication tree or strengthen it. Learn more in Secure realms.
Default
ldapServicetree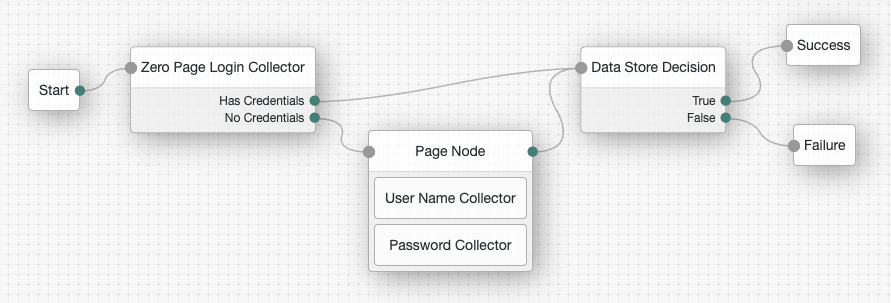
- Agent
-
The
Agenttree is used by PingGateway and the web and Java agents to authenticate to AM. The tree validates the agent credentials with an Agent Data Store Decision node.This tree is used by all instances of PingGateway, and the web and Java agents. Consider this before making any changes or deleting it.
Default
Agenttree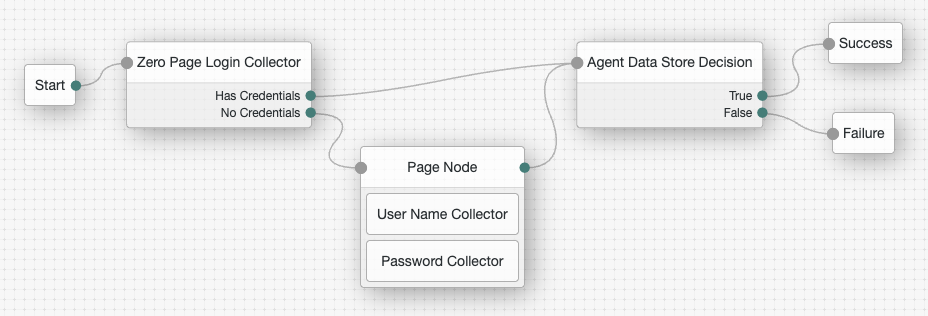
- amsterService
-
The
amsterServicetree is used by Amster to authenticate to AM using SSH keys. The tree validates the incoming private key with an Amster Jwt Decision node.Changing or removing this tree could prevent Amster from connecting to AM.
Default
amsterServicetree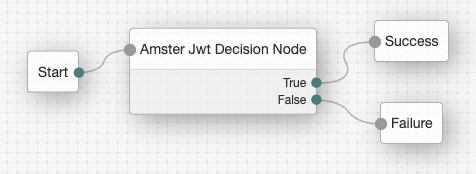
Sessions
AM creates a journey session to track the user’s progress through an authentication tree.
Once the journey has completed, AM creates an authenticated session to manage
the user’s access to resources if appropriate.
A session is not created if the tree has been configured as a
no session tree or the
noSession query parameter is set.
Learn more in Sessions.
Multi-factor authentication
Multi-factor authentication (MFA) is an authentication technique that requires users to provide multiple forms of identification when logging in to AM.
Multi-factor authentication provides a more secure method for users to access their accounts with the help of a device.
Learn more in Multi-factor authentication (MFA).
Configure authentication
The authentication process is very flexible and can be adapted to suit your specific deployment. The number of choices can seem daunting, but when you understand the basic process, you’ll be able to configure custom authentication paths to protect access to the applications in your organization.
You configure authentication per realm. When you create a new realm, it inherits the authentication configuration of the parent realm. This can save time, especially if you are configuring several subrealms.
The following table summarizes the high-level tasks required to configure authentication in a realm:
| Task | Resources |
|---|---|
Configure the required authentication mechanisms You need to decide how your users are going to log in. For example, you may require your users to provide multiple credentials, or to log in using third-party identity providers, such as Facebook or Google. |
|
Configure the realm defaults for authentication Authentication trees use several defaults that are configured at realm level. Review and configure them to suit your environment. |
|
Configure the success and failure URLs for the realm By default, AM redirects users to the UI after successful authentication. No failure URL is defined by default. |
|
Configure an identity store in your realm. The identity store you configure in the realm should contain those users that would log in to the realm. |
Success and failure redirection URLs
AM determines the redirection URL based on authentication success or failure.
You can configure success and failure URLs in a number of places in AM. For each authentication outcome, the user is redirected to the URL with the highest precedence, which is determined by where it is defined in AM.
|
By default, the maximum length of redirection URLs is 2000 characters. If your redirection URLs are longer than this, you should increase the value of the org.forgerock.openam.redirecturlvalidator.maxUrlLength advanced server property as needed. |
Success URL precedence
When a user authenticates successfully, AM evaluates the redirection URL according to the following order of precedence:
-
The URL set in the
gotologin URL parameter. For example:https://am.example.com:8443/am/XUI/?realm=/alpha&goto=http%3A%2F%2Fwww.example.com#loginUnless the URLs are in the same domain as PingAM, any URLs specified in the gotoparameter must be explicitly listed in the Valid goto URL Resources property of the Validation Service. Otherwise, they’re ignored. -
The URL set in the authentication tree.
Add a Success URL node to the tree and configure the Success URL in the node properties.
-
The URL set in the Success URL attribute in the user’s profile.
In the AM admin UI, go to Realm Name > Identities > identity. In the Success URL field, enter a URL, and save your changes.
You can also specify the client type by entering
ClientType|URLas the property value. If the client type is specified, it takes precedence over a regular URL in the user’s profile. -
The URL set in the Default Success Login URL attribute in the Top Level Realm.
Go to Configure > Authentication > Core Attributes > Post Authentication Processing. In the Default Success Login URL field, enter a URL, and save your changes.
You can also specify the client type by entering
ClientType|URLas the property value. If the client type is specified, it will have precedence over a Default Success Login URL in the Top Level realm.
Failure URL precedence
When a user fails to authenticate, AM evaluates the redirection URL according to the following order of precedence:
-
The URL set in the
gotoOnFailparameter. For example:https://am.example.com:8443/am/XUI/?realm=/alpha&gotoOnFail=http%3A%2F%2Fwww.example.com#loginUnless the URLs are in the same domain as PingAM, any URLs specified in the gotoOnFailparameter must be explicitly listed in the Valid goto URL Resources property of the Validation Service. Otherwise, they’re ignored. -
The URL set in the authentication tree.
Add a Failure URL node to the tree and configure the failure URL in the node properties.
-
The URL set in the Failure URL attribute in the user’s profile.
In the AM admin UI, go to Realm Name > Identities > identity. In the Failure URL field, enter a URL, and save your changes.
You can also specify the client type by entering
ClientType|URLas the property value. If the client type is specified, it will have precedence over a regular URL in the user’s profile. -
The URL set in the Default Failure Login URL attribute in the Top Level Realm.
In the AM admin UI, go to Configure > Authentication > Core Attributes > Post Authentication Processing. In the Default Failure Login URL field, enter a URL, and save your changes.
You can also specify the client type by entering
ClientType|URLas the property value. If the client type is specified, it will have precedence over a Default Failure Login URL in the Top Level realm.
Configure trusted URLs
Redirection URLs can be relative to AM’s URL, or absolute.
By default, AM trusts all relative URLs and those absolute URLs that are in the same scheme, FQDN, and port as AM. This increases security against possible phishing attacks through an open redirect.
To configure AM to trust other absolute URLs, add them to the validation service. If they are not added, AM will redirect to the user profile or to the administrator console on log in, and to the default logout page in the UI on log out.
Do I need to add my URL to the validation service?
Consider these example URLS for a deployment configured at https://am.example.com:8443/am:
| URL | Add to the validation service? |
|---|---|
|
Yes, the scheme and port are different. |
|
Yes, the port is different. |
|
No, the paths relative to the AM URL are trusted. |
|
Yes, the scheme, port, and FQDN are different. |
|
By default, the maximum length of redirection URLs is 2000 characters. If your redirection URLs are longer than this, you should increase the value of the org.forgerock.openam.redirecturlvalidator.maxUrlLength advanced server property as needed. |
Add a URL to the validation service
-
In the AM admin UI, go to Realms > Realm Name > Services.
Note that you can add an instance of the validation service on the Top Level Realm, too.
-
If the Validation Service is not in the list of services, configure a new service:
-
Click Add a Service.
-
From the Choose a service type drop-down list, select Validation Service.
-
-
In the Valid goto URL Resources field, enter one or more valid URL patterns to allow.
For example,
http://app.example.com:80/*?*.General examples of URL pattern matching
-
If no port is specified,
http://www.example.comcanonicalizes tohttp://www.example.com:80andhttps://www.example.comcanonicalizes tohttps://www.example.com:443. -
A wildcard before "://" only matches up to "://"
For example,
http*://*.com/*matcheshttp://www.example.com/hello/worldandhttps://www.example.com/hello. -
A wildcard between "://" and ":" matches up to ":"
For example,
http://*:85matcheshttp://www.example.com:85. -
A wildcard between ":" and "/" only matches up to the first "/"
For example,
http://www.:/matcheshttp://www.example.com:80. In another example,http://www.example.com:*matcheshttp://www.example.com:<any port>andhttp://www.example.com:<any port>, but nothing more. -
A wildcard after "/" matches anything, depending on whether it is single-level or a wildcard appropriately.
For example,
https://www.example.com/*matcheshttps://www.example.com:443/foo/bar/baz/me. -
If you do not use any wildcards, AM exactly matches the string, so
http://www.example.comonly matcheshttp://www.example.com, but NOThttp://www.example.com/(trailing slash).If you put the wildcard after the path, AM expects a path (even if it is blank), so
http://www.example.com/*matcheshttp://www.example.com/andhttp://www.example.com/foo/bar/baz.html, but NOThttp://www.example.com. -
http://www.example.com:*/matcheshttp://www.example.com/, which also canonicalizes tohttp://www.example.com:80/. -
https://www.example.com:*/matcheshttps://www.example.com/, which also canonicalizes tohttps://www.example.com:443/.
For more information on pattern matching and wildcard rules, refer to Specifying resource patterns with wildcards.
-
-
Click Create to save your settings.
Validate a goto URL
To validate a goto URL over REST, use the /json/users?_action=validateGoto endpoint
(or /json/realms/root/realms/_Realm Name_/users?_action=validateGoto to specify a sub realm).
For example:
$ curl \
--request POST \
--header "Accept-API-Version: protocol=2.1,resource=3.0" \
--header "Content-Type: application/json" \
--header "iPlanetDirectoryPro: AQIC5…ACMDE.*" \
--data '{"goto":"https://www.example.com/"}' \
'https://am.example.com:8443/am/json/realms/root/realms/alpha/users?_action=validateGoto'
{
"successURL":"https://www.example.com/"
}If the URL is valid, the endpoint returns the specified URL as the successURL response parameter.
A goto URL is considered valid if one of the following is true:
-
The URL is configured in the validation service
-
The URL is relative
-
The URL is encoded
Encoded URLs are treated as relative URLs for the purposes of validation. To be treated as an absolute URL, the URL must not be encoded.
If the specified URL is invalid, the endpoint returns the default success URL.
Note that a valid session is optional; you can still call the validateGoto endpoint with an expired session.
Core authentication attributes
Every AM realm has a set of authentication properties that applies to all authentication performed to that realm. The settings are referred to as core authentication attributes.
To configure core authentication attributes for an entire AM deployment, go to Configure > Authentication in the AM admin UI, and click Core Attributes.
To override the global core authentication configuration in a realm, go to Realms > Realm Name > Authentication > Settings in the AM admin UI.
amster service name: Authentication
ssoadm service name: iPlanetAMAuthService
Global Attributes
The following properties are available under the Global Attributes tab:
- Pluggable Authentication Module Classes
-
This property was used only for authentication with modules and chains and is no longer documented.
- LDAP Connection Pool Size
-
Sets a minimum and a maximum number of LDAP connections to be used by any authentication node that connects to a specific directory server. This connection pool is different to the SDK connection pool configured in the
serverconfig.xmlfile.Format is
host:port:minimum:maximum.amsterattribute:ldapConnectionPoolSizessoadmattribute:iplanet-am-auth-ldap-connection-pool-size - Default LDAP Connection Pool Size
-
Sets the default minimum and maximum number of LDAP connections to be used by any authentication node that connects to any directory server. This connection pool is different to the SDK connection pool configured in the
serverconfig.xmlfile.Format is
minimum:maximum.When tuning for production, start with 10 minimum, 65 maximum. For example,
10:65.amsterattribute:ldapConnectionPoolDefaultSizessoadmattribute:iplanet-am-auth-ldap-connection-pool-default-size - Remote Auth Security
-
When enabled, AM requires the authenticating application to send its SSO token. This allows AM to obtain the username and password associated with the application.
amsterattribute:remoteAuthSecurityEnabledssoadmattribute:sunRemoteAuthSecurityEnabled - Keep Post Process Objects for Logout Processing
-
When enabled, AM stores instances of post-processing classes into the authenticated session. When the user logs out, the original post-processing classes are called instead of new instances. This may be required for special logout processing.
Enabling this setting increases the memory usage of AM.
amsterattribute:keepPostProcessInstancesssoadmattribute:sunAMAuthKeepPostProcessInstances
Core
The following properties are available under the Core tab:
- Administrator Authentication Configuration
-
The default authentication tree used when an administrative user, such as
amAdmin, logs in to the AM admin UI.You can’t set a tree configured to always run as the default authentication tree. ssoadmattribute:iplanet-am-auth-admin-auth-module - Organization Authentication Configuration
-
The default authentication tree used when a non-administrative user logs in to AM.
You can’t set a tree configured to always run as the default authentication tree. amsterattribute:orgConfigssoadmattribute:iplanet-am-auth-org-config
User Profile
The following properties are available under the User Profile tab:
User Profile-
Specifies whether a user profile needs to exist in the user datastore, or should be created on successful authentication. The possible values are:
true. Dynamic.-
After successful authentication, AM creates a user profile if one does not already exist. AM then issues the SSO token. AM creates the user profile in the user datastore configured for the realm.
createAlias. Dynamic with User Alias.-
After successful authentication, AM creates a user profile that contains the
User Alias Listattribute, which defines one or more aliases for mapping a user’s multiple profiles. ignore. Ignored.-
After successful authentication, AM issues an SSO token regardless of whether a user profile exists in the datastore. The presence of a user profile is not checked.
Any functionality which needs to map values to profile attributes, such as SAML or OAuth 2.0, will not operate correctly if the User Profile property is set to
ignore. false. Required.-
After successful authentication, the user must have a user profile in the user datastore configured for the realm in order for AM to issue an SSO token.
ssoadmattribute:iplanet-am-auth-dynamic-profile-creation. Set this attribute’s value to one of the following:true,createAlias,ignore, orfalse.
- User Profile Dynamic Creation Default Roles
-
Specifies the distinguished name (DN) of a role to be assigned to a new user whose profile is created when either the
trueorcreateAliasoptions are selected under the User Profile property. There are no default values. The role specified must be within the realm for which the authentication process is configured.This role can’t be a filtered role. If you want to automatically assign specific services to the user, configure the Required Services property in the user profile.
This functionality is deprecated.
amsterattribute:defaultRolessoadmattribute:iplanet-am-auth-default-role - Alias Search Attribute Name
-
After a user is successfully authenticated, the user’s profile is retrieved. AM first searches for the user based on the datastore settings. If that fails to find the user, AM will use the attributes listed here to look up the user profile. This setting accepts any datastore specific attribute name.
amsterattribute:aliasAttributeNamessoadmattribute:iplanet-am-auth-alias-attr-nameIf the
Alias Search Attribute Nameproperty is empty, AM uses theiplanet-am-auth-user-naming-attrproperty from theiPlanetAmAuthService. Theiplanet-am-auth-user-naming-attrproperty is only configurable through thessoadmcommand-line tool and not through the AM admin UI.$ ssoadm get-realm-svc-attrs \ --adminid uid=amAdmin,ou=People,dc=am,dc=example,dc=com \ --password-file PATH_TO_PWDFILE \ --realm REALM \ --servicename iPlanetAMAuthService$ ssoadm set-realm-svc-attrs \ --adminid uid=amAdmin,ou=People,dc=am,dc=example,dc=com \ --password-file PATH_TO_PWDFILE \ --realm REALM \ --servicename iPlanetAMAuthService \ --attributevalues iplanet-am-auth-user-naming-attr=SEARCH_ATTRIBUTEbash
Account Lockout
The following properties are available under the Account Lockout tab:
- Login Failure Lockout Mode
-
When enabled, AM deactivates the LDAP attribute defined in the Lockout Attribute Name property in the user’s profile upon login failure. This attribute works in conjunction with the other account lockout and notification attributes.
amsterattribute:loginFailureLockoutModessoadmattribute:iplanet-am-auth-login-failure-lockout-mode - Login Failure Lockout Count
-
Defines the number of attempts that a user has to authenticate within the time interval defined in Login Failure Lockout Interval before being locked out.
amsterattribute:loginFailureCountssoadmattribute:iplanet-am-auth-login-failure-count - Login Failure Lockout Interval
-
Defines the time in minutes during which failed login attempts are counted. If one failed login attempt is followed by a second failed attempt within this defined lockout interval time, the lockout count starts, and the user is locked out if the number of attempts reaches the number defined by the Login Failure Lockout Count property. If an attempt within the defined lockout interval time proves successful before the number of attempts reaches the number defined by the Login Failure Lockout Count property, the lockout count is reset.
amsterattribute:loginFailureDurationssoadmattribute:iplanet-am-auth-login-failure-duration - Email Address to Send Lockout Notification
-
Specifies one or more email addresses to which notification is sent if a user lockout occurs.
Separate multiple addresses with spaces, and append
|locale|charsetto addresses for recipients in non-English locales.amsterattribute:lockoutEmailAddressssoadmattribute:iplanet-am-auth-lockout-email-address - Warn User After N Failures
-
Specifies the number of authentication failures after which AM displays a warning message that the user will be locked out.
ssoadmattribute:iplanet-am-auth-lockout-warn-user - Login Failure Lockout Duration
-
Defines how many minutes a user must wait after a lockout before attempting to authenticate again. Entering a value greater than 0 enables duration lockout and disables persistent (physical) lockout. Duration lockout means the user’s account is locked for the number of minutes specified. The account is unlocked after the time period has passed.
amsterattribute:lockoutDurationssoadmattribute:iplanet-am-auth-lockout-duration - Lockout Duration Multiplier
-
For duration lockout, this attribute defines a multiplier that is applied to the value of the Login Failure Lockout Duration for each successive lockout. For example, if Login Failure Lockout Duration is set to 3 minutes, and the Lockout Duration Multiplier is set to 2, the user is locked out of the account for 6 minutes. After the 6 minutes has elapsed, if the user again provides the wrong credentials, the lockout duration is then 12 minutes. With the Lockout Duration Multiplier, the lockout duration is incrementally increased based on the number of times the user has been locked out.
amsterattribute:lockoutDurationMultiplierssoadmattribute:sunLockoutDurationMultiplier - Lockout Attribute Name
-
Defines the LDAP attribute used for physical lockout. The default attribute is
inetuserstatus, although the field in the AM admin UI is empty. The Lockout Attribute Value field must also contain an appropriate value.amsterattribute:lockoutAttributeNamessoadmattribute:iplanet-am-auth-lockout-attribute-name - Lockout Attribute Value
-
Specifies the action to take on the attribute defined in Lockout Attribute Name. The default value is
inactive, although the field in the AM admin UI is empty. The Lockout Attribute Name field must also contain an appropriate value.amsterattribute:lockoutAttributeValuessoadmattribute:iplanet-am-auth-lockout-attribute-value - Invalid Attempts Data Attribute Name
-
Specifies the LDAP attribute used to hold the number of failed authentication attempts towards Login Failure Lockout Count. Although the field appears empty in the AM admin UI, AM stores this data in the
sunAMAuthInvalidAttemptsDataAttrNameattribute defined in thesunAMAuthAccountLockoutobjectclass by default.amsterattribute:invalidAttemptsDataAttributeNamessoadmattribute:sunAMAuthInvalidAttemptsDataAttrName - Store Invalid Attempts in Data Store
-
When enabled, AM stores the information regarding failed authentication attempts as the value of the
Invalid Attempts Data Attribute Namein the user datastore. Information stored includes the number of invalid attempts, the time of the last failed attempt, lockout time and lockout duration. Storing this information in the identity repository allows it to be shared among multiple instances of AM.Enable this property to track invalid log in attempts when using server-side or client-side journey sessions.
amsterattribute:storeInvalidAttemptsInDataStoressoadmattribute:sunStoreInvalidAttemptsInDS
General
The following properties are available under the General tab:
- Default Authentication Locale
-
Specifies the default language subtype to be used by the Authentication service. The default value is
en_US.amsterattribute:localessoadmattribute:iplanet-am-auth-locale - Identity Types
-
This property was used only for authentication with modules and chains and is no longer documented.
- Pluggable User Status Event Classes
-
This property was used only for authentication with modules and chains and is no longer documented.
- Use Client-Side Sessions
-
When enabled, AM assigns client-side sessions to users authenticating to this realm. Otherwise, AM users authenticating to this realm are assigned server-side sessions.
Learn more in Introduction to sessions.
amsterattribute:statelessSessionsEnabledssoadmattribute:openam-auth-stateless-sessions - Two Factor Authentication Mandatory
-
This property was used only for authentication with modules and chains and is no longer documented.
- External Login Page URL
-
If the authentication user interface is hosted separately from AM, this property specifies the URL of the external login user interface.
When set, AM uses the provided URL as the base of the resume URI instead of using the Base URL Source Service to obtain the base URL.
If authentication is suspended in an authentication tree, AM uses this URL to construct the resume URI.
Find more information about the Base URL Source Service in Configure the Base URL source service.
amsterattribute:externalLoginPageUrlssoadmattribute:externalLoginPageUrl - Default Authentication Level
-
This property was used only for authentication with modules and chains and is no longer documented.
Trees
The following properties are available under the Trees tab:
- Authentication session state management scheme
-
Specifies the location where AM stores journey sessions.
Possible values are:
-
CTS. AM stores journey sessions server-side, in the CTS token store. -
JWT. AM sends the journey session to the client as a JWT. -
In-Memory. AM stores journey sessions in its memory.
Learn more in Introduction to sessions.
Default:
JWT(new installations),In-Memory(after upgrade)amsterattribute:authenticationSessionsStateManagementssoadmattribute:openam-auth-authentication-sessions-state-management-scheme -
- Max duration (minutes)
-
Specifies the maximum allowed duration of a journey session, including any time spent in the suspended state, in minutes.
Values from
1to2147483647are allowed.Default:
5amsterattribute:authenticationSessionsMaxDurationssoadmattribute:openam-auth-authentication-sessions-max-duration - Suspended authentication duration (minutes)
-
Specifies the length of time a journey session can be suspended in minutes.
Suspending a journey session allows time for out-of-band authentication methods, such as responding to emailed codes or performing an action on an additional device. The value must be less than or equal to the total time allowed for a journey session, specified in the
Max duration (minutes)property.Values from
1to2147483647are allowed.Default:
5ssoadmattribute:suspendedAuthenticationTimeout - Enable Allowlisting
-
When enabled, AM allowlists journey sessions to protect them against replay attacks.
Default: Disabled
amsterattribute:authenticationSessionsWhitelistssoadmattribute:openam-auth-authentication-sessions-whitelist - Stops sending tokenId
-
When HttpOnly session cookies are enabled and a client calls the
/json/authenticateendpoint with a valid SSO token, AM returns an emptytokenIdfield.Disable this property to have AM send a valid token ID in this scenario.
For security reasons, you should leave this property enabled. If you have migrated an existing deployment, adjust your clients to expect an empty token ID, then enable this property. Default: Enabled
amsterattribute:authenticationTreeCookieHttpOnlyssoadmattribute:authenticationTreeCookieHttpOnly
Security
The following properties are available under the Security tab:
- Module Based Authentication
-
This property was used only for authentication with modules and chains and is no longer documented.
- Persistent Cookie Encryption Certificate Alias
-
Specifies the key pair alias in the AM keystore to use for encrypting persistent cookies.
This property is deprecated. Use the rotatable secret mapping
am.authentication.nodes.persistentcookie.encryptioninstead.If AM finds a matching secret in the secret store for
am.authentication.nodes.persistentcookie.encryption, this alias is ignored.Learn more about rotating secrets in Map and rotate secrets.
Default:
testamsterattribute:keyAliasssoadmattribute:iplanet-am-auth-key-alias - Zero Page Login
-
This property was used only for authentication with modules and chains and is no longer documented.
- Zero Page Login Referer Allowlist
-
This property was used only for authentication with modules and chains and is no longer documented.
- Zero Page Login Allowed Without Referer?
-
This property was used only for authentication with modules and chains and is no longer documented.
- Add clear-site-data Header on Logout
-
When enabled, AM adds the Clear-Site-Data header to successful logout responses. The
Clear-Site-Datadirective instructs the browser to delete relevant site data on logout. This directive includescache,cookies,storage, andexecutionContexts.Default: true (enabled)
amsterattribute:addClearSiteDataHeader
- Organization Authentication Signing Secret
-
The HMAC shared secret for signing RESTful authentication requests. This secret should be Base64 encoded and at least 128 bits in length. By default, a cryptographically secure, random value is generated.
When users attempt to authenticate to the UI, AM uses this secret to sign a JSON Web Token (JWT). The JWT contains the journey session ID, realm, and authentication index type value, but doesn’t contain the user’s credentials.
-
This configuration property is deprecated and will be removed in a future release.
If you’re using a secret store of type Keystore, HSM, Google KMS, or Google Secret Manager, map the
am.authn.authid.signing.HMACsecret label to a secret instead. If you map this secret label and set the configuration property, the mapped secret takes precedence. -
You can map multiple secrets to the
am.authn.authid.signing.HMACsecret label to enable secret rotation.AM signs the authentication token with the active secret but checks all mapped secrets when verifying the authentication token signature. Therefore, if you rotate the active secret while an authentication request is in progress, the returned authentication token can still be verified.
If you delete the secret that was used to sign an authentication token, the
authIDreturned in the authentication request can’t be verified and authentication fails.
amsterattribute:sharedSecretssoadmattribute:iplanet-am-auth-hmac-signing-shared-secret -
Post Authentication Processing
The following properties are available under the Post Authentication Processing tab:
- Default Success Login URL
-
Accepts a list of values that specifies where users are directed after successful authentication. The format of this attribute is
client-type|URLalthough the only value you can specify at this time is a URL which assumes the type HTML. The default value is/am/console. Values that do not specify HTTP have that appended to the deployment URI.amsterattribute:loginSuccessUrlssoadmattribute:iplanet-am-auth-login-success-url - Default Failure Login URL
-
Accepts a list of values that specifies where users are directed after authentication has failed. The format of this attribute is
client-type|URLalthough the only value you can specify at this time is a URL which assumes the type HTML. Values that do not specify HTTP have that appended to the deployment URI.amsterattribute:loginFailureUrlssoadmattribute:iplanet-am-auth-login-failure-url - Authentication Post Processing Classes
-
This property was used only for authentication with modules and chains and is no longer documented.
- Generate UserID Mode
-
This property was used only for authentication with modules and chains and is no longer documented.
- Pluggable User Name Generator Class
-
This property was used only for authentication with modules and chains and is no longer documented.
- User Attribute Mapping to Session Attribute
-
This property was used only for authentication with modules and chains and is no longer documented.
Nodes and trees
Authentication trees provide fine-grained authentication by allowing multiple paths and decision points throughout the authentication flow. Use them to build complex authorization scenarios, while offering users a streamlined sign-on experience.
Trees are made up of authentication nodes, which define actions taken during authentication. Each node performs a single task during authentication, such as, collecting a username or making a simple decision based on a cookie.
Nodes can have multiple outcomes rather than just success or failure. This lets you create complex yet customer-friendly authentication experiences by linking nodes together, creating loops, branching the tree for different authentication scenarios, and nesting nodes within a tree:
AM provides the following default trees: ldapService, Agent and amsterService.
Learn more in Default trees.
You can use trees to further control the authentication process. The following table describes some examples of how you can do this.
| Task | Resource |
|---|---|
Assign authentication levels to branches on a tree, with higher levels typically used to allow access to more restricted resources. |
|
Use individual nodes to handle session property management. |
|
Call out to third-party systems by using scripted nodes. |
|
Use webhooks to register events to make HTTP POST calls to a server. |
Authentication levels for trees
When a user successfully authenticates, AM creates a session, which allows AM to manage the user’s access to resources. The session is assigned an authentication level. The authentication level is often used as a measure of the strength of the authentication performed. For example, username and password could be assigned a low authentication level, and multi-factor with Push and webAuthn could be assigned a high one.
Authorization policies could require a particular authentication level to access protected resources. When an authenticated user tries to access a protected resource without satisfying the authentication level requirement, AM denies access to the resource and returns an advice indicating that the user needs to reauthenticate at the required authentication level to access the resource.
The web or Java agent or policy enforcement point can then send the user back to AM for session upgrade. Learn more in Session upgrade
AM provides the following nodes to manage authentication levels:
-
The
Authentication Level Decisionnode, which checks if the current authentication level is equal or greater than the one specified in the node. -
The
Modify Authentication Levelnode, which can raise or lower the authentication level.
Position these nodes to alter the authentication level depending on the route taken through the authentication tree.
Account lockout for trees
Use account lockout to limit the number of times an end user can attempt to authenticate with invalid credentials before rendering their account inactive. Limiting the number of attempts helps to prevent password-guessing and brute-force attacks.
By default, authentication trees support account lockout and provide nodes for checking and changing a user’s status:
- Account Active Decision node
-
Use this node to determine whether an account is locked or unlocked.
-
An account is considered locked under these conditions:
-
The status is
inactive. -
The status is
activeand a duration lockout is set on the account.
-
-
An account is considered unlocked under this condition:
-
The status is
activeand no duration lockout is set on the account.
-
-
- Account Lockout node
-
Use this node to change the account’s status to inactive or active.
When setting an account to inactive, the node doesn’t consider the realm’s account lockout settings, so effectively sets a persistent lockout on the account.
When setting an account to active, the node also resets the failed attempts and lockout duration counters.
In addition to the lockout-specific nodes above, the Success and Failure nodes include account lockout functionality, when lockout is enabled in a realm, as follows:
- Success node
-
-
Checks the User Status property of the user profile, when reached, and fails the authentication with an error message, if the account is marked as
Inactive:
The error message is returned in the JSON response if authenticating to the tree by using REST:
{
    "code":401,
    "reason":"Unauthorized",
    "message":"User Locked Out."
}
json -
Resets the failure count in the user profile, when reached, if the User Status property is set to
Active.
-
- Failure node
-
-
Checks the invalid attempts property of the user profile, and returns a warning message if the number of failed attempts is equal to or greater than the configured Warn User After N Failures value in the realm:

The error message is returned in the JSON response if authenticating to the tree by using REST:
{
    "code":401,
    "reason":"Unauthorized",
    "message":"Warning: You will be locked out after 1 more failure(s)."
}
json -
Increments the failure count in the user profile, when reached.
-
Returns an error message if the account is marked as
Inactive:
The error message is returned in the JSON response if authenticating to the tree by using REST:
{
    "code":401,
    "reason":"Unauthorized",
    "message":"User Locked Out."
}
json
-
You can find information on configuring account lockout in a realm in Account lockout.
Configure trees
The following table summarizes the high-level tasks required to configure authentication trees:
| Task | Resources | ||
|---|---|---|---|
Design your user authentication journey Authentication trees are flexible. For example, the same tree can branch for different use cases, or users can be forced to loop though branches until they’re able to present the required credentials. It’s easy to create a massive tree that’s difficult to understand, read, and maintain in the UI. For this reason, AM lets you nest trees within trees. The best way to tackle the design decision is to write down a list of required steps users would need to take to sign on to your environment. Then, check the list of nodes available in AM.
|
|
||
Decide if you need custom nodes If the nodes available in AM or in the Marketplace don’t meet your needs, you can create your own scripted node types or build your own nodes in Java. |
|||
Decide if you need webhooks or tree hooks You can create custom webhooks or post-authentication hooks for nodes that need them. |
|||
Configure your authentication trees Use the authentication tree designer to quickly configure a tree or use the REST API. |
|||
Configure webhooks, if required If you have configured the |
Create an authentication tree in the UI
-
In the AM admin UI, go to Realms > Realm Name > Authentication > Trees and click Create Tree.
-
Enter a tree name, for example
myAuthTree, and click Create.The authentication tree designer displays with the Start entry point connected to the Failure exit point.
The authentication tree designer provides the following features on the toolbar:
Authentication tree designer toolbar Button Usage 
Lay out and align nodes according to the order they’re connected.

Toggle the designer window between normal and full screen layout.

Remove the selected node. You can’t delete the Start entry point.
-
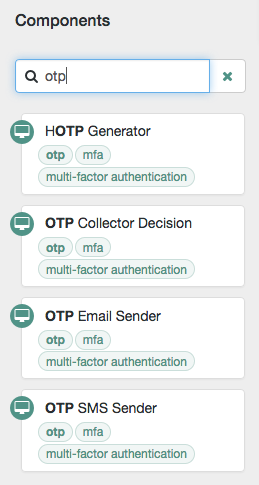
Add a node to the tree by dragging the node from the Components panel on the left-hand side, and dropping it into the designer area.
The list of authentication nodes is divided into categories. Click the category title to expand and collapse the categories.
Use the filter text field to restrict the list of authentication nodes. This will match on the node’s name and any tags applied to the node:
-
Configure the node properties by using the right-hand panel.
You can find more information on the available properties for each node in Node reference.
-
Connect the node to the tree as follows:
-
Select and drag the output connector from an existing node and drop it onto the new node.
-
Select and drag the output connector from the new node and drop it onto an existing node.
Nodes have one or more connectors, displayed as dots on the node. Unconnected connectors appear red until you connect them to other nodes in the tree.
Input connectors appear on the left of the node, output connectors appear on the right. A line is drawn between the connectors of connected nodes, and the connectors no longer appear red.
-
-
To change a connection, select and drag the green connector in the connection and drop it onto the new location.
-
Continue adding, connecting and removing nodes until the tree is complete, then click Save.
-
Test your authentication tree by navigating to a URL similar to the following:
https://am.example.com:8443/am/XUI/?realm=/alpha&service=myAuthTree#login
Create an authentication tree over REST
To create an authentication tree over REST, send individual PUT requests to create each node. Then send a PUT request to update the tree configuration, including the tree ID and all the nodes in the tree. You can find information on the required parameters in the online REST API reference.
Consider the following when creating authentication trees using the REST API:
-
You must re-create each node when creating a new authentication tree.
-
Each node must have a valid UUID as its identifier. You can generate UUIDs online, for example, using the Online UUID Generator.
If you don’t use a valid UUID, authentication will fail with the following error:
ERROR: Could not get SMS service: authenticationTreesService java.lang.IllegalArgumentException: Invalid UUID string: 12345
-
The
entryNodeIdfield specified when creating the authentication tree is the UUID of the first node in the tree. -
The
outcomefield specified when creating the authentication tree is the UUID of the next node. This allows you to move between nodes. -
The Success and Failure nodes have the following static UUIDs:
-
Success node:
70e691a5-1e33-4ac3-a356-e7b6d60d92e0 -
Failure node:
e301438c-0bd0-429c-ab0c-66126501069a
These UUIDs remain constant across all authentication trees and AM versions.
-
Example
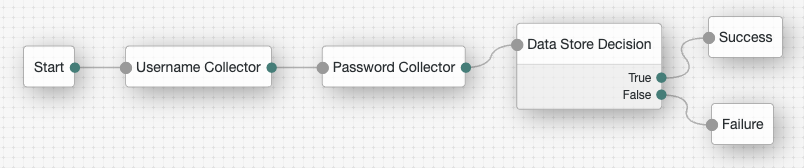
Complete these steps to create a simple authentication tree consisting of three nodes: Username Collector node, Password Collector node, and Data Store Decision node.
-
Generate UUIDs for each of the nodes you want to create. This example uses the following UUIDs:
-
Username Collector node:
8f9d2280-caa7-433f-93a9-1f64f4cae60a -
Password Collector node:
54f14341-d1b7-436f-b159-d1f9b6c626eb -
Data Store Decision node:
3fc7ce22-fc79-4131-85f2-f1844709d042
-
-
Authenticate to AM as the
amAdminuser:$ curl \ --request POST \ --header "Content-Type: application/json" \ --header "X-OpenAM-Username: amadmin" \ --header "X-OpenAM-Password: password" \ --header "Accept-API-Version: resource=2.0, protocol=1.0" \ 'https://am.example.com:8443/am/json/realms/root/realms/alpha/authenticate' { "tokenId":"AQIC5wM…TU3OQ*", "successUrl":"/am/console", "realm":"/alpha" }bash -
Create the Username Collector node, where the UUID is the one you generated in step 1:
$ curl \ --request PUT \ --header "iPlanetDirectoryPro: AQIC5wM…TU3OQ*" \ --header "Content-Type: application/json" \ --header "Accept-API-Version: protocol=2.1,resource=1.0" \ --header "If-None-Match: *" \ --data '{ "_id": "8f9d2280-caa7-433f-93a9-1f64f4cae60a", "_type": { "_id": "UsernameCollectorNode", "name": "Username Collector" } }' \ "https://am.example.com:8443/am/json/realms/root/realms/alpha/realm-config/authentication/authenticationtrees/nodes/UsernameCollectorNode/8f9d2280-caa7-433f-93a9-1f64f4cae60a" { "_id": "8f9d2280-caa7-433f-93a9-1f64f4cae60a", "_rev": "280717409", "_type": { "_id": "UsernameCollectorNode", "name": "Username Collector", "collection": true }, "_outcomes": [ { "id": "outcome", "displayName": "Outcome" } ] }bash -
Create the Password Collector node, where the UUID is the one you generated in step 1:
$ curl \ --request PUT \ --header "iPlanetDirectoryPro: AQIC5wM…TU3OQ*" \ --header "Content-Type: application/json" \ --header "Accept-API-Version: protocol=2.1,resource=1.0" \ --header "If-None-Match: *" \ --data '{ "_id": "54f14341-d1b7-436f-b159-d1f9b6c626eb", "_type": { "_id": "PasswordCollectorNode", "name": "Password Collector" } }' \ "https://am.example.com:8443/am/json/realms/root/realms/alpha/realm-config/authentication/authenticationtrees/nodes/PasswordCollectorNode/54f14341-d1b7-436f-b159-d1f9b6c626eb" { "_id": "54f14341-d1b7-436f-b159-d1f9b6c626eb", "_rev": "792175357", "_type": { "_id": "PasswordCollectorNode", "name": "Password Collector", "collection": true }, "_outcomes": [ { "id": "outcome", "displayName": "Outcome" } ] }bash -
Create the Data Store Decision node, where the UUID is the one you generated in step 1:
$ curl \ --request PUT \ --header "iPlanetDirectoryPro: AQIC5wM…TU3OQ*" \ --header "Content-Type: application/json" \ --header "Accept-API-Version: protocol=2.1,resource=1.0" \ --header "If-None-Match: *" \ --data '{ "_id": "3fc7ce22-fc79-4131-85f2-f1844709d042", "_type": { "_id": "DataStoreDecisionNode", "name": "Data Store Decision" } }' \ "https://am.example.com:8443/am/json/realms/root/realms/alpha/realm-config/authentication/authenticationtrees/nodes/DataStoreDecisionNode/3fc7ce22-fc79-4131-85f2-f1844709d042" { "_id": "3fc7ce22-fc79-4131-85f2-f1844709d042", "_rev": "2145625368", "_type": { "_id": "DataStoreDecisionNode", "name": "Data Store Decision", "collection": true }, "_outcomes": [ { "id": "true", "displayName": "True" }, { "id": "false", "displayName": "False" } ] }bash -
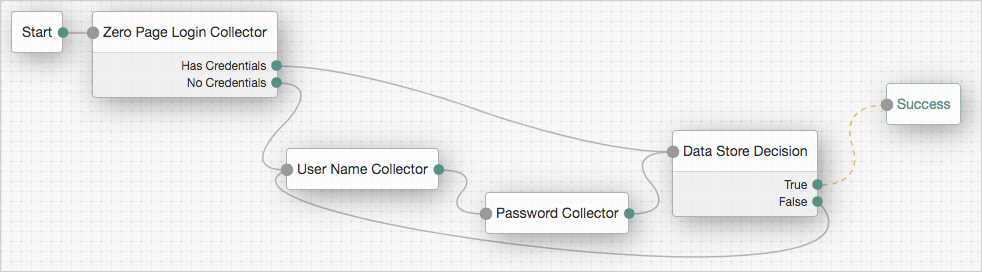
Create the authentication tree with these three nodes, where the UUIDs are the ones you used to create the nodes. Make sure you set
entryNodeIdto the UUID of the first node and set theoutcomeof each node to the UUID of the next node:$ curl \ --request PUT \ --header "iPlanetDirectoryPro: AQIC5wM…TU3OQ*" \ --header "Content-Type: application/json" \ --header "Accept-API-Version: protocol=2.1,resource=1.0" \ --header "If-None-Match: *" \ --data '{ "entryNodeId": "8f9d2280-caa7-433f-93a9-1f64f4cae60a", "nodes": { "8f9d2280-caa7-433f-93a9-1f64f4cae60a": { "displayName": "Username Collector", "nodeType": "UsernameCollectorNode", "connections": { "outcome": "54f14341-d1b7-436f-b159-d1f9b6c626eb" } }, "54f14341-d1b7-436f-b159-d1f9b6c626eb": { "displayName": "Password Collector", "nodeType": "PasswordCollectorNode", "connections": { "outcome": "3fc7ce22-fc79-4131-85f2-f1844709d042" } }, "3fc7ce22-fc79-4131-85f2-f1844709d042": { "displayName": "Data Store Decision", "nodeType": "DataStoreDecisionNode", "connections": { "false": "e301438c-0bd0-429c-ab0c-66126501069a", "true": "70e691a5-1e33-4ac3-a356-e7b6d60d92e0" } } } }' \ "https://am.example.com:8443/am/json/realms/root/realms/alpha/realm-config/authentication/authenticationtrees/trees/myNewTree" { "_id": "myNewTree", "_rev": "2061817222", "uiConfig": {}, "entryNodeId": "8f9d2280-caa7-433f-93a9-1f64f4cae60a", "innerTreeOnly": false, "nodes": { "8f9d2280-caa7-433f-93a9-1f64f4cae60a": { "displayName": "Username Collector", "nodeType": "UsernameCollectorNode", "connections": { "outcome": "54f14341-d1b7-436f-b159-d1f9b6c626eb" } }, "54f14341-d1b7-436f-b159-d1f9b6c626eb": { "displayName": "Password Collector", "nodeType": "PasswordCollectorNode", "connections": { "outcome": "3fc7ce22-fc79-4131-85f2-f1844709d042" } }, "3fc7ce22-fc79-4131-85f2-f1844709d042": { "displayName": "Data Store Decision", "nodeType": "DataStoreDecisionNode", "connections": { "false": "e301438c-0bd0-429c-ab0c-66126501069a", "true": "70e691a5-1e33-4ac3-a356-e7b6d60d92e0" } } }, "enabled": true }bash -
Verify the tree has been created in the AM admin UI. It should look similar to this:
Enable and disable an authentication tree
Custom authentication trees are enabled by default when you save them. For security purposes, you can disable custom authentication trees during development and testing to prevent accidentally allowing access through these trees. Rather than having unused authentication trees enabled, you should disable the default authentication trees until you need them.
When a user attempts to authenticate through a disabled tree, AM returns a No configuration found error.
To enable or disable an authentication tree, send a PUT request to update the tree configuration. Include the tree ID
and all the nodes in the tree, and set the enabled property.
You can find information on the required parameters in the
online REST API reference.
Example
$ curl \
--request PUT \
--header "iPlanetDirectoryPro: AQIC5wM…TU3OQ*" \
--header "Content-Type: application/json" \
--header "Accept-API-Version: protocol=2.1,resource=1.0" \
--header "If-None-Match: *" \
--data '{
"entryNodeId": "c11e9cf8-ef48-4740-876f-6300e2f46aef",
"nodes": {
...
},
"enabled": false
}' \
"https://am.example.com:8443/am/json/realms/root/realms/alpha/realm-config/authentication/authenticationtrees/trees/myAuthTree"
{
"_id": "myAuthTree",
"_rev": "2070284866",
"uiConfig": {},
"entryNodeId": "c11e9cf8-ef48-4740-876f-6300e2f46aef",
"innerTreeOnly": false,
"nodes": {
...
},
"staticNodes": {
"startNode": {
"x": 50,
"y": 25
},
"70e691a5-1e33-4ac3-a356-e7b6d60d92e0": {
"x": 570,
"y": 30
},
"e301438c-0bd0-429c-ab0c-66126501069a": {
"x": 573,
"y": 107
}
},
"enabled": false
}Disable direct access through an inner tree
An inner tree or child tree lets you nest authentication logic. There is no limit to the depth of nesting.
You configure an inner tree like any other tree then call it from a parent tree using an Inner Tree Evaluator node.
You could want to hide inner trees as complete services. In other words, you could want to prevent users from authenticating directly through an inner tree, either for security reasons or because the inner tree is insufficient as a complete authentication service.
To prevent a tree from being used outside of its parent tree, set the innerTreeOnly property to true in the tree
configuration. Send a PUT request to update the tree configuration, including the tree ID and all the nodes in the tree.
You can find information on the required parameters in the
online REST API reference.
Example
$ curl \
--request PUT \
--header "iPlanetDirectoryPro: AQIC5wM…TU3OQ*" \
--header "Content-Type: application/json" \
--header "Accept-API-Version: protocol=2.1,resource=1.0" \
--header "If-None-Match: *" \
--data '{
"entryNodeId": "c11e9cf8-ef48-4740-876f-6300e2f46aef",
"nodes": {
...
},
"innerTreeOnly": true
}' \
"https://am.example.com:8443/am/json/realms/root/realms/alpha/realm-config/authentication/authenticationtrees/trees/myAuthTree"
{
"_id": "myAuthTree",
"_rev": "1081620278",
"uiConfig": {},
"entryNodeId": "c11e9cf8-ef48-4740-876f-6300e2f46aef",
"innerTreeOnly": true,
"nodes": {
...
},
"staticNodes": {
"startNode": {
"x": 50,
"y": 25
},
"70e691a5-1e33-4ac3-a356-e7b6d60d92e0": {
"x": 570,
"y": 30
},
"e301438c-0bd0-429c-ab0c-66126501069a": {
"x": 573,
"y": 107
}
},
"enabled": true
}Specify IDM identity resources in trees
When running AM as part of an integrated platform with IDM,
trees configured to use the platform need to identify
the type of identity resource or object the tree is working with.
To do this, use the identityResource configuration property.
If the property isn’t included in the tree configuration, it defaults to managed/user.
To update identityResource on a tree, use the REST API to update the tree:
$ curl \
--request PUT \
--header "iPlanetDirectoryPro: AQIC5wM…TU3OQ*" \
--header "Content-Type: application/json" \
--header "Accept-API-Version: protocol=2.1,resource=1.0" \
--header "If-None-Match: *" \
--data '{
"entryNodeId":"e301438c-0bd0-429c-ab0c-66126501069a",
"nodes":{},
"staticNodes":{},
"description":"Example tree description",
"identityResource":"managed/newObjectType"
}' \
"https://am.example.com:8443/am/json/realms/root/realm-config/authentication/authenticationtrees/trees/ExampleTree"In the previous example, the tree ExampleTree has no nodes added to it yet.
It includes the identityResource property, set to use a managed object in IDM called newObjectType.
Because this is a PUT request, you must include the entire tree as part of the request.
You can find more information about using the REST API in REST in AM.
Configure an authentication tree to always run
You can configure a tree to always run, whether a user authenticated successfully and a session exists or not. If enabled, the tree runs even when the session was created through a different tree and irrespective of the value of the ForceAuth parameter.
|
You can’t set a tree to always run when it’s set as the default authentication service. Also, to prevent unexpected behavior in the authentication flow, don’t configure the tree to always run when it’s mapped to the default acr. |
If a user successfully signs on using a specific authentication tree and then tries to reauthenticate to the same tree while the session is still valid, the default behavior is for the authentication flow to skip the processing of the tree. For example, the Set Session Properties node is never run in this scenario:
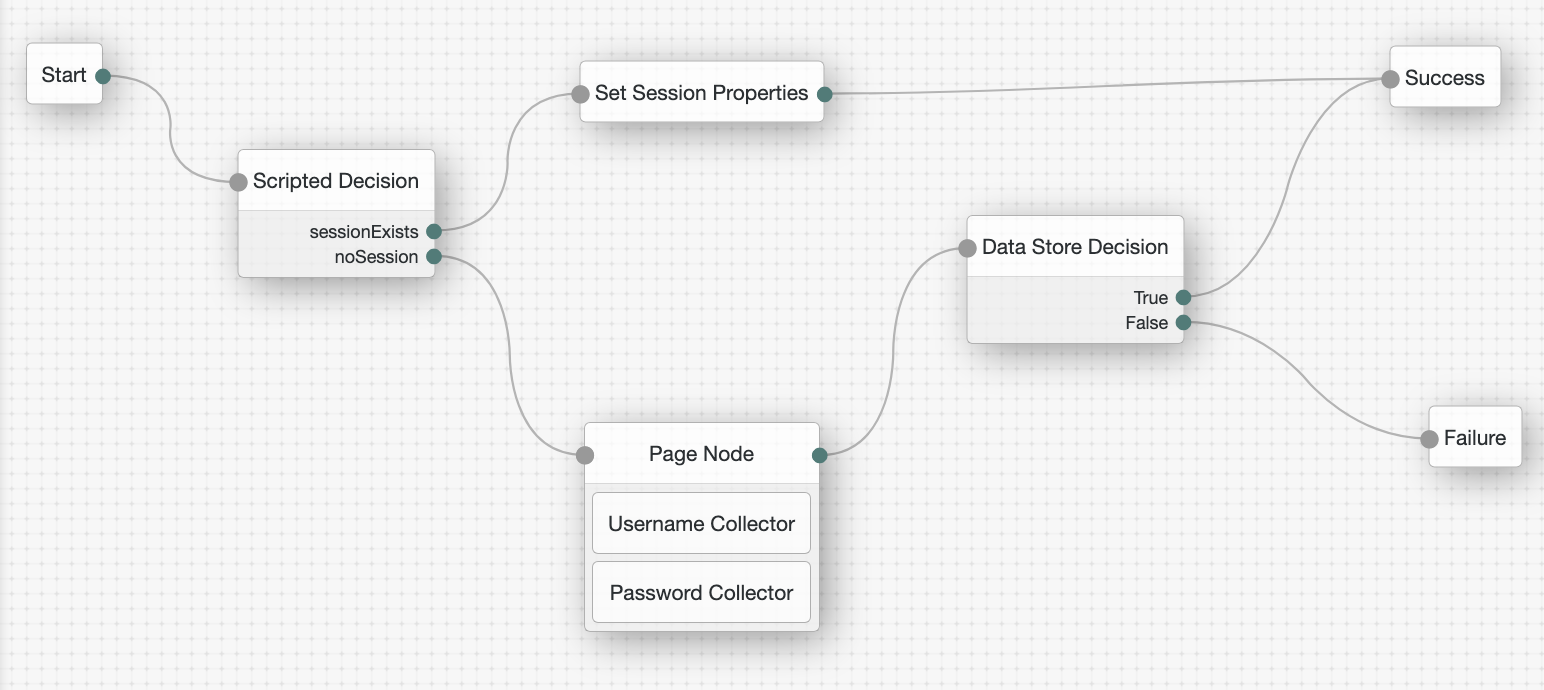
However, to make sure the tree always runs and sets the session property even when a valid authenticated session exists,
set the mustRun property to true in the tree configuration.
To do this, send a PUT request to update the tree configuration including the tree ID and all the nodes in the tree. Find information on the required parameters in the online REST API reference.
Example
$ curl \
--request PUT \
--header "iPlanetDirectoryPro: AQIC5wM…TU3OQ*" \
--header "Content-Type: application/json" \
--header "Accept-API-Version: protocol=2.1,resource=1.0" \
--header "If-None-Match: *" \
--data '{
"entryNodeId": "83fa0ce2-1b0f-4f8f-83fb-0d2648339797",
"nodes": {
"83fa0ce2-1b0f-4f8f-83fb-0d2648339797": {
"displayName": "Page Node",
"nodeType": "PageNode",
"x": 437,
"y": 187,
"connections": {
"outcome": "8113abc2-9bbe-4510-a676-bb4cb1dba6a6"
}
},
"2e0fb163-98d1-4ae1-88da-24d7f39cee1e": {
"displayName": "Set Session Properties",
"nodeType": "SetSessionPropertiesNode",
"x": 468,
"y": 20,
"connections": {
"outcome": "70e691a5-1e33-4ac3-a356-e7b6d60d92e0"
}
},
"adec5f3d-db07-4e2d-bd9e-2aedfe95b636": {
"displayName": "Scripted Decision",
"nodeType": "ScriptedDecisionNode",
"x": 38,
"y": 113,
"connections": {
"noSession": "83fa0ce2-1b0f-4f8f-83fb-0d2648339797",
"sessionExists": "2e0fb163-98d1-4ae1-88da-24d7f39cee1e"
}
},
"8113abc2-9bbe-4510-a676-bb4cb1dba6a6": {
"displayName": "Data Store Decision",
"nodeType": "DataStoreDecisionNode",
"x": 686,
"y": 214,
"connections": {
"false": "e301438c-0bd0-429c-ab0c-66126501069a",
"true": "70e691a5-1e33-4ac3-a356-e7b6d60d92e0"
}
}
},
"mustRun": true
}' \
"https://am.example.com:8443/am/json/realms/root/realms/alpha/realm-config/authentication/authenticationtrees/trees/myAuthTree"
{
"_id": "myAuthTree",
"_rev": "71943491",
"uiConfig": {},
"entryNodeId": "83fa0ce2-1b0f-4f8f-83fb-0d2648339797",
"innerTreeOnly": false,
"nodes": {
"83fa0ce2-1b0f-4f8f-83fb-0d2648339797": {
"displayName": "Page Node",
"nodeType": "PageNode",
"x": 437,
"y": 187,
"connections": {
"outcome": "8113abc2-9bbe-4510-a676-bb4cb1dba6a6"
}
},
"2e0fb163-98d1-4ae1-88da-24d7f39cee1e": {
"displayName": "Set Session Properties",
"nodeType": "SetSessionPropertiesNode",
"x": 468,
"y": 20,
"connections": {
"outcome": "70e691a5-1e33-4ac3-a356-e7b6d60d92e0"
}
},
"adec5f3d-db07-4e2d-bd9e-2aedfe95b636": {
"displayName": "Scripted Decision",
"nodeType": "ScriptedDecisionNode",
"x": 38,
"y": 113,
"connections": {
"noSession": "83fa0ce2-1b0f-4f8f-83fb-0d2648339797",
"sessionExists": "2e0fb163-98d1-4ae1-88da-24d7f39cee1e"
}
},
"8113abc2-9bbe-4510-a676-bb4cb1dba6a6": {
"displayName": "Data Store Decision",
"nodeType": "DataStoreDecisionNode",
"x": 686,
"y": 214,
"connections": {
"false": "e301438c-0bd0-429c-ab0c-66126501069a",
"true": "70e691a5-1e33-4ac3-a356-e7b6d60d92e0"
}
}
},
"staticNodes": {
"startNode": {
"x": 20,
"y": 20
},
"70e691a5-1e33-4ac3-a356-e7b6d60d92e0": {
"x": 913,
"y": 31
},
"e301438c-0bd0-429c-ab0c-66126501069a": {
"x": 932,
"y": 305
}
},
"mustRun": true,
"enabled": true
}Configure journey session duration in a tree
The maximum duration of a journey session is derived by AM as described in Maximum duration.
You can override global and realm level duration values in an individual tree if required. For example, a tree that requires email verification could have a longer duration than a simple tree that authenticates users with a username and password.
|
Duration values set in a tree can be overridden at the node level. Learn more in Maximum duration. Additionally, duration values set on inner trees are ignored. |
Learn more in Suspend journey progress.
To change the authentication tree duration, set the treeTimeout property to the required number of minutes in the tree configuration.
Send a PUT request to update the tree configuration, including the tree ID and all the nodes in the tree. You can find information on the
required parameters in the online REST API reference.
Example
$ curl \
--request PUT \
--header "iPlanetDirectoryPro: AQIC5wM…TU3OQ*" \
--header "Content-Type: application/json" \
--header "Accept-API-Version: protocol=2.1,resource=1.0" \
--header "If-None-Match: *" \
--data '{
"entryNodeId": "c11e9cf8-ef48-4740-876f-6300e2f46aef",
"nodes": {
...
},
"treeTimeout": 10
}' \
"https://am.example.com:8443/am/json/realms/root/realms/alpha/realm-config/authentication/authenticationtrees/trees/myAuthTree"
{
"_id": "myAuthTree",
"_rev": "1081620278",
"uiConfig": {},
"entryNodeId": "c11e9cf8-ef48-4740-876f-6300e2f46aef",
"innerTreeOnly": false,
"nodes": {
...
},
"staticNodes": {
"startNode": {
"x": 50,
"y": 25
},
"70e691a5-1e33-4ac3-a356-e7b6d60d92e0": {
"x": 570,
"y": 30
},
"e301438c-0bd0-429c-ab0c-66126501069a": {
"x": 573,
"y": 107
}
},
"treeTimeout": 10,
"enabled": true
}Configure authenticated session timeouts in a tree
Timeout settings for an authenticated session are derived by AM as described in Configure authenticated session timeout settings.
You can override global and realm level timeout values in an individual tree if required. For example, a tree that implements MFA could have a longer authenticated session timeout than a simple tree that authenticates users with a username and password.
|
Session timeouts set in a tree can be overridden at the node or user level. Learn more in Configure authenticated session timeout settings. Session timeout values set on inner trees are ignored. However, if session timeouts are set at the node level in an inner tree, the updated timeouts are used in the parent tree. |
Learn more in Session termination.
To change the session timeouts in a tree, set the maximumSessionTime and maximumIdleTime properties to the
required number of minutes in the tree configuration. Send a PUT request to update the tree configuration, including the tree ID and all the
nodes in the tree. You can find information on the required parameters in the
online REST API reference.
Example
The following example sets the maximumSessionTime to an hour and the maximumIdleTime to 15 minutes for
authenticated sessions established through this tree:
$ curl \
--request PUT \
--header "iPlanetDirectoryPro: AQIC5wM…TU3OQ*" \
--header "Content-Type: application/json" \
--header "Accept-API-Version: protocol=2.1,resource=1.0" \
--header "If-None-Match: *" \
--data '{
"entryNodeId": "c11e9cf8-ef48-4740-876f-6300e2f46aef",
"nodes": {
...
},
"maximumSessionTime": 60,
"maximumIdleTime": 15
}' \
"https://am.example.com:8443/am/json/realms/root/realms/alpha/realm-config/authentication/authenticationtrees/trees/myAuthTree"
{
"_id": "myAuthTree",
"_rev": "1081620278",
"uiConfig": {},
"entryNodeId": "c11e9cf8-ef48-4740-876f-6300e2f46aef",
"innerTreeOnly": false,
"nodes": {
...
},
"staticNodes": {
"startNode": {
"x": 50,
"y": 25
},
"70e691a5-1e33-4ac3-a356-e7b6d60d92e0": {
"x": 570,
"y": 30
},
"e301438c-0bd0-429c-ab0c-66126501069a": {
"x": 573,
"y": 107
}
},
"maximumSessionTime": 60,
"maximumIdleTime": 15,
"enabled": true
}Configure a no session tree
A no session tree doesn’t result in an authenticated session when it successfully completes.
A common use case for a no session tree is a delegated admin task, such as an administrator changing a user’s password. In this scenario, you don’t want an authenticated session to be created when the administrator enters the credentials of the user whose password they are changing.
|
This can also be achieved by setting the If the |
To configure a no session tree, set the noSession property to true in the tree configuration.
Send a PUT request to update the tree configuration, including the tree ID and all the nodes in the tree. You can find information on the
required parameters in the online REST API reference.
Example
$ curl \
--request PUT \
--header "iPlanetDirectoryPro: AQIC5wM…TU3OQ*" \
--header "Content-Type: application/json" \
--header "Accept-API-Version: protocol=2.1,resource=1.0" \
--header "If-None-Match: *" \
--data '{
"entryNodeId": "c11e9cf8-ef48-4740-876f-6300e2f46aef",
"nodes": {
...
},
"noSession": true
}' \
"https://am.example.com:8443/am/json/realms/root/realms/alpha/realm-config/authentication/authenticationtrees/trees/myAuthTree"
{
"_id": "myAuthTree",
"_rev": "1081620278",
"uiConfig": {},
"entryNodeId": "c11e9cf8-ef48-4740-876f-6300e2f46aef",
"innerTreeOnly": false,
"nodes": {
...
},
"staticNodes": {
"startNode": {
"x": 50,
"y": 25
},
"70e691a5-1e33-4ac3-a356-e7b6d60d92e0": {
"x": 570,
"y": 30
},
"e301438c-0bd0-429c-ab0c-66126501069a": {
"x": 573,
"y": 107
}
},
"noSession": true,
"enabled": true
}Configure webhooks
Webhooks are used to send HTTP POST calls to a server with contextual information about an authenticated session when a predefined event occurs, for example, logging out.
Webhooks are used from within authentication trees by the Register Logout Webhook node.
Create a webhook
-
In the AM admin UI, go to Realms > Realm Name > Authentication > Webhooks.
-
To create a new webhook, select Create Webhook, specify a webhook name, and click Create.
-
To edit an existing webhook, select the name of the webhook.
-
-
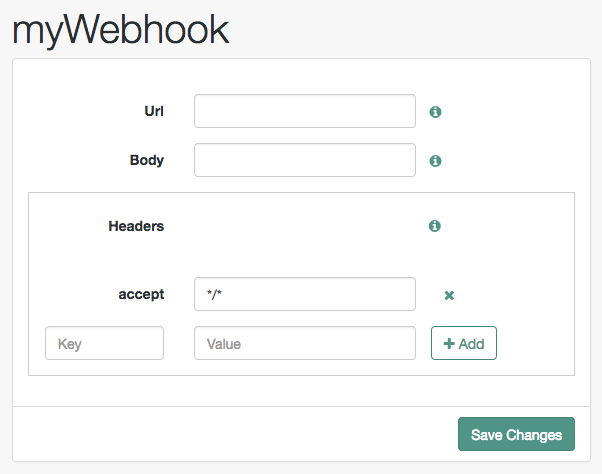
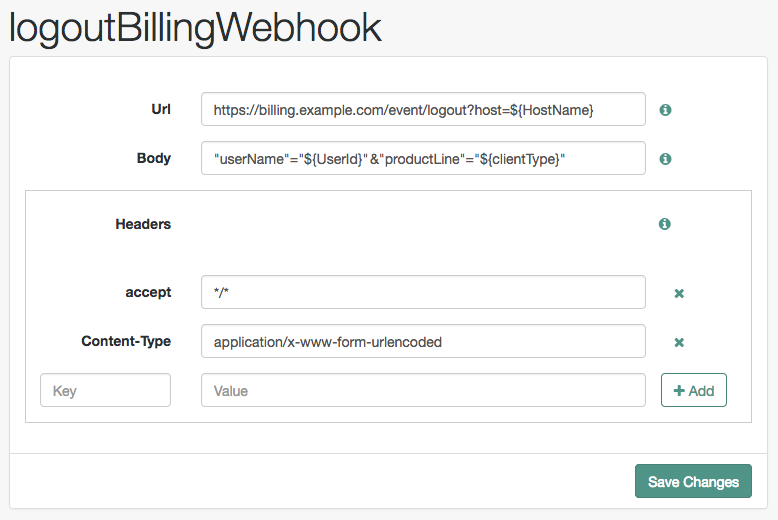
Complete the fields as required:
- Url
-
Specifies the URL to which the HTTP POST is sent when the event occurs.
- Body
-
Specifies the body of the HTTP POST. You can send different formats by also setting the correct Content-Type header in the
Headerproperty, for example:-
Form Data. Enter the body value in the format
parameter=value¶meter2=value2, and set aContent-Typeheader ofapplication/x-www-form-urlencoded. -
JSON Data. Enter the body value in the format
{"parameter":"value","parameter2":"value2"}, and set aContent-Typeheader ofapplication/json.
-
- Headers
-
Specifies any HTTP headers to add to the POST.
To add a header, enter the name of the header in the
Keyfield, and the value, and click Add (➕).To remove a header, click Delete (✖).
The fields in a webhook support variables for retrieving values from the authenticated session after the user has successfully authenticated.
Specify a variable in the following format:
${variable_name}To access the type of webhook event, use the
WebhookEventTypeparameter key to return one of the following possible values:-
LOGOUT -
UPGRADE -
DESTROY -
MAX_TIMEOUT -
IDLE_TIMEOUT
For example, to retrieve the event type as a query parameter:
&event=${WebhookEventType}You can use a variable to access custom properties added to the session with the Set Session Properties node as well as the following default session properties:
Default Session Properties
Property Example value Description AMCtxId22e73c81-708e-4849-b064-db29b68ef943-105372
The audit ID for the session. This is logged as the
trackingIdsfield in AM access audit logs.amlbcookie01
The cookie that identifies the AM server that generated the session. For environments with multiple AM servers, this can be used for load balancer stickiness.
authInstant2022-02-28T14:06:31Z
The exact time that authentication completed.
AuthLevel5
The authentication level of the session, determined by the login mechanism used to create the session. For example, a tree can have an authentication level of 10.
Step-up authentication is triggered if an authentication level specified by an agent or policy that is designed to protect a resource, is greater than or equal to the value of the
AuthLevelsession property.For more information, see Session upgrade.
AuthTypeDataStore
Not supported.
CharSetUTF-8
The character set for the session, set to
UTF-8.clientTypegenericHTML
The type of client, set to
genericHTML.FullLoginURL/am/XUI/?realm=%2Falpha
The full login URL, including query parameters.
Host192.0.2.1
The originating IP address of the authentication request.
HostName192.0.2.1
The host name that was used when the session was authenticated.
IndexTypeservice
Based on the value of the
authIndexValuequery parameter during authentication. Typically, this is set toservice.Localeen_US
The session locale.
loginURL/am/XUI
The base login URL. A subset of
FullLoginURL.OidcSidg0wmSpoAIwH6HAwCnurvRcfYqh4
Unique session ID used by AM to determine whether OIDC ID tokens granted for the same client relate to the same session. This appears when
Enable Session Management(storeOpsToken) is set to true in the OAuth 2.0 provider settings.Organizationo=alpha,ou=services,dc=am,dc=example,dc=com
The DN of the realm where authentication took place.
Principalid=bjensen,ou=user,o=alpha,ou=services,dc=am,dc=example,dc=com
The value of
sun.am.UniversalIdentifier.Principalsbjensen
The username of the user. Not supported.
ServiceLogin
The name of the tree that was used to authenticate this session.
successURL/am/console
The URL that was redirected to, upon a successful login request.
sun.am.UniversalIdentifierid=bjensen,ou=user,o=alpha,ou=services,dc=am,dc=example,dc=com
The DN of the user (username is lowercase).
UserIdbjensen
The
idvalue from thePrincipalproperty.UserProfileRequired
Can be one of:
Required,Create,Ignore, orCreateWithAlias. Based on the value of thedynamicProfileCreationauthentication configuration. Values other thanIgnoreindicates that user profile attributes were mapped based on theUser Attribute Mapping to Session Attributesetting. See authentication configuration for details.Default:
Required.UserTokenbjensen
The username.
XUSRef8700f1a5-904e-4849-8b2b-cb25296ef453-291173
If the cross-upgrade session reference property is enabled, this value identifies the session through its lifecycle. This is logged in the
trackingIdsfield in AM audit logs for session creation and upgrade events.
Create tree hooks
This section explains how to create a hook used by a node within an authentication tree. These tree hooks can perform custom processing after an authentication tree has successfully completed and a session has been created.
AM includes the following authentication tree hooks:
| Tree hook | Used by node | Details |
|---|---|---|
|
Creates a JWT with the session, encryption, and node details. The JWT is then used to set a persistent cookie on the response. |
|
|
Adds error details to the response. You can inject a TreeFailureResponse
object into your tree hook that adds error details to the message when the |
|
|
Adds failure details to the response. You can inject a TreeFailureResponse object into your tree hook that adds failure details to the message when the |
|
|
Adds success details to the response. |
|
|
Recreates the specified persistent cookie with new idle time and JWT |
The core class of an authentication tree hook
The following example shows an excerpt from the UpdatePersistentCookieTreehook class.
The Persistent Cookie Decision node uses this tree hook to recreate the persistent cookie.
/**
 * A TreeHook for updating a persistent cookie.
 */
@TreeHook.Metadata(configClass = PersistentCookieDecisionNode.Config.class)  (1)
public class UpdatePersistentCookieTreeHook implements TreeHook {            (2)

    ...

    @Inject                                                                  (3)
    UpdatePersistentCookieTreeHook(@Assisted Request request,
            @Assisted Response response,
            @Assisted PersistentCookieDecisionNode.Config config,
            @Assisted Realm realm,
            PersistentJwtStringSupplier persistentJwtStringSupplier,
            PersistentCookieResponseHandler persistentCookieResponseHandler,
            SecretReferenceCache secretReferenceCache){
        this.request = request;
        this.response = response;
        this.config = config;
        this.persistentJwtStringSupplier = persistentJwtStringSupplier;
        this.persistentCookieResponseHandler = persistentCookieResponseHandler;
        this.secretCache = secretReferenceCache.realm(realm);
    }

    @Override
    public void accept() throws TreeHookException {                          (4)
        logger.debug("UpdatePersistentCookieTreeHook.accept");
        String orgName = PersistentCookieResponseHandler.getOrgName(response);
        Cookie originalJwt = getJwtCookie(request, config.persistentCookieName());

        if (originalJwt == null) {
            return;
        }
        ...
    }
  ...
}| 1 | The @TreeHook.Metadata annotation.
Before defining the core class, use a Java @TreeHook.Metadata annotation
to specify the class the tree hook uses for its configuration.
Use the configClass property to specify the configuration class of the node that will be using the tree hook.
|
||
| 2 | The core class must implement the TreeHook interface.
Learn more in the TreeHook interface in the AM Public API Javadoc. |
||
| 3 | AM uses Google’s Guice dependency injection framework for authentication nodes and tree hooks.
Use the @Inject annotation to construct a new instance of the tree hook,
specifying the configuration interface set up earlier and any other required parameters.
You can use the
|
||
| 4 | Implement the public void accept() method to define actions to perform on a successful journey outcome.
Optionally, override the The main logic of a tree hook is handled by these two methods. |
Node reference
This page covers the configuration of the authentication nodes that are built into AM.
|
A number of additional authentication nodes are available from the Marketplace. |
Basic authentication nodes
Use the following nodes for basic authentication tasks, such as collecting usernames and passwords:
Multi-factor authentication nodes
Use the following nodes to configure trees with multi-factor authentication capabilities, such as web authentication and push authentication:
Risk management authentication nodes
Use the following nodes to examine the perceived risk associated with the authentication and act on it:
Behavioral authentication nodes
Use the following nodes to adjust the behavior of authentication trees:
Contextual authentication nodes
Use the following nodes to authenticate with a digital certificate, change the flow, or set a cookie based on the authentication context:
Federation authentication nodes
Use the following nodes to configure trees with federation capabilities, such as OAuth 2.0, social authentication, and account provisioning:
Identity management authentication nodes
Use the following nodes to perform identity management during an authentication tree flow, such as mapping anonymous users to a session.
Utility authentication nodes
Use the following nodes to perform various tasks during the authentication flow:
Thing authentication nodes
Use the following nodes to perform various tasks related to authenticating IoT things:
Custom scripted nodes
With AM’s Node Designer, you can create your own node types to reuse common functionality in journeys. Define node properties and run custom server-side scripts in these nodes to dynamically set values and decide the outcome of authentication journeys.
To write a script for your custom node, you can use any of the next-generation
script bindings available to the Scripted Decision node API,
including httpClient, idRepository, and openidm.
For example, use the Node Designer to create node types that perform functions such as:
-
Updating email addresses for users based on their location
-
Adding users to a particular group
-
Generating a JWT and stores it in shared state
New node types appear in the Components panel of the tree designer ready for you to include in your authentication journey with a simple drag and drop.
You can also share the functionality by exporting your custom node type and importing it into a different environment.
|
You can’t use library scripts with custom scripted nodes. Custom scripted nodes are designed to be self-contained units so that you can import and export them. Import and export functionality isn’t compatible with library scripts. |
Design secure nodes
Before you start creating custom scripted nodes, read the following points of best practice to make sure your custom nodes are as secure as possible.
- Don’t add sensitive data to shared state
-
Store sensitive information such as passwords in secrets.
- Sanitize input data
-
Remove sensitive information before using or storing data.
- Don’t log sensitive data
-
Make sure you don’t output sensitive information to logs.
Find more information in Security considerations.
Create a node type
-
In the AM admin UI, go to Realms > Realm Name > Authentication > Node Designer and click Create Node Type.
Custom node types are global objects and don’t belong to a realm, so even if you create a node type in one realm, you can still access it from another realm.
-
On the
New Node Typepage, enter a unique service name using lowercase letters or numbers only. Also, enter a suitable name for your node type to be displayed in the tree designer.For example,
setemployeedetailsandSet Employee Details, respectively.The service name is a fixed reference to the node type, but you can change the display name later.
-
In the Node Designer editor, set or review the following fields:
Field Value Display Name
The name displayed in the tree editor. This provides the default name for new nodes of this type. Must be unique.
Description
The description for the node type. The description isn’t displayed in the editor.
Outcomes
Enter one or more names for the outcome paths of this node. You can’t name an outcome
Script Errorbecause that’s reserved for theError Outcomepath.For example,
truefalse.Node Inputs
Optionally, list the node state data available to the node.
For example,
username.Default:
*(The node can access all shared and transient state data)
Node Outputs
Optionally, list the data the node outputs to shared state.
Default:
*(The node sets all state data)
Properties
A JSON object that contains the node configuration. The keys can be accessed from your script through the
propertiesbinding. The values depend on the journey configuration.For example, this configuration defines properties for an employee’s location and group:
{ "emp_group": { (1) "title": "Employee group", (2) "description": "Specify all relevant groups", (3) "required": true, (4) "type": "STRING", (5) "defaultValue": ["Admin", "Sales"], (6) "multivalued": true (7) }, "emp_location": { "title": "Employee location", "description": "Select the primary location", "required": true, "type": "STRING", "defaultValue": "UK", "options": { (8) "UK": "London", "US": "New York" } } }json1 The key that can be accessed from the script, for example, properties.emp_group.2 Required. The title of the property appears as the property name. Must be unique. 3 The description appears as the tooltip in the tree designer. 4 Required. Whether it’s mandatory to enter a value for this property. 5 Required. The input type: STRING,NUMBER,BOOLEAN, orOBJECT.6 The initial value(s) for this property that’s displayed in the UI. If you define options, this value must match one of the option keys.7 Enables multiple values for a single property for all types except OBJECT. Must be false ifoptionsare provided. Default:false.8 Define key/value pairs to display options in a drop-down list. The key must only contain alphanumeric characters and underscores and can’t consist only of digits. The values displayed in the list can be any valid string. These example properties display in the tree designer view as follows:
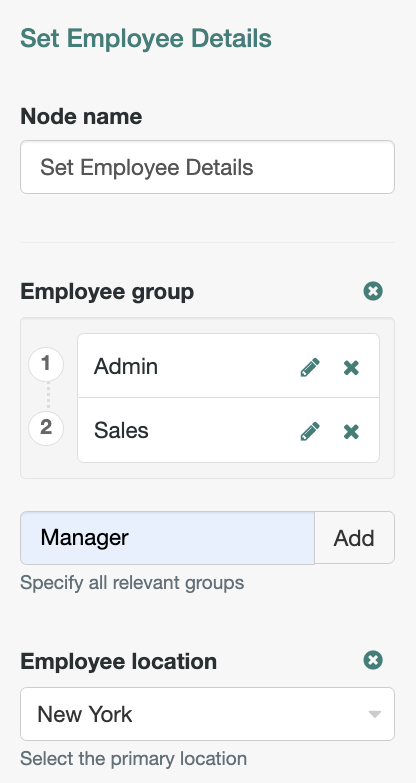
Script
Write or paste in a next-generation script that runs when your custom node is processed.
Use the Node Designer binding,
properties, to reference the configured values that you’ve defined in the Properties field. In addition toproperties, your script has access to all the Scripted Decision node script bindings. Find examples of scripts and how to use the bindings in Scripted Decision node API.For example, this script adds an email address to the user profile and stores employee details in node state:
var username = nodeState.get("username"); var identity = idRepository.getIdentity(username); if (attributes.emp_location == "UK") { identity.addAttribute("mail", username + "@example.co.uk"); } else { identity.addAttribute("mail", username + "@example.com"); } identity.store(); nodeState.putShared("location", attributes.emp_location); nodeState.putShared("group", attributes.emp_group); action.goTo("true");javascriptNode Designer scripts only appear in the Node Designer. You can’t manage these scripts under Realms > Realm Name > Scripts. Error Outcome
Enable to add an extra path for scripting errors, for example, if the script references an outcome that’s not defined in the Outcomes field. The outcome appears on the node as Script Error.
Category
Select a category from the list. Your node type appears under this section in the tree designer view.
Tags
Add tags to organize the node. You can use these to search for a node type in the tree designer.
-
Save your changes.
Import a node type
To reuse node types in other environments, you can import a JSON file containing one or more node types.
-
In the AM admin UI, go to Node Designer and click Import.
-
On the Import Nodes page, drag the JSON file into the Import File box or click in the box to open a file browser and select the JSON file.
-
Click Import.
AM displays an error if a node of that type already exists or the JSON is invalid.
Export a node type
To reuse node types in other environments, you can export them to a JSON file.
-
In the AM admin UI, go to Node Designer and select one or more node types from the list to export.
-
Click Export.
-
The node types are downloaded to a JSON file.
|
Exporting node types doesn’t include external dependencies. To make sure exported node types
work as expected, record dependencies such as those relied on by bindings that
interact with external services and configuration, for example, You can then use these notes to replicate the dependencies when importing the node types into a different environment. |
Use your custom node type
Create a journey that references your new node type and configure values appropriate for that journey.
-
In the AM admin UI, go to Realms > Realm Name > Authentication > Trees and create a tree.
-
Search for your custom node type in the Components panel using the tags, the name, or the category of your node.
-
Add the node to your tree and set its properties to values that are appropriate for your authentication journey.
-
If you need to make changes to your node type, edit its configuration in the Node Designer and return to the tree designer.
You might need to delete the node from your journey and select a new instance to view updates.
The following example includes the custom node type, Set Employee Details in a journey that sets user-specific information based on node configuration after a successful authentication.
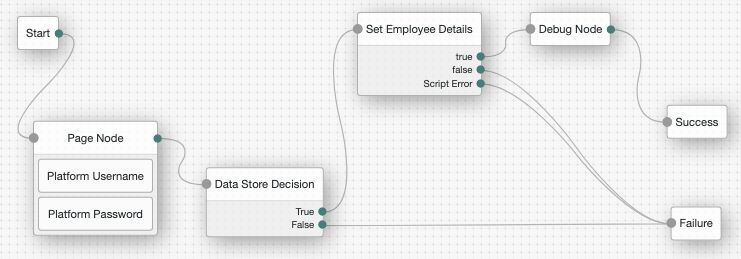
The node is configured with the following values:
- Employee location
-
New York - Employee group
-
AdminSales
For a user, bjensen, the node adds the email address bjensen@example.com to the
mail identity profile attribute and the debug node outputs the following updates to nodeState:
  ...
  "location": "New York",
  "group": [
      "Admin",
      "Sales"
  ]
  ...
}Delete a node type
Deleting a custom node type is a permanent operation. You won’t be able to retrieve it after it’s deleted.
-
In the AM admin UI, go to Realms > Realm Name > Authentication > Node Designer.
-
Select the checkbox next to one or more node types. Click x Delete.
| You can’t delete a custom node type if a journey uses a node of that type. |
Example: Generate JWT node
This example generates a signed JWT using the HMAC SHA-256 algorithm based on tree configuration and the username. It then sets the generated key in shared state.
-
Create a custom node type with the following settings:
Field Value Display Name
Generate JWT
Description
Select an algorithm to generate a key for encryption / decryption purposes.
Outcomes
truefalseNode Inputs
*
Node Outputs
*
Properties
{ "issuer": { "title": "Issuer", "type": "STRING", "description": "The issuer (iss) claim", "required": true }, "audience": { "title": "Audience", "type": "STRING", "description": "The audience (aud) claim", "required": true }, "signingkey": { "title": "HMAC Signing Key", "type": "STRING", "description": "The secret label for the HMAC signing key", "defaultValue": "scripted.node.secret", "required": true }, "validity": { "title": "Validity (minutes)", "type": "NUMBER", "required": true, "defaultValue": 5 } }jsonScript
var aud = properties.audience; var iss = properties.issuer; var validity = properties.validity; var secret = properties.signingkey; var signingkey = secrets.getGenericSecret(secret).getAsUtf8(); var username = nodeState.get("username"); var data = { jwtType:"SIGNED", jwsAlgorithm: "HS256", issuer: iss, subject: username, audience: aud, type: "JWT", validityMinutes: validity, signingKey: signingkey }; var jwt = jwtAssertion.generateJwt(data); if (jwt !== null && jwt.length > 0) { nodeState.putShared("assertionJwt" , jwt); action.goTo("true"); } else { action.goTo("false"); }javaError Outcome
Enabled
Tags
Utilities -
Create a journey that includes an instance of the new node type.
For example:
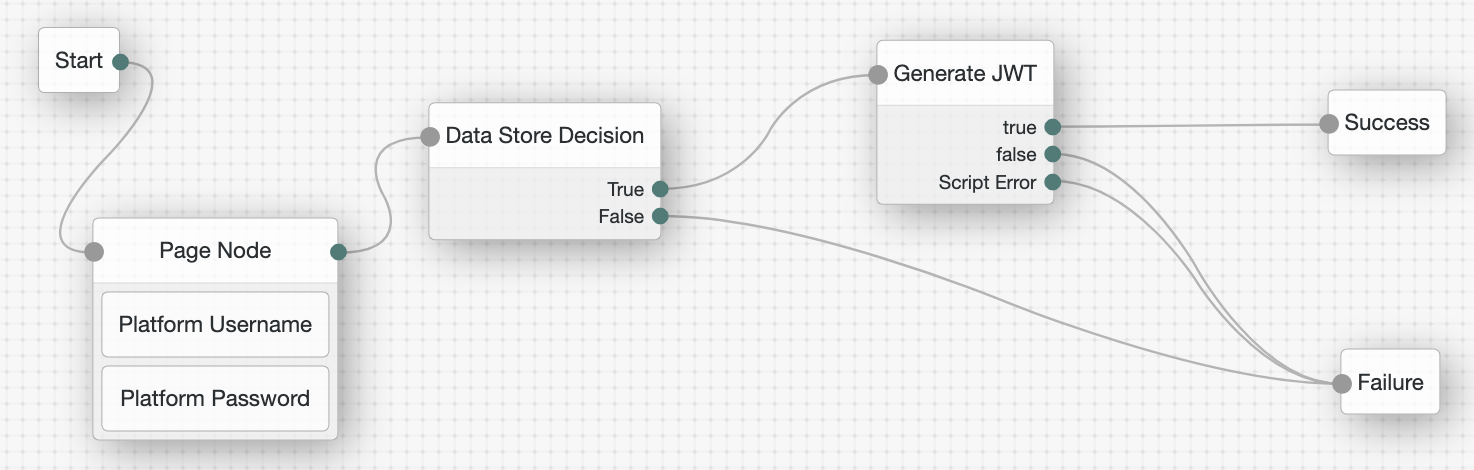
-
Configure the node with a secret label mapped to an HMAC signing secret and values for the
issuerandaudienceJWT claims.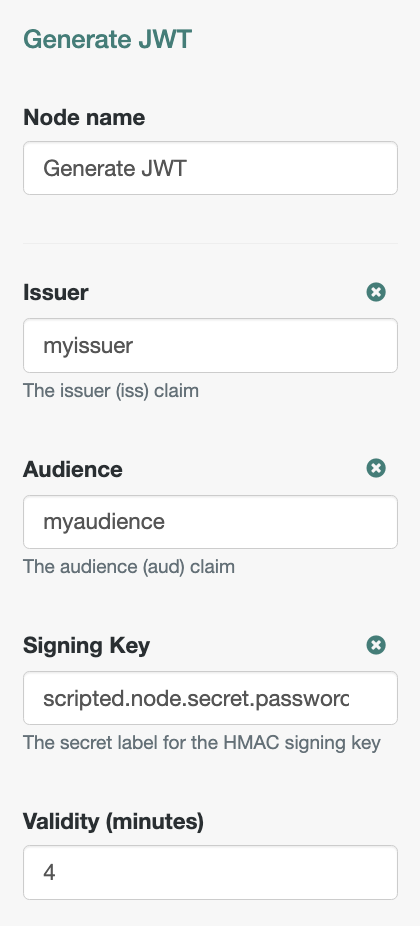
-
Test the journey. The JWT is added to shared state:
{
    "realm": "/alpha",
    "assertionJwt": "eyJ0eXAiOiJKV1QiLCJhbGciOiJIUz...rXNQ4QhFeIBC2LiH-Sr72Q4",
    ...
}
json
Authenticate with a browser
When using AM’s extended user interface (XUI),
the base URL to authenticate to points to /XUI/#login under the deployment URL,
such as https://am.example.com:8443/am/XUI/#login.
The base URL to log out is similar, for example, https://am.example.com:8443/am/XUI/#logout/.
When authenticating using a browser, you can send AM a realm and also different authentication parameters that would help you customize the user’s experience.
Specify the realm in the URL
When making a request to the UI, specify the realm or realm alias as the value of a realm parameter
in the query string, or the DNS alias in the domain component of the URL.
If you don’t use a realm alias, you must specify the entire hierarchy of the realm.
For example: https://am.example.com:8443/am/XUI/?realm=/customers/europe#login/.
The following table demonstrates additional examples:
| Description | Example URL |
|---|---|
Full path of the realm as a parameter of |
|
Realm alias of the realm as a parameter of |
|
DNS Alias of the realm as the fully qualified host name in the URL |
|
The DNS alias is overridden by any use of either the full path or a realm alias as a query string parameter.
Authentication parameters
AM accepts the following parameters in the query string. Except for the IDToken parameters, don’t set a
parameter more than once in a single query.
- arg=newsession
-
Request that AM end the user’s current session and start a new session.
- ForceAuth
-
If
ForceAuth=true, request that AM force the user to authenticate even if they already have a valid session.When
ForceAuth=true, on successful authentication, AM issues new session tokens to users on reauthentication, even if the current session already meets the security requirements. - goto
-
On successful authentication, or successful logout, request that AM redirect the user to the specified location. Values must be URL-encoded. For more information, refer to Success and failure redirection URLs.
- gotoOnFail
-
On authentication failure, request that AM redirect the user to the specified location. Values must be URL-encoded. For more information, refer to Success and failure redirection URLs.
- locale
-
Request that AM display the user interface in the specified, supported locale. Locale can also be set in the user’s profile, in the HTTP header from her browser, configured in AM, and so on.
- realm
-
Request that AM authenticate the user to the specified realm.
- service
-
Request that AM authenticate the user with the specified authentication tree.
Example UI login URLs
Use any of the options listed in Authentication parameters as URL parameters. Note that URL parameters must appear before any occurrences of the pound or hash character (#). The following are example URLs with parameters:
| Description | Example URL |
|---|---|
Log in to the Top Level Realm, requesting that AM display the user interface in German. |
|
Log in to the |
|
Log in to the |
|
Authenticate over REST
AM provides the /json/authenticate endpoint for authentication,
and the /json/sessions endpoint for managing sessions and logging out.
The following table summarizes authentication operations you can perform using REST:
| Task | Resources |
|---|---|
Authenticate to AM Authenticating to AM means logging in to a specific realm and receiving a session token from AM. Add parameters to the authentication request to provide AM with more information about how you want to authenticate. |
|
Use the session token AM provides you with a session token after authenticating to a realm. Use this token in subsequent calls to AM. For example, when using REST calls to create, modify, or delete configuration objects. |
|
Log out of AM Log out your users by sending a |
|
Invalidate sessions Obtain all the sessions for a given user and invalidate them to ensure they are logged out of AM. |
Log in to AM over REST
To authenticate to AM using REST, make an HTTP POST request to the json/authenticate endpoint.
You must specify the entire hierarchy of the realm, starting at the Top Level Realm.
Prefix each realm in the hierarchy with the realms/ keyword.
For example, /realms/root/realms/customers/realms/europe.
|
The |
AM uses the default authentication service configured for the realm. You can override the default by specifying authentication services and other options in the REST request.
AM provides both simple authentication methods, such as providing username and password, and complex authentication journeys that may involve a tree with inner tree evaluation and/or multi-factor authentication.
For authentication journeys where providing a username and password is enough,
you can log in to AM using a curl command similar to the following:
$ curl \
--request POST \
--header "Content-Type: application/json" \
--header "X-OpenAM-Username: bjensen" \
--header "X-OpenAM-Password: Ch4ng31t" \
--header "Accept-API-Version: resource=2.0, protocol=1.0" \
'https://am.example.com:8443/am/json/realms/root/realms/alpha/authenticate'
{
"tokenId":"AQIC5wM…TU3OQ*",
"successUrl":"/am/console",
"realm":"/alpha"
}The username and password are sent in headers. This zero page login mechanism works only for name/password authentication.
Note that the POST body is empty; otherwise, AM interprets the body as a continuation of an existing authentication attempt, one that uses a supported callback mechanism. AM implements callback mechanisms to support complex authentication journeys, such as those where the user needs to be redirected to a third party or interact with a device as part of multi-factor authentication.
After a successful authentication,
AM returns a tokenId object that applications can present as a cookie value
for other operations that require authentication.
This object is known as the session token.
Find information about how applications can use the session token in
Session token after authentication.
If HttpOnly cookies are enabled and a client calls the /json/authenticate endpoint with a valid SSO token,
AM returns the tokenId field empty.
For example:
{
    "tokenId":"",
    "successUrl":"/am/console",
    "realm":"/alpha"
}|
You can request AM to authenticate a user without providing them a session by using the |
UTF-8 usernames
To use UTF-8 usernames and passwords in calls to the /json/authenticate endpoint,
base64-encode the string, and wrap the string as described in RFC 2047:
encoded-word = "=?" charset "?" encoding "?" encoded-text "?="
For example, to authenticate using a UTF-8 username, such as ɗëɱø, perform the following steps:
-
Encode the string in base64 format:
yZfDq8mxw7g=. -
Wrap the base64-encoded string as per RFC 2047:
=?UTF-8?B?yZfDq8mxw7g=?=. -
Use the result in the
X-OpenAM-Usernameheader passed to the authentication endpoint as follows:$ curl \ --request POST \ --header "Content-Type: application/json" \ --header "X-OpenAM-Username: =?UTF-8?B?yZfDq8mxw7g=?=" \ --header "X-OpenAM-Password: Ch4ng31t" \ --header "Accept-API-Version: resource=2.0, protocol=1.0" \ 'https://am.example.com:8443/am/json/realms/root/realms/alpha/authenticate' { "tokenId": "AQIC5w…NTcy*", "successUrl": "/am/console", "realm":"/alpha" }bash
Authenticate to specific authentication trees
You can provide AM with additional information about how you are authenticating. For example, you can specify the authentication tree you want to use, or request from AM a list of the authentication services that would satisfy a particular authentication condition.
The following example shows how to specify the Example tree
by using the authIndexType and authIndexValue query string parameters:
$ curl \
--request POST \
--header "X-OpenAM-Username: bjensen" \
--header "X-OpenAM-Password: Ch4ng31t" \
--header 'Accept-API-Version: resource=2.0, protocol=1.0' \
'https://am.example.com:8443/am/json/realms/root/realms/alpha/authenticate?authIndexType=service&authIndexValue=Example'You can exchange Example with any other tree.
Find information about using the authIndexType parameter to authenticate to specific services
in Authenticate endpoints.
Return callback information to AM
The /json/authenticate endpoint supports callback mechanisms to perform complex authentication journeys.
Whenever AM needs to return or request information,
it will return a JSON object with the authentication step, the authentication identifier, and the related callbacks.
The following types of callbacks are available:
- Read-only callbacks
-
AM uses read-only callbacks to provide information to the user, such as text messages or the amount of time that the user needs to wait before continuing their authentication journey.
- Interactive callbacks
-
Interactive callbacks request information from the user. Use these, for example, to request a user’s username and password or to request that the user select between options.
- Backchannel callbacks
-
AM uses backchannel callbacks when it needs to access additional information from the user’s request. For example, when it requires a particular header or a certificate.
Read-only and interactive callbacks have an array of output elements suitable for displaying to the end user.
The JSON returned in interactive callbacks also contains an array of input elements that must
be completed and returned to AM.
For example:
"output": [
    {
        "name": "prompt",
        "value": " User Name: "
    }
    ],
"input": [
    {
        "name": "IDToken1",
        "value": ""
    }
]The value of some interactive callbacks can be returned as headers,
such as the X-OpenAM-Username and X-OpenAM-Password headers,
but most of them must be returned in JSON as a response to the request.
Depending on how complex the authentication journey is, AM may return several callbacks sequentially. Each must be completed and returned to AM until authentication is successful.
The following example shows a request for authentication,
and AM’s response of the NameCallback and PasswordCallback callbacks:
$ curl \
--request POST \
--header "Content-Type: application/json" \
--header "Accept-API-Version: resource=2.0, protocol=1.0" \
'https://am.example.com:8443/am/json/realms/root/realms/alpha/authenticate'
{
"authId": "eyJ0eXAiOiJKV1QiLCJhbGciOiJIUzI1NiJ9.eyJvdGsiOiJ…", (1)
"template": "",
"stage": "DataStore1",
"callbacks": [
{
"type": "NameCallback", (2)
"output": [ (3)
{
"name": "prompt",
"value": " User Name: "
}
],
"input": [ (4)
{
"name": "IDToken1",
"value": ""
}
]
},
{
"type": "PasswordCallback",
"output": [
{
"name": "prompt",
"value": " Password: "
}
],
"input": [
{
"name": "IDToken2",
"value": ""
}
]
}
]
}| 1 | The JWT that uniquely identifies the authentication context to AM. |
| 2 | The type of callback. It must be listed under Supported callbacks. |
| 3 | The information AM offers about this callback. Usually, this information is displayed to the user in the UI. |
| 4 | The information AM is requesting.
The user must fill the "value": "" object with the required information. |
To respond to a callback, send back the whole JSON object with the missing values filled.
The following example shows how to respond to the NameCallback and PasswordCallback callbacks,
with the bjensen and Ch4ng31t values filled:
$ curl \
--request POST \
--header "Content-Type: application/json" \
--header "Accept-API-Version: resource=2.0, protocol=1.0" \
--data '{
"authId":""eyJ0eXAiOiJKV1QiLCJhbGciOiJIUzI1NiJ9.eyJvdGsiOiJ…",
"template":"",
"stage":"DataStore1",
"callbacks":[
{
"type":"NameCallback",
"output":[
{
"name":"prompt",
"value":" User Name: "
}
],
"input":[
{
"name":"IDToken1",
"value":"bjensen"
}
]
},
{
"type":"PasswordCallback",
"output":[
{
"name":"prompt",
"value":" Password: "
}
],
"input":[
{
"name":"IDToken2",
"value":"Ch4ng31t"
}
]
}
]
}' \
'https://am.example.com:8443/am/json/realms/root/realms/alpha/authenticate'
{
"tokenId":"AQIC5wM…TU3OQ*",
"successUrl": "/am/console",
"realm":"/alpha"
}On complex authentication journeys, AM may send several callbacks sequentially. Each must be completed and returned to AM until authentication is successful.
Find information about the callbacks AM can return in Supported callbacks.
Authenticate endpoints
To authenticate to AM using REST, send an HTTP POST request to the json/authenticate endpoint.
Specify the realm hierarchy, starting at the Top Level Realm and prefix each realm in the hierarchy with the realms/ keyword. For example, /realms/root/realms/customers/realms/europe.
/json/authenticate
The following list describes the json/authenticate endpoint parameters:
authIndexType
The authIndexType specifies the type of authentication the user will perform.
Always use this parameter in conjunction with the authIndexValue to provide additional information about how the user
is authenticating.
If not specified, AM authenticates the user against the default authentication service configured for the realm.
The authIndexType can be one of the following:
composite_advice-
When the
authIndexTypeiscomposite_advice, theauthIndexValuemust be a URL-encoded composite advice string.Use the
composite_advicetype to indicate which authentication services to use when logging in a user.This example indicates that the user should authenticate with an authentication level of at least 10:
$ curl -G \ --request POST \ --header "Content-Type: application/json" \ --header 'Accept-API-Version: resource=2.0, protocol=1.0' \ --data-urlencode 'authIndexType=composite_advice' \ --data-urlencode 'authIndexValue=<Advices> <AttributeValuePair> <Attribute name="AuthLevelConditionAdvice"/> <Value>10</Value> </AttributeValuePair> </Advices>' \ 'https://am.example.com:8443/am/json/realms/root/authenticate'bashThis curlcommand URL-encodes the XML values. The--getoption appends them as query string parameters to the URL.Possible options for
Advicesare:-
AuthenticateToServiceConditionAdvice. Requires the name of an authentication tree. For example:<Advices> <AttributeValuePair> <Attribute name="AuthenticateToServiceConditionAdvice"/> <Value>myExampleTree</Value> </AttributeValuePair> </Advices>xml -
AuthenticateToRealmConditionAdvice. Requires the name of a realm. For example:[/mnt/scratch/workspaces/workspace/am-docs-release_8.0.x/target/asciidoc/modules/ROOT/attachments/programlistings/login-advices.bash:#AuthenticateToRealmConditionAdvice]xml -
AuthLevelConditionAdvice. Requires an authentication level.For example:
<Advices>
  <AttributeValuePair>
    <Attribute name="AuthLevelConditionAdvice"/>
    <Value>10</Value>
  </AttributeValuePair>
</Advices>
xml -
AuthenticateToTreeConditionAdvice. Requires the name of an authentication tree. For example:<Advices> <AttributeValuePair> <Attribute name="AuthenticateToTreeConditionAdvice"/> <Value>PersistentCookieTree</Value> </AttributeValuePair> </Advices>xml
You can specify multiple advice conditions and combine them. For example:
<Advices>
  <AttributeValuePair>
    <Attribute name="AuthenticateToServiceConditionAdvice"/>
    <Value>ldapService</Value>
  </AttributeValuePair>
  <AttributeValuePair>
    <Attribute name="AuthenticateToServiceConditionAdvice"/>
    <Value>Example</Value>
  </AttributeValuePair>
  <AttributeValuePair>
    <Attribute name="AuthLevelConditionAdvice"/>
    <Value>10</Value>
  </AttributeValuePair>
</Advices>
xml -
resource-
When the
authIndexTypeisresource, theauthIndexValuemust be a URL protected by an AM policy.For example, to log into AM using a policy matching the
https://www.example.comresource, you could use the following:$ curl \ --request POST \ --header 'Accept-API-Version: resource=2.0, protocol=1.0' \ 'https://am.example.com:8443/am/json/realms/root/realms/alpha/authenticate?authIndexType=resource&authIndexValue=https%3A%2F%2Fwww.example.com'bashNote that the resource must be URL-encoded. Authentication will fail if no policy matches the resource.
service-
When the
authIndexTypeisservice, theauthIndexValueis the tree AM must use to authenticate the user.For example, to authenticate using the
Loginauthentication tree, you could use the following:$ curl \ --request POST \ --header 'Accept-API-Version: resource=2.0, protocol=1.0' \ 'https://am.example.com:8443/am/json/realms/root/realms/alpha/authenticate?authIndexType=service&authIndexValue=Login'bashIf
authIndexType=serviceand noauthIndexValueis specified, the default service is used. This is similar to noauthIndexTypebeing set. transaction-
When the
authIndexTypeistransaction, theauthIndexValuemust be the unique ID of a transaction token.Learn more in Transactional authorization.
If there are several authentication services that satisfy the authentication requirements, AM presents them as a choice callback to the user. Return the required callbacks to AM to authenticate.
Required: No.
authIndexValue
This parameter sets a value for the specific authIndexType.
Required: Yes, when using the authIndexType parameter.
noSession
When set to true, this parameter specifies that AM should not return a session when authenticating a user.
For example:
$ curl \
--request POST \
--header "Content-Type: application/json" \
--header "Accept-API-Version: resource=2.0, protocol=1.0" \
--header "X-OpenAM-Username: bjensen" \
--header "X-OpenAM-Password: Ch4ng31t" \
'https://am.example.com:8443/am/json/realms/root/realms/alpha/authenticate?noSession=true'
{
    "message":"Authentication Successful",
    "successUrl":"/am/console",
    "realm":"/"
}Required: No.
/json/authenticate/backchannel
Lets a third-party federation service initiate and monitor a backchannel authentication flow.
/authenticate/backchannel/initialize
Initiates a backchannel authentication request. This endpoint has no additional parameters.
You must access this endpoint with an OAuth 2.0 token that has the back_channel_authentication scope.
The token must have been granted by the same AM instance specified in the redirect URI.
|
The request body can include the following parameters:
type(string, mandatory)-
The authentication type. Currently, only
serviceis supported. value(string, mandatory)-
The name of the AM authentication tree to direct the user or agent to.
subject(object, optional)-
The subject of the authentication:
type(string, mandatory)-
The subject type:
useroragent. name(string, mandatory)-
The subject name.
data(object, optional)-
Data to add to the initial authentication journey state, as key-value pairs. For example:
"type": "service", "value": "Login"jsonRestricted fields:
realmandauthLevel. trackingId(string, optional)-
A tracking ID to add to the audit logs for this authentication flow. If provided, AM logs this ID in addition to its own audit tracking ID. This lets a federation service track the flow of backchannel authentication requests through AM using their own tracking IDs.
The custom tracking ID must be a string of 36 characters or less and can include only the following characters:
A-Za-z0-9-and_
Example
$ curl \
--request POST \
--header "Content-Type: application/json" \
--header "Accept-API-Version: resource=1, protocol=2.0" \
--header "Authorization: Bearer FnpG1lU0fUooJFY-82sq3UiAnGA" \
--data '{
  "type": "service",
  "value": "Login",
  "subject": {
    "type": "user",
    "name": "bjensen"
  },
  "trackingId": "Y5tyzQi9cGVJjy2L"
}',
"https://am.example.com:8443/am/json/realms/root/realms/alpha/authenticate/backchannel/initialize"
{
  "transaction": "b3070138-cd73-4ef2-bd58-812602d7b757",
  "redirectUri": "https://am.example.com:8443/am/UI/Login?realm=/alpha&authIndexType=transaction&authIndexValue=b3070138-cd73-4ef2-bd58-812602d7b757"
}/authenticate/backchannel/info
Provides information on the status of a backchannel authentication flow. This endpoint has no additional parameters.
The request body must include the following parameter:
transaction(string, mandatory)-
The ID of the transaction associated with the authentication tree being queried.
Example
$ curl \
--request POST \
--header "Content-Type: application/json" \
--header "Accept-API-Version: resource=1, protocol=2.0" \
--header "Authorization: Bearer B158QzJzokTTwhAF6DshB0XQ0Rg" \
--data '{
    "transaction": "b3070138-cd73-4ef2-bd58-812602d7b757"
}' \
"https://am.example.com:8443/am/json/realms/root/realms/alpha/authenticate/backchannel/info"
{
  "state": "CREATED",
  "result": "UNKNOWN",
  "auditTrackingIds": [
    "82d76902-7d18-41ea-9ae6-05643b05d018-166108"
  ],
  "type": "service",
  "value": "Login",
  "subject": {
    "type": "user",
    "name": "bjensen"
  }
}The response of a request to this endpoint includes the following properties:
state(string)-
The state of the authentication journey. Possible values include:
-
CREATED -
IN_PROGRESS -
COMPLETED
-
result(string)-
The result of the authentication. Possible values include:
-
UNKNOWN -
APPROVED -
DENIED
-
auditTrackingIds(array)-
An array of IDs that can be used to link requests that are part of the same flow.
type(string)-
The type of authentication that was performed. Currently, only
serviceis supported. value(string)-
The name of the authentication journey that was performed.
subject(object)-
The subject of the authentication.
type(string)-
The subject type of the subject. Possible values are
userandagent. name(string)-
The name of the subject.
sessionProperties(object)-
Additional information about the user’s session, if one was created successfully. You can use the Set Session Properties node to add properties to a session in a journey. You must configure a Session Property Whitelist Service for the realm to allow these properties to be published.
Supported callbacks
This section lists the callbacks AM supports.
You’ll find an example of using callbacks to authenticate to AM in Return callback information to AM.
Supported callbacks can be categorized as follows:
| Callback type | Use |
|---|---|
Request information. |
|
Return information to the client application, potentially for display to the user. |
|
Recover additional information from the user’s request. |
Interactive callbacks
Nodes return the following callbacks to request information.
BooleanAttributeInputCallback
Collects a boolean-style confirmation, such as yes/no or true/false.
The Attribute Collector node uses this instead of a ConfirmationCallback to apply IDM policies and validate the response.
| Callback output field | Description |
|---|---|
|
An array of JSON objects describing validation policies that the input failed. The object is empty until the input is provided and validation fails. |
|
A string containing the name of the attribute in the user profile. |
|
An array of JSON objects describing IDM validation policies the input must pass. An empty JSON object if the node does not require validation. The node collects policy information from IDM. For more information about the policies available by default, refer to Default policy for managed objects in the IDM documentation. |
|
A string containing the description of the information required from the user. |
|
A boolean indicating whether input is required for this attribute. |
|
When the node requires validation, this boolean indicates whether to apply validation policies only,
or to validate the input and continue to the next node.
When When |
|
A string containing a default value for the attribute, if required. |
{
  "callbacks": [{
    "type": "BooleanAttributeInputCallback",
    "output": [{
      "name": "name",
      "value": "preferences/marketing"
    }, {
      "name": "prompt",
      "value": "Send me special offers and services"
    }, {
      "name": "required",
      "value": true
    }, {
      "name": "policies",
      "value": {}
    }, {
      "name": "failedPolicies",
      "value": []
    }, {
      "name": "validateOnly",
      "value": false
    }, {
      "name": "value",
      "value": false
    }],
    "input": [{
      "name": "IDToken1",
      "value": false
    }, {
      "name": "IDToken1validateOnly",
      "value": false
    }]
  }]
}In the input, return the value and a boolean to set validateOnly.
- Class to import
-
org.forgerock.openam.authentication.callbacks.BooleanAttributeInputCallback
Learn more in BooleanAttributeInputCallback.
ChoiceCallback
Provides a list of choices and collects the selected choice.
In the input, return 0 if the user selected the first choice, 1 for the second choice, and so forth.
{
  "callbacks": [{
    "type": "ChoiceCallback",
    "output": [{
      "name": "prompt",
      "value": "Choose one"
    }, {
      "name": "choices",
      "value": ["Choice A", "Choice B", "Choice C"]
    }, {
      "name": "defaultChoice",
      "value": 2
    }],
    "input": [{
      "name": "IDToken1",
      "value": 0
    }]
  }]
}- Class to import
-
javax.security.auth.callback.ChoiceCallback
Learn more in ChoiceCallback.
ConfirmationCallback
Collects a boolean-style confirmation, such as yes/no or true/false with an optional "Cancel" choice.
| Callback output field | Description |
|---|---|
|
A number identifying the default option in the array of |
|
A number indicating the severity of the message:
|
|
A number indicating the type of confirmation:
|
|
An array of strings containing the option text for display to the user. |
|
A string containing the description of the choice to display to the user. |
{
  "callbacks": [{
    "type": "ConfirmationCallback",
    "output": [{
      "name": "prompt",
      "value": ""
    }, {
      "name": "messageType",
      "value": 0
    }, {
      "name": "options",
      "value": ["Submit", "Start Over", "Cancel"]
    }, {
      "name": "optionType",
      "value": -1
    }, {
      "name": "defaultOption",
      "value": 1
    }],
    "input": [{
      "name": "IDToken1",
      "value": 0
    }]
  }]
}In the input, return 0 if the user selected the first choice, 1 for the second choice, and so forth.
- Class to import
-
javax.security.auth.callback.ConfirmationCallback
Learn more in ConfirmationCallback.
ConsentMappingCallback
Provides profile attributes that require user consent and collects consent from the user.
| Callback output field | Description |
|---|---|
|
A string containing the access level description for display to the user. |
|
A string containing the name for display to the user. |
|
An array containing names of the attributes to share. |
|
A string containing an icon specification for the privacy and consent notice. |
|
A boolean indicating whether consent is required. |
|
A string containing the privacy and consent notice for display to the user. |
|
A string containing the name of the mapping. |
{
  "callbacks": [{
    "type": "ConsentMappingCallback",
    "output": [{
      "name": "name",
      "value": "managedUser_managedUser"
    }, {
      "name": "displayName",
      "value": "Test Mapping"
    }, {
      "name": "icon",
      "value": ""
    }, {
      "name": "accessLevel",
      "value": "Actual Profile"
    }, {
      "name": "isRequired",
      "value": true
    }, {
      "name": "message",
      "value": "You consent to your data being shared with external services."
    }, {
      "name": "fields",
      "value": []
    }],
    "input": [{
      "name": "IDToken1",
      "value": false
    }]
  }]
}The user must give consent to all attributes or to none; in the input, return a single boolean value.
- Class to import
-
org.forgerock.openam.authentication.callbacks.ConsentMappingCallback
Learn more in ConsentMappingCallback.
DeviceBindingCallback
Binds a client device to a user.
| Callback output field | Description |
|---|---|
|
The ID of the user to bind the device to. |
|
The username of the user to bind the device to. |
|
Specifies how the client secures access to the private key. Available options are:
|
|
A string containing the challenge the client should sign with the private key and return for validation. |
|
A string containing an optional title to display when requesting biometric authentication to secure access to the keypair. |
|
A string containing an optional subtitle to display when requesting biometric authentication to secure access to the keypair. |
|
A string containing optional descriptive text to display when requesting biometric authentication to secure access to the keypair. |
|
An integer specifying the number of seconds to wait for device binding to complete before reporting a timeout error. |
{
  "authId": "...",
  "callbacks": [
    {
      "type": "DeviceBindingCallback",
      "output": [
        {
          "name": "userId",
          "value": "id=bjensen,ou=user,dc=am,dc=example,dc=com"
        },
        {
          "name": "username",
          "value": "bjensen"
        },
        {
          "name": "authenticationType",
          "value": "BIOMETRIC_ALLOW_FALLBACK"
        },
        {
          "name": "challenge",
          "value": "6IBkTEPcMQ0xCghIclmDLost2ssGO5cPDs0AjUhmDTo="
        },
        {
          "name": "title",
          "value": "Authentication required"
        },
        {
          "name": "subtitle",
          "value": "Cryptography device binding"
        },
        {
          "name": "description",
          "value": "Please authenticate with biometrics to proceed"
        },
        {
          "name": "timeout",
          "value": 60
        }
      ],
      "input": [
        {
          "name": "IDToken1jws",
          "value": ""
        },
        {
          "name": "IDToken1deviceName",
          "value": ""
        },
        {
          "name": "IDToken1deviceId",
          "value": ""
        },
        {
          "name": "IDToken1clientError",
          "value": ""
        }
      ]
    }
  ]
}The client device should perform the following high-level steps to fulfil this callback:
-
Generate a keypair and secure access to it as defined by the
authenticationTypefield. -
Generate a JSON web token (JWT) that has the ID of the user in the subject (
sub) field and the original value of thechallenge.For example:
{ "sub": "id=bjensen,ou=user,dc=am,dc=example,dc=com", "challenge": "6IBkTEPcMQ0xCghIclmDLost2ssGO5cPDs0AjUhmDTo=" } -
Sign the JWT using the RS512 algorithm to create a JSON Web Signature (JWS).
-
Complete the callback, returning the JWS, the key ID (
KID) of the keypair, the public key, and the name and the unique ID of the device.
The server verifies the returned information and persists it in the user’s profile if correct.
{
  "authId": "...",
  "callbacks": [
    {
      "type": "DeviceBindingCallback",
      "output": [...],
      "input": [
        {
          "name": "IDToken1jws",
          "value": "eyJhbGciOiJIUzI1NiI....JV_adQssw5cB6aDS6m_kwIiw"
        },
        {
          "name": "IDToken1deviceName",
          "value": "Example Brand Version Android Device"
        },
        {
          "name": "IDToken1deviceId",
          "value": "ae9573dbbf442e7f-8e0c8b428409e0f1c"
        },
        {
          "name": "IDToken1clientError",
          "value": ""
        }
      ]
    }
  ]
}Class to import in scripts: org.forgerock.openam.authentication.callbacks.DeviceBindingCallback
Learn more in DeviceBindingCallback.
DeviceProfileCallback
Collects information about the device used to authenticate.
| Callback output field | Description |
|---|---|
|
A boolean indicating whether to collect device metadata. |
|
A boolean indicating whether to collect the device location. |
|
A string containing optional text to display while collecting device information. |
{
  "callbacks": [{
    "type": "DeviceProfileCallback",
    "output": [{
      "name": "metadata",
      "value": true
    }, {
      "name": "location",
      "value": true
    }, {
      "name": "message",
      "value": "Collecting....."
    }],
    "input": [{
      "name": "IDToken1",
      "value": ""
    }]
  }]
}In the input, return escaped JSON resembling the following example response data.
{
  "identifier": "aec3fe784...o3Xjiizyb9=",
  "alias": "Pixel 3 XL",
  "metadata": {
    "platform": {
      "platform": "Android",
      "version": 28,
      "device": "generic_x86_arm",
      "deviceName": "AOSP on IA Emulator",
      "model": "AOSP on IA Emulator",
      "brand": "google",
      "locale": "en_US",
      "timeZone": "America/Vancouver",
      "jailBreakScore": 1
    },
    "hardware": {
      "hardware": "ranchu",
      "manufacturer": "Google",
      "storage": 774,
      "memory": 1494,
      "cpu": 4,
      "display": {
        "width": 1440,
        "height": 2621,
        "orientation": 1
      },
      "camera": {
        "numberOfCameras": 2
      }
    },
    "browser": {
      "agent": "Dalvik/2.1.0 (Linux; U; Android 9; AOSP on IA Emulator Build/PSR1.180720.117)"
    },
    "bluetooth": {
      "supported": false
    },
    "network": {
      "connected": true
    },
    "telephony": {
      "networkCountryIso": "us",
      "carrierName": "Android"
    }
  },
  "location": {
    "latitude": 51.431534,
    "Longitude": -2.622353
  }
}The location and metadata fields are required when their values are true in the output.
The alias and identifier fields are optional and provided when the client uses the Ping SDKs.
alias-
A friendly name for the device often derived from the make and model.
identifier-
A unique identifier string that can be used to later match the device.
location-
Latitude and longitude of the device.
metadata-
Refer to the example response data for details.
- Class to import
-
org.forgerock.openam.authentication.callbacks.DeviceProfileCallback
Learn more in DeviceProfileCallback.
DeviceSigningVerifierCallback
Verifies the signature of data from a registered device.
| Callback output field | Description |
|---|---|
|
The ID of the user authenticating, if already determined by the authentication journey. |
|
A string containing the challenge the client should sign with the private key and return for validation. |
|
A string containing an optional title to display when requesting biometric authentication to access the keypair. |
|
A string containing an optional subtitle to display when requesting biometric authentication to access the keypair. |
|
A string containing optional descriptive text to display when requesting biometric authentication to access the keypair. |
|
An integer specifying the number of seconds to wait for device signing to complete before reporting a timeout error. |
{
  "authId": "...",
  "callbacks": [
    {
      "type": "DeviceSigningVerifierCallback",
      "output": [
        {
          "name": "userId",
          "value": ""
        },
        {
          "name": "challenge",
          "value": "Kc4dc14on98DYFzr5SoP2n3TC/JWAcAqTJMjCM+T27Y="
        },
        {
          "name": "title",
          "value": "Authentication required"
        },
        {
          "name": "subtitle",
          "value": "Cryptography device binding"
        },
        {
          "name": "description",
          "value": "Please complete with biometric to proceed"
        },
        {
          "name": "timeout",
          "value": 60
        }
      ],
      "input": [
        {
          "name": "IDToken1jws",
          "value": ""
        },
        {
          "name": "IDToken1clientError",
          "value": ""
        }
      ]
    }
  ]
}The client device should perform the following high-level steps to fulfill this callback:
-
Generate a JSON web token (JWT) that has the ID of the user in the subject (
sub) field) and the original value of thechallenge.For example:
{ "sub": "id=bjensen,ou=user,dc=am,dc=example,dc=com", "challenge": "6IBkTEPcMQ0xCghIclmDLost2ssGO5cPDs0AjUhmDTo=" } -
Sign the JWT using the RS512 algorithm to create a JSON Web Signature (JWS).
-
Complete the callback, returning the JWS.
The server verifies the signature against the stored public key.
{
  "authId": "...",
  "callbacks": [
    {
      "type": "DeviceSigningVerifierCallback",
      "output": [...],
      "input": [
        {
          "name": "IDToken1jws",
          "value": "eyJhbGciOiJIUzI1NiI....JV_adQssw5cB6aDS6m_kwIiw"
        },
        {
          "name": "IDToken1clientError",
          "value": ""
        }
      ]
    }
  ]
}Class to import in scripts: org.forgerock.openam.authentication.callbacks.DeviceSigningVerifierCallback
Learn more in DeviceSigningVerifierCallback.
HiddenValueCallback
Provides form values that are to remain hidden from the user.
{
  "callbacks": [{
    "type": "HiddenValueCallback",
    "output": [{
      "name": "value",
      "value": "6186c911-b3be-4dbc-8192-bdf251392072"
    }, {
      "name": "id",
      "value": "jwt"
    }],
    "input": [{
      "name": "IDToken1",
      "value": "jwt"
    }]
  }]
}- Class to import
-
com.sun.identity.authentication.callbacks.HiddenValueCallback
Learn more in HiddenValueCallback.
IdPCallback
Collects the result of a native OAuth 2.0 or OIDC request to a social identity provider.
The Social Provider Handler node returns this callback when its Client Type is set to NATIVE.
The output provides the information required to perform the request. Clients built using the Ping SDKs for Android or iOS use this to authenticate to the social identity provider with the mobile OS native APIs.
| Callback output field | Description |
|---|---|
|
An array containing the Authentication Context Class Reference values for the native authentication request. |
|
A string containing the identifier for the native authentication request. |
|
A string containing the nonce for the native authentication request. |
|
A string containing a name for the provider. |
|
A string containing the redirection URI for the native authentication request. |
|
A string containing the Request Object for the native authentication request. |
|
A string containing a URL that references a resource containing the Request Object for the native authentication request. |
|
An array containing the scopes for the native authentication request. |
{
  "callbacks": [{
    "type": "IdPCallback",
    "output": [{
      "name": "provider",
      "value": "amazon"
    }, {
      "name": "clientId",
      "value": "amzn1.application-oa2-client.f0c11aa1f8504f8da26a346ccc55a39e"
    }, {
      "name": "redirectUri",
      "value": "https://localhost:8443/am"
    }, {
      "name": "scopes",
      "value": ["profile"]
    }, {
      "name": "nonce",
      "value": ""
    }, {
      "name": "acrValues",
      "value": []
    }, {
      "name": "request",
      "value": ""
    }, {
      "name": "requestUri",
      "value": ""
    }],
    "input": [{
      "name": "IDToken1token",
      "value": ""
    }, {
      "name": "IDToken1token_type",
      "value": ""
    }]
  }]
}In the input, return a JWT id_token, access_token or authorization code for the token,
and id_token, access_token or authorization_code for the token type.
- Class to import
-
org.forgerock.openam.authentication.callbacks.IdPCallback
Learn more in IdPCallback.
KbaCreateCallback
Collects knowledge-based authentication (KBA) answers to questions defined in the user profile, or user-defined question and answer pairs.
{
  "callbacks": [{
    "type": "KbaCreateCallback",
    "output": [{
      "name": "prompt",
      "value": "Select a security question"
    }, {
      "name": "predefinedQuestions",
      "value": ["What's your favorite color?"]
    }],
    "input": [{
      "name": "IDToken1question",
      "value": ""
    }, {
      "name": "IDToken1answer",
      "value": ""
    }]
  }]
}In the input, return an empty IDTokenNumberquestion value
when IDTokenNumberanswer corresponds to predefinedQuestions[Number].
For user-provided questions, return both.
- Class to import
-
org.forgerock.openam.authentication.callbacks.KbaCreateCallback
Learn more in KbaCreateCallback.
NameCallback
Collects a string entered by the user, such as a username.
{
  "callbacks": [{
    "type": "NameCallback",
    "output": [{
      "name": "prompt",
      "value": "User Name"
    }],
    "input": [{
      "name": "IDToken1",
      "value": ""
    }]
  }]
}- Class to import
-
javax.security.auth.callback.NameCallback
Learn more in NameCallback.
NumberAttributeInputCallback
Collects a numeric attribute, such as size or age.
The Attribute Collector node uses this to apply IDM policies and validate the response.
| Callback output field | Description |
|---|---|
|
An array of JSON objects describing validation policies that the input failed. The object is empty until the input is provided and validation fails. |
|
A string containing the name of the attribute in the user profile. |
|
An array of JSON objects describing IDM validation policies the input must pass. An empty JSON object if the node does not require validation. The node collects policy information from IDM. For more information about the policies available by default, refer to Default policy for managed objects in the IDM documentation. |
|
A string containing the description of the information required from the user. |
|
A boolean indicating whether input is required for this attribute. |
|
When the node requires validation, this boolean indicates whether to apply validation policies only,
or to validate the input and continue to the next node.
When When |
|
A string containing a default value for the attribute, if required. |
In the input, return the value and a boolean to set validateOnly.
- Class to import
-
org.forgerock.openam.authentication.callbacks.NumberAttributeInputCallback
Learn more in NumberAttributeInputCallback.
PasswordCallback
Collects a password value.
{
  "callbacks": [{
    "type": "PasswordCallback",
    "output": [{
      "name": "prompt",
      "value": "Password"
    }],
    "input": [{
      "name": "IDToken1",
      "value": ""
    }]
  }]
}- Class to import
-
javax.security.auth.callback.PasswordCallback
Learn more in PasswordCallback.
PingOneProtectEvaluationCallback
Instructs the client to return the data captured by the PingOne Signals (Protect) SDK so that a risk evaluation can be completed.
| Callback output field | Description |
|---|---|
|
A boolean indicating whether to stop collecting behavioral data after returning the existing data. |
{
  "callbacks":[
    {
      "type":"PingOneProtectEvaluationCallback",
      "output":[
        {
          "name":"pauseBehavioralData",
          "value":true
        }
      ],
      "input":[
        {
          "name":"IDToken1signals",
          "value":""
        },
        {
          "name":"IDToken1clientError",
          "value":""
        }
      ]
    }
  ]
}In the input:
-
In
IDToken1signals, return the data captured by the PingOne Signals SDK. -
In
IDToken1clientError, return an empty string to signal success, or an error string to indicate that the client was unable to process the request.
- Class to import
-
org.forgerock.openam.authentication.callbacks.PingOneProtectEvaluationCallback
Learn more in PingOneProtectEvaluationCallback.
PingOneProtectInitializeCallback
Instructs the client to initialize the PingOne Signals (Protect) SDK to gather information during a transaction.
| Callback output field | Description |
|---|---|
|
A string containing the PingOne environment ID. |
|
A boolean indicating whether to output SDK log messages to the developer console. |
|
An array of device attributes to ignore when collecting device signals. |
|
A string containing a custom host URL from which to retrieve a "Pong" token. Not currently used. |
|
A boolean indicating whether to calculate metadata on demand. When |
|
A boolean indicating whether to collect behavioral data. |
|
A boolean indicating whether the client stores device data in the browser’s localStorage only. When |
|
An integer indicating the number of days that device attestation can rely upon the device fallback key. |
|
A boolean indicating whether to tie the device payload to a non-extractable crypto key stored in the browser for content authenticity verification. |
|
A boolean indicating whether to collect tag data. |
{
  "type":"PingOneProtectInitializeCallback",
  "output":[
    {
      "name":"envId",
      "value":"3072206d-c6ce-4c19-a366-f87e972c7cc3"
    },
    {
      "name":"consoleLogEnabled",
      "value":false
    },
    {
      "name":"deviceAttributesToIgnore",
      "value":[
        "field1",
        "field2"
      ]
    },
    {
      "name":"customHost",
      "value":""
    },
    {
      "name":"lazyMetadata",
      "value":false
    },
    {
      "name":"behavioralDataCollection",
      "value":true
    },
    {
      "name":"deviceKeyRsyncIntervals",
      "value":14
    },
    {
      "name":"enableTrust",
      "value":false
    },
    {
      "name":"disableTags",
      "value":false
    },
    {
      "name":"disableHub",
      "value":false
    }
  ],
  "input":[
    {
      "name":"IDToken1clientError",
      "value":""
    }
  ]
}In the input, in the IDToken1clientError field return an empty string to signal success, or any error string to indicate initialization of the SDK failed.
- Class to import
-
org.forgerock.openam.authentication.callbacks.PingOneProtectInitializeCallback
Learn more in PingOneProtectInitializeCallback.
SelectIdPCallback
Collects a choice of an enabled social identity provider or local authentication.
The Select Identity Provider node returns this callback when multiple social identity providers are enabled, or when Local Authentication is enabled alongside at least one provider.
In the input, return the provider name, such as amazon or localAuthentication.
{
  "callbacks": [{
    "type": "SelectIdPCallback",
    "output": [{
      "name": "providers",
      "value": [{
        "provider": "amazon",
        "uiConfig": {
          "buttonCustomStyle": "background: linear-gradient(to bottom, #f7e09f 15%,#f5c646 85%);color: black;border-color: #b48c24;",
          "buttonImage": "",
          "buttonClass": "fa-amazon",
          "buttonDisplayName": "Amazon",
          "buttonCustomStyleHover": "background: linear-gradient(to bottom, #f6c94e 15%,#f6c94e 85%);color: black;border-color: #b48c24;",
          "iconClass": "fa-amazon",
          "iconFontColor": "black",
          "iconBackground": "#f0c14b"
        }
      }, {
        "provider": "google",
        "uiConfig": {
          "buttonImage": "images/g-logo.png",
          "buttonCustomStyle": "background-color: #fff; color: #757575; border-color: #ddd;",
          "buttonClass": "",
          "buttonCustomStyleHover": "color: #6d6d6d; background-color: #eee; border-color: #ccc;",
          "buttonDisplayName": "Google"
        }
      }, {
        "provider": "localAuthentication"
      }]
    }, {
      "name": "value",
      "value": ""
    }],
    "input": [{
      "name": "IDToken1",
      "value": ""
    }]
  }]
}- Class to import
-
org.forgerock.openam.authentication.callbacks.SelectIdPCallback
Learn more in SelectIdPCallback.
StringAttributeInputCallback
Collects string attributes, such as city names, telephone numbers, and postcodes.
The Attribute Collector node uses this instead of a TextInputCallback to apply IDM policies and validate the response.
| Callback output field | Description |
|---|---|
|
An array of JSON objects describing validation policies that the input failed. The object is empty until the input is provided and validation fails. |
|
A string containing the name of the attribute in the user profile. |
|
An array of JSON objects describing IDM validation policies the input must pass. An empty JSON object if the node does not require validation. The node collects policy information from IDM. For more information about the policies available by default, refer to Default policy for managed objects in the IDM documentation. |
|
A string containing the description of the information required from the user. |
|
A boolean indicating whether input is required for this attribute. |
|
When the node requires validation, this boolean indicates whether to apply validation policies only,
or to validate the input and continue to the next node.
When When |
|
A string containing a default value for the attribute, if required. |
{
  "callbacks": [{
    "type": "StringAttributeInputCallback",
    "output": [{
      "name": "name",
      "value": "givenName"
    }, {
      "name": "prompt",
      "value": "First Name"
    }, {
      "name": "required",
      "value": true
    }, {
      "name": "policies",
      "value": {
        "policyRequirements": ["REQUIRED", "VALID_TYPE"],
        "fallbackPolicies": null,
        "name": "givenName",
        "policies": [{
          "policyRequirements": ["REQUIRED"],
          "policyId": "required"
        }, {
          "policyRequirements": ["VALID_TYPE"],
          "policyId": "valid-type",
          "params": {
            "types": ["string"]
          }
        }],
        "conditionalPolicies": null
      }
    }, {
      "name": "failedPolicies",
      "value": []
    }, {
      "name": "validateOnly",
      "value": false
    }, {
      "name": "value",
      "value": ""
    }],
    "input": [{
      "name": "IDToken1",
      "value": ""
    }, {
      "name": "IDToken1validateOnly",
      "value": false
    }]
  }]
}When input validation is not required, the policies contain an empty object:
{
  "name": "policies",
  "value": {}
}In the input, return the value and a boolean to set validateOnly.
- Class to import
-
org.forgerock.openam.authentication.callbacks.StringAttributeInputCallback
Learn more in StringAttributeInputCallback.
TermsAndConditionsCallback
Displays the current terms and conditions and collects the user’s agreement to them.
{
  "callbacks": [
    {
      "type": "TermsAndConditionsCallback",
      "output": [
        {
          "name": "version",
          "value": "0.0"
        },
        {
          "name": "terms",
          "value": "Terms and conditions text that you must agree to."
        },
        {
          "name": "createDate",
          "value": "2022-10-28T04:20:11.320Z"
        }
      ],
      "input": [
        {
          "name": "IDToken1",
          "value": false
        }
      ]
    }
  ]
}In the input, return true if the user agrees to the terms and conditions.
- Class to import
-
org.forgerock.openam.authentication.callbacks.TermsAndConditionsCallback
Learn more in TermsAndConditionsCallback.
TextInputCallback
Collects text input from the user.
{
  "callbacks": [{
    "type": "TextInputCallback",
    "output": [{
      "name": "prompt",
      "value": "Provide a nickname for this account"
    }],
    "input": [{
      "name": "IDToken1",
      "value": ""
    }]
  }]
}- Class to import
-
javax.security.auth.callback.TextInputCallback
Learn more in TextInputCallback.
ValidatedPasswordCallback
Collects a password value.
The Platform Password node uses this instead of a PasswordCallback to apply IDM policies and validate the response.
| Callback output field | Description |
|---|---|
|
An array of JSON objects describing validation policies that the input failed. The object is empty until the input is provided and validation fails. |
|
A string containing the name of the attribute in the user profile. |
|
An array of objects describing IDM validation policies the input must pass. An empty JSON object if the node does not require validation. The node collects policy information from IDM. For more information about the policies available by default, refer to Default policy for managed objects in the IDM documentation. |
|
A string containing the description of the information required from the user. |
|
When the node requires validation, this boolean indicates whether to apply validation policies only,
or to validate the input and continue to the next node.
When When |
{
  "callbacks": [{
    "type": "ValidatedPasswordCallback",
    "output": [{
      "name": "echoOn",
      "value": false
    }, {
      "name": "policies",
      "value": {
        "policyRequirements": ["VALID_TYPE", "MIN_LENGTH", "AT_LEAST_X_CAPITAL_LETTERS", "AT_LEAST_X_NUMBERS", "CANNOT_CONTAIN_OTHERS"],
        "fallbackPolicies": null,
        "name": "password",
        "policies": [{
          "policyRequirements": ["VALID_TYPE"],
          "policyId": "valid-type",
          "params": {
            "types": ["string"]
          }
        }, {
          "policyId": "minimum-length",
          "params": {
            "minLength": 8
          },
          "policyRequirements": ["MIN_LENGTH"]
        }, {
          "policyId": "at-least-X-capitals",
          "params": {
            "numCaps": 1
          },
          "policyRequirements": ["AT_LEAST_X_CAPITAL_LETTERS"]
        }, {
          "policyId": "at-least-X-numbers",
          "params": {
            "numNums": 1
          },
          "policyRequirements": ["AT_LEAST_X_NUMBERS"]
        }, {
          "policyId": "cannot-contain-others",
          "params": {
            "disallowedFields": ["userName", "givenName", "sn"]
          },
          "policyRequirements": ["CANNOT_CONTAIN_OTHERS"]
        }],
        "conditionalPolicies": null
      }
    }, {
      "name": "failedPolicies",
      "value": []
    }, {
      "name": "validateOnly",
      "value": false
    }, {
      "name": "prompt",
      "value": "Password"
    }],
    "input": [{
      "name": "IDToken1",
      "value": ""
    }, {
      "name": "IDToken1validateOnly",
      "value": false
    }]
  }]
}In the input, return the value and a boolean to set validateOnly.
- Class to import
-
org.forgerock.openam.authentication.callbacks.ValidatedPasswordCallback
Learn more in ValidatedPasswordCallback.
ValidatedUsernameCallback
Collects a username.
The Platform Username node uses this instead of a NameCallback to apply IDM policies and validate the response.
| Callback output field | Description |
|---|---|
|
An array of JSON objects describing validation policies that the input failed. The object is empty until the input is provided and validation fails. |
|
A string containing the name of the attribute in the user profile. |
|
An array of objects describing IDM validation policies the input must pass. An empty JSON object if the node does not require validation. The node collects policy information from IDM. For more information about the policies available by default, refer to Default policy for managed objects in the IDM documentation. |
|
A string containing the description of the information required from the user. |
|
When the node requires validation, this boolean indicates whether to apply validation policies only,
or to validate the input and continue to the next node.
When When |
{
  "callbacks": [{
    "type": "ValidatedUsernameCallback",
    "output": [{
      "name": "policies",
      "value": {
        "policyRequirements": ["REQUIRED", "VALID_TYPE", "VALID_USERNAME", "CANNOT_CONTAIN_CHARACTERS", "MIN_LENGTH", "MAX_LENGTH"],
        "fallbackPolicies": null,
        "name": "userName",
        "policies": [{
          "policyRequirements": ["REQUIRED"],
          "policyId": "required"
        }, {
          "policyRequirements": ["VALID_TYPE"],
          "policyId": "valid-type",
          "params": {
            "types": ["string"]
          }
        }, {
          "policyId": "valid-username",
          "policyRequirements": ["VALID_USERNAME"]
        }, {
          "policyId": "cannot-contain-characters",
          "params": {
            "forbiddenChars": ["/"]
          },
          "policyRequirements": ["CANNOT_CONTAIN_CHARACTERS"]
        }, {
          "policyId": "minimum-length",
          "params": {
            "minLength": 1
          },
          "policyRequirements": ["MIN_LENGTH"]
        }, {
          "policyId": "maximum-length",
          "params": {
            "maxLength": 255
          },
          "policyRequirements": ["MAX_LENGTH"]
        }],
        "conditionalPolicies": null
      }
    }, {
      "name": "failedPolicies",
      "value": []
    }, {
      "name": "validateOnly",
      "value": false
    }, {
      "name": "prompt",
      "value": "Username"
    }],
    "input": [{
      "name": "IDToken1",
      "value": ""
    }, {
      "name": "IDToken1validateOnly",
      "value": false
    }]
  }]
}In the input, return the value and a boolean to set validateOnly.
- Class to import
-
org.forgerock.openam.authentication.callbacks.ValidatedUsernameCallback
Learn more in ValidatedUsernameCallback.
Read-only callbacks
Nodes use these callbacks to return information to the client application or to display information to the user.
MetadataCallback
Injects key-value pairs into the authentication process by adding extra metadata to the JSON response.
{
  "callbacks": [{
    "type": "MetadataCallback",
    "output": [{
      "name": "data",
      "value": {
        "myParameter": "MyValue"
      }
    }]
  }]
}- Class to import
-
com.sun.identity.authentication.spi.MetadataCallback
Learn more in MetadataCallback.
PollingWaitCallback
Indicates the number of milliseconds to wait before responding to the callback.
{
  "callbacks": [{
    "type": "PollingWaitCallback",
    "output": [{
      "name": "waitTime",
      "value": "8000"
    }, {
      "name": "message",
      "value": "Waiting for response..."
    }]
  }]
}- Class to import
-
org.forgerock.openam.authentication.callbacks.PollingWaitCallback
Learn more in PollingWaitCallback.
RedirectCallback
Redirects the user-agent.
The Social Provider Handler node returns this callback when its Client Type is set to BROWSER,
and the client must redirect the user to the social provider for authentication.
{
  "callbacks": [{
    "type": "RedirectCallback",
    "output": [{
      "name": "redirectUrl",
      "value": "https://accounts.google.com/o/oauth2/v2/auth?nonce..."
    }, {
      "name": "redirectMethod",
      "value": "GET"
    }, {
      "name": "trackingCookie",
      "value": true
    }]
  }]
}AM uses a trackingCookie to store the authentication identifier
that reflects the client’s place in the authentication process.
- Class to import
-
com.sun.identity.authentication.spi.RedirectCallback
Learn more in RedirectCallback.
SuspendedTextOutputCallback
Provides a message to display to the user when the authentication journey is suspended.
| Callback output field | Description |
|---|---|
|
A string containing a message to display to the user. |
|
A number indicating the severity of the message:
|
{
  "callbacks": [{
    "type": "SuspendedTextOutputCallback",
    "output": [{
      "name": "message",
      "value": "An email has been sent to your inbox."
    }, {
      "name": "messageType",
      "value": "0"
    }]
  }]
}- Class to import
-
org.forgerock.openam.auth.node.api.SuspendedTextOutputCallback
Learn more in SuspendedTextOutputCallback.
TextOutputCallback
Provides a message to display to the user.
| Callback output field | Description |
|---|---|
|
A string containing a message to display to the user. |
|
A number indicating the severity of the message:
|
{
  "callbacks": [{
    "type": "TextOutputCallback",
    "output": [{
      "name": "message",
      "value": "Default message"
    }, {
      "name": "messageType",
      "value": "0"
    }]
  }]
}- Class to import
-
javax.security.auth.callback.TextOutputCallback
Learn more in TextOutputCallback.
Backchannel callbacks
Nodes use these callbacks to recover additional information from the request, such as a header or a certificate.
HttpCallback
Accesses user credentials sent in the Authorization header:
Authorization: Basic bXlDbGllbnQ6Zm9yZ2Vyb2Nr
- Class to import
-
com.sun.identity.authentication.spi.HttpCallback
Learn more in HttpCallback.
LanguageCallback
Retrieves the locale from the request header for localizing text presented to the user.
- Class to import
-
javax.security.auth.callback.LanguageCallback
Learn more in LanguageCallback.
ScriptTextOutputCallback
Inserts a script into the page presented to the user; for example, to collect data about the user’s environment.
- Class to import
-
com.sun.identity.authentication.callbacks.ScriptTextOutputCallback
Learn more in ScriptTextOutputCallback.
X509CertificateCallback
Retrieves an X.509 certificate, for example, from a header.
- Class to import
-
com.sun.identity.authentication.spi.X509CertificateCallback
Learn more in X509CertificateCallback.
Session token after authentication
After a successful authentication,
AM returns a tokenId object that applications can present as a cookie value
for other operations that require authentication.
This object is a session token—a
representation of the exchange of information and credentials between AM and the user or identity.
The type of tokenId returned varies
depending on where AM stores the sessions for the realm to which the user authenticates:
-
If server-side sessions are enabled, the
tokenIdobject is a reference to the session state stored in the CTS token store. -
If client-side sessions are enabled, the
tokenIdobject is the session state for that particular user or identity.
Developers should be aware that the size of the tokenId for client-side sessions—2000 bytes or greater—is
considerably longer than for server-side sessions—approximately 100 bytes.
Learn more in Session cookies and session security.
The following is a common scenario when accessing AM by using REST API calls:
-
Call the
/json/authenticateendpoint to log a user in to AM.This REST API call returns a
tokenIDvalue, which is used in subsequent REST API calls to identify the user:$ curl \ --request POST \ --header "Content-Type: application/json" \ --header "X-OpenAM-Username: bjensen" \ --header "X-OpenAM-Password: Ch4ng31t" \ --header "Accept-API-Version: resource=2.0, protocol=1.0" \ 'https://am.example.com:8443/am/json/realms/root/realms/alpha/authenticate' { "tokenId":"AQIC5wM…TU3OQ*", "successUrl":"/am/console", "realm":"/alpha" }bashThe returned
tokenIDis known as a session token (also referred to as an SSO token). REST API calls made after successful authentication to AM must present the session token in the HTTP header as proof of authentication. -
Call one or more additional REST APIs on behalf of the logged-in user.
Each REST API call passes the user’s
tokenIDback to AM in the HTTP header as proof of previous authentication.The following is a partial example of a
curlcommand that inserts the token ID returned from a prior successful AM authentication attempt into the HTTP header:$ curl \ --request POST \ --header "Content-Type: application/json" \ --header "iPlanetDirectoryPro: AQIC5w…NTcy*" \ --header "Accept-API-Version: resource=2.0, protocol=1.0" \ --data '{ …bashObserve that the session token is inserted into a header field named
iPlanetDirectoryPro. This header field name must correspond to the name of the AM session cookie—by default,iPlanetDirectoryPro. You can find the cookie name in the AM admin UI, by navigating to Deployment > Servers > Server Name > Security > Cookie, in the Cookie Name field of the AM admin UI.Once a user has authenticated, it is not necessary to insert login credentials in the HTTP header in subsequent REST API calls. Note the absence of
X-OpenAM-UsernameandX-OpenAM-Passwordheaders in the preceding example.Users are required to have appropriate privileges in order to access AM functionality using the REST API. For example, users who lack administrative privileges cannot create AM realms. For more information on the AM privilege model, see Delegating Privileges.
-
Call the REST API to log the user out of AM, as described in Authenticate over REST.
As with other REST API calls made after a user has authenticated, the REST API call to log out of AM requires the user’s
tokenIDin the HTTP header.
Log out of AM over REST
Authenticated users can log out with the token cookie value and an HTTP POST to /json/sessions/?_action=logout:
$ curl \
--request POST \
--header "Content-type: application/json" \
--header "iPlanetDirectoryPro: AQICS…NzEz*" \
--header "Accept-API-Version: resource=3.1, protocol=1.0" \
'https://am.example.com:8443/am/json/realms/root/realms/alpha/sessions/?_action=logout'
{
"result": "Successfully logged out"
}Find information about using an administrator token to force the logout of other authenticated users in Invalidate sessions.
Single sign-on
Single sign-on (SSO) lets users who have authenticated to AM access multiple independent services from a single login session by storing authenticated sessions as HTTP cookies. (If you are unfamiliar with HTTP cookies, see HTTP cookies for more information.)
Cross-domain single sign-on (CDSSO) is an AM-specific capability
that provides SSO inside the same organization within a single domain or across domains.
For example, CDSSO allows your AM servers in the DNS domain .internal.net
to provide authentication and authorization to web and Java agents from the .internal.net domain
and other DNS domains, such as .example.net.
Since CDSSO removes the constraint of configuring SSO depending on the DNS domain, it simplifies the deployment of SSO in your environment.
When implementing CDSSO, take into account the following points:
-
For SSO across multiple organizations or when integrating with other access management software, use AM’s federation capabilities, such as OAuth 2.0 or SAML v2.0.
-
Web agents and Java agents both support CDSSO.
AM also supports CDSSO with PingGateway. Learn more in Single Sign-On and Cross-Domain Single Sign-On in the PingGateway documentation.
-
CDSSO supports server-side and client-side sessions. For more information about session state impact on CDSSO, see Impact of storage location for sessions.
Web agents and Java agents wrap the SSO session token inside an OpenID Connect (OIDC) JSON Web Token (JWT).
During the CDSSO flow, the agents create cookies for the different domains specified in the agent profile,
and the oauth2/authorize endpoint authorizes the different cookie domains as required.
The following diagram illustrates the CDSSO flow for web agents and Java agents:

Realms and SSO
When changing authentication realms, a subject leaves the current SSO realm. The new SSO realm might apply to different applications, and use a different authentication process. For AM, logging in to a new realm means logging out of the current realm.
When a user interactively changes realms through the end user UI, AM offers the option of logging out of the current realm to log in to the new realm, or choosing to remain logged in to the current realm.
The result depends on the user’s choice:
-
If the user cancels the change at this point, the user remains logged in to the current realm, and is not logged in to the new realm.
-
If the user chooses to log in to the new realm, AM first logs the user out of the current realm, and then prompts the user to log in to the new realm.
HTTP cookies
To understand how SSO works, you need to understand some key elements of the HTTP cookie, as described in RFC 6525, HTTP State Management Mechanism.
Within an HTTP cookie, you can store a single custom name=value pair, such as sessionid=value.
Other properties within a cookie are as follows:
- Domain
-
Normally set to the full URL that was used to access the configurator. To work with multiple subdomains, the
Domainshould be set to a URL likeDomain=server.example.net. This is also known as the cookie domain. - Path
-
The directory in the URL to which the cookie applies. If the
Path=/am, the cookie applies to the/amsubdirectory of the URL, and lower level directories, includingam/XUI. - Secure
-
If the
Securename is included, the cookie can be transferred only over HTTPS. When a request is made over HTTP, the cookie is not made available to the application.For more information, see Secure cookies by default.
- HttpOnly
-
When the
HttpOnlyflag is included, that cookie will not be accessible through JavaScript. According to RFC 6265, the noted flag "instructs the user agent to omit the cookie when providing access to cookies via 'non-HTTP' APIs (for example, a web browser API that exposes cookies to scripts)."For more information, see HttpOnly session cookies.
- Expires
-
The lifetime of a cookie can be limited, with an
Expiresname configured with a time, based on UTC (GMT).
|
Do not take a shortcut with a top-level domain.
Web browser clients today are designed to ignore cookies set to top-level domains including |
Implement CDSSO
CDSSO provides SSO capabilities for AM servers and web or Java agents within a single domain or across domains in the same organization.
CDSSO is the only mode of operation for web and Java agents, so no additional configuration is required to make it work.
You must, however, protect the session cookie against hijacking. For more information, see Restrict tokens for CDSSO session cookies.
|
PingGateway also supports CDSSO with AM. Learn more in the PingGateway Gateway Guide. |
Troubleshoot SSO
In general, problems with single sign-on relate to some sort of mismatch of domain names.
For example, a cookie that is configured on a third-level domain, such as sso.example.net,
will not work with an application on a similar domain, such as app.example.net.
The following list describes scenarios that may lead to similar problems:
-
When a cookie domain does not match a domain for the protected application.
Assume the application is configured on a domain named
example.org. That application will not receive an SSO token configured on theexample.netdomain. -
When a third-level domain is used for the SSO token.
If an SSO token is configured on
sso.example.net, an application onapp.example.netdoes not receive the corresponding session token. In this case, the solution is to configure the SSO token onexample.net. -
When the
Cookie Securityor theCDSSO Secure Enableproperties are configured in the agent profile with a regular HTTP application.If you need encrypted communications for an application protected by AM, use the
Cookie Securityor theCDSSO Secure Enableproperties and make sure the application is accessible over HTTPS. -
When the path listed in the cookie does not match the path for the application.
Perhaps the cookie is configured with a
/helloworldpath; that will not match an application that might be configured with a/hellomarspath. In that case, the application will not receive the cookie. -
When an inappropriate name is used for the cookie domain.
As noted earlier, client browsers are configured to ignore first-level domains, such as
comandnetas well as functional equivalents, such asco.ukandco.jp. -
When working with different browsers.
The
name=valuepairs described earlier may not apply to all browsers. The requirements for an HTTP cookie sent to an IE browser may differ from the requirements for other standard browsers, such as Firefox and Chrome. Based on anecdotal reports, IE does not recognize domain names that start with a number. In addition, IE reportedly refuses cookies that include the underscore (_) character in the FQDN. -
When a client-side session cookie exceeds the maximum size permitted by the browser.
As described in Session cookies and session security, the default size of the
iPlanetDirectoryProcookie is approximately 2,000 bytes. When you customize AM sessions by adding attributes, the cookie size grows. Browsers allow cookie sizes between 4,000 and 5,200 bytes, depending on the browser. AM single sign-on does not support a cookie size that exceeds the maximum cookie size allowed by the browser.
Social authentication
AM supports delegated authentication through third-party identity providers, such as Facebook, and Google. This lets users log in to AM using their social provider credentials.
These topics describe the high-level steps to configure social authentication.
Configure social identity providers
AM supports social identity providers that are OAuth 2.0 or OIDC 1.0-compliant. A number of social identity providers are configured by default:
| Identity provider | Specification |
|---|---|
Amazon |
OAuth 2.0 |
Apple |
OIDC |
OAuth 2.0 |
|
OIDC |
|
OAuth 2.0 |
|
itsme(1) |
OIDC |
LINE (Browser) |
OIDC |
LINE (Native) |
OIDC |
LinkedIn (Legacy) (2) |
OAuth 2.0 |
OIDC |
|
Microsoft |
OAuth 2.0 |
Salesforce |
OAuth 2.0 |
OAuth 2.0 |
|
VK (Vkontakte) |
OAuth 2.0 |
OAuth 2.0 |
|
WordPress |
OAuth 2.0 |
Yahoo |
OIDC |
(1) To integrate with itsme, you must obtain an Organization Validation (OV) certificate.
You must also configure it in the container where AM runs, or in the reverse proxy offloading SSL.
(2) The OAuth 2.0 version of the profile is deprecated by LinkedIn.
You can add providers that aren’t configured by default, as long as these providers have a solution implemented using either OAuth 2.0, or OpenID Connect.
Add identity providers
-
Register a service in the identity provider, and keep the provider’s documentation within reach. You will use it during this procedure.
To register a service in a provider, you must at least create a client ID and add the redirect URL to AM.
Redirect URLs
A redirect URL is a path in AM to which the identity provider redirects the user on successful authentication. For example,
https://platform.example.com:8443/am.Depending on the social identity provider and on your environment, you might need to make changes to the redirect URL later.
Configure the same redirect URL in the identity provider service and in the AM client.
Some providers require that you enable a specific setting or API in their service:
-
Enable the Gmail API in the Google Cloud Platform.
- Apple
-
You must have access to the Apple Development Program (Enterprise program is not eligible), and you must enable Sign In With Apple in the Apple Developer site.
-
You must have an Elevated Developer Twitter Account to obtain a token, and you must set up an application at https://developer.twitter.com/en/portal/dashboard.
- LINE
-
You must apply for permission for your LINE channel to access a user’s email address using OIDC:
-
In the LINE Developers console, enable Email address permission.
-
Agree to the terms and conditions, and follow the steps to complete the application.
-
The console displays
Appliedwhen your application is accepted.
If you don’t have email permission, the registration will fail with an
Invalid Attribute Syntaxerror. -
-
In the AM admin UI, go to Realms > Realm Name > Services.
-
Check if the
Social Identity Provider Serviceappears in the list of services configured for the realm.If it does not, click Add a Service, select
Social Identity Provider Servicefrom the drop-down list, and click Create. -
Ensure the Enabled switch is on.
-
Go to the Secondary Configurations tab.
AM includes scripts and configurations for several common identity providers.
-
In the Add a Secondary Configuration drop-down list, select the required identity provider.
If the required provider isn’t available, select one of the following to add a custom identity provider client:
-
Client Configuration for providers that implement the OAuth2 specification
-
Client Configuration for providers that implement the OpenID Connect specification
-
-
Provide the details of the service you registered with the social provider, such as the Client ID, the Client Secret, the Scope Delimiter (usually an empty space), and the Redirect URL.
For OAuth 2.0 social identity providers, store the client secret in a secret store for greater security.
Use the Client Secret Label Identifier to create a dynamic secret label to map to an alias for the secret.
Learn more about secrets in Map and rotate secrets.
Redirect URLs
A redirect URL is a path in AM to which the identity provider redirects the user on successful authentication. For example,
https://platform.example.com:8443/am.Depending on the social identity provider and on your environment, you might need to make changes to the redirect URL later.
Configure the same redirect URL in the identity provider service and in the AM client.
Don’t worry if you are missing some details; you can edit the configuration later after saving the client profile for the first time.
Click Create your changes to access all the configuration fields for the client.
-
Provide the client’s advanced configuration details and edit any required configuration details if needed.
Where do I find the required identity provider information?
-
Refer to the provider’s documentation.
Providers must specify their integration needs in their documentation, as well as their API endpoints.
For example, providers usually have different scopes that you can configure depending on your service’s needs.
Financial-grade providers usually also require additional security-related configuration, such as
acrvalues, PKCE-related settings, and more.Keep their documentation close while configuring the client profile.
-
Visit the provider’s
.well-knownendpoint.OAuth 2.0/OpenID Connect-compliant providers will display much of the information you need to configure the identity provider client in their
.well-knownendpoint. For example, the endpoint should expose their endpoint URLs, and the signing and encryption algorithms they support.
AM provides default configuration for the supported social identity providers based on each provider’s requirements. Providers sometimes change their requirements over time, so you must make sure the settings for the provider haven’t changed.
The important preconfigured fields are:
-
The provider’s URLs; for example, Authentication Endpoint URL, Access Token Endpoint URL, and User Profile Service URL.
-
The OAuth Scopes field.
-
The Well Known Endpoint for retrieving information about the provider.
Leave this field empty for the LINE (Browser)configuration. -
The configuration in the UI Config Properties section.
For common UI properties, refer to UI Config Properties.
-
The script selected in the Transform Script drop-down list.
This script is responsible for mapping attributes provided by the identity providers to a profile format compatible with AM.
For details, refer to Transform Script.
Some features require choosing algorithms from those supported by the provider, as well as creating secrets. Consider the following points before configuring the client:
-
Several capabilities in the identity provider client share the same secret labels. For example, signing request objects and signing client authentication JWTs.
-
Every identity provider client in a realm shares the same secrets.
Therefore, ensure that you configure features requiring secrets in a way that they’re compatible across clients in the same realm.
Learn more in /oauth2/connect/rp/jwk_uri.
For details on client configuration settings, refer to Social identity provider client configuration.
-
-
Save your changes.
You are now ready to Configure basic social registration trees.
|
To let AM contact Internet services through a proxy, refer to Configure AM behind a reverse proxy. You can control the behavior of the connection factory that AM uses as a client of the social identity providers: Client connection handler propertiesThe following advanced server properties control aspects of the connection factory:
They have sensible defaults configured. If you need to change them, read Advanced properties. |
Configure basic social registration trees
There are two nodes associated with Identity Providers:
- Select Identity Provider node
-
The Select Identity Provider node prompts the user to select a social identity provider to register or log in with, or (optionally) continue on with a local registration or login flow. When a provider is selected, the flow continues on to the Social Provider Handler node.
- Social Provider Handler node
-
The Social Provider Handler node is used in combination with the Select Identity Provider node. It communicates with the selected provider and collects the information provided after the user has authorized the service. It runs the provider’s configured normalization script to map the information into a format that AM can consume.
Next, the node uses a transformation script provided by AM called
Normalized Profile to Identityto transform the profile information into an identity object.The node then queries the identity store available for the realm to verify the user already exists. If the user exists, they are logged in. If the user does not exist, the user will need to be created.
Set up a basic social registration tree (journey)
Some of these steps differ slightly, depending on whether you’re using the AM admin UI or the Platform UI.
-
-
Decide whether users can log in with their AM credentials, and add the relevant nodes to the tree:
-
AM admin UI
-
Platform UI
-
Social authentication trees allowing local authentication might look like the following:
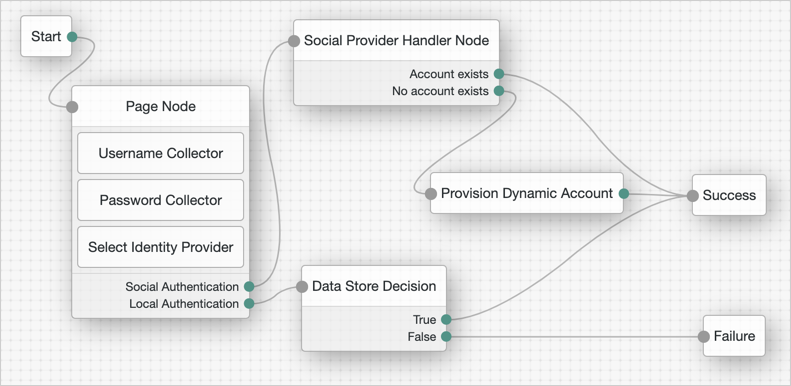
-
Social authentication trees enforcing social authentication login might look like the following:
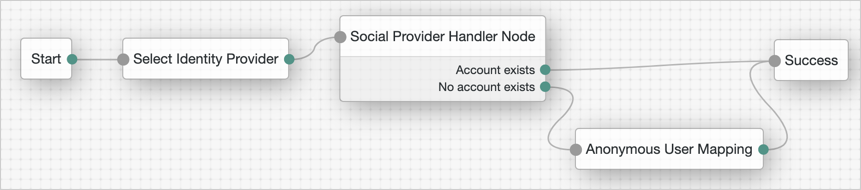
-
Social authentication journeys allowing local authentication might look like the following:
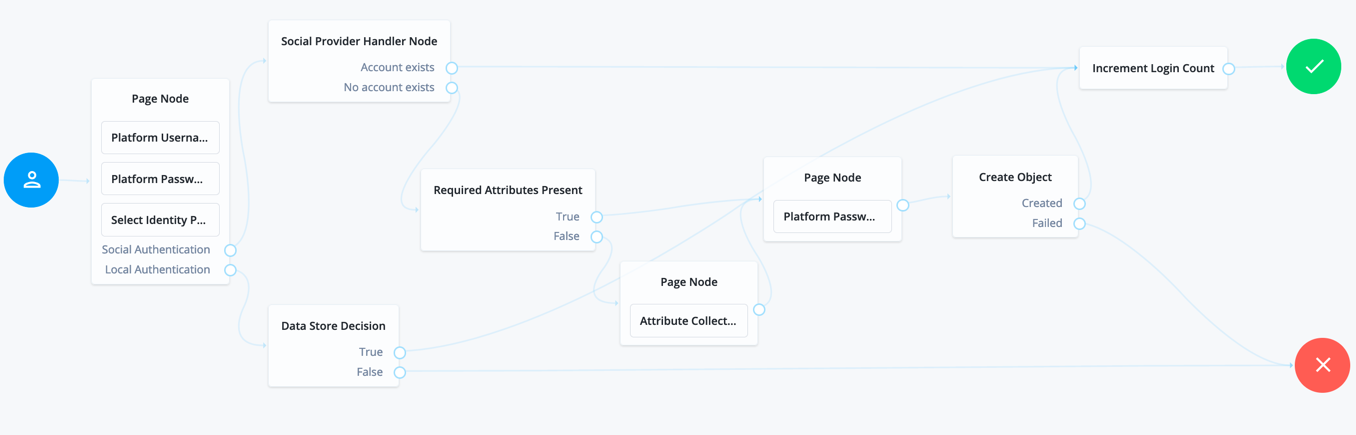
-
Social authentication journeys enforcing social authentication login might look like the following:
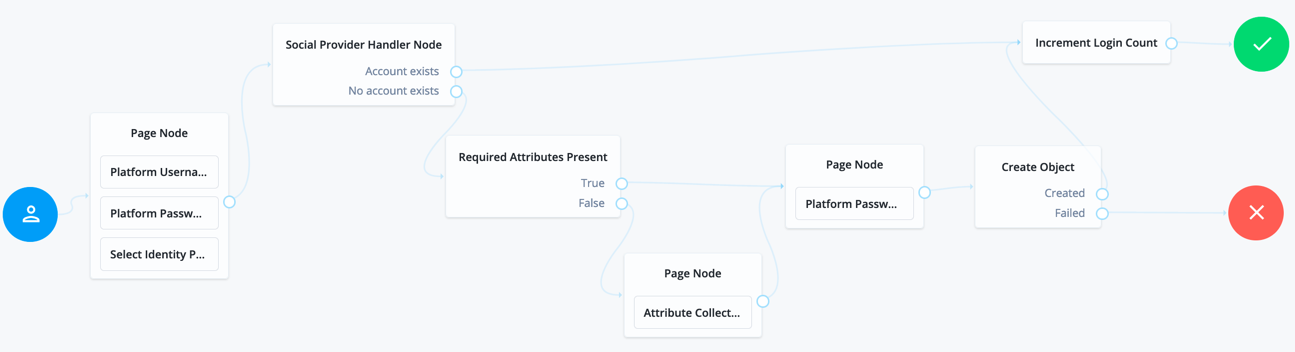
To configure either option, use the Include local authentication switch in the Select Identity Provider node.
To support both local and social authentication in the same page, you must use the Page node as shown in the example.
-
-
Configure the Social Provider Handler node:
-
In the Transformation Script field, select
Normalized Profile to Identity. This script transforms the normalized identity provider’s profile object into the appropriate user profile attributes of the realm’s identity store.If you are not using DS as the identity store, or if you added customized fields to it, you may need to modify the script.
Find the script and available bindings in normalized-profile-to-identity.js.
-
In Client Type, select
BROWSERwhen using the AM UI, orNATIVEwhen using the Ping SDKs.
-
Let users connect through their profile page
To let users connect to social identity providers through the End User UI profile page, add a mapping for your social authentication journey:
-
Log in to the AM admin UI and switch to the relevant realm.
-
From the left navigation pane, click Services.
-
Select Self Service Trees.
-
Set a new key and value and click + Add:
- Key
-
connectSocial - Value
-
The name of the journey
-
Click Save Changes.
Social identity provider client configuration
- Enabled
-
Whether the provider is enabled.
Required: Yes.
- Auth ID Key
-
The attribute the social identity provider uses to identify an authenticated individual. For example,
id,sub, oruser_id.Required: Yes.
By default, OIDC social authentication flows use the
subclaim to identify the subject, in accordance with the OIDC specification, which mandates that thesubclaim should uniquely identify the user.However, some identity providers don’t provide a unique value for the
subclaim. In this case, you can set the org.forgerock.am.auth.trees.authenticate.identified.identity advanced server property totrue. When set totrue, AM uses the value of theAuth ID Keyto identify the subject. - Client ID
-
The
client_idparameter as described in section 2.2 of The OAuth 2.0 Authorization Framework specification.Required: Yes.
- Client Secret
-
The
client_secretparameter as described in section 2.3 of The OAuth 2.0 Authorization Framework specification.This property is deprecated. Use the Client Secret Label Identifier instead.
If you set a Client Secret Label Identifier and AM finds a matching secret in a secret store, the Client Secret is ignored.
Required: No.
- Client Secret Label Identifier
-
An identifier used to create a secret label for mapping to a secret in a secret store.
AM uses this identifier to create a specific secret label for this service instance, using the template
am.social.providers.identifier.secretwhere identifier is the value of Client Secret Label Identifier.The identifier can only contain alphanumeric characters
a-z,A-Z,0-9, and periods (.). It can’t start or end with a period.If you set a Client Secret Label Identifier and AM finds a matching secret in a secret store, the Client Secret is ignored.
Required: No.
- Authentication Endpoint URL
-
The URL to the social provider’s endpoint handling authentication as described in section 3.1 of The OAuth 2.0 Authorization Framework. For example,
https://accounts.google.com/oauth2/v2/auth.Required: Yes.
- Access Token Endpoint URL
-
The URL to the endpoint handling access tokens as described in section 3.2 of The OAuth 2.0 Authorization Framework specification. For example,
https://www.googleapis.com/oauth2/v4/token.Required: Yes.
- User Profile Service URL
-
The user profile URL that returns profile information. For example,
https://www.googleapis.com/oauth2/v3/userinfo.This URL should return JSON objects in its response.
Required: No.
- Token Introspection Endpoint URL
-
The URL to the endpoint handling access token validation, as described in the OAuth 2.0 Token Introspection specification. For example,
https://oauth2.googleapis.com/tokeninfo.Required: No.
- Redirect URL
-
The URL the identity provider will redirect the user to after authenticating, as described in Section 3.1.2 of The OAuth 2.0 Authorization Framework specification.
This URL is usually a page or path in AM; for example,
https://am.example.com:8443/am?_realm=alpha, The URL is also registered in the IDP’s service.If you’re using an app built with the Ping SDKs for Android or iOS, you can also use a custom URI scheme as the redirect; for example,
com.example.sdkapp:redirect_uri_pathorfrauth://com.forgerock.ios.sdkapp.When using the
FORM_POSTResponse Mode, you must specify theform_postendpoint in the redirection URL. Refer to Response Mode for more information.Required: Yes.
- Redirect after form post URL
-
The URL of a custom login page or application. AM will send processed form post data related to social login authentication to that URL as the value of the
form_post_entryquery parameter.To continue the authentication journey, the custom login page is responsible for making a call to the AM
/json/authenticateendpoint with the authentication ID (authID) and the processed form data (form_post_entry).Configure this property when the following is true:
-
The
FORM_POSTResponse Mode is configured. -
Your users log in to AM using custom login pages, such as apps using the Ping SDKs, instead of the AM UI.
Required: No.
-
- Scope Delimiter
-
The delimiter used to separate scope values. For example, a blank space (), or a comma character (,).
Most providers use a blank space.
Required: Yes.
- OAuth Scopes
-
The list of scopes to request from the provider.
The scopes that the provider returns depends on the permissions that the resource owner, such as the end user, grants to the client application.
For example, Google exposes its supported scopes in their OAuth 2.0 Scopes for Google APIs documentation.
Required: Yes.
- Client Authentication Method
-
Specifies how the client should authenticate to the provider. Possible values are:
CLIENT_SECRET_POST-
The client sends the client ID and the secret in the
client_IDand theclient_secretparameters in the body of the request. CLIENT_SECRET_BASIC-
The client sends the client ID and the secret in a basic authorization header with the base64-encoded value of client-id:client-secret.
PRIVATE_KEY_JWT-
The client sends its credentials to the provider in a signed JWT as specified in the JSON Web Token (JWT) Profile for OAuth 2.0 Client Authentication and Authorization Grants.
ENCRYPTED_PRIVATE_KEY_JWT-
The client sends its credentials to the provider in a signed, then encrypted JWT as specified in the JSON Web Token (JWT) Profile for OAuth 2.0 Client Authentication and Authorization Grants.
TLS_CLIENT_AUTH-
The client presents a X.509 certificate that uses public key infrastructure (PKI), as specified in the OAuth 2.0 Mutual TLS (mTLS) Client Authentication and Certificate Bound Access Tokens.
SELF_SIGNED_TLS_CLIENT_AUTH-
The client presents a X.509 self-signed certificate, as specified in the OAuth 2.0 Mutual TLS (mTLS) Client Authentication and Certificate Bound Access Tokens.
Some authentication methods require additional configuration:
How do I configure JWT authentication with signed JWTs?
-
Obtain a list of supported signing algorithms from the provider’s
.well-knownendpoint, and decide which one you will use. -
In the JWT Signing Algorithm field, enter the signing algorithm that AM will use to sign the JWT. For example,
RSA256.This field may already be configured if the client is sending request objects.
-
Create a signing secret, and map it to the
am.services.oauth2.oidc.rp.jwt.authenticity.signingsecret label in an AM secret store.The secret label may already have secrets mapped to it if the client is sending signed request objects to the provider, or if another client in the realm is already using it.
For more information, refer to Secret stores, and /oauth2/connect/rp/jwk_uri.
-
Provide a JWK with the public key to the identity provider. Refer to their documentation for more information.
For example, you could copy the contents of the public JWK in a field in the provider’s service configuration, or you could configure the realm’s
/oauth2/connect/rp/jwk_uriendpoint, which exposes the client’s public keys.Configure the realm’s
/oauth2/connect/rp/jwk_uriendpoint in the provider, which exposes the client’s public keys. Refer to the provider’s documentation for more information. -
Change the value in the Private Key JWT Expiration Time (seconds) field, if needed. It has a sensible value preconfigured, but you may need to tune it for your provider.
How do I configure JWT authentication with signed and encrypted JWTs?
-
Follow the steps in How do I configure JWT authentication with signed JWTs? to configure AM to sign authentication JWTs.
Now you are ready to configure AM to encrypted authentication JWTs.
-
Obtain a list of supported encryption algorithms and methods from the provider’s
.well-knownendpoint, and decide which one you will use. -
In the JWT Encryption Algorithm field, select the encryption algorithm.
If the required encryption algorithm does not appear in the drop-down, check the reference entry for the JWT Encryption Algorithm field for information on how to add it.
This field may already be configured if the client is encrypting request objects.
-
In the JWT Encryption Method field, select the encryption method.
This field may already be configured if the client is encrypting request objects.
-
In the JWKS URI Endpoint field, configure the URI containing the provider’s public JWK set.
Obtain the URI from the provider’s
.well-knownendpoint, or their documentation.AM will use the JWK URI to fetch the provider’s public encryption key.
-
Perform one of the following steps depending on the encryption method you configured:
-
If you chose Direct AES Encryption method, select
NONEin the JWT Signing Algorithm field. Signing is redundant with this encryption method. -
If you chose an encryption method different from the Direct AES Encryption method, configure signing. For more information, refer to How do I configure JWT authentication with signed JWTs?.
-
How do I configure mTLS authentication with PKI?
-
Obtain a certificate for AM to use as a client. This certificate must be signed by a certificate authority (CA).
You can use the same certificate for different social identity provider client configurations, and you can only have one mTLS certificate by realm (either PKI-related, or self-signed).
-
Make the certificate available to AM by configuring it in a secret store. Map its alias to the
am.services.oauth2.mtls.client.authenticationsecret label.For example, you can create a
PKCS12keystore secret store.For more information, refer to Secret stores.
Even though the identity provider should trust the CA certificate automatically, the client certificate will appear in the /oauth2/connect/rp/jwk_uri endpoint.
How do I configure mTLS authentication with self-signed certificates?
-
Obtain a self-signed certificate that AM will use as a client.
You can use the same certificate for different social identity provider client configurations, and you can only have one mTLS certificate by realm (either PKI-related, or self-signed).
-
Make the certificate available to AM by configuring it in a secret store. Map its alias to the
am.services.oauth2.mtls.client.authenticationsecret label.For example, you can create a
PKCS12keystore secret store.For more information, refer to Secret stores.
To trust the self-signed certificate, the social identity provider must be able to access its public key and certificate. Social identity providers may have different ways of accessing public keys; for example, you may be able to configure the public JWK directly in the provider, or you may be able to provide AM’s /oauth2/connect/rp/jwk_uri endpoint, which exposes it.
Refer to your social identity provider documentation for more information.
Required: Yes.
- PKCE Method
-
The PKCE transformation method AM uses when making requests to the provider’s authorization endpoint, as specified in Section 4.2 of the Proof Key for Code Exchange by OAuth Public Clients specification.
Select
NONEto disable PKCE transformations.Required: No.
- Request Parameter JWT Option
-
(OIDC providers only) Specifies whether AM should provide a request object JWT to the provider. Possible values are:
NONE-
AM does not send a request object to the provider.
REFERENCE-
The request object JWT is stored in AM’s CTS token store, and AM exposes a unique identifier for it using the
oauth2/request_uriendpoint for the realm. The URL to the endpoint and the JWT’s unique identifier are passed to the provider in therequest_uriparameter of the request.Ensure that the provider can reach the endpoint.
An example of the URL is
https://platform.example.com:8443/am/realms/root/realms/myRealm/oauth2/request_uri/requestobjectIDWhen integrating with itsme, ensure that the base URL of AM contains the
443port. For example,https://platform.example.com:443/am.To do this, configure the reverse proxy or load balancer to expose the port, or the Base URL Source Service:
-
In the AM admin UI, go to Realms > Realm Name > Services.
-
Add a Base URL Source service if one is not already configured, or select it to change its properties:
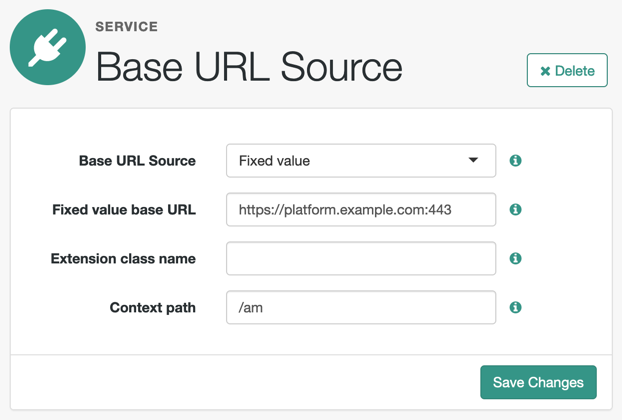
-
VALUE-
AM appends the JWT as the value of the
requestparameter of the request.How do I configure the client to send signed request objects?
-
In the Request Parameter JWT Option field, select either
VALUEorREFERENCE.Refer to your identity provider’s documentation for more information.
-
Obtain a list of supported signing algorithms from the provider’s
.well-knownendpoint, and decide which one you will use. -
In the JWT Signing Algorithm field, select the signing algorithm that AM will use to sign the request object. For example,
RS256.This field may already be configured if the client is using JWT client authentication.
-
Create a signing secret that uses the algorithm you selected previously, and map it to the`am.services.oauth2.oidc.rp.jwt.authenticity.signing` secret label in an AM secret store.
The secret label may already have secrets mapped to it if the client is using JWT client authentication, or if another client in the realm is already using it.
For more information, refer to Secret stores, and /oauth2/connect/rp/jwk_uri.
-
Provide a JWK with the public key to the identity provider. Refer to their documentation for more information.
For example, you could copy the contents of the public JWK in a field in the provider’s service configuration, or you could configure the realm’s
/oauth2/connect/rp/jwk_uriendpoint, which exposes the client’s public keys.Configure the realm’s
/oauth2/connect/rp/jwk_uriendpoint in the provider, which exposes the client’s public keys. Refer to the provider’s documentation for more information.
How do I configure the client to send signed and encrypted request objects?
-
Follow the steps in How do I configure the client to send signed request objects? to configure AM to send signed request objects.
Now you are ready to configure AM to send encrypted request objects.
-
Enable Encrypt Request Parameter JWT.
-
Obtain a list of supported encryption algorithms and methods from the provider’s
.well-knownendpoint, and decide which one you will use. -
In the JWT Encryption Algorithm field, select the encryption algorithm.
If the required encryption algorithm does not appear in the drop-down, check the reference entry for the JWT Encryption Algorithm field for information on how to add it.
This field may already be configured if the client is encrypting authentication JWTs.
-
In the JWT Encryption Method field, select the encryption method.
This field may already be configured if the client is encrypting authentication JWTs.
-
In the JWKS URI Endpoint field, configure the URI containing the provider’s public JWK set.
Obtain the URI from the provider’s
.well-knownendpoint.AM will use the JWK URI to fetch the provider’s public encryption key.
-
Perform one of the following steps depending on the encryption method you configured:
-
If you chose Direct AES Encryption method, select
NONEin the JWT Signing Algorithm field. Signing is redundant with this encryption method. -
If you chose an encryption method different from the Direct AES Encryption method, configure signing. For more information, refer to How do I configure the client to send signed request objects?.
-
-
- Encrypt Request Parameter JWT
-
Specifies whether the request parameter must be encrypted when Request Parameter JWT Option is set to
REFERENCEorVALUE. - ACR Values
-
(OIDC providers only) A space-separated list of the client’s
acrvalues in order of preference.Required: No.
- Well Known Endpoint
-
(OIDC providers only) The URL for retrieving information about the provider, such as endpoints and public keys. For example,
https://accounts.google.com/.well-known/openid-configuration.If you don’t specify a value, AM uses the Client Secret to verify signatures.
Leave this field empty for the LINE (Browser)configuration.Required: No.
- Request Object Audience
-
(OIDC providers only) The intended audience (
aud) of the request object when the Request Parameter JWT Option field is set toVALUEorREFERENCE.When not configured, the value of the Issuer field will be used as the audience of the request object.
- OP Encrypts ID Tokens
-
(OIDC providers only) Specifies whether the provider encrypts ID Tokens.
How do I configure the AM to receive encrypted tokens?
-
Obtain a list of supported ID token encryption algorithms from the provider’s
.well-knownendpoint, and decide which one the client will use. -
Create a suitable secret for the algorithm that you chose and map it to the
am.services.oauth2.oidc.rp.idtoken.encryptionsecret label in a secret store.The secret label may have existing secrets mapped if another client in the realm is using it.
For more information, refer to Secret stores and /oauth2/connect/rp/jwk_uri.
-
Provide a JWK with the public key to the identity provider. Refer to their documentation for more information.
For example, you could copy the contents of the public JWK in a field in the provider’s service configuration, or you could configure the realm’s
/oauth2/connect/rp/jwk_uriendpoint, which exposes the client’s public keys.Configure the realm’s
/oauth2/connect/rp/jwk_uriendpoint in the provider, which exposes the client’s public keys. Refer to the provider’s documentation for more information.
Required: No.
-
- Issuer
-
(OIDC providers only) The issuer of ID Tokens.
Either specify a regular expression or a string value that must exactly match the value returned in the ID token, depending on the configuration of the Issuer comparison check setting.
Obtain the
issuervalue from the provider’s.well-knownendpoint.Required: Yes.
- Enable Native Nonce
-
(OIDC providers only) When enabled, the provider native SDK must include a
nonceclaim in the ID token. The value of the claim must be the value of thenonceclaim sent in the Authentication Request.Required: No.
- User Info Response Format
-
(OIDC providers only) The format in which the provider’s
userinfoendpoint returns data.Some of the options require additional configuration:
How do I configure the client to receive signed userinfo JWTs?
-
In the JWKS URI Endpoint field, configure the URL containing the provider’s public JWK set. Obtain it from the provider’s
.well-knownendpoint, or their documentation.AM will use this URL to fetch the provider’s public signing key.
How do I configure the client to receive signed, then encrypted userinfo JWTs?
-
Follow the steps in How do I configure the client to receive signed userinfo JWTs? to configure AM to receive signed JWTs.
Now you are ready to configure AM to receive encrypted JWTs.
-
Obtain a list of supported ID token encryption algorithms from the provider’s
.well-knownendpoint, and decide which one the client will use. -
Create a suitable secret for the algorithm that you chose and map it to the
am.services.oauth2.oidc.rp.idtoken.encryptionsecret label in an AM secret store.The secret label may have existing secrets mapped if another client in the realm is using it, or if the provider encrypts ID tokens.
For more information, refer to Secret stores and /oauth2/connect/rp/jwk_uri.
-
Provide a JWK with the public key to the identity provider. Refer to the identity provider’s documentation for more information.
For example, you could copy the contents of the public JWK in a field in the provider’s service configuration, or you could configure the realm’s
/oauth2/connect/rp/jwk_uriendpoint, which exposes the client’s public keys.Configure the realm’s
/oauth2/connect/rp/jwk_uriendpoint in the provider, which exposes the client’s public keys. Refer to the provider’s documentation for more information.
Possible values are:
JSON-
The provider’s
userinfoendpoint returns a JSON object. SIGNED_JWT-
The provider’s
userinfoendpoint returns a signed JWT. SIGNED_THEN_ENCRYPTED_JWT-
The provider’s
userinfoendpoint returns a signed, then encrypted JWT.
-
- JWKS URI Endpoint
-
The URI that contains the public keys of the identity provider. AM will use these keys to verify signatures, or to encrypt objects.
Configure this field when:
-
Client Authentication Method is set to
ENCRYPTED_PRIVATE_KEY_JWT. -
Encrypt Request Parameter JWT is enabled.
-
User Info Response Format is set to
SIGNED_JWTorSIGNED_THEN_ENCRYPTED_JWT.
Required: No.
-
- Claims
-
Any claims on the request object, in JSON format. These claims must conform to the claims request parameter, as defined in the OpenID Connect specification.
- JWT Signing Algorithm
-
The signing algorithm supported by the provider that AM use to sign the following:
-
Client authentication JWTs when Client Authentication Method is set to
PRIVATE_KEY_JWT. -
(OIDC providers only) Request JWTs when Request Parameter JWT Option is set to
VALUEorREFERENCE.
Obtain a list of the supported algorithms from the provider’s
.well-knownendpoint. SelectNONEif the client will encrypt the JWT with the Direct AES Encryption method, because the signature will be redundant.
Required: No. -
- JWT Encryption Algorithm
-
The encryption algorithm supported by the provider that AM should use to encrypt client authentication JWTs when Client Authentication Method is set to
PRIVATE_KEY_JWT, and (OIDC providers only) request JWTs when Request Parameter JWT Option is set toVALUEorREFERENCE.If set to
NONE, AM will not encrypt the JWTs. Obtain a list of the supported algorithms from the provider’s.well-knownendpoint. Configure the algorithms exposed in this field using the AM advanced server property, openam.private.key.jwt.encryption.algorithm.whitelist.How do I configure advanced server properties?
-
To configure advanced server properties for all instances in the AM environment, go to Configure > Server Defaults > Advanced in the AM admin UI.
-
To configure advanced server properties for a specific instance, go to Deployment > Servers > Server Name > Advanced.
If the property you want to add or edit is already configured, click on the pencil () button to edit it. When you are finished, click on the tick () button.
Save your changes.
Required: No.
-
- JWT Encryption Method
-
The encryption algorithm supported by the provider that AM should use to encrypt the following:
-
Client authentication JWTs when Client Authentication Method is set to
PRIVATE_KEY_JWT. -
(OIDC providers only) Request JWTs when Request Parameter JWT Option is set to
VALUEorREFERENCE.
Use in conjunction with
JWT Encryption Algorithm. Obtain a list of the supported methods from the provider’s.well-knownendpoint.Required: No.
-
- Private Key JWT Expiration Time (seconds)
-
The amount of time, in seconds, that AM will cache the client authentication JWT before creating a new one.
Caching the JWT avoids creating a new one for every client authentication. However, it may also become invalid if the provider changes it configuration.
Required: No.
- Response Mode
-
(OIDC providers only) Specify the way the provider will return ID tokens to AM. Possible values are:
-
DEFAULT. The provider returns the ID token as query parameters, as explained in the OpenID Connect Core 1.0 incorporating errata set 1 specification.Most preconfigured providers use the
DEFAULTresponse mode. -
FORM_POST. The provider returns the ID token by submitting an HTML form using the HTTP POST method, as explained in the OAuth 2.0 Form Post Response Mode specification.When using this response mode, add the
/oauth2/client/form_post/ClientConfigNameURI to the Redirect URL, where ClientConfigName is the name of the social identity provider client that you are configuring. For example,https://platform.example.com:8443/am/oauth2/client/form_post/myAppleClient.By default, the
form_postendpoint processes the post data, encrypts it, and redirects with it back to the authentication tree to resume authentication.However, environments using custom login pages need to configure the Redirect after form post URL property to redirect back to the custom login pages.
The
/oauth2/client/form_postdoes not require authentication. Protect it from denial of service (DoS) attacks by limiting the rate at which it can take connections in your load balancer or proxy.If you configured AM with AES Key Wrap encryption, you must configure the
org.forgerock.openam.encryption.useextractandexpandproperty.For more information, refer to Use stronger encryption algorithms.
Required: Yes.
-
- Certificate Revocation Checking Options
-
Specify one or more options to be used by the TLS certificate revocation checking mechanism.
The possible values are:
-
ONLY_END_ENTITY: Only check the revocation status of end-entity certificates. -
PREFER_CRLS: Prefer certificate revocation lists (CRLs) to Online Certificate Status Protocol (OCSP). -
NO_FALLBACK: Disable the fallback mechanism. -
SOFT_FAIL: Allow revocation check to succeed if the revocation status cannot be determined due to a network error. -
DISABLE_REVOCATION_CHECKING: Disable all revocation checking.
Including
DISABLE_REVOCATION_CHECKINGas one of the options will prevent any revocation checking. Find other options in PKIXRevocationChecker.Option.If no options are selected, the default behavior is to enable revocation checking with
SOFT_FAIL.If the certificate does not specify any OCSP or CRL endpoints, the revocation checking will hard fail even if the
SOFT_FAILoption is enabled. In this case, an administrator could disable revocation checking. -
- Use custom trust store
-
Specifies whether a custom truststore is used to verify the server certificate of the
.well-knownendpoint or JWKs URI of an OpenID provider (OP) in a TLS handshake.If enabled, a secret label is dynamically generated using the alphanumeric characters of the client configuration name. For example, a client configuration named
sampleOidcConfigresults in a secret label ofam.services.oidc.reliant.party.sampleOidcConfig.truststore.Note that the generated secret label must then be mapped to an alias that exists in the realm secret store.
If this setting isn’t enabled, AM uses the default truststore to verify the server certificate.
- Request Native App for UserInfo
-
(Apple SSO) When enabled, this flag indicates that the native app can send the user’s
userinfoin JSON format.Apple returns the
userinfoonly once, when the user first consents to send their details, and not on subsequent authentication attempts. In addition, the user has the option not to consent to Apple sending theiruserinfo.If you are progressively profiling the
userinfowith data from other social providers—usually, using a Patch Object node--there is a risk of overwriting the user’s details with blank values when the user authenticates through Apple SSO.To mitigate this risk, you can add a Scripted Decision node to your authentication journey to assess whether
userinfois provided.How do I use a Scripted Decision node to check
userinfo?The normalized-profile-to-managed-user.js and normalized-profile-to-managed-user.groovy scripts set a boolean flag (
nameEmptyOrNull) that indicates whether Apple returned the user’sfirstNameandlastName.Add a Scripted Decision node to your journey that evaluates the flag and sets the outcome accordingly; for example:
-
Next-generation
-
Legacy
if (nodeState.get('nameEmptyOrNull')) { action.goTo("true"); } else { action.goTo("false"); }javascriptvar fr = JavaImporter(org.forgerock.openam.auth.node.api.Action); if (nodeState.get('nameEmptyOrNull')) { action = fr.Action.goTo("true").build(); } else { action = fr.Action.goTo("false").build(); }javascriptYou can now configure your journey to patch the
userinfoobject based on the outcome of the Scripted Decision node.If you need to progressively profile the user information on every authentication, regardless of whether the user’s first name and last name are returned by the OIDC provider, you can use another Scripted Decision node that does the following:
-
If the user details aren’t present, route the
userinfopatch through a Patch Object node configured to ignore thefirstNameandlastName. (In the Ignored Fields list, addgivenNameto ignore thefirstNameandsnto ignore thelastName.) -
If the user details are present, route the
userinfopatch through a Patch Object node that patches the full object.
Learn more in First name and last name get blanked out when signing in to Advanced Identity Cloud or PingAM using Apple social sign-on in the Knowledge Base.
Required: No.
-
- UI Config Properties
-
Specifies a map of properties defined and consumed in the UI. The map affects how the identity provider’s logo will show on the login page.
AM common end user UI properties
-
buttonImage: A relative path to an image in the End User UI. -
buttonCustomStyle: Any custom CSS you wish to apply to the button outside of normal End User UI styling. -
buttonClass: Adds the specified class to the identity provider button, for any additional styling you want to apply. -
buttonCustomStyleHover: Adds custom styling when the cursor is hovering over the button. -
buttonDisplayName: The name of the identity provider, which will be included either on the button or in the button’saltattribute, depending on styling.
Required: Yes.
-
- Transform Script
-
A script to convert the provider’s raw profile object into a normalized object.
Each social identity provider returns different user profile information using their own attribute names.
For example, Google’s OIDC
/userinfoendpoint returns claims, which AM stores in arawProfileobject. The followinggoogle-profile-normalization.groovyscript maps the attributes of this object to AM profile attributes:import static org.forgerock.json.JsonValue.field import static org.forgerock.json.JsonValue.json import static org.forgerock.json.JsonValue.object return json(object( field("id", rawProfile.sub), field("displayName", rawProfile.name), field("givenName", rawProfile.given_name), field("familyName", rawProfile.family_name), field("photoUrl", rawProfile.picture), field("email", rawProfile.email), field("username", rawProfile.email), field("locale", rawProfile.locale)))groovyThe script returns a JSON object containing normalized attributes in the following format:
("<platformAttributeName>", rawProfile.<providerAttributeName>)For example,
idis the platform attribute name, whilerawProfile.subis the field received from the provider.Even if field names are the same, such as
emailandrawProfile.email, they still need to be mapped for them to be included in the returned JSON object.AM provides default scripts for other preconfigured identity providers. To view the bindings and expected return values, find the
<identity provider>-profile-normalization.*scripts in Sample scripts.To write your own script in Groovy or Javascript for an identity provider, go to Realms > Realm Name > Scripts, and use the provided scripts as a reference.
When a user authenticates, the social authentication journey calls another transformation script set in the Social Provider Handler node to convert the attributes again; this time into an identity object that AM can process.
Social authentication nodes expect every attribute to have a value. In other words, the attributes returned by the identity provider cannot be empty or
null, or the journey will end with an error.For example, if a user tries to log in using Google as the identity provider, but they did not configure a surname in their account, Google returns
nullas the value of thefamilyNamefor the identity, and social authentication fails.Ensure all users have their social profiles configured correctly, or modify the transformation scripts so that they don’t collect null or empty attributes.
Required: Yes
- Issuer comparison check
-
(OIDC providers only) Determines how the expected issuer value should match the actual value of the
issclaim:-
EXACT: AM performs a string comparison between the expected and actual issuer values, which must result in an exact match. -
REGEX: AM evaluates the expected issuer value as a regular expression, against which the actual value must match.This lets social identity providers use a common issuer value for multiple tenants, which is replaced with a unique value during the OIDC authentication flow. For example,
^https://login.microsoftonline.com/(.*)/v2.0$is successfully matched againsthttps://login.microsoftonline.com/tenant-d5c6a592-eec6-47f0/v2.0.Consider the performance impact when constructing regular expressions as the comparison is performed for each social identity provider interaction.
Also, ensure the regular expression is as specific as possible to avoid matching against incorrect issuer values.
-
Suspend journey progress
Suspending journeys lets you save a user’s progress through an authentication tree, and later resume from the same point.
Any input provided during the journey is saved when the authentication tree is suspended, and restored when the authentication tree is resumed. This lets the authentication tree continue after closing the browser, using a different browser, or even on a different device.
When suspending an authentication tree, you provide the user with a URL they must visit to resume their journey. That URL contains a unique identifier for retrieving the saved progress, and can only be used once. These URLs are sometimes referred to as magic links.
The Email Suspend node supports suspended journeys.
Typical use cases include passwordless authentication, and email verification during progressive profile completion.
The following example lets a user authenticate if they have forgotten their username:
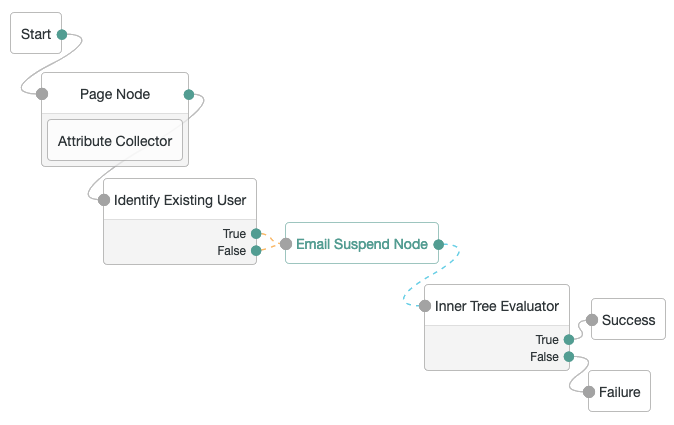
After obtaining the user’s email address in the Attribute Collector node, the example tree attempts to identify the user. Then, the tree attempts to email the user, and suspends itself.
Note that both the True and False outcomes are mapped into the Email Suspend node to reduce potential data leakage. If the username is found, it is included in the email sent to the user, along with the link to use to resume the authentication tree.
When the user follows the link, the authentication tree resumes at the Inner Tree Evaluator node, which lets the user authenticate with their recovered username and credentials.
Configure suspended journeys
You can configure the maximum duration of a journey session so that resources can be freed up if the journey is not completed. You can also configure how long a journey session can be suspended.
You should set the maximum duration to the maximum time required to complete the journey. For example, if you’re sending an email, 10 minutes might be reasonable. The time allowed for suspending a journey must be the same as or less than the maximum duration of the journey session.
Maximum duration
The maximum duration can be set in different locations to provide greater control over the length of journey sessions.
AM determines which setting to apply to the journey session in the following order of precedence:
-
The timeout settings in the Update Journey Timeout node.
-
The maximum duration set for an authentication tree.
Set the
treeTimeoutproperty in the tree configuration.Duration values set on inner trees are ignored.
Learn more in Configure journey session duration in a tree.
-
The maximum duration set in the realm.
Go to Realms > Realm Name > Authentication > Settings > Trees > Max duration (minutes) to change the maximum duration.
Learn more in Core authentication attributes.
-
The maximum duration set globally for the AM site. The default is
5minutes.Go to Configure > Authentication > Core Attributes > Trees > Max duration (minutes) to change the maximum duration.
Learn more in Core authentication attributes.
Suspend duration
The suspend duration can be set in different locations to provide greater control over how long a journey session can be suspended.
AM determines which setting to apply to the journey session in the following order of precedence:
-
The suspend duration set in a node:
-
Configure the suspend duration in the Email Suspend node.
-
Configure the suspend duration in the Scripted Decision node using the
actionobject.Learn more in Suspend and resume journeys.
-
-
The suspend duration set in the realm.
Go to Realms > Realm Name > Authentication > Settings > Trees > Suspended authentication duration (minutes) to change the suspend duration.
Learn more in Core authentication attributes.
-
The suspend duration set globally for the AM site. The default is
5minutes.Go to Configure > Authentication > Core Attributes > Trees > Suspended authentication duration (minutes) to change the suspend duration.
Learn more in Core authentication attributes.
Add suspended journeys to custom nodes
You can enable suspended journeys in your custom nodes using the suspend method.
Override the length of time a journey session can be suspended in minutes using the suspendDuration method.
Learn more in the Action class.
Backchannel authentication
Backchannel authentication lets a third-party federation service initiate authentication with AM on behalf of a user. The federation service collects the user data and transmits this data directly to AM. AM redirects the user to complete the authentication process without having to re-enter the collected data. Backchannel authentication provides a seamless user experience and is more secure as users don’t have to enter credentials multiple times.
Backchannel authentication uses a transactional authorization process with requests sent to the backchannel authentication REST endpoints. Data supplied by the federation service is saved in a transaction with a specific transaction ID. When the user starts their authentication journey in AM, the transaction locates the federation-provided data and inserts it into the journey’s shared state.
The following diagram illustrates the backchannel authentication flow.

Demonstrate backchannel authentication
These steps use an OAuth 2.0 client to mimic the third-party federation service. The client initializes the backchannel authentication transaction and AM redirects the user to a simple login journey to complete authentication.
The process includes the following steps:
Create an authentication journey
This example assumes a simple journey that lets the user log in by supplying only their password. The username is provided by the third-party federation service as part of the backchannel authentication request.
The name of the journey is Login.

Configure the OAuth 2.0 provider service
-
In the AM admin UI, go to Realms > Realm Name > Services > OAuth2 Provider > Advanced.
-
In the Client Registration Scope Allowlist field, add
back_channel_authenticationand click Save. -
In the Grant Types field, add
Client Credentialsif it isn’t already there.
Find more information in Authorization server configuration.
Create an OAuth 2.0 client
The OAuth 2.0 client represents the third-party federation service.
Create a confidential client named myClient with the following configuration:
-
Client ID:
myClient -
Client secret:
my-client-secret -
Scope(s):
back_channel_authentication -
Grant Types:
Client Credentials
Find more information in Client application registration.
Configure the Base URL Source
By default, the base URL of the redirect URI is retrieved from the incoming HTTP request. For this demonstration, configure a fixed base URL with the value of your AM host.
-
In the AM admin UI, go to Realms > Realm Name > Services and click Add a Service.
-
Select
Base URL Sourceand click Create. -
In the Base URL Source list, select
Fixed value. -
Set the Fixed value base URL to your AM host, for example,
https://am.example.com:8443/am. -
Click Save Changes.
Allowlist session properties (optional)
When you query the state of a successful backchannel authentication, you might want to obtain certain session details. To do this, configure the Session Property Whitelist Service and specify any properties to be included in a query response.
-
Go to Realms > Realm Name > Services, and click Add a Service.
-
Select
Session Property Whitelist Serviceand click Create. -
In the Allowlisted Session Property Names, enter the session properties you want to obtain.
-
Click Save Changes.
Get an access token
Get an access token with a scope of back_channel_authentication using the client credentials grant. For example:
$ curl \
--request POST \
--data "grant_type=client_credentials" \
--data "client_id=myClient" \
--data "client_secret=my-client-secret" \
--data "scope=back_channel_authentication" \
"https://am.example.com:8443/am/oauth2/realms/root/realms/alpha/access_token"
{
  "access_token": "FnpG1lU0fUooJFY-82sq3UiAnGA",
  "scope": "back_channel_authentication",
  "token_type": "Bearer",
  "expires_in": 3599
}Find more information in OAuth 2.0 client authentication.
Initialize the backchannel authentication transaction
This section assumes that a user has already signed on to the third-party federation service and that the service has their username.
As the OAuth 2.0 client, send an HTTP POST request to the /authenticate/backchannel/initialize endpoint.
Specify the authentication journey to which the user should be redirected and the username in the JSON payload.
Optionally, specify a custom tracking ID that lets the federation service track the request through AM.
If provided, AM logs this ID and its own audit tracking ID. The custom tracking ID must be a string of
36 characters or less and can include only the characters A-Z a-z 0-9 - and _.
For example:
$ curl \
--request POST \
--header "Content-Type: application/json" \
--header "Accept-API-Version: resource=1, protocol=2.0" \
--header "Authorization: Bearer FnpG1lU0fUooJFY-82sq3UiAnGA" \
--data '{
  "type": "Service",
  "value": "Login",
  "subject": {
    "type": "user",
    "name": "bjensen"
  },
  "trackingId": "Y5tyzQi9cGVJjy2L"
}',
"https://am.example.com:8443/am/json/realms/root/realms/alpha/authenticate/backchannel/initialize"
{
  "transaction": "b3070138-cd73-4ef2-bd58-812602d7b757",
  "redirectUri": "https://am.example.com:8443/am/XUI/Login?realm=/alpha&authIndexType=transaction&authIndexValue=b3070138-cd73-4ef2-bd58-812602d7b757"
}AM returns a transaction ID and the complete redirect URI, including the transaction ID.
Complete the backchannel authentication
In a real-world scenario, the user follows the redirectUri provided in the response and completes the authentication.
As user bjensen, open the provided redirect URI in a browser window:
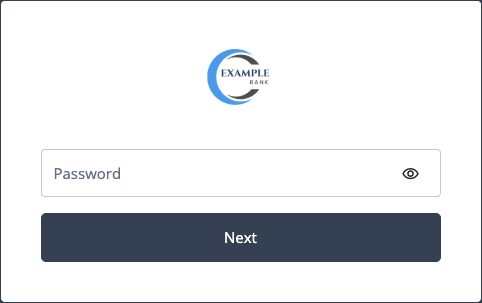
Enter bjensen’s password. Her username was provided in the backchannel initiation request.
Click Next and observe that bjensen is authenticated.
Check the status of the backchannel authentication request
Using the same access token, send an HTTP POST request to the /authenticate/backchannel/info endpoint, specifying the
transaction ID in the JSON payload. For example:
$ curl \
--request POST \
--header "Content-Type: application/json" \
--header "Accept-API-Version: resource=1, protocol=2.0" \
--header "Authorization: Bearer Nc_SMVZ85VTJ_CDpaqO5JkMBOAs" \
--data '{
    "transaction": "b3070138-cd73-4ef2-bd58-812602d7b757"
}' \
"https://am.example.com:8443/am/json/realms/root/realms/alpha/authenticate/backchannel/info"
{
  "state": "COMPLETED",
  "result": "APPROVED",
  "auditTrackingIds": [
    "82d76902-7d18-41ea-9ae6-05643b05d018-1029776",
    "trackingId": "Y5tyzQi9cGVJjy2L"
  ],
  "type": "service",
  "value": "Login",
  "subject": {
    "type": "user",
    "name": "bjensen"
  },
  "sessionProperties": {
    "authInstant": "2024-12-03T14:04:31Z"
    "AMCtxId": "1289ff8c-c712-9215-b282-bad671f56vy2-847363"
    "Service": "Login"
  }
}The response includes the following:
-
The
stateof the transaction (CREATED,IN_PROGRESS, orCOMPLETED) -
The
resultof the backchannel authentication (UNKNOWN,APPROVED, orDENIED) -
An array of
auditTrackingIds, including the standard audit ID AM generates and any custom tracking IDs supplied in the initial request. -
Any allowlisted
sessionProperties.
Backchannel authentication REST endpoints
AM exposes the following REST endpoints for backchannel authentication:
| Endpoint | Description | ||
|---|---|---|---|
|
Lets a third-party federation service initiate a backchannel authentication flow. |
||
|
Lets a third-party federation service verify that a backchannel authentication process completed successfully.
|
Find reference information on these endpoints in json/authenticate/backchannel.
Multi-factor authentication (MFA)
Multi-factor authentication (MFA) is an authentication technique that requires users to provide multiple forms of identification when logging in to AM.
Multi-factor authentication provides a more secure method for users to access their accounts with the help of a device. Note that the word device is used in this section to mean a piece of equipment that can display a one-time password or that supports push notifications using protocols supported by AM multi-factor authentication. Devices are most commonly mobile phones with authenticator apps that support the OATH protocol or push notifications, but could also include other equipment.
The following is an example scenario of multi-factor authentication in AM:
-
An AM administrator configures an authentication tree to capture the user’s username and password and to create one-time passwords.
-
An end user authenticates to AM using that authentication tree.
-
AM prompts the user to enter the username and password—the first factor in multi-factor authentication.
-
If the user ID and password were correct, AM sends the user an email with a one-time password.
-
The user provides the one-time password to AM to successfully complete authentication—the second factor in multi-factor authentication.
AM supports the following multi-factor authentication protocols:
-
MFA: Open Authentication (OATH) to enable one-time password authentication.
-
MFA: Push authentication to receive push notifications in a device as part of the authentication process.
-
MFA: Web authentication (WebAuthn) to enable authentication using an authenticator device, such as a fingerprint scanner.
MFA: Web authentication (WebAuthn)
WebAuthn lets users authenticate with an authenticator device, such as the fingerprint scanner on their laptop or phone. The user’s browser communicates with the authenticator device.
AM can request the browser to activate the authenticator device with certain criteria; for example:
-
The authenticator device must be built-in, not a USB device that the user can eject
-
The device must verify the user’s identity, not just the user’s presence
To use WebAuthn with AM, users must first register their authenticators. If recovery codes are enabled, users should copy their codes on successful registration.
Registration involves the selected authenticator creating, or minting, a key pair. The public key of the pair is returned to AM and stored in the user’s profile. The private key is stored securely in the authenticator itself or in the platform that manages the authenticators. The private key does not leave the client at any time.
When authenticating with WebAuthn, the authenticator device locks data with its stored private key and sends it to AM. AM verifies the data using the public key stored in the user’s profile. If the data verification succeeds and passes any attestation checks, AM considers the authentication successful.
|
AM supports WebAuthn for the following user agents on the specified platforms:
| Browser(1) | Platform |
|---|---|
Google Chrome |
Desktop |
Android |
|
Safari |
Desktop |
iOS |
|
Microsoft Edge |
Desktop |
Mozilla Firefox |
Desktop |
(1) Latest stable versions are supported.
Create trees for WebAuthn
The example tree that follows registers the user’s device if necessary, and authenticates the user with the device. If the user has already registered their device, they only need to enter their username, and then perform the authorization gesture with their registered device to complete authentication.
If the user does not have a registered device, they must provide both their username and their password. The Data Store Decision node confirms their identity before allowing them to register their device. The user then authenticates with the new device to complete authentication.
|
The tree created here does not include user-friendly features, such as letting the user retry their password if they mistype it. |
Configure the WebAuthn Profile Encryption service
In the AM admin UI, configure the WebAuthn Profile Encryption service for the realm where you create the tree.
This service configures how AM stores registered device metadata.
-
In the AM admin UI for the realm, click Services > Add a Service.
-
Select WebAuthn Profile Encryption Service in the service type drop-down list, and create the new service configuration.
-
Accept the default configuration unless you must encrypt the device metadata in user profiles:
- Profile Storage Attribute
-
webauthnDeviceProfiles(default) - Device Profile Encryption Scheme
-
If you choose an encryption scheme, also edit the settings to access the keys.
For details, read Secrets, certificates, and keys.
Default:
No encryption of device settings.For detailed information about the available properties, refer to WebAuthn profile encryption service.
Create the WebAuthn tree
-
Configure the WebAuthn Profile Encryption service for the realm if you have not already done so.
-
In the AM admin UI, create a tree for WebAuthn under Realms > Realm Name > Authentication > Trees.
-
Add the following nodes to your tree:
-
Connect the nodes as demonstrated in the following figure:
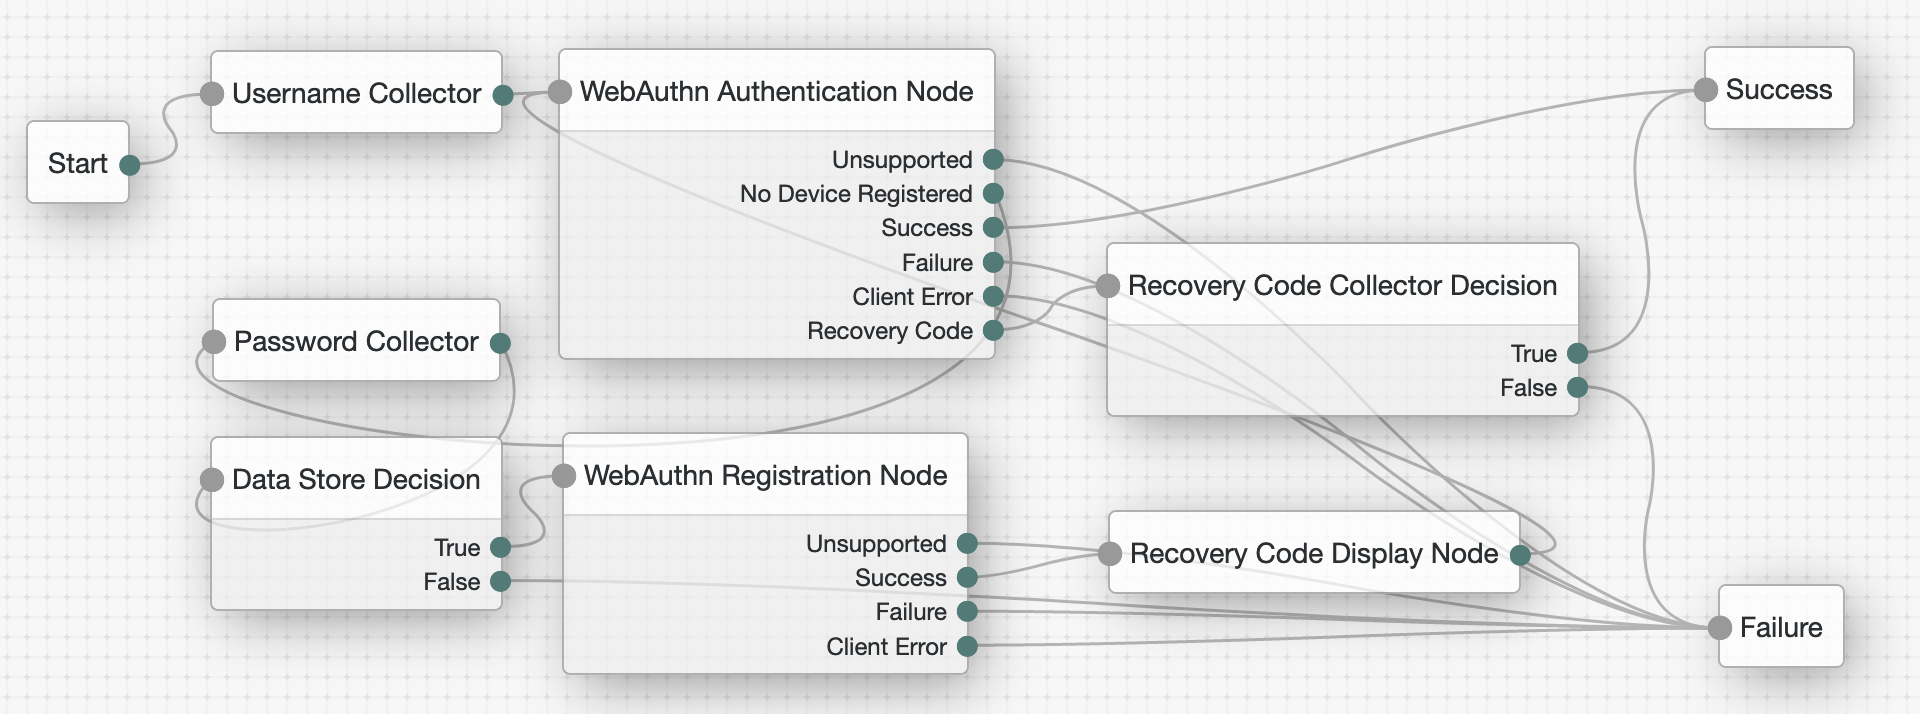
-
On the WebAuthn Authentication node, select Allow recovery codes.
-
On the WebAuthn Registration node, select Generate recovery codes.
-
Save your changes.
Test the WebAuthn tree
-
Register a test user account unless you have already done so.
-
In an incognito browser window, browse to the WebAuthn tree.
The URL looks something like:
https://am.example.com:8443/am/XUI/?realm=/alpha&service=myWebAuthnTree#loginA login screen prompts for the username.
-
Enter the username for the test user account.
-
If the user does not have a registered device:
-
Enter the test user’s password when prompted.
-
Register a WebAuthn authenticator by performing an authorization gesture.
For example, press the button on a connected YubiKey or scan your fingerprint.
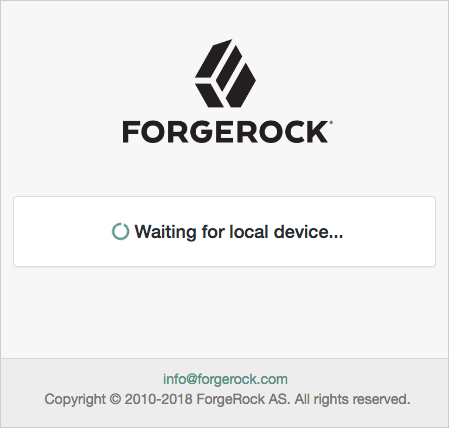
The browser may present a consent pop-up to allow access to the available authenticators.
When you grant consent, the browser activates the relevant authenticators, ready for registration.
If the device registration is successful, the tree returns to the WebAuthn Authentication node.
-
-
When prompted, authenticate by performing an authorization gesture with a registered device.
The UI displays the user profile page.
The dashboard page lists the registered devices that you can rename or delete.
The default name for a new WebAuthn device is
New Security Key.
Configure usernameless authentication with ForgeRock Go
With ForgeRock Go, you can create a secure and seamless login experience by authenticating with any credential on the user’s device that supports FIDO2 WebAuthn.
You can also extend passwordless authentication to include usernameless authentication with popular authenticators that support resident keys; for example, Windows Hello (biometric authenticators).
To use usernameless authentication, you must register an authenticator that supports resident keys to the user’s profile, and enable the option to associate a certificate on the device with the user’s username.
Once registered, that device can be used to authenticate the user without them having to provide their credentials; they need to select the appropriate entry to use from the list their device provides.
To configure usernameless authentication with ForgeRock Go, create a web authentication registration tree to associate a device that supports resident keys with a user. The registration tree is similar to that described in Create trees for WebAuthn.
Create a second tree that lets users authenticate to AM without entering their username or password, by using ForgeRock Go.
|
The trees created here do not include user-friendly features, such as allowing retries or redirecting for further help on failures. |
Create the ForgeRock Go registration tree
-
Configure the WebAuthn Profile Encryption service for the realm if you have not already done so.
-
In the AM admin UI, create a tree for ForgeRock Go registration under Realms > Realm Name > Authentication > Trees.
-
Add the following nodes to your tree:
-
(Optional) Scripted Decision node
When configured for ForgeRock Go, by default the WebAuthn Registration node stores the tree’s shared state variable
usernameon the device. During authentication, this value later identifies the user.Use a Scripted Decision node to customize the display name or string to be saved in the shared state.
Script to set the display name-
Next-generation
-
Legacy
var user = nodeState.get('username'); var identity = idRepository.getIdentity(user); var displayName = ''; var givenName = identity.getAttributeValues('givenName')[0]; var surname = identity.getAttributeValues('sn')[0]; var email = identity.getAttributeValues('mail')[0]; if (givenName) { displayName += givenName; } if (surname) { displayName += ' ' + surname; } if (email) { displayName += ' (' + email + ')'; } if (displayName) { nodeState.putShared('displayName', displayName); } else { nodeState.putShared('displayName', user); } action.goTo("true");javascriptvar fr = JavaImporter(org.forgerock.openam.auth.node.api.Action); var user = nodeState.get('username').asString(); var displayName = ''; var givenName = idRepository.getAttribute(user, 'givenName'); var surname = idRepository.getAttribute(user, 'sn'); var email = idRepository.getAttribute(user, 'mail'); if (givenName) { displayName += givenName.toArray()[0]; } if (surname) { displayName += ' ' + surname.toArray()[0]; } if (email) { displayName += ' (' + email.toArray()[0] + ')'; } if (displayName) { nodeState.putShared('displayName', displayName.toString()); } else { nodeState.putShared('displayName', user.toString()); } action = fr.Action.goTo("true").build();javascript -
-
Connect the nodes as demonstrated in the following figure:
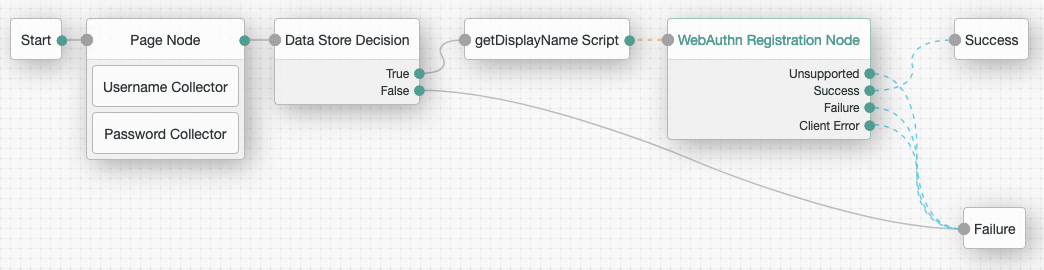
If you do not use the Scripted Decision node, connect the Data Store Decision node
Trueoutput directly to the WebAuthn Registration node. -
If you use the Scripted Decision node:
-
Select your script in the Script dropdown.
-
Add the outcome of your script,
truein this example, in the Outcomes field.
-
-
On the WebAuthn Registration node:
-
Select Username to device.
-
If you do not use the Scripted Decision node, add
userNamein the Shared state attribute for display name field. -
If you use the Scripted Decision node, add the shared state variable name, such as
displayName, in the Shared state attribute for display name field.
-
-
Save your changes.
Create the ForgeRock Go authentication tree
-
Configure the WebAuthn Profile Encryption service for the realm if you have not already done so.
-
In the AM admin UI, create a tree for ForgeRock Go authentication under Realms > Realm Name > Authentication > Trees.
-
Add a WebAuthn Authentication node to your tree.
-
Connect the nodes as demonstrated in the following figure:
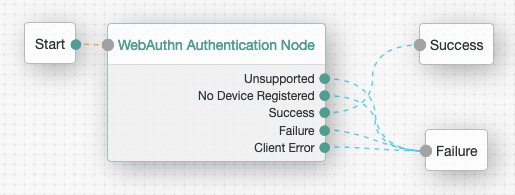
-
On the WebAuthn Authentication node, ensure Username from device is enabled.
-
Save your changes.
Register with ForgeRock Go
Follow these steps to register a device for usernameless authentication, and then authenticate with no username or password, only an authorization gesture.
-
Register a test user account unless you have already done so.
-
In an incognito browser window, browse to the ForgeRock Go registration tree.
The URL looks something like:
https://am.example.com:8443/am/XUI/?realm=/alpha&service=myForgeRockGoRegistrationTree#loginA login screen prompts for your credentials.
-
Sign in with the username and password of the test user.
-
If you are authenticating from a FIDO2-enabled device, it prompts you for the method to verify your identity.
For example, you might use a USB security key or a built-in biometric sensor.
Select the option to associate with the user.
-
Perform the authorization gesture of the chosen option when asked to do so.
For example, press the button on your USB security key or scan your fingerprint.
The UI displays the user profile page.
The dashboard page lists the registered devices that you can rename or delete.
Authenticate with ForgeRock Go
After registering, authenticate with ForgeRock Go without your username or password:
-
Sign out.
-
In the same browser window, browse to the ForgeRock Go authentication tree.
The URL looks something like:
https://am.example.com:8443/am/XUI/?realm=/alpha&service=myForgeRockGoAuthenticationTree#login -
Perform the authorization gesture of the chosen option when prompted.
A list of the accounts associated with the authentication device displays:
In this example, the user’s full name and email address appear. The Scripted Decision node gathered them during registration.
-
Select the account to sign in.
The UI displays the user profile page without you having to enter your username or password.
Configure WebAuthn trust anchors
The CA attestation type lets AM verify the authenticity of attestation data received from a device by using the relevant CA certificates.
If the trust chains defined by the CA certificates have CRL or OCSP entries, AM can also check for revocation.
To configure trust anchors in AM, obtain the CA-issued certificate chains for the devices you intend to verify, and make them available to AM in a secret store.
When the relevant certificate chains are in place,
configure the WebAuthn Registration node with the alias of the secret store,
and set Preferred mode of attestation to either DIRECT or INDIRECT.
Perform the following steps to enable trust anchors and achieve CA attestation for trusted devices:
-
Obtain the CA-issued certificate chains for the devices you want to verify.
You might need to consult the device manufacturer to obtain the certificate chains.
-
Import the certificate chains into a keystore:
$ keytool -import \ -file /Downloads/vendor-a-ca.crt \ -alias "vendor-a-devices" \ -storetype JCEKS \ -storepass changeit \ -keystore /path/to/am/security/keystores/webauthnTrustStore.jceksbashThis command imports a hypothetical trust chain from "Vendor A" into a secret store named
webauthnTrustStore.jceks, located in the default AM path for keystores,/path/to/am/security/keystores.If the keystore does not exist, the command creates it and sets the store password to
changeit; otherwise, it adds the specified certificate to the secret store. -
Repeat the previous step until the
webauthnTrustStore.jcekssecret store contains all the CA-issued certificate chains for the devices you want to verify. -
Ensure that the password to access the new
webauthnTrustStore.jcekssecret store is available to your AM instance; for example, by encrypting the password and adding the result to a new file namedwebauthnStorepass, in/path/to/am/security/secrets/encrypted.For more information, see File System Secret Volumes Secret Stores.
-
In the AM admin UI, go to the realm containing the web authentication registration tree that will attempt CA-level attestation, go to Authentication > Trees, and click your registration tree.
-
Select the WebAuthn Registration Node, and in the properties pane:
-
Set the Preferred mode of attestation property to
DIRECTorINDIRECT. -
Set the Trust Store alias property to a string that identifies the trust store, and is the suffix of the secret label used for mappings; for example,
webauthnTrustStore. -
To act upon the attestation type achieved when registering a device; for example, using a script, enable the Store data in transient state property.
When you enable this property, the WebAuthn Registration Node stores the level of attestation achieved in a variable named
webauthnAttestationType, in the tree’s transient state.Use code similar to the following JavaScript to read the value of
webauthnAttestationType:var attestationLevel = transientState.get("webauthnAttestationType");javascript -
Save your changes.
For more information on the available properties, see WebAuthn Registration node.
-
-
Navigate back to the realm page, select Secret Stores, and click Add Secret Store.
-
In Secret Store ID, enter the alias you specified in the registration node earlier; for example,
webauthnTrustStore.Select the store type, specify the path to the store, and click Create.
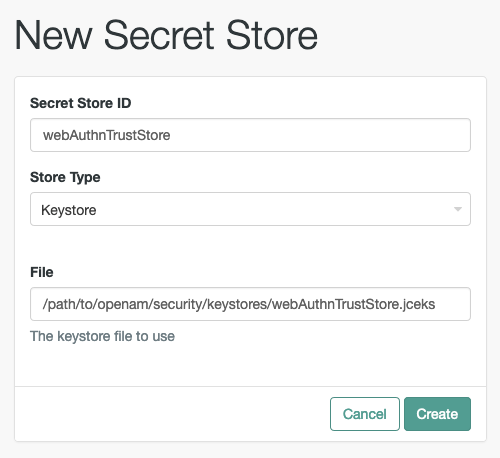
-
Set the Store password secret label to the name of the file you created earlier with the encrypted value of the store password in; for example,
webauthnStorepass.Save your changes.
-
On the Mappings tab, click Add Mapping.
-
In Secret Label, select the secret label that begins with
am.authentication.nodes.webauthn.truststore, and has the alias you specified earlier as the suffix.For example,
am.authentication.nodes.webauthn.truststore.webauthnTrustStore. -
Enter the alias of the certificate chains you want to use for verification, and click Add.
Repeat this step to add all the aliases of certificate chains you want to use for CA-level attestation:
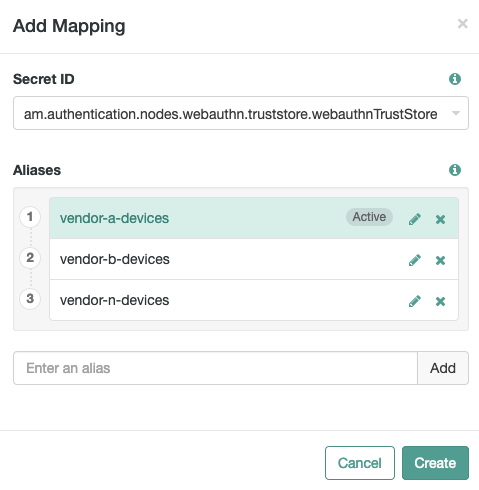
-
Save your changes.
Your registration tree is now ready to verify the attestation data against the list of configured certificate chains.
MFA: Push authentication
You can use push notifications as part of the authentication process in AM.
To receive push notifications when authenticating, end users must register an Android or iOS device with AM. The registered device can then be used as an additional factor when authenticating to AM. AM can send the device a push notification, which can be accepted by the ForgeRock Authenticator app. In the app, the user can allow or deny the request that generated the push notification and return the response to AM.
About push
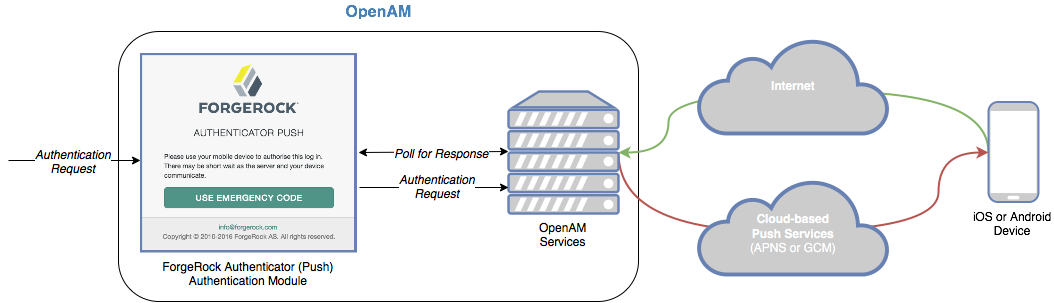
The following steps occur as a user completes a push notification journey:
-
The user provides credentials to enable AM to locate the user profile and determine if they have a registered mobile device.
-
AM prompts the user to register a mobile device if they have not done so already.
The user registers their device through the ForgeRock Authenticator application. The application supports a variety of methods to respond to push notifications from tapping a button to biometrics if the device supports them.
Registering a device stores device metadata in the user profile that is required for push notifications. AM uses the configured ForgeRock Authenticator (Push) service, which supports encrypting the metadata.
For more information, refer to Manage devices for MFA.
-
Once the user has a registered device, AM creates a push message specific to the device.
The message has a unique ID that AM stores while waiting for the response.
AM writes a pending record with the same message ID to the CTS store for redundancy should an individual server go offline during the authentication process.
-
AM sends the push message to the registered device.
AM delivers the message through the configured push notification service.
Depending on the registered device, AM uses either Apple Push Notification Services (APNS) or Google Cloud Messaging (GCM) to deliver the message.
AM begins to poll the CTS for an accepted response from the registered device.
-
The user responds to the notification through the ForgeRock Authenticator application on the device, for example, approving or rejecting the notification.
The application responds to the push notification message with the user’s choice.
-
AM verifies the message is from the correct registered device and has not been tampered with, and marks the pending record as accepted if valid.
AM detects the accepted record and redirects the user to their profile page, completing the authentication.
Implement push
The following table summarizes the tasks to perform to implement push authentication in your environment:
| Task | Resources |
|---|---|
Configure authentication If you are planning to implement passwordless push authentication, also refer to Limitations when using passwordless push authentication. |
|
Test push authentication After configuring AM, download the ForgeRock Authenticator application and test your configuration. |
Push authentication journeys
Configure authentication journeys (trees) for passwordless authentication and to receive push notifications.
When configured for passwordless authentication, the authentication flow requires the user to enter their user ID, but not their password. AM sends a push notification to their registered device to complete authentication with the ForgeRock Authenticator application.
Before implementing passwordless push authentication, consider the Limitations when using passwordless push authentication.
Configure the ForgeRock Authenticator (Push) service
In the AM admin UI, configure the ForgeRock Authenticator (Push) service for the realm where you create the tree.
This service specifies the user profile attribute that stores registered device metadata.
-
In the AM admin UI for the realm, click Services > Add a Service.
-
Select ForgeRock Authenticator (Push) Service in the service type drop-down list, and create the new service configuration.
-
Accept the default configuration unless you must encrypt the device metadata in user profiles:
- Profile Storage Attribute
-
pushDeviceProfiles(default) - Device Profile Encryption Scheme
-
If you choose an encryption scheme, also edit the settings to access the keys. For details about access to AM keys, read Secrets, certificates, and keys.
Default:
No encryption of device settings. - ForgeRock Authenticator (Push) Device Skippable Attribute Name
-
push2faEnabled(default)
For additional details, refer to the reference documentation, ForgeRock Authenticator (Push) Service.
Configure the Push Notification service
In the AM admin UI, configure the Push Notification service for the realm.
|
AM uses an external AWS service to send push notifications. Its configuration requires access keys and other metadata. As a Ping Identity customer, you have streamlined access to the required metadata. Before you start, log in to Backstage, then follow the instructions in How To Configure Service Credentials (Push Auth, Docker) in Backstage. Download the AWS credential data in JSON format and refer to that as you configure the service. |
-
In the AM admin UI for the realm, click Services > Add a Service.
-
Select Push Notification Service in the service type drop-down list.
-
Update the following fields with the data you generated on Backstage, then create the new service configuration:
- SNS Access Key ID
-
The generated Key ID; the
"accessKeyId"in the JSON - SNS Access Key Secret
-
The generated Secret; the
"accessKeySecret"in the JSON - SNS Endpoint for APNS
-
The generated APNS; the
"APNS"in the JSON - SNS Endpoint for GCM
-
The generated GCM; the
"GCM"in the JSON
You can also store the Access Key Secret in a secret store. For additional details, refer to the reference documentation, Push Notification service.
Create a push authentication journey
The procedure assumes the following:
-
Users provide user IDs and passwords as the first step of multi-factor authentication (MFA).
-
AM sends the push notification to the device as an additional factor to complete authentication.
-
You have prepared the prerequisite services, described in Configure the ForgeRock Authenticator (Push) service and Configure the Push Notification service.
-
In the AM admin UI under Realms > Realm Name > Authentication > Trees, create a tree for push notification.
-
Add the following nodes to your tree:
-
Connect the nodes as demonstrated in the following figure:
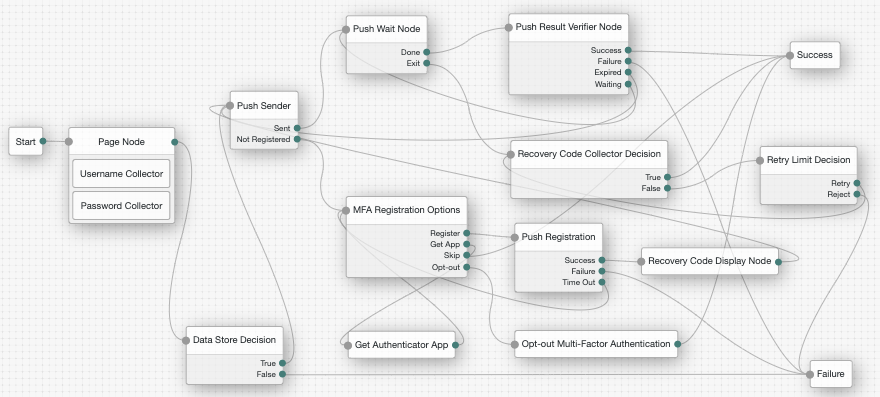 Figure 4. Example push authentication tree
Node connections
List of node connections Source node Outcome path Target node Page Node containing:
-
Username Collector / Platform Username
-
Password Collector / Platform Password
→
Data Store Decision
Data Store Decision
True
Push Sender
False
Failure
Push Sender
Sent
Push Wait
Not Registered
MFA Registration Options
Push Wait
Done
Push Result Verifier
Exit
Recovery Code Collector Decision
Push Result Verifier
Success
Success
Failure
Failure
Expired
Push Sender
Waiting
Push Wait
MFA Registration Options
Register
Push Registration
Get App
Get Authenticator App
Skip
Success
Opt-out
Opt-out Multi-Factor Authentication
Recovery Code Collector Decision
True
Success
False
Retry Limit Decision
Push Registration
Success
Recovery Code Display Node
Failure
Failure
Time Out
MFA Registration Options
Get Authenticator App
→
MFA Registration Options
Opt-out Multi-Factor Authentication
→
Success
Retry Limit Decision
Retry
Recovery Code Collector Decision
Reject
Failure
Recovery Code Display Node
→
Push Sender
-
-
Save your changes.
-
Test your authentication tree as follows:
-
Copy and paste the Preview URL into a browser in incognito mode. The URL looks something like:
https://am.example.com:8443/am/XUI/?realm=alpha&authIndexType=service&authIndexValue=myPushAuthTree.A login screen prompting you to enter your user ID and password appears.
-
Verify that you can use the ForgeRock Authenticator application to perform MFA.
If the authentication tree is correctly configured, authentication is successful and AM displays the user profile page. For details, refer to Test push authentication.
-
-
Create a passwordless authentication journey
The procedure assumes the following:
-
Users provide only their user IDs as the first step of MFA.
-
Users have pre-registered a device for push authentication.
-
AM sends the push notification to the device as an additional factor to complete authentication, without the need for the user’s password.
-
You have prepared the prerequisite services, described in Configure the ForgeRock Authenticator (Push) service and Configure the Push Notification service.
-
In the AM admin UI under Realms > Realm Name > Authentication > Trees, create a tree for passwordless authentication.
-
Add the following nodes to your tree:
-
Connect the nodes as demonstrated in the following figure:
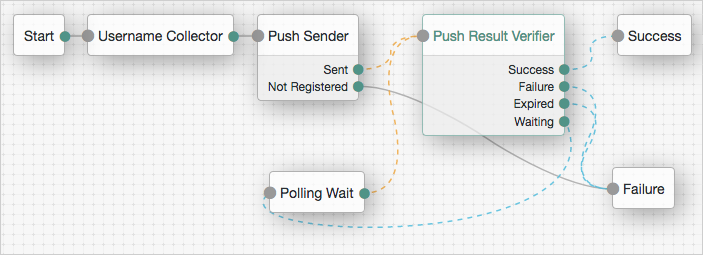 Figure 5. Passwordless push authentication
 -
Save your changes.
-
Test your authentication tree as follows:
-
Copy and paste the Preview URL into a browser in incognito mode. The URL looks something like:
https://am.example.com:8443/am/XUI/?realm=alpha&authIndexType=service&authIndexValue=myPasswordlessAuthTree.A login screen appears, prompting you to enter your user ID.
-
Verify that you can use the ForgeRock Authenticator application to perform MFA.
If the authentication tree is correctly configured, authentication is successful and AM displays the user profile page without the user entering their password.
For details, refer to Test push authentication.
-
-
Test push authentication
AM presents you with a page for entering only your user ID, or user ID and password. After you provide those credentials, AM verifies them. If your credentials are valid and the account has a device registered for push notifications, AM sends a push notification to the registered device.
If the user does not yet have a device registered for push authentication, refer to Register.
|
The device needs access to the Internet to receive push notifications, and the AM server must be able to receive responses from the device. |
Receive push notifications
On your registered device, you receive a push notification from AM. Depending on the state of the device and the ForgeRock Authenticator application, respond to the notification as follows:
-
Unlock the device, if necessary, when you receive a device notification from the application.
The ForgeRock Authenticator application opens and displays the push notification.
-
If the device is unlocked, but the ForgeRock Authenticator application is not open, select the device notification to open the application and display the push notification.
-
Open the ForgeRock Authenticator application to respond quickly to notifications.
Approve requests
How you approve requests depends on the ForgeRock Authenticator application settings, and on what the device supports.
Default settings for push notifications use a simple pop up in the application, similar to the following:
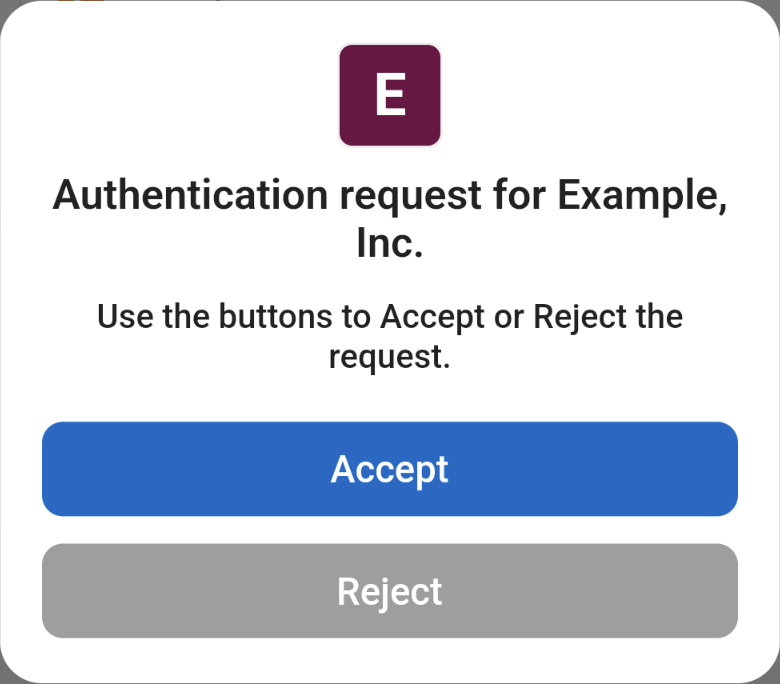
Deny requests
Deny the request by tapping the cancel icon in the top-right of the screen or, if Touch ID or face recognition are enabled, tap the Reject button.
|
If you do not approve or deny the request on the registered device, the AM Push Authentication page times out and authentication fails. You can configure this through the Message Timeout in the Push Sender node for the tree. |
Register
If your credentials are valid but your profile is missing the metadata for a registered device registered, the MFA Registration Options node of the tree governs what happens:
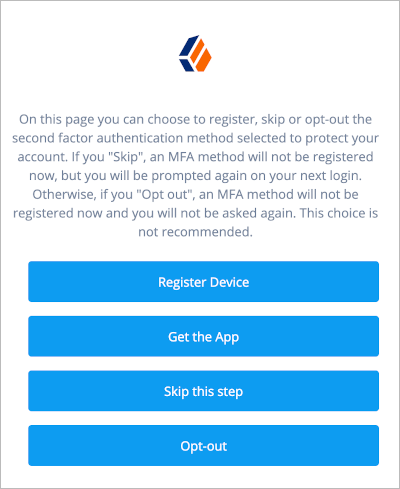
- Register Device
-
Configure the journey to continue to the Push Registration node.
When completing the journey, scan the QR code it displays with the ForgeRock Authenticator application.
For additional details, refer to Register the ForgeRock Authenticator for multi-factor authentication.
- Get the application
-
Configure the journey to continue to the Get Authenticator App node.
When completing the journey, follow the link needed to obtain the ForgeRock Authenticator application for your device.
- Skip this step
-
Displayed only if the node configuration allows the user to skip. (Optional) In the example journey, skipping is linked to the Success node.
- Opt-out
-
Configure the journey to continue to the Opt-out Multi-Factor Authentication node and let the user not use push.
In the example journey, opting out is linked to the Success node.
Configure successful registration to return to the Push Sender node, which starts the actual push notification stage of the journey, and the user can receive push notifications.
Limitations when using passwordless push authentication
When authenticating to a passwordless push authentication journey, the user enters their user ID, but not their password. AM sends a push notification to their device to complete the authentication.
Be aware of the following limitations when you implement passwordless push authentication:
-
Unsolicited push messages could be sent to a user’s registered device by anyone who knew or was able to guess their user ID.
-
If a malicious user attempted to authenticate by using push at the same time as a legitimate user, the legitimate user might unintentionally approve the malicious attempt. This is because push notifications only contain the username and issuer in the text, and it is not easy to determine which notification relates to which authentication attempt.
Consider using push notifications as part of MFA, and not on their own.
MFA: Open Authentication (OATH)
The ForgeRock Authenticator (OATH) nodes support HMAC one-time password (HOTP) and time-based one-time password (TOTP) authentication as defined in the OATH standard protocols for HOTP (RFC 4226) and TOTP (RFC 6238). Both HOTP and TOTP authentication require an OATH-compliant device that can provide the password.
OTP support
HOTP authentication generates the one-time password (OTP) every time the user requests a new password on their device. The device tracks the number of times the user requests a new OTP with a counter. The OTP displays for a period of time you designate in the setup, so the user may be further in the counter on their device than on their account.
AM will resynchronize the counter when the user finally logs in. To accommodate this, you set the number of passwords a user can generate before their device cannot be resynchronized. For example, if you set the number of HOTP Window Size to 50 and someone presses the button 30 times on the user’s device to generate a new password, the counter in AM will review the passwords until it reaches the OTP entered by the user. If someone presses the button 51 times, you will need to reset the counter to match the number on the device’s counter before the user can log in to AM. HOTP authentication doesn’t check earlier passwords, so if the user attempts to reset the counter on their device, they won’t be able to log in until you reset the counter in AM to match their device. For more information, refer to Reset registered devices over REST.
TOTP authentication constantly generates a new OTP based on a time interval you specify. The device tracks the last several passwords generated and the current password. The TOTP Time Steps setting configures the number of passwords tracked. The Last Login Time setting monitors the time when a user logs in to make sure that user is not logged in several times within the present time period. The TOTP Time-Step Interval should not be so long as to lock users out, with a recommended time of 30 seconds.
Create a tree for OTP authentication
To create an example authentication tree that uses OATH authentication, perform the following steps:
-
In the AM admin UI, select the realm that will contain the authentication tree.
-
Select Authentication > Trees, and click +Create Tree.
-
Type a name for your tree in the New Tree page; for example,
myAuthTree, and click Create.The authentication tree designer page is displayed with default Start, Failure, and Success nodes.
Learn more about using the authentication tree designer in Configure trees.
-
Add the following nodes to the designer area:
-
Connect the nodes as shown:
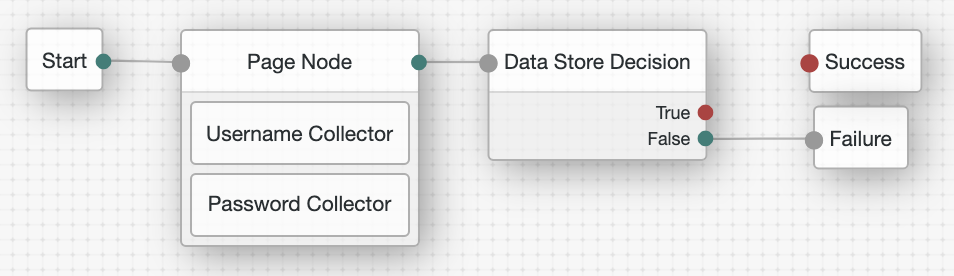
-
Type 'OATH' to filter the list of nodes in the Components panel box:
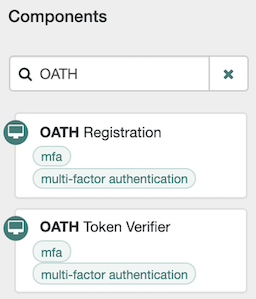
-
Drag an OATH Token Verifier node and an OATH Registration node onto the designer area.
-
For both OATH nodes, set the OATH Algorithm property to TOTP, and connect to the existing nodes as follows:
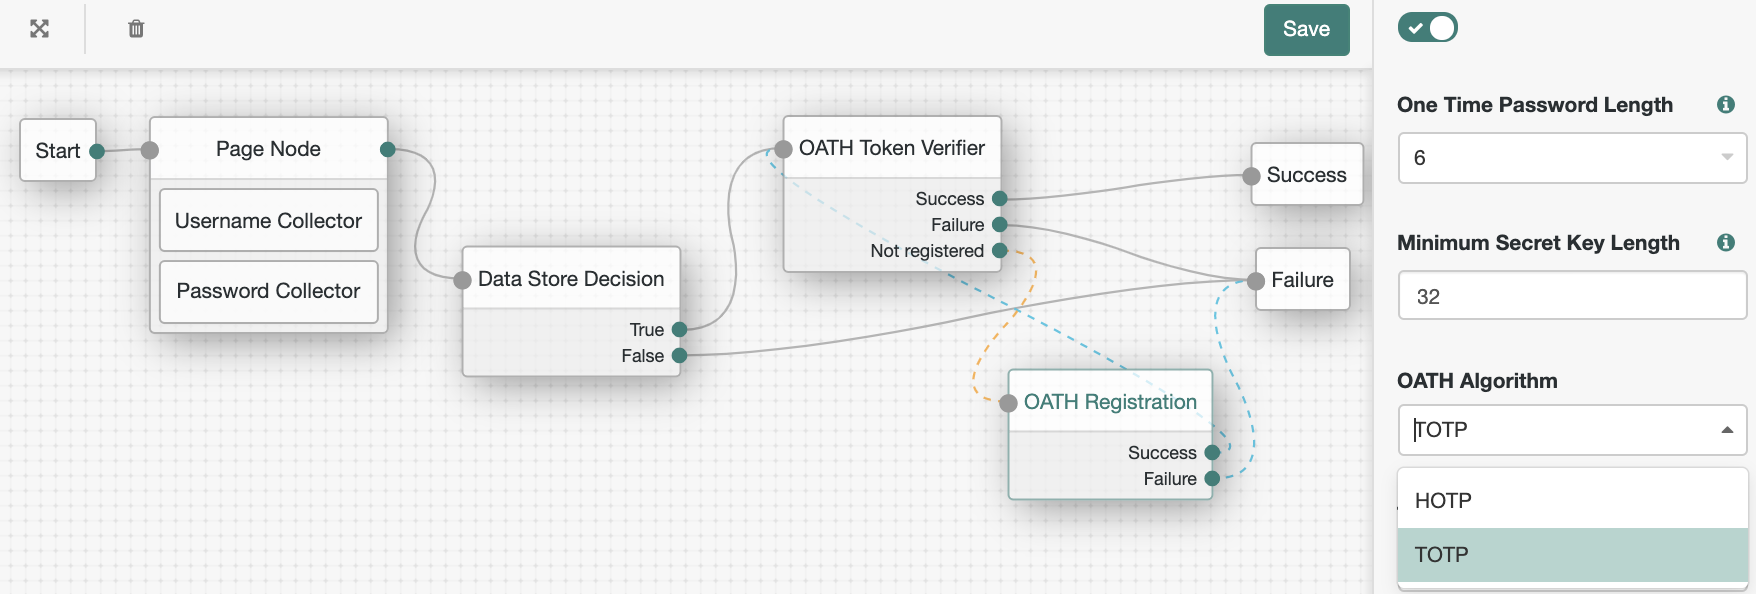
The value for OATH Algorithm must be the same for both nodes. For this example, select TOTP to generate a new OTP at a specified time step interval.
-
Save your changes.
Note that the tree you have created is a simple example for the purposes of demonstrating a basic OATH authentication journey. In a production environment, you could include additional nodes, such as:
- MFA Registration Options node
-
Provides options for users to register a multi-factor authentication device, get the authenticator app, or skip the registration process.
- Opt-out Multi-Factor Authentication node
-
Sets an attribute in the user’s profile which lets them skip multi-factor authentication.
- Recovery Code Display node
-
Lets a user view recovery codes to use in case they have lost or damaged their registered authenticator device.
- Retry Limit Decision node
-
Lets a journey loop a specified number of times, for example, to allow a user to retry entering their OATH token.
For information about how to configure these nodes, see Node reference.
-
Test your authentication tree as follows:
-
Log out of AM, and then go to a URL similar to the following:
https://am.example.com:8443/am/XUI/?realm=alpha&service=myAuthTree#login -
Log in using the username and password. For example, enter
bjensen, and the passwordCh4ng31t. -
On successful login, if the screen displays a QR code, you will need to register your device.
To register the device with the ForgeRock Authenticator, follow the instructions in The ForgeRock Authenticator application.
-
Follow the procedure described in Authenticate with an OTP to verify that you can authenticate using the ForgeRock Authenticator app.
-
Authenticate with an OTP
This example task assumes the following prerequisites:
-
The authentication tree is set up as described in Create a tree for OTP authentication.
-
You have successfully logged in with valid credentials.
-
You have registered your device for ForgeRock Authenticator (OATH) authentication.
Follow these steps to complete OTP authentication:
-
On your registered device, open the ForgeRock Authenticator app, and then tap the OTP section for the account matching the user ID:

The OTP is displayed on the screen. This is automatically refreshed at an interval defined in the OATH Token Verifier node. If the animated timer indicates the OTP is close to expiry, wait until a new OTP is generated.
-
On the ForgeRock Authenticator (OATH) page in AM, enter the OTP that the authenticator app generated on your phone, and click Submit:
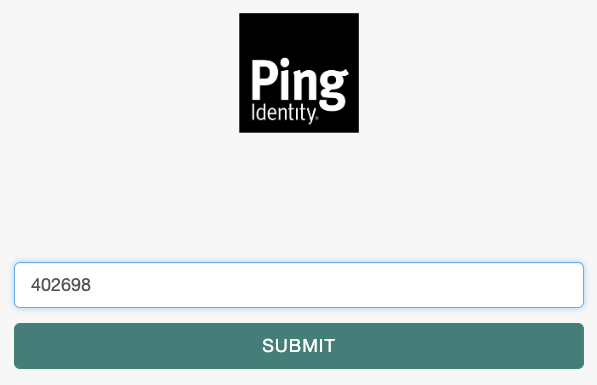
AM displays the user’s profile page.
Manage devices for MFA
Multi-factor authentication requires you to register a device, which is used as an additional factor when you log in to AM.
The following table summarizes different tasks related to devices used for multi-factor authentication:
| Task | Resources |
|---|---|
Learn about the ForgeRock Authenticator Download the ForgeRock Authenticator app, which supports push authentication notifications and one-time passwords, and register it in AM. |
|
Recover user accounts Learn how to recover a user account when the user has lost their registered device, or when their device has become out of sync with AM. |
|
Reset registered devices In some scenarios, for example, when users are not able to access their recovery codes, you can reset their registered devices to allow them to register again. |
|
List registered devices Learn how to list devices registered to a user. |
|
MFA details are stored in the following profile attributes:
You can access these attributes in scripts in the same way you access other profile attributes. |
The ForgeRock Authenticator application
The ForgeRock Authenticator application supports push authentication notifications and one-time passwords.
Download and install the ForgeRock Authenticator application to perform multi-factor authentication. The application is available for both Android and iOS devices, and is free to download from:
Register the ForgeRock Authenticator for MFA
Register the ForgeRock Authenticator application to use it as an additional factor when logging in.
The ForgeRock Authenticator application supports registration of multiple accounts and multiple different authentication methods in each account, such as push notifications and one-time passwords.
For information on registering Web Authentication (WebAuthn) devices with AM, refer to Create trees for WebAuthn.
You register the ForgeRock Authenticator application once per authentication method with an identity provider. For example, if one tree uses push notifications and another uses one-time passwords, you must register the application separately for push notifications and one-time passwords.
The ForgeRock Authenticator application must access the internet to register for push notifications. Registering for one-time password authentication does not require a connection to the internet.
-
When accessing a protected resource that requires multi-factor authentication, AM prompts you to register a device, and displays a QR code screen:
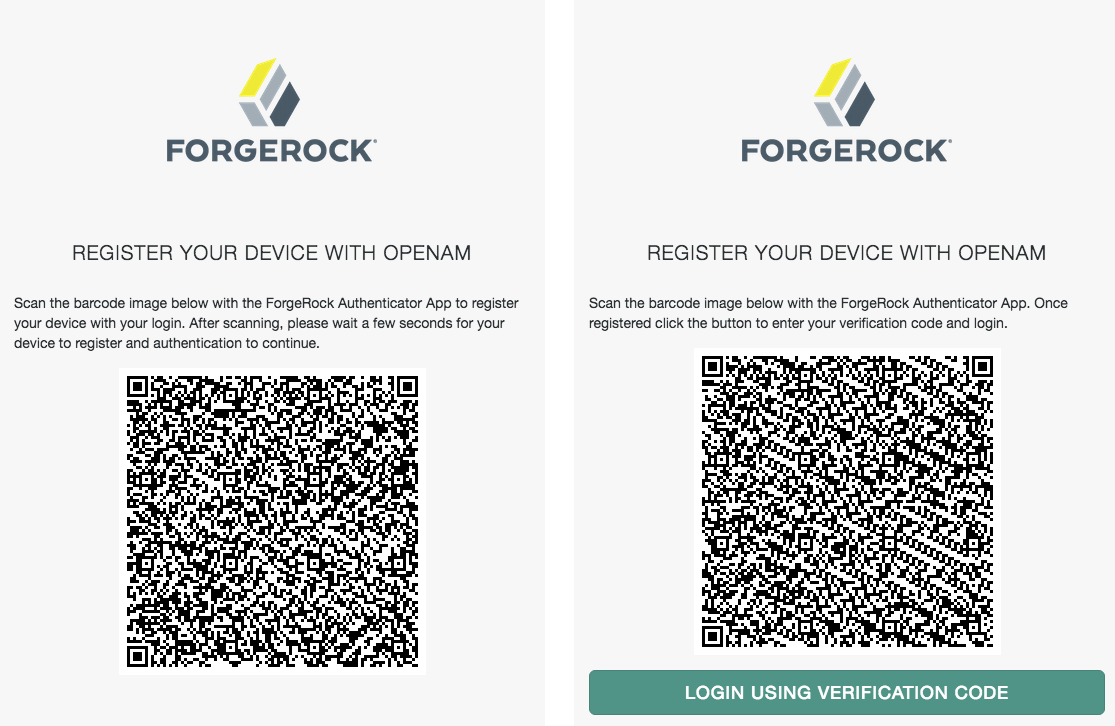
-
If you are logging in on the device and cannot scan the screen, click the On a mobile device? link to launch the application and register the device, bypassing the QR code.
-
If you are logging in on a computer, start the ForgeRock Authenticator application and click its plus icon () to register the device.
The screen on the device changes to an interface similar to your camera app.
Scan the QR code with the ForgeRock authenticator app.
The application displays the account you registered in the list of accounts.
-
-
After registering your device, you MUST make a copy of the recovery codes for the account.
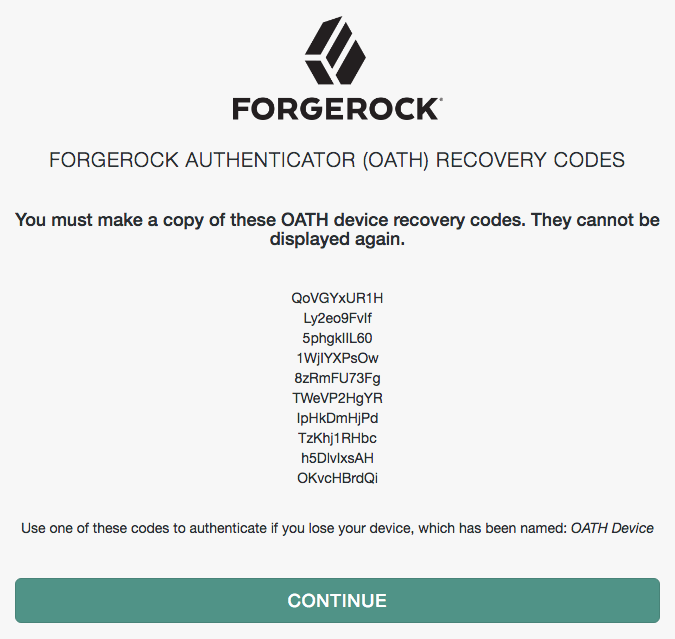
Store the recovery codes separately from your device. The recovery codes will never be displayed again. They serve as one time verification codes to log in if your registered device is lost, stolen, or broken.
When you have safely stored the recovery codes for your newly registered push device, click Done.
-
If prompted, respond to the push notification or enter a one-time password from the app.
Your device is now registered. You can use it to perform multi-factor authentication.
Recover after replacing a lost device
If you register a device with AM and then lose it, you must authenticate to AM using a recovery code. After deleting the lost device, you can register a new device.
-
Access the list of recovery codes you saved when registering the lost device.
If you did not save the recovery codes when you registered the device, contact your administrator to remove the device from your user profile instead of following these steps.
Administrators can refer to Reset registered devices over REST for details.
-
Begin to sign in as you normally would.
When prompted to use a multi-factor option, click the Use Recovery Code link.
-
Enter the recovery code when prompted.
Because recovery codes are valid for a single use only, remove the code you used from your list.
AM lets you sign in to access your profile page.
-
Under Dashboard > Authentication Devices, click the context menu button for the lost device, and click Delete.
-
Register your new device by signing out, then accessing the protected resource that requires MFA.
When registering for push notifications or one-time passwords, refer to The ForgeRock Authenticator application.
Recover after a device becomes out of sync
A device that generates one-time passwords can get out of sync with the OATH authentication service in some cases. If you repeatedly enter valid one-time passwords that appear to be valid passwords, but AM rejects the passwords as unauthorized, your device is likely out of sync.
To resynchronize your device, you must authenticate with a recovery code, and register the device again. Follow the steps in Recover after replacing a lost device.
If you did not save the recovery codes when you registered the device, contact your administrator to remove the device from your user profile instead.
Reset registered devices over REST
As described in Recover after replacing a lost device, a user who has lost a mobile phone registered with AM can register a replacement device by authenticating using a recovery code, deleting their existing device, and then registering a new device.
Additional support is required for users who lose mobile devices but did not save their recovery codes when they initially registered the device, and for users who have used up all their recovery codes.
AM provides a REST API to reset a device profile by deleting information about a user’s registered device. Both the user and administrator accounts can use the REST API to reset a device profile. Administrators can:
-
Provide authenticated users with a self-service page that calls the REST API to reset their devices.
-
Call the REST API themselves to reset a user’s device profiles.
-
Call the REST API themselves to reset a device that is out of sync, where the HOTP counter exceeds the HOTP threshold window and requires a reset.
When making a REST API call, specify the realm in the path component of the endpoint.
You must specify the entire hierarchy of the realm, starting at the Top Level Realm.
Prefix each realm in the hierarchy with the realms/ keyword.
For example, /realms/root/realms/customers/realms/europe.
Reset OATH devices
To reset a user’s OATH device profile,
send an HTTP POST request to the /users/user/devices/2fa/oath?_action=reset endpoint.
The following example resets the OATH devices of a user named myUser in a realm called alpha:
$ curl \
--request POST \
--header "Content-Type: application/json" \
--header "Accept-API-Version: resource=1.0" \
--header "iPlanetDirectoryPro: AQIC5w…2NzEz*" \
--data '{}' \
'https://am.example.com:8443/am/json/realms/root/realms/alpha/users/myUser/devices/2fa/oath?_action=reset'
{
"result":true
}The reset action deletes the OATH device profile, which by default has a limit of one profile per device,
and sets the Select to Enable Skip option to its default value of Not Set.
Reset push devices
To reset push devices over REST, send an HTTP POST request to the /users/user/devices/2fa/push?_action=reset endpoint.
The following example resets push devices for a user named myUser in a realm called alpha:
$ curl \
--request POST \
--header "Content-Type: application/json" \
--header "Accept-API-Version: resource=1.0" \
--header "iPlanetDirectoryPro: AQIC5w…2NzEz*" \
--data '{}' \
'https://am.example.com:8443/am/json/realms/root/realms/alpha/users/myUser/devices/2fa/push?_action=reset'
{
"result":true
}Delete WebAuthn devices
The reset action is not implemented on the webauthn endpoint.
You can delete a WebAuthn device over REST as follows:
-
Retrieve a list of WebAuthn devices associated with a user by querying the
users/user/devices/2fa/webauthnendpoint.The following example retrieves a list of WebAuthn devices for a user named
myUserin a realm calledalpha:$ curl \ --request GET \ --header "iPlanetDirectoryPro: AQIC5w…2NzEz*" \ 'https://am.example.com:8443/am/json/realms/root/realms/alpha/users/myUser/devices/2fa/webauthn?_queryFilter=true' { "result": [ { "_id": "ff1db8bf-d2d7-46e1-926a-568b877f87a5", "_rev": "163664231", "deviceName": "New Security Key", "uuid": "ff1db8bf-d2d7-46e1-926a-568b877f87a5", "deviceManagementStatus": false } ], "resultCount": 1, "pagedResultsCookie": null, "totalPagedResultsPolicy": "NONE", "totalPagedResults": -1, "remainingPagedResults": -1 }bash -
Delete the required WebAuthn device from the user by sending an HTTP DELETE request to the
users/user/devices/2fa/webauthn/device-idendpoint, including the ID of the WebAuthn device you want to delete:$ curl \ --request DELETE \ --header "Accept-API-Version: resource=1.0" \ --header "iPlanetDirectoryPro: AQIC5w…2NzEz*" \ 'https://am.example.com:8443/am/json/realms/root/realms/alpha/users/myUser/devices/2fa/webauthn/ff1db8bf-d2d7-46e1-926a-568b877f87a5' { "_id": "ff1db8bf-d2d7-46e1-926a-568b877f87a5", "_rev": "1642022518", "uuid": "ff1db8bf-d2d7-46e1-926a-568b877f87a5", "recoveryCodes": [ ... ], "credentialId": "XGJpYNYv4AHG9sHHgxFfTw", "algorithm": "SHA256withECDSA", "deviceName": "New Security Key", "key": { "kty": "EC", "x": "zMDAfFwRQR_5HIGfK1iJQ0kYwtudesx_UXocoBVrWbo", "y": "UgRBOBlpq6QYsXlqfHDzY8XNv-5DEMajRp9_3klkhDU", "crv": "P-256" } }bash -
Repeat step 2 to delete additional WebAuthn devices for the user, if needed.
Reset bound devices
To delete all bound devices for a user, send an HTTP POST request to the /users/user/devices/2fa/binding?_action=reset endpoint. Learn more about binding devices to a user profile in device binding.
The following example deletes bound devices for a user named myUser in a realm called alpha:
$ curl \
--request POST \
--header "Content-Type: application/json" \
--header "Accept-API-Version: resource=1.0" \
--header "iPlanetDirectoryPro: AQIC5w…2NzEz*" \
--data '{}' \
'https://am.example.com:8443/am/json/realms/root/realms/alpha/users/myUser/devices/2fa/binding?_action=reset'
{
"result":true
}|
Deleting a bound device on the server does not remove the private keys from the device. Instead, you can use the Ping SDKs to remove the bound device from the server, and then remove the keys from the device. Refer to Unbind devices by deleting keys. |
Refresh push device IDs
The Push Notification service relies on device tokens or IDs issued by the Android and iOS platforms to deliver notifications to end users. These platforms occasionally issue new device tokens. Depending on the platform, there are several reasons a device ID might change:
-
Android
-
iOS
-
JavaScript
In Android, the instance ID is deleted or changes if any of the following occurs:
-
An app is restored on a new device.
-
The user uninstalls and reinstalls the app.
-
The user clears app data.
On iOS, the device ID is stored in the Keychain. This means the ID persists when the app is removed.
However, the device ID is deleted or changes if any of the following occurs:
-
The user wipes or factory resets the phone.
-
The user migrates to a new phone.
-
The keychain is programmatically deleted from the phone.
-
The device ID is programmatically deleted from the Keychain.
-
The keychain identifier in the
forgerock_keychain_access_groupconfiguration property changes.
In JavaScript, the device ID is deleted or changes if any of the following occurs:
-
The browser window creates the device ID while in "private" or "incognito" mode. Closing the browser removes the ID.
-
The browser removes the ID when cleaning up old data to accommodate new data.
-
The browser is uninstalled and reinstalled. The ID is removed.
-
The user removes the device ID by clearing the browser data.
To make sure push notifications are received correctly, the Push Notification service must have the most recent device ID for a particular device.
When a new device ID is issued on a device, the following steps must occur:
-
The Ping SDKs send an HTTP POST request to the
https://am.example.com:8443/am/json/realms/realm-name/push/sns/messageendpoint withaction=refresh.The request includes the
mechanismUid,username, and a JWT that includes the newdeviceID. -
The Push Notification service decodes the JWT and extracts the new
deviceID. -
The Push Notification service locates the user’s push device profile, based on the
username, and updates the value of thedeviceID.
| If you’re not using the Ping SDKs, you must adapt your authenticator application to follow these steps. |
List registered devices over REST
AM provides a REST API to retrieve information about MFA devices registered to a user.
When making a REST API call, specify the realm in the path component of the endpoint.
You must specify the entire hierarchy of the realm, starting at the Top Level Realm.
Prefix each realm in the hierarchy with the realms/ keyword.
For example, /realms/root/realms/customers/realms/europe.
List OATH devices
To return a list of OATH devices registered to a user, query the users/user/devices/2fa/oath endpoint.
The following example lists the OATH devices for a user named myUser in a realm called alpha:
$ curl \
--request GET \
--header "iPlanetDirectoryPro: AQIC5w…2NzEz*" \
'https://am.example.com:8443/am/json/realms/root/realms/alpha/users/myUser/devices/2fa/oath?_queryFilter=true'
{
"result" : [ {
"_id" : "ff1db8bf-d2d7-46e1-926a-568b877f87a5",
"_rev" : "172031596",
"deviceName" : "OATH Device",
"uuid" : "ff1db8bf-d2d7-46e1-926a-568b877f87a5",
"deviceManagementStatus" : false
} ],
"resultCount" : 1,
"pagedResultsCookie" : null,
"totalPagedResultsPolicy" : "NONE",
"totalPagedResults" : -1,
"remainingPagedResults" : -1
}List push devices
To return a list of push devices registered to a user, query the users/user/devices/2fa/push endpoint.
The following example lists the push devices for a user named myUser in a realm called alpha:
$ curl \
--request GET \
--header "iPlanetDirectoryPro: AQIC5w…2NzEz*" \
'https://am.example.com:8443/am/json/realms/root/realms/alpha/users/myUser/devices/2fa/push?_queryFilter=true'
{
"result" : [ {
"_id" : "ff1db8bf-d2d7-46e1-926a-568b877f87a5",
"_rev" : "172031596",
"deviceName" : "Push Device",
"uuid" : "ff1db8bf-d2d7-46e1-926a-568b877f87a5",
"deviceManagementStatus" : false
} ],
"resultCount" : 1,
"pagedResultsCookie" : null,
"totalPagedResultsPolicy" : "NONE",
"totalPagedResults" : -1,
"remainingPagedResults" : -1
}List WebAuthn devices
To return a list of WebAuthn devices registered to a user, query the users/user/devices/2fa/webauthn endpoint.
The following example lists the WebAuthn devices for a user named myUser in a realm called alpha:
$ curl \
--request GET \
--header "iPlanetDirectoryPro: AQIC5w…2NzEz*" \
'https://am.example.com:8443/am/json/realms/root/realms/alpha/users/myUser/devices/2fa/webauthn?_queryFilter=true'
{
"result": [
{
"_id": "ff1db8bf-d2d7-46e1-926a-568b877f87a5",
"_rev": "163664231",
"deviceName": "New Security Key",
"uuid": "ff1db8bf-d2d7-46e1-926a-568b877f87a5",
"deviceManagementStatus": false
}
],
"resultCount": 1,
"pagedResultsCookie": null,
"totalPagedResultsPolicy": "NONE",
"totalPagedResults": -1,
"remainingPagedResults": -1
}List bound devices
To return a list of bound devices for a user, query the users/user/devices/2fa/binding endpoint. Learn more about binding devices to a user profile in device binding.
The following example lists the bound devices for a user named myUser in a realm called alpha:
$ curl \
--request GET \
--header "iPlanetDirectoryPro: AQIC5w…2NzEz*" \
'https://am.example.com:8443/am/json/realms/root/realms/alpha/users/myUser/devices/2fa/binding?_queryFilter=true'
{
"result": [
{
"_id": "ff1db8bf-d2d7-46e1-926a-568b877f87a5",
"_rev": "192142989",
"createdDate": 1715182923119,
"lastAccessDate": 1715182923183,
"deviceId": "e2e84b5d2a927abdcb85570bac9701c390a92751",
"deviceName": "iOS Device",
"uuid": "ff1db8bf-d2d7-46e1-926a-568b877f87a5",
"key": {
...
},
"deviceManagementStatus": false
}
],
"resultCount": 1,
"pagedResultsCookie": null,
"totalPagedResultsPolicy": "NONE",
"totalPagedResults": -1,
"remainingPagedResults": -1
}Implement CAPTCHA
CAPTCHA is a way to challenge a user to verify that they are human, and includes a number of different services. Choose the CAPTCHA service that best suits your requirements. The default configuration in the CAPTCHA node is for Google’s reCAPTCHA service. You must provide a CAPTCHA Site Key and CAPTCHA Secret Key to use the node.
Test the CAPTCHA node
ForgeRock provides a Postman collection to configure AM to test the CAPTCHA node. The Postman collection contains the queries to demonstrate the CAPTCHA node with reCAPTCHA V2, V3 and with hCaptcha. Before you start, set up a reCAPTCHA V2 and V3 site, and an hCaptcha site, and copy their site and secret keys.
-
Download and install Postman.
-
Download the ForgeRock CAPTCHA Collection.
-
Import the collection into Postman:
-
Select File > Import … > Upload Files.
-
Select the CAPTCHA collection, and click Open, then click Import.
-
-
Change the collection variables to suit your environment:
-
On the Collections tab, select the ForgeRock CAPTCHA Collection.
-
Click on the Variables tab, and set the value of at least the following variables:
-
URL_base -
admin_password -
demo_username -
demo_password
-
-
Click Update to save your changes.
You are ready to run the collection.
-
-
After creating the authentication trees, visit the following URLs in your browser to demonstrate the login flow for each CAPTCHA type:
-
URL_base/XUI/?realm=sub_realm&service=recaptchav3
-
URL_base/XUI/?realm=sub_realm&service=recaptchav2
-
URL_base/XUI/?realm=sub_realm&service=hcaptcha
Use the demo_username and demo_password to log in.
-
Authentication reference
Use the links in this table to find reference information about authentication configuration settings, endpoints and the scripting API for authentication in AM.
| Link | Description |
|---|---|
The settings for configuring authentication in AM at the realm or global level. |
|
Describes the nodes available in AM and how to configure them. |
|
The authentication endpoints and their parameters. |
|
The settings required for configuring social authentication. |
|
How to configure AM services. |
|
The supported callbacks. |
|
The API for Scripted Decision node. |
Learn more about configuring AM settings and services in Reference.