Use cases
These pages show you how to implement common use cases for directory services. If directory services are new to you, first work through the exercises in Start here.
The use cases show how IAM administrator Pat works in the directory services lab environment to develop and test processes and procedures before scaling them up for staging and production deployments.
|
These pages walk you through key aspects of DS. They’re a great starting point but do not make you an expert. Follow along to improve your practical know how. Use what you learned to help answer the additional questions. Be sure read the related documentation and think through the answers to your questions before deploying directory services into production. |
Replication
Replicated DS across regions.
Backup
Back up and restore DS data.
Disaster recovery
Recover quickly after a disaster.
Password storage
Use stronger password storage.
LDAP schema
Change LDAP schema definitions.
CTS store
Replicate AM CTS data.
Enforceable limits
Enforce limits to protect directory services.
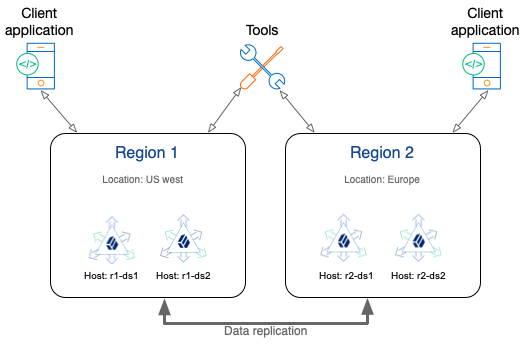
Cross-region replication
Simulate deploying replicated DS servers across multiple regions.
Description
Estimated time to complete: 25 minutes
DS replication works well across LANs and WANs. While some large and very high-performance deployments could call for optimizations to reduce latency or network bandwidth to a minimum, most deployments don’t need them.
|
If you are running in Kubernetes, there’s an easier way. Try the ForgeOps Cloud Deployment Model (CDM) reference implementation instead. |
In this use case, you:
-
Set up DS servers as if you were replicating across the WAN to different regions.
-
Validate DS replicates data changes as expected.
-
Review additional options to optimize performance if necessary.
Goals
In completing this use case, you learn to:
-
Set up DS servers.
-
Share secrets to protect network connections and encrypted data.
-
Use appropriate bootstrap replication servers.
-
Show replication in action.
Example scenario
As a directory service administrator, Pat plans to deploy directory services in multiple locations for redundancy.
Pat plans to show other identity administrators how the deployment would look and discuss whether the deployment would call for any optimizations.
Prerequisites
Knowledge
Before you start:
-
Make sure you are familiar with the command line on your operating system.
-
If you’re new to directory services, work through the examples to learn LDAP and to learn replication.
Deployment
When deploying replicated DS servers, be aware of these constraints:
- Network
-
-
All DS servers must be able to connect to each other; their network must be routed.
-
Each server FQDN must be unique and resolvable by all other DS servers; don’t reuse FQDNs across regions.
-
To recover from network partitions without intervention, DS servers must connect often enough to replay each other’s changes before the end of the replication purge delay (default: 3 days).
-
- DS configuration
-
Each DS server must:
-
Share the same deployment ID.
-
Have a unique server ID.
-
Be able to contact its bootstrap replication servers.
A bootstrap replication server is one of the replication servers in a deployment other DS servers contact to discover all the other DS servers in the deployment.
-
Be able to verify and trust the digital certificates other DS servers use to establish their identities.
DS tools must trust the server certificates to connect to DS servers securely. DS servers must trust each other’s certificates to use secure connections for replication.
This sample uses DS tools to simplify setting up a private PKI for this purpose. Your organization can use its own PKI in deployment.
-
Tasks
This sample deployment shows the steps to simulate a cross-region, replicated deployment on your computer. Use the same steps with geographically distributed computers or virtual machines for a real deployment.
-
Two regions, each with two DS servers.
-
The DS servers are fully meshed for replication; each server connects to the other server.
-
You don’t necessarily need this many DS servers. Two DS servers are the minimum for replication and availability. If the WAN has high bandwidth and low latency, one DS server per region is enough.
-
DS servers function the same in a simulated cross-region deployment and an actual cross-region deployment.
Replication requires distinct, stable server IDs and FQDNs. For replication, it doesn’t matter whether the DS servers are on the same network interface or separated by a WAN.
Perform these tasks to simulate replicated DS servers across multiple regions.
Task 1: Prepare for installation
-
Make sure the DS server systems can connect to each other.
This sample simulates DNS on your computer by updating the hosts file with an alias for each DS server:
# Simulate DNS in a cross-region deployment # with FQDN aliases for the loopback address: 127.0.0.1 r1-ds1.example.com 127.0.0.1 r1-ds2.example.com 127.0.0.1 r2-ds1.example.com 127.0.0.1 r2-ds2.example.comWhen deploying in a production environment, make sure you have properly configured the DNS.
-
Unpack the DS server files once for each server to install.
This sample uses folder locations aligned with the hostnames:
Base path Description /path/to/r1-ds1Region 1, first server
/path/to/r1-ds2Region 1, second server
/path/to/r2-ds1Region 2, first server
/path/to/r2-ds2Region 2, second server
-
Define the key configuration details for the deployment.
This sample uses the following settings:
Server ID Bootstrap replication servers r1-ds1r1-ds1.example.com
r2-ds1.example.comr1-ds2r2-ds1r2-ds2 -
Define how the DS servers trust each other’s certificates.
This sample uses a private PKI based on the deployment ID. You generate a deployment ID for all DS servers using the
dskeymgrcommand:$ /path/to/r1-ds1/bin/dskeymgr \ create-deployment-id \ --deploymentIdPassword password <deployment-id>bashThe deployment ID is a string. To use it, you must have the deployment ID password.
-
Determine the port numbers for the service.
This sample uses different port numbers for each DS server because all the servers are on the same computer:
Sample server Port numbers r1-ds1LDAP: 1389
LDAPS: 1636
HTTPS: 8443
Admin: 4444
Replication: 8989r1-ds2LDAP: 11389
LDAPS: 11636
HTTPS: 18443
Admin: 14444
Replication: 18989r2-ds1LDAP: 21389
LDAPS: 21636
HTTPS: 28443
Admin: 24444
Replication: 28989r2-ds2LDAP: 31389
LDAPS: 31636
HTTPS: 38443
Admin: 34444
Replication: 38989When installing each DS server on a different host, use the same port numbers everywhere.
Task 2: Install servers in "region 1"
Install servers in the first simulated region on your computer. In deployment, you would install each DS server on a separate host system:
-
Make sure you have the deployment ID required to install each DS server.
$ export DEPLOYMENT_ID=<deployment-id>bash -
Install the first server in "region 1".
$ /path/to/r1-ds1/setup \
 --serverId r1-ds1 \
 --deploymentId $DEPLOYMENT_ID \
 --deploymentIdPassword password \
 --rootUserDn uid=admin \
 --rootUserPassword password \
 --monitorUserPassword password \
 --hostname r1-ds1.example.com \
 --ldapPort 1389 \
 --ldapsPort 1636 \
 --httpsPort 8443 \
 --adminConnectorPort 4444 \
 --replicationPort 8989 \
 --profile ds-evaluation \
 --bootstrapReplicationServer r1-ds1.example.com:8989 \
 --bootstrapReplicationServer r2-ds1.example.com:28989 \
 --start \
 --acceptLicense
bash -
Install the second server in "region 1".
$ /path/to/r1-ds2/setup \
 --serverId r1-ds2 \
 --deploymentId $DEPLOYMENT_ID \
 --deploymentIdPassword password \
 --rootUserDn uid=admin \
 --rootUserPassword password \
 --monitorUserPassword password \
 --hostname r1-ds2.example.com \
 --ldapPort 11389 \
 --ldapsPort 11636 \
 --httpsPort 18443 \
 --adminConnectorPort 14444 \
 --replicationPort 18989 \
 --profile ds-evaluation \
 --bootstrapReplicationServer r1-ds1.example.com:8989 \
 --bootstrapReplicationServer r2-ds1.example.com:28989 \
 --start \
 --acceptLicense
bash
Task 3: Install servers in "region 2"
Install servers in the second simulated region on your computer. In deployment, you would install each DS server on a separate host system:
-
Make sure you have the deployment ID required to install each DS server.
$ export DEPLOYMENT_ID=<deployment-id>bash -
Install the first server in "region 2".
$ /path/to/r2-ds1/setup \
 --serverId r2-ds1 \
 --deploymentId $DEPLOYMENT_ID \
 --deploymentIdPassword password \
 --rootUserDn uid=admin \
 --rootUserPassword password \
 --monitorUserPassword password \
 --hostname r2-ds1.example.com \
 --ldapPort 21389 \
 --ldapsPort 21636 \
 --httpsPort 28443 \
 --adminConnectorPort 24444 \
 --replicationPort 28989 \
 --profile ds-evaluation \
 --bootstrapReplicationServer r1-ds1.example.com:8989 \
 --bootstrapReplicationServer r2-ds1.example.com:28989 \
 --start \
 --acceptLicense
bash -
Install the second server in "region 2".
$ /path/to/r2-ds2/setup \
 --serverId r2-ds2 \
 --deploymentId $DEPLOYMENT_ID \
 --deploymentIdPassword password \
 --rootUserDn uid=admin \
 --rootUserPassword password \
 --monitorUserPassword password \
 --hostname r2-ds2.example.com \
 --ldapPort 31389 \
 --ldapsPort 31636 \
 --httpsPort 38443 \
 --adminConnectorPort 34444 \
 --replicationPort 38989 \
 --profile ds-evaluation \
 --bootstrapReplicationServer r1-ds1.example.com:8989 \
 --bootstrapReplicationServer r2-ds1.example.com:28989 \
 --start \
 --acceptLicense
bash
Validation
Show updates to one simulated region getting replicated to the other region.
-
Modify an entry in the first region.
The following command changes a description to
Description to replicate:$ /path/to/r1-ds1/bin/ldapmodify \ --hostname r1-ds1.example.com \ --port 1636 \ --useSsl \ --usePkcs12TrustStore /path/to/r1-ds1/config/keystore \ --trustStorePassword:file /path/to/r1-ds1/config/keystore.pin \ --bindDn uid=bjensen,ou=People,dc=example,dc=com \ --bindPassword hifalutin <<EOF dn: uid=bjensen,ou=People,dc=example,dc=com changetype: modify replace: description description: Description to replicate EOFbash -
Read the entry in the other region:
$ /path/to/r2-ds2/bin/ldapsearch \ --hostname r2-ds2.example.com \ --port 31636 \ --useSsl \ --usePkcs12TrustStore /path/to/r2-ds2/config/keystore \ --trustStorePassword:file /path/to/r2-ds2/config/keystore.pin \ --bindDn uid=bjensen,ou=People,dc=example,dc=com \ --bindPassword hifalutin \ --baseDn dc=example,dc=com \ "(uid=bjensen)" description dn: uid=bjensen,ou=People,dc=example,dc=com description: Description to replicatebashNotice
description: Description to replicatein the output.
You have shown replication works across regions.
What’s next
After successfully showing the demonstration to other administrators, Pat doesn’t stop there.
Pat leads the administrators to review the tradeoffs they can choose to make for the production deployment. Some of the questions to discuss include the following:
-
Are there any applications we must direct to the nearest DS server on the network? For example, there could be applications with very low latency requirements, or the cost of network connections to remote servers could be much higher.
If so, can those applications configure their own failover rules? Do we need a load balancer to do this for them?
-
Do our DS replicas generate so much replication traffic that we should take steps to limit traffic between regions?
If so, would standalone replication and directory servers be a good tradeoff? Should we configure replication group IDs to have directory servers in a region connect preferentially to replication servers in the same region?
-
Should we use our own PKI to protect client-facing network connections over LDAP and HTTP?
This sample uses the server and CA certificates generated with the deployment ID and deployment ID password. You can set up DS with your own keys, using your own PKI to protect secure connections.
-
How many DS servers do we really need?
At a bare minimum, we need at least two DS servers to keep the service running while we upgrade, for example. The fewer servers we have, the easier it is to manage the service.
The answers to these questions depend on costs and service-level performance requirements. Don’t optimize or pay extra for high performance unless you need it.
Explore further
Reference material
| Reference | Description |
|---|---|
On Kubernetes? Use the ForgeOps CDM reference implementation instead. |
|
Configure bootstrap replication servers. |
|
Understand how DS uses secrets and keys. |
|
Install directory services. |
|
Optimize network bandwidth for deployments with many servers. |
|
Read this before configuring a load balancer. |
|
When performance is a concern, measure, tune, and test. |
|
Background and procedures for working with DS replication. |
|
Opt for your own PKI to protect network connections. |
Backup and restore
Plan DS backup and restore procedures for your deployment.
Description
Estimated time to complete: 20 minutes
Safely and regularly back up your directory data to recover quickly when accidents happen.
In this use case, you:
-
Back up directory data using DS tools.
-
Cause an incident requiring recovery.
-
Restore directory data after an incident.
-
Validate the data restore procedure.
Goals
In completing this use case, you learn to:
-
Use DS backup and restore tools.
-
Schedule a recurring backup task.
-
Restore directory data from backup files.
-
Purge outdated backup files.
Example scenario
As a directory service administrator, Pat plans to deploy directory services for critical identity data such as login credentials.
Pat knows good backup and restore plans are a must for identity and access services. If the data is lost, end users cannot authenticate, and account profiles are lost.
Pat plans to show other identity administrators how the backup and restore procedures work and get them to review the process before deployment.
Prerequisites
Knowledge
Before you start, bring yourself up to speed with Pat:
-
Pat is familiar with the command line on the target operating system, a Linux distribution in this example.
-
Pat knows how to use basic LDAP commands, having worked examples to learn LDAP.
-
Pat has already successfully completed directory service installation and setup procedures.
Actions
Before you try this example, set up two replicated DS directory servers on your computer as described in Install DS and Learn replication.
Tasks
Pat demonstrates how to back up and restore DS directory data from the evaluation profile. The order of the tasks is the same in deployment, but the directory data is different.
Task 1: Schedule a recurring backup operation
When you use the DS tools, backup operations are incremental. You can take regular backups with a reasonable amount of disk space relative to your data.
Configure backup tasks
-
Schedule a regular backup task.
The following example schedules an hourly backup task:
$ /path/to/opendj/bin/dsbackup \
 create \
 --backupLocation bak \
 --recurringTask "00 * * * *" \
 --description "Back up every hour" \
 --taskId HourlyBackup \
 --completionNotify diradmin@example.com \
 --errorNotify diradmin@example.com \
 --hostname localhost \
 --port 4444 \
 --bindDN uid=admin \
 --bindPassword password \
 --usePkcs12TrustStore /path/to/opendj/config/keystore \
 --trustStorePassword:file /path/to/opendj/config/keystore.pin
bash -
Schedule a task to remove backup data older than the replication purge delay.
When you restore data from backup, the backup you restore must be more recent than the replication purge delay. If you restore from older data, the replica you restore can’t replicate with other servers. The default replication purge delay is three days.
The following example schedules an hourly task to remove outdated backup data:
$ /path/to/opendj/bin/dsbackup \ purge \ --backupLocation bak \ --recurringTask "00 * * * *" \ --description "Purge old backups every hour" \ --olderThan "3 days" \ --taskId HourlyPurge \ --completionNotify diradmin@example.com \ --errorNotify diradmin@example.com \ --hostname localhost \ --port 4444 \ --bindDN uid=admin \ --bindPassword password \ --usePkcs12TrustStore /path/to/opendj/config/keystore \ --trustStorePassword:file /path/to/opendj/config/keystore.pinbashThis task ensures you won’t fill up the disk with old backup data.
(Optional) Back up data now
At this point, the recurring backup task is scheduled; however, the next backup operation won’t start until the top of the hour. If you want to continue this example without waiting for the task to run, you can back up the data now.
These steps demonstrate offline backup:
-
Stop the server:
$ /path/to/opendj/bin/stop-dsbash -
Back up the data with the server offline:
$ /path/to/opendj/bin/dsbackup \ create \ --backupLocation bak \ --offlinebashThe command writes the backup data to the
bak/directory under the server installation directory. -
Start the server:
$ /path/to/opendj/bin/start-dsbash
Task 2: Simulate the loss of a server
-
Make sure you have at least one set of backup files:
$ /path/to/opendj/bin/dsbackup \ list \ --backupLocation bak \ --offlinebashThis command runs on the files and can run in offline mode even if the server is up.
If you are waiting for the hourly backup task to run, there may not be any backup files yet.
-
Simulate the loss of a server by stopping it abruptly and deleting the files.
This example removes the
second-dsserver:$ kill -9 <second-ds-pid> $ rm -rf /path/to/replicabash -
Change an entry.
You use this change later to validate the restore procedure and show replication replays changes occurring after the last backup operation:
$ /path/to/opendj/bin/ldapmodify \
 --hostname localhost \
 --port 1636 \
 --useSsl \
 --usePkcs12TrustStore /path/to/opendj/config/keystore \
 --trustStorePassword:file /path/to/opendj/config/keystore.pin \
 --bindDn uid=bjensen,ou=People,dc=example,dc=com \
 --bindPassword hifalutin << EOF
dn: uid=bjensen,ou=People,dc=example,dc=com
changetype: modify
replace: description
description: Updated after the replica crashed
EOF
bash
Task 3: Recover and restore the lost server
-
Replace the lost server with the same configuration but don’t start it.
This example uses the evaluation profile:
$ cd ~/Downloads && unzip ~/Downloads/DS-7.5.1.zip && mv opendj /path/to/replica $ export DEPLOYMENT_ID=<deployment-id> $ /path/to/replica/setup \ --serverId second-ds \ --deploymentId $DEPLOYMENT_ID \ --deploymentIdPassword password \ --rootUserDn uid=admin \ --rootUserPassword password \ --hostname localhost \ --ldapPort 11389 \ --ldapsPort 11636 \ --adminConnectorPort 14444 \ --replicationPort 18989 \ --bootstrapReplicationServer localhost:8989 \ --profile ds-evaluation \ --set ds-evaluation/generatedUsers:0 \ --acceptLicensebashRebuilding the basic server configuration depends on your deployment. For testing and deployment, adapt the commands to fit your process.
-
Restore the server data from backup:
$ /path/to/replica/bin/dsbackup \
 restore \
 --offline \
 --backendName dsEvaluation \
 --backupLocation /path/to/opendj/bak
bash -
Start the server:
$ /path/to/replica/bin/start-dsbashAfter the server starts and connects to other servers, replication replays changes from after the backup operation.
Validation
Demonstrate the server you restored has the same data as the other replica.
-
Read the description you changed after the backup operation and server crash on
first-ds:$ /path/to/opendj/bin/ldapsearch \ --hostname localhost \ --port 1636 \ --useSsl \ --usePkcs12TrustStore /path/to/opendj/config/keystore \ --trustStorePassword:file /path/to/opendj/config/keystore.pin \ --bindDn uid=bjensen,ou=People,dc=example,dc=com \ --bindPassword hifalutin \ --baseDn dc=example,dc=com \ "(cn=Babs Jensen)" \ description dn: uid=bjensen,ou=People,dc=example,dc=com description: Updated after the replica crashedbash -
Read the same data on the
second-dsserver you restored from backup:/path/to/replica/bin/ldapsearch \ --hostname localhost \ --port 11636 \ --useSsl \ --usePkcs12TrustStore /path/to/opendj/config/keystore \ --trustStorePassword:file /path/to/opendj/config/keystore.pin \ --bindDn uid=bjensen,ou=People,dc=example,dc=com \ --bindPassword hifalutin \ --baseDn dc=example,dc=com \ "(cn=Babs Jensen)" \ description dn: uid=bjensen,ou=People,dc=example,dc=com description: Updated after the replica crashedbashThe data is the same on both servers. You have shown your backup and restore procedure is sound.
What’s next
After demonstrating the process, Pat implements backup and restore procedures for testing and deployment. These procedures become part of the organization’s runbook, so operators can implement them quickly and easily.
Pat realizes disaster recovery is more than restoring backup files. Pat also implements disaster recovery procedures for testing and deployment as part of the organization’s runbook.
Explore further
This use case can serve as a template for DS test and production deployments. Adapt this example for deployment:
-
Make sure the backup tasks run on more than one DS replica to avoid a single point of backup failure.
-
To keep things simple, this example shows a backup on the local filesystem.
In testing and deployment, make sure you store backup files remotely in a shared location. For example, consider backing up to cloud storage.
A shared remote location for backup files makes it easier to restore from the same backup on multiple replicas.
-
If the filesystem on your servers supports atomic snapshots, consider backing up DS with filesystem snapshots.
Disaster recovery
Directory services are critical to authentication, session management, authorization, and more. When directory services are broken, quick recovery is a must.
In DS directory services, a disaster is a serious data problem affecting the entire replication topology. Replication can’t help you recover from a disaster because it replays data changes everywhere.
Disaster recovery comes with a service interruption, the loss of recent changes, and a reset for replication. It is rational in the event of a real disaster. It’s unnecessary to follow the disaster recovery procedure for a hardware failure or a server that’s been offline too long and needs reinitialization. Even if you lose most of your DS servers, you can still rebuild the service without a service interruption or data loss.
|
For disaster recovery to be quick, you must prepare in advance. Don’t go to production until you have successfully tested your disaster recovery procedures. |
Description
Estimated time to complete: 30 minutes
In this use case, you:
-
Back up a DS directory service.
-
Simulate a disaster.
-
Restore the service to a known state.
-
Validate the procedure.
Goals
In completing this use case, you learn to:
-
Back up and restore directory data.
-
Restart cleanly from backup files to recover from a disaster.
Example scenario
Pat has learned how to install and configure replicated directory services and recognizes broken directory services could bring identity and access management services to a halt, too.
Pat understands replication protects directory services from single points of failure. However, what happens if a misbehaving application or a mistaken operator deletes all the user accounts, for example? Pat realizes replication replays the operations everywhere. In the case of an error like this, replication could amplify a big mistake into a system-wide disaster. (For smaller mistakes, refer to Recover from user error.)
Pat knows the pressure on the people maintaining directory services to recover quickly would be high. It would be better to plan for the problem in advance and to provide a scripted and tested response. No one under pressure should have to guess how to recover a critical service.
Pat decides to demonstrate a safe, scripted procedure for recovering from disaster:
-
Start with a smoothly running, replicated directory service.
-
Cause a "disaster" by deleting all the user accounts.
-
Recover from the disaster by restoring the data from a recent backup.
-
Verify the results.
Pat knows this procedure loses changes between the most recent backup operation and the disaster. Losing some changes is still better than a broken directory service. If Pat can discover the problem and repair it quickly, the procedure minimizes lost changes.
Prerequisites
Knowledge
Before you start, bring yourself up to speed with Pat:
-
Pat is familiar with the command line and command-line scripting on the target operating system, a Linux distribution in this example. Pat uses shell scripts to automate administrative tasks.
-
Pat knows how to use basic LDAP commands, having worked examples to learn LDAP.
-
Pat has already scripted and automated the directory service installation and setup procedures. Pat already saves copies of the following items:
-
The deployment description, documentation, plans, runbooks, and scripts.
-
The system configuration and software, including the Java installation.
-
The DS software and any customizations, plugins, or extensions.
-
A recent backup of any external secrets required, such as an HSM or a CA key.
-
A recent backup of each server’s configuration files, matching the production configuration.
-
The deployment ID and password.
This example scenario focuses on the application and user data, not the directory setup and configuration. For simplicity, Pat chooses to demonstrate disaster recovery with two replicated DS servers set up for evaluation.
-
-
Pat has a basic understanding of DS replication, including how replication makes directory data eventually consistent.
Actions
Before you try this example, set up two replicated DS directory servers on your computer as described in Install DS and Learn replication.
Tasks
Pat demonstrates this recovery procedure on a single computer. In deployment, the procedure involves multiple computers, but the order and content of the tasks remain the same.
|
This procedure applies to DS versions providing the For deployments with any earlier DS servers that don’t provide the command, you can’t use this procedure. Instead, refer to How do I perform disaster recovery steps in DS? |
-
You perform disaster recovery on a stopped server, one server at a time.
-
Disaster recovery is per base DN, like replication.
-
On each server you recover, you use the same disaster recovery ID, a unique identifier for this recovery.
To minimize the service interruption, this example recovers the servers one by one. It is also possible to perform disaster recovery in parallel by stopping and starting all servers together.
Task 1: Back up directory data
Back up data while the directory service is running smoothly.
-
Back up the directory data created for evaluation:
$ /path/to/opendj/bin/dsbackup \ create \ --start 0 \ --backupLocation /path/to/opendj/bak \ --hostname localhost \ --port 4444 \ --bindDN uid=admin \ --bindPassword password \ --usePkcs12TrustStore /path/to/opendj/config/keystore \ --trustStorePassword:file /path/to/opendj/config/keystore.pinbashThe command returns, and the DS server runs the backup task in the background.
When adapting the recovery process for deployment, you will schedule a backup task to run regularly for each database backend.
-
Check the backup task finishes successfully:
$ /path/to/opendj/bin/manage-tasks \ --summary \ --hostname localhost \ --port 4444 \ --bindDN uid=admin \ --bindPassword password \ --usePkcs12TrustStore /path/to/opendj/config/keystore \ --trustStorePassword:file /path/to/opendj/config/keystore.pin \ --no-promptbashThe status of the backup task is "Completed successfully" when it is done.
Recovery from disaster means stopping the directory service and losing the latest changes. The more recent the backup, the fewer changes you lose during recovery. Backup operations are cumulative, so you can schedule them regularly without using too much disk space as long as you purge outdated backup files. As you script your disaster recovery procedures for deployment, schedule a recurring backup task to have safe, current, and complete backup files for each backend.
Task 2: Simulate a disaster
-
Delete all user entries in the evaluation backend:
$ /path/to/opendj/bin/ldapdelete \ --deleteSubtree \ --hostname localhost \ --port 1636 \ --useSsl \ --usePkcs12TrustStore /path/to/opendj/config/keystore \ --trustStorePassword:file /path/to/opendj/config/keystore.pin \ --bindDN uid=admin \ --bindPassword password \ ou=people,dc=example,dc=combashThis command takes a few seconds to remove over 100,000 user entries. It takes a few seconds more for replication to replay all the deletions on the other DS replica.
Why is this a disaster? Suppose you restore a DS replica from the backup to recreate the missing user entries. After the restore operation finishes, replication replays each deletion again, ensuring the user entries are gone from all replicas.
Although this example looks contrived, it is inspired by real-world outages. You cannot restore the entries permanently without a recovery procedure.
Task 3: Recover from the disaster
This task restores the directory data from backup files created before the disaster. Adapt this procedure as necessary if you have multiple directory backends to recover.
| All changes since the last backup operation are lost. |
Subtasks:
Prepare for recovery
-
If you have lost DS servers, replace them with servers configured as before the disaster.
In this example, no servers were lost. Reuse the existing servers.
-
On each replica, prevent applications from making changes to the backend for the affected base DN. Changes made during recovery would be lost or could not be replicated:
$ /path/to/opendj/bin/dsconfig \ set-backend-prop \ --backend-name dsEvaluation \ --set writability-mode:internal-only \ --hostname localhost \ --port 4444 \ --bindDN uid=admin \ --bindPassword password \ --usePkcs12TrustStore /path/to/opendj/config/keystore \ --trustStorePassword:file /path/to/opendj/config/keystore.pin \ --no-prompt $ /path/to/replica/bin/dsconfig \ set-backend-prop \ --backend-name dsEvaluation \ --set writability-mode:internal-only \ --hostname localhost \ --port 14444 \ --bindDN uid=admin \ --bindPassword password \ --usePkcs12TrustStore /path/to/opendj/config/keystore \ --trustStorePassword:file /path/to/opendj/config/keystore.pin \ --no-promptbashIn this example, the first server’s administrative port is
4444. The second server’s administrative port is14444. -
Record the ID of the last good backup before the disaster.
The following command lists backups for the
dsEvaluationbackend, the one affected by the disaster:$ /path/to/opendj/bin/dsbackup \ list \ --backupLocation /path/to/opendj/bak \ --backendName dsEvaluation \ --offlineThe output for a backup operation includes the date and the ID. Use the date shown in the output to find the ID of the last good backup:
… Backend name: dsEvaluation Server ID: first-ds Backup Date: 17/Feb/2025 16:23:26 [Europe/Paris] Backup ID: dsEvaluation_20250217152326308 …Make sure you find the ID of the last backup before the disaster. This isn’t necessarily the same ID as the last successful backup. If the disaster only broke your data, not the service, the last successful backup could’ve run after the disaster.
-
Make sure the files for the last backup before the disaster are available to all DS servers you’ll recover.
Disaster recovery includes restoring all directory server replicas from the same good backup files.
If you store backup files locally on each server, copy the backup files to each server. You can optionally purge backup files you won’t use to avoid copying more files than necessary. Only use the backup from the backup files you copied and not the local backups on the server you’re recovering. You’ll recover the server from the good backup files and won’t use the local files.
Recover the first directory server
|
DS uses the disaster recovery ID to set the generation ID, an internal, shorthand form of the initial replication state. Replication only works when the data for the base DN share the same generation ID on each server. There are two approaches to using the
Don’t mix the two approaches in the same disaster recovery procedure. Use the generated recovery ID or the recovery ID of your choice, but do not use both. |
This process generates the disaster recovery ID to use when recovering the other servers.
-
Stop the directory server you use to start the recovery process:
$ /path/to/opendj/bin/stop-dsbash -
Restore the affected data on this directory server.
The following command restores data from the last good backup based on the ID you found in Prepare for recovery:
$ /path/to/opendj/bin/dsbackup \ restore \ --offline \ --backupId ${BACKUP_ID} \ --backupLocation /path/to/opendj/bakbashChanges to the affected data that happened after the backup are lost. Use the most recent backup files prior to the disaster.
This approach to restoring data works in deployments with the same DS server version. When all DS servers share the same DS version, you can restore all the DS directory servers from the same backup data.
Backup archives are not guaranteed to be compatible across major and minor server releases. Restore backups only on directory servers of the same major or minor version.
-
Run the command to begin the disaster recovery process.
When this command completes successfully, it displays the disaster recovery ID:
$ /path/to/opendj/bin/dsrepl \ disaster-recovery \ --baseDn dc=example,dc=com \ --generate-recovery-id \ --no-prompt Disaster recovery id: <generatedId>bashRecord the <generatedId>. You will use it to recover all other servers.
-
Start the recovered server:
$ /path/to/opendj/bin/start-dsbash -
Test the data you restored is what you expect.
-
Start backing up the recovered directory data.
The new backup is for potential future recoveries, not the current disaster recovery. To be safe, take new backups as soon as you allow external applications to make changes again.
As explained in New backup after recovery, you can no longer rely on pre-recovery backup data after disaster recovery. Unless the new backup is stored in a different location than the backup used for recovery, the operation won’t take a long time, as it takes advantage of the cumulative backup feature.
-
Allow external applications to make changes to directory data again:
$ /path/to/opendj/bin/dsconfig \
 set-backend-prop \
 --backend-name dsEvaluation \
 --set writability-mode:enabled \
 --hostname localhost \
 --port 4444 \
 --bindDN uid=admin \
 --bindPassword password \
 --usePkcs12TrustStore /path/to/opendj/config/keystore \
 --trustStorePassword:file /path/to/opendj/config/keystore.pin \
 --no-prompt
bash
You have recovered this replica and begun to bring the service back online. To enable replication with other servers to resume, recover the remaining servers.
Recover remaining servers
|
Make sure you have:
|
You can perform this procedure in parallel on all remaining servers or on one server at a time. For each server:
-
Stop the server:
$ /path/to/replica/bin/stop-dsbash -
Unless the server is a standalone replication server, restore the affected data from the same last good backup files you used for the first server:
$ /path/to/replica/bin/dsbackup \
 restore \
 --offline \
 --backupId ${BACKUP_ID} \
 --backupLocation /path/to/opendj/bak
bash -
Run the recovery command.
The following command uses a generated ID. It verifies this server’s data match the first server you recovered:
$ export DR_ID=<generatedId> $ /path/to/replica/bin/dsrepl \ disaster-recovery \ --baseDn dc=example,dc=com \ --generated-id ${DR_ID} \ --no-promptbashIf the recovery ID is a unique ID of your choosing, use
dsrepl disaster-recovery --baseDn <base-dn> --user-generated-id <recoveryId>instead. This alternative doesn’t verify the data on each replica match and won’t work if the replication topology includes one or more standalone replication servers. -
Start the recovered server:
$ /path/to/replica/bin/start-dsbash -
If this is a directory server, test the data you restored is what you expect.
-
If this is a directory server, allow external applications to make changes to directory data again:
$ /path/to/replica/bin/dsconfig \
 set-backend-prop \
 --backend-name dsEvaluation \
 --set writability-mode:enabled \
 --hostname localhost \
 --port 14444 \
 --bindDN uid=admin \
 --bindPassword password \
 --usePkcs12TrustStore /path/to/opendj/config/keystore \
 --trustStorePassword:file /path/to/opendj/config/keystore.pin \
 --no-prompt
bash
After completing these steps for all servers, you have restored the directory service and recovered from the disaster.
Validation
After recovering from the disaster, validate replication works as expected. Use the following steps as a simple guide.
-
Modify a user entry on one replica.
The following command updates Babs Jensen’s description to
Post recovery:$ /path/to/opendj/bin/ldapmodify \ --hostname localhost \ --port 1636 \ --useSsl \ --usePkcs12TrustStore /path/to/opendj/config/keystore \ --trustStorePassword:file /path/to/opendj/config/keystore.pin \ --bindDn uid=bjensen,ou=People,dc=example,dc=com \ --bindPassword hifalutin <<EOF dn: uid=bjensen,ou=People,dc=example,dc=com changetype: modify replace: description description: Post recovery EOF # MODIFY operation successful for DN uid=bjensen,ou=People,dc=example,dc=combash -
Read the modified entry on another replica:
$ /path/to/replica/bin/ldapsearch \
 --hostname localhost \
 --port 11636 \
 --useSsl \
 --usePkcs12TrustStore /path/to/opendj/config/keystore \
 --trustStorePassword:file /path/to/opendj/config/keystore.pin \
 --bindDN uid=bjensen,ou=People,dc=example,dc=com \
 --bindPassword hifalutin \
 --baseDn dc=example,dc=com \
 "(cn=Babs Jensen)" \
 description
dn: uid=bjensen,ou=People,dc=example,dc=com
description: Post recovery
bash
You have shown the recovery procedure succeeded.
What’s next
Example scenario
With the plan for disaster recovery off to a good start, Pat’s next steps are to:
-
Develop tests and detailed procedures for recovering from a disaster in deployment.
-
Put in place backup plans for directory services.
The backup plans address these more routine maintenance cases and keep the directory service running smoothly.
-
Document the procedures in the deployment runbook.
Explore further
This use case can serve as a template for DS test and production deployments. Adapt this example for deployment:
-
Back up files as a regularly scheduled task to ensure you always have a recent backup of each backend.
-
Regularly export the data to LDIF from at least one DS replica in case all backups are lost or corrupted. This LDIF serves as a last resort when you can’t recover the data from backup files.
-
Store the backup files remotely with multiple copies in different locations.
-
Purge old backup files to avoid filling up the disk space.
-
Be ready to restore each directory database backend.
Before deployment
When planning to deploy disaster recovery procedures, take these topics into account.
Recover before the purge delay
When recovering from backup, you must complete the recovery procedure while the backup is newer than the replication delay.
If this is not possible for all servers, recreate the remaining servers from scratch after recovering as many servers as possible and taking a new backup.
New backup after recovery
Disaster recovery resets the replication generation ID to a different format than you get when importing new directory data.
After disaster recovery, you can no longer use backups created before the recovery procedure started for the recovered base DN. Directory servers can only replicate data under a base DN with directory servers having the same generation ID. The old backups no longer have the right generation IDs.
Instead, immediately after recovery, back up data from the recovered base DN and use the new backups going forward when you restore servers after the disaster recovery has completed.
You can purge older backup files to prevent someone accidentally restoring from a backup with an outdated generation ID.
Change notifications reset
Disaster recovery clears the changelog for the recovered base DN.
If you use change number indexing for the recovered base DN, disaster recovery resets the change number.
Reference material
Reference |
Description |
In-depth introduction to replication concepts |
|
The basics, plus backing up to the cloud and using filesystem snapshots |
|
About keys, including those for encrypting and decrypting backup files |
|
Details about exporting and importing LDIF, common data stores |
|
Examples you can use when scripting installation procedures |
|
Examples you can use when scripting server configuration |
Change password storage
What seemed a secure password storage scheme a few years ago no longer looks safe. You can configure DS to migrate to stronger password storage.
Description
Estimated time to complete: 30 minutes
With a reversible encryption scheme, an attacker who gains access to the server files can recover all the plaintext passwords. With a strong one-way hash scheme, the attacker must use brute force methods for each password.
However, not all one-way hash schemes are safe, either. Older password storage schemes, such as the salted Secure Hash Algorithm (SHA-1) schemes, use one-way hash functions designed for message authentication and digital signatures. SHA-1 schemes are fast; a server processes authentications with low latency and high throughput. On the downside, high-performance algorithms also make brute force attack techniques more effective. Modern off-the-shelf GPUs can calculate billions of SHA-1 hashes per second. Dedicated hardware can calculate even more hashes per second.
Goals
In completing this use case, you learn to:
-
Discover password policies using outdated password storage schemes.
-
List accounts using outdated password storage schemes.
-
Create a replicated password policy and configure its password storage scheme settings.
-
Assign accounts a password policy.
Example scenario
The security team where Pat works has mandated passwords must be stored with a computationally intensive one-way hash, such as Argon2, Bcrypt, PBKDF2, or PKCS5S2.
Pat knows the default password storage scheme for the DS directory service has not changed in years. Many user accounts still have salted SHA-1-based password storage.
Pat considers the options and decides to move to a PBKDF2-based scheme. Pat plans to show how to switch to PBKDF2 and to get the other identity administrators to review the process.
At this point, the security team has not communicated a due date to implement the mandate. Pat expects the change to be transparent for users and application developers.
As a directory service administrator, Pat must work with the deployment team to make sure DS systems have enough CPU. PBKDF2 uses far more CPU resources than outdated storage schemes.
Prerequisites
Knowledge
Before you start, make sure you have the same background knowledge as Pat:
-
Pat is familiar with the command line on the target operating system, a Linux distribution in this example.
-
Pat knows how to use basic LDAP commands, having worked through the examples to learn LDAP.
-
Pat has already successfully completed directory service installation and setup procedures.
Background
The problem
Sometimes, people ask why DS doesn’t provide a tool to move passwords from one storage scheme to another.
Pat explains DS uses one-way hash functions to store passwords. These are one-way functions because going from a password to a hash is deterministic and straightforward. Going from a hash to a password is hard. For computationally intensive schemes like PBKDF2, going from a hash to a password is effectively impossible.
Even given the PBKDF2-based password hashes for all the accounts in the directory service, you’d spend plenty of money and computer resources cracking any of them to recover an original password.
Any tool to move passwords from one storage scheme to another must first crack every password hash. For this reason, DS does not provide such a tool, and there are no plans to develop one.
The solution
One possible solution is to change the storage scheme in password policies, disable the target storage schemes, and require users to reset the passwords for their accounts; however, this can be disruptive.
Pat knows a less disruptive solution is to wait until the next successful authentication, then let DS store the password with the new storage scheme.
When you authenticate with a DN and password—an LDAP simple bind—you supply the password. If the authentication succeeds, the password is valid. DS still has the password at this time, so it can hash the password according to the new scheme and remove the hash computed by the old scheme.
In DS, the password policy defines the storage scheme to use. As an administrator, Pat configures a password policy to deprecate the old scheme in favor of the new scheme. Pat then waits for accounts to bind and lets DS update the storage scheme.
Constraints
Waiting for accounts to bind is not a problem unless there are time constraints.
For example, if there’s a mandate to move away from the deprecated scheme by a target date, then Pat will have to effectively lock "inactive" accounts. Those accounts must reset their passwords after the date.
As an administrator, Pat can implement this by disabling the deprecated password storage scheme on the target date. Accounts cannot bind with a password stored using a disabled scheme.
Pat knows to warn application owners and developers of end-user UIs and self-service account management tools "inactive" accounts cannot authenticate when their passwords still use the old scheme after the target date.
Applications can rely on account usability features to discover why LDAP binds fail. Developers of end-user tools can use the hints in their applications to reset user passwords and prompt users to set new passwords.
Tasks
Pat demonstrates how to change password storage with a single DS server using the evaluation profile. The order of the tasks is the same in deployment, but the target storage schemes can differ.
Pat shows the process with a subentry password policy. You create an LDAP subentry and DS replicates it to the other replicas. If you use per-server password policies instead, you must edit the configuration for each DS replica.
Task 1: Set up DS
-
Create a deployment ID to use when setting up DS:
$ /path/to/opendj/bin/dskeymgr create-deployment-id --deploymentIdPassword password
<deployment-id>
$ export DEPLOYMENT_ID=<deployment-id>
bash -
Set up a single DS server using the evaluation profile with an outdated password storage scheme:
$ /path/to/opendj/setup \ --serverId evaluation-only \ --deploymentId $DEPLOYMENT_ID \ --deploymentIdPassword password \ --rootUserDn uid=admin \ --rootUserPassword password \ --monitorUserPassword password \ --hostname localhost \ --ldapPort 1389 \ --ldapsPort 1636 \ --httpsPort 8443 \ --adminConnectorPort 4444 \ --replicationPort 8989 \ --profile ds-evaluation \ --set ds-evaluation/useOutdatedPasswordStorage:true \ --start \ --acceptLicensebashThe
useOutdatedPasswordStoragesets the password storage scheme for users toSalted SHA-512.
Task 2: List password policies using outdated schemes
To show the process, Pat deprecates the outdated storage scheme in favor of a new stronger storage scheme.
-
List all available password storage schemes:
$ /path/to/opendj/bin/dsconfig \ list-password-storage-schemes \ --hostname localhost \ --port 4444 \ --usePkcs12TrustStore /path/to/opendj/config/keystore \ --trustStorePassword:file /path/to/opendj/config/keystore.pin \ --bindDN uid=admin \ --bindPassword password \ --no-prompt Password Storage Scheme : Type : enabled ------------------------:--------------------:-------- 3DES (DEPRECATED) : triple-des : false AES (LEGACY) : aes : false Argon2 : argon2 : true Base64 (LEGACY) : base64 : false Bcrypt : bcrypt : true Blowfish (DEPRECATED) : blowfish : false Clear (LEGACY) : clear : false CRYPT : crypt : false PBKDF2 : pbkdf2 : false PBKDF2-HMAC-SHA256 : pbkdf2-hmac-sha256 : true PBKDF2-HMAC-SHA512 : pbkdf2-hmac-sha512 : true PKCS5S2 : pkcs5s2 : false Salted SHA-1 (LEGACY) : salted-sha1 : false Salted SHA-256 : salted-sha256 : false Salted SHA-384 : salted-sha384 : false Salted SHA-512 : salted-sha512 : true SCRAM-SHA-256 : scram-sha256 : true SCRAM-SHA-512 : scram-sha512 : true SHA-1 (LEGACY) : sha1 : falsebashAccounts cannot authenticate with a password if their password policy depends on a disabled password storage scheme. Only the enabled password storage schemes (
enabled: true) matter for this procedure:-
Argon2 -
Bcrypt -
PBKDF2-HMAC-SHA256 -
PBKDF2-HMAC-SHA512 -
Salted SHA-512 -
SCRAM-SHA-256 -
SCRAM-SHA-512
For this example, Pat migrates passwords away from
Salted SHA-512. The others are stronger password storage schemes. -
-
List the per-server password policies to identify any that use the outdated scheme.
$ /path/to/opendj/bin/dsconfig \ list-password-policies \ --hostname localhost \ --port 4444 \ --usePkcs12TrustStore /path/to/opendj/config/keystore \ --trustStorePassword:file /path/to/opendj/config/keystore.pin \ --bindDN uid=admin \ --bindPassword password \ --no-prompt Password Policy : Type : password-attribute : default-password-storage-scheme ------------------------:-----------------:--------------------:-------------------------------- Default Password Policy : password-policy : userPassword : Salted SHA-512 Root Password Policy : password-policy : userPassword : PBKDF2-HMAC-SHA256bashThe
Default Password Policyuses the outdated storage scheme:-
The
Default Password Policyapplies to accounts in user and application data. -
The
Root Password Policyapplies to DS service accounts, such as the directory superuser (uid=admin).
-
-
List subentry password policies to check for any using the outdated scheme.
$ /path/to/opendj/bin/ldapsearch \ --hostname localhost \ --port 1636 \ --useSsl \ --usePkcs12TrustStore /path/to/opendj/config/keystore \ --trustStorePassword:file /path/to/opendj/config/keystore.pin \ --bindDN uid=admin \ --bindPassword password \ --baseDn "" \ "(&(objectClass=subEntry)(objectClass=ds-pwp-password-policy))"bashThe command returns nothing; DS has no subentry password policies configured for the evaluation profile.
Task 3: List accounts using outdated schemes
DS has a userPassword index to the directory entries using each password scheme.
-
List the accounts using the outdated scheme.
This command uses a filter with an extensible match comparison,
1.3.6.1.4.1.36733.2.1.4.14:=Salted SHA-512. The object identifier corresponds to password storage scheme quality match syntax. The filter matches entries whose password is stored withSalted SHA-512(SSHA512):$ /path/to/opendj/bin/ldapsearch \ --hostname localhost \ --port 1636 \ --useSsl \ --usePkcs12TrustStore /path/to/opendj/config/keystore \ --trustStorePassword:file /path/to/opendj/config/keystore.pin \ --bindDN uid=admin \ --bindPassword password \ --baseDn dc=example,dc=com \ "(userPassword:1.3.6.1.4.1.36733.2.1.4.14:=SSHA512)" 1.1bashAn attribute list of
1.1means the search should not return attribute values, just DNs.If you have multiple password policies with outdated storage schemes, search like this for each one.
The response can be empty, meaning no accounts use the storage scheme. If a password policy uses an outdated password storage scheme, but no accounts use it, update the password policy to deprecate the outdated scheme. Double-check the response is still empty, and disable the outdated scheme in each DS configuration to prevent its use.
-
If you want to check which password policy an account has, request
pwdPolicySubentry:$ /path/to/opendj/bin/ldapsearch \ --hostname localhost \ --port 1636 \ --useSsl \ --usePkcs12TrustStore /path/to/opendj/config/keystore \ --trustStorePassword:file /path/to/opendj/config/keystore.pin \ --bindDN uid=admin \ --bindPassword password \ --baseDn dc=example,dc=com \ "(cn=Babs Jensen)" \ pwdPolicySubentry dn: uid=bjensen,ou=People,dc=example,dc=com pwdPolicySubentry: cn=Default Password Policy,cn=Password Policies,cn=configbashThe
pwdPolicySubentryhas the DN of the applicable password policy for the entry. You could usepwdPolicySubentryinstead of1.1in the previous step to show the attribute for each user.
Task 4: Move accounts to the new scheme
These steps deprecate Salted SHA-512 in favor of PBKDF2-HMAC-256:
-
Configure a password policy to deprecate the outdated scheme.
$ /path/to/opendj/bin/ldapmodify \ --hostname localhost \ --port 1636 \ --useSsl \ --usePkcs12TrustStore /path/to/opendj/config/keystore \ --trustStorePassword:file /path/to/opendj/config/keystore.pin \ --bindDN uid=admin \ --bindPassword password << EOF dn: cn=New password policy,dc=example,dc=com objectClass: top objectClass: subentry objectClass: ds-pwp-password-policy objectClass: ds-pwp-validator objectClass: ds-pwp-length-based-validator cn: New password policy ds-pwp-password-attribute: userPassword ds-pwp-default-password-storage-scheme: PBKDF2-HMAC-SHA256 ds-pwp-deprecated-password-storage-scheme: Salted SHA-512 ds-pwp-length-based-min-password-length: 8 subtreeSpecification: {base "", specificationFilter "(userPassword=*)" } EOF # ADD operation successful for DN cn=New password policy,dc=example,dc=combashThe
subtreeSpecificationapplies the password policy to all accounts underdc=example,dc=comwith auserPasswordattribute. -
Check the new policies apply as expected.
The following command shows the new policy applies to a user account:
$ /path/to/opendj/bin/ldapsearch \ --hostname localhost \ --port 1636 \ --useSsl \ --usePkcs12TrustStore /path/to/opendj/config/keystore \ --trustStorePassword:file /path/to/opendj/config/keystore.pin \ --bindDN uid=admin \ --bindPassword password \ --baseDn dc=example,dc=com \ "(cn=Babs Jensen)" \ pwdPolicySubentry userPassword dn: uid=bjensen,ou=People,dc=example,dc=com userPassword: {SSHA512}<hash> pwdPolicySubentry: cn=New password policy,dc=example,dc=combashThe password is still hashed with the old scheme. The user hasn’t authenticated since the password policy change.
-
Wait for accounts to bind with password-based authentication.
You can check progress using the searches described in Task 3: List accounts using outdated schemes.
-
(Optional) When enough accounts have changed storage schemes, disable stale password policies and the outdated scheme.
Task 5: Plan any necessary communications
When you have no time constraints, there’s nothing to communicate to application developers or end users. Make sure DS systems have the resources to process the stronger password policy; communicate about this with those providing systems for testing and deployment. Eventually, DS updates the password storage scheme for all active accounts.
If you have a due date to finish the move, you must disable the outdated scheme at that time:
$ /path/to/opendj/bin/dsconfig \
 set-password-storage-scheme-prop \
 --scheme-name "Salted SHA-512" \
 --set enabled:false \
 --hostname localhost \
 --port 4444 \
 --usePkcs12TrustStore /path/to/opendj/config/keystore \
 --trustStorePassword:file /path/to/opendj/config/keystore.pin \
 --bindDN uid=admin \
 --bindPassword password \
--no-promptThis has the effect of locking inactive accounts—those who didn’t authenticate before the date—because they are stuck with the disabled storage scheme. An administrator must reset the passwords to activate the accounts.
-
Plan with other identity administrators and identity application developers how to automate the password reset and change process to active locked accounts.
In a Ping Identity Platform deployment, you can configure self-service features to help end users help themselves.
-
If possible, let end users know they need to sign on before the due date to keep their accounts active.
Let them know inactive accounts are locked out after the due date, and describe how they can activate their accounts after the lockout.
Validation
Display a user’s password before and after authentication to confirm the policy causes DS to update how it stores the password.
-
Read a
userPasswordas directory superuser to display the password storage scheme:$ /path/to/opendj/bin/ldapsearch \ --hostname localhost \ --port 1636 \ --useSsl \ --usePkcs12TrustStore /path/to/opendj/config/keystore \ --trustStorePassword:file /path/to/opendj/config/keystore.pin \ --bindDN uid=admin \ --bindPassword password \ --baseDn dc=example,dc=com \ "(cn=Babs Jensen)" \ userPassword dn: uid=bjensen,ou=People,dc=example,dc=com userPassword: {SSHA512}<hash>bashThe attribute shows the password storage scheme in braces before the hash. The user has not authenticated since the policy change. The scheme is still
Salted SHA-512(SSHA512). -
Read the
userPasswordagain as the user to display the password storage scheme:$ /path/to/opendj/bin/ldapsearch \ --hostname localhost \ --port 1636 \ --useSsl \ --usePkcs12TrustStore /path/to/opendj/config/keystore \ --trustStorePassword:file /path/to/opendj/config/keystore.pin \ --bindDN uid=bjensen,ou=People,dc=example,dc=com \ --bindPassword hifalutin \ --baseDn dc=example,dc=com \ "(cn=Babs Jensen)" \ userPassword dn: uid=bjensen,ou=People,dc=example,dc=com userPassword: {PBKDF2-HMAC-SHA256}10:<hash>bashThe
--bindDnand--bindPasswordindicate the user authenticates with an LDAP simple bind. DS updates the hash when the user authenticates. The scheme is nowPBKDF2-HMAC-SHA256.
What’s next
After demonstrating the process, Pat implements plans to deprecate outdated password storage schemes in deployment.
Pat is careful to make sure DS systems have the resources to process PBKDF2 hashes, in particular for binds.
For example, Pat can use the authrate command to generate LDAP binds before and after the change.
Pat can also review logs and monitoring data from the deployment to estimate peak bind rates.
|
When you install DS, the The server’s default password policy uses this storage scheme. |
When DS systems have sufficient resources,
Pat can increase the number of iterations for the PBKDF2-HMAC-SHA256 scheme; for example,
setting pbkdf2-iterations: 10000 and rehash-policy: only-increase in the PBKDF2-HMAC-SHA256 scheme configuration.
DS updates the password storage hash for an account on the next successful authentication.
Explore further
This use case can serve as a template for DS test and production deployments. Adapt this example for deployment:
-
Review the password storage schemes used in deployment to determine what to change.
-
Make sure the directory service has appropriate resources to sustain authentication rates after moving to a resource-intensive password storage scheme.
-
Plan communications as necessary.
Change LDAP schema
Learn how to change LDAP schema definitions online and offline.
Description
Estimated time to complete: 30 minutes
LDAP schema definitions determine the kinds of information in the directory and how the information is related. You can update the schema definitions online and offline to change what the directory allows.
Develop and test schema changes online to catch any errors in the updated definitions.
After you validate the schema changes, you can deploy them online with the ldapmodify command
or offline by copying updated schema files.
Replication replays the LDAP schema changes to other DS servers.
In this use case, you:
-
Understand a scenario where schema changes make sense.
-
Understand how schema changes can require rebuilding indexes.
-
Develop and test schema changes.
-
Practice rolling out schema changes by copying updated schema files.
Goals
In completing this use case, you learn to:
-
Use the
ldapmodifycommand to change LDAP schema. -
Rebuild indexes affected by schema changes.
-
Review and remove replication metadata from changed schema files.
Example scenario
One of the directory application owners asks Pat to let their application page through accounts by class of service.
Pat’s directory deployment uses the definition for the classOfService attribute based on the evaluation profile.
Pat can add an index for the classOfService attribute,
but wonders if the application owner has additional requirements.
In discussion with the application owner, Pat learns the application owner:
-
Found the class of service attribute can accept any random string value.
They ask Pat if class of service could be restricted to an enumeration of
bronze,silver,gold, andplatinum. -
Wants a
sharedQuotaattribute like thediskQuotaandmailQuotaattributes.The application owner doesn’t use
sharedQuotayet, but plans to use it in a few weeks.
Prerequisites
Knowledge
Before you start:
-
Make sure you are familiar with the command line on your operating system.
-
If you’re new to directory services, work through the examples to learn LDAP.
Actions
Before you try this example, install a DS server in evaluation mode.
Tasks
Pat shows the tasks with DS servers in evaluation mode. The order and content of the tasks for production deployments are the same.
Task 1: Add a classOfService index
The application owner wants to page through accounts by class of service. Class of service has only a few values, and every user account could have the attribute. This is a good match for a big index.
-
Create the index:
$ /path/to/opendj/bin/dsconfig \
 create-backend-index \
 --backend-name dsEvaluation \
 --index-name classOfService \
 --set index-type:big-equality \
 --hostname localhost \
 --port 4444 \
 --bindDN uid=admin \
 --bindPassword password \
 --usePkcs12TrustStore /path/to/opendj/config/keystore \
 --trustStorePassword:file /path/to/opendj/config/keystore.pin \
 --no-prompt
bash -
Build the new index:
$ /path/to/opendj/bin/rebuild-index \
 --baseDn dc=example,dc=com \
 --index classOfService \
 --hostname localhost \
 --port 4444 \
 --bindDn uid=admin \
 --bindPassword password \
 --usePkcs12TrustStore /path/to/opendj/config/keystore \
 --trustStorePassword:file /path/to/opendj/config/keystore.pin
bash
Applications can now use the simple paged results control to page through entries with a specified class of service.
Task 2: Develop schema changes
Pat notices the classOfService attribute has SYNTAX 1.3.6.1.4.1.1466.115.121.1.15 (directory string syntax).
Pat can change the schema definition to use a custom enumeration syntax,
so DS only allows applications to set one of the desired values.
Pat can update the schema again to extend the enumeration as necessary.
Pat also adds a new sharedQuota attribute modeled on the diskQuota and mailQuota attributes.
Pat knows DS rejects malformed online modifications to schema definitions.
Pat develops and tests the schema changes with the ldapmodify command.
|
When changing a schema definition, delete the existing value and add the new value as part of the same modification. Otherwise, there’s a window after you delete a definition and before you add the new one where an update could fail or an index could become degraded due to the missing schema definition. The definition you delete must match the definition in the schema LDIF exactly, not including space characters. When you update schema definitions online, DS sets the |
-
Update the schema definitions.
The following example command:
-
Adds an enumeration syntax for class of service
-
Updates the
classOfServiceattribute to use the enumeration syntax -
Adds a
sharedQuotaattribute to thecosobject class for class of service attributes
$ /path/to/opendj/bin/ldapmodify \
 --hostname localhost \
 --port 1636 \
 --useSsl \
 --usePkcs12TrustStore /path/to/opendj/config/keystore \
 --trustStorePassword:file /path/to/opendj/config/keystore.pin \
 --bindDN uid=admin \
 --bindPassword password << EOF
dn: cn=schema
changetype: modify
add: ldapSyntaxes
ldapSyntaxes: ( example-custom-syntax-oid
  DESC 'Enumeration syntax for class of service'
  X-ENUM ( 'bronze' 'silver' 'gold' 'platinum' )
  X-ORIGIN 'DS Documentation Examples' )
-
delete: attributeTypes
attributeTypes: ( example-class-of-service-attribute-type
  NAME 'classOfService'
  EQUALITY caseIgnoreMatch
  ORDERING caseIgnoreOrderingMatch
  SUBSTR caseIgnoreSubstringsMatch
  SYNTAX 1.3.6.1.4.1.1466.115.121.1.15
  SINGLE-VALUE
  USAGE userApplications
  X-ORIGIN 'DS Documentation Examples' )
-
add: attributeTypes
attributeTypes: ( example-class-of-service-attribute-type
  NAME 'classOfService'
  EQUALITY caseIgnoreMatch
  ORDERING caseIgnoreOrderingMatch
  SUBSTR caseIgnoreSubstringsMatch
  SYNTAX example-custom-syntax-oid
  SINGLE-VALUE
  USAGE userApplications
  X-ORIGIN 'DS Documentation Examples' )
-
add: attributeTypes
attributeTypes: ( example-class-of-service-shared-quota
  NAME 'sharedQuota'
  EQUALITY caseIgnoreMatch
  ORDERING caseIgnoreOrderingMatch
  SUBSTR caseIgnoreSubstringsMatch
  SYNTAX 1.3.6.1.4.1.1466.115.121.1.15
  USAGE userApplications
  X-ORIGIN 'DS Documentation Examples' )
-
delete: objectClasses
objectClasses: ( example-class-of-service-object-class
  NAME 'cos'
  SUP top
  AUXILIARY
  MAY ( classOfService $ diskQuota $ mailQuota )
  X-ORIGIN 'DS Documentation Examples' )
-
add: objectClasses
objectClasses: ( example-class-of-service-object-class
  NAME 'cos'
  SUP top
  AUXILIARY
  MAY ( classOfService $ diskQuota $ mailQuota $ sharedQuota )
  X-ORIGIN 'DS Documentation Examples' )
EOF
bash -
-
Rebuild affected indexes.
This update changes the
classOfServicesyntax, so rebuild the index to use the new syntax:$ /path/to/opendj/bin/rebuild-index \ --baseDn dc=example,dc=com \ --index classOfService \ --hostname localhost \ --port 4444 \ --bindDn uid=admin \ --bindPassword password \ --usePkcs12TrustStore /path/to/opendj/config/keystore \ --trustStorePassword:file /path/to/opendj/config/keystore.pinbashIf the enumeration syntax changes again, rebuild the
classOfServiceindex.
Task 3: Save changed schema files
For the production servers, Pat doesn’t change the schema online. Pat keeps schema definition files under source control to track all schema changes.
After modifying the schema online, Pat locates the schema definitions added and changed in the db/schema LDIF files.
Pat notices DS rewrites the updated LDIF files with one schema definition per line.
Before putting the changed LDIF files under source control, Pat takes care to remove the operational attributes
including the ds-sync-generation-id and ds-sync-state attributes.
Using the wrong values for those attributes could break schema replication.
Pat lets DS replication manage the operational attributes.
In Pat’s copies of the LDIF files, the schema definitions are folded for readability. Each line continuation starts with two spaces before a schema element keyword. LDIF continuation consumes the first space. The second space separates the keyword from the preceding text.
Show 60-ds-evaluation-schema.ldif
dn: cn=schema
objectclass: top
objectclass: ldapSubentry
objectclass: subschema
cn: schema
ldapSyntaxes: ( example-custom-syntax-oid
DESC 'Enumeration syntax for class of service'
X-ENUM ( 'bronze' 'silver' 'gold' 'platinum' )
X-ORIGIN 'DS Documentation Examples'
X-SCHEMA-FILE '60-ds-evaluation-schema.ldif' )
attributeTypes: ( example-class-of-service-disk-quota
NAME 'diskQuota'
EQUALITY caseIgnoreMatch
ORDERING caseIgnoreOrderingMatch
SUBSTR caseIgnoreSubstringsMatch
SYNTAX 1.3.6.1.4.1.1466.115.121.1.15
USAGE userApplications
X-ORIGIN 'DS Documentation Examples'
X-SCHEMA-FILE '60-ds-evaluation-schema.ldif' )
attributeTypes: ( example-class-of-service-mail-quota
NAME 'mailQuota'
EQUALITY caseIgnoreMatch
ORDERING caseIgnoreOrderingMatch
SUBSTR caseIgnoreSubstringsMatch
SYNTAX 1.3.6.1.4.1.1466.115.121.1.15
USAGE userApplications
X-ORIGIN 'DS Documentation Examples'
X-SCHEMA-FILE '60-ds-evaluation-schema.ldif' )
attributeTypes: ( example-class-of-service-shared-quota
NAME 'sharedQuota'
EQUALITY caseIgnoreMatch
ORDERING caseIgnoreOrderingMatch
SUBSTR caseIgnoreSubstringsMatch
SYNTAX 1.3.6.1.4.1.1466.115.121.1.15
USAGE userApplications
X-ORIGIN 'DS Documentation Examples'
X-SCHEMA-FILE '60-ds-evaluation-schema.ldif' )
attributeTypes: ( json-attribute-oid
NAME 'json'
EQUALITY caseIgnoreJsonQueryMatch
SYNTAX 1.3.6.1.4.1.36733.2.1.3.1
X-ORIGIN 'DS Documentation Examples'
X-SCHEMA-FILE '60-ds-evaluation-schema.ldif' )
attributeTypes: ( oauth2token-attribute-oid
NAME 'oauth2Token'
EQUALITY caseIgnoreOAuth2TokenQueryMatch
SYNTAX 1.3.6.1.4.1.36733.2.1.3.1
X-ORIGIN 'DS Documentation Examples'
X-SCHEMA-FILE '60-ds-evaluation-schema.ldif' )
attributeTypes: ( jsonToken-attribute-oid
NAME 'jsonToken'
EQUALITY caseIgnoreJsonTokenIDMatch
SYNTAX 1.3.6.1.4.1.36733.2.1.3.1
SINGLE-VALUE
X-ORIGIN 'DS Documentation Examples'
X-SCHEMA-FILE '60-ds-evaluation-schema.ldif' )
attributeTypes: ( example-class-of-service-attribute-type
NAME 'classOfService'
EQUALITY caseIgnoreMatch
ORDERING caseIgnoreOrderingMatch
SUBSTR caseIgnoreSubstringsMatch
SYNTAX example-custom-syntax-oid
SINGLE-VALUE
USAGE userApplications
X-ORIGIN 'DS Documentation Examples'
X-SCHEMA-FILE '60-ds-evaluation-schema.ldif' )
objectClasses: ( json-object-class-oid
NAME 'jsonObject'
SUP top
AUXILIARY
MAY json
X-ORIGIN 'DS Documentation Examples'
X-SCHEMA-FILE '60-ds-evaluation-schema.ldif' )
objectClasses: ( oauth2token-object-class-oid
NAME 'oauth2TokenObject'
SUP top
AUXILIARY
MAY oauth2Token
X-ORIGIN 'DS Documentation Examples'
X-SCHEMA-FILE '60-ds-evaluation-schema.ldif' )
objectClasses: ( json-token-object-class-oid
NAME 'JsonTokenObject'
SUP top
AUXILIARY
MAY jsonToken
X-ORIGIN 'DS Documentation Examples'
X-SCHEMA-FILE '60-ds-evaluation-schema.ldif' )
objectClasses: ( example-class-of-service-object-class
NAME 'cos'
SUP top
AUXILIARY
MAY ( classOfService $ diskQuota $ mailQuota $ sharedQuota )
X-ORIGIN 'DS Documentation Examples'
X-SCHEMA-FILE '60-ds-evaluation-schema.ldif' )Show 99-user.ldif
dn: cn=schema
objectclass: top
objectclass: ldapSubentry
objectclass: subschema
cn: schemaPat also keeps copies of the original DS schema files under source control. When upgrading, Pat compares the original files with the upgraded files and applies any changes to the modified production files as necessary.
Task 4: Deploy changed schema files
To make a schema change in deployment, stop the server, add the custom schema, and restart the server.
-
Prepare to show schema change deployment by setting up two replicated DS directory servers as described in Install DS and Learn replication.
-
Make sure you have local copies of the changed schema definition files:
- 60-ds-evaluation-schema.ldif
-
This file contains the changed schema definitions.
- 99-user.ldif
-
This file removes the replication metadata.
-
Stop a server:
$ /path/to/opendj/bin/stop-dsbash -
Add the custom schema files and start the replica:
$ cp 60-ds-evaluation-schema.ldif /path/to/opendj/db/schema/bash -
Start the server:
$ /path/to/opendj/bin/start-dsbash
Replication applies the changes to other servers.
Task 5: Deploy the classOfService index
Create and build the index on each replica an application uses for searches:
-
Create the index on the first server:
$ /path/to/opendj/bin/dsconfig \ create-backend-index \ --backend-name dsEvaluation \ --index-name classOfService \ --set index-type:big-equality \ --hostname localhost \ --port 4444 \ --bindDN uid=admin \ --bindPassword password \ --usePkcs12TrustStore /path/to/opendj/config/keystore \ --trustStorePassword:file /path/to/opendj/config/keystore.pin \ --no-promptbash -
Build the new index on the first server:
$ /path/to/opendj/bin/rebuild-index \
 --baseDn dc=example,dc=com \
 --index classOfService \
 --hostname localhost \
 --port 4444 \
 --bindDn uid=admin \
 --bindPassword password \
 --usePkcs12TrustStore /path/to/opendj/config/keystore \
 --trustStorePassword:file /path/to/opendj/config/keystore.pin
bash -
Create the index on the second server:
$ /path/to/replica/bin/dsconfig \
 create-backend-index \
 --backend-name dsEvaluation \
 --index-name classOfService \
 --set index-type:big-equality \
 --hostname localhost \
 --port 14444 \
 --bindDN uid=admin \
 --bindPassword password \
 --usePkcs12TrustStore /path/to/replica/config/keystore \
 --trustStorePassword:file /path/to/replica/config/keystore.pin \
 --no-prompt
bash -
Build the new index on the second server:
$ /path/to/replica/bin/rebuild-index \
 --baseDn dc=example,dc=com \
 --index classOfService \
 --hostname localhost \
 --port 14444 \
 --bindDn uid=admin \
 --bindPassword password \
 --usePkcs12TrustStore /path/to/replica/config/keystore \
 --trustStorePassword:file /path/to/replica/config/keystore.pin
bash
The new schema definitions and indexes are ready to use.
Validation
After you deploy the changed schema definitions and classOfService indexes,
follow these steps to check you can use the updated schema definitions and index.
-
Page through entries with
goldclass of service on the second replica as a user who doesn’t have theunindexed-searchprivilege:$ ldapsearch \ --hostname localhost \ --port 11636 \ --useSsl \ --usePkcs12TrustStore /path/to/replica/config/keystore \ --trustStorePassword:file /path/to/replica/config/keystore.pin \ --bindDN uid=kvaughan,ou=People,dc=example,dc=com \ --bindPassword bribery \ --baseDn dc=example,dc=com \ --simplePageSize 5 \ "(classOfService=gold)" \ mail dn: uid=abarnes,ou=People,dc=example,dc=com mail: abarnes@example.com dn: uid=ahall,ou=People,dc=example,dc=com mail: ahall@example.com dn: uid=aknutson,ou=People,dc=example,dc=com mail: aknutson@example.com dn: uid=alutz,ou=People,dc=example,dc=com mail: alutz@example.com dn: uid=ashelton,ou=People,dc=example,dc=com mail: ashelton@example.com Press RETURN to continuebash -
Show users can now have
platinumclass of service:$ /path/to/replica/bin/ldapmodify \ --hostname localhost \ --port 11636 \ --useSsl \ --usePkcs12TrustStore /path/to/replica/config/keystore \ --trustStorePassword:file /path/to/replica/config/keystore.pin \ --bindDN uid=admin \ --bindPassword password << EOF dn: uid=bjensen,ou=People,dc=example,dc=com changetype: modify replace: classOfService classOfService: platinum EOFbash -
Show users can’t have a random string for class of service:
$ /path/to/replica/bin/ldapmodify \
 --hostname localhost \
 --port 11636 \
 --useSsl \
 --usePkcs12TrustStore /path/to/replica/config/keystore \
 --trustStorePassword:file /path/to/replica/config/keystore.pin \
 --bindDN uid=admin \
 --bindPassword password << EOF
dn: uid=bjensen,ou=People,dc=example,dc=com
changetype: modify
replace: classOfService
classOfService: custom extended service
EOF
# The LDAP modify request failed: 21 (Invalid Attribute Syntax)
# Additional Information:  When attempting to modify entry uid=bjensen,ou=People,dc=example,dc=com to replace the set of values for attribute classOfService, value "custom extended service" was found to be invalid according to the associated syntax: The provided value "custom extended service" cannot be parsed because it is not allowed by enumeration syntax with OID "example-custom-syntax-oid"
bash
What’s next
Pat knows schema definition changes are safe in files under source control. The reasons for the schema changes are not so well known. Pat plans to start and maintain a schema dictionary. The schema dictionary will describe each attribute known to be in use. It will track:
-
Who uses the attribute, including their contact information, and how they use it
-
What data it stores, and who owns the data, including contact information
-
Where the data comes from, especially if it comes from another system
-
When there are maintenance windows for the attribute (for reindexing and so on)
In addition, Pat has more to discuss with the application owner, who asked for the new sharedQuota attribute.
The diskQuota and mailQuota attributes
depend on the classOfService attribute for their values.
-
How should DS define
sharedQuotavalues? -
What should the quotas be for
classOfService: platinum?
DS for AM CTS
Show how to replicate AM core token service (CTS) data and fail over when a DS server is unavailable.
Description
Estimated time to complete: 45 minutes
AM uses DS to store CTS data, such as session tokens, data for SAML v2.0 and OAuth 2.0 applications, and push notifications.
Replicate the CTS data as you would any other directory data for availability, but realize AM applications are not necessarily built with DS eventual consistency in mind. For this reason, configure AM to use affinity load balancing when connecting to the DS CTS store. Affinity load balancing ensures each request for the same entry goes to the same DS server. If the DS server becomes unavailable, AM fails over to another DS server.
Suppose an AM application makes several AM calls in quick succession, and each call requires AM to retrieve a CTS entry from DS. Without affinity, if AM updates the CTS entry on one DS then reads it from another DS, it’s possible replication won’t have had time to replay the changes between the update and the subsequent read. The application could get a confusing response when it appears AM "forgets" the update.
With affinity, both the update and the read target the same DS server. The AM client application gets the expected response each time.
In this use case, you:
-
Set up DS for AM CTS, configuration, and identity data.
-
Set up and configure AM to use the DS service with affinity and failover.
-
Show AM continues to work as expected when a DS server is unavailable.
Goals
In completing this use case, you learn to:
-
Set up DS and AM together.
-
Configure affinity and failover for AM connections to DS.
-
Replicate CTS data effectively while minimizing the impact on AM clients.
Example scenario
As a directory service administrator, Pat plans to deploy directory services for AM CTS data.
Pat knows AM has a number of configuration options for CTS, but wants to clarify the basic deployment principles before tuning the service for their specific deployment.
Pat plans to show the AM administrators the basic approach, and then discuss additional options.
Prerequisites
Knowledge
Before you start:
-
Make sure you are familiar with the command line on your operating system.
-
If you’re new to directory services, consider working through the examples to learn LDAP and to learn replication.
-
If you’re new to AM, consider working through the AM evaluation tasks.
Tasks
This sample deployment shows the steps to replicate CTS data on your computer. Use the same steps with geographically distributed computers or virtual machines for a real deployment.

-
Two AM servlets run in Apache Tomcat and serve HTTP requests from AM client applications.
-
Two replicated DS servers provide storage for AM.
-
Each AM servlet makes LDAP requests to DS for CTS data.
Task 1: Prepare for installation
-
Make sure there’s an FQDN for AM.
The cookie domain for AM session cookies depends on the FQDN, because the browser uses it to connect to AM.
This sample simulates DNS on your computer by updating the hosts file with an alias for each DS server:
# Simulate DNS with an FQDN alias for the loopback address: 127.0.0.1 am.example.comWhen deploying in a production environment, make sure you have properly configured the DNS.
-
Unpack the server files once for each server to install.
This sample uses folder locations aligned with the hostnames:
Base path Description /path/to/ds1First DS server
/path/to/ds2Second DS server
/path/to/tomcatApache Tomcat server
-
Determine the port numbers for the service.
This sample uses different port numbers for each server because all the servers are on the same computer:
Sample server Port numbers ds1LDAP: 1389
LDAPS: 1636
Admin: 4444
Replication: 8989ds2LDAP: 11389
LDAPS: 11636
Admin: 14444
Replication: 18989Tomcat
HTTPS: 8080
When installing each DS server on a different host, use the same port numbers everywhere.
-
Set the
JAVA_HOMEenvironment variable to a supported JDK home if it isn’t already set:$ export JAVA_HOME=<supported-jdk-home>bash -
Define how the DS servers trust DS server certificates.
This sample uses a private PKI based on the deployment ID. You generate a deployment ID for all DS servers using the
dskeymgrcommand:$ /path/to/ds1/bin/dskeymgr \ create-deployment-id \ --deploymentIdPassword password <deployment-id>bashThe deployment ID is a string. To use it, you must have the deployment ID password.
Once you generate the ID, set a
DEPLOYMENT_IDenvironment variable for use in other steps of this sample:$ export DEPLOYMENT_ID=<deployment-id>bash -
Make sure Tomcat and AM trust DS server certificates for secure LDAPS connections.
This sample uses the private PKI based on the deployment ID you generated. Prepare a truststore with the DS CA certificate for Tomcat:
$ /path/to/ds1/bin/dskeymgr \
export-ca-cert \
--deploymentId $DEPLOYMENT_ID \
--deploymentIdPassword password \
--outputFile /path/to/ca-cert.pem

$ keytool \
-importcert \
-trustcacerts \
-alias ca-cert \
-file /path/to/ca-cert.pem \
-keystore /path/to/truststore \
-storepass changeit \
-storetype JKS \
-noprompt

$ export TRUSTSTORE=/path/to/truststore
bash
Task 2: Set up DS
These sample commands prepare DS servers for AM CTS, configuration, and identities.
They depend on the DEPLOYMENT_ID environment variable you set.
-
Set up the first DS server:
$ /path/to/ds1/setup \
--deploymentId $DEPLOYMENT_ID \
--deploymentIdPassword password \
--rootUserDN uid=admin \
--rootUserPassword password \
--monitorUserPassword password \
--hostname localhost \
--adminConnectorPort 4444 \
--ldapPort 1389 \
--enableStartTls \
--ldapsPort 1636 \
--replicationPort 8989 \
--bootstrapReplicationServer localhost:8989 \
--bootstrapReplicationServer localhost:18989 \
--profile am-config \
--set am-config/amConfigAdminPassword:5up35tr0ng \
--profile am-cts \
--set am-cts/amCtsAdminPassword:5up35tr0ng \
--profile am-identity-store \
--set am-identity-store/amIdentityStoreAdminPassword:5up35tr0ng \
--acceptLicense \
--start
bash -
Set up the second DS server:
$ /path/to/ds2/setup \
--deploymentId $DEPLOYMENT_ID \
--deploymentIdPassword password \
--rootUserDN uid=admin \
--rootUserPassword password \
--monitorUserPassword password \
--hostname localhost \
--adminConnectorPort 14444 \
--ldapPort 11389 \
--enableStartTls \
--ldapsPort 11636 \
--replicationPort 18989 \
--bootstrapReplicationServer localhost:8989 \
--bootstrapReplicationServer localhost:18989 \
--profile am-config \
--set am-config/amConfigAdminPassword:5up35tr0ng \
--profile am-cts \
--set am-cts/amCtsAdminPassword:5up35tr0ng \
--profile am-identity-store \
--set am-identity-store/amIdentityStoreAdminPassword:5up35tr0ng \
--acceptLicense \
--start
bash
At this point, both DS servers are running and replicating changes to each other.
Task 3: Set up Tomcat
-
Update Tomcat settings for AM:
This command uses the
TRUSTSTOREenvironment variable you set:echo "export CATALINA_OPTS=\"\$CATALINA_OPTS \ -Djavax.net.ssl.trustStore=${TRUSTSTORE} \ -Djavax.net.ssl.trustStorePassword=changeit \ -Djavax.net.ssl.trustStoreType=jks \ -server \ -Xmx2g \ -XX:MetaspaceSize=256m \ -XX:MaxMetaspaceSize=256m\"" > /path/to/tomcat/bin/setenv.shbash -
Make the Tomcat scripts executable:
$ chmod +x /path/to/tomcat/bin/*.shbash -
Start Tomcat:
$ /path/to/tomcat/bin/startup.shbash
At this point, Tomcat is ready for you to set up AM.
Task 4: Set up AM
These steps prepare AM to use DS with affinity load balancing and failover.
-
Copy the AM .war file to
/path/to/tomcat/webapps/am1.warand/path/to/tomcat/webapps/am2.war. -
Configure AM at http://am.example.com:8080/am1 and http://am.example.com:8080/am2.
Use the following configuration settings:
Setting Choice Configuration Options
Create New Configuration.
Server Settings > Default User Password
Passw0rdServer Settings > Server URL
http://am.example.com:8080Server Settings > Cookie Domain
example.comServer Settings > Platform Locale
en_USServer Settings > Configuration Directory
/path/to/am1or/path/to/am2Configuration Data Store Settings > Configuration Data Store
External DS
Configuration Data Store Settings > SSL/TLS Enabled
Enable
Configuration Data Store Settings > Host Name
localhostConfiguration Data Store Settings > Port
1636Configuration Data Store Settings > Encryption Key
Save the generated key (example:
w72dwbuhsLQzFNcUftA8eMCaw3a5ayhL) fromam1to use when configuringam2.Configuration Data Store Settings > Root Suffix
ou=am-configConfiguration Data Store Settings > Login ID
uid=am-config,ou=admins,ou=am-configConfiguration Data Store Settings > Password
5up35tr0ngConfiguration Data Store Settings > Server configuration
New deployment (
am1) or Additional server for existing deployment (am2)The
am2server uses the same stores as those of the existing deployment.This choice causes the configurator to skip to the Site Configuration settings for
am2.User Data Store Settings > User Data Store Type
ForgeRock Directory Services (DS)
User Data Store Settings > SSL/TLS Enabled
Enable
User Data Store Settings > Directory Name
localhostUser Data Store Settings > Port
1636User Data Store Settings > Root Suffix
ou=identitiesUser Data Store Settings > Login ID
uid=am-identity-bind-account,ou=admins,ou=identitiesUser Data Store Settings > Password
5up35tr0ngSite Configuration
No
-
Configure the CTS store with affinity load balancing to both DS servers.
On the
am1servlet, make these configuration changes, which are shared with theam2servlet:-
Log in to the AM admin UI at http://am.example.com/am1 as
amadminwithPassw0rd. -
Browse to Configure > Server Defaults > CTS.
-
Use the following CTS settings, saving changes before switching tabs:
Setting Choice CTS Token Store > Store Mode
External Token Store
CTS Token Store > Root Suffix
ou=famrecords,ou=openam-session,ou=tokensExternal Store Configuration > SSL/TLS Enabled
Enable
External Store Configuration > Connection String(s)
localhost:1636,localhost:11636External Store Configuration > Login Id
uid=openam_cts,ou=admins,ou=famrecords,ou=openam-session,ou=tokensExternal Store Configuration > Password
5up35tr0ngExternal Store Configuration > Affinity Enabled
Enable
-
-
Configure the identity store with affinity load balancing to both DS servers.
In the
am1admin UI, while connected asamadmin:-
Browse to Top Level Realm > Identity Stores > ds1 > Server Settings.
-
Update the following identity settings:
Setting Choice LDAP Server
Add
localhost:11636.Affinity Enabled
Enable
Affinty Level
Bind
-
Save your changes.
-
-
Configure the configuration store to use both DS servers.
In the
am1admin UI, while connected asamadmin:-
Browse to Deployment > Servers.
-
For each AM servlet:
-
Browse to Server URL > Directory Configuration > Server.
-
Add an entry for the second DS server and save the changes:
Setting Choice NAME
ds2HOST NAME
localhostPORT NUMBER
11636CONNECTION TYPE
SSL
-
Save your changes.
-
-
-
Log out of the AM admin UI.
-
Restart Tomcat to take the configuration changes into account:
$ /path/to/tomcat/bin/shutdown.sh
# Wait a moment for Tomcat to shut down cleanly before starting it again.
$ /path/to/tomcat/bin/startup.sh
bash
At this point, AM is ready to use.
Task 5: Create a test user
You will use this account for validation.
-
Log in to the AM admin UI at http://am.example.com/am1 as
amadminwithPassw0rd. -
Browse to Top Level Realm > Identities and click + Add Identity.
-
Use the following settings for the test user:
Setting Choice User ID
bjensenPassword
hifalutinEmail Address
bjensen@example.comFirst Name
BabsLast Name
JensenFull Name
Barbara Jensen -
Log out of the AM admin UI.
Validation
To validate your work, check:
-
A user can log in to one AM servlet and access the other with the same session while all servers are up.
-
The session is still honored when a CTS store is unavailable.
The following sections show how to do this in detail.
Access AM as the test user
-
Log in to AM at http://am.example.com/am1 as
bjensenwith passwordhifalutin.The AM UI displays the user profile page:
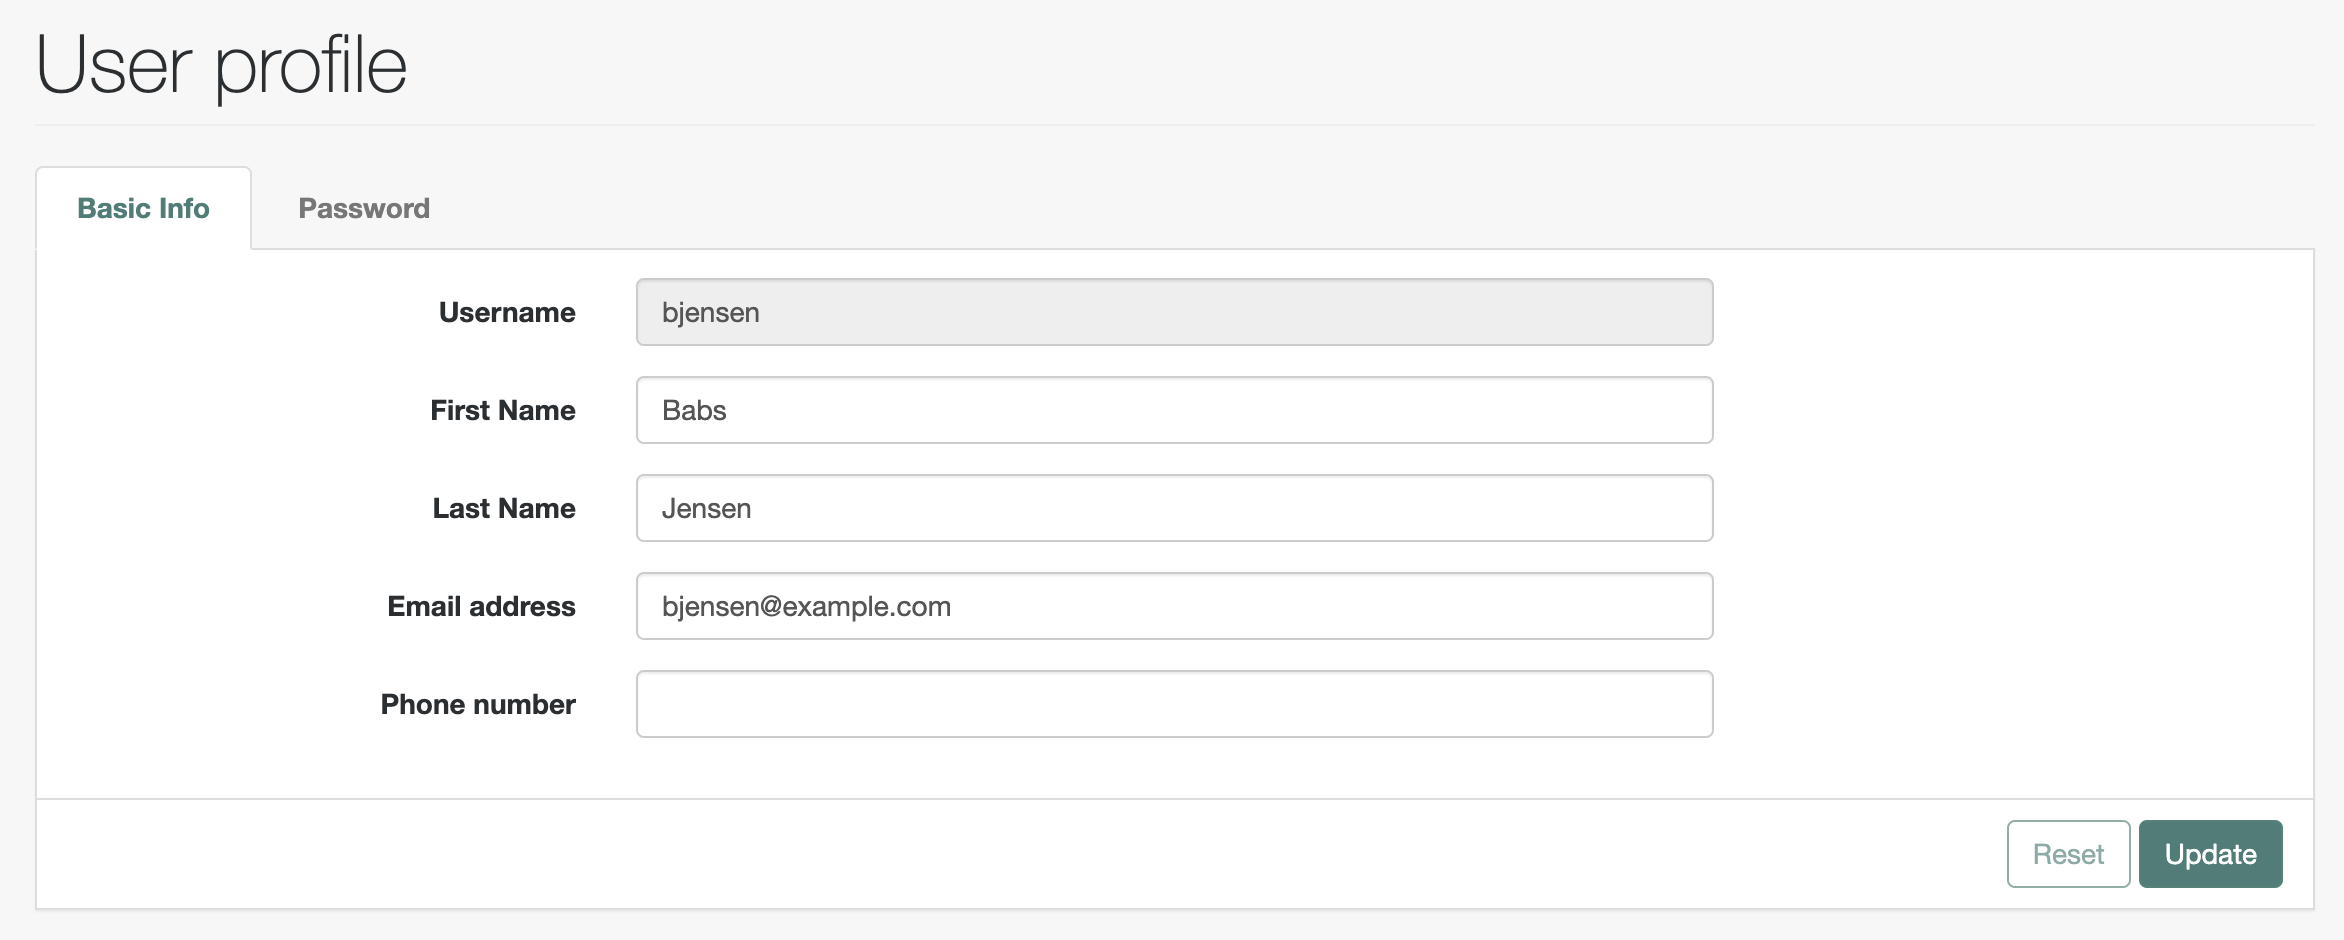
-
Switch AM servlets by updating the URL in the browser address bar, replacing
am1witham2.The AM UI displays the same user profile page again.
-
On the command line, find the associated CTS token in DS:
$ /path/to/ds1/bin/ldapsearch \ --hostname localhost \ --port 1636 \ --useSsl \ --useJavaTrustStore "${TRUSTSTORE}" \ --trustStorePassword changeit \ --bindDn uid=openam_cts,ou=admins,ou=famrecords,ou=openam-session,ou=tokens \ --bindPassword 5up35tr0ng \ --baseDn ou=famrecords,ou=openam-session,ou=tokens \ "(coreTokenUserId=id=bjensen,ou=user,ou=am-config)" \ coreTokenObject dn: coreTokenId=<token-id>,ou=famrecords,ou=openam-session,ou=tokens coreTokenObject: {"clientDomain":"ou=am-config","clientID":"id=bjensen,ou=user,ou=am-config","...":...}bashNotice the CTS does not reference the test user account by its DN, but instead by its AM universal ID.
Show sample core token object
{
"clientDomain": "ou=am-config",
"clientID": "id=bjensen,ou=user,ou=am-config",
"creationTimeInMillis": 1706087705386,
"listeners": {
"8f51ba31-a2e8-4f44-a998-91b411ffde3e": true,
"f0e6df25-2a9c-4be7-a5bb-1ae22c834190": true
},
"maxCachingTimeInMinutes": 3,
"maxIdleTimeInMinutes": 30,
"maxSessionTimeInMinutes": 120,
"restrictedTokensBySessionID": {},
"sessionEventURLs": {},
"sessionID": {
"encryptedString": "ecJSF_y5EMdaJhQ4oJ01JGiXAyU.*AAJTSQACMDEAAlNLABxraFNLaytaenFKMlBtYjNmelpBdG9JTUU3ZEE9AAR0eXBlAANDVFMAAlMxAAA.*"
},
"sessionProperties": {
"Locale": "en_GB",
"authInstant": "2024-01-24T09:15:05Z",
"Organization": "ou=am-config",
"UserProfile": "Required",
"Principals": "bjensen",
"successURL": "/am1/console",
"CharSet": "UTF-8",
"Service": "ldapService",
"Host": "127.0.0.1",
"FullLoginURL": "/am1/UI/Login?realm=%2F",
"AuthLevel": "0",
"clientType": "genericHTML",
"AMCtxId": "4cc3e651-f4eb-4bd6-9355-03b2b0abb45b-319",
"loginURL": "/am1/UI/Login",
"UserId": "bjensen",
"AuthType": "DataStore",
"sun.am.UniversalIdentifier": "id=bjensen,ou=user,ou=am-config",
"HostName": "127.0.0.1",
"amlbcookie": "01",
"Principal": "id=bjensen,ou=user,ou=am-config",
"UserToken": "bjensen"
},
"sessionState": "VALID",
"sessionType": "USER",
"timedOutTimeInSeconds": 0
}
json
You have shown the test user session works for either AM servlet.
Test CTS failover
-
Stop the first DS server to force AM to use the second DS server:
$ /path/to/ds1/bin/stop-dsbash -
Verify you can still access both AM servlets as
bjensen.For
am1andam2, the AM UI displays the user profile page. -
Start the first DS server and stop the second:
$ /path/to/ds1/bin/start-ds
$ /path/to/ds2/bin/stop-ds
bash -
Verify again you can still access both AM servlets as
bjensen.For
am1andam2, the AM UI displays the user profile page.
You have demonstrated how AM can use DS as a CTS store with affinity load balancing and failover.
What’s next
After successfully showing the sample to AM administrators, Pat leads a discussion to review the tradeoffs they can choose to make for the production deployment. Some of the questions to discuss include the following:
-
Do we back up CTS data?
If CTS data is lost, users must authenticate again.
If that’s acceptable, then we won’t back up CTS data, which is volatile and potentially large.
-
Should there be a separate DS service for CTS data?
CTS access patterns are very different from identity store access patterns. They cause DS to fill and empty its database cache in very different ways.
In a high-volume deployment, it may make sense to split the data up.
-
What AM features are in use?
Could we have DS reap expired tokens (optional) instead of AM (default)?
AM administrators can bring their own questions to the discussion.
Enforce limits
Enforce application and user limits to protect against a denial of service.
Description
Estimated time to complete: 20 minutes
DS has many settings to prevent client applications from using more than their share of directory resources.
|
Don’t disable global limit settings. Lift restrictions for specific trusted client applications, accounts, or groups. |
Goals
In completing this use case, you learn:
-
The DS alternatives for enforcing limits.
-
How to change limits.
-
The result codes when an application exceeds a limit.
Example scenario
As a directory service administrator, Pat knows directory services are critical for identity applications.
To prevent performance problems and denial of service, Pat wants to restrict what a misbehaving client can do. Pat also wants to make it easy for applications and users to take advantage of directory services.
Pat knows DS offers many options to set limits and aims to review them in light of the directory service requirements.
Prerequisites
Knowledge
Before you start:
-
Make sure you are familiar with working with the command line on your operating system.
-
If you’re new to directory services, work through the examples to learn LDAP.
Actions
Before you try the sample commands, install a DS server in evaluation mode.
Tasks
Task 1: Review enforceable limits
The following tables list available options for enforcing limits. To change limits for:
-
A single
ldapsearchcommand, use the size or time limit options. -
An application, user or group of accounts, set operational attributes.
-
A DS server, update configuration settings with the
dsconfigcommand.
| Limit | Option to use |
|---|---|
Size limit |
|
Time limit |
|
| Attribute | What it overrides |
|---|---|
|
How long an idle connection remains open. |
|
The maximum number of entries returned for a search. |
|
The maximum processing time for a search operation. |
| Setting | Scope | Description |
|---|---|---|
Connection handler1 |
The maximum size request this connection handler allows. When client applications add groups with large numbers of members, for example, requests can exceed the default limit. This setting affects only the size of requests, not responses. Default: 5 megabytes |
1 HTTP and LDAP connection handlers have this setting.
| Setting | Scope | Description |
|---|---|---|
Global, |
The client applications that DS accepts connections from identified by hostname or IP address. Default: not set |
|
Global, |
The client applications that DS refuses connections from identified by hostname or IP address. Default: not set |
|
Global |
The maximum number of seconds a client connection may remain established since its last completed operation. If the network drops idle connections, set this to a lower value than the idle time limit for the network. This is particularly useful when networks drop idle connections without notification and without closing the connection. It ensures DS shuts down idle connections in an orderly fashion. DS servers do not enforce idle timeout settings for persistent searches. Default: |
|
Global |
The total number of concurrent client connections DS accepts. Each connection uses memory. On Linux systems, each connection uses a file descriptor. Default:`0`, meaning no limit |
|
Global, |
The client applications DS limits to Default: not set |
|
Global, |
The maximum number of concurrent connections for specified clients. Default: |
1 DS applies the settings in this order:
-
If the
denied-clientproperty is set, DS denies connections from any client matching the settings. -
If the
restricted-clientproperty is set, DS counts the connections from any client matching the settings.If a matching client exceeds
restricted-client-connection-limitconnections, DS refuses additional connections. -
If the
allowed-clientproperty is set, DS lets any client matching the settings connect. -
If the limits are not set, DS lets any client connect.
2 The settings on a connection handler override the global settings.
| Setting | Scope | Description |
|---|---|---|
Global |
The maximum number of concurrent persistent searches. Default: |
|
Global |
The maximum number of entries returned for a single search. Default: |
|
Global |
The maximum number of seconds to process a single search. Default: |
Task 2: Override account limits
-
Give an administrator access to update the operational attributes:
$ ldapmodify \
 --hostname localhost \
 --port 1636 \
 --useSsl \
 --usePkcs12TrustStore /path/to/opendj/config/keystore \
 --trustStorePassword:file /path/to/opendj/config/keystore.pin \
 --bindDN uid=admin \
 --bindPassword password << EOF
dn: ou=People,dc=example,dc=com
changetype: modify
add: aci
aci: (targetattr = "ds-rlim-time-limit||ds-rlim-size-limit")
 (version 3.0;acl "Allow Kirsten Vaughan to manage search limits";
 allow (all) (userdn = "ldap:///uid=kvaughan,ou=People,dc=example,dc=com");)
EOF
bash -
Override the limits for a single entry:
$ ldapmodify \ --hostname localhost \ --port 1636 \ --useSsl \ --usePkcs12TrustStore /path/to/opendj/config/keystore \ --trustStorePassword:file /path/to/opendj/config/keystore.pin \ --bindDN uid=kvaughan,ou=people,dc=example,dc=com \ --bindPassword bribery << EOF dn: uid=bjensen,ou=People,dc=example,dc=com changetype: modify add: ds-rlim-size-limit ds-rlim-size-limit: 10 EOFbashWhen Babs Jensen performs an indexed search returning more than 10 entries, she reads the following message:
$ ldapsearch \
 --hostname localhost \
 --port 1636 \
 --useSsl \
 --usePkcs12TrustStore /path/to/opendj/config/keystore \
 --trustStorePassword:file /path/to/opendj/config/keystore.pin \
 --bindDN uid=bjensen,ou=people,dc=example,dc=com \
 --bindPassword hifalutin \
 --baseDN dc=example,dc=com \
 "(sn=jensen)"

# The LDAP search request failed: 4 (Size Limit Exceeded)
# Additional Information:  This search operation has sent the maximum of 10 entries to the client
bash
Task 2: Override group limits
-
Give an administrator the privilege to write subentries:
$ ldapmodify \ --hostname localhost \ --port 1636 \ --useSsl \ --usePkcs12TrustStore /path/to/opendj/config/keystore \ --trustStorePassword:file /path/to/opendj/config/keystore.pin \ --bindDN uid=admin \ --bindPassword password << EOF dn: uid=kvaughan,ou=People,dc=example,dc=com changetype: modify add: ds-privilege-name ds-privilege-name: subentry-write EOFbashNotice here that the directory superuser,
uid=admin, assigns privileges. Any administrator with theprivilege-changeprivilege can assign privileges. However, if the administrator can update administrator privileges, they can assign themselves thebypass-aclprivilege. Then they are no longer bound by access control instructions, including both user data ACIs and global ACIs. For this reason, do not assign theprivilege-changeprivilege to normal administrator users. -
Create an LDAP subentry to override the limits with collective attributes:
$ ldapmodify \ --hostname localhost \ --port 1636 \ --useSsl \ --usePkcs12TrustStore /path/to/opendj/config/keystore \ --trustStorePassword:file /path/to/opendj/config/keystore.pin \ --bindDN uid=kvaughan,ou=people,dc=example,dc=com \ --bindPassword bribery << EOF dn: cn=Remove Administrator Search Limits,dc=example,dc=com objectClass: collectiveAttributeSubentry objectClass: extensibleObject objectClass: subentry objectClass: top cn: Remove Administrator Search Limits ds-rlim-size-limit;collective: 0 ds-rlim-time-limit;collective: 0 subtreeSpecification: {base "ou=people", specificationFilter "(isMemberOf=cn=Directory Administrators,ou=Groups,dc=example,dc=com)" } EOFbashThe
baseentry identifies the branch with administrator entries. For details on how subentries apply, refer to About subentry scope. -
Show an administrator account has limits set to
0(no limit):$ ldapsearch \ --hostname localhost \ --port 1636 \ --useSsl \ --usePkcs12TrustStore /path/to/opendj/config/keystore \ --trustStorePassword:file /path/to/opendj/config/keystore.pin \ --bindDN uid=kvaughan,ou=people,dc=example,dc=com \ --bindPassword bribery \ --baseDN uid=kvaughan,ou=people,dc=example,dc=com \ --searchScope base \ "(&)" \ ds-rlim-time-limit ds-rlim-size-limit dn: uid=kvaughan,ou=People,dc=example,dc=com ds-rlim-size-limit: 0 ds-rlim-time-limit: 0bash
Task 3: Limit persistent searches
An LDAP persistent search maintains an open connection until the client application ends the search. Whenever a modification changes data in the search scope, DS returns a search result. The more concurrent persistent searches, the more work the server has to do for each modification:
Set the global property max-psearches to limit total concurrent persistent searches.
The following command sets a maximum of 30 persistent searches:
$ dsconfig \
 set-global-configuration-prop \
 --hostname localhost \
 --port 4444 \
 --bindDN uid=admin \
 --bindPassword password \
 --set max-psearches:30 \
 --usePkcs12TrustStore /path/to/opendj/config/keystore \
 --trustStorePassword:file /path/to/opendj/config/keystore.pin \
--no-promptTask 4: Limit connections
-
Limit the total concurrent connections DS accepts.
The following command sets the limit to 64K (the minimum number of file descriptors to make available to DS on a Linux system):
$ dsconfig \
 set-global-configuration-prop \
 --hostname localhost \
 --port 4444 \
 --bindDN uid=admin \
 --bindPassword password \
 --set max-allowed-client-connections:65536 \
 --usePkcs12TrustStore /path/to/opendj/config/keystore \
 --trustStorePassword:file /path/to/opendj/config/keystore.pin \
 --no-prompt
bash -
Set an idle timeout of 24 hours:
$ dsconfig \
 set-global-configuration-prop \
 --hostname localhost \
 --port 4444 \
 --bindDN uid=admin \
 --bindPassword password \
 --set idle-time-limit:24h \
 --usePkcs12TrustStore /path/to/opendj/config/keystore \
 --trustStorePassword:file /path/to/opendj/config/keystore.pin \
 --no-prompt
bash -
Limit access to clients in the
example.comdomain:$ dsconfig \ set-global-configuration-prop \ --hostname localhost \ --port 4444 \ --bindDN uid=admin \ --bindPassword password \ --set allowed-client:example.com \ --usePkcs12TrustStore /path/to/opendj/config/keystore \ --trustStorePassword:file /path/to/opendj/config/keystore.pin \ --no-promptbash -
Limit clients on the
10.0.0.*network to 1000 concurrent connections each:$ dsconfig \ set-global-configuration-prop \ --hostname localhost \ --port 4444 \ --bindDN uid=admin \ --bindPassword password \ --set restricted-client:"10.0.0.*" \ --set restricted-client-connection-limit:1000 \ --usePkcs12TrustStore /path/to/opendj/config/keystore \ --trustStorePassword:file /path/to/opendj/config/keystore.pin \ --no-promptbash
Task 5: Permit large requests
The following command increases the limit to 20 MB for the LDAP connection handler. This lets client applications add large static group entries, for example:
$ dsconfig \
 set-connection-handler-prop \
 --hostname localhost \
 --port 4444 \
 --bindDN uid=admin \
 --bindPassword password \
 --handler-name LDAP \
 --set max-request-size:20mb \
 --usePkcs12TrustStore /path/to/opendj/config/keystore \
 --trustStorePassword:file /path/to/opendj/config/keystore.pin \
--no-promptResult codes
When an LDAP application exceeds a limit, DS responds with the appropriate result code:
-
3: Time Limit Exceededwhen the request took too long to process. -
4: Size Limit Exceededwhen the request returned too many entries. -
11: Administrative Limit Exceededwhen the request exceeded a limit imposed by one of the other settings.
Refer to any additional information DS returns with the result to determine what action to take.