PingOne Advanced Identity Cloud
This guide provides examples of how to use PingGateway with PingOne Advanced Identity Cloud for Single Sign-On and API Security. It is for PingOne Advanced Identity Cloud evaluators, administrators, and architects.
Example installation for this guide
Unless otherwise stated, the examples in this guide assume the following installation:
-
PingGateway installed on
http://ig.example.com:8080, as described in the Install . -
Sample application installed on
http://app.example.com:8081, as described in Use the sample application. -
An PingOne Advanced Identity Cloud tenant with the default configuration, as described in the PingOne Advanced Identity Cloud documentation.
When using PingOne Advanced Identity Cloud, you need to know the value of the following properties:
-
The root URL of your PingOne Advanced Identity Cloud tenant. For example,
https://myTenant.forgeblocks.com.The URL of the PingAM component of PingOne Advanced Identity Cloud is the root URL of your PingOne Advanced Identity Cloud tenant followed by
/am. For example,https://myTenant.forgeblocks.com/am. -
The realm where you work. The examples in this document use
alpha.Prefix each realm in the hierarchy with the
realmskeyword. For example,/realms/root/realms/alpha.
If you use a different configuration, substitute in the procedures accordingly.
Authenticate a PingGateway agent to PingOne Advanced Identity Cloud
|
PingGateway agents are automatically authenticated to PingOne Advanced Identity Cloud by a non-configurable authentication module. Authentication chains and modules are deprecated in PingOne Advanced Identity Cloud and replaced by journeys. You can now authenticate PingGateway agents to PingOne Advanced Identity Cloud with a journey. The procedure is currently optional, but will be required when authentication chains and modules are removed in a future release of PingOne Advanced Identity Cloud. Learn more in the PingOne Advanced Identity Cloud documentation on Journeys. |
This section describes how to create a journey to authenticate an PingGateway agent to PingOne Advanced Identity Cloud. The journey has the following requirements:
-
It must be called
Agent -
Its nodes must pass the agent credentials to the Agent Data Store Decision node.
When you define a journey in PingOne Advanced Identity Cloud, that same journey is used for all instances of PingGateway, Java agent, and Web agent. Consider this point if you change the journey configuration.
-
Log in to the PingOne Advanced Identity Cloud admin UI as an administrator.
-
Click Journeys > New Journey.
-
Add a journey with the following information and click Create journey:
-
Name:
Agent -
Identity Object: The user or device to authenticate.
-
(Optional) Description: Authenticate a PingGateway agent to PingOne Advanced Identity Cloud
The journey designer is displayed, with the
Startentry point connected to theFailureexit point, and aSuccessnode. -
-
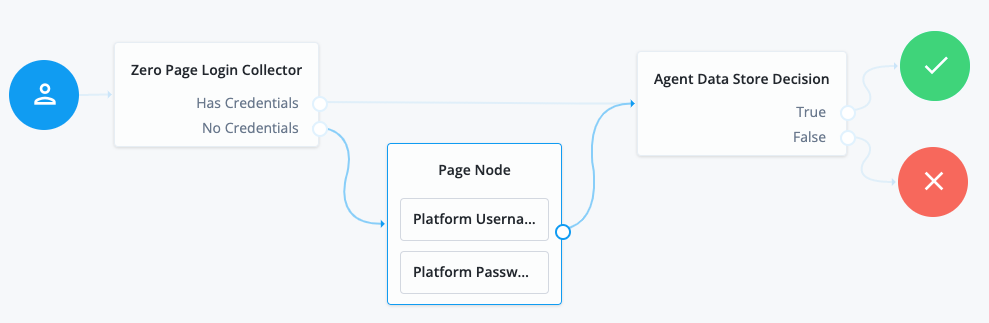
Using the Filter nodes bar, find and then drag the following nodes from the Components panel into the designer area:
-
Zero Page Login Collector node to check whether the agent credentials are provided in the incoming authentication request, and use their values in the following nodes.
This node is required for compatibility with Java agent and Web agent.
-
Page node to collect the agent credentials if they aren’t provided in the incoming authentication request, and use their values in the following nodes.
-
Agent Data Store Decision node to verify the agent credentials match the registered PingGateway agent profile.
Many nodes can be configured in the panel on the right side of the page. Unless otherwise stated, don’t configure the nodes, and use only the default values. -
-
Drag the following nodes from the Components panel into the Page node:
-
Platform Username node to prompt the user to enter their username.
-
Platform Password node to prompt the user to enter their password.
-
-
Connect the nodes as follows and save the journey:
Register a PingGateway agent in PingOne Advanced Identity Cloud
This procedure registers an agent profile for PingGateway.
-
Log in to the PingOne Advanced Identity Cloud admin UI as an administrator.
-
Click Gateways & Agents > New Gateway/Agent > Identity Gateway > Next and use the hints in the following table to create the agent profile:
Field Description Example ID
Set the unique agent profile name PingGateway uses to connect.
ig_agentPassword
Store the password PingGateway uses to connect in the agent profile.
Record the password to use when configuring PingGateway.
A strong password.
The examples in the documentation use
passwordand its base64-encodingcGFzc3dvcmQ=.Use Secret Store for password
Store the password in a secret and reference the secret by its label.
Follow the steps in Use the secret store for the password after you create the agent profile.
Click to enable
Secret Label Identifier
This field appears when you select Use Secret Store for password.
This value represents the
identifierpart of the secret label for the agent. PingOne Advanced Identity Cloud uses the identifier to generate a secret label in the following format:am.application.agents.identifier.secret. Learn more in Secret labels.After setting this, add an ESV secret for the password and map the ESV to the secret label.
igUse secure passwords in a production environment. Consider using a password manager to generate secure passwords. -
Click Save Profile > Done to display the new agent profile.
-
(Optional) Add the list of Redirect URLs used in PingGateway routes and click Save to update the profile.
Use the secret store for the password
When you select Use Secret Store for password and set a secret label for the agent profile, PingOne Advanced Identity Cloud creates the secret label but the secret isn’t yet defined or mapped to the label:
-
Define an ESV secret, such as
esv-ig_agent, holding the password for PingGateway to connect.The examples in the documentation use
password.Learn how in creating ESV secrets. In production deployments, restrict access to the password from configuration placeholder and script contexts.
-
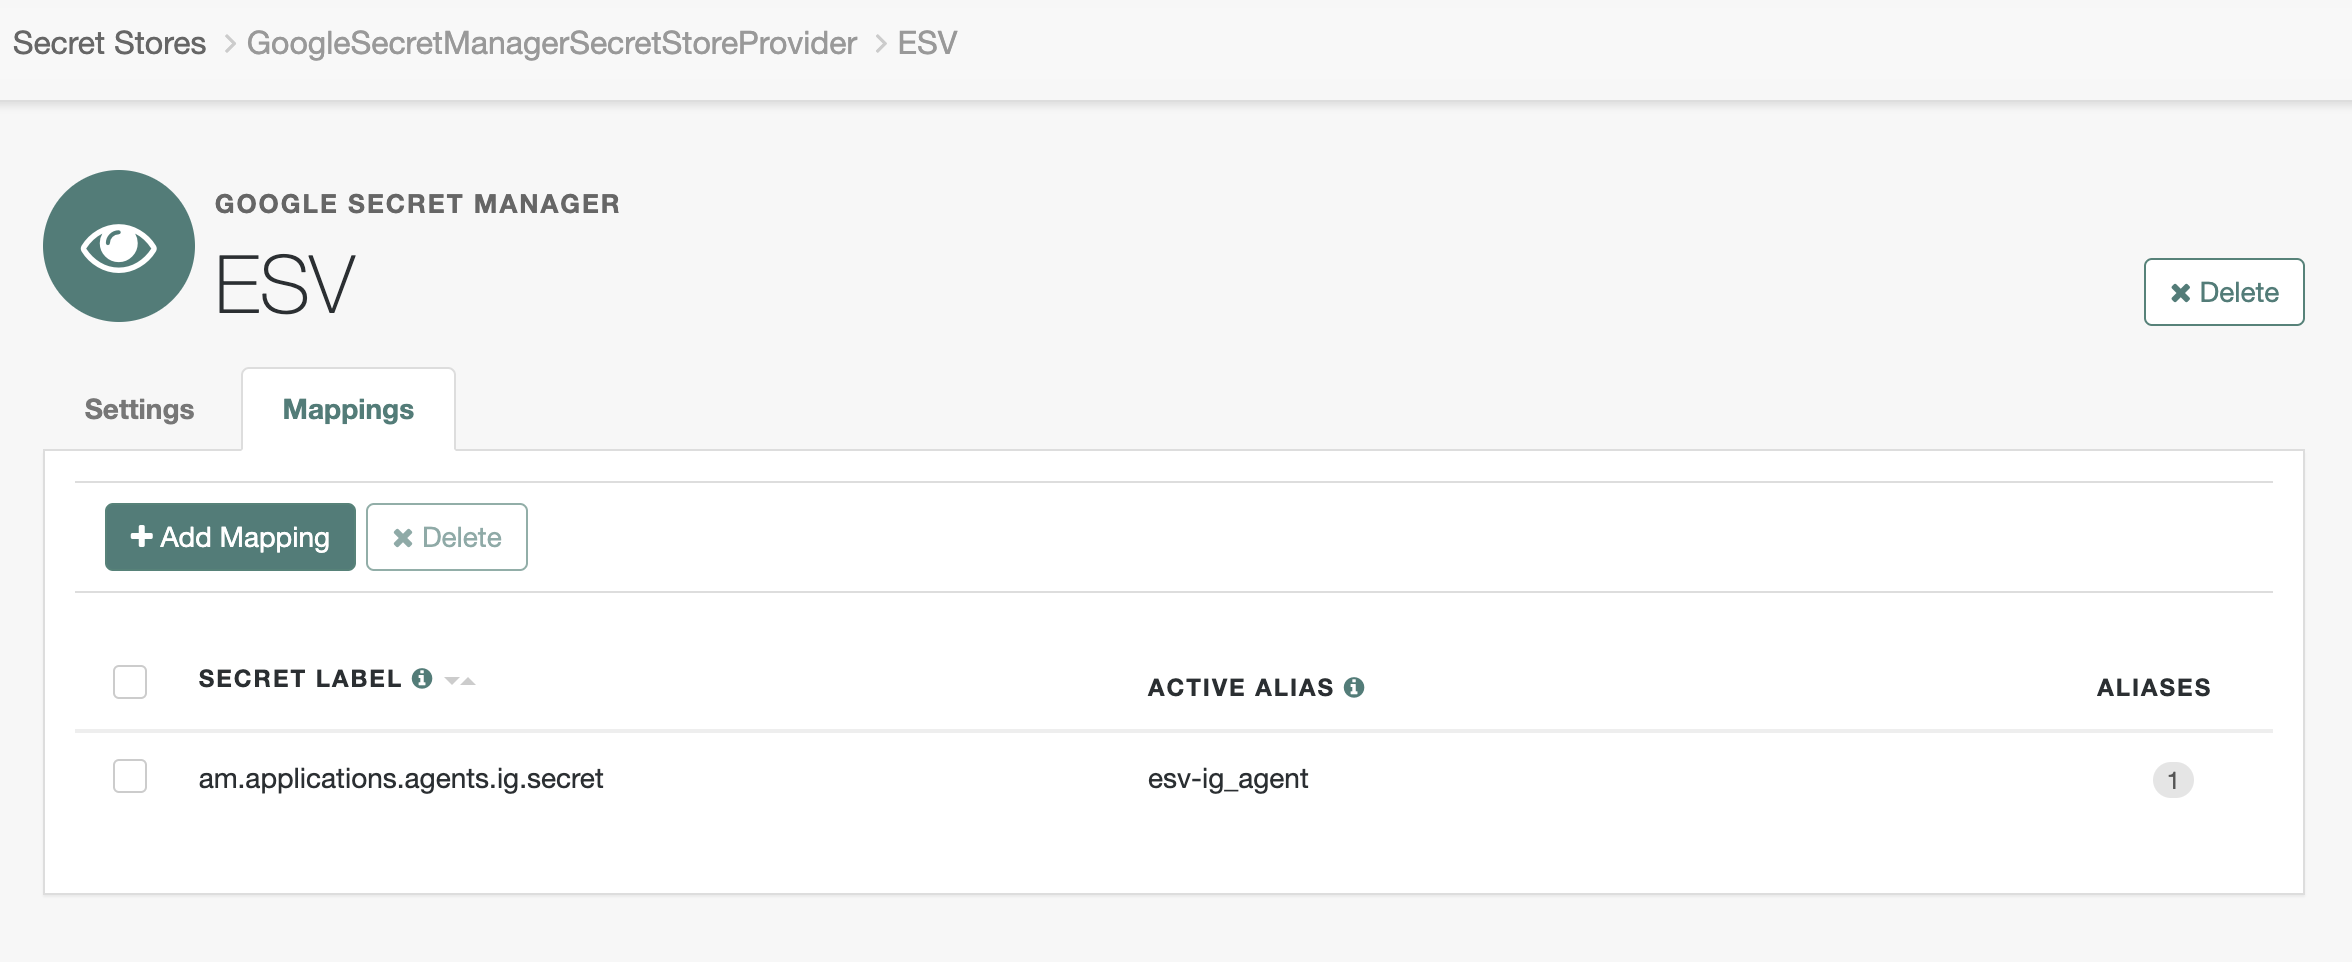
Map the ESV to the label created when you set the Secret Label Identifier:
-
Click Native Consoles > Access Management > Secret Stores > ESV > Mappings > Add mappings.
-
In the Add Mapping modal, select the label, such as
am.application.agents.ig.secret, in the Secret Label list. -
In the aliases field, enter the ESV secret, such as
esv-ig_agent, and click Add. -
Click Create to add the mapping:
Learn more in Map ESV secrets to secret labels.
-
Note the following points:
-
If you update or delete the Secret Label Identifier, AM updates or deletes the corresponding mapping for the previous identifier unless another agent shares the mapping.
-
When you rotate a secret, update the corresponding mapping.
Optional settings
In the AM admin UI, consider the following additional optional settings for the agent profile under Applications > Agents > Identity Gateway > agent ID:
-
To direct login to a custom URL instead of the default AM login page, configure Login URL Template for CDSSO.
-
To apply a different introspection scope, click Token Introspection and select a scope from the list.
-
Click Save to update the profile.
Set up a demo user in PingOne Advanced Identity Cloud
This procedure sets up a demo user in the alpha realm.
-
Log in to the PingOne Advanced Identity Cloud admin UI as an administrator.
-
Go to Identities > Manage > Alpha realm - Users, and add a user with the following values:
-
Username:
demo -
First name:
demo -
Last name:
user -
Email Address:
demo@example.com -
Password:
Ch4ng3!t
-
Recommendations
Use PingGateway with PingOne Advanced Identity Cloud as you would with any other service.
-
During updates, individual PingOne Advanced Identity Cloud tenant servers go offline temporarily. PingGateway can receive HTTP 502 Bad Gateway responses for some requests during the update.
In your ClientHandler and ReverseProxyHandler configurations, configure PingGateway to retry operations when this occurs:
"retries": {
    "enabled": true,
    "condition": "${response.status.code == 502}"
}
json -
Update PingGateway to use the latest version you can to benefit from fixes and improvements.
About PingGateway and PingOne Advanced Identity Cloud
PingOne Advanced Identity Cloud simplifies the consumption of ForgeRock as an Identity Platform. However, many organizations have business web applications and APIs deployed across multiple clouds, or on-premise.
PingGateway facilitates non-intrusive integration of your web applications and APIs with PingOne Advanced Identity Cloud, for SSO and API Security. The following image illustrates how PingGateway bridges your business to PingOne Advanced Identity Cloud:
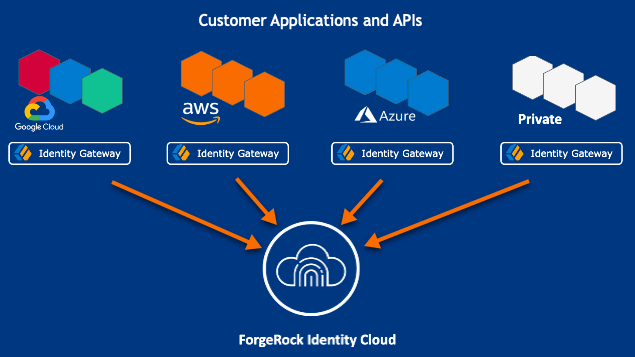
Learn more about PingOne Advanced Identity Cloud from the PingOne Advanced Identity Cloud documentation.
OAuth 2.0
This example sets up OAuth 2.0, using the standard introspection endpoint, where PingOne Advanced Identity Cloud is the Authorization Server and PingGateway is the resource server.
For more information about PingGateway as an OAuth 2.0 resource server, refer to Validate access tokens with introspection.
| This procedure uses the Resource Owner Password Credentials grant type. As suggested in The OAuth 2.0 Authorization Framework, use other grant types whenever possible. |
Before you start, prepare PingOne Advanced Identity Cloud, PingGateway, and the sample application as described in Example installation for this guide.
-
Set up PingOne Advanced Identity Cloud:
-
Log in to the PingOne Advanced Identity Cloud admin UI as an administrator.
-
Make sure you are managing the
alpharealm. If not, click the current realm at the top of the screen, and switch realm. -
Go to Identities > Manage > Alpha realm - Users, and add a user with the following values:
-
Username:
demo -
First name:
demo -
Last name:
user -
Email Address:
demo@example.com -
Password:
Ch4ng3!t
-
-
Go to Custom Application > Custom Application > OIDC - OpenId Connect > Web and add a web application with the following values:
-
Name:
oauth2-client -
Owners:
demo user -
Client Secret:
password -
(Optional) Use Secret Store for password: Select this to store the password in an ESV secret.
If you select this option, enter a Secret Label Identifier. This value represents the
identifierpart of the secret label for the client. PingOne Advanced Identity Cloud uses the identifier to generate a secret label in the following format:am.applications.oauth2.client.identifier.secret.To complete the client profile, add an ESV secret for the password and map the ESV to the secret label. To learn more, read Secret labels in the PingOne Advanced Identity Cloud documentation.
-
Sign On > Grant Types:
Authorization Code,Resource owner Password Credentials -
Sign On > Scopes:
mailFor more information, refer to PingOne Advanced Identity Cloud’s Application management.
-
-
Register a PingGateway agent with the following values, as described in Register a PingGateway agent in PingOne Advanced Identity Cloud:
-
ID:
ig_agent -
Password:
password
-
-
(Optional) Authenticate a PingGateway agent to PingOne Advanced Identity Cloud.
PingGateway agents are automatically authenticated to PingOne Advanced Identity Cloud by a deprecated authentication module in PingOne Advanced Identity Cloud. This step is currently optional, but will be required when authentication chains and modules are removed in a future release of PingOne Advanced Identity Cloud.
-
-
Set up PingGateway:
-
Set up PingGateway for HTTPS, as described in Configure PingGateway for TLS (server-side).
-
Set an environment variable for the PingGateway agent password, and then restart PingGateway:
$ export AGENT_SECRET_ID='cGFzc3dvcmQ='bashThe password is retrieved by a SystemAndEnvSecretStore, and must be base64-encoded.
-
Add the following route to PingGateway, replacing the value for the property
amInstanceUrl:-
Linux
-
Windows
$HOME/.openig/config/routes/oauth2rs-idc.json
%appdata%\OpenIG\config\routes\oauth2rs-idc.json
{ "name": "oauth2rs-idc", "baseURI": "http://app.example.com:8081", "condition": "${find(request.uri.path, '^/oauth2rs-idc')}", "properties": { "amInstanceUrl": "https://myTenant.forgeblocks.com/am" }, "heap": [ { "name": "SystemAndEnvSecretStore-1", "type": "SystemAndEnvSecretStore" }, { "name": "AmService-1", "type": "AmService", "config": { "url": "&{amInstanceUrl}", "realm": "/alpha", "agent": { "username": "ig_agent", "passwordSecretId": "agent.secret.id" }, "secretsProvider": "SystemAndEnvSecretStore-1" } } ], "handler": { "type": "Chain", "config": { "filters": [ { "name": "OAuth2ResourceServerFilter-1", "type": "OAuth2ResourceServerFilter", "config": { "scopes": [ "mail" ], "requireHttps": false, "realm": "OpenIG", "accessTokenResolver": { "name": "TokenIntrospectionAccessTokenResolver-1", "type": "TokenIntrospectionAccessTokenResolver", "config": { "amService": "AmService-1", "providerHandler": { "type": "Chain", "config": { "filters": [ { "type": "HttpBasicAuthenticationClientFilter", "config": { "username": "ig_agent", "passwordSecretId": "agent.secret.id", "secretsProvider": "SystemAndEnvSecretStore-1" } } ], "handler": "ForgeRockClientHandler" } } } } } } ], "handler": { "type": "StaticResponseHandler", "config": { "status": 200, "headers": { "Content-Type": [ "text/html; charset=UTF-8" ] }, "entity": "<html><body><h2>Decoded access_token: ${contexts.oauth2.accessToken.info}</h2></body></html>" } } } } }jsonNotice the following features of the route compared to
rs-introspect.jsonin Validate access tokens with introspection, where a local PingAM instance is the Authorization Server:-
The AmService
URLpoints to PingAM in PingOne Advanced Identity Cloud. -
The AmService
realmpoints to the realm where you have configured your web application and the PingGateway agent.
-
-
-
Test the setup:
-
In a terminal, export an environment variable for the URL of PingAM in PingOne Advanced Identity Cloud:
$ export amInstanceUrl='myAmInstanceUrl' -
Use a
curlcommand similar to the following to retrieve an access token:$ mytoken=$(curl -s \ --user "oauth2-client:password" \ --data 'grant_type=password&username=demo&password=Ch4ng3!t&scope=mail' \ $amInstanceUrl/oauth2/realms/alpha/access_token | jq -r ".access_token") -
Validate the access token returned in the previous step:
$ curl -v \
--cacert /path/to/secrets/ig.example.com-certificate.pem \
--header "Authorization: Bearer ${mytoken}" \
https://ig.example.com:8443/oauth2rs-idc

{
  active = true,
  scope = mail,
  realm = /alpha,
  client_id = oauth2-client,
  ...
}
-
PingOne Advanced Identity Cloud as an OpenID Connect provider
This example sets up PingOne Advanced Identity Cloud as an OpenID Connect (OIDC) provider with PingGateway as a relying party.
For more information about PingGateway and OIDC, refer to OpenID Connect.
Before you start, prepare PingOne Advanced Identity Cloud, PingGateway, and the sample application as described in Example installation for this guide.
-
Set up PingOne Advanced Identity Cloud:
-
Log in to the PingOne Advanced Identity Cloud admin UI as an administrator.
-
Make sure you are managing the
alpharealm. If not, click the current realm at the top of the screen, and switch realm. -
Go to Identities > Manage > Alpha realm - Users, and add a user with the following values:
-
Username:
demo -
First name:
demo -
Last name:
user -
Email Address:
demo@example.com -
Password:
Ch4ng3!t
-
-
Go to Custom Application > Custom Application > OIDC - OpenId Connect > Web and add a web application with the following values:
-
Name:
oidc_client -
Owners:
demo user -
Client Secret:
password -
(Optional) Use Secret Store for password: Select this to store the password in an ESV secret.
If you select this option, enter a Secret Label Identifier. This value represents the
identifierpart of the secret label for the client. PingOne Advanced Identity Cloud uses the identifier to generate a secret label in the following format:am.applications.oauth2.client.identifier.secret.To complete the client profile, add an ESV secret for the password and map the ESV to the secret label. To learn more, read Secret labels in the PingOne Advanced Identity Cloud documentation.
-
Sign On > Sign-in URLs:
https://ig.example.com:8443/home/id_token/callback -
Sign On > Grant Types:
Authorization Code -
Sign On > Scopes:
openid,profile,email -
Show advanced settings > Authentication > Implied Consent:
On
-
For more information, refer to PingOne Advanced Identity Cloud’s Application management.
-
-
Set up PingGateway:
-
Set an environment variable for the
oidc_clientpassword, and then restart PingGateway:$ export OIDC_SECRET_ID='cGFzc3dvcmQ='bash
-
Add the following route to PingGateway to serve the sample application .css and other static resources:
-
Linux
-
Windows
$HOME/.openig/config/routes/00-static-resources.json
%appdata%\OpenIG\config\routes\00-static-resources.json
{
  "name" : "00-static-resources",
  "baseURI" : "http://app.example.com:8081",
  "condition": "${find(request.uri.path,'^/css') or matchesWithRegex(request.uri.path, '^/.*\\\\.ico$') or matchesWithRegex(request.uri.path, '^/.*\\\\.gif$')}",
  "handler": "ReverseProxyHandler"
}
json -
-
Add the following route to PingGateway, replacing the value for the property
amInstanceUrl:-
Linux
-
Windows
$HOME/.openig/config/routes/oidc-idc.json
%appdata%\OpenIG\config\routes\oidc-idc.json
{ "name": "oidc-idc", "baseURI": "http://app.example.com:8081", "condition": "${find(request.uri.path, '^/home/id_token')}", "properties": { "amInstanceUrl": "https://myTenant.forgeblocks.com/am" }, "heap": [ { "name": "SystemAndEnvSecretStore-1", "type": "SystemAndEnvSecretStore" }, { "name": "AuthenticatedRegistrationHandler-1", "type": "Chain", "config": { "filters": [ { "name": "ClientSecretBasicAuthenticationFilter-1", "type": "ClientSecretBasicAuthenticationFilter", "config": { "clientId": "oidc_client", "clientSecretId": "oidc.secret.id", "secretsProvider": "SystemAndEnvSecretStore-1" } } ], "handler": "ForgeRockClientHandler" } } ], "handler": { "type": "Chain", "config": { "filters": [ { "name": "AuthorizationCodeOAuth2ClientFilter-1", "type": "AuthorizationCodeOAuth2ClientFilter", "config": { "clientEndpoint": "/home/id_token", "failureHandler": { "type": "StaticResponseHandler", "config": { "status": 500, "headers": { "Content-Type": [ "text/plain" ] }, "entity": "Error in OAuth 2.0 setup." } }, "registrations": [ { "name": "oauth2-client", "type": "ClientRegistration", "config": { "clientId": "oidc_client", "issuer": { "name": "Issuer", "type": "Issuer", "config": { "wellKnownEndpoint": "&{amInstanceUrl}/oauth2/realms/alpha/.well-known/openid-configuration" } }, "scopes": [ "openid", "profile", "email" ], "authenticatedRegistrationHandler": "AuthenticatedRegistrationHandler-1" } } ], "requireHttps": false, "cacheExpiration": "disabled" } } ], "handler": "ReverseProxyHandler" } } }jsonCompared to
07-openid.jsonin AM as OIDC provider, where PingAM is running locally, the ClientRegistrationwellKnownEndpointpoints to PingOne Advanced Identity Cloud. -
-
-
Test the setup:
-
In your browser’s privacy or incognito mode, go to https://ig.example.com:8443/home/id_token.
The PingOne Advanced Identity Cloud login page is displayed.
-
Log in to PingOne Advanced Identity Cloud as user
demo, passwordCh4ng3!t. The home page of the sample application is displayed.
-
Cross-domain single sign-on
For organizations relying on AM’s session and policy services with SSO, consider cross-Domain Single Sign-On (CDSSO) as an alternative to SSO through OpenID Connect.
This example sets up PingOne Advanced Identity Cloud as an SSO authentication server for requests processed by PingGateway. For more information about PingGateway and CDSSO, refer to Cross-domain single sign-on (CDSSO).
Before you start, prepare PingOne Advanced Identity Cloud, PingGateway, and the sample application as described in Example installation for this guide.
-
Set up PingOne Advanced Identity Cloud:
-
Log in to the PingOne Advanced Identity Cloud admin UI as an administrator.
-
Make sure you are managing the
alpharealm. If not, click the current realm at the top of the screen, and switch realm. -
Go to Identities > Manage > Alpha realm - Users, and add a user with the following values:
-
Username:
demo -
First name:
demo -
Last name:
user -
Email Address:
demo@example.com -
Password:
Ch4ng3!t
-
-
Register a PingGateway agent with the following values, as described in Register a PingGateway agent in PingOne Advanced Identity Cloud:
-
ID:
ig_agent -
Password:
password -
Redirect URLs:
https://ig.ext.com:8443/home/cdsso/redirect
-
-
(Optional) Authenticate a PingGateway agent to PingOne Advanced Identity Cloud.
PingGateway agents are automatically authenticated to PingOne Advanced Identity Cloud by a deprecated authentication module in PingOne Advanced Identity Cloud. This step is currently optional, but will be required when authentication chains and modules are removed in a future release of PingOne Advanced Identity Cloud. -
Add a Validation Service:
-
In PingOne Advanced Identity Cloud, select Native Consoles > Access Management. The AM admin UI is displayed.
-
Select Services, and add a validation service with the following Valid goto URL Resources:
-
https://ig.ext.com:8443/* -
https://ig.ext.com:8443/*?*
-
-
-
-
Set up PingGateway:
-
Set up PingGateway for HTTPS, as described in Configure PingGateway for TLS (server-side).
-
Add the following
sessionconfiguration toadmin.json.This ensures the browser passes the session cookie in the form-POST to the redirect endpoint (step 6 of Information flow during CDSSO):
{ "connectors": […], "session": { "type": "InMemorySessionManager", "config": { "cookie": { "sameSite": "none", "secure": true } } }, "heap": […] }This step is required for the following reasons:
-
When
sameSiteisstrictorlax, the browser doesn’t send the session cookie, which contains the nonce used in validation. If PingGateway doesn’t find the nonce, it assumes that the authentication failed. -
When
secureisfalse, the browser is likely to reject the session cookie.Learn more in AdminHttpApplication (
admin.json).
-
-
Set an environment variable for the PingGateway agent password, and then restart PingGateway:
$ export AGENT_SECRET_ID='cGFzc3dvcmQ='bashThe password is retrieved by a SystemAndEnvSecretStore, and must be base64-encoded.
-
Add the following route to PingGateway to serve the sample application .css and other static resources:
-
Linux
-
Windows
$HOME/.openig/config/routes/00-static-resources.json
%appdata%\OpenIG\config\routes\00-static-resources.json
{
  "name" : "00-static-resources",
  "baseURI" : "http://app.example.com:8081",
  "condition": "${find(request.uri.path,'^/css') or matchesWithRegex(request.uri.path, '^/.*\\\\.ico$') or matchesWithRegex(request.uri.path, '^/.*\\\\.gif$')}",
  "handler": "ReverseProxyHandler"
}
json -
-
Add the following route to PingGateway, and correct the value for the property
amInstanceUrl:-
Linux
-
Windows
$HOME/.openig/config/routes/cdsso-idc.json
%appdata%\OpenIG\config\routes\cdsso-idc.json
{ "name": "cdsso-idc", "baseURI": "http://app.example.com:8081", "condition": "${find(request.uri.path, '^/home/cdsso')}", "properties": { "amInstanceUrl": "https://myTenant.forgeblocks.com/am" }, "heap": [ { "name": "SystemAndEnvSecretStore-1", "type": "SystemAndEnvSecretStore" }, { "name": "AmService-1", "type": "AmService", "config": { "url": "&{amInstanceUrl}", "realm": "/alpha", "agent": { "username": "ig_agent", "passwordSecretId": "agent.secret.id" }, "secretsProvider": "SystemAndEnvSecretStore-1", "sessionCache": { "enabled": false } } } ], "handler": { "type": "Chain", "config": { "filters": [ { "name": "CrossDomainSingleSignOnFilter-1", "type": "CrossDomainSingleSignOnFilter", "config": { "redirectEndpoint": "/home/cdsso/redirect", "authCookie": { "path": "/home", "name": "ig-token-cookie" }, "amService": "AmService-1" } } ], "handler": "ReverseProxyHandler" } } }jsonNotice the following features of the route where PingAM is running locally:
-
The AmService
URLpoints to PingAM in PingOne Advanced Identity Cloud. -
The AmService
realmpoints to the realm where you configure your PingGateway agent.
-
-
Restart PingGateway.
-
-
Test the setup:
-
In your browser’s privacy or incognito mode, go to https://ig.ext.com:8443/home/cdsso.
The PingOne Advanced Identity Cloud login page is displayed.
-
Log in to PingOne Advanced Identity Cloud as user
demo, passwordCh4ng3!t.PingAM calls
/home/cdsso/redirect, and includes the CDSSO token. The CrossDomainSingleSignOnFilter passes the request to sample app.
-
Password replay
Password replay brings single sign-on (SSO) to legacy web applications without the need to edit, upgrade, or recode them.
Use PingGateway with an appropriate PingOne Advanced Identity Cloud journey to capture and replay username password credentials. PingGateway and PingOne Advanced Identity Cloud share a secret key to encrypt and decrypt the password and keep it safe.
When running AM in a self-hosted deployment, read Password replay with AM.
Request flow

-
PingGateway intercepts the browser’s HTTP GET request.
-
PingGateway redirects the user to the appropriate PingOne Advanced Identity Cloud journey for authentication.
-
PingOne Advanced Identity Cloud authenticates the user and stores the encrypted password in a JWT.
-
PingOne Advanced Identity Cloud redirects the browser back to the protected application with the JWT.
-
PingGateway intercepts the browser’s HTTP GET request again:
-
The user is authenticated.
-
PingGateway gets the password from the JWT and decrypts it.
-
PingGateway gets the username from PingOne Advanced Identity Cloud based on the user
_id.
-
-
PingGateway replaces the request with an HTTP POST to the application, taking the credentials from the context.
-
The sample application validates the credentials from the HTTP POST request.
-
The sample application responds with the user’s profile page.
-
PingGateway passes the response from the sample application to the browser.
Tasks
Before you begin
-
Make sure you can access the PingOne Advanced Identity Cloud tenant as an administrator.
-
Choose the realm to use in the PingOne Advanced Identity Cloud tenant.
The following tasks use the
alpharealm. -
Prepare hostnames for PingGateway and the sample application.
The following tasks use
ig.example.comfor PingGateway andapp.example.comfor the sample application.
Task 1: Run the sample application
-
Open a command-line window and start the sample application:
$ java -jar PingGateway-sample-application-2024.11.0-jar-with-dependencies.jarbashThe sample application runs in the foreground until you stop it.
-
Check you can access the sample application by browsing http://app.example.com:8081/login.
The sample application displays a login screen.
Task 2: Install PingGateway
This task installs PingGateway, but doesn’t configure it for password replay yet.
-
Set a top-level
sessionproperty inconfig.jsonalongside theheapandconnections:"session": { "type": "InMemorySessionManager", "config": { "cookie": { "sameSite": "none", "secure": true } } }PingOne Advanced Identity Cloud prompts the browser to send a session cookie on successful authentication.
-
When
sameSiteisstrictorlax, the browser doesn’t send the session cookie with the nonce used in validation. If PingGateway doesn’t find the nonce, it assumes that the authentication failed. -
When
secureisfalse, the browser is likely to reject the session cookie.
-
-
Add a base configuration file.
Comment captures in the handler to avoid flooding the PingGateway log,
"_capture": "all". -
Configure static routes for use with the sample application.
-
Check you can access the sample application through PingGateway by browsing https://ig.example.com:8443/static.
You might have used a self-signed certificate for the PingGateway HTTPS configuration. If your browser doesn’t recognize the PingGateway certificate and flags it as a security risk, choose to continue.
PingGateway displays a basic profile page for the
demouser.
PingGateway now has the configuration required as a basis on which to build password replay.
Task 3: Register PingGateway with PingOne Advanced Identity Cloud
If you have not yet registered PingGateway with PingOne Advanced Identity Cloud, follow these steps:
-
Configure an
Agentjourney PingGateway uses to authenticate with PingOne Advanced Identity Cloud. -
Register a profile for PingGateway.
Field Value Description ID
ig-agentThe PingGateway username when connecting to the
AmServicein PingOne Advanced Identity Cloud.Password
passwordThe PingGateway password when connecting to the
AmServicein PingOne Advanced Identity Cloud.In production tenants, use a strong password.
Redirect URLs
https://ig.example.com:8443/replay/redirectThe PingGateway endpoint to process the encrypted JWT from PingOne Advanced Identity Cloud.
PingOne Advanced Identity Cloud is now ready for PingGateway to connect. You’ll share the credentials with PingGateway in Task 6: Configure PingGateway.
Task 4: Prepare a shared secret
PingGateway and PingOne Advanced Identity Cloud share a secret symmetric key to encrypt and decrypt the password.
-
Generate a random AES 256-bit key to use as a shared secret.
How you generate the secret key is up to you. For example:
$ openssl rand -base64 32 YWJjZGVmZ2hpamtsbW5vcHFyc3R1dnd5eHowMTIzNDU=bashKeep the secret safe.
-
Store the shared secret key as an ESV in PingOne Advanced Identity Cloud.
-
Sign on to the PingOne Advanced Identity Cloud admin UI as an administrator and go to Tenant Settings > Global Settings > Environment Secrets & Variables.
-
Click Variables > + Add Variable.
-
In the Add a Variable modal, enter the following settings:
Field Value Description Name
esv-ig-shared-secretThe ESV name for the secret.
Value
YWJjZGVmZ2hpamtsbW5vcHFyc3R1dnd5eHowMTIzNDU=The base64-encoded random AES 256-bit key.
-
Click Save to create the variable.
PingOne Advanced Identity Cloud can now access the secret through the
esv.ig.shared.secretsystem property. You will share the secret with PingGateway in Task 6: Configure PingGateway. -
Task 5: Prepare PingOne Advanced Identity Cloud
Update the PingOne Advanced Identity Cloud validation service for PingGateway, create a script to capture the password, and a journey to use the script.
-
Sign on to the PingOne Advanced Identity Cloud admin UI as an administrator and go to Native Consoles > Access Management, select Services, and the following Valid goto URL Resources to the Validation Service:
-
https://ig.example.com:8443/* -
https://ig.example.com:8443/*?*
-
-
Go to Scripts > Auth Scripts, click + New Script and create a Journey Decision Node script with the Legacy engine named
Password replayand the following JavaScript content.The script adds a JWT encrypted with the shared secret key to the session:
Show script
var fr = JavaImporter( org.forgerock.openam.auth.node.api.Action, org.forgerock.openam.auth.node.api, javax.security.auth.callback.TextOutputCallback, org.forgerock.json.jose.builders.JwtBuilderFactory, org.forgerock.json.jose.jwt.JwtClaimsSet, org.forgerock.json.jose.jwe.JweAlgorithm, org.forgerock.json.jose.jwe.EncryptionMethod, javax.crypto.spec.SecretKeySpec, org.forgerock.secrets.SecretBuilder, org.forgerock.util.encode.Base64 ); var NodeOutcome = { ERROR: 'false', SUCCESS: 'true' }; var config = { encryptionKey: systemEnv.getProperty("esv.ig.shared.secret") }; function getKey () { logger.message("encKey: " + config.encryptionKey) return new fr.SecretKeySpec(fr.Base64.decode(config.encryptionKey), 'AES'); } function buildJwt (claims) { logger.message('Building response JWT'); var encryptionKey = getKey(); var jwtClaims = new fr.JwtClaimsSet; jwtClaims.setClaims(claims); var jwt = new fr.JwtBuilderFactory() .jwe(encryptionKey) .headers() .alg(fr.JweAlgorithm.DIRECT) .enc(fr.EncryptionMethod.A128CBC_HS256) .done() .claims(jwtClaims) .build(); return jwt; } try { password=nodeState.get("password").asString() var registrationClaims = { password: password }; passwordJwt = buildJwt(registrationClaims); action = fr.Action.goTo(NodeOutcome.SUCCESS).putSessionProperty("sunIdentityUserPassword", passwordJwt).build(); } catch (e) { logger.error('ERROR ' + e); action = fr.Action.send(new fr.TextOutputCallback(fr.TextOutputCallback.ERROR, e.toString())).build(); }javascriptYou can download the script as password-replay.js.
-
Go to Journeys, click + New Journey, and create a journey named
Password replaywhose Identity Object ismanaged/alpha_user. -
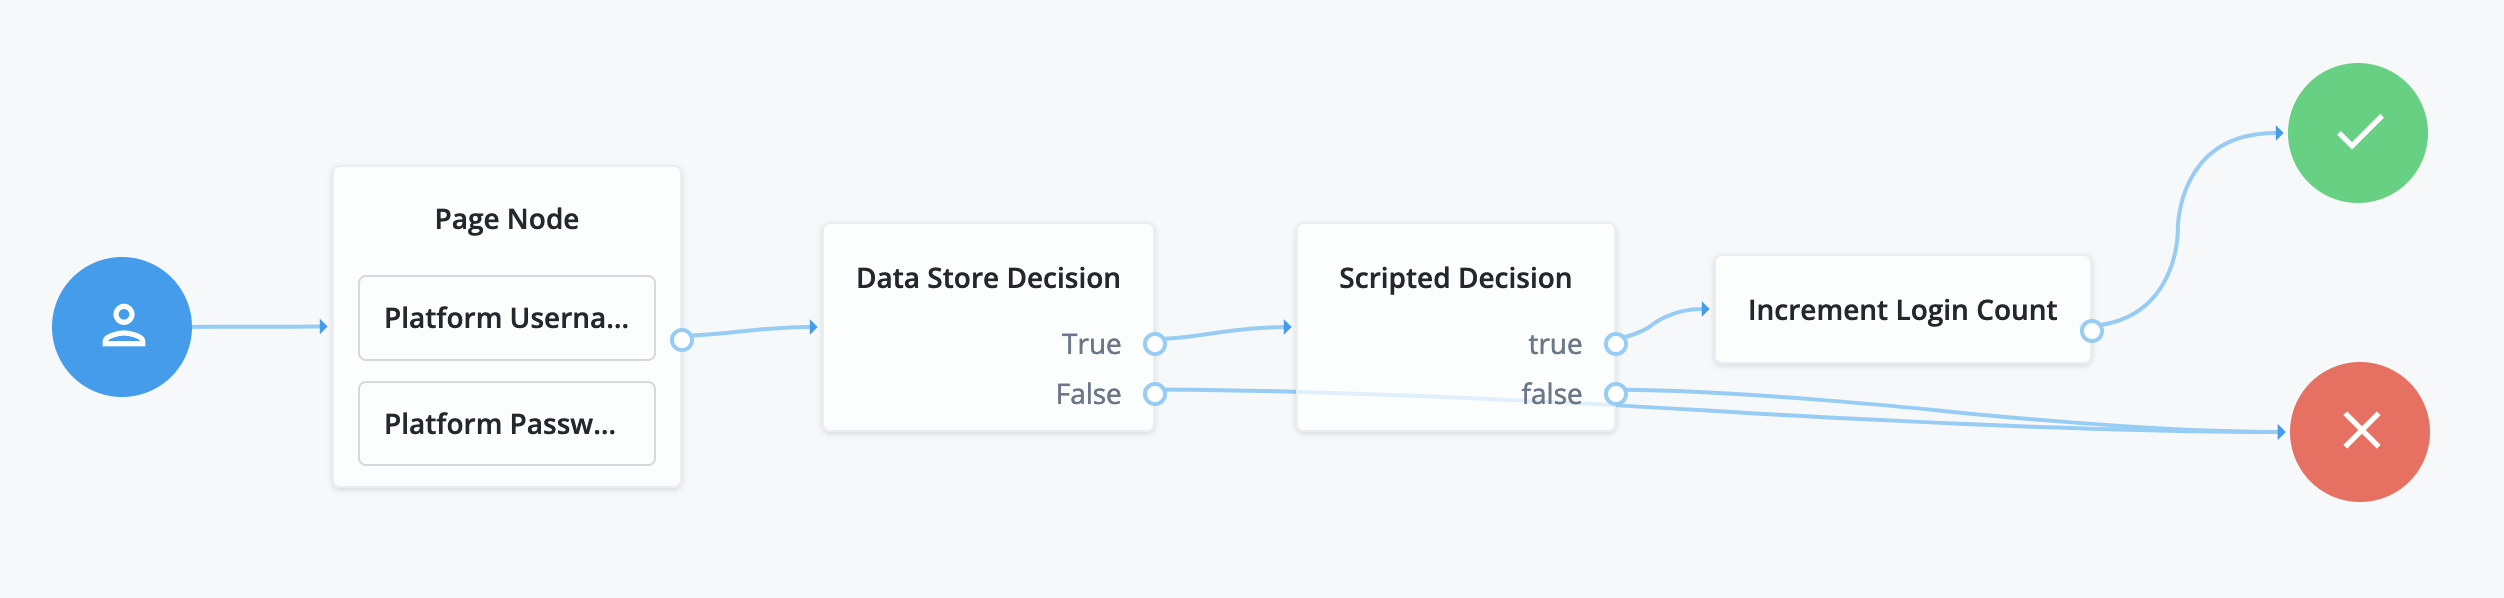
Configure and save the journey with the nodes shown in this screenshot:
-
The Page node presents a page with input fields to prompt for the username and password.
-
The Platform Username node collects and injects the
userNameinto the shared node state. -
The Platform Password node collects and injects the
passwordinto the shared node state.
-
-
The Data Store Decision node uses the username and password to determine whether authentication is successful.
-
The Scripted Decision node references your script and has the same outcomes:
trueandfalse. -
The Increment Login Count node updates the login count on successful authentication.
-
-
In your browser’s privacy or incognito mode, go to the new journey and sign on with the credentials of a known user in the
alpharealm.PingOne Advanced Identity Cloud authenticates you and displays the user profile page.
You can now configure PingGateway to use the journey to capture the password.
Task 6: Configure PingGateway
The password replay configuration includes the PingGateway password to connect to PingOne Advanced Identity Cloud, the shared secret, and a route.
-
Set an environment variable locally on the computer running PingGateway to access the agent password:
# The base64-encoded PingGateway agent "password": $ export AGENT_SECRET_ID='cGFzc3dvcmQ='bashPingGateway retrieves the password with a SystemAndEnvSecretStore, which requires it to be base64-encoded.
The password must match the agent profile password you set in PingOne Advanced Identity Cloud. PingGateway uses the password to connect to PingOne Advanced Identity Cloud.
-
Set an environment variable locally on the computer running PingGateway to access the shared secret key:
# The base64-encoded shared secret key: $ export AES_KEY='YWJjZGVmZ2hpamtsbW5vcHFyc3R1dnd5eHowMTIzNDU='bashPingGateway retrieves the shared secret with a SystemAndEnvSecretStore, which requires it to be base64-encoded.
The shared secret key must match the secret key you stored in the PingOne Advanced Identity Cloud ESV. PingOne Advanced Identity Cloud uses the secret key to encrypt the password to replay. PingGateway uses the secret key to decrypt the password to replay.
-
Add a route for password replay.
-
Linux
-
Windows
$HOME/.openig/config/routes/04-replay-aic.json
%appdata%\OpenIG\config\routes\04-replay-aic.json
Show route
{ "name": "04-replay-aic", "condition": "${find(request.uri.path, '^/replay')}", "properties": { "amInstanceUrl": "https://myTenant.forgeblocks.com/am/" }, "heap": [ { "name": "SystemAndEnvSecretStore-1", "type": "SystemAndEnvSecretStore", "config": { "mappings": [ { "secretId": "aes.key", "format": { "type": "SecretKeyPropertyFormat", "config": { "format": "BASE64", "algorithm": "AES" } } } ] } }, { "name": "AmService-1", "type": "AmService", "config": { "url": "&{amInstanceUrl}", "realm": "/alpha", "agent": { "username": "ig-agent", "passwordSecretId": "agent.secret.id" }, "secretsProvider": "SystemAndEnvSecretStore-1" }, "sessionCache": { "enabled": false } }, { "name": "CapturedUserPasswordFilter-1", "type": "CapturedUserPasswordFilter", "config": { "ssoToken": "${contexts.ssoToken.value}", "keySecretId": "aes.key", "keyType": "AES", "secretsProvider": "SystemAndEnvSecretStore-1", "amService": "AmService-1" } } ], "handler": { "type": "Chain", "config": { "filters": [ { "name": "CrossDomainSingleSignOnFilter-1", "type": "CrossDomainSingleSignOnFilter", "config": { "redirectEndpoint": "/replay/redirect", "authCookie": { "path": "/replay", "name": "ig-token-cookie" }, "amService": "AmService-1", "authenticationService": "Password replay" } }, { "name": "UserProfileFilter-1", "type": "UserProfileFilter", "config": { "username": "${contexts.ssoToken.info.uid}", "userProfileService": { "type": "UserProfileService", "config": { "amService": "AmService-1", "profileAttributes": [ "username" ] } } } }, { "name": "PasswordReplayFilter-1", "type": "PasswordReplayFilter", "config": { "loginPage": "${true}", "credentials": "CapturedUserPasswordFilter-1", "request": { "method": "POST", "uri": "http://app.example.com:8081/login", "form": { "username": [ "${contexts.userProfile.username}" ], "password": [ "${contexts.capturedPassword.value}" ] } } }, "capture": [ "all" ] } ], "handler": "ReverseProxyHandler" } } }jsonYou can download the route as 04-replay-aic.json.
The route:
-
Matches requests whose path starts with
/replay. -
Sets an
amInstanceUrlproperty to the access management service in PingOne Advanced Identity Cloud.Update the URL to target your tenant.
-
Loads the
aes.keysecret key from the localAES_KEYenvironment variable. -
Connects to PingOne Advanced Identity Cloud as
ig-agentwith theagent.secret.idpassword from the localAGENT_SECRET_IDenvironment variable. -
Extracts the captured password from the SSO token context and decrypts it with the
aes.keysecret key. -
Uses a CrossDomainSingleSignOnFilter to redirect to the PingOne Advanced Identity Cloud
Password replayjourney for authentication, getting the authentication information from theig-token-cookie. -
Queries the access management service in PingOne Advanced Identity Cloud to retrieve the username for signing on.
You can retrieve other profile attributes with the UserProfileFilter, such as the email address or first and last names. The sample application expects the username in this example, so the route gets the username.
-
Signs on to the sample application with the username and password.
-
Returns the result to the browser.
In production, remove
"capture": ["all"]from the PasswordReplayFilter to avoid recording credentials in the logs. -
-
Restart PingGateway to read the secrets from the environment and load the new route.
In the PingGateway output, make sure the route loaded successfully with no errors or warnings:
@system - Loaded the route with id '04-replay-aic' registered with the name '04-replay-aic'.
Task 7: Create a test user in PingOne Advanced Identity Cloud
The sample application validates the credentials for password replay. It must recognize the username and password you use.
The sample application has built-in username-password combinations. The username and password credentials shown in the following steps are one of the built-in pairs.
-
In your browser’s privacy or incognito mode, go to the default login journey for the realm you’re using.
For example,
https://myTenant.forgeblocks.com/am/XUI/?realm=/alpha#/. -
Click the Create an account link and enter the following settings in the Sign Up page:
Field Value Username
wolkigFirst name
WilhelmLast name
WolkigEmail Address
Your email. PingOne Advanced Identity Cloud sends a confirmation mail to this address.
Password
Geh3imnis!Select a security question
What’s your favorite color?Answer
Red -
Click Next to complete account creation and view the user profile.
-
Sign off.
Validation
-
In your browser’s privacy or incognito mode, go to https://ig.example.com:8443/replay/.
PingGateway redirects to the PingOne Advanced Identity Cloud journey.
-
Sign on as user
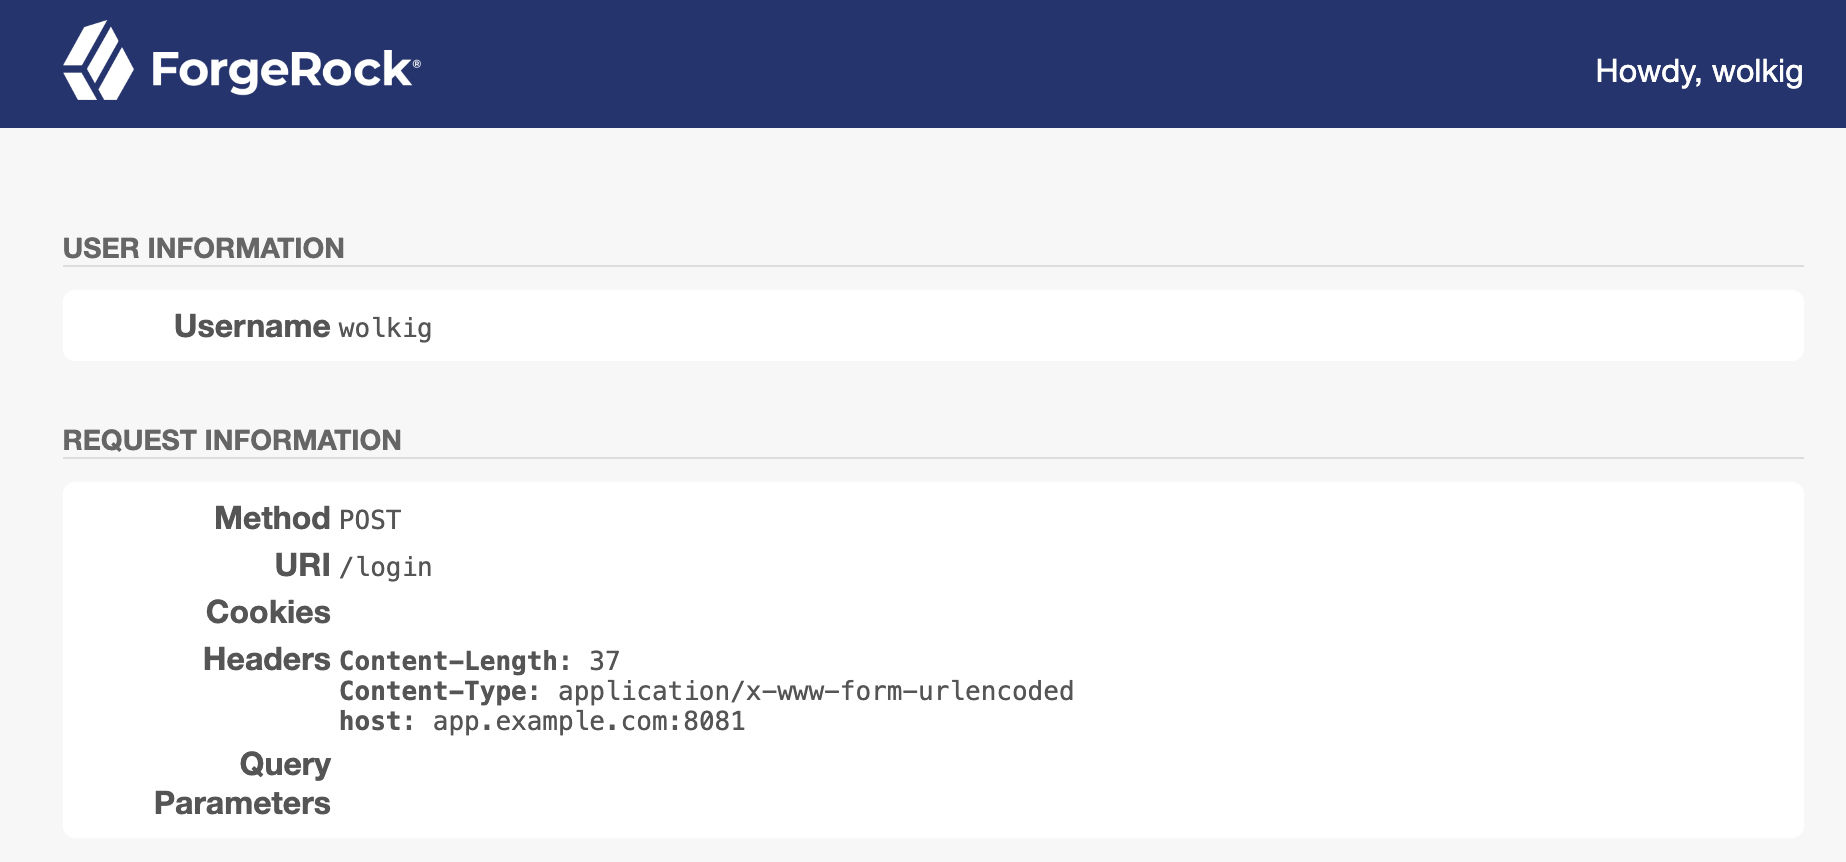
wolkigwith passwordGeh3imnis!.PingGateway successfully replays the credentials against the sample application. The sample application displays its user profile page:
-
Review the PingGateway output.
On success, the output displays the credentials and the profile page:
...INFO  o.f.o.d.c.C.c.PasswordReplayFilter-1 @04-replay-aic -

[CONTINUED]--- (filtered-request) exchangeId:<id> - transactionId:<id> --->

[CONTINUED]POST http://app.example.com:8081/login HTTP/1.1
[CONTINUED]Content-Length: 37
[CONTINUED]Content-Type: application/x-www-form-urlencoded

[CONTINUED]password=Geh3imnis%21&username=wolkig

...INFO  o.f.o.d.c.C.c.PasswordReplayFilter-1 @04-replay-aic -

[CONTINUED]<--- (response) exchangeId:<id> - transactionId:<id> ---

[CONTINUED]HTTP/1.1 200 OK
...

[CONTINUED]<!DOCTYPE html>
...
You have successfully demonstrated password replay with PingGateway and PingOne Advanced Identity Cloud.
If password replay fails, consider the outcome of the HTTP POST from PingGateway to the sample application:
- HTTP 401 Unauthorized
-
PingGateway is not replaying the credentials.
Review the PingGateway output to determine whether the username or password is missing when PingGateway replays the credentials.
If the password is missing, make sure PingGateway and PingOne Advanced Identity Cloud share the same AES secret key.
- HTTP 403 Forbidden
-
PingGateway is not replaying the right credentials.
Make sure you’re using a username-password combination known to the sample application.
Policy enforcement
The following procedure gives an example of how to request and enforce policy decisions from PingOne Advanced Identity Cloud.
Enforce a simple policy
Before you start, set up and test the example in Cross-domain single sign-on.
-
Set up PingOne Advanced Identity Cloud:
-
In the PingOne Advanced Identity Cloud admin UI, select Native Consoles > Access Management. The AM admin UI is displayed.
-
Select Authorization > Policy Sets > New Policy Set, and add a policy set with the following values:
-
Id :
PEP-CDSSO -
Resource Types :
URL
-
-
In the new policy set, add a policy with the following values:
-
Name :
CDSSO -
Resource Type :
URL -
Resource pattern :
*://*:*/* -
Resource value :
http://app.example.com:8081/home/cdssoThis policy protects the home page of the sample application.
-
-
On the Actions tab, add an action to allow HTTP
GET. -
On the Subjects tab, remove any default subject conditions, add a subject condition for all
Authenticated Users.
-
-
Set up PingGateway:
-
Replace
cdsso-idc.jsonwith the following route, and correct the value for the property amInstanceUrl:-
Linux
-
Windows
$HOME/.openig/config/routes/pep-cdsso-idc.json
%appdata%\OpenIG\config\routes\pep-cdsso-idc.json
{ "name": "pep-cdsso-idc", "baseURI": "http://app.example.com:8081", "condition": "${find(request.uri.path, '^/home/cdsso')}", "properties": { "amInstanceUrl": "https://myTenant.forgeblocks.com/am" }, "heap": [ { "name": "SystemAndEnvSecretStore-1", "type": "SystemAndEnvSecretStore" }, { "name": "AmService-1", "type": "AmService", "config": { "url": "&{amInstanceUrl}", "realm": "/alpha", "agent": { "username": "ig_agent", "passwordSecretId": "agent.secret.id" }, "secretsProvider": "SystemAndEnvSecretStore-1", "sessionCache": { "enabled": false } } } ], "handler": { "type": "Chain", "config": { "filters": [ { "name": "CrossDomainSingleSignOnFilter-1", "type": "CrossDomainSingleSignOnFilter", "config": { "redirectEndpoint": "/home/cdsso/redirect", "authCookie": { "path": "/home", "name": "ig-token-cookie" }, "amService": "AmService-1" } }, { "name": "PolicyEnforcementFilter-1", "type": "PolicyEnforcementFilter", "config": { "application": "PEP-CDSSO", "ssoTokenSubject": "${contexts.cdsso.token}", "amService": "AmService-1" } } ], "handler": "ReverseProxyHandler" } } }jsonNote the following feature of the route compared to
cdsso-idc.json:-
The CrossDomainSingleSignOnFilter is followed by a PolicyEnforcementFilter to enforce the policy
PEP-CDSSO.
-
-
-
Test the setup:
-
Go to https://ig.ext.com:8443/home/cdsso.
If you have warnings that the site is not secure respond to the warnings to access the site.
PingGateway redirects you to PingOne Advanced Identity Cloud for authentication.
-
Log in to PingOne Advanced Identity Cloud as user
demo, passwordCh4ng3!t.PingOne Advanced Identity Cloud redirects you back to the request URL, and PingGateway requests a policy decision. PingOne Advanced Identity Cloud returns a policy decision that grants access to the sample application.
-
Step up authorization for a transaction
Before you start, set up and test the example in pep.adoc#pep-cdsso.
-
In the PingOne Advanced Identity Cloud admin UI, select Scripts > Auth Scripts > New Script > Journey Decision Node > Next, and add a default Journey Decision Node Script called
TxTestPassword:/* - Data made available by nodes that have already executed are available in the sharedState variable. - The script should set outcome to either "true" or "false". */ var givenPassword = nodeState.get("password").asString() if (givenPassword.equals("7890")) { outcome = "true" } else { outcome = "false" }javascript -
Configure a journey:
-
Click Journeys and add a journey with the following configuration:
-
Name:
Tx01_Tree -
Identity Object:
Alpha realm usersThe journey canvas is displayed.
-
-
In Nodes > Basic Authentication, drag a Password Collector node onto the canvas.
-
In Nodes > Utilities, drag a Scripted decision node onto the canvas.
-
Configure the scripted decision node as follows:
-
Script: select
TxTestPassword -
Outcomes: enter
trueandfalse
-
-
Connect the nodes as shown:
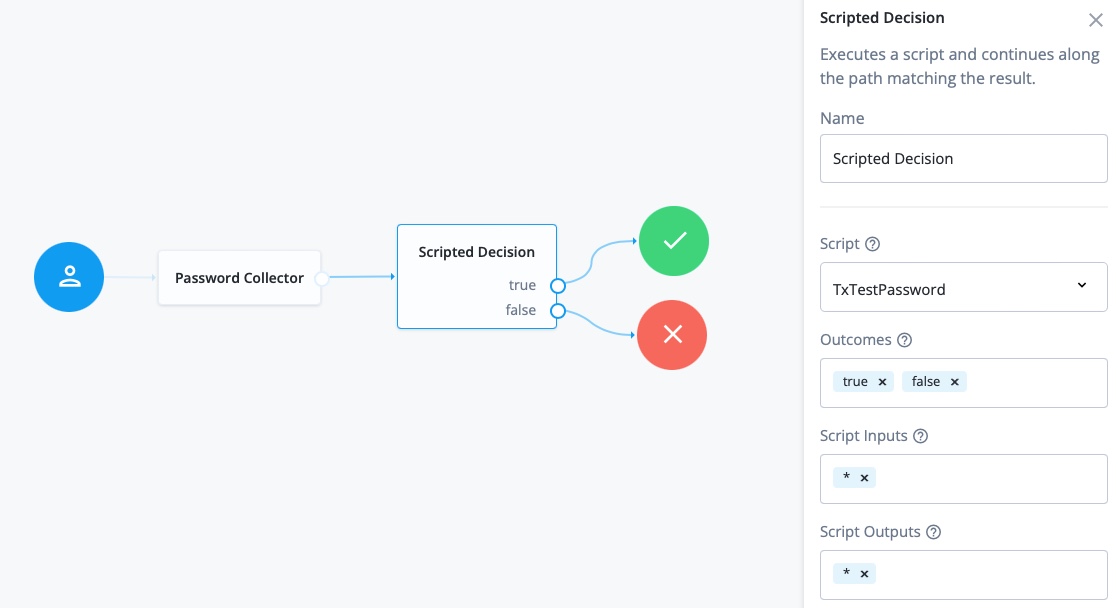
For information about configuring trees, refer to PingOne Advanced Identity Cloud Docs
-
-
Edit the authorization policy:
-
In the PingOne Advanced Identity Cloud admin UI, select Native Consoles > Access Management. The AM admin UI is displayed.
-
Select Authorization > Policy Sets > PEP-CDSSO, and add the following environment condition to the
CDSSOpolicy:-
All of -
Type:
Transaction -
Script name:
Authenticate to tree -
Strategy Specifier:
Tx01_Tree
-
-
-
Test the setup:
-
In a browser, go to https://ig.ext.com:8443/home/cdsso.
If you have not previously authenticated to PingOne Advanced Identity Cloud, the CrossDomainSingleSignOnFilter redirects the request to PingOne Advanced Identity Cloud for authentication.
-
Log in to PingOne Advanced Identity Cloud as user
demo, passwordCh4ng3!t. -
Enter the password
7890required by the scriptTxTestPassword.PingOne Advanced Identity Cloud redirects you back to the request URL, and PingGateway requests a policy decision. PingOne Advanced Identity Cloud returns a policy decision based on the authentication journey.
-
Pass runtime data downstream in a JWT
This example sets up PingOne Advanced Identity Cloud as an identity provider, to pass identity or other runtime information downstream, in a JWT signed with a PEM.
For more information about using runtime data, refer to
Pass data along the chain. To help with development, the sample
application includes a /jwt endpoint to display the JWT, verify its signature,
and decrypt it.
Before you start, prepare PingOne Advanced Identity Cloud, PingGateway, and the sample application as described in Example installation for this guide.
-
Set up secrets:
-
Locate a directory for secrets, and go to it:
$ cd /path/to/secretsbash -
Create the following secret key and certificate pair as PEM files:
$ openssl req \ -newkey rsa:2048 \ -new \ -nodes \ -x509 \ -days 3650 \ -subj "/CN=ig.example.com/OU=example/O=com/L=fr/ST=fr/C=fr" \ -keyout ig.example.com-key.pem \ -out ig.example.com-certificate.pembashTwo PEM files are created, one for the secret key, and another for the associated certificate.
-
Map the key and certificate to the same secret ID in PingGateway:
$ cat ig.example.com-key.pem ig.example.com-certificate.pem > key.manager.secret.id.pembash -
Generate PEM files to sign and verify the JWT:
$ openssl req \
-newkey rsa:2048 \
-new \
-nodes \
-x509 \
-days 3650 \
-subj "/CN=ig.example.com/OU=example/O=com/L=fr/ST=fr/C=fr" \
-keyout id.key.for.signing.jwt.pem \
-out id.key.for.verifying.jwt.pem
bash -
Make sure the following files have been added to your secrets directory:
-
id.key.for.signing.jwt.pem -
id.key.for.verifying.jwt.pem -
key.manager.secret.id.pem -
ig.example.com-certificate.pem -
ig.example.com-key.pem
-
-
-
Set up PingOne Advanced Identity Cloud:
-
Log in to the PingOne Advanced Identity Cloud admin UI as an administrator.
-
Go to Identities > Manage > Alpha realm - Users, and add a user with the following values:
-
Username:
demo -
First name:
demo -
Last name:
user -
Email Address:
demo@example.com -
Password:
Ch4ng3!t
-
-
Register a PingGateway agent with the following values, as described in Register a PingGateway agent in PingOne Advanced Identity Cloud:
-
ID:
ig_agent_jwt -
Password:
password -
Redirect URLs:
https://ig.example.com:8443/jwt/redirect
-
-
(Optional) Authenticate a PingGateway agent to PingOne Advanced Identity Cloud.
PingGateway agents are automatically authenticated to PingOne Advanced Identity Cloud by a deprecated authentication module in PingOne Advanced Identity Cloud. This step is currently optional, but will be required when authentication chains and modules are removed in a future release of PingOne Advanced Identity Cloud. -
Add a Validation Service:
-
In PingOne Advanced Identity Cloud, select Native Consoles > Access Management. The AM admin UI is displayed.
-
Select Services, and add a validation service with the following Valid goto URL Resources:
-
https://ig.example.com:8443/* -
https://ig.example.com:8443/*?*
-
-
-
-
Set up PingGateway:
-
Set up TLS by adding the following file to PingGateway, replacing the value for the property
secretsDir:-
Linux
-
Windows
$HOME/.openig/config/admin.json
%appdata%\OpenIG\config\admin.json
{
  "mode": "DEVELOPMENT",
  "properties": {
    "secretsDir": "/path/to/secrets"
  },
  "connectors": [
    {
      "port": 8080
    },
    {
      "port": 8443,
      "tls": "ServerTlsOptions-1"
    }
  ],
  "heap": [
    {
      "name": "ServerTlsOptions-1",
      "type": "ServerTlsOptions",
      "config": {
        "keyManager": {
          "type": "SecretsKeyManager",
          "config": {
            "signingSecretId": "key.manager.secret.id",
            "secretsProvider": "ServerIdentityStore"
          }
        }
      }
    },
    {
      "name": "ServerIdentityStore",
      "type": "FileSystemSecretStore",
      "config": {
        "format": "PLAIN",
        "directory": "&{secretsDir}",
        "suffix": ".pem",
        "mappings": [{
          "secretId": "key.manager.secret.id",
          "format": {
            "type": "PemPropertyFormat"
          }
        }]
      }
    }
  ]
}
json -
-
Set an environment variable for the PingGateway agent password, and then restart PingGateway:
$ export AGENT_SECRET_ID='cGFzc3dvcmQ='bashThe password is retrieved by a SystemAndEnvSecretStore, and must be base64-encoded.
-
Add the following route to PingGateway to serve the sample application .css and other static resources:
-
Linux
-
Windows
$HOME/.openig/config/routes/00-static-resources.json
%appdata%\OpenIG\config\routes\00-static-resources.json
{
  "name" : "00-static-resources",
  "baseURI" : "http://app.example.com:8081",
  "condition": "${find(request.uri.path,'^/css') or matchesWithRegex(request.uri.path, '^/.*\\\\.ico$') or matchesWithRegex(request.uri.path, '^/.*\\\\.gif$')}",
  "handler": "ReverseProxyHandler"
}
json -
-
Add the following route to PingGateway, replacing the value for the properties
secretsDirandamInstanceUrl:-
Linux
-
Windows
$HOME/.openig/config/routes/jwt-idc.json
%appdata%\OpenIG\config\routes\jwt-idc.json
{
  "name": "jwt-idc",
  "condition": "${find(request.uri.path, '/jwt')}",
  "baseURI": "http://app.example.com:8081",
  "properties": {
    "secretsDir": "/path/to/secrets",
    "amInstanceUrl": "https://myTenant.forgeblocks.com/am"
  },
  "heap": [
    {
      "name": "SystemAndEnvSecretStore-1",
      "type": "SystemAndEnvSecretStore"
    },
    {
      "name": "AmService-1",
      "type": "AmService",
      "config": {
        "url": "&{amInstanceUrl}",
        "realm": "/alpha",
        "agent": {
          "username": "ig_agent_jwt",
          "passwordSecretId": "agent.secret.id"
        },
        "secretsProvider": "SystemAndEnvSecretStore-1",
        "sessionCache": {
          "enabled": false
        }
      }
    },
    {
      "name": "pemPropertyFormat",
      "type": "PemPropertyFormat"
    },
    {
      "name": "FileSystemSecretStore-1",
      "type": "FileSystemSecretStore",
      "config": {
        "format": "PLAIN",
        "directory": "&{secretsDir}",
        "suffix": ".pem",
        "mappings": [{
          "secretId": "id.key.for.signing.jwt",
          "format": "pemPropertyFormat"
        }]
      }
    }
  ],
  "session": {
    "type": "InMemorySessionManager",
    "config": {
      "cookie": {
        "sameSite": "none",
        "secure": true
      }
    }
  },
  "handler": {
    "type": "Chain",
    "config": {
      "filters": [
        {
          "name": "CrossDomainSingleSignOnFilter-1",
          "type": "CrossDomainSingleSignOnFilter",
          "config": {
            "redirectEndpoint": "/jwt/redirect",
            "authCookie": {
              "path": "/jwt",
              "name": "ig-token-cookie"
            },
            "amService": "AmService-1"
          }
        },
        {
          "name": "UserProfileFilter",
          "type": "UserProfileFilter",
          "config": {
            "username": "${contexts.ssoToken.info.uid}",
            "userProfileService": {
              "type": "UserProfileService",
              "config": {
                "amService": "AmService-1"
              }
            }
          }
        },
        {
          "name": "JwtBuilderFilter-1",
          "type": "JwtBuilderFilter",
          "config": {
            "template": {
              "name": "${contexts.userProfile.commonName}",
              "email": "${contexts.userProfile.rawInfo.mail[0]}"
            },
            "secretsProvider": "FileSystemSecretStore-1",
            "signature": {
              "secretId": "id.key.for.signing.jwt",
              "algorithm": "RS512"
            }
          }
        },
        {
          "name": "HeaderFilter-1",
          "type": "HeaderFilter",
          "config": {
            "messageType": "REQUEST",
            "add": {
              "x-openig-user": ["${contexts.jwtBuilder.value}"]
            }
          }
        }
      ],
      "handler": "ReverseProxyHandler"
    }
  }
}
json -
-
-
Test the setup:
-
Go to https://ig.example.com:8443/jwt.
If you receive warnings that the site is not secure, respond to the warnings to access the site. The PingOne Advanced Identity Cloud login page is displayed.
-
Log in to PingOne Advanced Identity Cloud as user
demo, passwordCh4ng3!t. The sample app displays the signed JWT along with its header and payload. -
In
USE PEM FILE, enter the absolute path toid.key.for.verifying.jwt.pemto verify the JWT signature.
-
Secure the OAuth 2.0 access token endpoint
This section uses a GrantSwapJwtAssertionOAuth2ClientFilter to transform requests for OAuth 2.0 access tokens into secure JWT bearer grant type requests. It propagates the transformed requests to PingOne Advanced Identity Cloud to obtain an access token.
Use GrantSwapJwtAssertionOAuth2ClientFilter to increase the security of less-secure grant-type requests, such as Client credentials grant requests or Resource owner password credentials grant requests.
|
The GrantSwapJwtAssertionOAuth2ClientFilter obtains access tokens from the
Consider the following options to secure access to the GrantSwapJwtAssertionOAuth2ClientFilter:
|
The following figure shows the flow of information for a grant swap:

Before you start, prepare PingOne Advanced Identity Cloud, PingGateway, and the sample application as described in Example installation for this guide.
-
Set up PingOne Advanced Identity Cloud:
-
Log in to the PingOne Advanced Identity Cloud admin UI as an administrator.
-
Create a service account with the following values, as described in Create a new service account:
-
Name:
myServiceAccount -
Scopes:
fr:idm:* All Identity Management APIsThe service account ID is displayed and you are prompted to download the private key. The public key is held in PingOne Advanced Identity Cloud.
For more information, refer to Service accounts.
-
-
Make a note of the service account ID and download the private key to your secrets directory.
-
Rename the key to match the regex format
(\.[a-zA-Z0-9])*. For example, renamemyServiceAccount_privateKey.jwktoprivateKey.jwk.
-
-
Set up PingGateway:
-
Set up PingGateway for HTTPS, as described in Configure PingGateway for TLS (server-side).
-
Add the following route to PingGateway:
-
Linux
-
Windows
$HOME/.openig/config/routes/grant-swap.json
%appdata%\OpenIG\config\routes\grant-swap.json
{
  "name" : "grant-swap",
  "properties": {
    "idcInstanceUrl": "https://myTenant.forgeblocks.com",
    "issuer": "service-account-id",
    "secretsDir": "path-to-secrets",
    "privateKeyFilename": "privateKey.jwk"
  },
  "condition" : "#{find(request.uri.path, '^/am/oauth2/access_token') && request.entity.form['grant_type'][0] == 'client_credentials'}",
  "baseURI" : "&{idcInstanceUrl}:443/",
  "heap" : [ {
    "name": "JwkPropertyFormat-01",
    "type": "JwkPropertyFormat"
  },
    {
      "name": "FileSystemSecretStore-01",
      "type": "FileSystemSecretStore",
      "config": {
        "format": "JwkPropertyFormat-01",
        "directory": "&{secretsDir}",
        "mappings": [ {
          "secretId": "&{privateKeyFilename}",
          "format": "JwkPropertyFormat-01"
        }
        ]
      }
    }
  ],
  "handler" : {
    "type" : "Chain",
    "capture" : "all",
    "config" : {
      "filters" : [
        {
          "name" : "GrantSwapJwtAssertionOAuth2ClientFilter-01",
          "description": "access /access_token endpoint with jwt-bearer-profile",
          "type" : "GrantSwapJwtAssertionOAuth2ClientFilter",
          "capture" : "all",
          "config" : {
            "clientId" : "service-account",
            "assertion" : {
              "issuer" : "&{issuer}",
              "audience" : "&{idcInstanceUrl}/am/oauth2/access_token",
              "subject" : "&{issuer}",
              "expiryTime": "2 minutes"
            },
            "signature": {
              "secretId": "&{privateKeyFilename}",
              "includeKeyId": false
            },
            "secretsProvider": "FileSystemSecretStore-01",
            "scopes" : {
              "type": "RequestFormResourceAccess"
            }
          }
        }
      ],
      "handler" : "ForgeRockClientHandler"
    }
  }
}
json -
-
In the route, replace the values for the following properties with your values:
-
idcInstanceUrl: The root URL of your PingOne Advanced Identity Cloud tenant. -
issuer: The ID of the service account created in PingOne Advanced Identity Cloud -
secretsDir: The directory containing the downloaded private key -
privateKeyFilename: The filename of the downloaded private key
-
-
Notice the following features of the route:
-
The condition intercepts only
client_credentialsgrant-type requests on the path/am/oauth2/access_token. A more secure condition can be set on the client ID. -
Requests are rebased to the PingOne Advanced Identity Cloud URL.
-
A FileSystemSecretStore loads the private-key JWK used to sign the JWT.
-
The GrantSwapJwtAssertionOAuth2ClientFilter:
-
Requires the core JWT claims
issuer,subject,audience, andexpiryTime. -
Uses RequestFormResourceAccess to extract scopes from the inbound request for inclusion in the JWT-assertion grant-type request propagated to AM.
-
Signs the JWT with the JWK provided by the service account.
-
-
The GrantSwapJwtAssertionOAuth2ClientFilter
clientIdrefers to the OAuth 2.0 client ID created by AM. The value must beservice-account.
-
-
Add the following route to PingGateway to return a standard OAuth 2.0 error response if the request fails the route condition:
-
Linux
-
Windows
$HOME/.openig/config/routes/zz-returns-invalid-request.json
%appdata%\OpenIG\config\routes\zz-returns-invalid-request.json
{
  "name" : "zz-returns-invalid-request",
  "handler" : {
    "type" : "StaticResponseHandler",
    "capture" : "all",
    "config" : {
      "status": 400,
      "headers": {"Content-Type": ["application/json; charset=UTF-8"]},
      "entity": "{\"error\": \"Invalid_request\", \"error_description\": \"Invalid request\"}"
    }
  }
}
json -
-
-
Test the setup by accessing the route with a
curlcommand similar to this:$ curl \ --cacert /path/to/secrets/ig.example.com-certificate.pem \ --location \ --request POST 'https://ig.example.com:8443/am/oauth2/access_token' \ --header 'Content-Type: application/x-www-form-urlencoded' \ --data-urlencode 'client_id=myServiceAccount' \ --data-urlencode 'grant_type=client_credentials' \ --data-urlencode 'scope=fr:idm:*' {"access_token":"eyJ...","scope":"fr:idm:*","token_type":"Bearer","expires_in":899}The command makes a
client_credentialsgrant-type request on the path/am/oauth2/access_token, supplying the client ID and scopes. PingGateway transforms the request into a JWT-assertion grant-type request and propagates it to PingOne Advanced Identity Cloud.Because the service account in PingOne Advanced Identity Cloud supports the requested scope, the GrantSwapJwtAssertionOAuth2ClientFilter returns an access token.