Use ESVs for signing and encryption keys
PingOne Advanced Identity Cloud lets you store signing and encryption keys in ESV secrets, then map them to secret labels. Each secret label represents an authentication feature in Advanced Identity Cloud, such as signing OAuth 2.0 client access tokens.
Advanced Identity Cloud can directly access keys stored in a mapped ESV secret, there is no need to restart Advanced Identity Cloud services.
You can rotate keys stored in a mapped ESV secret by adding new secret versions to the ESV. The key in the latest secret version is used to sign new access tokens, then subsequently validate them. Keys in older secret versions (that are still enabled) are still used to validate existing access tokens.
You can also rotate SAML 2.0 certificates using ESV secrets. Learn more in Rotate SAML 2.0 certificates using ESVs
Secret labels
Secret labels (also known as secret IDs or purposes) represent authentication features in Advanced Identity Cloud that
need a signing or encryption key. For example, to sign an OAuth 2.0 client access token with an
HMAC key, you would use the secret label am.services.oauth2.stateless.signing.HMAC.
For a full list of secret labels, learn more in Secret labels.
Secret labels with fixed names
Most secret labels represent an authentication feature that requires only a single secret per
realm. These secret labels have fixed names as they require only a single mapping per realm to
override them. An example of a secret label with a fixed name is am.services.oauth2.stateless.token.encryption,
the label for the secret used to encrypt client-side access tokens issued in the realm.
Secret labels with identifiers
Some secret labels represent an authentication feature that could require multiple instances per
realm, such as OAuth 2.0 clients. The names of these secret labels contain a configurable portion,
known as the identifier, to support multiple override mappings per realm. An example of a secret
label with an identifier is am.applications.oauth2.client.<identifier>.secret.
Authentication features that support secret labels with identifiers provide a
Secret Label Identifier field that lets you define the identifier value. The value of
the identifier must be alphanumeric, can also contain periods (but not at the start or end), and
must not contain spaces. When you create an instance of the authentication feature and define a
Secret Label Identifier, Advanced Identity Cloud creates a new secret label; for example, if you
create a new OAuth 2.0 client and define the Secret Label Identifier as "salesforce",
Advanced Identity Cloud creates the secret label am.applications.oauth2.client.salesforce.secret.
You can then map the secret label to an ESV secret. If you don’t create a mapping, the authentication feature falls back to a manually entered password.
|
In the case of OAuth 2.0 clients, Advanced Identity Cloud defines four secret labels for each client. In the example above, Advanced Identity Cloud creates the following secret labels:
Continuing the example, Advanced Identity Cloud tries to find a mapping for any of the four secret labels, before falling back to a manually entered password. Learn more in Authenticate OAuth 2.0 clients. |
Map ESV secrets to secret labels
In each realm, each secret label is mapped to a default secret key. You cannot
access these default secret keys. However, you can override the default key mappings. To do this, map
a secret label to an ESV secret in a realm’s ESV secret store.
To store a key in an ESV secret, then map it to a secret label:
-
Create an ESV secret, containing the value of your new signing or encryption key:
For examples of how to generate asymmetric and symmetric keys, learn more in:
-
To use the admin console, follow the steps in Create secrets.
-
To use the API:
-
Create an access token for the appropriate realm. Learn more in Get an access token.
-
Create the ESV secret:
Show request
$ curl \
--request PUT 'https://<tenant-env-fqdn>/environment/secrets/<secret-name>' \(1)
--header 'Authorization: Bearer <access-token>' \(2)
--header 'Content-Type: application/json' \
--header 'Accept-API-Version: protocol=1.0;resource=1.0' \
--data-raw '{
    "encoding": "<encoding-format>",(3)
    "useInPlaceholders": false,(4)
    "valueBase64": "<base64-encoded-key>"(5)
}'
1 Replace <secret-name> with an appropriate secret name; for example, esv-oauth2-signing-key. Learn more in ESV naming.2 Replace <access-token> with the access token. 3 Replace <encoding-format> with one of the following: -
pemfor asymmetric keys. -
base64hmacorbase64aesfor symmetric keys.
Learn more in Encoding format.
4 Ensure that useInPlaceholdersis set tofalse. Learn more in Control access to secrets.5 Replace <base64-encoded-key> with your new signing or encryption key, encoded as a Base64 string. Show response
{ "_id": "esv-oauth2-signing-key", "activeVersion": "", "description": "", "encoding": "base64hmac", "lastChangeDate": "2022-01-28T13:25:40.515Z", "lastChangedBy": "23b299e8-90d4-406e-9431-80faf25bc7c0", "loaded": true, "loadedVersion": "", "useInPlaceholders": false } -
-
-
-
In the Advanced Identity Cloud admin console, click Native Consoles > Access Management.
-
In the AM native admin console, go to Realm > Secret Stores.
-
Click the ESV secret store, then click Mappings.
-
Click + Add Mapping, then enter the following information:
Secret Label
Select a secret label; for example
am.services.oauth2.stateless.signing.HMAC.aliases
Enter the name of the ESV secret you created in step 1, including the
esv-prefix; for example,esv-oauth2-signing-key. Then click Add.Only add a single ESV alias. The UI lets you add additional aliases, but this is a legacy mechanism for key rotation. Instead, rotate ESV keys by adding new secret versions to the ESV. Learn more in Rotate keys in mapped ESV secrets. -
Click Create.
Rotate keys in mapped ESV secrets
You can rotate keys stored in a mapped ESV secret by manipulating the enabled status of its secret versions:
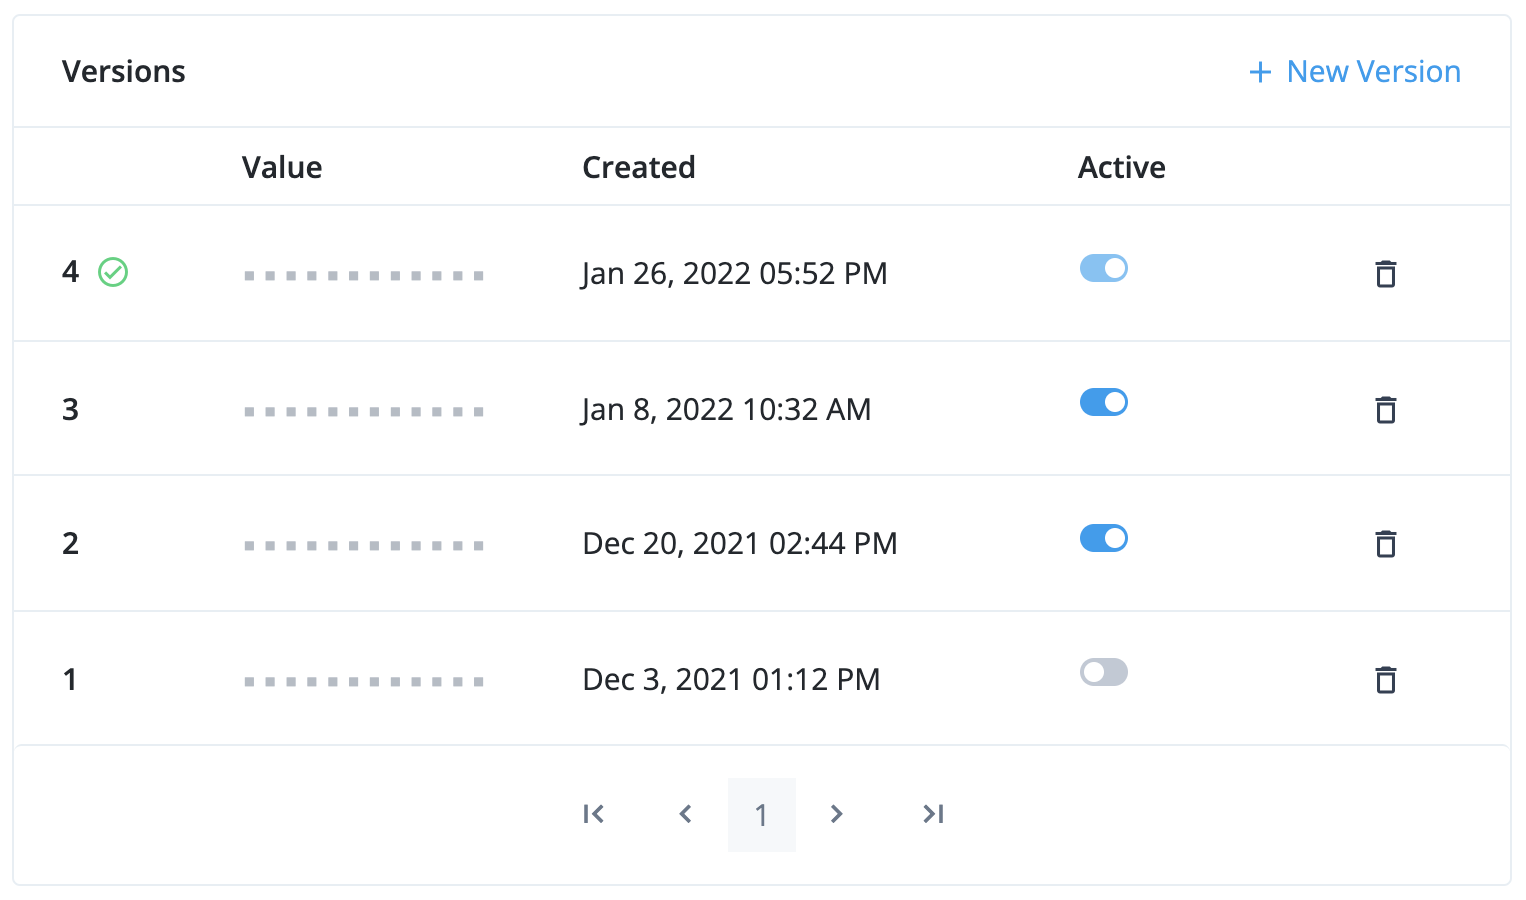
- Version 4
-
This is the latest secret version. It is enabled and cannot be disabled. It is used to sign new tokens. Existing tokens signed by this key are still valid.
- Version 3 and version 2
-
These are older secret versions. They are still enabled. Existing tokens signed by these keys are still valid.
- Version 1
-
This is an older secret version. It is disabled. Existing tokens signed by this key are not valid.
Rotate SAML 2.0 certificates using ESVs
Generate an RSA key pair
To generate an RSA key pair to use in an ESV:
-
Run the following command to generate a private key:
$ openssl genrsa -out private-key.pem -
Then, generate a public key using the private key:
$ openssl req -new -x509 -key private-key.pem -out public-key.pem -days 365 -subj /CN=idcloud -
Combine the private key and public key into a key pair:
$ cat private-key.pem public-key.pem > key-pair.pem -
If you intend to use an API request to create the ESV:
-
Encode the key pair into
base64:$ openssl enc -base64 -A -in key-pair.pem -out key-pair-base64.pemThe file
key-pair-base64.pemnow contains abase64encoded key pair value. -
You can now use this value in the
valueBase64property of the JSON body of the API request. Refer to step 1b in Map ESV secrets to secret labels for an example.
-
Generate an AES or HMAC key
To generate an AES or HMAC key to use in an ESV:
-
Run the following command:
$ head -c<bytes> /dev/urandom | openssl enc -base64 -A -out key.txt(1)1 Replace <bytes> with your required key length; for example, 512. Summary of command:
-
Generates a random number using
/dev/urandom -
Truncates the random number to your required key length using
head -
Encodes the truncated random number into
base64usingopenssl
-
-
If you intend to use an API request to create the ESV:
-
Encode the key into
base64again:$ openssl enc -base64 -A -in key.txt -out key-base64.txtThe file
key-base64.txtnow contains abase64encoded key value. -
You can now use this value in the
valueBase64property of the JSON body of the API request. Refer to step 1b in Map ESV secrets to secret labels for an example.
-