Custom object relationships for analytic reports
Analytic reports now support additional custom object relationship use cases for companies that require more refined reports.
-
Use case 1: Relate an identity schema object to another identity schema object.
-
Use case 2: Relate an identity schema object to a new custom object.
-
Use case 3: Relate a custom object to an identity schema object.
-
Use case 4: Relate a custom object to another custom object.
Realm visibility for custom objects
The realm visibility of your custom objects depends on a naming prefix. The following table displays the rules for the naming prefix:
| Description | Example | Realm visibility |
|---|---|---|
Custom object name starts with "alpha_" |
alpha_leadResearcher |
Only alpha |
Custom object name starts with "bravo_" |
bravo_leadResearcher |
Only bravo |
Custom object name doesn’t start with "alpha_", "bravo_", nor has "_" in the name |
parentOrganization |
Both alpha and bravo |
Custom object name doesn’t start with "alpha_", "bravo_", but has a "_" in the name |
parent_organization |
None |
Use case 1: Relate an identity schema object to another identity schema object.
In this use case, you link a standard, out-of-the-box identity schema object to another identity schema object.
Scenario
An AI research company wants to generate a report that lists all of its lead researchers for each suborganization. This report helps create a comprehensive view of your company’s leadership structure.
What you’ll do
To configure your report, do the following tasks:
-
Create a parent organization and its suborganizations.
-
Define a role and assign users as members.
-
Create user profiles and link them to the appropriate roles and organizations.
-
Build a report template in the Advanced Reporting UI that joins
Users,Roles, andOrganizations. -
Generate the final report to view the results.
Before you begin
-
Ensure you have administrator access to the Advanced Identity Cloud admin console.
-
Confirm you’re familiar with creating and managing standard objects like
Users,Roles, andOrganizations. -
Verify you have access to the Advanced Reporting feature.
Data model
The data model for use case 1 has the following structure:
-
Organizations: The company has a parent
AI Researchorganization with two suborganizations:Natural Language ProcessingandComputer Vision. -
Roles: A
lead_researcherrole grants permissions to approve research proposals and access high-performance computing resources. -
Users: Researchers like Dr. Evelyn Reed and Dr. Kenji Tanaka are created as users.
-
Relationship: You link a
userto aroleand then scope that role membership to a specificorganization. For example, Dr. Evelyn Reed is assigned thelead_researcherrole, but her permissions are constrained to only theNatural Language Processingorganization.
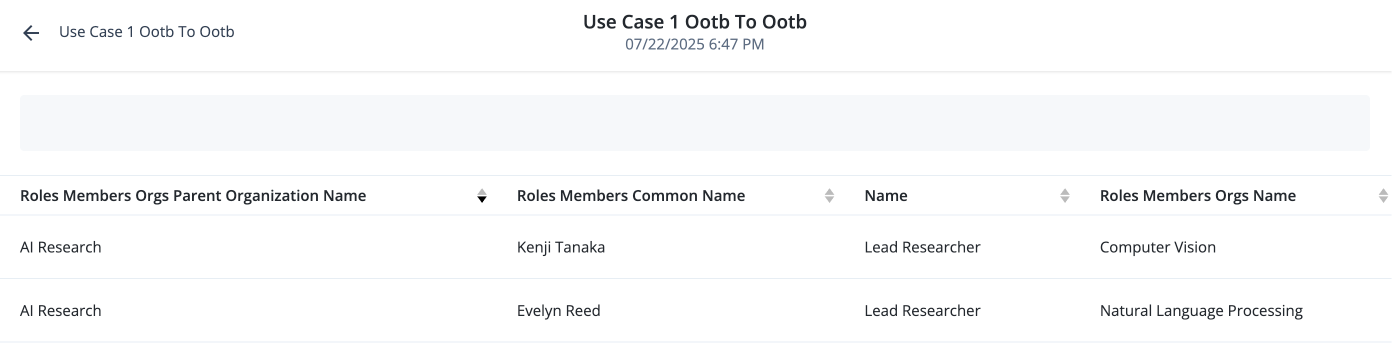
Report model
Create a report on the following identity relationships to produce a clear overview of who leads which research unit.
| User | Role | Organization |
|---|---|---|
Dr. Evelyn Reed |
lead_researcher |
Natural Language Processing |
Dr. Kenji Tanaka |
lead_researcher |
Computer Vision |
Tasks
Task 1: Create the organizations
Create the parent AI Research organization and its two suborganizations, Natural Language Processing and Computer Vision.
-
In the Advanced Identity Cloud admin console, go to Identities > Manage.
-
On the Manage Identities page, click Alpha realm - Organizations and New Alpha realm - Organizations.
-
On the New Alpha realm - Organizations page, enter the name: AI Research.
-
Click Save.
-
In the organization page, leave the Parent Organization field blank.
-
Click Save.
Task 2: Create the suborganizations
Create the suborganizations: Natural Language Processing and Computer Vision.
-
Create
Natural Language Processing:-
In the Advanced Identity Cloud admin console, go to Identities > Manage.
-
On the Manage Identities page, click Alpha realm - Organizations and New Alpha realm - Organizations.
-
On the New Alpha realm - Organizations page, enter the Name:
Natural Language Processing. -
Click Save.
-
In the organization page, enter AI Research in the Parent Organization field.
-
Click Save.
-
-
Create
Computer Vision:-
In the Advanced Identity Cloud admin console, go to Identities > Manage.
-
On the Manage Identities page, click Alpha realm - Organizations and New Alpha realm - Organizations.
-
On the New Alpha realm - Organizations page, enter the name: Computer Vision.
-
Click Save.
-
In the organization page, enter AI Research in the Parent Organization field.
-
Click Save.
-
Task 3: Create the users and link them to organizations
Create the user profiles for Evelyn Reed and Kenji Tanaka. For each user, link their profile to the appropriate organization. For example, on Evelyn Reed’s profile:
-
In the Advanced Identity Cloud admin console, go to Identities > Manage.
-
On the Manage Identities page, click Alpha realm - Users and New Alpha realm - User.
-
On the New Alpha realm - User page, enter information for the following users and then click Save.
-
Evelyn Reed
-
Kenji Tanaka
-
-
On the user page for
Evelyn Reed, add the following:-
Click Provisioning Roles > Add Provisioning Roles, and select Lead Researcher.
-
Click Organizations I Administer > Add Organizations I Administer, and select Natural Language Processing.
-
Click Save.
-
Click Organizations to which I belong > Add Organizations to which I Belong, and select Natural Language Processing.
-
Click Save.
-
-
Repeat the previous steps for
Kenji Tanaka.
Task 4: Create the role and add members
Create an internal role named Lead Researcher and add the users evelynReed and
kenjiTanaka as members.
-
On the New Alpha realm - Role page, go to Role Members > Add Role Members.
-
In the Add Role Members modal, enter
evelynReedandkenjiTanaka, and click Save.
Task 5: Create the report template
Create a report template that combines these three objects to produce a clear overview of who leads which research unit.
-
In the Advanced Identity Cloud admin console, click New Report.
-
On the New Report modal, enter the following properties, and then click Next:
Field Description Name
Name of the report. Follow the naming conventions established by your company.
Description
(Optional) Enter a description describing the report.
Who Can Run
Click to set who can run this report.
Groups:
-
Report Viewer
Users:
-
Select the users who can run this report. The users available to select are those assigned the
report_viewergroup permission."
-
-
Next, add a data source or select an existing data source:
-
Click Data Source.
-
On the Add a Data Source modal, select a data source to use in this report, and then click Next:
-
Select Roles as a data source.
-
On the Reports canvas, click Name in the Roles source.
-
-
In Related Data Sources, click Members.
-
In the Roles/members source, click Common Name.
-
-
In Related Data Sources, click Organizations to which I Belong.
-
In the Roles/members/orgs source, click Name.
-
-
In Related Data Sources, click Parent Organization.
-
In the Roles/members/orgs/parentOrganization source, click Name.
-
-
Click Save.
-
Click Save.
Use case 2: Relate an identity schema object to a new custom object.
In this use case, you link a standard identity schema object to a new custom object. This allows you to extend your core identity data with business-specific information.
Use case 2: Scenario
The AI research company wants to track the academic publications
authored by its researchers. The standard User object doesn’t
have fields for this, so you must link the User object to a new
publication custom object.
What you’ll do
-
Define the new
publicationcustom object. -
Add a relationship property to the standard
Userobject to link to your new custom object. -
Create records for individual publications.
-
Edit user profiles to link them to their corresponding publication records.
-
Build and run a report that joins the
Usersdata source with your custompublicationdata.
Before you begin
-
Ensure you have administrator access to the Advanced Identity Cloud admin console.
-
Verify you have access to the IDM native admin console to modify objects.
-
Confirm you are familiar with creating and managing standard
Userobjects.
Data model
The data model for use case 2 has the following structure:
-
Custom Object
publication: Define a new object to store publication details.-
paperTitle(String): Title of the paper. -
journalName(String): Name of the journal. -
publicationDate(Date): Date of publication.
-
-
Standard Object
User: Out-of-the-box user object. -
Relationship: Add a new relationship attribute,
authoredPapers, to theUserobject. This attribute links a user’s profile to one or more records in thepublicationobject.
Report model
Create a report that joins the User object with the publication custom
object to see which papers were authored by which researchers.
| Researcher Name | Paper Title | Journal |
|---|---|---|
Dr. Evelyn Reed |
Advances in Neural Network Compression |
Journal of Machine Learning Research |
Dr. Kenji Tanaka |
Real-time Object Detection on Edge Devices |
IEEE Transactions on Pattern Analysis |
Tasks
Task 1: Create the 'publication' custom object
To create a custom object publication:
-
In the Advanced Identity Cloud admin console, click Native Consoles > Identity Management.
-
In the top navigation menu, click Configure > Managed Objects.
-
Click New Managed Object.
-
In the Managed Object Name field, enter
publication. -
In the Readable Title field, enter
Publication. -
In the Managed Object Icon field, select an icon for the object to appear on the Managed Objects page.
-
In the Managed Design Icon field, find an icon in the Google icon repository.
-
In the Description field, enter a general description of the object. For example,
Stores metadata for academic papers published by company researchers.
-
-
In the Managed Object/publication page, click Add a property. For each property, enter or select the following:
Property Name Label Type Required papertitle
Title of the paper
String
Required
journalname
Name of the journal
String
Required
publicationdate
Date of the publication
String
-
Click Save.
Task 2: Create the publication records
To create a publication custom object:
-
In the Advanced Identity Cloud admin console, navigate to Identities > Manage.
-
Click Publications to view the list of existing publication records if any.
-
Click New Publication to open the creation form.
-
Fill in the details for the paper. For example:
-
Title of the paper:
Advances in Neural Network Compression -
Name of the journal:
Journal of Machine Learning Research -
Date of the publication:
2025-10-15
-
-
Click Save.
-
On the Publication page, click Save.
-
Repeat the steps for another publication:
-
Title of the paper:
Real-time Object Detection on Edge Devices -
Name of the journal:
IEEE Transactions on Pattern Analysis -
Date of the publication:
2025-02-19
-
You’ve now created a record for the specific publications.
Task 3: Add a relationship from the User object to the Publication object
To create a custom relationship property using the Advanced Identity Cloud admin console:
-
In the Advanced Identity Cloud admin console, click Native Consoles > Identity Management.
-
In the top navigation menu, click Configure > Managed Objects.
-
Select a managed object type: alpha_user.
-
Click Add a Property. An entry field displays.
-
In the Name field, enter a name for the custom relationship property. The name must begin with the string
custom_, such ascustom_publication. -
In the Type list, select Relationship.
-
Click Next. The Add Resources modal displays.
-
In the Resource list, select the resource to map the custom relationship property to. Select publication.
-
In the Display Properties list, select the properties on the resource to map to the custom relationship property. Select paperTitle.
-
-
Click Save. The Relationships Property screen for the new relationship property displays.
-
Click Save.
| Objects are limited to 10 custom relationships. If you need an object to have more, create custom relationships from the related object and map them to the original object. |
Task 4: Link users to their publications
To set the publication object for each user:
-
In the Advanced Identity Cloud admin console, navigate to Identities > Manage.
-
Click Alpha realm - Users, search for
evelynReed, and click the user.-
On the Alpha realm - User page, scroll down to Custom_publication. Select Advances in Neural Network Compression.
-
Click Save.
-
-
Repeat the steps for
kenjiTanaka. Click Alpha realm - Users, search forkenjiTanaka, and click the user.-
On the Alpha realm - User page, scroll down to Custom_publication. Select Real-time Object Detection on Edge Devices.
-
Click Save.
-
Task 5: Create the report template
-
In the Advanced Identity Cloud admin console, click New Report.
-
On the New Report modal, enter the following properties, and then click Next:
Field Description Name
Name of the report. Follow the naming conventions established by your company.
Description
(Optional) Enter a description of the report.
Who Can Run
Click to set who can run this report.
Groups:
-
Report Viewer
Users:
-
Select the users who can run this report. To select a user, you must have assigned the
report_viewergroup permissions to the user from the Manage Identity page.
-
-
Next, add a data source or select an existing data source:
-
Click Data Source.
-
On the Add a Data Source modal, select a data source to use in this report, and then click Next:
-
Select Users.
-
On the Reports canvas, click Common Name.
-
-
In Related Data Sources, click Custom relationship.
-
In the users/custom_publication source:
-
Click Title of the paper.
-
Click Name of the journal.
-
-
-
Click Save.
-
Click Save.

Use case 3: Relate a custom object to an identity schema object.
In this use case, you link a new custom object to a standard identity schema object. This allows you to track business-specific information and relate it directly to your core identity data.
Scenario
The AI research company wants to track specific research projects and assign them
to lead researchers. To do this, create a researchProject custom object and
link it to the standard User object.
What you’ll do
-
Define the new
researchProjectcustom object that includes a relationship to theUserobject. -
Create records for individual research projects.
-
Link each project record to a lead researcher by selecting a user.
-
Build and run a report that joins the
researchProjectdata source with theUserdata.
Before you begin
-
Ensure you have administrator access to the Advanced Identity Cloud admin console.
-
Verify you have access to the IDM native admin console to modify objects.
-
Confirm you’re familiar with creating and managing standard
Userobjects.
Data model
The data model for use case 3 has the following structure:
-
Custom Object
researchProject: Define a new object to store project details.-
projectName(String): Public name of the project. -
projectID(String): Unique internal identifier. -
projectStatus(String): Current state, such as "Active" or "Completed." -
leadResearcher(Relationship): Link to a record in theUserobject.
-
-
Standard Object
User: Out-of-the-box user object. -
Relationship: The
leadResearcherattribute on theresearchProjectobject creates a direct link from a project to the user who leads it.
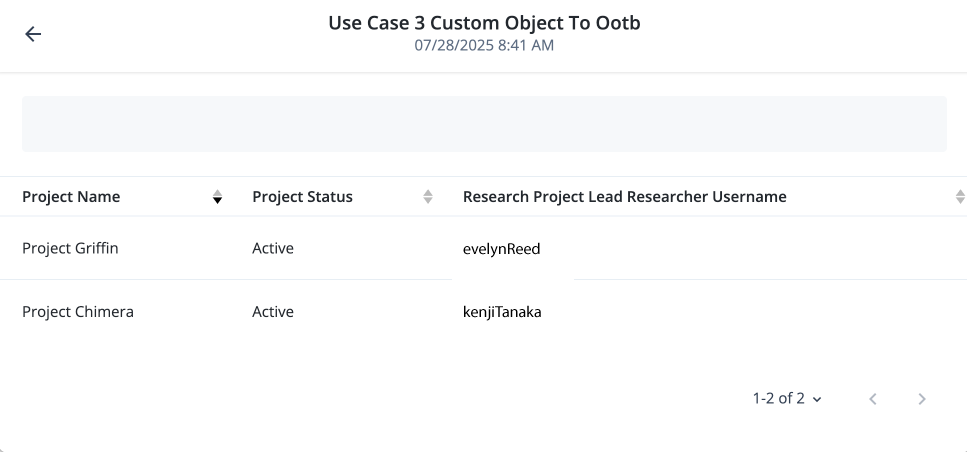
Report model
You can create a report that joins the researchProject custom object with the User object to see which projects are assigned to which researchers.
| Project Name | Project Status | Lead Researcher |
|---|---|---|
Project Chimera |
Active |
Dr. Evelyn Reed |
Project Griffin |
Active |
Dr. Kenji Tanaka |
Tasks
Task 1: Create the researchProject custom object
To create a custom object researchProject:
-
In the Advanced Identity Cloud admin console, click Native Consoles > Identity Management.
-
In the top navigation menu, click Configure > Managed Objects.
-
Click New Managed Object.
-
In the Managed Object Name field, enter "researchProject".
-
In the Readable Title field, enter "Research Project".
-
In the Managed Object Icon field, select an icon for the object to appear on the Managed Objects page.
-
In the Managed Design Icon field, find an icon in the Google icon repository.
-
In the Description field, enter a general description of the object. For example,
Stores information about active and proposed research projects.
-
-
In the Managed Object/publication page, click Add a property. For each property, enter or select the following:
Property Name
Label
Type
Required
projectName
Project Name
String
Required
projectID
Project ID
String
projectStatus
Project Status
string
leadResearcher
Lead Researcher
Relationship
-
Click Save.
Task 2: Create records for each research project
To create records for each researchProject:
-
In the Advanced Identity Cloud admin console, navigate to Identities > Manage.
-
Click Research Projects to view the list of existing project records if any.
-
Click New Research Project to open the creation form.
-
Fill in the details for the project. For example:
-
Project Name:
Project Chimera -
Project ID:
RC-2025-01 -
Project Status:
Active -
Lead Researcher:
Evelyn Reed
-
-
Click Save.
-
On the Research Project page, click Save.
-
Repeat the steps for another project:
-
Project Name:
Project Griffin -
Project ID:
TC-2025-01 -
Project Status:
Active -
Lead Researcher:
Kenji Tanaka
-
You’ve now created a record for the specific projects.
Task 3: Create the report template
-
In the Advanced Identity Cloud admin console, click New Report.
-
On the New Report modal, enter the following properties, and then click Next:
Field Description Name
Name of the report. Follow the naming conventions established by your company.
Description
(Optional) Enter a description of the report.
Who Can Run
Click to set who can run this report.
Groups:
-
Report Viewer
Users:
-
Select the users who can run this report. To select a user, you must have assigned the
report_viewergroup permissions to the user from the Manage Identity page.
-
-
Next, add a data source or select an existing data source:
-
Click Data Source.
-
On the Add a Data Source modal, select a data source to use in this report, and then click Next:
-
Select Users.
-
On the Reports canvas, click Common Name.
-
-
In Related Data Sources, click Custom relationship.
-
In the users/custom_publication source:
-
Click Title of the paper.
-
Click Name of the journal.
-
-
-
Click Save.
-
Click Save.
Use case 4: Relate a custom object to another custom object.
In this use case, you link two different custom objects. This is useful when you need to model complex business processes that involve multiple types of unique data that don’t exist in the standard identity schema.
Scenario
Continuing with the AI Research company example, you need to track not
only the research projects but also specialized, high-cost equipment allocated to
each project. You can achieve this by creating a relationship between two custom
objects: researchProjectEquipment and specializedEquipment.
What you’ll do
-
Define the
specializedEquipmentcustom object. -
Define the
researchProjectcustom object, including a relationship tospecializedEquipment. -
Create records for individual specialized equipment objects.
-
Create records for research projects and link them to their allocated equipment.
-
Build and run a report that joins your two custom objects.
Before you begin
-
Ensure you have administrator access to the Advanced Identity Cloud admin console.
-
Verify you have access to the IDM native admin console to modify objects.
-
Confirm you are familiar with the process of creating a single custom object.
Data model
The data model for use case 4 has the following structure:
-
Custom Object
specializedEquipment: Define an object to track equipment details.-
equipmentName(String): Name of the equipment (for example, "Quantum Computing Pod"). -
assetTag(String): Unique internal tracking tag. -
equipmentStatus(String): Current state, such as "In Use" or "Available."
-
-
Custom Object
researchProjectEquipment: You use the same object from use case 3, but add a new relationship property.-
projectName(String): Project name. -
projectID(String): Unique project ID. -
leadResearcher(Relationship): A link to the out-of-the-boxUserobject. -
allocatedEquipment(Relationship): New field to link to thespecializedEquipmentcustom object.
-
-
Relationship: The
allocatedEquipmentattribute on theresearchProjectEquipmentobject creates a link from a project to the specific equipment it uses.
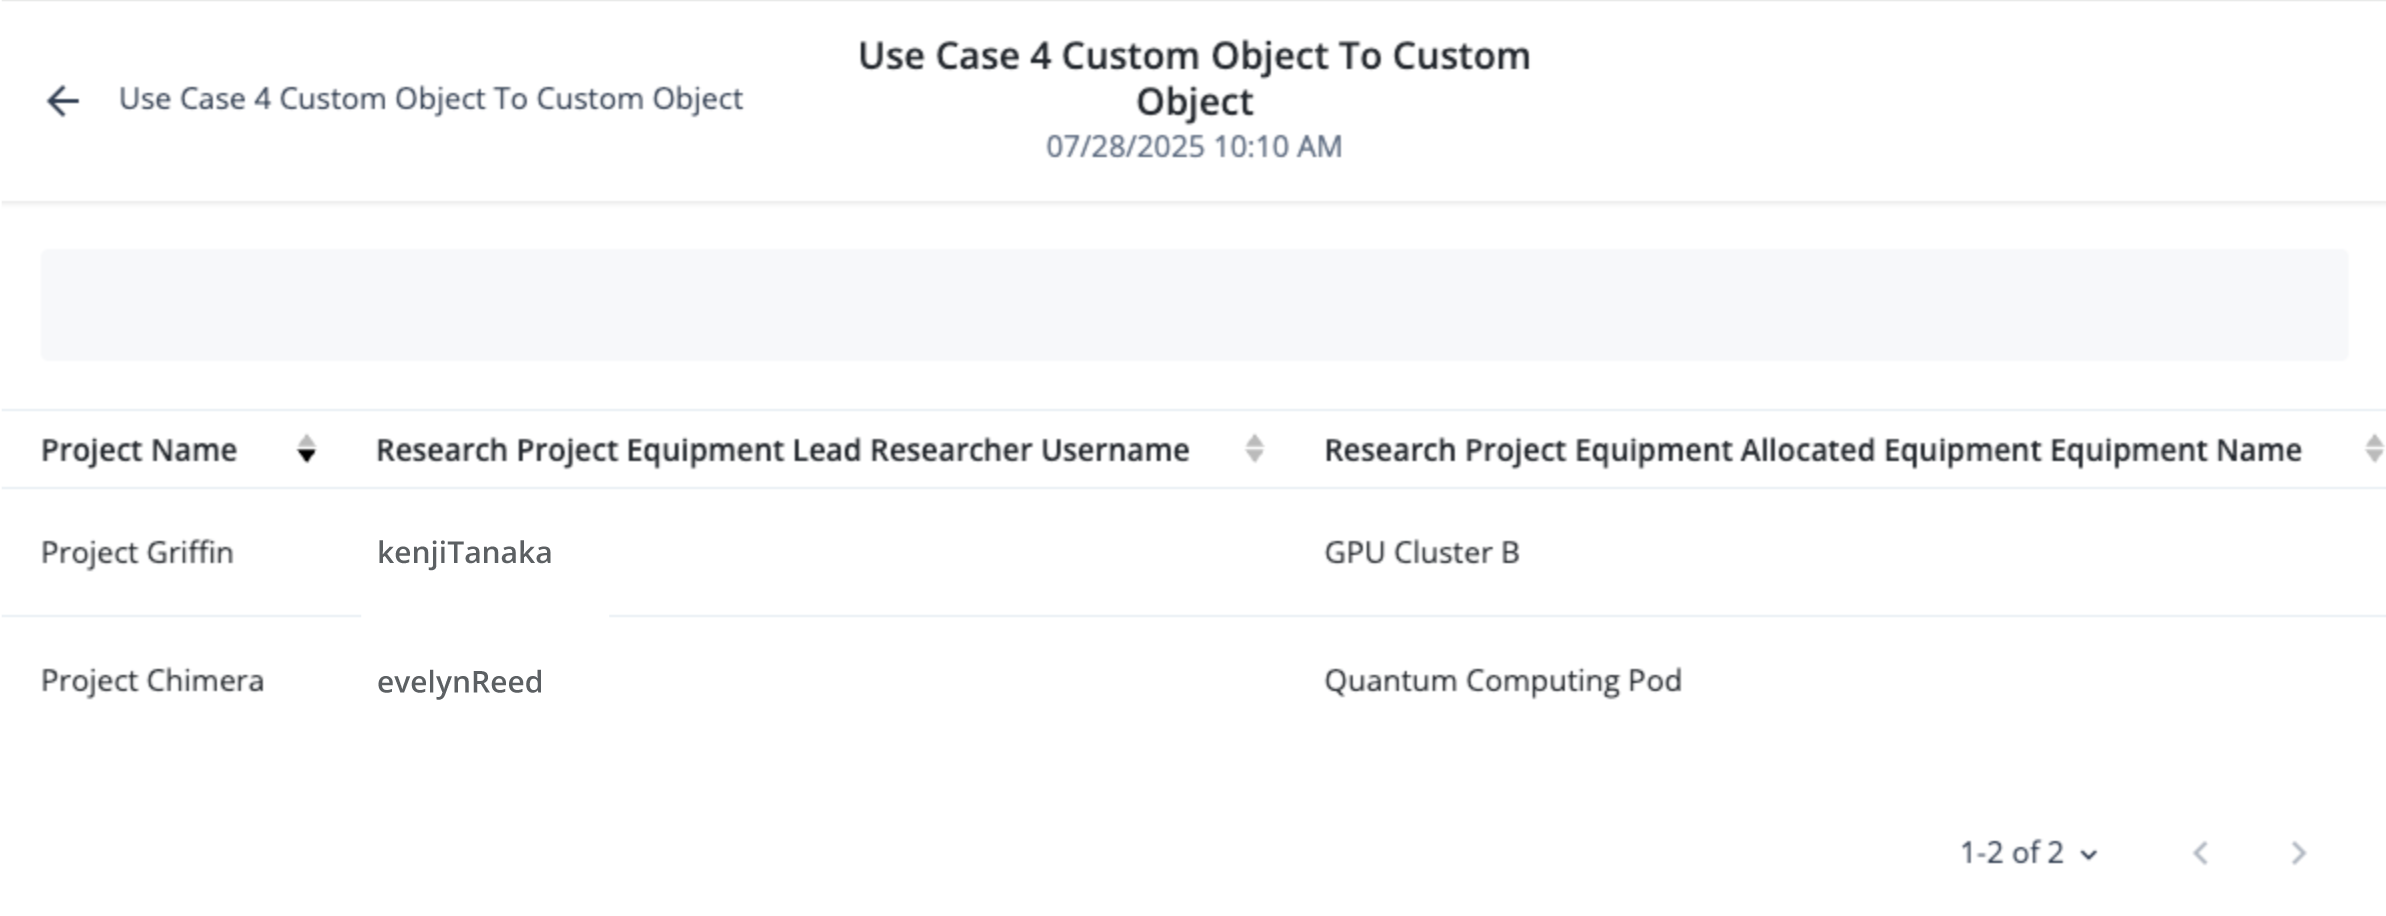
Report model
You can create a report that joins these two custom objects to see which equipment is allocated to which project, which helps with resource management and auditing.
| Project Name | Lead Researcher | Allocated Equipment |
|---|---|---|
Project Chimera |
Dr. Evelyn Reed |
Quantum Computing Pod |
Project Griffin |
Dr. Kenji Tanaka |
GPU Cluster B |
Tasks
Task 1: Create the specializedEquipment custom object
In the IDM native admin console, create a new managed object named specializedEquipment
with the properties equipmentName, assetTag, and equipmentStatus.
-
Object Name:
specialized Equipment -
Description: Stores information about specialized computing hardware and lab equipment.
-
Attributes:
-
equipmentName(String): Name of the equipment, for example, "Quantum Computing Pod." -
assetTag(String): Unique internal tracking tag, for example, "EQUIP-QC-001." -
equipmentStatus(String): Current state, such as "In Use", "Available", or "Under Maintenance."
-
To create a custom object specializedEquipment:
-
In the Advanced Identity Cloud admin console, click Native Consoles > Identity Management.
-
In the top navigation menu, click Configure > Managed Objects.
-
Click New Managed Object.
-
In the Managed Object Name field, enter
specializedEquipment. -
In the Readable Title field, enter
Specialized Equipment. -
In the Managed Object Icon field, select an icon for the object to appear on the Managed Objects page.
-
In the Managed Design Icon field, find an icon in the Google icon repository.
-
In the Description field, enter a general description of the object. For example,
Stores the information about active and proposed research projects.
-
-
In the Managed Object/publication page, click Add a property. For each property, enter or select the following:
Property Name
Label
Type
Required
equipmentName
Equipment Name
String
Required
assetTag
Asset Tag
String
equipmentStatus
Equipment Status
String
-
Click Save.
Task 2: Create the researchProjectEquipment custom object
The researchProjectEquipment object has the following structure:
-
Object Name:
researchProjectEquipment -
Description: Stores the information about active and proposed research projects
-
Attributes:
-
projectName(String):Project Chimera -
projectID(String):RC-2025-07 -
leadResearcher(Relationship): A link to the out-of-the-boxUserobject -
allocatedEquipment(Relationship): A new field to link to thespecializedEquipmentcustom object
-
To create a custom object researchProjectEquipment:
-
In the Advanced Identity Cloud admin console, click Native Consoles > Identity Management.
-
In the top navigation menu, click Configure > Managed Objects.
-
Click New Managed Object.
-
In the Managed Object Name field, enter
researchProjectEquipment. -
In the Readable Title field, enter
Research Project Equipment. -
In the Managed Object Icon field, select an icon for the object to appear on the Managed Objects page.
-
In the Managed Design Icon field, find an icon in the Google icon repository.
-
In the Description field, enter a general description of the object. For example,
Stores the information about active and proposed research projects.
-
-
In the Managed Object/publication page, click Add a property. For each property, enter or select the following:
Property Name
Label
Type
Required
projectName
Project Name
String
Required
projectID
Project ID
String
leadResearcher
Lead Researcher
Relationship
allocatedEquipment
Allocated Equipment
String
-
Click Save.
Task 3: Create records for specialized equipment
To create records for the specializedEquipment object:
-
In the Advanced Identity Cloud admin console, navigate to Identities > Manage.
-
Click Research Project Equipment to view the list of existing project records if any.
-
Click New Research Project Equipment to open the creation form.
-
Fill in the details for the equipment. For example:
-
Equipment Name:
Quantum Computing -
Asset Tag:
EQUIP-QC-001 -
Equipment Status:
In Use
-
-
On the Research Project page, click Save.
-
Repeat the steps for another project:
-
Fill in the details for the equipment. For example:
-
Equipment Name:
GPU Cluster B -
Asset Tag:
EQUIP-QC-004 -
Equipment Status:
In Use
-
You’ve now created records for the specific equipment.
Task 4: Create records for the allocated equipment
To create records for the allocatedEquipment object:
-
In the Advanced Identity Cloud admin console, navigate to Identities > Manage.
-
Click Research Projects to view the list of existing project records if any.
-
Click New Research Project to open the creation form.
-
Fill in the details for the project. For example:
-
Project Name:
Project Chimera -
Project ID:
RC-2025-07 -
Lead Researcher:
Evelyn Reed -
Allocated Equipment: Quantum Computing Pod
-
-
Click Save.
-
On the Research Project page, click Save.
-
Repeat the steps for another project:
-
Project Name:
Project Griffin -
Project ID:
TC-2025-01 -
Lead Researcher:
Kenji Tanaka -
Allocated Equipment: GPU Cluster B
-
You’ve now created a record for the specific equipment.
Task 5: Create the report template
-
In the Advanced Identity Cloud admin console, click New Report.
-
On the New Report modal, enter the following properties, and then click Next:
Field Description Name
Name of the report. Follow the naming conventions established by your company.
Description
(Optional) Enter a description of the report.
Who Can Run
Click to set who can run this report.
Groups:
-
Report Viewer
Users:
-
Select the users who can run this report. To select a user, you must have assigned the
report_viewergroup permissions to the user from the Manage Identity page.
-
-
Next, add a data source or select an existing data source:
-
Click Data Source.
-
On the Add a Data Source modal, select a data source to use in this report, and then click Next:
-
Select Research Project Equipment.
-
On the Reports canvas, click Project Name.
-
-
In Related Data Sources, click Lead Researcher.
-
In the researchProjectEquipment/allocatedEquipment source, click Equipment Name.
-
-
In Related Data Sources, click Allocated Equipment.
-
In the researchProjectEquipment/allocatedEquipment source, click Equipment Name.
-
-
Click Save.
-
Click Save.