Auth scripting
You can use authentication and authorization (auth) scripting to modify default Advanced Identity Cloud behavior in many situations: client-side authentication, policy conditions, handling OpenID Connect claims, and others.
Use JavaScript for auth scripting in Advanced Identity Cloud. Groovy scripts are deprecated and will eventually be completely replaced with JavaScript scripts.
For JavaScript examples of all auth script types, review the sample scripts. Each sample script includes a list of available variables.
|
Scripts can potentially emit the personally identifiable information (PII) of your end users into Advanced Identity Cloud logs, and then into external services that consume Advanced Identity Cloud logs. Ping Identity recommends that you establish a review and testing process for all scripts to prevent PII leaking out of your Advanced Identity Cloud tenant environments. |
Auth script types
The auth script types available in Advanced Identity Cloud include the following:
Journeys
| Script type | Description | Information |
|---|---|---|
Configuration Provider Node |
Runs in a Configuration Provider node as a step in an authentication journey. |
|
Journey Decision Node |
Runs in a Scripted Decision node as a step in an authentication journey. |
OAuth2 / OIDC
| Script type | Description | Information |
|---|---|---|
OAuth2 Access Token Modification |
Modifies the key-value pairs contained within access tokens before they’re issued to a client. |
|
OAuth2 Evaluate Scope |
Retrieves and modifies scopes for OAuth 2.0 access token introspection. |
|
OAuth2 May Act |
Adds the |
|
OAuth2 Trusted JWT Issuer |
Dynamically retrieves the details of an issuer during the JWT profile for authorization grant. |
|
OAuth2 Validate Scope |
Modifies how Advanced Identity Cloud validates requested OAuth 2.0 scopes. |
|
OIDC Claims |
Modifies or overrides OIDC claims when issuing an ID token
or in the response from the |
SAML
| Script type | Description | Information |
|---|---|---|
SAML2 SP Adapter |
Modifies the processing of the authentication request on the SP. |
|
SAML2 IDP Adapter |
Modifies the processing of the authentication request on the IDP. |
|
SAML2 IDP Attribute Mapper |
Maps user-configured attributes to SAML attributes in the assertion returned by the IDP. |
|
SAML2 NameID Mapper |
Customize the value of the NameID attribute in the SAML assertion on the remote SP. |
Other
| Script type | Description | Information |
|---|---|---|
Client-side Authentication |
Runs on the client during authentication. |
|
Library |
Contains reusable functionality that can be imported into journey decision node scripts or other library scripts. |
|
Policy Condition |
Modifies authorization policy decisions. |
|
Social Identity Provider Profile Transformation |
Runs in a Social Provider Handler node. Adapts the fields received from a social identity provider to align with the fields expected by Advanced Identity Cloud. |
|
PingOne Verify Completion Decision Node |
Runs in a PingOne Verify Completion Decision node so that you can access information about the user’s PingOne Verify transactions. |
|
Some script types aren’t yet available in the Advanced Identity Cloud admin console. To view a list of all the script types, under Native Consoles > Access Management, go to Realms > Realm Name > Scripts and click New Script. |
Manage auth scripts
To manage your auth scripts, go to Realm > Scripts > Auth Scripts.
On the Scripts page, you can view a list of existing scripts. To edit, duplicate, or delete a script, click its More () menu.
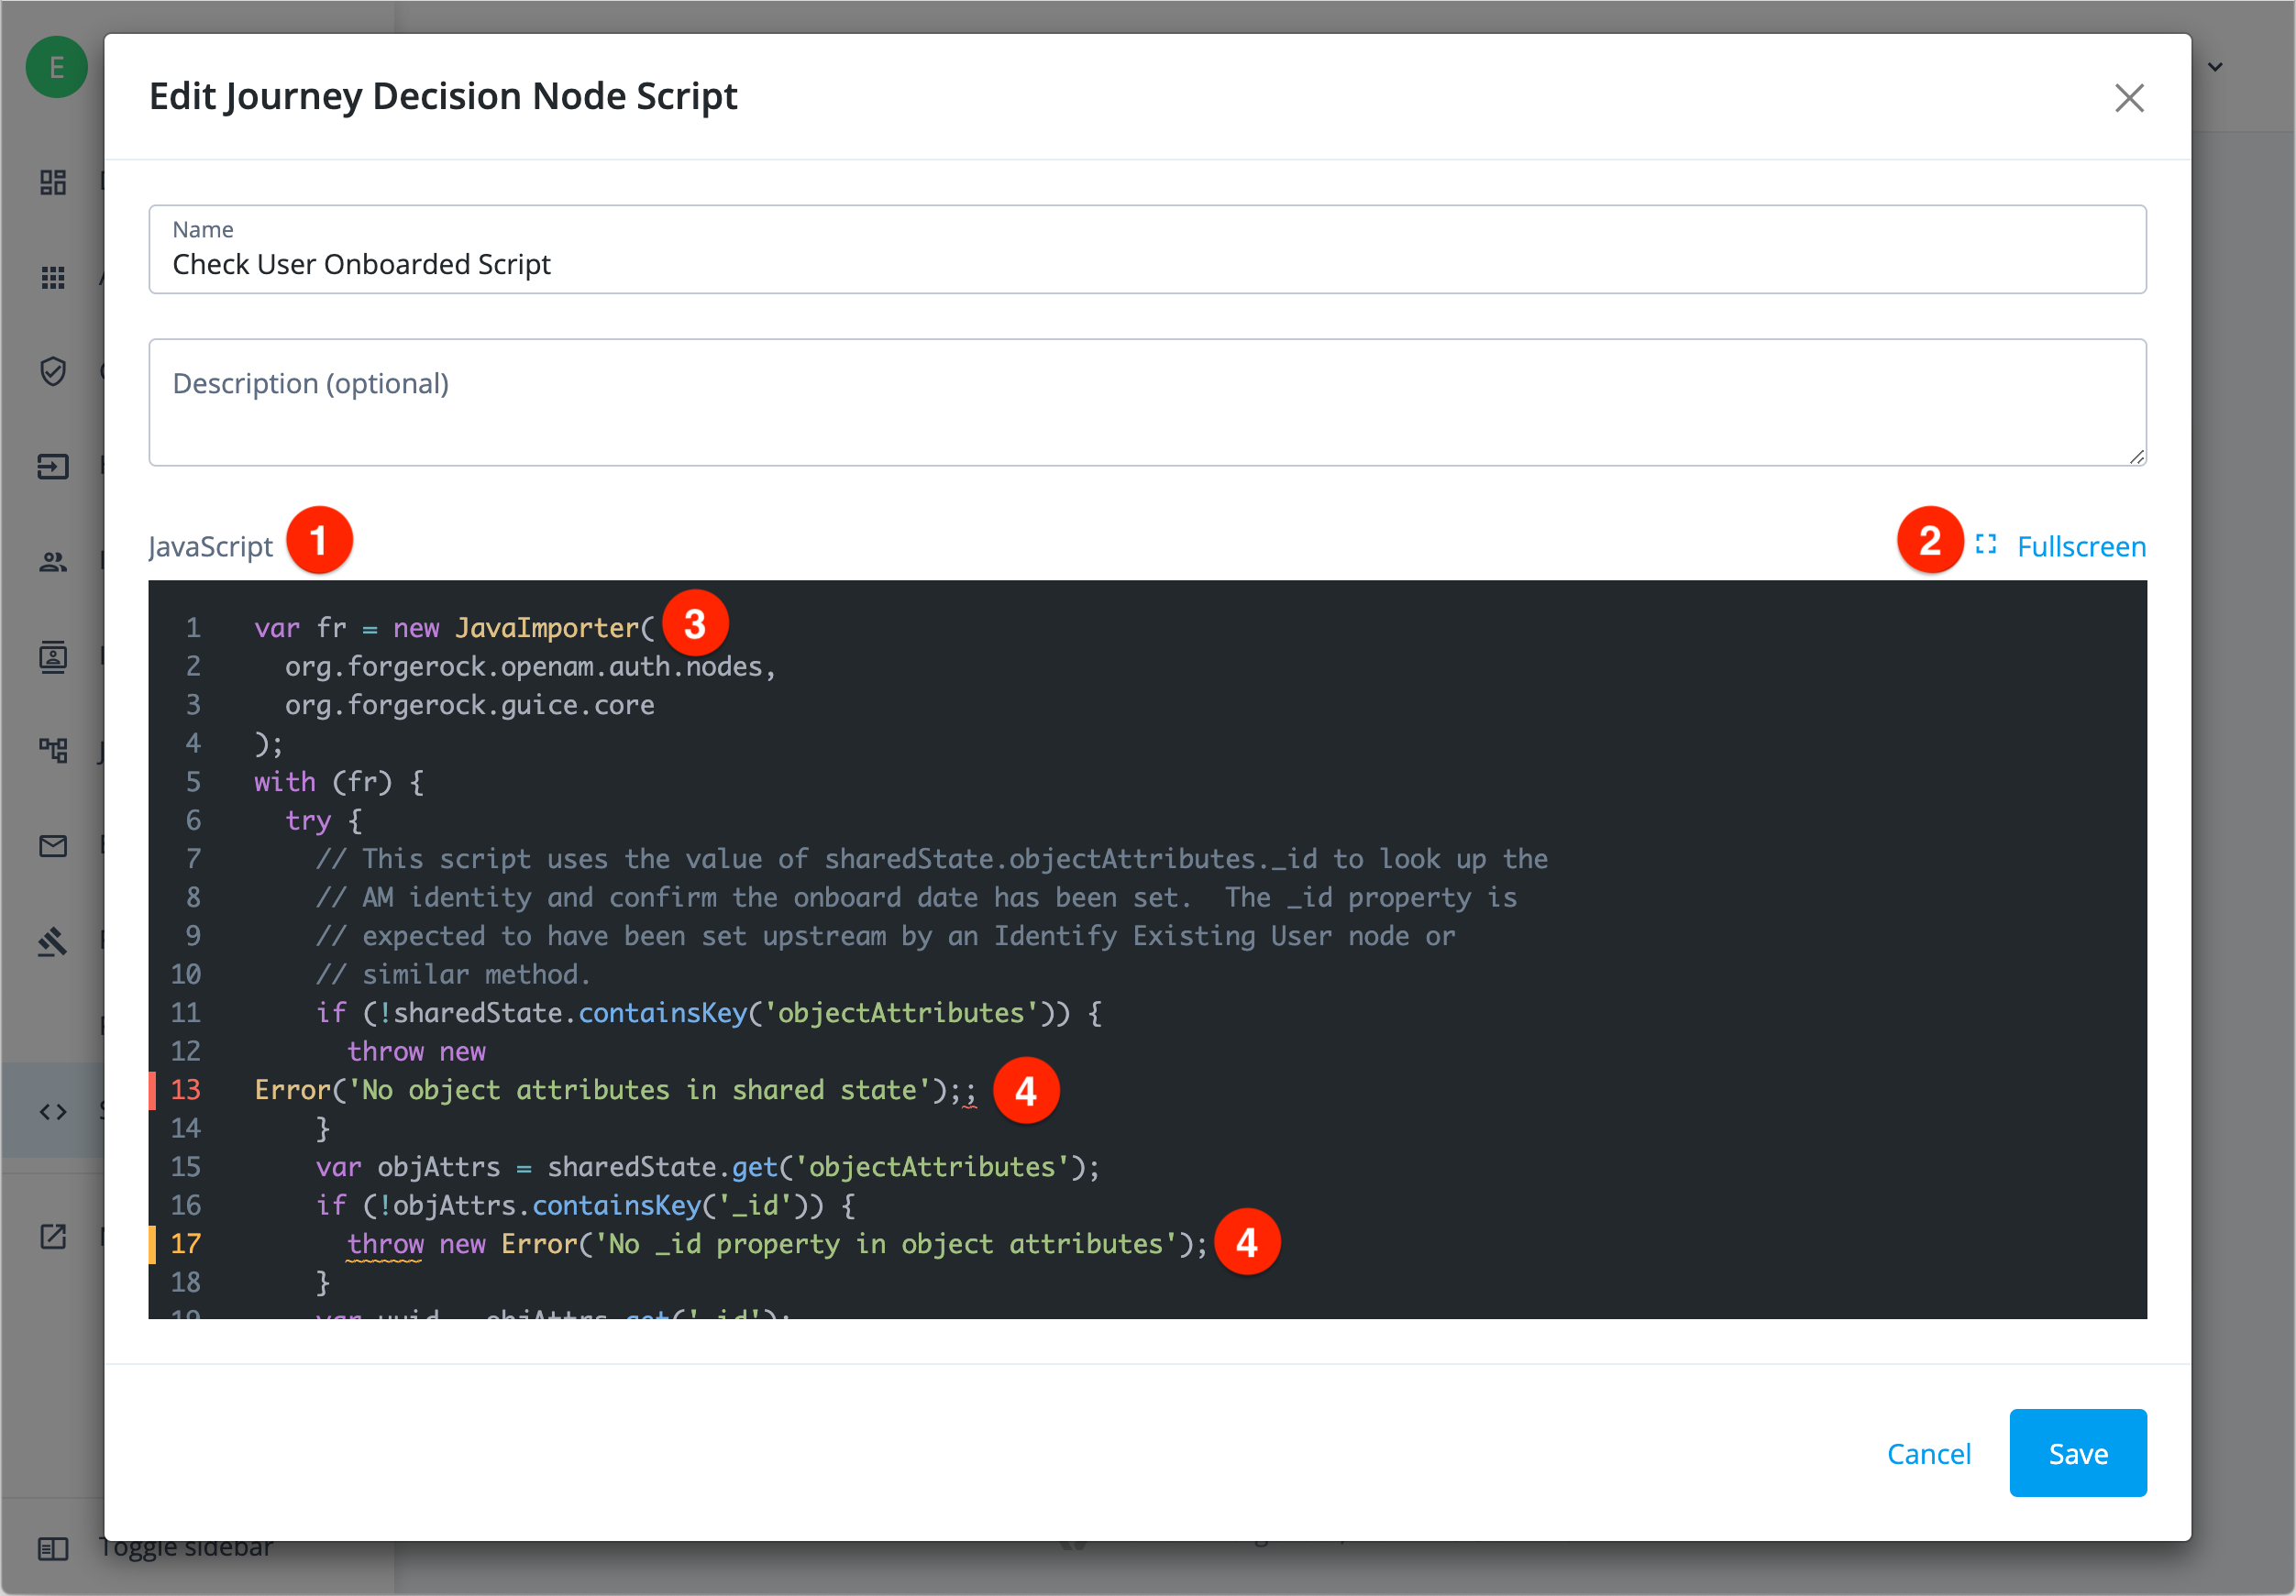
The edit option in the More menu opens the script in a lightweight editor that features syntax highlighting and validation checking. You can maximize the editor to full screen to edit larger scripts:

① JavaScript editor
② Fullscreen option
③ Syntax highlighting
④ Syntax error highlighting and validation checking
Create a new auth script
-
Go to Realm > Scripts > Auth Scripts, then click + New Script.
-
Choose an auth script type.
After you select a script type, the editor opens. The editor is prepopulated with a default script for that type, which is intended as a starting point for your custom script.
If you selected the wrong script type, click Previous to select a different script type.
-
If the next-generation script engine is available for the script type, such as for journey decision node scripts, Advanced Identity Cloud displays the Choose Script Engine page.
Select Legacy or Next Generation to set the script engine for your script.
-
Enter a unique Name and optional Description for the script, then click Save.
After you save a script, you can’t change its type.
Journey decision node scripts
Learn more about journeys in Journeys.
You can also create, edit, and validate journey decision node scripts directly from within a Scripted Decision node.
-
Go to Realm > Journeys.
-
Open a journey in the journey editor.
-
Find an existing scripted decision node or add a new one.
-
Select the scripted decision node to open the context pane on the right side.
-
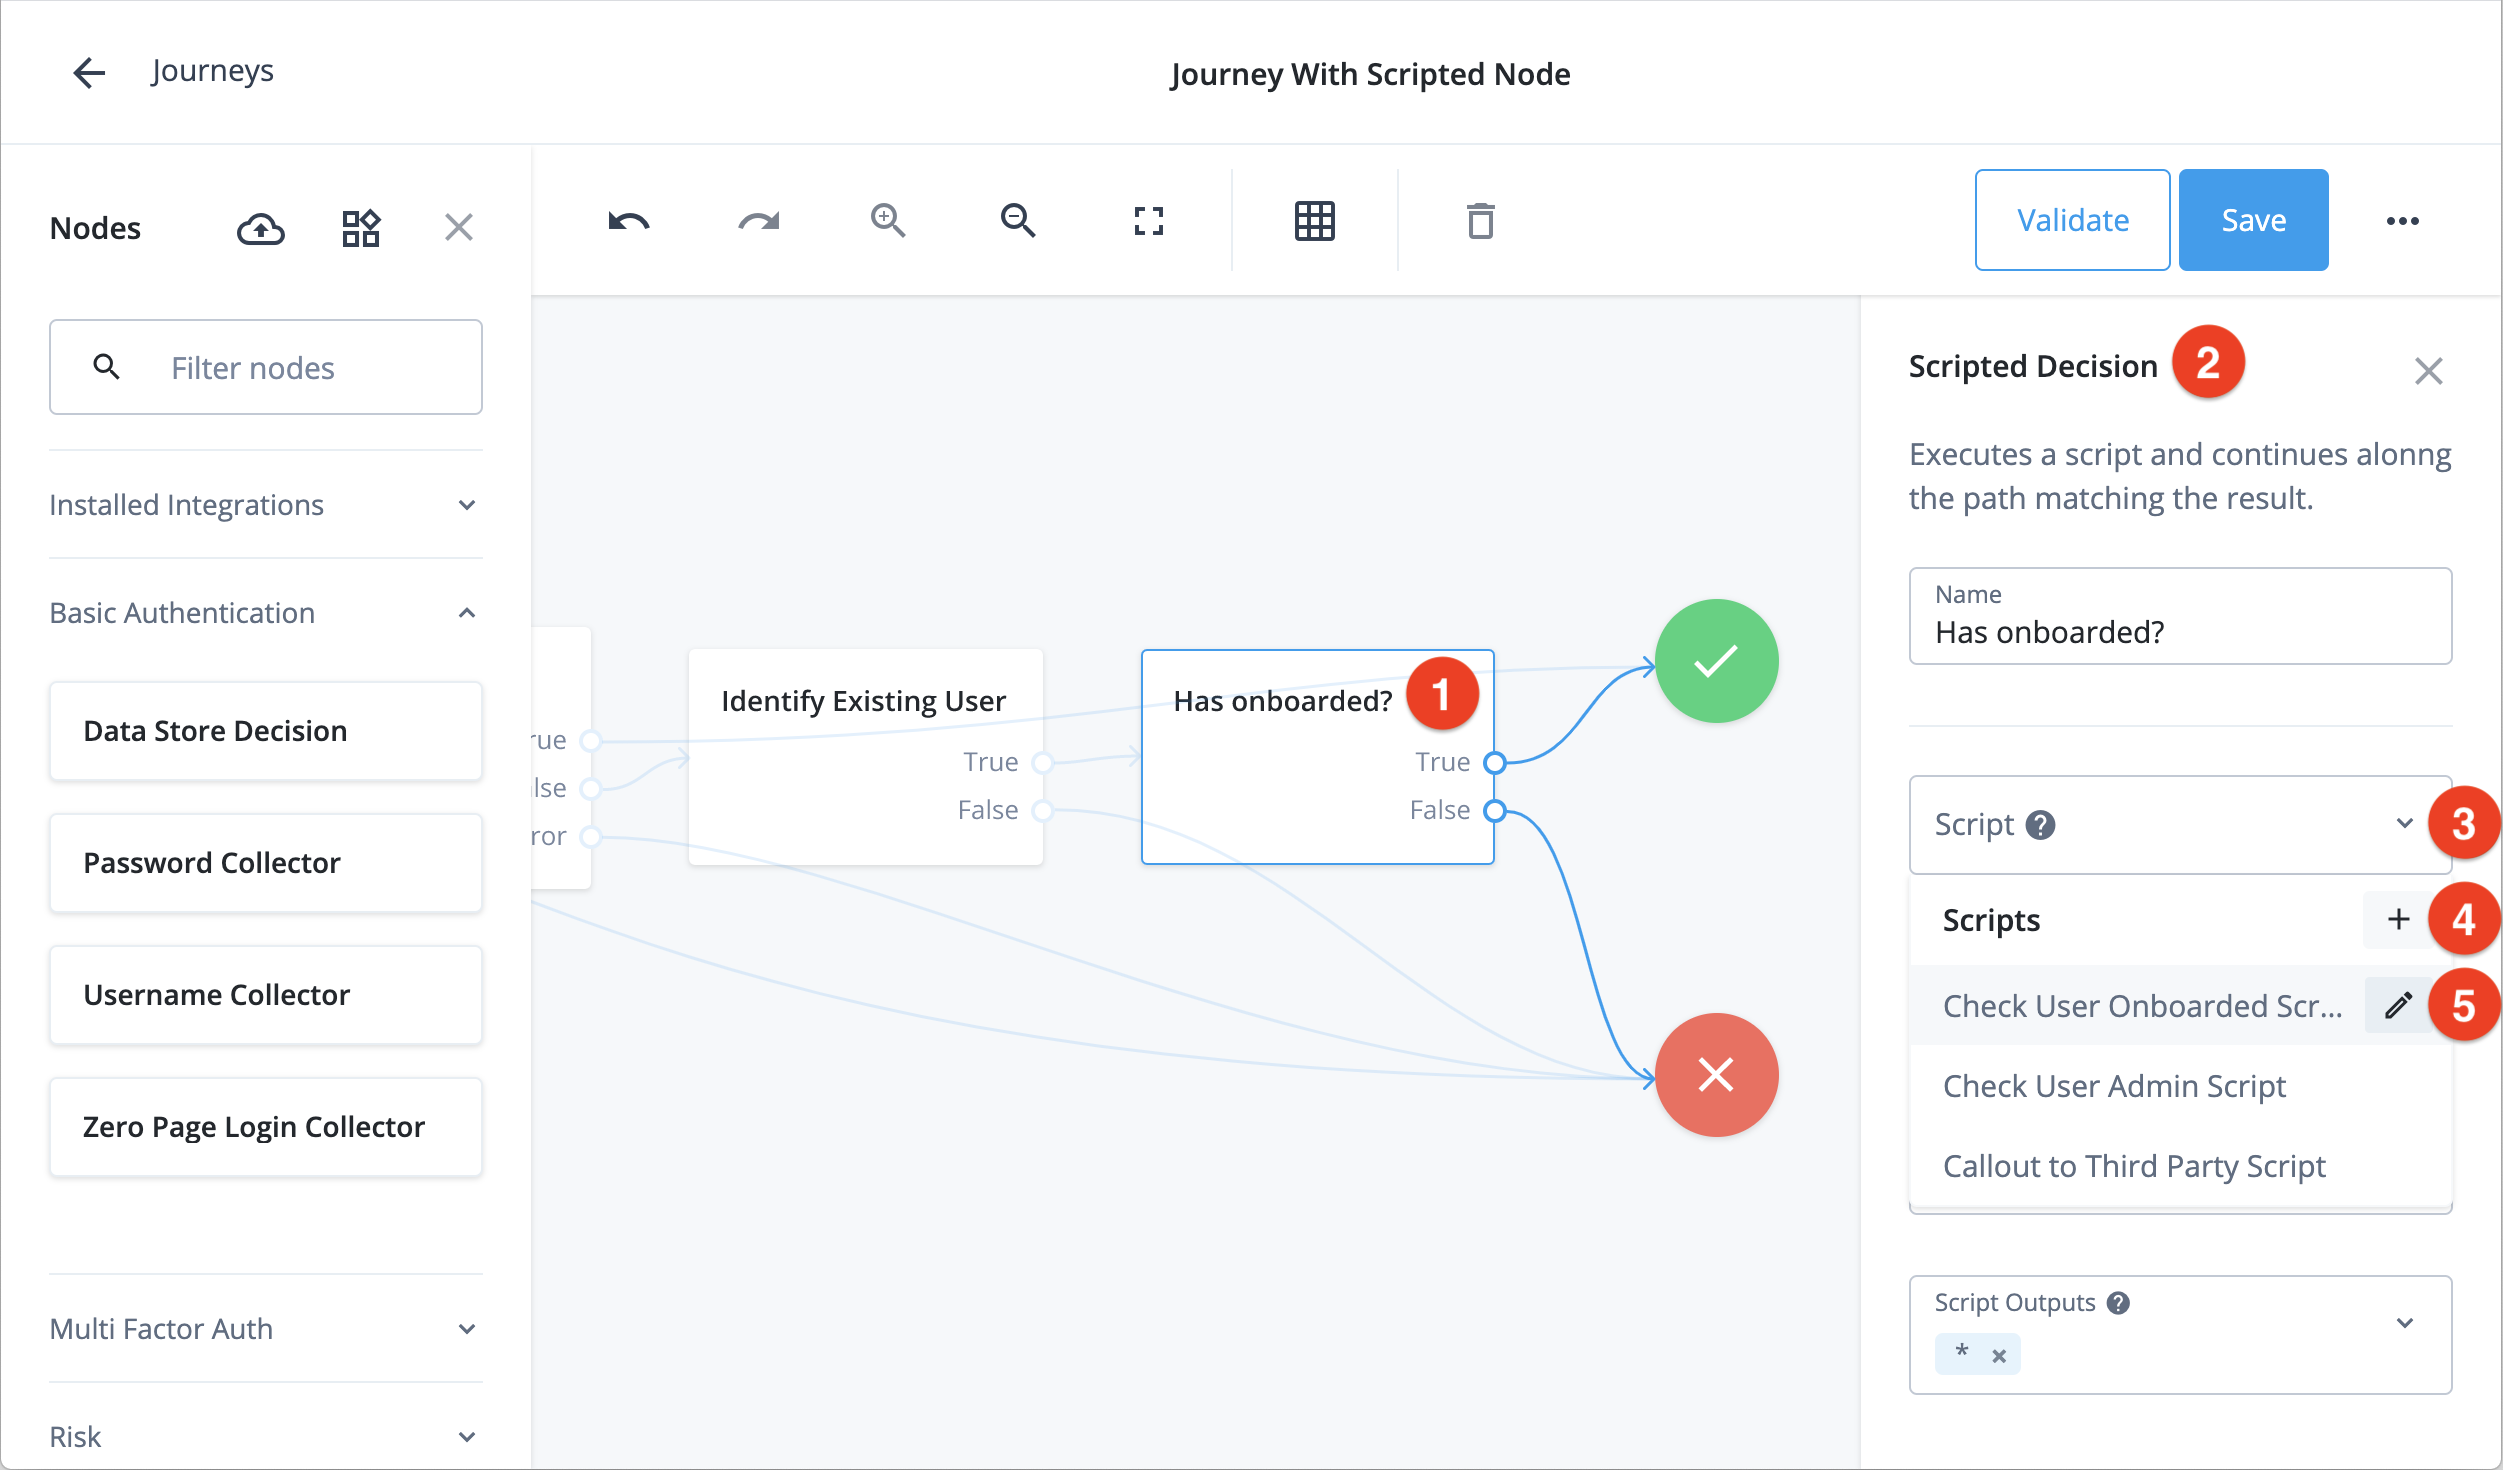
The following screenshot shows where you can create a new journey decision node script ④ or edit an existing one ⑤:

① Scripted decision node
② Context pane
③ Journey decision node script drop-down
④ Add new journey decision node script
⑤ Edit existing journey decision node script
Create a new journey decision node script
Add a new journey decision node script in the journey editor or from Realm > Scripts > Auth Scripts.
-
Select Legacy or Next Generation on the Choose Script Engine page.
Learn more about the enhanced scripting engine in Next-generation scripts.
-
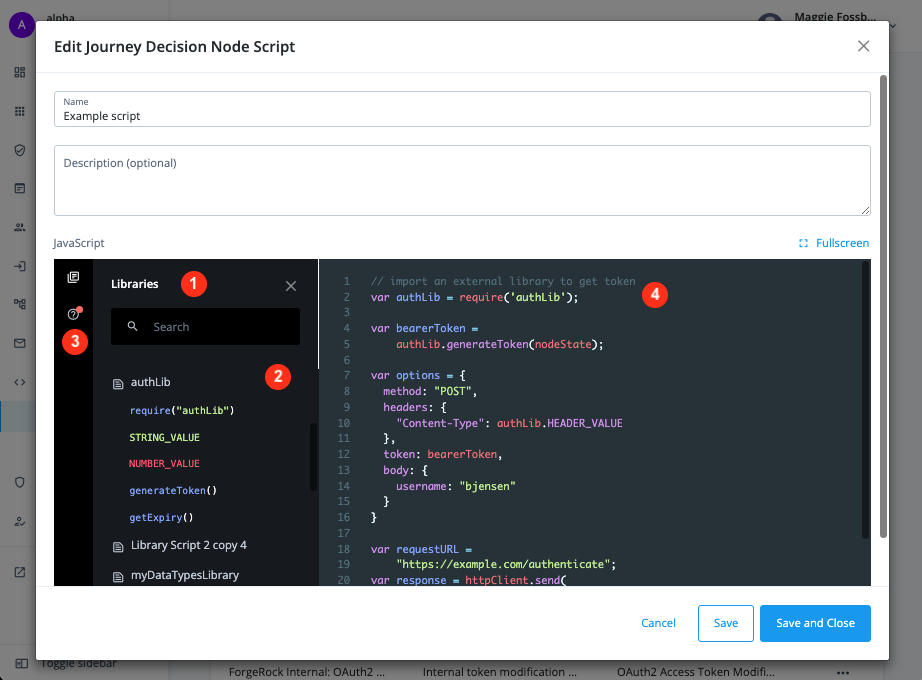
If you create or edit a Next Generation script, click the Libraries icon in the top right to display the following side panel:

① View and search library scripts to import in your script.
② Click to expand a library script and view its exported methods and constants.
The font colors indicate the exported types:-
Blue for functions
-
Red for numbers
-
Green for strings
-
Orange for boolean types
-
Purple for objects / properties
③ Click the Docs icon to view links to context-related documentation.
A red dot denotes documentation updates.
④ Edit your script and import library scripts as necessary. -
-
Enter a unique Name and optional Description for the script, then click Save.