Backchannel request grant
Use the backchannel request grant for client-initiated backchannel authentication (CIBA).
| The OIDC backchannel request grant (CIBA) described here is distinct from the Advanced Identity Cloud backchannel authentication feature. |
CIBA lets a relying party (RP), the consumption device, get an end user’s consent without redirection through the end user’s browser. Instead, the end user authenticates and grants consent through an authentication device such as an authenticator application or a mobile banking application on the user’s mobile phone.
Advanced Identity Cloud applies the guidelines suggested by the OpenID Financial-grade API (FAPI) Working Group to implement CIBA.
The backchannel flow

-
The RP has a user identifier and requires the end user’s consent. It prepares a signed Json Web Token (JWT).
-
The RP sends an HTTP POST request with the signed JWT to Advanced Identity Cloud, the OpenID provider (OP).
-
The OP validates the signature using the RP’s public key and verifies the JWT. If the JWT is valid, the OP returns an
auth_req_idand a polling interval. -
The RP polls the OP with the
auth_req_id, waiting for the end user’s authorization. If the RP does not respect the polling interval, the OP returns an error. -
The OP sends a push notification with the
binding_messageto request the end user’s authorization. -
The end user authorizes the request with the authorization gesture on their authentication device; for example, the user clicks a button in their authenticator application or provides their fingerprint.
-
The OP returns an access token and an ID token to the RP.
The RP can use the ID token subject ID claim as the end user’s identity.
-
If the RP requires additional claims, it sends a request to the /oauth2/userinfo endpoint with the access token for authorization.
-
If the access token is valid, the
/oauth2/userinfoendpoint returns any additional claims.The RP can use the subject ID and the additional claims to identify the end user.
Prepare for CIBA
Configure the service
-
In the Advanced Identity Cloud admin console, go to Journeys and create a journey such as the following:
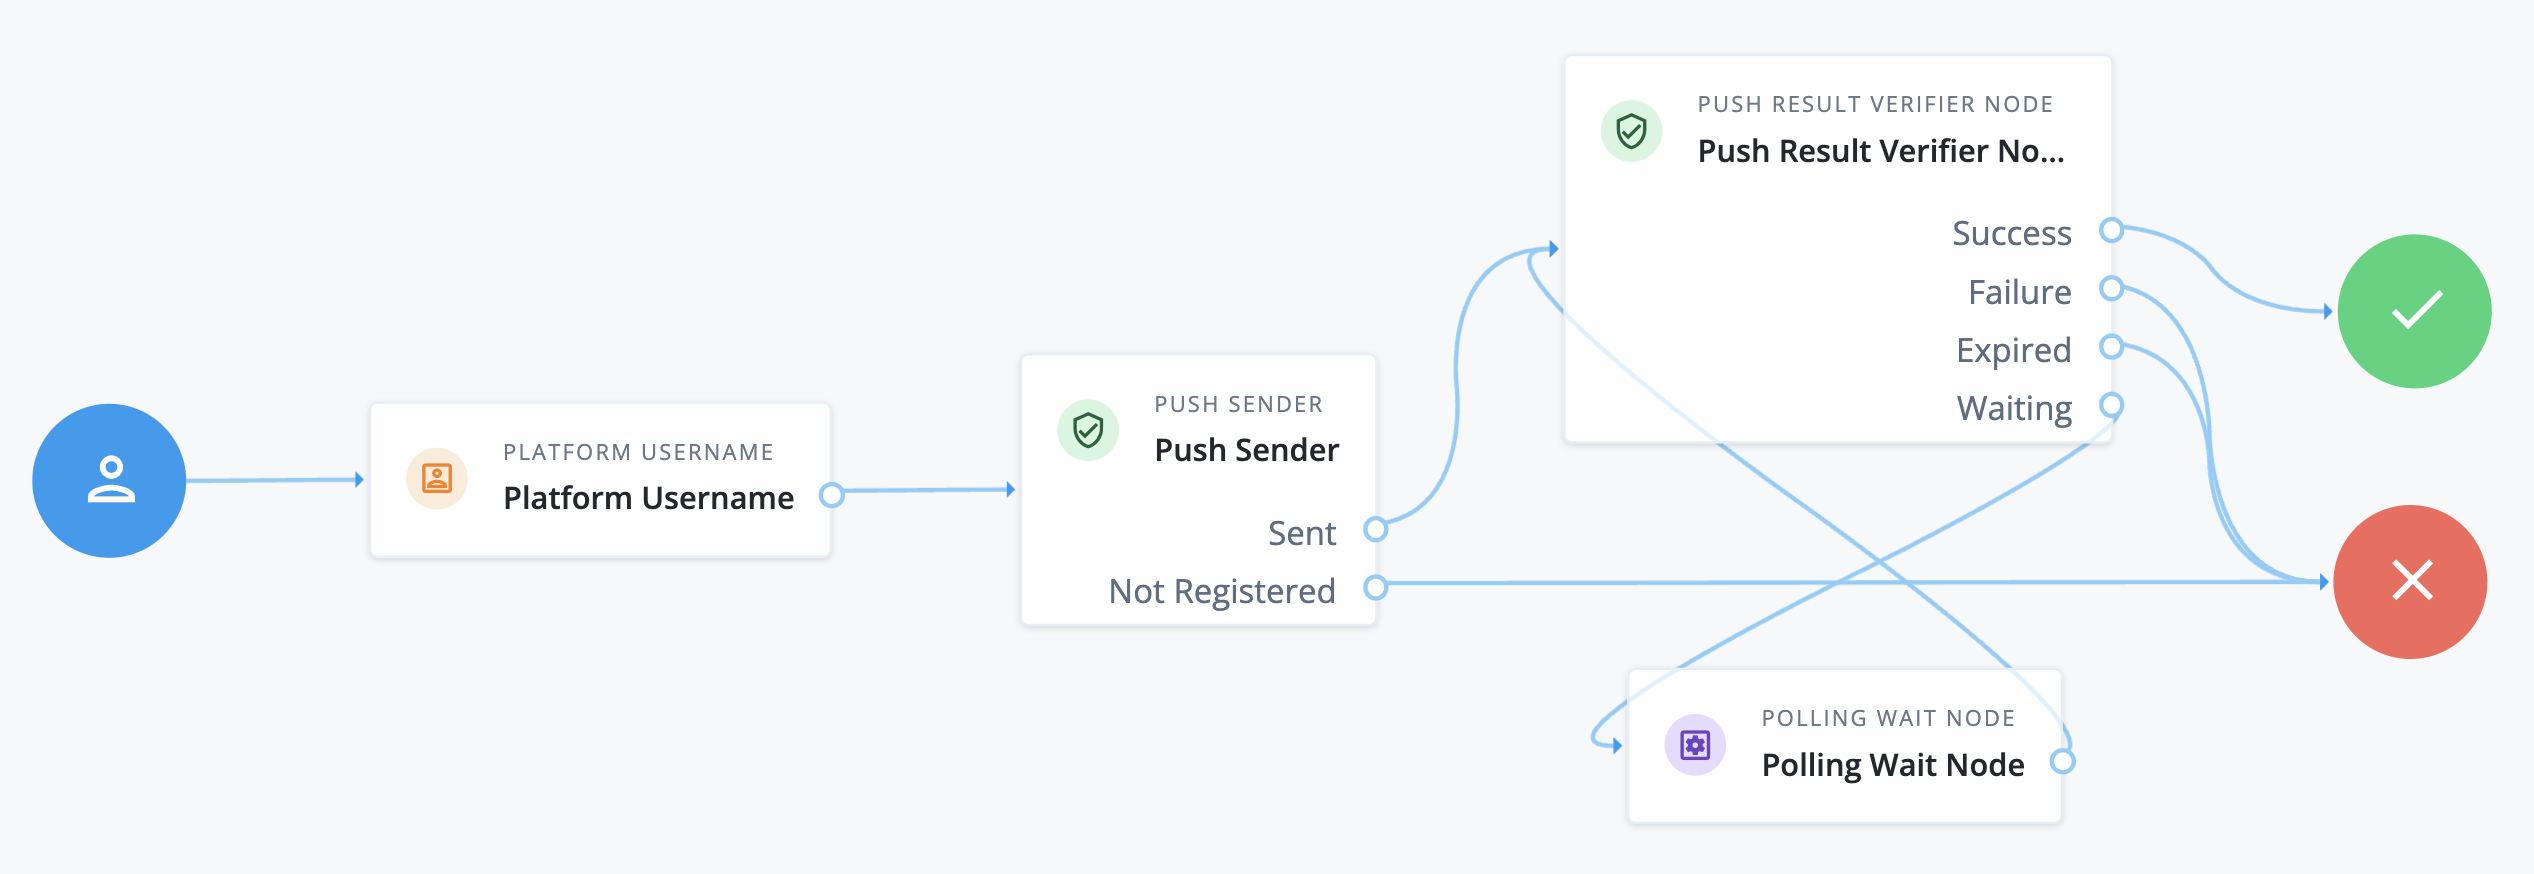
The journey uses these nodes:
Learn more in Push authentication journeys.
Don’t configure a CIBA journey as a transactional authentication journey. If a CIBA journey is configured as transactional only, the journey won’t run because CIBA isn’t a transactional flow.
-
Save the journey with a name such as
CIBA Push Journey. -
Under Native Consoles > Access Management, go to Realms > Realm Name > Services > OAuth2 Provider > Advanced and make sure the Grant Types field includes
Back Channel Request.Save any changes you make.
-
Associate the journey with incoming
acr_values:-
Switch to the Advanced OpenID Connect tab of the OAuth 2.0 provider configuration.
-
In the OpenID Connect acr_values to Auth Chain Mapping box:
-
Set the Key to the value that will be passed in through the
acr_valuesclaim of the incoming CIBA request. For example,push. -
Click Add. The Value field changes from a text input to a list of journeys available in the tenant.
-
In the Value field, select the name of your journey. For example,
CIBA Push Journey.
-
-
Save your changes.
For more information, refer to The
acrclaim. -
Generate JWKs
You’ll need a JWK public and private key pair to sign JWTs for CIBA requests. You’ll also need the JWK public key so that Advanced Identity Cloud can verify the JWT signatures.
-
Generate a JWK public and private key pair:
-
Use jose to run a command similar to the following:
$ jose jwk gen \ --input '{"kty":"EC", "use": "sig", "crv":"P-256", "kid": "myCIBAKey", "alg":"ES256"}' \ --output public-private-key-pair.jwk -
A file named
public-private-key-pair.jwknow contains a newly generated public and private key pair.{ "kty": "EC", "use": "sig", "crv": "P-256", "d": "m0CkLGYvqZM124-c4he9etz7qIt45q6oZ8ulyKw2t9Y", "kid": "myCIBAKey", "x": "m0CkpWpZyGu-FLRLjCGBVGC7Fwm5vGt8Lm3HhYU4ylg", "y": "U8NMtO-C2c3yhu2I_ApAELttmaittfPNPQaIJxvTCHk", "alg": "ES256", }Use this key pair to sign JWTs for CIBA requests.
-
-
Extract the JWK public key:
-
Run the following command:
$ jose jwk pub \ --input public-private-key-pair.jwk \ --output public-key.jwk -
A file named
public-key.jwknow contains only the public key:{ "kty": "EC", "use": "sig", "crv": "P-256", "kid": "myCIBAKey", "x": "m0CkpWpZyGu-FLRLjCGBVGC7Fwm5vGt8Lm3HhYU4ylg", "y": "U8NMtO-C2c3yhu2I_ApAELttmaittfPNPQaIJxvTCHk", "alg": "ES256", }Use this public key to configure the OIDC application in Advanced Identity Cloud.
-
Register an RP
-
In the Advanced Identity Cloud admin console, create an application owner profile and record the username and password.
-
Register the RP as a client application.
-
In the Advanced Identity Cloud admin console, go to Applications and select + Custom Application.
-
Select the sign-on method as OIDC - OpenId Connect then click Next.
-
Select the application type as Web then click Next.
-
Enter a human-readable Name for your application, such as
My CIBA Application. -
In the Owners list, select the application owner identity you created in step 1. Click Next.
-
Enter a Client ID, such as
myCIBAClient, and a Client Secret, and save them for later. -
Switch to the Sign On tab and under General Settings set the Scopes
openidandprofile. -
Save your changes.
-
-
Configure access to the RP’s public keys so Advanced Identity Cloud can verify JWT signatures. Advanced Identity Cloud ignores keys specified in JWT headers, such as
jkuandjweand uses the keys specified in the RP profile to verify the JWT signature.-
Under Show advanced settings > Signing and Encryption, choose the Public key selector.
-
Depending on the Public key selector value you chose, set one of the other fields appropriately.
For example:
-
Set Public key selector
JWKs_URIand Json Web Key URI to the URL where the RP publishes its public keys.This method simplifies key rotation as Advanced Identity Cloud rereads the keys periodically.
-
Set Public key selector to
JWKsand manually input Json Web Key with a JWK set of one or more public keys. To create a JWK set, enclose one or more JWKs in akeysarray, such as in the following examples, which use the public key created in step 2 of Generate JWKs.JWK example JWK set example { "kty": "EC", "use": "sig", "crv": "P-256", "kid": "myCIBAKey", "x": "m0CkpWpZyGu-FLRLjCGBVGC7Fwm5vGt8Lm3HhYU4ylg", "y": "U8NMtO-C2c3yhu2I_ApAELttmaittfPNPQaIJxvTCHk", "alg": "ES256", }{ "keys": [ { "kty": "EC", "use": "sig", "crv": "P-256", "kid": "myCIBAKey", "x": "m0CkpWpZyGu-FLRLjCGBVGC7Fwm5vGt8Lm3HhYU4ylg", "y": "U8NMtO-C2c3yhu2I_ApAELttmaittfPNPQaIJxvTCHk", "alg": "ES256" } ] }
-
-
Save your changes.
-
Get an auth request ID
Follow these steps as RP to get a CIBA authentication request ID:
-
Prepare a payload of required claims:
Claim Description Example acr_valuesA string identifying the mechanism for the end user to provide authorization.
"acr_values": "push"audA string or array of strings indicating the intended audience of the JWT. Must include the authorization server OAuth 2.0 endpoint including port number 443.
"aud": "https://<tenant-env-fqdn>:443/am/oauth2/realms/root/realms/alpha"binding_messageA short (100 character max.) string message to display to the user when obtaining authorization.
For push notification, messages must:
-
Begin with a letter, number, or punctuation mark.
-
Not include line breaks or control characters.
"binding_message": "Allow ExampleBank to transfer £50 from 'Main' to 'Savings'? (EB-0246326)"expThe expiration time in seconds since January 1, 1970 UTC. An expiration time more than 30 minutes in the future causes a
JWT expiration time is unreasonableerror message."exp": 1761066489To generate a value just under 30 minutes in the future, run the following command in a Unix or Linux shell:
$ echo $(($(date -u +%s) + 1799))issThe unique identifier of the JWT issuer; must match the client ID in the application profile.
"iss": "myCIBAClient"login_hintA string identifying the principal and subject of the JWT (the end user).
"login_hint": "a0325ea4-9d9b-4056-931b-ab64704cc3da"scopeA string holding a space-separated list of the requested scopes; must include
openid."scope": "openid profile"An example payload of claims looks like the following:
{ "aud": "https://openam-mycompany.forgeblocks.com:443/am/oauth2/realms/root/realms/alpha", "binding_message": "Allow ExampleBank to transfer £50 from 'Main' to 'Savings'? (EB-0246326)", "acr_values": "push", "exp": 1761066489, "iss": "myCIBAClient", "login_hint": "a0325ea4-9d9b-4056-931b-ab64704cc3da", "scope": "openid profile" } -
-
Create a signed JWT:
-
Use jose to run a command similar to the following:
$ jose jws sig \
-I payload.json \(1)
-k public-private-key-pair.jwk \(2)
-s '{"alg":"ES256"}' -c
1 payload.jsonshould contain the claims prepared in the previous step.2 public-private-key-pair.jwkshould contain a JWK public and private key pair like the one created in step 1 of Generate JWKs. -
An example signed JWT looks like the following:
eyJhbGciOiJFUzI1NiJ9.eyJhdWQiOiJodHRwczovL29wZW5hbS1teWNvbXBhbnkuZm9yZ2VibG9ja3
MuY29tOjQ0My9hbS9vYXV0aDIvcmVhbG1zL3Jvb3QvcmVhbG1zL2FscGhhIiwiYmluZGluZ19tZXNzY
WdlIjoiQWxsb3cgRXhhbXBsZUJhbmsgdG8gdHJhbnNmZXIgwqM1MCBmcm9tICdNYWluJyB0byAnU2F2
aW5ncyc_IChFQi0wMjQ2MzI2KSIsImFjcl92YWx1ZXMiOiJwdXNoIiwiZXhwIjoxNzU5OTQzODM5LCJ
pc3MiOiJteUNJQkFDbGllbnQiLCJsb2dpbl9oaW50IjoiYTAzMjVlYTQtOWQ5Yi00MDU2LTkzMWItYW
I2NDcwNGNjM2RhIiwic2NvcGUiOiJvcGVuaWQgcHJvZmlsZSJ9.m0CkAdmfjmm2PehE7cUG6NBCE3sN
puo4EvsruZgARdsDtdubLg9dWBNUhpETtwW-_ZXLPQKs0ZnQHEfMc_9pqA
-
-
Send an HTTP POST to the /oauth2/bc-authorize endpoint with the signed JWT in a data parameter named
request:$ curl \ --request POST \ --user '<rp-client-id>:<rp-client-secret>' \(1)(2) --data 'request=<signed-jwt>' \(3) 'https://<tenant-env-fqdn>/am/oauth2/realms/root/realms/alpha/bc-authorize'(4)1 Replace <rp-client-id> with the client ID of your RP. For example, myCIBAClient.2 Replace <rp-client-secret> with the client secret of your RP. 3 Replace <signed-jwt> with the signed JWT you created in the previous step. 4 Replace <tenant-env-fqdn> with the host name of your Advanced Identity Cloud instance. Advanced Identity Cloud returns a JSON object with the
auth_req_idvalue:{ "auth_req_id": "<auth-req-id>", "expires_in": 600, "interval": 2 }Advanced Identity Cloud sends a push notification with the
binding_messageto the end user.
Exchange an auth request ID for tokens
To get an access token and ID token as the RP, poll the /oauth2/access_token endpoint with HTTP POST requests having the following parameters:
-
grant_type=urn:openid:params:grant-type:ciba -
auth_req_id=<auth-req-id>
For example:
$ curl \
--request POST \
--user '<rp-client-id>:<rp-client-secret>' \
--data 'grant_type=urn:openid:params:grant-type:ciba' \
--data 'auth_req_id=<auth-req-id>' \
'https://<tenant-env-fqdn>/am/oauth2/realms/root/realms/alpha/access_token'
The response depends on the end user and the polling interval:
-
After the end user has authorized the operation, Advanced Identity Cloud returns an ID token and an access token:
{ "access_token": "<access-token>", "refresh_token": "<refresh-token>", "scope": "openid profile", "id_token": "<id-token>", "token_type": "Bearer", "expires_in": 3599 } -
Before the end user authorizes the operation, Advanced Identity Cloud returns an HTTP 400 Bad Request status:
{ "error_description": "End user has not yet been authenticated", "error": "authorization_pending" } -
The auth ID response includes a polling
interval. The RP must waitintervalseconds before retrying the request (default: two seconds). If the RP does not wait long enough between retries, Advanced Identity Cloud returns an HTTP 400 Bad Request status:{ "error_description": "The polling interval has not elapsed since the last request", "error": "slow_down" }
Additional OIDC claims
An RP can request additional claims about the end user with the access token at the /oauth2/userinfo endpoint:
$ curl \
--request GET \
--header "Authorization Bearer <access-token>" \
"https://<tenant-env-fqdn>/am/oauth2/realms/root/realms/alpha/userinfo"
{
  "name": "<end-user-display-name>",
  "family_name": "<end-user-family-name>",
  "given_name": "<end-user-given-name>",
  "sub": "<end-user-id>",
  "subname": "<end-user-id>"
}